
Installing Oracle’s VirtualBox in Microsoft Windows
Installing Linux Ubuntu 20.04.4 in VirtualBox
Acquiring the ROS environment variable key
Installing ROS
Starting ROS for the very first time
Learning important Linux ROS shell commands
Installing Anaconda
Learning Ubuntu Linux commands necessary to develop rover prototypes
What are ROS launch files?
Running Gazebo and Rviz to test our system
Summary, exercises, and hints
Before We Begin
- 1.
If you are planning on using the Ubuntu Linux operating system as the host operating system, then there is no need to install VirtualBox.
- 2.
Different versions of ROS target specific versions of Ubuntu Linux. We will use Noetic ROS, which specifically requires Ubuntu Linux 20.04.4. Make sure you match the ROS version to the correct Linux version. This is important during “Installing VirtualBox …” and “Installing Ubuntu Linux …”
- 3.
The ORDER of installation is important: VirtualBox, Ubuntu, Anaconda, ROS. Any other order may cause problems.
- 4.
Ubuntu Linux 20.04.x is also known as Focal Fossa. We will call it Ubuntu. We will use Noetic ROS, but we will call it ROS.
- 5.
Although all shell text commands will be for Noetic ROS, they are compatible with earlier versions of ROS, such as Kinetic and Indigo.
Installing the VirtualBox Software
The purpose of the Oracle VirtualBox is to create virtual machines to develop and run programs in an operating system other than your regular system. The virtual machine is an emulation of the target operating system. We want the Ubuntu Linux 20.04.04 OS emulated on our Microsoft Windows system. (There are versions of VirtualBox for Mac OS and Linux.) After installing VirtualBox, we will install an Ubuntu Linux 20.04.04 virtual machine. This virtual Ubuntu Linux 20.04.4 OS will serve as our ROS development environment. This virtual machine is essentially a program that executes an entire operating system, such as Ubuntu Linux 20.04.4 OS, as an application. The physical computer, running Microsoft Windows, serves as the host, and Ubuntu Linux 20.04.4 serves as the guest.
- 1.
Install Oracle’s VirtualBox from the following link:
www.virtualbox.org/wiki/Downloads

A screenshot of download virtual box tab.
Downloading Oracle’s VirtualBox
- 2.
After downloading the VirtualBox executable, find the file and double-click on it to execute. You should now see an image something like Figure 3-2. Click Next.

A screenshot of Oracle setup wizard window with highlighted next button.
Installing Oracle’s VirtualBox
- 3.
Accept the default settings on the next couple of pop-up windows until you get the warning about resetting the network (Figure 3-3). Click Yes, and the VirtualBox program will install.

A screenshot of Oracle network interfaces window with highlighted yes button.
Installing Oracle’s VirtualBox (continued)
Creating a New VirtualBox Virtual Machine
- 1.
After it starts, you will see an area on the window that looks like Figure 3-4. To create a new machine, i.e., one that has not been installed before, click on New. If you do not see this ribbon bar, then you can access it from the Tools ➤ New toolbar.

A screenshot of buttons labeled preferences, import, export, new, and add. Text below it reads welcome to Virtualbox!
Creating a virtual machine within Oracle’s VirtualBox
- 2.
Fill out the installation form like in Figure 3-5. Click Next. This does not install the operating system; it is a placeholder for later.

A screenshot of Oracle setup wizard window for filling name, machine folder, type, and version. Next button is highlighted at the bottom.
Creating a virtual machine within Oracle’s VirtualBox
- 3.
Next, we allocate memory for our development system. The default is 1024 MB, but we will allocate at least 2048 MB (Figure 3-6). You may allocate more, but 2048 MB is enough.

A screenshot of Oracle setup wizard window for selecting memory size. Next button is highlighted at the bottom.
Allocating memory for the virtual machine
- 4.
To create the virtual disk on the physical hard disk, accept the default settings shown in Figure 3-7. Since we do not have an existing drive, we have to create a new drive.

A screenshot of Oracle setup wizard window for check-in options for hard disk. Create a virtual hard disk now option is checked-in and create button is highlighted at the bottom.
Creating virtual hard disk
- 5.
Accept the default setting for the virtual hard drive type shown in Figure 3-8. We chose VDI because it is optimized for VirtualBox.

A screenshot of Oracle setup wizard window for check-in options for hard disk file type. V D I option is checked-in and next button is highlighted at the bottom.
Setting the virtual hard drive type
- 6.
Accept the default setting for the type of physical disk storage type shown in Figure 3-9. We chose dynamic, so the size can grow and shrink automatically.

A screenshot of Oracle setup wizard window for check-in options for storage on physical hard disk. Dynamically allocated option is checked-in and next button is highlighted at the bottom.
Setting the physical hard drive to allocate dynamically
- 7.
Finally, set the location and maximum size your virtual disk can hold (Figure 3-10). The default location is derived from your original disk name, and the default size is okay for our little project. Click Create.

A screenshot of Oracle setup wizard window for file location and size. Size is set at 10 G B and create button is highlighted at the bottom.
Setting the location and size of the virtual disk
- 8.
You should now have a virtual machine installed, as shown by the orange box in Figure 3-11.

A screenshot of Oracle V M Virtual box manager. A bar on the left lists melodic Linux running and Ubuntu R O S power off.
Installation complete
What we have just done is create an empty disk that we will next install in our Ubuntu Linux operating system.
Installing Linux Ubuntu 20.04.4 in VirtualBox
To download the required DVD/CD ISO image for Ubuntu Linux 20.04.4, a.k.a Focal Fossa, go to http://old-releases.ubuntu.com/releases/20.04.4/.
- 1.
After downloading the Ubuntu image, we need to load it into our virtual machine on VirtualBox. Click on Ubuntu_ROS to highlight that virtual disk. Click on Settings, and you will see a popup menu similar to that in Figure 3-12.

A screenshot of Ubuntu R O S settings of general options in Oracle V M Virtual box manager.
ISO settings
- 2.
We need to install the specific version of the operating system that we set as a placeholder earlier (“Installing VirtualBox,” Step 3). Our version is dictated by the Noetic ROS, which is specifically designed for Ubuntu Linux 20.04.4. Click on Storage. In Figure 3-13, notice the empty disk icon (orange box) and the disk on the far right (red box). This is where we will attach our downloaded ISO image. Click the red box icon to connect the downloaded ISO file. Choose the first option, “Choose Virtual Optical Disk File…”

A screenshot of Ubuntu R O S settings of storage options in Oracle V M Virtual box manager.
Storage settings needed to attach ISO image
- 3.
Find and select your downloaded ISO file. Ours was saved in the “Download” folder. Select “Ubuntu-20.04.4-desktop-amd64.iso” and then click Open. This will attach the ISO file to your VirtualBox as the operating system. If you wanted to, you could now run your Linux system. However, we are going to tweak the settings of our operating system to make the development environment easier to use, as seen in Figure 3-14.

A screenshot of Windows explorer with I S O image files.
Select your ISO image and open it
- 4.
In Figure 3-15, the word “empty” has been replaced with your ISO image name. Your operating system is installed.

A screenshot of Ubuntu R O S settings with selected file for of storage in Oracle V M Virtual box manager.
ISO image attached
- 5.
Change your display settings to match Figure 3-16. We assume you have at least 4 GB video and SVGA. Setting the Scale Factor to 200% lets the window be a reasonable size.

A screenshot of Ubuntu R O S settings of display options in Oracle V M Virtual box manager.
Display settings
- 6.
Finally, we need to set a couple of system settings. Figure 3-17 shows the optimal RAM to be assigned (green bar), and Figure 3-18 shows the optimal CPUs that can be assigned (green bars). The green bars match your computer’s hardware our system has 8 GB RAM and 4 CPUs, so that is what we assigned. If you choose any values in the red, then the system will be configured to a different set of hardware; therefore, it will be slower.

A screenshot of Ubuntu R O S settings of system motherboard options in Oracle V M Virtual box manager.
System motherboard settings

A screenshot of Ubuntu R O S settings of system processor options in Oracle V M Virtual box manager.
System processor settings
- 7.
Your system should now be ready to install a fully operational virtual Linux system. Click on Start (or double-click on your drive) to start installing your Linux system. See Figure 3-19.

A screenshot of settings, discard, and start button with a drop-down menu next to it. The settings and start button are highlighted.
Starting the Ubuntu Linux OS as a guest virtual machine
- 8.
Click on Install Ubuntu (Figure 3-20). We will be selecting the defaults most of the time during the installation. If necessary, change the settings for your installation.

A screenshot of Ubuntu Linux O S install setup window with preference for language. Two icons on the right are try Ubuntu and install ubuntu.
Ubuntu Linux OS install setup
- 9.
Our next step is to set the keyboard preferences (Figure 3-21). The default settings were sufficient for us since we are currently located in the United States.

A screenshot of Ubuntu Linux O S install setup window for keyboard layout selected to the U S english .
Ubuntu keyboard preferences
- 10.
Once we have established the keyboard settings, we can then set the normal installation for Ubuntu (Figure 3-22).

A screenshot of Ubuntu Linux O S install setup window for updates and other software. The normal installation and download updates while installing are checked-in.
Normal Ubuntu installation
- 11.
We assume there are no prior installments of Ubuntu before proceeding with the final installation (Figure 3-23). The default settings are once again sufficient for us.

A screenshot of Ubuntu Linux O S install setup window for installation type selected to erase disk and install Ubuntu.
Erase disk and install Ubuntu (continued)
- 12.
Once the installation process begins, we might also encounter a warning that declares that we are about to rewrite the targeted virtual disk (Figure 3-24). We then click Continue.

A screenshot of Ubuntu Linux O S install setup confirmation window for writing the changes on the disk.
Ubuntu installation warning
- 13.
Set the correct time zone for the Ubuntu computer system (Figure 3-25).

A screenshot of Ubuntu Linux O S timezone setting on the world map with highlighted New York.
Ubuntu timezone setting
- 14.
Finally, we input the name, username, and password for the Ubuntu system (Figure 3-26). Since we are only using Ubuntu as a development platform, we should use a strong password for security purposes. To maintain the highest levels of password security for the Ubuntu Development environment, we could use numbers 0–9, letters a–z or A–Z, and special characters such as #, ^, and *.

A screenshot of sections to fill in name, computer's name, username, password, confirm password, and require my password to log in.
Setting the name, username, and password for the Ubuntu installation

A screenshot of Oracle V M Virtual ox manager with listed melodic Linux and Ubuntu R O S.
Ubuntu finally installed
Updating Ubuntu Linux 20.04.4

A screenshot of Ubuntu home screen.
Ubuntu initial screen
- 1.
To start a terminal window, right-click on the desktop background, being sure to avoid icons (Figure 3-29). Click on the Open in Terminal menu choice.

A screenshot of Ubuntu home screen with open in terminal option selected on the right-click access menu.
Ubuntu open terminal selection. Access menu by right-clicking
- 2.
On a freshly installed Linux system, your terminal will be full screen (Figure 3-30). Later on, we will run multiple terminals at the same time, so let’s make the terminal “windowed” by clicking on the □ in the upper-right corner of the terminal, as indicated by the orange arrow.

A screenshot of Ubuntu terminal window with an arrow pointing at a square button.
Ubuntu terminal session
- 3.
Now we have a terminal window on our desktop (Figure 3-31). The installation of ROS will be done through this terminal window using commands. We are not going to fully explain the commands, since it is beyond the scope of this book, but simple internet research should suffice if you want to investigate further.

A screenshot of Ubuntu terminal window on the home screen.
Ubuntu initial terminal screen
- 4.
Even though we just installed Ubuntu Linux 20.04.4, there may be software updates to drivers, applications, etc. We need to update the operating system. We will be using sudo apt-get commands. Sudo means “superuser do” and it temporarily elevates you with system administrator privileges; therefore, you will have to enter your password. Execute the following command in the terminal to update the necessary features:
to upgrade your operating system files to the latest versions.

A screenshot of command window with two highlighted text that reads sudo apt-get update and sudo apt-get upgrade.
Ubuntu terminal update command

A screenshot of command window with a list of commands.
Ubuntu terminal update completed
We have now updated our Ubuntu Linux system to the latest version. Next, we need to set up Ubuntu to allow external libraries (ROS, etc.) These libraries come from external repositories.
Configuring Ubuntu Repositories

A screenshot of Ubuntu system settings icon.
Ubuntu system settings icon (orange box)

A screenshot of Ubuntu software update icon.
Ubuntu software update icon

A screenshot of Ubuntu software update dialog box with highlighted settings button.
Ubuntu software settings option

A screenshot of highlighted Ubuntu software tab on a dialog box titled software and updates.
Display of selected repository checkboxes
Installing Anaconda
As a reminder, the ORDER of installation is important: VirtualBox, Ubuntu, Anaconda, ROS. Any other order may cause problems.
Developing a complex software project is made more manageable if we use an integrated development environment (IDE). An IDE combines a simple text editor (Gedit) and a compiler (Anaconda). Doing the programming in an IDE makes the programming process easier because the built-in tools and the IDE are smart enough to catch simple errors. There are many great IDEs available for Linux; we chose Gedit for its elegant simplicity. The Anaconda compiler can run Python 2.7, which is required by ROS.

A screenshot of Anaconda installer wizard with 64-bit x86 installer 529 M B option selected.
Anaconda install

A screenshot of highlighted downloads and open in terminal option.
Anaconda locating download

A screenshot of command window while installing Anaconda.
Anaconda bash install
Now that we have installed our compiler, we need to set up the operating system to accept ROS. We do this by setting up the ROS source list and key.
ROS Source List
The ROS source list has now been configured. Now we will set the ROS environment key.
ROS Environment Variable Key

A screenshot of command window while installing Anaconda with Noetic R O S install key.
Getting Noetic ROS install key
The ROS.org Community recently discovered a security flaw with the original key for Noetic ROS. That is why we are using this newer key. The reader needs to be vigilant of all security upgrades, maintenance, and/or additional enhancements within the ROS ecosystem. The reader needs to occasionally review and check for such security updates within the ROS.org discussion forums.
Installing the Robotic Operating System (ROS)

A screenshot of command window with two highlighted text that reads sudo apt-get update and sudo apt-get install ros-noetic-desktop-full.
Ubuntu ROS install
The full-featured version of Noetic ROS should now be installed. Let us take this system out for a spin.
If you receive an error that none of the Noetic packages could be located, you might be required to upgrade the Ubuntu software. Please execute the following terminal commands:
$ sudo apt-get update
$ sudo apt-get upgrade
Installing ROSINSTALL
Be very careful about the spaces and dashes in the previous command. If you get an error, verify every dash and space.
Starting ROS for the Very First Time
Adding the ROS Path

A screenshot of command window.
Starting ROS configuration in Gedit
A screenshot of command window with many highlighted commands.
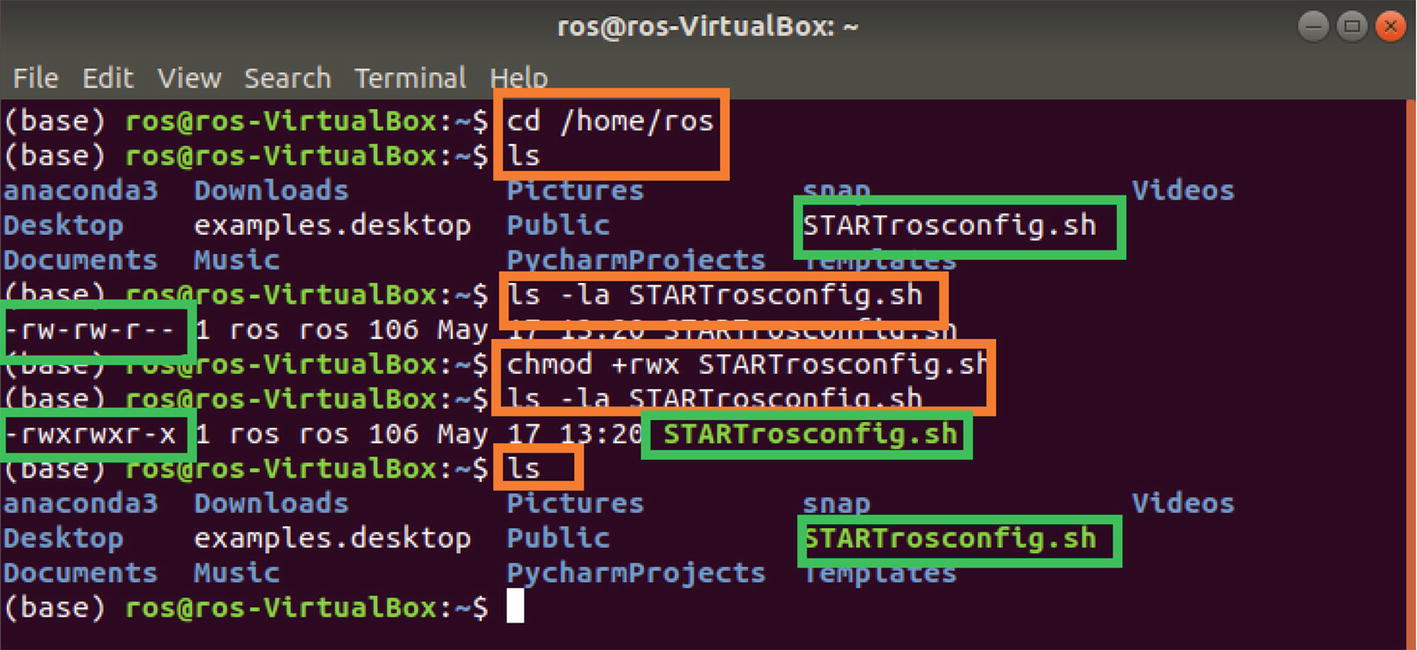
Making STARTrosconfig an executable

A screenshot of command window.
Verify ROS paths
Creating a ROS Catkin Workspace
If you receive the following error—“Ackermann msgs were not found by Cmake”—or that any other type of error message was not found, then you need to manually install the correct package, such as the Ackermann package, as follows:
$ sudo apt install ros-noetic-ackermann-msgs
<username> will be the Ubuntu Linux OS username you defined earlier.
The catkin_ws workspace has now been sourced as the main workspace directory for developing applications within the ROS environment. If we did not obtain the ROS package path directory output as expected, please consult debugging issues within the ROS.org Community website for further information.
Final Checks for Noetic ROS
The following shell text command will determine if the correct version of ROS has indeed been installed and is operational:
If the output is Noetic, then you have completely succeeded in obtaining a fully operational ROS environment. Congratulations.
All shell commands used in this book are compatible with both the current and future Noetic versions of ROS. The only difference might be the number of parameters and substituting the word “Noetic” for the correct rosversion where necessary.
Noetic ROS Architecture
With the successful installation of Noetic ROS, we will introduce its architecture. The ROS architecture was designed to operate with robots of all types (rovers, drones, planes, boats, submarines, etc.). As such, the ROS framework was designed to handle multiple components or nodes in a robot. A node is a sensor, motor, controller, etc. In other words, it is a piece of hardware that performs a function for the robot. ROS refers to a “program node” as the software necessary to control the hardware. The primary node is known as the central master node.

A schematic of an oval labeled master connected to line detector via surface, driver via velocity, controller via distance, surface, and velocity, and distance sensor via distance.
Preliminary ROS architecture AI rover layout
Figure 3-46 shows five nodes: the master node and four system nodes. When a system node starts, it sends information to the master comprising the type of data that the node can send and receive. The nodes that send data to the master node are called publisher nodes. For example, the Distance Sensor and Line Detector nodes are publisher nodes, since they send data (distance to target and surface information, respectfully) to the master node. The nodes that receive data from the master node are called subscriber nodes. So the Driver node is a subscriber node since it receives velocity data from the master node. The Controller node is both a publisher and a subscriber node.
The Controller node will be hosting the deep learning and cognitive deep learning routines developed in later chapters. These deep learning routines will send and receive messages to and from the ROS master node. The master node will reroute that message to their intended nodes, such as a message to the Driver node to control the speed.
Simple “Hello World” ROS Test

A schematic of an oval labeled R O S master with a box below it labeled hello world. Two ovals on the bottom left and bottom right labeled talker node and listener node point at R O S master via arrows labeled 1 and 2, respectively. An arrow from talker node points at hello world which point at listener node.
Simple talker and listener node ROS test example
If you have made it this far, congratulations, you have successfully installed VirtualBox, Ubuntu Linux, and Noetic ROS. (Do not shut down the nodes, as we will use them in the next section.) Next, we visit two components that come with ROS: RQT Graph and Gazebo Robot Simulator. (We will talk about Rviz and TensorFlow when we use them.)
ROS RQT Graph

A screenshot of R Q T graph tool window. A oval on the left reads talker and an oval on the right reads listener with a rightward arrow in between labeled chatter.
Talker node sending information to listener node
The ROS command rosrun rqt_graph rqt_graph graphically displays all active publisher and subscriber nodes in an RQT Graph window. The interpretation of Figure 3-43 is that /talker is sending a message to /listener. Notice that the ROS master node is left out. The default message pipeline name is /chatter.
ROS Gazebo
Gazebo is a graphical simulation tool used to visualize any virtual world you create. The virtual world can contain objects, robots, buildings, obstacles, etc. You define them in terms Gazebo understands, and it will be simulated in a Gazebo window.
Gazebo is a standalone program that needs to be tied to the ROS system and world definition. This means we will “launch” the program from “within” ROS using the roslaunch command. Briefly, the ROS way of doing things: rosrun and roslaunch. The command rosrun launches a (Python) script to run an object’s script by itself (or a limited number of other objects). In contrast, roslaunch loads and executes all objects (and associated scripts) in a world environment, where each object can interact with the other objects.

A computer generated layout of Willow garage.
Willow Garage generated world
Now that we have verified Gazebo is installed correctly, we will be replacing the willowgarage_world.launch file with our world: a simplified simulated world of the unexplored Egyptian Catacombs and our intrepid AI rover. The AI rover’s scripts with adaptive intelligence and decision making will circumvent ancient dangers that might still await us.
Summary
To start our project, we installed VirtualBox and a virtual Ubuntu Linux 20.04.4 LTS operating system. We then installed Anaconda, our Python programming interpreter, on Ubuntu. Lastly, we successfully installed the Noetic ROS on Ubuntu. This completed setting up our development environment.
To verify the environment was successfully installed, we created and ran two ROS nodes that communicated through Python scripts. We used RQT Graph to visualize the running nodes. Finally, we verified the Gazebo simulator could be launched from ROS. (I don’t know about you, but I am tired.) Now that we have set up our development environment, we can start designing and developing our AI rover explorer and our simplified virtual Egyptian catacombs world.
- 1.
What other worlds can be explored within the roslaunch command for the Gazebo simulator? If need be, please consult internet resources.
- 2.
What other tests could be used to determine a successful installation of ROS?
- 3.
What other messages can be exchanged between nodes?