© Vaskaran Sarcar 2020
V. SarcarInteractive Object-Oriented Programming in Javahttps://doi.org/10.1007/978-1-4842-5404-2_13

13. Database Programming

Vaskaran Sarcar1 
(1)
Bangalore, Karnataka, India
 
Your Java application can talk to a database using JDBC, which is a Java standard API. It provides you with the necessary interface to connect a relational database. In the context of connecting a database with a Java application, expert programmers might prefer alternatives like JPA, Hibernate, and so on. But this chapter is dedicated to JDBC because it maintains its own significance and usefulness. To do exercises in JDBC programming, you need to be familiar with the following concepts:
  • What is a database, and how can it help you to store or organize the data?

  • How can a database be connected?

  • How can your Java application talk to the database? (Or, how can you establish a connection to the database and then how can you insert, update, or delete a record in the database?)

You will shortly learn that your Java program will use the JDBC API, which supports some JDBC drivers, to connect to a database. Figure 13-1 presents a simplified view of the overall process whereby the application (your Java program) and the database are connected through a JDBC driver.
../images/433474_2_En_13_Chapter/433474_2_En_13_Fig1_HTML.jpg
Figure 13-1

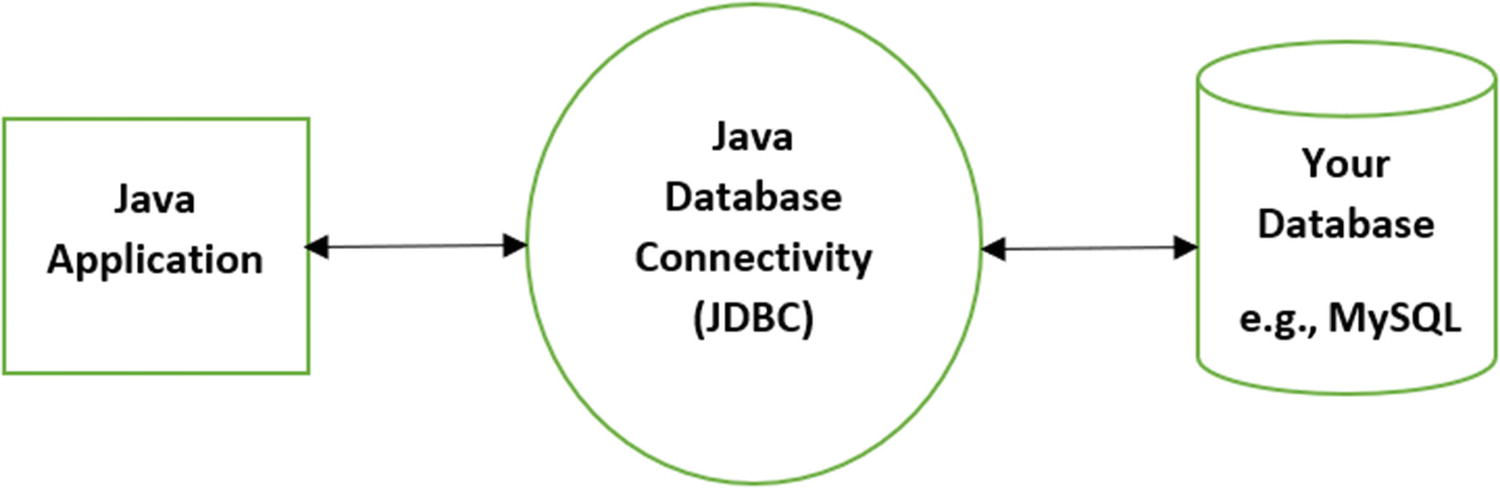
JDBC can connect a Java application and a database (for example, MySQL)

So, let’s examine each of these parts in this chapter.

Note

If you are absolutely new to database programming, you may need to know some key terms that are mentioned briefly in this chapter. So, it is recommended that you visit these terms and definitions repeatedly for a better understanding. Gradually, these terms will be clear to you, and you will be able to perform complex database programming.

Database and DBMS

A database is a collection of related files, usually called tables. A table is a collection of related records. A record is a collection of related fields, and the smallest piece of meaningful information in a file is called a field (or data item).

A database management system (DBMS) is a software package to manage these data effectively. Oracle Database, SQL Server, MySQL, MS-Access, and so forth are some commonly used DBMS packages.

Types of DBMS

There are various types of DBMS; for example:)
  • Hierarchical DBMS (HDBMS)

  • Network DBMS (NDBMS)

  • Relational DBMS (RDBMS)

  • Object-oriented database (OODB)

  • Distributed DBMS (DDBMS)

Each of these has its own pros and cons. Selecting a database depends on your own needs. Based upon your needs, instead of choosing an SQL data structure (which is suitable for an RDBMS), you may prefer NoSQL ( it is a non-relational structure and can be suitable for a DDBMS).

In this chapter, you’ll see the usage of an RDBMS and simple SQL statements only.

RDBMS

In RDBMS, data are stored in rows and columns, which is similar to tables. These tables are termed relations. Rows of a table are referred to as tuples , and columns are referred to as attributes .

Each row of a table contains a record. Each column contains fields. Consider the table in Figure 13-2.

For your reference, I have marked all the records and attributes in Figure 13-2.
../images/433474_2_En_13_Chapter/433474_2_En_13_Fig2_HTML.jpg
Figure 13-2

A sample table in an RDBMS.

You can process different records of a relation based on some mathematical formulation, which is termed relational algebra . Since the entire database can be processed using these mathematical formulae, relational algebra is the theoretical foundation for relational databases and SQL.

Oracle Database, MySQL, Microsoft SQL Server, IBM DB2, and so on are common examples of RDBMS. In this chapter, I have used MySQL to demonstrate the examples.

Note

In Appendix C, I have shown the installation steps of MySQL on a Win10 machine.

SQL

The full name of SQL is Structured Query Language. It is a very popular and widely used RDBMS language. It is an English-like language and is considered a fourth-generation language. Create data, update data, read data, and delete data are the most common operations with SQL. In Java, you will see the use of the java.sql package, which contains the API to support database programming (usually with a relational database). This API supports many operations, some of which are as follows:
  • Establish a connection with the database via DriverManager facility. DriverManager class and Driver interface are often used in this part of programming.

  • Talk to your database through SQL statements. You will often use Connection interface, Statement, PreparedStatement, and CallableStatement for this part of programming. You’ll see the use of Statement in Demonstration 1 and Demonstration 2. Demonstration 3 will show the use of PreparedStatement, and Demonstration 4 will show the use of CallableStatement.

  • Process the results obtained through different queries through the ResultSet interface.

In this chapter, you will see the use of these basic operations when the Java program interacts with the MySQL database.

Points To Remember

  • Java, C++, C, etc. are third-generation languages (3GL). In 3GLs, the focus is on “How to solve a problem?”, but in 4GLs, the focus is on “What do you want?” But some advanced 3GLs can combine some of the important aspects of 4GLs.

  • It is important to note that SQL does not differentiate between uppercase and lowercase character sets.

  • JDBC is an SQL-level API. It allows you to construct and combine SQL statements inside Java API calls.

Note

The simple SQL statements are used to demonstrate various programs in this chapter. If you are absolutely new to SQL, it is recommended that you do exercises with simple SQL statements in your preferred database to get a better idea before you proceed further.

Connecting to a Database

You can connect to a database through different drivers. These drivers are supported in the JDBC API. A JDBC driver is a software component that stays on client machines to help Java programs talk to the DBMS; i.e., it acts like an adapter. There are four different types of JDBC drivers, as follows:
  • Type-1 (or JDBC-ODBC bridge ) driver: It converts JDBC method calls into ODBC function calls. The ODBC bridge driver must be installed on the client machine. Here, the JDBC driver can talk to a third-party API that may not be written in Java. Also, Type-1 drivers are not written in Java, so these are not portable. These drivers are suitable only for local connections. Oracle stopped supporting these drivers from Java 8 onward. They now recommend you use the JDBC drivers that are available from specific vendors of the database.

  • Type-2 (or Native-API ) driver: These drivers use client-side libraries of the database so that they can convert JDBC method calls into native calls of database API. It is a partially Java driver. Since both the native driver and the client libraries stay on the local machine, these drivers are not used for remote network connections. But they can provide a better performance than type-1 drivers.

  • Type-3 (or Network Protocol ) driver: These are fully written in Java. Here, the clients first communicate with a middleware application server, which converts the JDBC calls into vendor-specific DBMS calls, and then those calls are forwarded to the database server. For these drivers, no client-side library needs to be installed on the local machine, because the application server is capable of doing the required jobs. A single type-3 driver can also be used to connect multiple databases. But network support is essential for the client machine, and the overall maintenance is costly because you may need to provide database-specific coding in the middle tier.

  • Type-4 (or, Thin ) driver: These are also fully written in Java, but they can provide the highest performance because they are provided by the vendor itself. Here, no special software needs to be installed either on the client machine or on the server machine. The only major drawback is that, since it is provided by a specific vendor, it is dependent on the particular database where the vendor can use different protocols.

    Note In Demonstration 5, you will also see the use of a javax.sql.DataSource object to establish a connection between your Java application and the database. From JDBC2.0 onward, this is the recommended approach to connect a datasource. Still I am discussing all of these to help you understand the legacy codes. Also, I believe the learning of “Database Programming in Java” is incomplete without these discussions.

Figure 13-3 demonstrates how three different types of databases can be connected through the JDBC driver.
../images/433474_2_En_13_Chapter/433474_2_En_13_Fig3_HTML.jpg
Figure 13-3

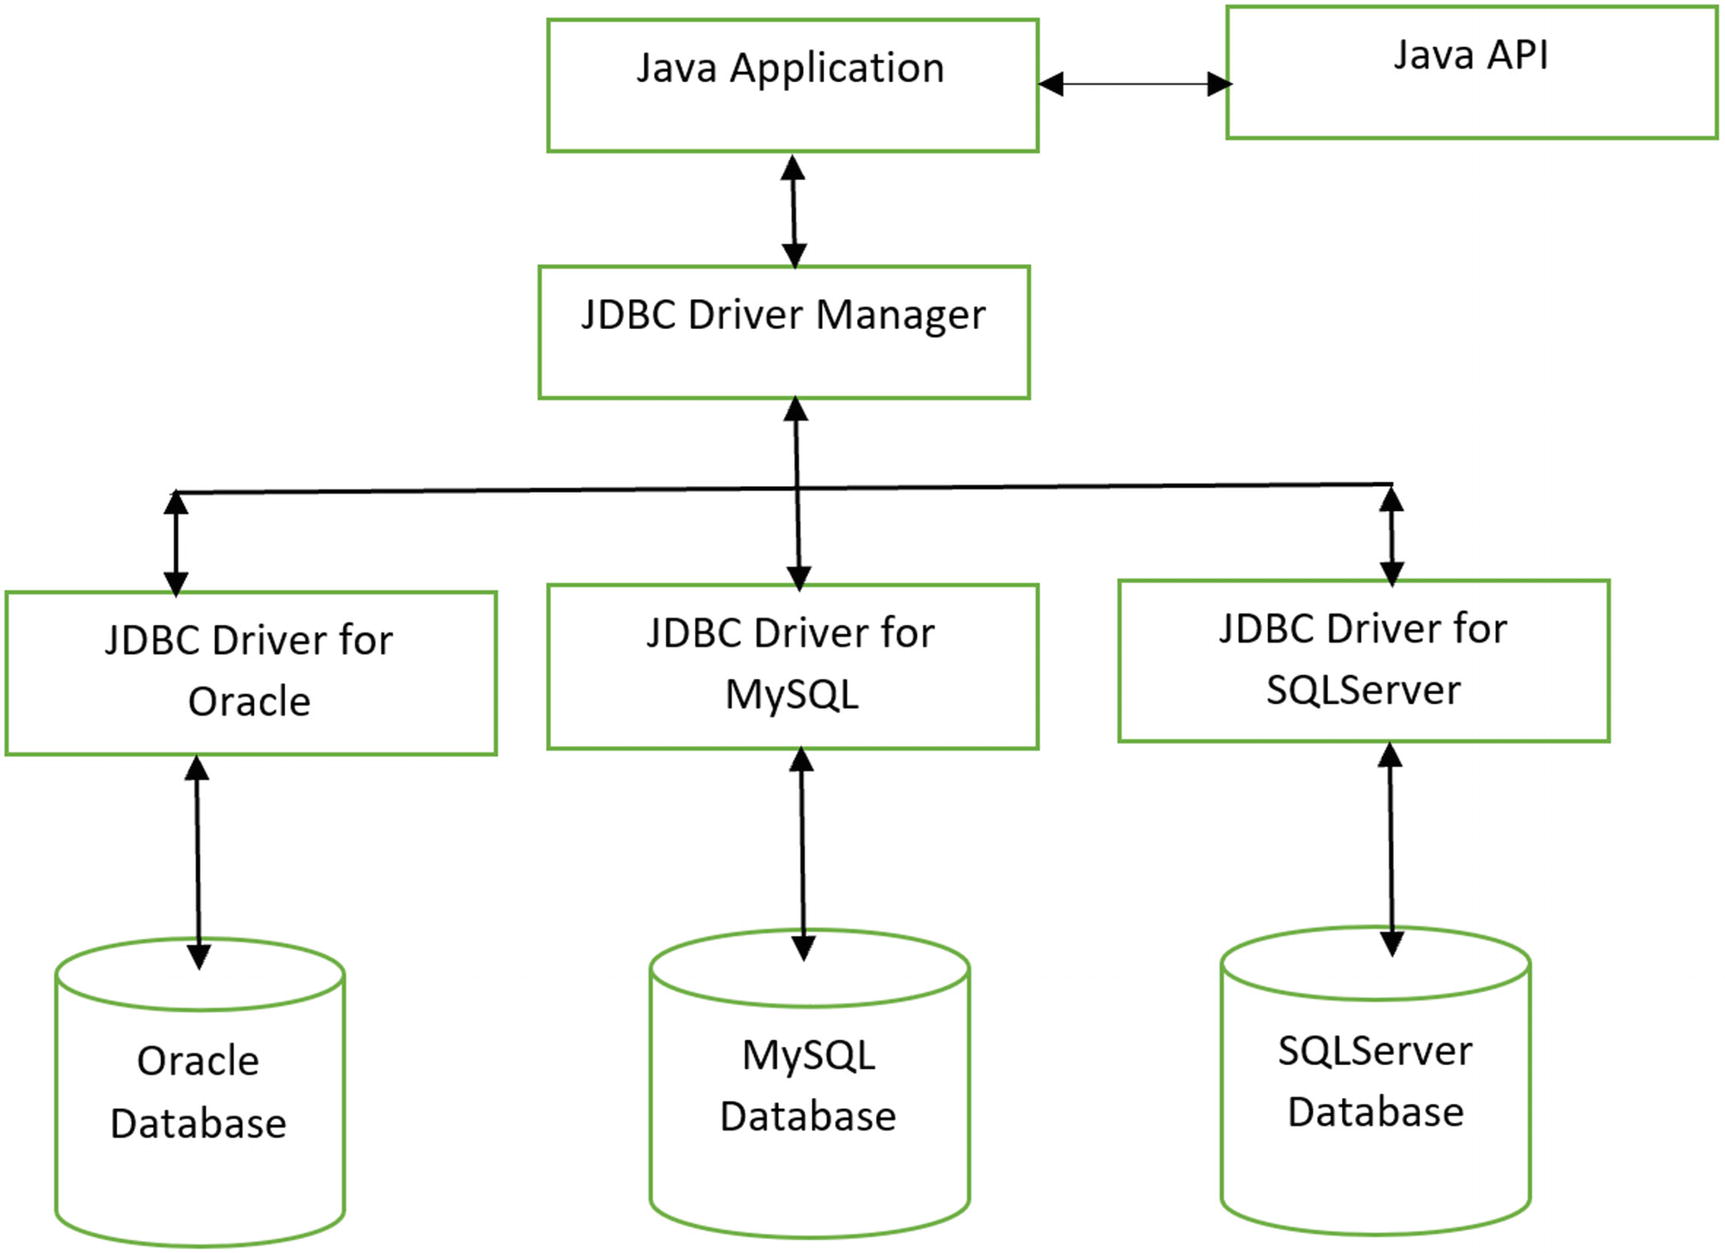
Different types of databases can be connected through the JDBC driver

You may have different JDBC drivers to connect to different databases. But as an end user, you don’t need to worry about their implementation. At this moment, it is sufficient for you to know that you need a JDBC driver to connect to a database.

Q&A Session

13.1 How can I decide which driver is suitable for my application?

If you know that you need only one specific database, pick Type-4. If you need to access multiple databases, choose Type-3. When you do not have either Type-3 or Type-4, you can consider Type-2 drivers. Type-1 is in general not recommended to use, but you can limit its use to testing purposes.

13.2 What are typical operations of the application server when any client uses type-3 drivers?

Some typical operations include logging, load balancing, auditing, and so on.

Talking to a Database in a Java Application

Now, you’ll see some demonstrations where Java applications will interact with a MySQL database. You can follow a similar approach for other databases. You’ll see the use of the Type-4 driver in the upcoming demonstrations.

When you connect to a database through a Java program, typically you may need to consider the following steps:
  1. 1.

    Load your JDBC driver.

     
  2. 2.

    Create a connection object and connect to the database.

     
  3. 3.

    Exercise the SQL statements with your Java program.

     
  4. 4.

    Map the retrieved result and process it as per your needs.


Here, I assume that you have installed MySQL on your local computer. If it is not installed yet, you can follow the link https://dev.mysql.com/downloads/installer/ to get the installer and relevant details. At the time of this writing, mysql-installer-community-8.0.16.0 is the latest version. You can also refer to Appendix C, where I have shown the installation steps of MySQL on a Win10 machine.

But installing the database is only the first step. To connect to the database using a Java application you need a vendor-specific connector. I am using MySQL and JDBC. So, I searched for the connector that is used for the JDBC driver in MySQL. At the time of this writing, mysql-connector-java-8.0.16.zip is available at the following link https://dev.mysql.com/downloads/connector/j/. I have chosen the platform-independent version (Figure 13-4) and downloaded it in the local system.
../images/433474_2_En_13_Chapter/433474_2_En_13_Fig4_HTML.jpg
Figure 13-4

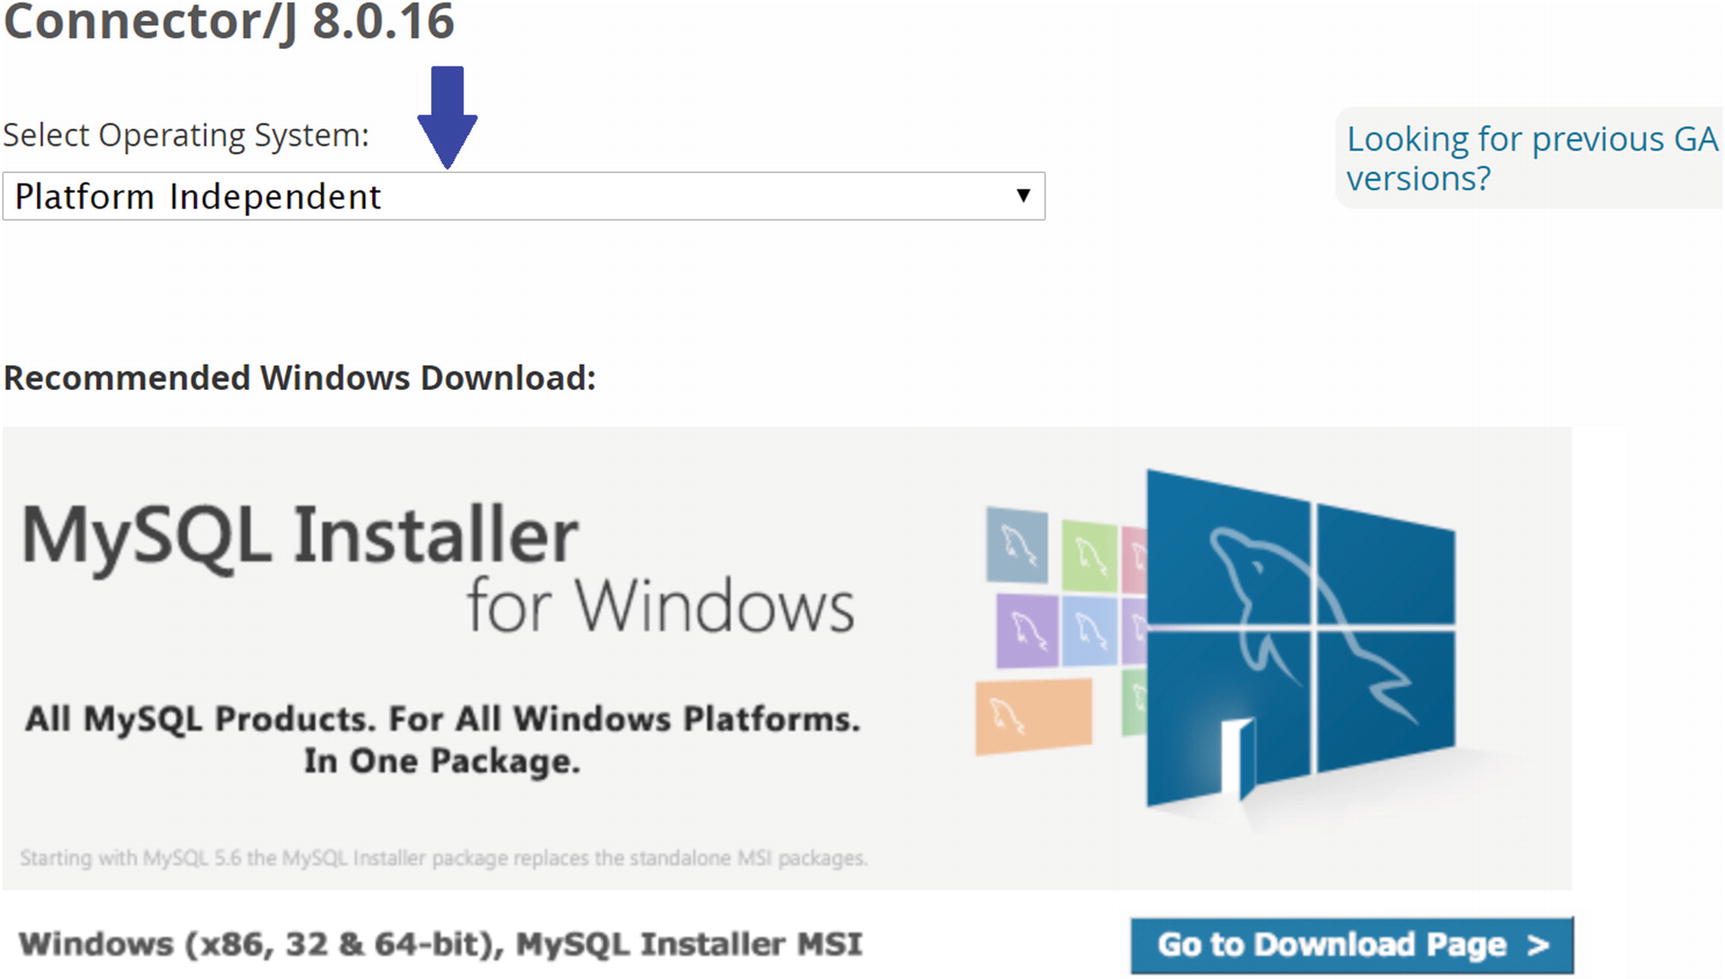
Download MySql Connector/J 8.0.16 Platform Independent version from https://dev.mysql.com/downloads/connector/j/

Once you download and extract the zip file, you will get the mysql-connector-java-8.0.16.jar file (the latest version at the time of this writing), which you need to add in your Java build path in Eclipse (ProjectPropertiesJava Build PathAdd External JARs…). Once you add this external jar in Eclipse, you may get a screen similar to that shown in Figure 13-5.
../images/433474_2_En_13_Chapter/433474_2_En_13_Fig5_HTML.jpg
Figure 13-5

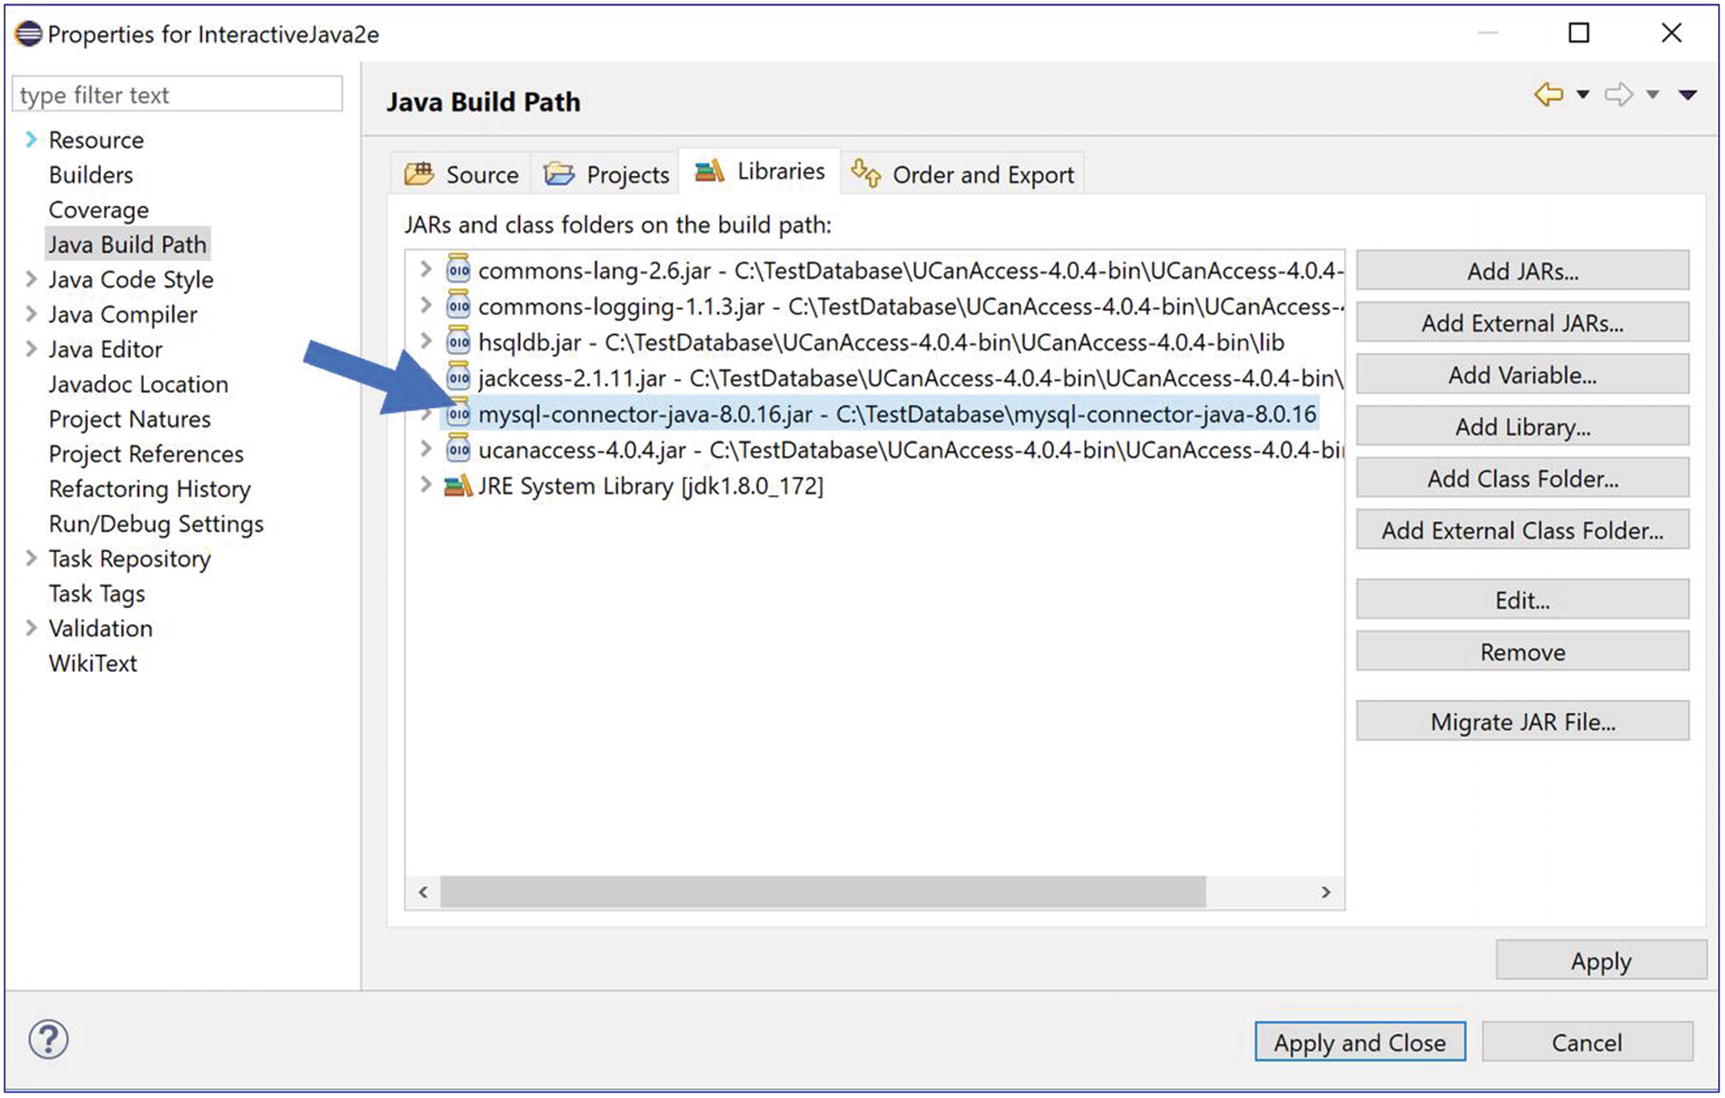
The mysql-connector-java-8.0.16.jar is added in Eclipse

Important Terms

Now, let’s go through some demonstrations. To understand the upcoming demonstrations, you need to be familiar with the following classes, interfaces, and methods:

DriverManager : This class manages a set of JDBC drivers. It matches the connection request from a Java application with the proper databse driver. (It is important to note that JDBC 2.0 provides an alternate way to connect to a datasource. The use of a DataSource object is a recommended way to connect to a datasource. )

Driver : This is an interface to handle the communication with the database server. Each driver must provide a class that will implement this interface. Each Driver class should be small and standalone so that it can be loaded without vast supporting codes. When a Driver class is loaded, you should create an instance of it and register it with DriverManager. So, in Demonstration 1, you may notice the following line of code:
// for MySql database
Class.forName("com.mysql.cj.jdbc.Driver").newInstance();

Points To Remember

  • Similar to connecting with an Oracle database, you may notice the use of the following code:

Class.forName("oracle.jdbc.driver.OracleDriver").newInstance();
  • To connect with a MS SQL Server, you may notice the use of the following code:
    Class.forName("com.microsoft.jdbc.sqlserver.SQLServerDriver").newInstance();

Connection : This interface provides the methods with which to connect a database. Your SQL statements execute, and results are returned within the context of a connection. You can simply say that all the communication with the database passes through the connection object.

getConnection() : This method attempts to make a connection to the given database URL. Multiple overloaded versions are avaiable for this method. In Demonstration 1, you will notice the following line of code:
DriverManager.getConnection("jdbc:mysql://localhost:3306/test", "root", "admin");
That is, I’m using following overloaded version:
public static Connection getConnection(String url, String user, String password) throws SQLException

where the user string indicates the database user name and the password string is that user’s password.

Note

The string localhost is used because I have installed the MySQL database in my local system and test is my local database name.

Statement : It is an interface. A Statement object is used to execute the static SQL statement and returns the results for that. By default, only one ResultSet object per Statement object can be opened in a particular moment.

createStatement() : This method creates a Statement object to send SQL statements to the database.

executeQuery() : This method is used to execute an SQL statement that returns a single ResultSet object.

executeUpdate() : This method is used to execute an SQL statement that can be any of the insert, update, or delete statements. You can also use DDL statements, which return nothing. (You can refer to Q&A 13.10 in this context.)

Note

The executeQuery() or the executeUpdate() methods cannot be called on a PreparedStatement or on a CallableStatement.

ResultSet : This is an interface that represents the result set of a database query. The SQL statements that read data (using a database query) return the data in a result set. The select statement is a standard way to select rows and view them in the result set.

In Demonstration 1, you will notice that you retrieve the query result once an SQL statement is executed using a Statement object. It acts like an iterator so that you can easily move through its data. In this context, it is useful to know that a ResultSet object maintains a cursor to point at the current row in the result set.

SQLException : This class is used to describe various database access errors (or any other errors that may occur in a database application).

Creating a Database and Inserting Records

Demonstration 1 shows how you can connect to a MySQL database and how you can retrieve the records from a table in the database.

Before that, you can familiar yourself with MySQL Workbench which is a graphical tool and can be used when you work with MySQL servers and databases. Once installed, you can get it in your startup menu, like in Figure 13-6.
../images/433474_2_En_13_Chapter/433474_2_En_13_Fig6_HTML.jpg
Figure 13-6

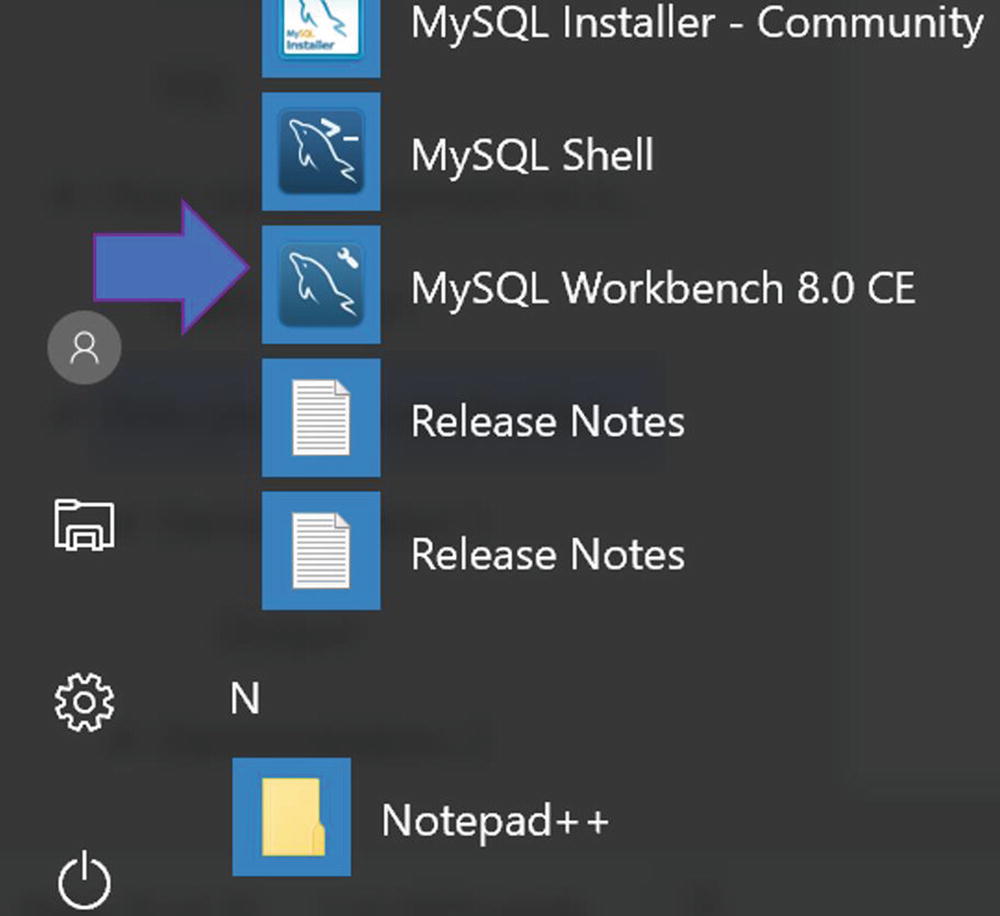
Once installed, MySQL Workbench 8.0 is available in the startup menu

Before I start, I create a database test, and then I create a table employee in that database. In the employee table, I insert three records only. Creating a database and creating a table inside the database is very easy. You can skip the following section contained in square brackets [ ] if you know these commands.

[For example, once you log in to your database sever:
  • To create the database called test, you can use the following command:

create database test;
  • To create the table called employee, you can use the following command:

create table employee(EmpId int(10),Name varchar(10),Age int(10), Salary double);
It simply says the employee table has four columns: EmpId, Name, Age, and Salary. The datatypes with sizes are also described here. The varchar datatype may seem new to you. For now, simply know that it is used for those who can hold both letters and numbers.
  • To insert a record in your employee table, you can use the following command:

insert into employee values (1,'Amit',25,1200.5);

Similarly, you can insert other records.

Another important point to note is that if you want to make a column unique and not null, you can use it as a primary key. For example, if I want no duplicates in the EmpId column and I want each record to include the information for EmpId, I’ll use the concept of a primary key while creating the table, which is as follows:
create table employee(EmpId int(10) primary key,Name varchar(10),Age int(10), Salary double);

Now, when you insert a record into the employee table, you need to supply the information for EmpId. In short, by using a primary key, you can uniquely identify a record.]

Figure 13-7 represents the MySQL Workbench view for that. From the figure, you can see that the test database currently contains one table, employee, with three records. The figure also presents the table schema for the employee table.
../images/433474_2_En_13_Chapter/433474_2_En_13_Fig7_HTML.jpg
Figure 13-7

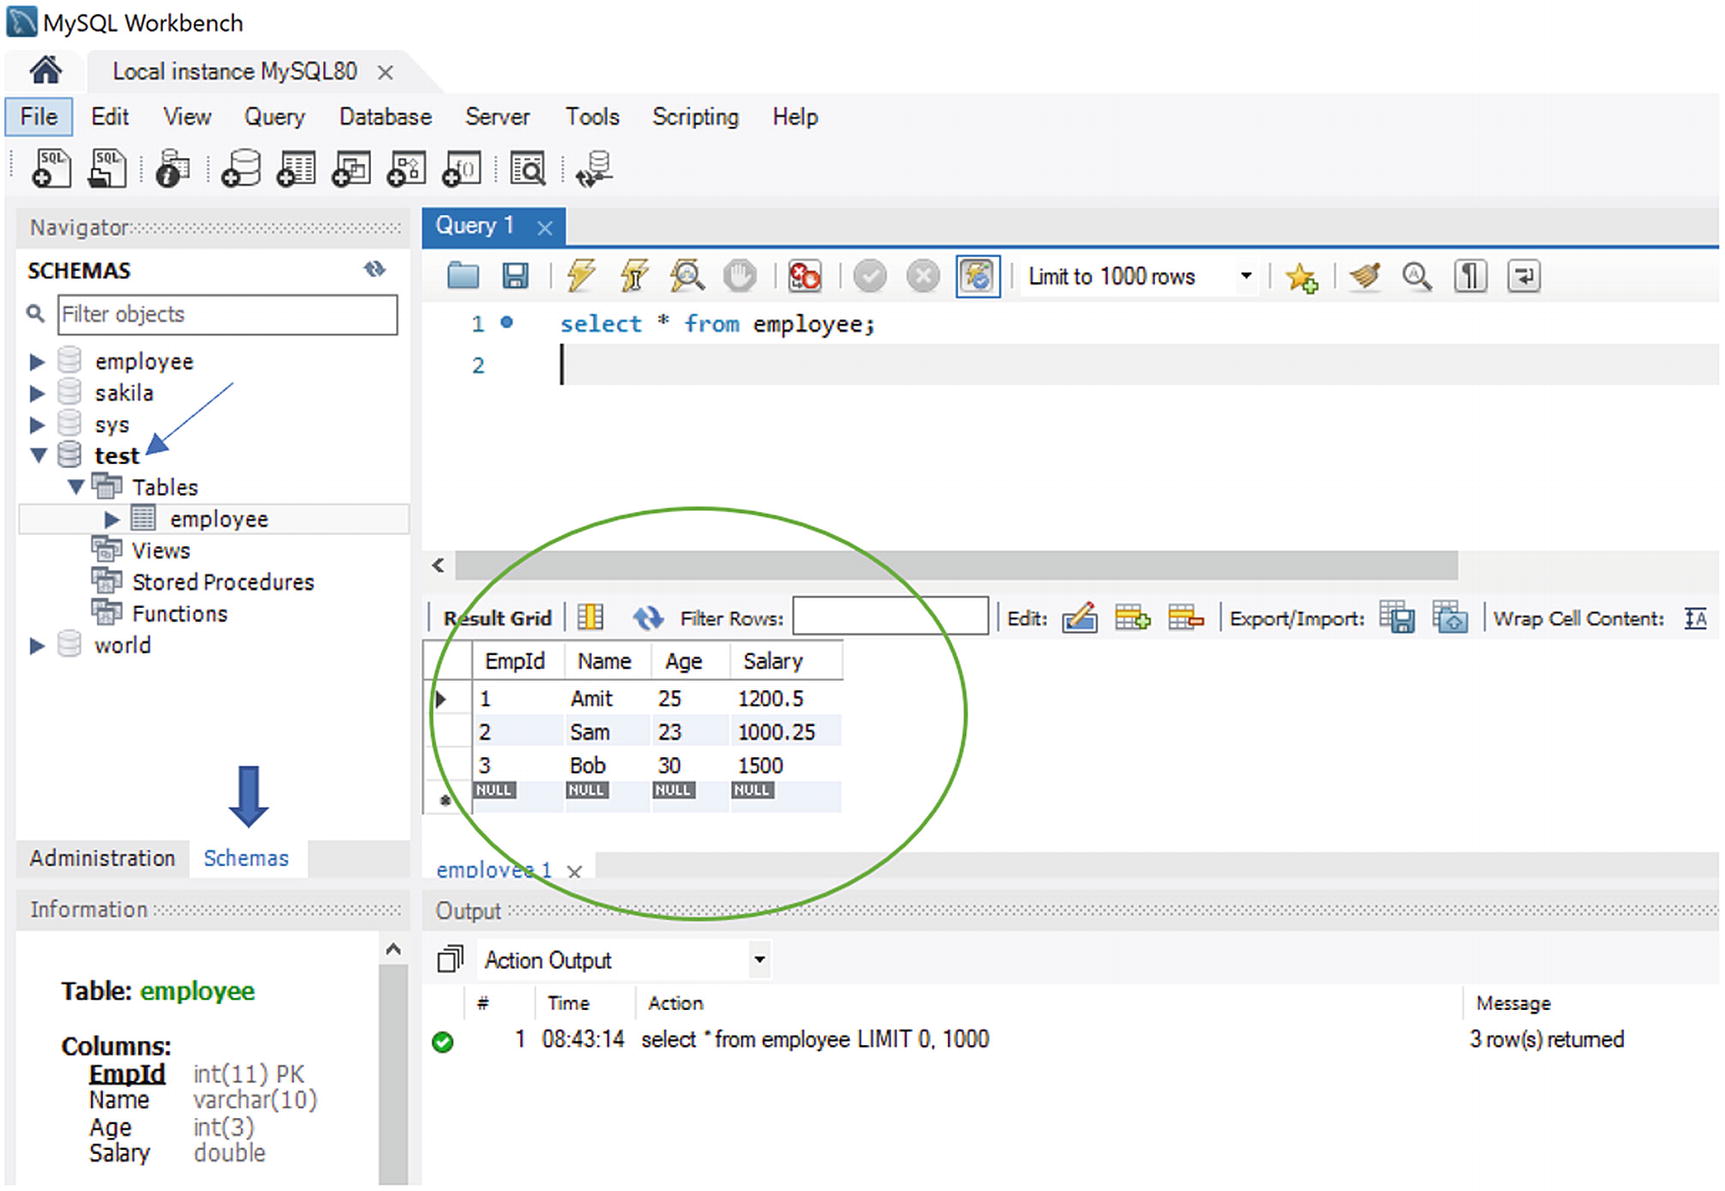
The MySQL Workbench view for the employee table in the test database

But to understand the upcoming demonstrations, you need not be familiar with MySQL Workbench in detail. Here, I have used this graphical tool to show you the current database and the tables in it before you start programming with JDBC.

MySQL Command Prompt View

Alternatively, you can use the MySQL command prompt. You can exercise the following commands (shown in bold) from this command prompt. For your easy reference, I am putting my comments or command details inside the square brackets [ ].
Enter password: *****
Welcome to the MySQL monitor.  Commands end with ; or g.
Your MySQL connection id is 19
Server version: 8.0.16 MySQL Community Server - GPL
Copyright (c) 2000, 2019, Oracle and/or its affiliates. All rights reserved.
Oracle is a registered trademark of Oracle Corporation and/or its affiliates. Other names may be trademarks of their respective owners.
Type 'help;' or 'h' for help. Type 'c' to clear the current input statement.
[To list all databases in your local MySQL server, use 'show databases' command]
mysql> show databases;
+--------------------+
| Database           |
+--------------------+
| employee           |
| information_schema |
| mysql              |
| performance_schema |
| sakila             |
| sys                |
| test               |
| world              |
+--------------------+
8 rows in set (0.00 sec)
[To switch to a particular database, use the following command]
mysql> use test;
Database changed
[To display all the tables in your database, use the following command]
mysql> show tables;
+----------------+
| Tables_in_test |
+----------------+
| employee       |
+----------------+
1 row in set (0.00 sec)
[To display all records in a table (in this case, 'employee'), use the following command]
mysql> select * from employee;
+-------+------+------+---------+
| EmpId | Name | Age  | Salary  |
+-------+------+------+---------+
|     1 | Amit |   25 |  1200.5 |
|     2 | Sam  |   23 | 1000.25 |
|     3 | Bob  |   30 |    1500 |
+-------+------+------+---------+
3 rows in set (0.00 sec)
mysql> desc employee;
+--------+-------------+------+-----+---------+-------+
| Field  | Type        | Null | Key | Default | Extra |
+--------+-------------+------+-----+---------+-------+
| EmpId  | int(11)     | NO   | PRI | NULL    |       |
| Name   | varchar(10) | YES  |     | NULL    |       |
| Age    | int(3)      | YES  |     | NULL    |       |
| Salary | double      | YES  |     | NULL    |       |
+--------+-------------+------+-----+---------+-------+
4 rows in set (0.00 sec)
mysql>

Demonstration 1

I already said that Demonstration 1 shows how you can connect to a MySQL database and how can you retrieve records from a table in the database. As noted earlier, I created a database called test and then I created a table employee in that database. Currently, the employee table contains three records, which were also shown prior to this demonstration. To understand this example, you may need to revisit the descriptions of important classes, interfaces, and methods that were covered earlier.
package java2e.chapter13;
import java.sql.*;
class Demonstration1 {
public static void main(String[] args) throws SQLException {
             System.out.println("***Demonstration-1.Connecting to the MySql server.***");
             Connection connectionOb = null;
             try {
                    // for MySql database
                    Class.forName("com.mysql.cj.jdbc.Driver").newInstance();
                    connectionOb = DriverManager.getConnection("jdbc:mysql://localhost:3306/test", "root", "admin");
                    Statement statementOb = connectionOb.createStatement();
                    ResultSet queryResult = statementOb.executeQuery("select * from Employee");
                    System.out.println(" EmployeeId " + "EmployeeName " + "Age " + "Salary");
                    System.out.println("------------------------------------------");
                    while (queryResult.next()) {
                           System.out.print(queryResult.getString("EmpId") + " " + queryResult.getString("Name") + " "+ queryResult.getInt("Age") + " " + queryResult.getDouble("Salary"));
                           System.out.println();
                    }
             } catch (SQLException ex) {
                    System.out.println(ex.getMessage());
             }
             // To catch any other exception
             catch (Exception ex) {
                    System.out.println(ex.getMessage());
                    ex.printStackTrace();
             } finally {
                    // Close the connection
                    if (connectionOb != null) {
                           connectionOb.close();
                    }
             }
       }
}
Output:
***Demonstration-1. Connecting to the MySql server. ***
 EmployeeId       EmployeeName       Age       Salary
------------------------------------------
1             Amit             25       1200.5
2             Sam             23       1000.25
3             Bob             30       1500.0

Demonstration 2

In Demonstration 2, I’ll update some records, then I’ll delete a record. Finally, I’ll update the records in such a way that I can obtain the initial state of the table. For example, you’ll see that though Amit’s age was updated from 25 to 35, at the end I have reset it back to 25. Also, I have deleted the newly added record for John. Similarly, though I made a change to Bob’s salary, at the end I have reset the value.

Another notable change in this demonstration is that, in this example, I have used executeUpdate() to update a record. In Demonstration 1, you saw the use of the executeQuery() method .
package java2e.chapter13;
import java.sql.*;
class Demonstration2 {
       public static void main(String[] args) throws SQLException {
             System.out.println("***Demonstration-2.Connecting to the MySql server.***");
             Connection connectionOb = null;
             try {
                    // for MySql database
                    Class.forName("com.mysql.cj.jdbc.Driver").newInstance();
                    connectionOb = DriverManager.getConnection("jdbc:mysql://localhost:3306/test", "root", "admin");
                    Statement statementOb = connectionOb.createStatement();
                    System.out.println("Here is the initial table");
                    ResultSet queryResult = statementOb.executeQuery("select * from Employee");
                    System.out.println(" EmployeeId " + "EmployeeName " + "Age " + "Salary");
                    System.out.println("------------------------------------------");
                    while (queryResult.next()) {
                           System.out.print(queryResult.getString("EmpId") + " " + queryResult.getString("Name") + " "
                                        + queryResult.getInt("Age") + " " + queryResult.getDouble("Salary"));
                           System.out.println();
                    }
                    //Updating 2 records and inserting a new record.
                    System.out.println("Updating Amit's age as 35.");
                    statementOb.executeUpdate("update Employee set Age=35 where name="Amit" ");
                    System.out.println("Updating Bob's salary to 2000.25");
                    statementOb.executeUpdate("update Employee set Salary=2000.25 where name="Bob" ");
                    System.out.println("Inserting a new record into the Employee table ");
                    statementOb.executeUpdate("insert into Employee values(4,'John',27,975)");
                    System.out.println("**Here is the updated table.**");
                    queryResult = statementOb.executeQuery("select * from Employee");
                    System.out.println(" EmployeeId " + "EmployeeName " + "Age " + "Salary");
                    System.out.println("------------------------------------------");
                    while (queryResult.next()) {
                           System.out.print(queryResult.getString("EmpId") + " " + queryResult.getString("Name") + " "
                                        + queryResult.getInt("Age") + " " + queryResult.getDouble("Salary"));
                           System.out.println();
                    }
                    //Deleting a record from the Employee table and setting the initial values again in the Employee table.
                    System.out.println(" Deleting the record of John from the Employee table.");
                    statementOb.executeUpdate("delete from employee where name="John" ");
                    System.out.println("Updating Amit's age as 25 again.");
                    statementOb.executeUpdate("update Employee set Age=25 where name="Amit" ");
                    System.out.println("Updating Bob's salary to 1500.0 again.");
                    statementOb.executeUpdate("update Employee set Salary=1500.0 where name="Bob" ");
                    System.out.println(" **Here is the updated table.**");
                    queryResult = statementOb.executeQuery("select * from Employee");
                    System.out.println(" EmployeeId " + "EmployeeName " + "Age " + "Salary");
                    System.out.println("------------------------------------------");
                    while (queryResult.next()) {
                           System.out.print(queryResult.getString("EmpId") + " " + queryResult.getString("Name") + " "
                                        + queryResult.getInt("Age") + " " + queryResult.getDouble("Salary"));
                           System.out.println();
                    }
             } catch (SQLException ex) {
                    System.out.println(ex.getMessage());
             }
             // To catch any other exception
             catch (Exception ex) {
                    System.out.println(ex.getMessage());
                    ex.printStackTrace();
             } finally {
                    // Close the connection
                    if (connectionOb != null) {
                           connectionOb.close();
                    }
             }
       }
}
Here is the output. The key changes are shown in bold letters.
***Demonstration-2.Connecting to the MySql server.***
Here is the initial table
 EmployeeId   EmployeeName   Age   Salary
------------------------------------------
1             Amit           25    1200.5
2             Sam            23    1000.25
3             Bob            30    1500.0
Updating Amit's age as 35.
Updating Bob's salary to 2000.25
Inserting a new record into the Employee table
**Here is the updated table.**
 EmployeeId   EmployeeName   Age   Salary
------------------------------------------
1             Amit           35    1200.5
2             Sam            23    1000.25
3             Bob            30    2000.25
4             John           27    975.0
Deleting the record of John from the Employee table.
Updating Amit's age as 25 again.
Updating Bob's salary to 1500.0 again.
**Here is the updated table.**
 EmployeeId   EmployeeName   Age   Salary
------------------------------------------
1             Amit           25    1200.5
2             Sam            23    1000.25
3             Bob            30    1500.0

Note

This program can be further improved if you use separate methods for display records and update (or, insert) records and call those methods from your main() method. You can follow the same for other demonstrations in this chapter. I just focused on updating and inserting the records in this example and kept it aligned with demonstration 1.

Demonstration 3

This demonstration shows the use of the PreparedStatement object . PreparedStatement is an interface that extends the Statement interface. The use of PreparedStatement can provide you the following facilities:
  • You can use parameterized SQL statements.

  • You can reuse the statement with new values.

  • You can provide batch processing and faster execution.

In the following example, you will notice the use of the following lines:
PreparedStatement preparedStatementOb=null;
preparedStatementOb=connectionOb.prepareStatement("insert into Employee values(?,?,?,?)");
You can see that a PreparedStatement object is created with four input parameters. Notice the four question marks (?). These are the placeholders for your inputs. You provide values to replace these question marks before you execute a PreparedStatement object. You can supply values using the setter methods defined in the PreparedStatement class. In the upcoming demonstration, you will supply a new record (where employee name is “Ivan”) using the following statements:
preparedStatementOb.setInt(1,4);
preparedStatementOb.setString(2,"Ivan");
preparedStatementOb.setInt(3,27);
preparedStatementOb.setDouble(4,975.6);

It is important to note that the first argument of these setter methods specifies the question mark placeholder. For example, the two setInt() calls specify the first and third placeholders, respectively; setString() specifies the second placeholder; and setDouble() specifies the fourth placeholder.

Finally, you will invoke the executeUpdate() method on the PreparedStatement object as follows:
preparedStatementOb.executeUpdate();
Now, go through the following demonstration and its corresponding output:
package java2e.chapter13;
import java.sql.*;
public class Demonstration3 {
       public static void main(String[] args) throws SQLException {
             System.out.println("***Demonstration-3.Use of PreparedStatement.***");
             Connection connectionOb = null;
             try {
                    // for MySql database
                    Class.forName("com.mysql.cj.jdbc.Driver").newInstance();
                    connectionOb = DriverManager.getConnection("jdbc:mysql://localhost:3306/test", "root", "admin");
                    Statement statementOb = connectionOb.createStatement();
                    System.out.println("Here is the initial table.");
                    ResultSet queryResult = statementOb.executeQuery("select * from Employee");
                    System.out.println(" EmployeeId " + "EmployeeName " + "Age " + "Salary");
                    System.out.println("------------------------------------------");
                    while (queryResult.next()) {
                           System.out.print(queryResult.getString("EmpId") + " " + queryResult.getString("Name") + " "
                                        + queryResult.getInt("Age") + " " + queryResult.getDouble("Salary"));
                           System.out.println();
                    }
                    //Inserting a new record in the table
                    System.out.println(" Inserting a new record into the Employee table.");
                    PreparedStatement preparedStatementOb=null;
                    preparedStatementOb=connectionOb.prepareStatement("insert into Employee values(?,?,?,?)");
                    preparedStatementOb.setInt(1,4);
                    preparedStatementOb.setString(2,"Ivan");
                    preparedStatementOb.setInt(3,27);
                    preparedStatementOb.setDouble(4,975.6);
                    preparedStatementOb.executeUpdate();
                    System.out.println("**Here is the updated table.**");
                    queryResult = statementOb.executeQuery("select * from Employee");
                    System.out.println(" EmployeeId " + "EmployeeName " + "Age " + "Salary");
                    System.out.println("------------------------------------------");
                    while (queryResult.next()) {
                           System.out.print(queryResult.getString("EmpId") + " " + queryResult.getString("Name") + " "
                                        + queryResult.getInt("Age") + " " + queryResult.getDouble("Salary"));
                           System.out.println();
                    }
                    //Deleting a record from the Employee table and setting the initial values again in the Employee table.
                    System.out.println(" Deleting the record of Ivan from the Employee table.");
                    statementOb.executeUpdate("delete from employee where name="Ivan" ");
                    System.out.println("After the deletion of Ivan's record, here is the updated table.**");
                    queryResult = statementOb.executeQuery("select * from Employee");
                    System.out.println(" EmployeeId " + "EmployeeName " + "Age " + "Salary");
                    System.out.println("------------------------------------------");
                    while (queryResult.next()) {
                           System.out.print(queryResult.getString("EmpId") + " " + queryResult.getString("Name") + " "
                                        + queryResult.getInt("Age") + " " + queryResult.getDouble("Salary"));
                           System.out.println();
                    }
             } catch (SQLException ex) {
                    System.out.println(ex.getMessage());
             }
             // To catch any other exception
             catch (Exception ex) {
                    System.out.println(ex.getMessage());
                    ex.printStackTrace();
             } finally {
                    // Close the connection
                    if (connectionOb != null) {
                           connectionOb.close();
                    }
             }
       }
}
Output:
***Demonstration-3.Use of PreparedStatement.***
Here is the initial table.
 EmployeeId   EmployeeName   Age   Salary
------------------------------------------
1             Amit           25    1200.5
2             Sam            23    1000.25
3             Bob            30    1500.0
Inserting a new record into the Employee table.
**Here is the updated table.**
 EmployeeId   EmployeeName   Age   Salary
------------------------------------------
1             Amit           25    1200.5
2             Sam            23    1000.25
3             Bob            30    1500.0
4             Ivan           27    975.6
Deleting the record of Ivan from the Employee table.
After the deletion of Ivan's record, here is the updated table.**
 EmployeeId   EmployeeName   Age   Salary
------------------------------------------
1             Amit           25    1200.5
2             Sam            23    1000.25
3             Bob            30    1500.0

Q&A Session

13.3 Why is the use of PreparedStatement objects considered faster than using Statement objects?

PreparedStatement objects can contain precompiled SQL statements. So, if you pass the same query (with the same or different data) multiple times, DBMS can run the query much faster. But, in the case of a Statement object, SQL needs to validate the query each time you use it.

13.4 Is passing the parameters mandatory for PreparedStatement objects ?

No. In Demonstration 3, you could simply use the following lines of code to get the same result:
//Parameters are not mandatory for PreparedStatement .
preparedStatementOb = connectionOb.preparedStatement("insert into Employee values(4,'IvanS',27,975.6)");

Normally, you use PreparedStatement when your SQL query takes parameters. The SQL statement that takes parameters can help you to execute the statement with different values, which is very common in real-world scenarios. For simplicity and to make the program shorter, I have not used command-line arguments or user-defined inputs. But in practice, you can always pass the arguments using the command line, which in turn will replace the question marks before your query is processed.

13.5 How is the executeQuery() method different from executeUpdate()?

The executeUpdate() method is associated with insert, update, or delete operations or SQL statements that return nothing, such as DDL statements. This method does not return any ResultSet object.

On the other hand, executeQuery() executes an SQL statement that returns a single ResultSet object. This method cannot be called on PreparedStatement or CallableStatement (this will be discussed in the next demonstration).

13.6 What are the key advantages of using PreparedStatement?

Here are the key advantages of using PreparedStatement:
  • You can pass parameterized SQL statements.

  • You can reuse the statement with different values.

  • You can provide batch processing.

  • Since it supports precompiled SQL statements, you may enhance the execution time.

13.7 What is batch processing ? Can you give an example?

By “batch processing,” I mean that you can execute a bunch (or group or set) of queries. The addBatch() and executeBatch() methods in the Statement interface can help you in this area.

Let’s add the following lines to Demonstration 1:
statementOb.addBatch("insert into Employee values(4,'Ivan',27,975.6)");
statementOb.addBatch("insert into Employee values(5,'Jacklin',29,575.5)");
//Batch execution
statementOb.executeBatch();
Now, you can see that the records are inserted properly. Similarly, you can delete the records as follows:
//Now deleting the records  from the Employee table
//and resetting the original state of Employee table.
System.out.println(" Deleting the record of Ivan and Jacklin from the Employee table.");
statementOb.addBatch("delete from employee where name="Ivan" ");
statementOb.addBatch("delete from employee where name="Jacklin" ");
//Batch execution
statementOb.executeBatch();

Demonstration 4

This demonstration shows the use of the CallableStatement object . CallableStatement is an interface that extends PreparedStatement, which in turn extends the Statement interface. CallableInterface is used to execute stored procedures and functions in SQL.

Note

There are some significant differences between stored procedures and functions. For example, in MySQL, a stored procedure can be used to return one or multiple values or no value, whereas a function always returns single value. Also, you can call a function directly with a SQL statement while you cannot do the same for a procedure. A stored procedure can have IN, OUT, INOUT parameters but a stored function can have only IN parameters by default. To make the example short and simple, in Demonstration 4 you’ll see the use of a small function only.

Before you start, create a table called numbertable (in your test database) as in Table 13-1.
Table 13-1

The numbertable Table Created in the Database

FirstNumber

SecondNumber

12.3

15.7

32.5

25.3

25.0

75.0

You can see that the table has two attributes, FirstNumber and SecondNumber, and each row of the table contains various double type values. Let’s say you want to calculate the aggregate of the two double values of each row in the table; you can accomplish this task using a function called total().

So, before you execute Demonstration 4, you may wish to complete the following steps:
  1. 1.

    Create NumberTable and fill the table with necessary data.

     
  2. 2.

    You create a function total() that accepts two double type values as parameters and returns the aggregate.


You can complete Step 1 and Step 2 in various ways and in your preferred order. In the following section, I give you the commands (with corresponding outputs) that I used once I connected my database to complete these steps. The SQL statements are shown in bold for a better readability. I am also putting the supporting comments inside brackets [ ].

Step 1

[Creating the NumberTable]
mysql> create table NumberTable(FirstNo Double, SecondNo Double);
Query OK, 0 rows affected (2.77 sec)
[Check the tables in the test database. This is optional for you.]
mysql> show tables;
+----------------+
| Tables_in_test |
+----------------+
| employee       |
| numbertable    |
+----------------+
2 rows in set (0.08 sec)
[Insert the data in the first row in the table.]
mysql> insert into numbertable values(12.3,15.7);
Query OK, 1 row affected (2.12 sec)
[Insert the data in the second row in the table.]
mysql> insert into numbertable values(32.3,25.3);
Query OK, 1 row affected (0.13 sec)
[Insert the data in the third row in the table.]
mysql> insert into numbertable values(25,75);
Query OK, 1 row affected (0.08 sec)
[Check the current status of the table.]
mysql> select * from numbertable;
+---------+----------+
| FirstNo | SecondNo |
+---------+----------+
|    12.3 |     15.7 |
|    32.3 |     25.3 |
|      25 |       75 |
+---------+----------+
3 rows in set (0.08 sec)

Step 2

Create the function called total: [A function is a stored program in which you can pass parameters, and, in turn, it will return a value.]
mysql> create function total(firstNumber double, secondNumber double) returns double deterministic return firstNumber + secondNumber;
Query OK, 0 rows affected (1.03 sec)

Note

As per the MySQL 8.0 reference manual: “A routine is considered ‘deterministic’ if it always produces the same result for the same input parameters, and “’not deterministic’ otherwise. If neither DETERMINISTIC nor NOT DETERMINISTIC is given in the routine definition, the default is NOT DETERMINISTIC.”

So, if you miss the word deterministic in the previous query, you may encounter following error:
ERROR 1064 (42000): You have an error in your SQL syntax; check the manual that corresponds to your MySQL server version for the right syntax to use near 'sum(firstNumber double,secondNumber double)
returns double
return firstNumber+se' at line 1
[Now I display the function details. This is optional for you.]
mysql> Select Routine_name as "Function Name", routine_Definition as "Definition", Routine_Schema "Schema", Data_Type as "Types", Created From  Information_Schema.Routines Where Routine_Name="total" and Routine_Type= 'FUNCTION';

Here is a snapshot from the MySQL 8.0 command-line client for better readability:

../images/433474_2_En_13_Chapter/433474_2_En_13_Figa_HTML.jpg
Now, let’s analyze the upcoming program. In the following example, you will notice the following line of code:
CallableStatement callableStmt=connectionOb.prepareCall("{?= call total(?,?)}");

You can see that a CallableStatement object is created by invoking the prepareCall() method, and that the prepareCall() method accepts a String parameter.

Note

Like many other methods, there are various overloaded versions of the prepareCall() method. I have used the simplest one in this example.

Notice the three question marks. You know that these are used for method parameters. These parameters are sequential in nature, and the first parameter starts with 1.

The following lines will show the usage of these parameters:
callableStmt.setDouble(2,queryResult.getDouble("FirstNo"));
callableStmt.setDouble(3,queryResult.getDouble("SecondNo"));
/*
Here, we have used the registerOutParameter() method of the CallableStatement interface, which registers the OUT parameter in the ordinal position in parameterIndex(first argument) to the JDBC type sqlType(second argument). All OUT parameters must be registered before a stored procedure is executed.
*/
callableStmt.registerOutParameter (1,Types.DOUBLE);
callableStmt.execute();
It indicates that there are two double type values, in positions 2 and 3. The question mark in position 1 will be replaced with the function (the function name is total() in this case) call, which accepts these double type values as parameters and returns the aggregate (which is also a double type value). Now, go through the full implementation and the corresponding output.
package java2e.chapter13;
import java.sql.*;
class Demonstration4 {
       public static void main(String[] args) throws SQLException {
             System.out.println("***Demonstration-4.Using a Callable Statement.***");
             Connection connectionOb = null;
             try {
                    // for MySQL database
                    Class.forName("com.mysql.cj.jdbc.Driver").newInstance();
                    connectionOb = DriverManager.getConnection("jdbc:mysql://localhost:3306/test", "root", "admin");
                    Statement statementOb = connectionOb.createStatement();
                    System.out.println("This is the original table.");
                    ResultSet queryResult = statementOb.executeQuery("select * from NumberTable");
                    System.out.println("FirstNumber " + "SecondNumber");
                    System.out.println("--------------------------");
                    while (queryResult.next()) {
                           System.out.print(queryResult.getDouble("FirstNo") + " " + queryResult.getString("SecondNo"));
                           System.out.println();
                    }
                    System.out.println(" Calling the total() function on each record of the NumberTable.");
                    //Using the Callable statement
                    CallableStatement callableStmt=connectionOb.prepareCall("{?= call total(?,?)}");
                    queryResult = statementOb.executeQuery("select * from NumberTable");
                    System.out.println("FirstNumber " + "SecondNumber "+"Total");
                    System.out.println("--------------------------------------");
                    while (queryResult.next()) {
                           System.out.print(queryResult.getDouble("FirstNo") + " " + queryResult.getDouble("SecondNo")+ " ");
                           callableStmt.setDouble(2,queryResult.getDouble("FirstNo"));
                           callableStmt.setDouble(3,queryResult.getDouble("SecondNo"));
                           /*Here, we have used the registerOutParameter method of the CallableStatement interface, which registers the OUT parameter in the ordinal position in parameterIndex(first argument) to the JDBC type sqlType(second argument). All OUT parameters must be registered before a stored procedure is executed.*/
                           callableStmt.registerOutParameter (1,Types.DOUBLE);
                           callableStmt.execute();
                           System.out.print(callableStmt.getDouble(1));
                           System.out.println();
                    }
             } catch (SQLException ex) {
                    System.out.println(ex.getMessage());
             }
             // To catch any other exception
             catch (Exception ex) {
                    System.out.println(ex.getMessage());
                    ex.printStackTrace();
             } finally {
                    // Close the connection
                    if (connectionOb != null) {
                           connectionOb.close();
                    }
             }
       }
}
Output:
***Demonstration-4.Using a Callable Statement.***
This is the original table.
FirstNumber      SecondNumber
----------------------------
12.3             15.7
32.5             25.3
25.0             75.0
Calling the total() function on each record of the NumberTable:
FirstNumber      SecondNumber     Total
---------------------------------------
12.3             15.7              28.0
32.5             25.3              57.8
25.0             75.0             100.0

Q&A Session

13.8 When should I prefer a Statement object over a PreparedStatement or a CallableStatement?

You can remember the following points:
  • If you want to execute simple SQL statements (for example, select * from Table_name;” ), use a Statement object.

  • If you want to use precompiled statements, use PreparedStatement.

  • If you want to use stored procedures (or functions), use CallableStatement.

13.9 What is a stored procedure?

In simple words, if you want to repeat a sequence of tasks, you create a stored procedure. A stored procedure is much like writing a method in Java. The steps to create a stored procedure can vary across the databases.

In this chapter, I have used a simple function, total(), in Demonstration 4 to serve our needs.

13.10 You have used the term DDL in the context of SQL in some places. What does it mean?

SQL commands are commonly classified among the following:
  • DDL (Data Definition Language) statements are used to create or modify a database object’s structure. You use create, alter, drop, and truncate statements in this context.

  • DML (Data Manipulation Language) statements are used to retrieve, insert, update, and delete records in a database. For example, you use insert, update, delete, and select statements in this context. Some engineers prefer to put select statements in a separate category called DQL (Data Query Language).

  • DCL (Data Control Language) statements can be used to create various roles and permissions to control access to a database. For example, you may use grant and revoke statements in this context.

  • TCL (Transaction Control Language) statements are used to manage different transactions that occur in a database. For example, you may use commit, rollback, etc. statements in this context.

    Note As said before, to understand each of these terms in detail, you may need to exercise SQL statements on your own. In this chapter, our focus was not on detailed coverage of SQL; the focus was on Java applications that can simply talk to a database and perform some basic operations.

Demonstration 5

This demonstration shows the use of a javax.sql.DataSource interface object to connect to a datasource. It is a new addition to the JDBC 2.0 API and a preferred way to connect to a datasource. Using a DataSource object can provide connection pooling and distributed transactions. But since you are just starting your journey, we’ll focus on the the connection part only.

In Demonstration 5, the getMySqlDataSource() method is used. In this method, you create a MySqlDataSource object, set the database URL, and pass the user ID and password to connect to the database. Once this information is set, you can use this MySqlDataSource object to connect to the database.

You will understand the changes better if you compare Demonstration 5 with Demonstration 1. To make things simple, only a small portion of code in Demonstration 1 has been changed, and there is no significant change in the output. But you must take note of this new way of connecting to the database.

Before you proceed, I suggest you go through the following points.

Points To Remember

  • A DataSource object is used for a particular DBMS (or some other datasource, such as a file). If you need to use multiple datasources, you need to deploy a separate DataSource object for each of them.

  • The MysqlDataSource name has recently been changed from com.mysql.jdbc.jdbc2.optional.MysqlDataSource to com.mysql.cj.jdbc.MysqlDataSource.

  • The DataSource interface is available in the javax.sql package. It has two overloaded methods: Connection getConnection() throws SQLException and Connection getConnection(String username, String password) throws SQLException. You can use either of them.

  • The DataSource interface implementation may vary from vendor to vendor. This is why, to connect to a MySQL database, I imported the com.mysql.cj.jdbc.MysqlDataSource class to get the basic implementation of the DataSource interface. If you wish to connect to a different database, say, Oracle, you may need to import the oracle.jdbc.pool.OracleDataSource class.

So, when you compare with Demonstration 1, you see that this time you are NOT using the static getConnection() method of the DriverManager class to connect to the database called test. Instead, you are using the getConnection() method of a MysqlDataSource object. I have kept the old code in commented lines so that you can notice the key changes easily.
package java2e.chapter13;
import java.sql.*;
import javax.sql.DataSource;
/*
The name of the class that implements java.sql.Driver in MySQL Connector/J has changed from com.mysql.jdbc.Driver to com.mysql.cj.jdbc.Driver. The old class name has been deprecated. The names of these commonly used classes and interfaces have also been changed. For example, com.mysql.jdbc.jdbc2.optional is changed to com.mysql.cj.jdbc.MysqlDataSource
 */
import com.mysql.cj.jdbc.MysqlDataSource;
class Demonstration5 {
static DataSource getMysqlDataSource() throws SQLException {
             MysqlDataSource mysqlDataSourceOb = null;
             mysqlDataSourceOb = new MysqlDataSource();
             mysqlDataSourceOb.setUrl("jdbc:mysql://localhost:3306/test");
             mysqlDataSourceOb.setUser("root");// Set user id.
             mysqlDataSourceOb.setPassword("admin");// Set //password
             return mysqlDataSourceOb;
       }
public static void main(String[] args) throws SQLException {
             System.out.println("***Demonstration-5.Connecting to the MySql server using a DataSource object.***");
             Connection connectionOb = null;
             try {
                    // for MySql database
                    //Class.forName("com.mysql.cj.jdbc.Driver").newInstance();
                    // connectionOb =
                    // DriverManager.getConnection("jdbc:mysql://localhost:3306/test", "root", "admin");
                    connectionOb = getMysqlDataSource().getConnection();
                    /*
                    The following will also work if you do not supply username, password in getMysqlDataSource()
                    //connectionOb=getMysqlDataSource().getConnection( "root", "admin");
                    */
                    Statement statementOb = connectionOb.createStatement();
                    ResultSet queryResult = statementOb.executeQuery("select * from Employee");
                    System.out.println(" EmployeeId " + "EmployeeName " + "Age " + "Salary");
                    System.out.println("--------------------------------");
                    while (queryResult.next()) {
                           System.out.print(queryResult.getString("EmpId") + " " + queryResult.getString("Name") + " "
                                        + queryResult.getInt("Age") + " " + queryResult.getDouble("Salary"));
                           System.out.println();
                    }
             } catch (SQLException ex) {
                    System.out.println(ex.getMessage());
             }
             // To catch any other exception
             catch (Exception ex) {
                    System.out.println(ex.getMessage());
                    ex.printStackTrace();
             } finally {
                    // Close the connection
                    if (connectionOb != null) {
                           connectionOb.close();
                    }
             }
       }
}
Here is the output:
***Demonstration-5.Connecting to the MySql server using a DataSource object.***
 EmployeeId   EmployeeName   Age   Salary
------------------------------------------
1             Amit           25    1200.5
2             Sam            23    1000.25
3             Bob            30    1500.0

Summary

This chapter discussed the following topics:
  • What is JDBC?

  • What is a database?

  • What is a DBMS? What are different types of DBMS?

  • What is RDBMS?

  • What is SQL?

  • How can a Java application talk to a database?

  • How can you connect to MySQL?

  • How do you use Statement, PreparedStatement, and CallableStatement in your program?

  • How can you invoke a small function using a Connection object?

  • As per the new recommendation, how can you use a javax.sql.DataSource interface object to connect to a datasource?

..................Content has been hidden....................

You can't read the all page of ebook, please click here login for view all page.
Reset
3.144.41.134