CHAPTER 3
DOWNLOADING AND INSTALLING UNTANGLE
Can it really be that easy? Just download some software and all of a sudden you have a firewall and content filter that keeps the kids from going where they shouldn’t online or keeps the computers on a small business network free of malware?
To answer that question: No. It isn’t quite that easy. Most things that are free come at some sort of price, even if that price is just a bit more work than you might otherwise expect. However, making the leap from computer parts or repurposed PC to functional content filter and firewall isn’t as hard as you might expect.
START DOWNLOADING AND START BURNING
If you’ve ever installed a Linux operating system on a computer—whether as an experiment, to save money on a DIY system, to eke an extra bit of life out of an old system, or because you prefer the open source operating system—then you’ve probably burned an ISO image to a CD-ROM or DVD-ROM. The same goes for those of you who have managed and deployed volume-licensed software from Microsoft. You may have even made one if you created an archive of a home movie DVD or backed up software or music DVDs.
An International Organization for Standardization (ISO) image is an exact copy of an optical disk (a CD-ROM or DVD-ROM) that can then be written to a blank disk. These can also be written to USB drives, although the easiest method, using software that is generally already installed on most PCs, is to simply burn a CD or DVD from the image. The Mac OS Disk Utility, various Roxio software often installed on new PCs, and Free ISO Burner (http://www.freeisoburner.com/) for Windows will all create optical disks from disk images. Once you have an optical disk with the Untangle installation media on it, you’re ready for the next step.
An ISO, BIOS, and Boot Sequence Primer
For those of you who have never installed an operating system on a computer before, the idea of an ISO is important because it allows users to create CDs or DVDs from which computers can boot. I’m going to get extra basic here for a minute to make sure you’re on the same technical page, so (as with some sizeable chunks of this chapter) feel free to skim or skip the next couple of paragraphs if you frequently reimage computers, build or maintain computers for a living, or otherwise fully understand the boot process of a PC. Otherwise, read on for a quick primer.
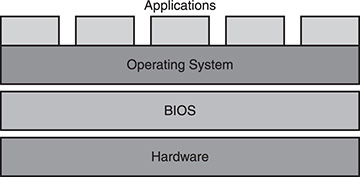
When a computer boots, it looks for an operating system to load into memory and launch all of the interfaces and functions with which you’re familiar. The operating system, or OS, provides the interface between users and the computer, between applications and the computer, and, to some extent, between users and applications. (See Figure 3.1.) Generally, the operating system resides on a hard disk, but most computers can also be set to look for CD-ROMs or DVD-ROMs that contain a bootable operating system or associated installer. The aforementioned ISO images contain just such a bootable operating system.
To set a computer to look at its optical drive for a bootable OS before it looks at its own hard drives, you may need to modify the BIOS. BIOS, which stands for basic input output system, essentially enables the OS and various peripheral devices to communicate at a basic level with the computer’s underlying hardware. Among other things, the BIOS establishes the order in which the computer checks for bootable devices. By default, most newer computers look first to their internal hard drives, then to optical drives, USB drives, 3.5-inch floppy drives (if present), and even to a computer network.
Schematic of a PC operating system.
If the PC in question was built from scratch and contains an empty hard drive, then the computer will skip the hard disk and pick up the optical drive—which, in your case, will contain an Untangle ISO. It will then jump automatically to the Untangle installer (more on that later). However, if the PC has been repurposed, recycled, or bought new with an operating system already installed, or if it becomes necessary to reinstall Untangle for whatever reason, then it will ignore the bootable CD or DVD in the optical drive and boot to Windows (or whatever OS was previously installed) unless the computer’s BIOS instructs it to look at the optical drive first.
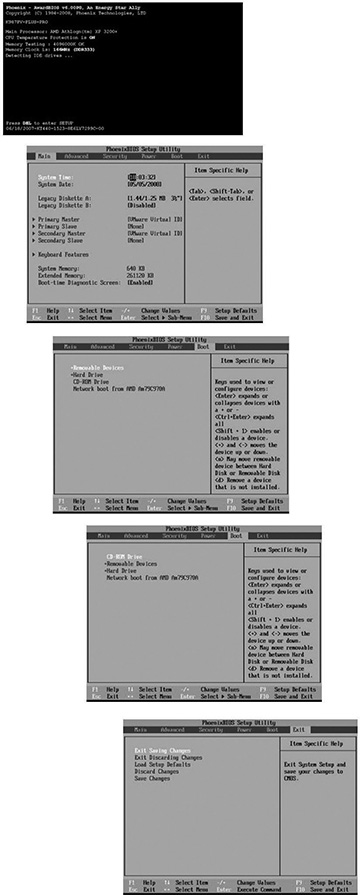
You access the BIOS settings immediately at system startup by pressing a particular key, which invariably is different for every computer you encounter (or build). Most PCs quickly display the required key to “Enter Setup” as they start; press this key (often Delete, F10, F12, or F2), and you will be presented with a BIOS setup interface. Again, this is rarely standardized and is not a graphical interface, meaning that it must be navigated with keystrokes. However, the necessary keystrokes are generally detailed somewhere on the screen; a bit of experimentation will yield a section of the setup application that allows users to change the boot sequence. Setting the optical drive to the first position will allow the computer to boot from a CD or DVD and run the Untangle install (or any OS install for that matter).
Figure 3.2 shows a common BIOS setup sequence for changing the boot order on a PC; the actual sequence and appearance will depend on the age of the computer and the manufacturer of its motherboard, but this figure gives a sense of the interface you can expect.
Yes, Untangle Is an OS
Untangle is not software that runs within an operating system like a typical antivirus utility. Rather, it’s a complete operating system that runs a number of applications designed to protect an entire network and handle a variety of networking functions. Untangle is based on Debian Linux (as are Ubuntu and Mint, the two most popular versions of desktop Linux) but bears little resemblance to what you typically think of as an operating system.
Untangle provides a very basic console to launch its services, shut down the machine, and assign simple options. Untangle has a built-in Web server and all administration happens via a Web browser. In fact, when the Untangle server is launched, a browser simply opens full screen and users never have to touch the underlying Untangle OS. More likely, users will be able to run the server “headless”—i.e., without a monitor, accessing the administrative tools from another PC. (Any Web browser on a PC connected to the network will work, as will remotely connected machines. I’ll cover remote administration and the setup required for access to the server from outside the network in Chapter 9, “Advanced Topics,” in the section on remote administration.)
Common BIOS interface for changing the boot order of a PC.
The key message here? Installing Untangle will wipe out anything that already existed on the computer you are using. It requires no additional software to run and, in general, is meant to run by itself on a dedicated computer, just as one would generally run Microsoft Windows by itself on a dedicated PC.
Choosing and Burning the Disk Image
Okay, disk-image experts, start reading again here.
All that background aside, it’s time to actually get the Untangle ISO and burn it to a CD or DVD. It doesn’t matter which medium you use; the ISO looks the same to a computer regardless. Obviously, if you are using DVDs, the computer doing the burning needs to have a drive capable of writing DVDs and the computer that will become the Untangle server needs to be able to read them.
You can download the Untangle ISO from www.untangle.com/get-untangle. It is available in both 32-bit and 64-bit versions. The 32-bit version will run on any PC hardware and is suitable for most applications. The 64-bit version is a better choice if you intend to process larger amounts of data or expect that your appliance will be used in more demanding settings (with a higher numbers of users, with greater volumes of traffic, etc.).
32-Bit Versus 64-Bit
As a rule of thumb, a 64-bit operating system is required to access 4GB of RAM or more. Untangle recommends 2GB of RAM or more for more than 150 users and 4GB of RAM for 500–1,500 users. Thus, as the number of users on your network approaches 150 users, you should plan to use 64-bit Untangle to ensure scalability. Smaller networks will not be negatively impacted by the use of 64-bit Untangle if you have an appropriate 64-bit processor.
If you aren’t sure which to pick, go with the 32-bit version. Performance will be indistinguishable for small office or home applications. The 64-bit download requires compatible hardware (all AMD Athlon, Phenom, Opteron, and FX processors and most Intel Core and Xeon processors; check manufacturer Web sites for details), but will scale better as loads increase and will be able to address larger amounts of system memory. (Anything greater than 3.5 GB of RAM requires a 64-bit OS to be available to the system; 32-bit versions will work if the PC has more RAM, but will not be able to recognize it.)
Once you download the ISO, instructions for burning the image to a DVD or CD vary by operating system, as well as by any software previously installed on the burning computer.
![]() In Windows 7 and 8, the Windows Disk Image Burner is included by default and can usually be accessed by right-clicking the ISO file. Many users have reported that the burner software is easily displaced by other software that can also burn image files, so an easy solution is to simply download the free ISO Recorder software at http:// alexfeinman.com/isorecorder.htm. It isn’t fancy, but works well.
In Windows 7 and 8, the Windows Disk Image Burner is included by default and can usually be accessed by right-clicking the ISO file. Many users have reported that the burner software is easily displaced by other software that can also burn image files, so an easy solution is to simply download the free ISO Recorder software at http:// alexfeinman.com/isorecorder.htm. It isn’t fancy, but works well.
![]() In Mac OS X, the Disk Utility will handle burning tasks. It can be found in the Utilities folder in Applications.
In Mac OS X, the Disk Utility will handle burning tasks. It can be found in the Utilities folder in Applications.
![]() Linux users can download any number of disk-burning applications using Apt, Synaptic, or whatever software management utility is installed in their particular choice of distributions; K3b is a particularly powerful and popular choice for disk burning on Linux.
Linux users can download any number of disk-burning applications using Apt, Synaptic, or whatever software management utility is installed in their particular choice of distributions; K3b is a particularly powerful and popular choice for disk burning on Linux.
Tip
A wide variety of available software can be found on CNET (http://download.cnet.com/1770-20_4-0.html? tag=mncol%3Bsort%3Bda&query=disk+burning+software&searchtype=downloads&filter=&sort=date Added +asc&rpp=10).
Follow the instructions specific to your software and create the CD or DVD and then read on.
INSTALLATION
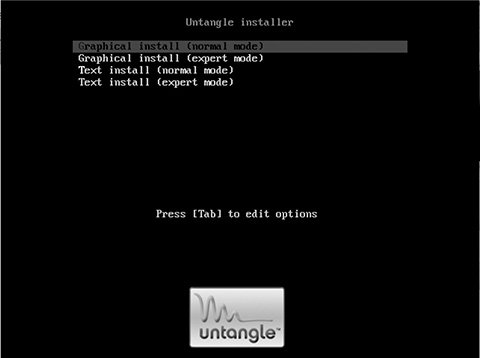
Once the BIOS setup is complete and the disk is burned, insert the disk into the Untangle server’s drive and restart it. When it boots, you will be greeted with the screen shown in Figure 3.3 (although on some hardware, this screen may take some time to appear).
The normal graphical install option is fine for most applications. Occasionally, if using very limited hardware with minimal graphics support or 500 MB or less of RAM, the text installer will be necessary. Expert mode provides access to advanced configuration options up front. You’ll set up the advanced options after the installation. (Advanced options are discussed later in this book.)
Pressing Enter launches a wizard with entirely self-explanatory options that will be very familiar to anyone who has installed a graphical Linux operating system before. Language, dialect, keyboard layout, and time zone selection screens all bring you to a system test screen. Untangle will scan your system hardware and alert you if there are hardware problems that will prevent Untangle from running (for example, insufficient memory or an inadequate processor).
Startup screen.
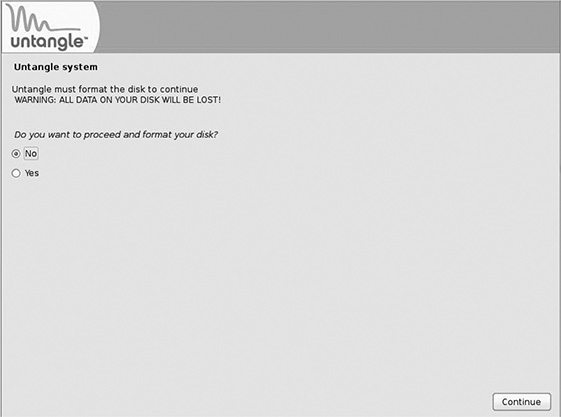
Assuming your hardware passes muster, click Continue. As shown in Figure 3.4, you will be asked if you want to proceed and format your disk. You don’t actually have a choice if you want the installer to continue, but it’s worth mentioning that this is the last chance to not erase the entire hard drive on the computer. While this is irrelevant for newly built PCs, any machines being repurposed should be completely backed up if there is any possibility that something of value may exist on the computer. Telling a lawyer—even in your cheeriest tone—that although three years of briefs were wiped out, the law firm is now protected from malware will not make you the IT hero that Untangle claims its solutions will on their Web site.
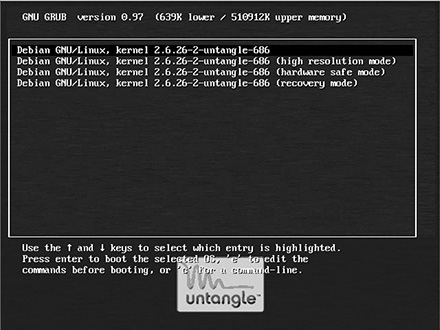
The Untangle installer will chug for a bit, formatting the hard drive and installing the OS. The time it takes to install will depend upon the hardware. When it has completed the installation, the installer will prompt you to remove the CD/DVD and will reboot automatically. If everything went as planned, you will be greeted with the GRUB boot loader screen when the computer reboots. (See Figure 3.5.) GRUB is a standard open source application for choosing from multiple operating systems or different interfaces to a single OS. In this case, you will be able to choose from high- and low-resolution versions of Untangle and two recovery options. The default low-resolution choice will be chosen automatically if you do nothing; this is generally the best choice anyway.
Last chance to save items that might be saved on a computer destined to be an Untangle appliance.
GRUB boot loader.
It may take as long as two to three minutes during the first boot after installation for the initial splash screen to be displayed. When the Untangle server boots, users gain access to a basic set of functions. Much of the underlying Debian Linux operating system is hidden and is of no real concern (unless users have an interest in advanced uses of the Untangle appliance or extending the functionality of the software).
As shown in Figure 3.6, users are presented with eight choices after boot:
![]() Launch Client
Launch Client
![]() Change Resolution
Change Resolution
![]() Turn On Screensaver
Turn On Screensaver
![]() Turn Off Screensaver
Turn Off Screensaver
![]() Reboot
Reboot
![]() Shutdown
Shutdown
![]() Recovery Utilities
Recovery Utilities
![]() Terminal
Terminal
Opening splash screen.
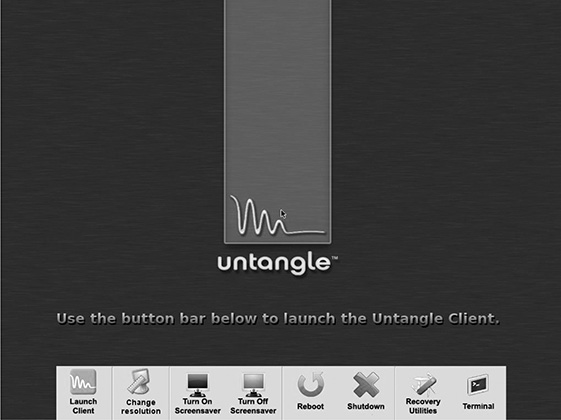
The “client” to be launched is nothing more than a Web browser configured to display a Web front end to Untangle. It runs in the open source browser Iceweasel, which, as its name suggests, will be very familiar to Firefox users. This browser can be minimized, enabling users to access a stripped-down version of the Debian desktop, but at this point, let’s focus on the browser.
The Change Resolution, Turn On Screensaver, Turn Off Screensaver, Reboot, and Shutdown buttons are self-explanatory, and the latter two may be the only buttons you ever need to click on this screen. The recovery utilities are available to advanced users who need to repair broken or corrupted installations. The Terminal button launches a command prompt and is the most direct means of accessing the OS.
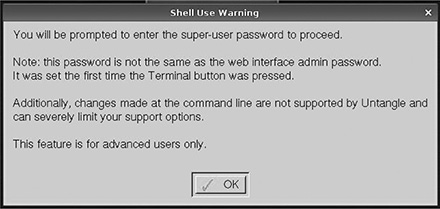
This leads to a brief digression from the flow of installing Untangle to provide a warning and a glimpse into the underlying operating system. The use of the terminal requires a reasonable understanding of Linux to be useful—or, in fact, to be something that anyone should attempt to access. The terminal is the most robust way to manipulate the file system, providing so-called “root” access to the server. In Linux nomenclature, the root user is a super-administrator with the ability to change, manage, override, or otherwise manipulate functions of the operating system, security settings, and file management. The root user, not surprisingly, can do a lot of damage. An experienced Linux administrator, however, would be crippled without root access at a terminal shell and could easily extend the functionality of an Untangle server or perform advanced troubleshooting from the command line. Even you will use it to diagnose potential networking issues, but you must take care when accessing the OS in this way.
The first time the terminal is launched, users are prompted to create a root password (see Figure 3.7). Note that this is different from the Untangle administrator password that you will create in the next section. It should be a strong password and kept someplace where you will be able to find it later. If it’s already been set and you need to access the terminal again but can’t remember it, you will need to reinstall Untangle.
Returning to the installation flow, on the first boot of the operating system, Iceweasel will launch automatically after a few seconds and prompt users to complete the system setup, all of which happens in the browser from here on. (See Figure 3.8.) On subsequent boots, the user will need to click the Launch Client button in the splash screen to access Untangle (or any of the other buttons described earlier to access additional functions). However, even when the browser window is active, it can be dragged to the bottom of the screen so that users can access the splash screen and shut down the computer, launch a terminal session, etc.
Dire warnings about accessing the command prompt.
Browser-based setup begins.
The initial part of the setup requires little explanation. Selecting a time zone, language, etc., is a standard part of any operating-system setup. You will also be prompted to create a password for the Admin user (not the super-administrator mentioned in the earlier discussion of the terminal prompt, but the main administrative user of Untangle). This should be a very strong password given that Untangle is ultimately responsible for the security of your network. A weak password would expose the network to intrusion and could also allow determined users to bypass content filtering and other restrictions on the use of the network. Best practice dictates that this password be at least eight characters long and include both upper- and lower-case letters, numbers, and special characters.
The next step, however, is where the Untangle-ness appears in the setup. At this point, you must map the multiple network interfaces to their various possible functions. Before you do, let’s take a step back to talk about identifying them and examine the function of each (depending upon how many were installed).
ETH1? ETH0? WHAT DO I PLUG IN WHERE?
Linux designations for network connections will look a bit unfamiliar to those accustomed to Windows and Mac operating systems. Particularly in Untangle, though, given the number of connections you will be supporting and the varied roles they may take on, the nomenclature and assignments are important. They are, however, not terribly intuitive.
Figure 3.9 shows the network interface detection screen. Untangle presents all active interfaces that it can detect and shows whether they are connected to a cable. Notice that Figure 3.9 shows three interfaces, as suggested in Chapter 1, “Getting a Computer.” Your setup will show only two if that is all you installed. Regardless of how many interfaces are installed (Untangle can support up to seven physical network connections, but must have a minimum of two), Linux numbers them sequentially, with the prefix eth and beginning with the number 0. Thus, the three interfaces on the test machine pictured in Figure 3.9 are eth0, eth1, and eth2. If any of the interfaces are wireless (neither preferred nor recommended, but workable in specific situations), they will also be numbered sequentially from 0, but with the prefix wlan.
As the setup screen suggests, it isn’t always possible to know which designation (i.e., eth0, eth1, etc.) corresponds to which actual jack in the Untangle server. However, because each is capable of serving a distinct function, it is important to know which is which—particularly at this step, where those distinct functions are assigned at a very basic level. The only way to actually know which physical interfaces map to particular logical interfaces (where physical refers to the network jack itself and logical refers to the eth/wlan interfaces used by the OS) is trial and error.
As noted, computers and motherboards frequently come with an integrated Ethernet jack. Often, these end up being eth0, while add-on cards are assigned subsequent numbers.
Identifying network interfaces.
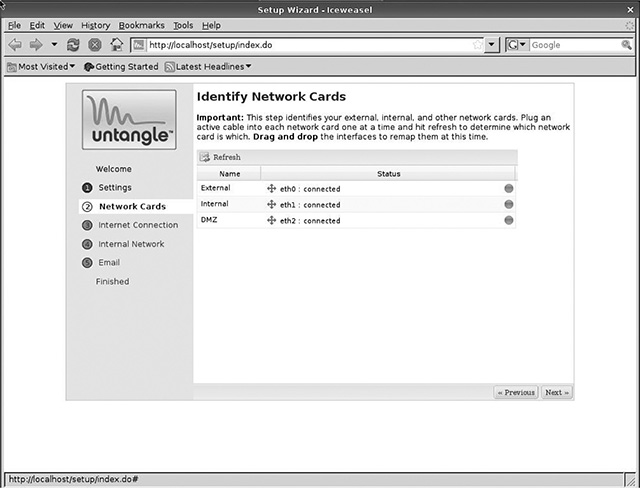
However, the steps outlined on the setup screen are a better means of accurately determining mappings:
1. Unplug any network cables.
2. Plug a single cable into your modem/router.
3. Click the Refresh link on the setup page. Only one interface should show a “connected” status.
4. Repeat this process until all connections have been identified.
These jacks should be labeled physically on the box with their logical identifiers so they can be connected to appropriate network segments when setup is complete. Notice that you have the option to remap the logical interfaces to particular functions in this screen by dragging and dropping them. Thus, eth0 could be remapped to the DMZ, for example. (More on what that means shortly.) While it rarely matters which physical interface has which function on the server as long as the mappings are known, there may be some cases related to the location of the jack or a particular arrangement in which it simply makes sense to assign a specific physical/logical mapping to a certain function. In general, though, all that is necessary is to document which jack is assigned to the internal and external interfaces (and any other interfaces that might be present).
ISN’T THE DMZ IN KOREA?
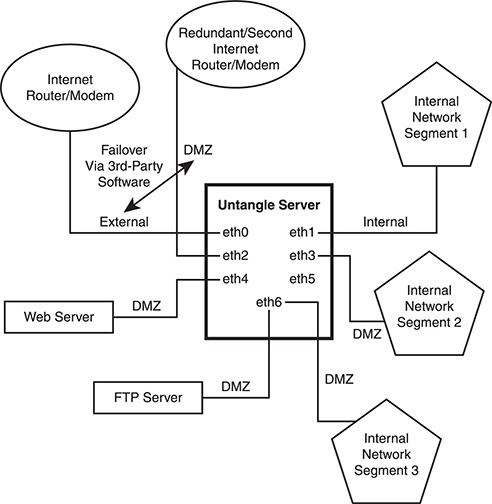
So what exactly are those functions? The internal and external interfaces are intuitive, but DMZ may not be. The DMZ is not just the demilitarized zone between North and South Korea established at the end of the Korean War, but also a quarantined network location where best practices dictate that publicly facing computers be located. These computers most often include Web and FTP servers.
If you only have two network interfaces, the DMZ won’t appear. If, however, you have more than three interfaces, then—in addition to the default internal, external, and DMZ interfaces—you can choose whether the extra interfaces are used to connect to the Internet (external), connect to a network segment (internal), or provide more DMZs. Note that using more than one external interface requires additional paid modules from Untangle (see the section on load balancing and bandwidth aggregation in Chapter 9).
Figure 3.10 illustrates the extreme case of seven interfaces with theoretical use cases for each. Figure 3.10 shows types of interfaces and their potential functions. Notice that once you get beyond internal, external, and the first DMZ interface, all other interfaces are referred to as “DMZ” by Untangle, even if they are not serving a DMZ function. The external interface, though, should always be used to connect Untangle to the Internet, and the internal interface should always connect to at least one of the internal “networks.” (This can be a single computer or device if appropriate.)
Web servers and other computers can be located on a single DMZ, but as you will discover soon, there may be situations in which one would want to apply different rules to different servers. This is most easily accomplished with separate interfaces. Similarly, connecting separate networks to different interfaces provides the most expedient (and the most efficient, in terms of managing traffic) means of applying different rules to different groups of computers.
As a simple example, a parent could have an interface connected to a wireless router to which only he or she has the password. Another interface could be connected to a wireless access point that only the kids use. Traffic on the parent’s router could be prioritized and otherwise unfiltered, while traffic from the kids’ interface could be deprioritized and filtered for explicit content and illegal file sharing. There are more sophisticated ways of accomplishing this in Untangle with a single interface, but often, pairing the physical interface with logical rules and policies or functions can create the simplest, most robust experience—particularly for less technical users (to which Untangle and this book should appeal).
Figure 3.10
What to do with all of those interfaces.
FINISHING THE INSTALL AND INITIAL CONFIGURATION
At this point, the Web-based installation is nearly finished. A few key steps remain, however. The next screen prompts users to determine how the IP address of the external interface is set. The options are static, dynamic, or PPPoE. (See Figure 3.11.)
Choosing the external interface connection type.
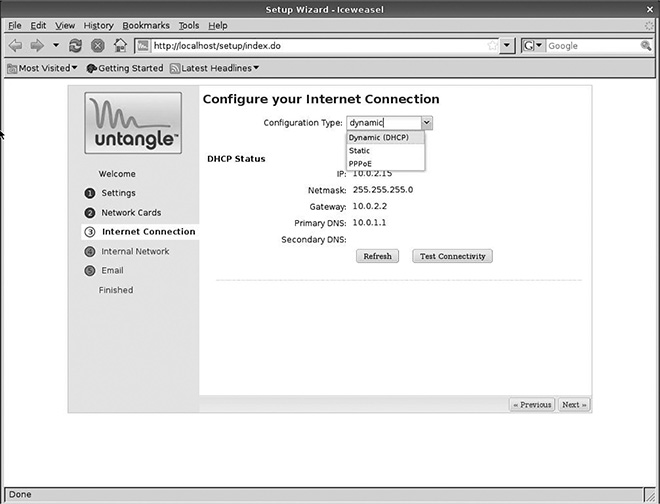
For a static IP address, the user sets an address and other related DNS and gateway information manually. This information will be provided by your ISP if you’ve paid for a static IP address as part of your Internet service (this is uncommon for consumer-grade service but very common for business-class service). This is quite useful in larger networks and makes remote administration of the Untangle server much easier, as well as facilitating remote access to other network resources. Keep in mind that Untangle can be set up as gateway to an internal network segment, as well—e.g., only a portion of the network is filtered or managed by the Untangle appliance. The external IP address used for this portion of the setup will then be obtained from the organization’s network administrator if he or she chooses to assign it a static IP.
More often for home users and small businesses, the external IP address is assigned by the ISP dynamically, just as individual nodes on most networks often receive their addresses via DHCP. In this case, simply choose Dynamic when setting up the external connection and Untangle will negotiate a connection and obtain an IP address from the ISP.
Untangle gets an external IP address on the fly that DNS (handled somewhere on the network, potentially by Untangle, but more likely by the router) resolves as needed for other computers to communicate with the server. This is a reasonable choice if Untangle is intended to act only as a content filter rather than implementing all of its gateway functions, particularly if the filtering will only happen inside a network (i.e., not for mobile devices that will access Untangle as a proxy server).
The final option is not recommended by Untangle and would rarely be necessary, but Untangle does support Point-to-Point Protocol over Ethernet (PPPoE). This is required when there is no modem or router present to handle negotiation of communications with certain types of Internet service. Its configuration and use are outside the scope of this book; it is assumed that a transceiver will be enabled on all networks so that PPPoE isn’t necessary.
After users select either a static or dynamic IP configuration for the external interface, they must choose whether the server will act as a transparent bridge or a router. (See Figure 3.12.)
Bridge versus router.
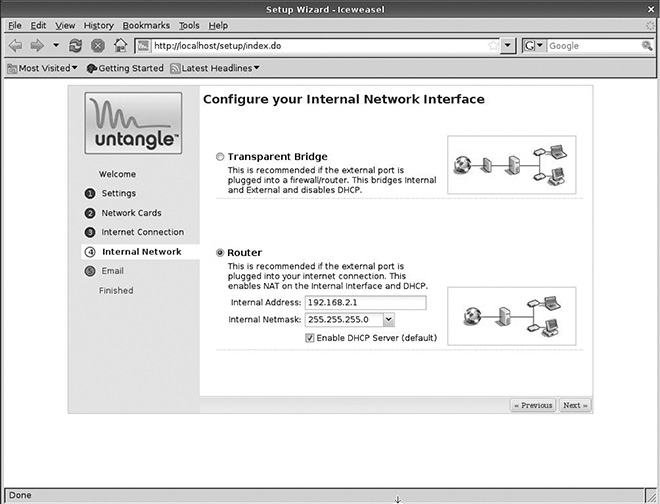
Because this fundamentally affects the function of the Untangle server, it’s worth a few moments of consideration. In Transparent Bridge mode, traffic is simply routed through the server and anything behind the server on a configured interface is filtered or managed by Untangle. Overall addressing and routing of traffic across the network is handled by another device (typically a dedicated router or firewall or a modem with routing capabilities). This is appropriate if the server will largely be used for content filtering or if there are network segments where filtering, protection, or other types of intervention are either unimportant or take a back seat to ultimate performance—for example, if the network already has a router and a Web server (that would otherwise not require filtering anyway) with heavy traffic that must be exposed to the Internet. The Web server would not even be attached to a DMZ interface, while segments of the network with user devices would have content and malware filtering enabled. This is also an easy default setup in home or test setups where most users are likely to already have a router in place and another router could cause conflicts and unwanted traffic slowdowns.
Untangle, however, is capable of functioning as a full-blown router and firewall. The Router option assumes that whatever transceiver is connecting the network to the Internet does not have any routing functions enabled. Untangle is then the first device connected to the transceiver (a CSU/DSU, a modem with routing disabled, or another device that simply makes a connection to the Internet without further handling of IP traffic). This is one area where Untangle can save larger organizations a fair amount of money by combining the functions of separate expensive devices. If you are looking for “one device to rule them all” (to paraphrase Tolkien), then you should choose the Router setup.
Most of the internal workings and administration of Untangle remain unchanged regardless of the setup chosen. Routing simply adds a new layer of functionality and is the most robust, cost-effective setup. Therefore, the remainder of this book assumes that the router function was chosen at setup unless otherwise noted.
Once this function is determined in the setup, Untangle runs through final, self-explanatory housekeeping steps and then reboots. The initial splash screen again appears after reboot and choosing to launch the client brings users to the main Web-based administrative interface where you will spend the remainder of this book.
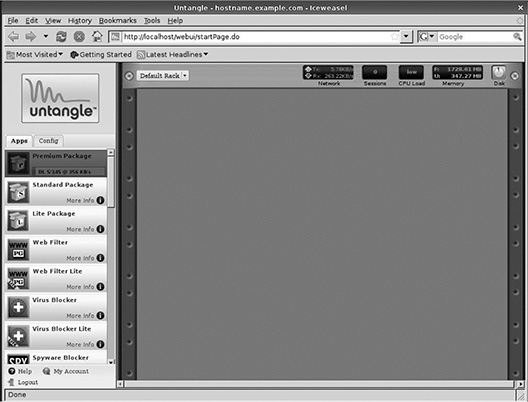
RUNNING THE SOFTWARE: BASICS OF THE UI
As noted before, all administration of an Untangle server takes place in a browser. (Look ahead to Figure 3.15.) Before users reach this interface, they will be prompted to create an Untangle account. This account is used on the Untangle Web site and allows the server to download updates, patches, and additional packages directly from Untangle servers. A brief wizard leads users through the account creation and prompts them to install either a “recommended” or “custom” configuration. (See Figure 3.13.) The recommended configuration installs a variety of modules automatically in Untangle, most of which are free. Paid modules are not open source and can be activated if users choose to pay for them. These are covered in detail in Chapter 9, in the section about paid features. For now, choose the recommended configuration and, once through the creation of an Untangle account, click the Install Now button (see Figure 3.14).
Choosing a pre-configured package of apps.

Again, a number of things happen automatically and in the background. The end result is the user interface shown in Figure 3.15. Untangle presents to users an imaginary rack of virtual devices representing installed software. These devices are accessed in the left pane of the interface. The pane has two tabs: Apps and Config. The Apps tab shows the installed software and the Config tab gives users granular control of the various networking tools that were set up either during installation or automatically by Untangle. The right pane is empty at this point, but clicking the individual apps or sections of the Config tab will populate the pane with setup screens and options for all server functions. The actual setup of these individual components is covered in Chapter 4, “What’s Happening Inside My Untangle Gateway?”
The Install Now button.
Figure 3.15
The Untangle user interface.