© The Author(s), under exclusive license to APress Media, LLC, part of Springer Nature 2022
N. VermeirIntroducing .NET 6https://doi.org/10.1007/978-1-4842-7319-7_10

10. .NET Compiler Platform

Nico Vermeir1  
(1)
Merchtem, Belgium
 

A part of the strength and flexibility of .NET comes from its compiler platform. Most people have known it under its project name Roslyn. With the compiler platform, developers can analyze their code, enforce coding guidelines, and more. Besides Roslyn, Microsoft has also introduced source generators. Source generators leverage Roslyn to generate code at compile time and include that generated code into the compilation.

Roslyn

Developers rely heavily on their tools to help their development. Just look at what Visual Studio does to help you write better code, or look at the rich ecosystem of Visual Studio extensions. IDE features like IntelliSense and Find All References need an understanding of the current code base; this is typically information that a compiler can provide. Compilers used to be black boxes that took your source code and transformed it into, in our case, intermediate language. With Roslyn, Microsoft aimed to open up the compiler platform and provide it with an API set for everyone to use to write code enhancing tools.

With Roslyn, we can write analyzers and code fixes. Analyzers look at your code and notify you when you write a piece of code that is not according to what the analyzer knows. .NET even ships with a default set of Analyzers; just open a new .NET 6 project and use solution explorer to have a look at Dependencies ➤ Analyzers, as shown in Figure 10-1.
Figure 10-1

Built-in analyzers

As you can see, Roslyn can provide numerous checks for best practices. The different icons point to the different severity levels of the checks. Some are warnings; others are errors and will cause builds to fail. Code fixes on the other hand provide proposals to the developer on how to refactor the code to fix an analyzer warning. A code fix can, for example, turn a For Each block into a simple LINQ statement by the push of a button. Figure 10-2 shows an example of this.
Figure 10-2

Using an analyzer to convert a For Each to LINQ

Roslyn ships with an SDK. That SDK provides us with all the tools we need to hook into the compiler pipeline. From the SDK we get compiler APIs, diagnostic APIs, scripting APIs, and workspace APIs.

Compiler API

The Compiler API contains the actual language-specific code compiler; in case of C#, this would be csc.exe. The API itself contains object models for each phase in the compiler pipeline. Figure 10-3 shows a diagram of the compiler pipeline.
Figure 10-3

Compiler pipeline (Source: Microsoft)

Diagnostic API

The diagnostic API is what gives us the “squiggly lines” in our code. It’s an API that analyzes syntax, assignments, and semantics based on Roslyn analyzers. It generates warnings or errors. This API can be used by linting tools to, for example, fail a build when certain team guidelines are not respected in a pull request.

Scripting API

This is part of the compiler layer and can be used to run code snippets as scripts. This is used by, for example, the C# Read, Evaluate, Print Loop, or REPL to run snippets of C# against a running assembly.

Workspace API

The workspace API provides the entry point for code analysis and refactorings over entire solutions. It powers IDE functions like Find All References and Formatting.

Syntax Tree

The syntax tree is a data structure exposed by the compiler API. It’s a representation of the syntax structure of your code. The syntax tree enables tools to process and analyze the structure of your code. Using the syntax tree add-ins and IDE software can detect patterns in your code and change it when deemed necessary. A syntax tree has three characteristics:
  • It contains the full information of the code that was typed by the developers, including comments, compiler pre-directives, and whitespaces.

  • The exact original code can be reconstructed from a syntax tree. A syntax tree is an immutable construct that was parsed from the original source code. In order to provide the full power of analytics and code refactoring, the syntax tree needs to be able to reproduce the exact code it was parsed from.

  • Syntax trees are thread-safe and immutable. A syntax tree is a state snapshot of the code. In-framework factory methods make sure that requested changes are pushed back to the code and a new syntax tree is generated based on the latest state of the source code. Syntax trees have a lot of optimalizations in place so that new instances of a tree can be generated very fast with little memory use.

Roslyn SDK

As mentioned before, Roslyn is extendable. To be able to develop your own Roslyn analyzers, you need to install the Roslyn SDK. The SDK is part of the Visual Studio installer; it’s available as an optional item as seen in Figure 10-4.
Figure 10-4

Installing the .NET Compiler Platform SDK

With the SDK comes the Syntax Visualizer. The Syntax Visualizer is an extra window in Visual Studio, under View ➤ Other Windows ➤ Syntax Visualizer, that lays out the syntax tree of the current open code file in Visual Studio. Its position synchronizes with your cursor in the source file. Figure 10-5 shows the visualizer docked to the side in Visual Studio 2022.
Figure 10-5

Syntax Visualizer

Figure 10-6

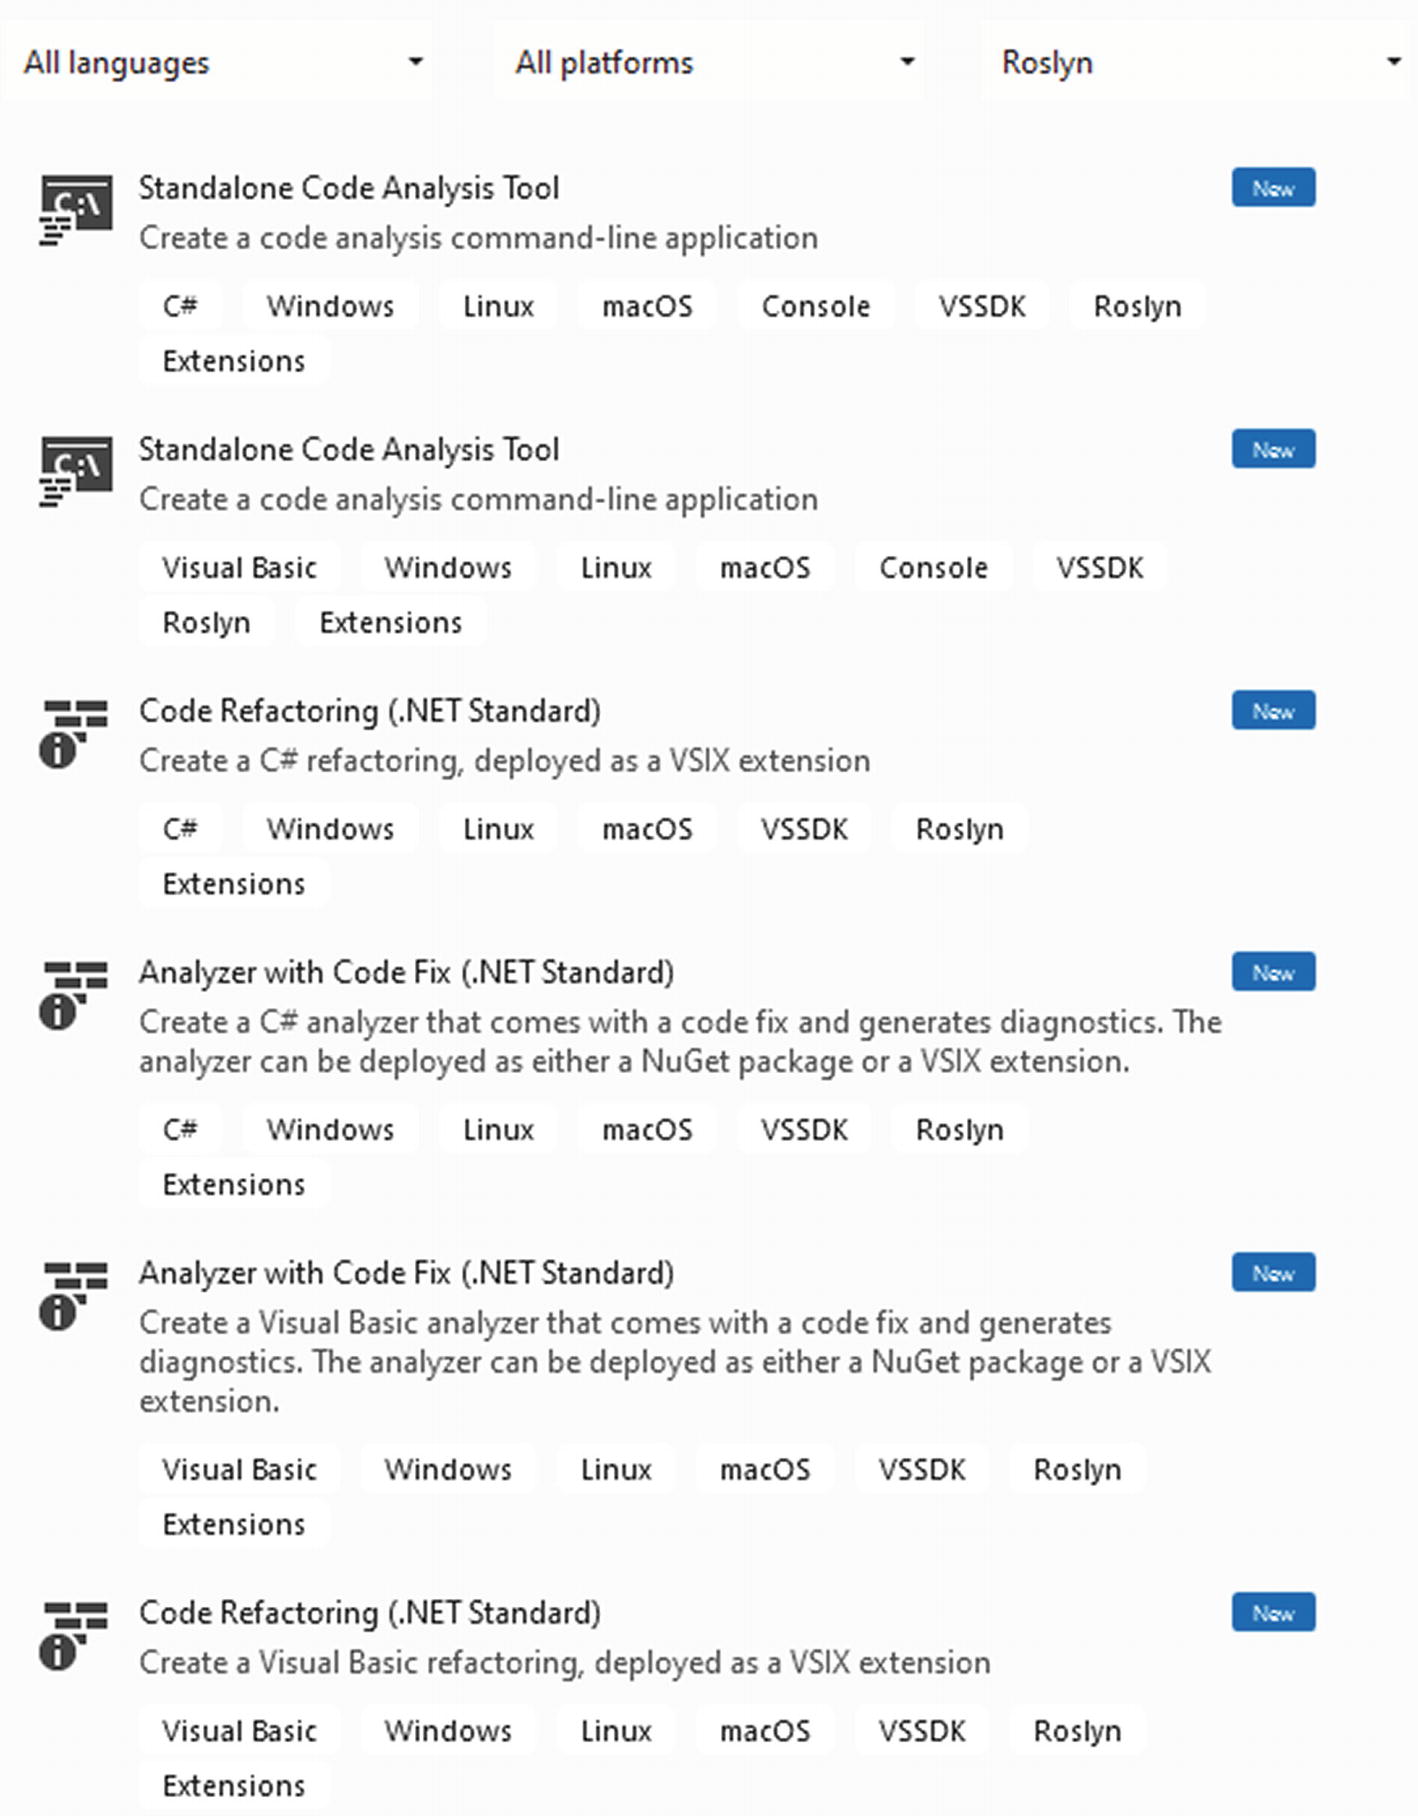
Roslyn project templates

The Syntax Visualizer is a great visual aid when working with the syntax tree. After installing the .NET Compiler Platform SDK, you will have access to new project templates in Visual Studio.

With these templates, you can build your own analyzers, code fixes, or code refactorings, both as a stand-alone console application and as a Visual Studio extension in the VSIX format. These templates are available for both C# and Visual Basic.

Creating an Analyzer

Let’s create a stand-alone code analysis. Notice that the code analysis tools need to be written in .NET Framework; don’t worry about that; they do support analyzing .NET 6 code. The default template queries the available version of MSBuild on your system and lists them to select which version you want to analyze code against. Figure 10-7 shows the default output when we run the unchanged template; this list might be different for you depending on what is installed on your system.
Figure 10-7

Listing the available MSBuild instances

The logic of detecting MSBuild instances is abstracted away by the Roslyn SDK; all we need to do is call MSBuildLocator.QueryVisualStudioInstances().ToArray() to get a list of versions installed. Let’s empty the Main method and start implementing a code analyzer ourselves.

When analyzing code, we will need a SyntaxTree object. A SyntaxTree holds a parsed representation of a code document. In our example, we will inspect a piece of code and print the using statements in the console. Once we have our syntax tree parsed, we can extract a CompilationUnitSyntax object. This object represents our code document, divided into members, using directives and attributes.

Listing 10-1 shows how to get the syntax tree and compilation unit from a piece of code.
static Task Main(string[] args)
{
    const string code = @"using System; using System.Linq; Console.WriteLine(""Hello World"");";
    SyntaxTree tree = CSharpSyntaxTree.ParseText(code);
    CompilationUnitSyntax root = tree.GetCompilationUnitRoot();
Listing 10-1

Generating the syntax tree and compilation unit

We are using a very simple code example to get the point across. We parse the code into a SyntaTree and extract the CompilationUnitRoot from there.

Next we will need a CSharpSyntaxWalker object. A syntax walker is an implementation of the Visitor design pattern. The Visitor pattern describes a way to decouple an object structure from an algorithm; more information on the pattern is found at https://en.wikipedia.org/wiki/Visitor_pattern.

The CSharpSyntaxWalker class is an abstract class so we will need to create our own class that inherits from CSharpSyntaxWalker. For this example, we add a class called UsingDirectivesWalker. Listing 10-2 shows the code for this class.
class UsingDirectivesWalker : CSharpSyntaxWalker
{
    public override void VisitUsingDirective(UsingDirectiveSyntax node)
    {
        Console.WriteLine($"Found using {node.Name}.");
    }
}
Listing 10-2

Custom using directive syntax walker

In this example, we are overriding the VisitUsingDirective method from the CSharpSyntaxWalker base class. The base class comes with many override methods that each visits a specific type of syntax nodes. The VisitUsingDirective method visits all using directives in our syntax tree. The complete list of methods that can be overwritten is found at https://docs.microsoft.com/en-us/dotnet/api/microsoft.codeanalysis.csharp.csharpsyntaxwalker.

For each using node we visit, we print its name. All there is left now is to use this custom syntax walker. Listing 10-3 shows the complete Main method.
static Task Main(string[] args)
{
    const string code = @"using System; using System.Linq; Console.WriteLine(""Hello World"");";
    SyntaxTree tree = CSharpSyntaxTree.ParseText(code);
    CompilationUnitSyntax root = tree.GetCompilationUnitRoot();
    var collector = new UsingDirectivesWalker();
    collector.Visit(root);
    Console.Read();
    return Task.CompletedTask;
}
Listing 10-3

Using the UsingDirectivesWalker

We instantiate our new syntax walker class and call its Visit method, passing in the CompilationUnitSyntax. This triggers the methods in the CSharpSyntaxWalker base class, from which one is overwritten in our own syntax walker class. This results in the output visible in Figure 10-8.
Figure 10-8

Analyzer output

This has been a very simple example of how to extract a specific piece of code from a code snippet. This should help you get started with Roslyn. If you want to read more and dive deeper into Roslyn, the complete Roslyn documentation is a great resource: https://docs.microsoft.com/en-us/dotnet/csharp/roslyn-sdk/.

Source Generators

A recent addition to the Compiler Platform is source generators. Source generators run during the compilation of your code. They can generate extra code files based on analysis of your code and include them in the compilation.

Source generators are written in C#; they can retrieve an object that is a representation of the code you have written. That object can be analyzed and used to generate extra source files based on the syntax and semantic models that are in the compilation object. Figure 10-9 shows where in the compilation pipeline the source generators live.
Figure 10-9

Compiler pipeline (image by Microsoft)

Source generators can be used to prevent the use of reflection. Instead of generating runtime classes, it might be possible to generate extra classes at compile time, of course depending on your use case. Being able to generate extra classes at compile time instead of runtime almost always means a performance increase. It is important to know, and remember, that source generators can only generate and inject extra code; they cannot change the code that was written by the developer.

Writing a Source Generator

Let us look at an example. For the example, we are going to write a source generator that takes any class that is decorated with a certain attribute and generate a record-type DTO from that class; DTOs are explained in more detail in the previous chapter. We will keep it quite simple for this demo generator, so do not worry about violating any DTO best practices in the generated code.

Source generators work with .NET 6 projects, but they need to be defined in a .NET Standard 2.0 library at the time of writing. After creating a .NET Standard 2.0 class library, we add a class that implements ISourceGenerator. To get the ISourceGenerator, we first need to install the Microsoft.CodeAnalysis NuGet package. Listing 10-4 shows the interface with its members.
public interface ISourceGenerator
{
    void Initialize(GeneratorInitializationContext context);
    void Execute(GeneratorExecutionContext context);
}
Listing 10-4

ISourceGenerator interface

ISourceGenerator consists of two methods. The Initialize method sets up the generator, while the Execute method does the actual generating of code.

For testing our generator, we will create a .NET 6 console application. After creating the project, we start by defining a very simple attribute. Listing 10-5 shows the attribute declaration.
internal class GenerateDtoAttribute : Attribute
{
}
Listing 10-5

Defining the attribute to filter on

We only need this attribute to do filtering at the time of generating, so no extra implementation is needed on the attribute class. Finally we add some classes and decorate them with the GenerateDto attribute, as shown in Listing 10-6.
[GenerateDto]
public class Product
{
    public string Name {  get; set; }
    public string Description {  get; set; }
    public double Price{  get; set; }
}
Listing 10-6

Example of a decorated class

Next we turn to the .NET Standard 2.0 project to implement our source generator. First thing we need to do is identify what classes are decorated with the GenerateDto attribute . To do this, we need to traverse the syntax tree and inspect the class nodes; this is done by an object called a Syntax Receiver. Syntax Receivers are objects that visit nodes and allow us to inspect them and save them to a collection that can be used for generating code. The Syntax Receivers are configured in GeneratorExecutonContext’s SyntaxReceiver property . The GeneratorExecutonContext is an object that gets passed into the Initialization of a source generator, which we will get to in a moment. Every time the source generator runs, it creates exactly one instance of its Syntax Receiver, meaning that every inspected node is done by the same receiver instance. Listing 10-7 demonstrates a Syntax Receiver that filters out class nodes that are decorated with our GenerateDto attribute.
internal class SyntaxReceiver : ISyntaxReceiver
{
    public List<ClassDeclarationSyntax> DtoTypes { get; } = new List<ClassDeclarationSyntax>();
    public void OnVisitSyntaxNode(SyntaxNode syntaxNode)
    {
        if (!(syntaxNode is ClassDeclarationSyntax classDeclaration) || !classDeclaration.AttributeLists.Any())
        {
            return;
        }
        bool requiresGeneration = classDeclaration.AttributeLists.Count > 0 &&
                classDeclaration.AttributeLists
                .SelectMany(_ => _.Attributes.Where(a => (a.Name as IdentifierNameSyntax).Identifier.Text == "GenerateDto"))
                .Any();
        if (requiresGeneration)
        {
            DtoTypes.Add(classDeclaration);
        }
    }
}
Listing 10-7

SyntaxReceiver

A Syntax Receiver is a class that implements the ISyntaxReceiver interface. The interface contains one member, an OnVisitSyntaxNode method. This method will be executed for every node in the syntax tree build by the Compiler Platform SDK. In this implementation, we inspect every node to see if it is of type ClassDeclarationSyntax. There are declaration syntax types for every type of node we can expect, including ClassDeclarationSyntax, InterfaceDeclarationSyntax, PropertyDeclarationSyntax, and so on. Once we have a ClassDeclarationSyntax that contains attributes, we use LINQ to check if the class contains our custom attribute. Once we have the IdentifierNameSyntax, we can verify if it has the name of the attribute we are filtering on, in this case GenerateDto. At this point, we have successfully detected a class that was decorated with the GenerateDto attribute, but we are not generating code yet; we are just traversing the syntax tree; that is why we save the found class nodes in an immutable property. The syntax receiver is single instance for every generator run anyway, so we can safely use properties to bring data from the receiver to the generator.

Let’s have a look at implementing the actual generator. We’ll start with the Initialize method that is part of the ISourceGenerator contract.
[Generator]
public class MySourceGenerator : ISourceGenerator
{
    public void Initialize(GeneratorInitializationContext context)
    {
        context.RegisterForSyntaxNotifications(() => new SyntaxReceiver());
    }
Listing 10-8

Initializing a source generator

In a source generator, a GeneratorInitializationContext object is passed into the Initialize method and a GeneratorExecutionContext is passed into the Execute method; this allows the Initialize method to, well, initialize the source generator. In this example, we use it to register our SyntaxReceiver into the generator pipeline. From this point on, whenever the generator runs, it will pass every syntax node through the receiver. The Execute method runs as part of the compilation pipeline whenever a source generator is installed into a project.
public void Execute(GeneratorExecutionContext context)
{
    if (!(context.SyntaxReceiver is SyntaxReceiver receiver))
    {
        return;
    }
Listing 10-9

Checking for the receiver

Our Execute method only works when the context contains the correct receiver. A quick typecheck makes sure everything is in order.
foreach (ClassDeclarationSyntax classDeclaration in receiver. DtoTypes)
{
    var properties = classDeclaration.DescendantNodes().OfType<PropertyDeclarationSyntax>();
    var usings = classDeclaration.DescendantNodes().OfType<UsingDirectiveSyntax>();
Listing 10-10

Grabbing properties and using statements

Next we loop over the list of class declarations we have captured in the receiver. By the time we get to this point in the code, the receiver will have done its work and the list will be filled with class declarations of classes that are decorated with the GenerateDto attribute . From every class declaration, we grab the properties, by looking for nodes of type PropertyDeclarationSyntax and the using directives by looking for UsingDirectiveSyntax. We need these because if we are going to generate records for every class, we need to know the properties so we can copy them and the using directives so that all the types can be resolved in their namespaces.
var sourceBuilder = new StringBuilder();
foreach (UsingDirectiveSyntax usingDirective in usings)
{
    sourceBuilder.AppendLine(usingDirective.FullSpan.ToString());
}
Listing 10-11

Generating the using directives

In Listing 10-11, we finally start generating code. We are using a StringBuilder to write out the entire code file before inserting it into the code base. First things to generate are the using directives. We already have a collection containing them, so we simply loop over the directives and call the AppendLine method to write it out. We use the FullSpan property on the UsingDirectiveSyntax; that property contains the entire instruction the node was parsed from, for example, using System.Linq.
var className = classDeclaration.Identifier.ValueText;
var namespaceName = (classDeclaration.Parent as NamespaceDeclarationSyntax).Name.ToString();
sourceBuilder.AppendLine($"namespace {namespaceName}.Dto");
sourceBuilder.AppendLine("{");
sourceBuilder.Append($"public record {className} (");
Listing 10-12

Generating namespace and class declarations

The next things we need are namespace and record declarations. We can get those from the class declaration we are currently processing. The class name can be found in the Identifier property of the ClassDeclarationSyntax object. In this example, we are assuming that there are no nested classes, so the parent object of a class should always be a namespace object. By casting the parent object as a NamespaceDeclarationSyntax object, we can get to the Name property. Using the StringBuilder from Listing 10-11 and some string interpolation, we add the needed code. Be careful with the brackets, try to envision what the generated code will look like, and make sure that all necessary brackets are there and properly closed when needed. We are building code as a simple string, so no intellisense here.
foreach (PropertyDeclarationSyntax property in properties)
{
    string propertyType = property.Type.ToString();
    string propertyName = property.Identifier.ValueText;
    sourceBuilder.Append($"{propertyType} {propertyName}, ");
}
//remove the final ', '
sourceBuilder.Remove(sourceBuilder.Length - 2, 2);
sourceBuilder.Append(");");
sourceBuilder.AppendLine("}");
context.AddSource(classDeclaration.Identifier.ValueText, SourceText.From(sourceBuilder.ToString(), Encoding.UTF8));
Listing 10-13

Generating parameters and injecting the code

Finally we use the list of properties we have from the class declaration to generate the record parameters. We can grab the datatype from the property’s Type property and the name from the Identifier property. We use the StringBuilder’s Append method to make sure that all parameters are appended on one line instead of adding a line break between each one. The parameters are separated with a comma, and the final comma is removed. Finally we close the brackets and our code is finished. We can use the AddSource method on the GeneratorExecutionContext object to inject the source into the codebase right before the code gets compiled. Our generated code is now part of the user code and will be treated as such by the compiler.

The final step in the process is linking the source generator to the project where we want to use it. Source generators are added as analyzers into the csproj file.
<Project Sdk="Microsoft.NET.Sdk">
  <PropertyGroup>
    <OutputType>Exe</OutputType>
    <TargetFramework>net6.0</TargetFramework>
    <ImplicitUsings>enable</ImplicitUsings>
  </PropertyGroup>
  <ItemGroup>
    <ProjectReference Include="..SourceGeneratorLibrarySourceGeneratorLibrary.csproj" OutputItemType="Analyzer" ReferenceOutputAssembly="false" />
  </ItemGroup>
</Project>
Listing 10-14

Adding a source generator to a project

The ItemGroup node in Listing 10-14 shows how to add a source generator. From this moment on, the source generator will run every time the project gets build. We can see if it works by loading the generated assembly in a decompiler like ILSpy. Upon inspection, we immediately see the Dto namespace appearing.
Figure 10-10

Dto namespace in ILSpy

When we inspect the namespace, we’ll see generated records for every class that was decorated with the GenerateDto attribute.
Figure 10-11

Generated record

Since we have these objects available now, we can also instantiate them from code.
var product = new Product("Introducing .NET 6", "Book by Apress about .NET 6", 50.0);
Listing 10-15

Using the generated DTO objects

Note that you might need to restart Visual Studio before Intellisense recognizes the generated objects.

Debugging Source Generators

As you might have guessed, debugging source generators is not as simple as setting a breakpoint and hitting the run button, but it is not much harder either. Instead of placing breakpoints, we can use the Debugger class from the System.Diagnostics namespace to programmatically pause the generator’s execution. Listing 10-16 shows the statement right at the start of code generation.
public void Execute(GeneratorExecutionContext context)
{
    Debugger.Launch();
Listing 10-16

Debugging a source generator

If we trigger the source generator again, by rebuilding the program that uses the generator, the message in Figure 10-12 will pop up.
Figure 10-12

Selecting a debugger

Select New instance of Visual Studio 2022. VS2022 will start up, load in the source file for the generator, and pause right at the Debugger.Launch statement, just like if it was a breakpoint. From this point on, we are in debug mode; we can inspect variables, step over or into statements, and so on. The Debugger.Launch call can be placed anywhere in the generator, even in a syntax receiver.

Wrapping Up

.NET’s compiler platform is a powerful platform that does so much more than just compiling code. It is a complete inspection and linting tool. The platform ships with an SDK that allows us to write our own inspections and fixes; this helps when working in teams to guard team agreements on code style but also for detecting bugs and anti-patterns.

Since .NET 5 the platform also has source generators. With source generators, we can generate code at compile time that gets injected into the compiler pipelines as if it was user-written code. Source generators can be a great help and can often replace places where previously we would have used reflection, for example, to generate DTO types like we have seen.

..................Content has been hidden....................

You can't read the all page of ebook, please click here login for view all page.
Reset
3.145.91.37