How often have you felt the need to leave feedback about a shopping experience? Hopefully you’ve done so at least once; I suspect though there may be a seed of doubt as to whether someone will pick up on it and do something about it!
Irrespective of what feedback you leave, chances are you have to type in your comments; what if you could do so using your voice? Yes, novel as it may seem, this is a perfect way to show off using the Speech APIs. In this chapter, we’ll set up a basic product page and add in voice feedback capabilities, which will automatically transcribe our comments into written text.
Setting the scene
Almost every e-commerce site you come across when browsing will have some form of feedback mechanism – it might be a purpose-built affair or something provided as a third-party service from a partner or supplier. At the risk of sounding blasé, it almost doesn’t matter how it is provided. Any company that transacts on the Internet should provide some form of mechanism; otherwise, they are likely to lose customers very quickly!
In most cases, feedback forms are typically ones where you have to type out your response – there’s nothing wrong with this, but it is an old-school way of doing things. Indeed, one might ask, “What other alternatives are there?” Well, you could use a questionnaire, but ultimately, it’s the qualitative feedback provided that is just as, if not more, important!
What if we could turn things on their head and provide it verbally? Yes, you heard me correctly – rather than spend time laboriously typing it out, let’s articulate it verbally. Sounds complicated, right? Well, perhaps not. We’ve already covered the basic tool needed for this, in the form of the Speech Recognition API. Let’s take a look at what is involved in setting this up and how this could become a really powerful tool.
Keeping things in scope
We will limit our demo to recording and transcribing spoken feedback and then rendering it on screen – the latter will be with an appropriate date and time stamp.
Our demo will initially focus on transcribing feedback in English, but will look at providing support for at least one other language, later in this chapter.
We won’t be recording any of the content left in our review into a database or submission by email; that falls outside of the scope of this demo.
With this in mind, let’s take a look at the architecture for our demo, to see what is involved in more detail.
Architecting our demo
At the start of the previous section, I made what might seem a bold claim that we wouldn’t need any additional software in order to set up our feedback: it’s time to make good on that promise! Well, here goes.
In a sense, we don’t need any extra software – the core functionality can be provided by using the Speech Recognition API and configuring it using standard features to record and transcribe spoken content. If however we did want to do things such as recording that feedback for later perusal, then yes, we would clearly need a suitable storage system and appropriate middleware to parse and store the content. However, that falls outside of the scope of this book – we’ll focus on just getting content transcribed and rendered on screen.
Building our review panel
Now that we’ve covered the basic parts of our architecture, let’s begin building our demo – we’ll focus on constructing the core review panel first, before exploring how to add in multi-language support later in the book.
It’s important to note that we will focus mainly on the JavaScript required to make our demo work – all of the HTML and CSS styling will come preconfigured, directly from the code download that accompanies this book.
The first stage in this chapter’s project is to construct the review panel, but before we get started, there is one thing we need to do. Go ahead and extract a copy of the reviews folder from the code download that accompanies this book – save it to our project area.
With this in place, let’s make a start coding our demo:
If you run into any trouble during this demo, then there is a finished version available in the code download that accompanies this book – it’s in the reviews folder, under the finished version subfolder.
- 1.
We’ll start by opening a new file and then saving it as scripts.js to the js subfolder inside the reviews folder.
- 2.We have a good chunk of code to add, which we will do so block by block – the first is a set of variables that reference various elements in the DOM, plus one we will use as a placeholder for working out if we are speaking:var transcript = document.getElementById('transcript');var log = document.getElementById('log');var start = document.getElementById('speechButton');var clearbtn = document.getElementById('clearall-btn');var submitbtn = document.getElementById('submit-btn');var review = document.getElementById('reviews');var unsupported = document.getElementById('unsupported');var speaking = false;
- 3.Next, we need to set up the basic frame of our script – this we use to work out if our browser supports the Speech Recognition API. Leave a blank line after the variables and then add this block:window.SpeechRecognition = window.SpeechRecognition || window.webkitSpeechRecognition || null;if (window.SpeechRecognition === null) {unsupported.classList.remove('hidden');start.classList.add('hidden');} else {...add code in here...}
- 4.We can now start to add our demo code – we begin by initialing and configuring an instance of the Speech Recognition API. Go ahead and replace the ...add code in here... line with this:var recognition = new window.SpeechRecognition();// Recogniser doesn't stop listening even if the user pausesrecognition.continuous = true;
- 5.With an instance of the API now initialized, we can start to respond to events. The first one is the onresult handler; for this, leave a line after the code from step 3 and then add in this event handler:// Start recognisingrecognition.onresult = function(event) {transcript.textContent = ";for (var i = event.resultIndex; i < event.results.length; i++) {if (event.results[i].isFinal) {transcript.textContent = event.results[i][0].transcript;} else {transcript.textContent += event.results[i][0].transcript;}}};
- 6.Next up, we need to trap for any instance where (heaven forbid) we get an error – for this, go ahead and leave a line blank after the onresult handler and then add in this code:// Listen for errorsrecognition.onerror = function(event) {log.innerHTML = 'Recognition error: ' + event.message + '<br />' + log.innerHTML;};
- 7.We’re now at one of the most important parts of this demo – a means to start and stop recording our feedback! We have two more event handlers to add, so let’s add in the first, which will fire when we start or stop recording. Leave a line blank after the code from step 5 and then add in this:start.addEventListener('click', function() {if (!speaking) {speaking = true;start.classList.toggle('stop');recognition.interimResults = document.querySelector('input[name="recognition-type"][value="interim"]').checked;try {recognition.start();log.innerHTML = 'Start speaking now - click to stop';} catch (ex) {log.innerHTML = 'Recognition error:' + ex.message;}} else {recognition.stop();start.classList.toggle('stop');log.innerHTML = 'Recognition stopped - click to speak';speaking = false;}});
- 8.The second event handler takes care of submitting our transcribed recording as feedback – for this, leave a line blank after the start handler and drop in this code:submitbtn.addEventListener('click', function() {let p = document.createElement('p');var textnode = document.createTextNode(transcript.value);p.appendChild(textnode);review.appendChild(p);let today = dayjs().format('ddd, MMMM D YYYY [at] H:HH');let s = document.createElement('small');textnode = document.createTextNode(today);s.appendChild(textnode);review.appendChild(s);let hr = document.createElement('hr');review.appendChild(hr);transcript.textContent = ";});clearbtn.addEventListener('click', function() {transcript.textContent = ";});
- 9.We’re almost there. All that remains is to save our code, so go ahead and do that now. Once done, fire up your browser, and then browse to https://speech/reviews/. If all is well, we should see something akin to the screenshot in Figure 5-1.
 Figure 5-1
Our finished review system
At this point, we should now have a working demo, where we can talk into a microphone and the Recognition Speech API transcribes it into written content. Although it seems like we’ve written a fair chunk of code, the basic principles are the same as the ones we first met back in Chapter 1, and started to develop in Chapter 2. To see what I mean, let’s dive into the code, to see how it all hangs together, in more detail.
Breaking apart the code in detail
As I am sure someone once said, we must start somewhere – there is no better place than the HTML markup that was preconfigured for our demo.
If we take a closer look, there shouldn’t be anything outrageously complex; the demo uses standard HTML and CSS to construct our basic form page. This aside, let’s take a quick look at what has been set up for us in more detail.
Exploring the HTML
The core part kicks off with an empty <div> for reviews, followed by the unsupported div, which we use to advise if the browser doesn’t support the API .
Next up, we set up the “Add Your Review” section – for this, we have two radio buttons, #final and #interim. These control whether the API renders transcribed code at the end or as we speak, respectively. We then have our #transcript text area, which we’ve set to read-only; we start adding content here once we’ve clicked the start button.
Once finished, clicking the start button will turn off the microphone. We then have the customary submit button, which posts content into the reviews div on screen. This is finished off by a call to the DayJS library – this is used to format dates posted in each review. We will come back to this shortly, when we dissect the script for this demo.
Exploring the JavaScript
In contrast, our JavaScript code is clearly more complex – this might put you off, but fear not. It’s not anything we’ve not used before, at least within the confines of the API! Let’s break down the code in more detail, to see how it all fits together.
We kick off by declaring references to various elements in our markup, before determining whether our browser can support the API, with a call to window.SpeechRecognition. If this is rendered as null, we display a suitably worded message; otherwise, we begin by initializing an instance of the API as recognition. At the same time, we set the .continuous property to true, to prevent the API from stopping listening after a period of time or in the event of inactivity.
The first event handler we use (and arguably the most important) is onresult – this takes care of transcribing our spoken content. It’s important to revisit this one and, in particular, the use of event.results[i][0].transcript.

The onResult function from our demo
Once we’ve iterated through all of the results, any that contain content are returned as an object of type SpeechRecognitionResultList ; this contains SpeechRecognitionResult objects, which can be accessed like an array using getter properties.
The first [0] returns the SpeechRecognitionResult at position 0 – this is effectively the final answer, which should be rendered on screen. However, if the speechRecognition.maxAlternatives property had been set, we would see the alternatives which are stored within SpeechRecognitionAlternative objects. In our case, the maxAlternatives property has not been set, so what is displayed on screen will be the final answer only.
The next event handler is a simple one in comparison – here we’re intercepting onerror and rendering any error generated on screen, along with the appropriate message.
This might range from something like no-speech to aborted – you can see a complete list available on the Mozilla MDN site at https://developer.mozilla.org/en-US/docs/Web/API/SpeechRecognitionError/error.
Moving on, we have the first of three event handlers that are used to record, transcribe, and submit (or display) our feedback. The first, start, is attached to the microphone button; we work out if we are already speaking. If not, we then activate the microphone, before determining if we should display interim results or the final article. We then run a try...catch block, inside of which we run recognition .start() to start recording our speech. When done, we stop the Speech Recognition API and flip the styles back, ready to start recording again.
The second event handler, tied to submitbtn , allows us to submit our content on screen into the feedback area. We first create a paragraph dynamically using createElement('p'), before assigning it the contents of transcript.value. We then calculate and format the date of recording using the DayJS library – we could have of course used standard JavaScript, but date manipulation can be awkward when using JavaScript!
The DayJS library is available for download at https://github.com/iamkun/dayjs, if you would like to learn more about this library.
This, along with the contents of transcript, is then appended to the review area in the DOM using review.appendChild(s), before we add a dynamically generated horizontal rule element to separate it from the next review feedback. In the third and final event handler, we use clearbtn to trigger emptying the contents of the transcript text area, so it is ready for the next comment to be recorded.
Now, it’s great that we have a working demo, but what about hosting in a more realistic context, such as a product page? If we’ve planned our demo correctly, it should be a matter of copying the code into the wider template, and we shouldn’t have to alter the code too much. Let’s dive in and see what happens…
Adding it to a product page
For our next demo, we’re going to merge the reviews demo into a basic product page for a nascent Raspberry Pi retailer – I’ve created a very basic one which certainly won’t win any awards, but should suffice to see our review panel working in a more practical context! Let’s dive in and take a look.
Before we get started, we need to open the source folders for both the reviews demo and the product page demo in your text editor – copies of both are in the merge folder that is in the code download that accompanies this book.
For the purposes of this demo, I will use the folder names productpage and reviews, to distinguish between the original source demos.
- 1.
The first change we need to make is with the index.html file in the reviews folder – look for this line: <div id="reviews">
- 2.
Copy from this line down to (and including) <div id="log">Click the microphone to start speaking</div>. Then paste it below this line – <h1>Product Reviews</h1> – in the index .html file, within the productpage folder.
- 3.Next, go ahead and remove this line from the productpage folder’s index.html file:<p>Insert reviews block here</p>
- 4.Our review panel uses the DayJS library to format the date of posting the review – for this we need to transfer across the call to the DayJS library. Go ahead and add this line:<script src="https://cdnjs.cloudflare.com/ajax/libs/dayjs/1.8.16/dayjs.min.js"></script>above the call to the scripts file in the productpage folder:<script src="js/scripts.js"></script>
- 5.
We now need to update the styling to allow for the added review panel – for this, go ahead and copy all of the styles from the review version of the styles.css file into the productpage folder’s CSS file.
- 6.
We’re almost done. Go ahead and copy the contents of the scripts.js file from the reviews folder into the top of the scripts.js file in the productpage folder.
- 7.
We need to copy across the mic.png image for our microphone button – copy the img folder from the reviews folder into the productpage folder.
- 8.The final step is to remove these two lines:<h1>Product Reviews</h1><p>Insert reviews block here</p>
- 9.
Go ahead and save the file – we can now preview our results. For this, browse to https://speech/productpage/. If all is well, we should see something akin to the screenshot shown in Figure 5-3.

The merged review panel
Unfortunately, the screenshot doesn’t do it justice – to get a feel for how it would work in action, I would recommend running the demo from the code download that accompanies this book. It’s in the productpage folder and ideally should be run as a secured URL. None of the code should be unfamiliar; although the merged version will be a little rough around the edges, it gives us a perfect opportunity to optimize code such as the CSS styling!
Okay, let’s move on. We’ve constructed our review system; at this point, we should have something that allows us to record feedback in English and display it on screen in an appropriate manner. Trouble is, in the modern age of the Internet, not everyone speaks English! It means that our demo will only be really effective in English-speaking markets or where customers can speak it as a second language.
Fortunately, this is easy to fix – we’ve already used some of the principles of how, in the previous chapter! With this in mind, let’s dive in and see what we need to do to allow our review system to accept and transcribe more than just English…
Adding language support
In this modern age where we should embrace different cultures, it’s important to show support for customers whose first language isn’t English. Yet adding support for extra languages can be something of a double-edged sword – it may be very easy to add support technically, but which languages should one choose to support?
Which browsers are our customers using? This is important as it depends a lot on which browser your customers are using: if it is Chrome (or latest versions of Edge), then support will be reasonably good – Google offers a range of different languages as part of this support. If however your customers prefer IE or Safari, then providing language support will be a moot point, as the API isn’t supported on either browser!
How do we risk not alienating customers if we decide not to offer support for a specific language? Clearly a language only spoken by a handful of customers isn’t one that will be added on the grounds of economic viability; yet, what if that customer happens to be one who is a substantial revenue earner for you? Is it a case of “they who shout loudest get heard first”? Yes, I know this is something of an extreme example, but it goes to show that prioritization is key!
Assuming we add in support for more languages, do you have the resource available to support customers who make use of the feature? After all, if they take the trouble to leave feedback in their own language, it somewhat destroys the whole purpose of having this option if the only language we can respond in is English. Yes, we could use a service such as Google Translate, but this is a poor substitute for offering a response from a real member of your team!
As we can see, simply adding in support technically is only part of the puzzle; to solve it (and offer the best support for our customers), we must consider the whole picture. We’ve touched on some of the questions we could ask, so it’s time we got technical. Let’s dive in and consider the code we need to add or adapt to allow our review system to cater for more languages.
Updating the demo
For our next demo, we’re going to add in support for customers who speak French – we could add in any number of different languages, but French happens to be the one I can speak! (Okay, it’s been a while since I’ve had to speak it full-time, but I digress…)
We need to source appropriate flag icons – for our demo, we’ll use the ones we had back in Chapter 3. If however you would like to try different languages, then a site such as https://www.gosquared.com/resources/flag-icons/ will be a good place to start.
We’ll need to add in markup and styling to host these flags – bear in mind that if we were to add in more than just French, we might have to consider relocating elements, to make additional space, or altering styles so they fit correctly.
We need to alter the configuration options when we use the Speech Recognition API, so that it is not hard-coded to the default of US English, but can accept other languages on request.
We need to add in event handlers to allow customers to select a language and update the API configuration options accordingly.
This might seem a lot, but in reality, the changes are very easy to make. To see what I mean, let’s dive in and make a start on updating our demo.
- 1.We’ll start by opening a copy of index.html and then looking for this block:<div class="button-wrapper"><div id="speechButton" class="start"></div></div>
- 2.Immediately below it, insert the following code for our flags:<section class="flags"><span class="intro">Choose language:</span><span class="en-us"><img src="img/en-us.png" alt="en-us">EN</span>|<span class="fr-fr"><img src="img/fr-fr.png" alt="fr-fr">FR</span></section>
- 3.Go ahead and save the file – we can close it, as it is not needed. Next, crack open scripts.js and then scroll down to this line:var unsupported = document.getElementById('unsupported');
- 4.Immediately below it, go ahead and add these variable declarations – make sure to leave a line blank after the const french... statement :var speaking = false;var chosenLang = 'en-us';const english = document.querySelector("span.en-us");const french = document.querySelector("span.fr-fr");
- 5.Scroll down a few lines. Then below recognition.continuous = true, go ahead and add this line:recognition.lang = chosenLang;
- 6.Next, look for the clearbtn event handler – leave a blank line below it and then add in this event handler, to take care of setting English as our chosen language:english.addEventListener("click", function() {recognition.lang = 'en-us';english.style.fontWeight = 'bold';french.style.fontWeight = 'normal';});
- 7.We have one more event handler to add in – this one takes care of setting French , when selected:french.addEventListener("click", function() {recognition.lang = 'fr-fr';english.style.fontWeight = 'normal';french.style.fontWeight = 'bold';});
- 8.Go ahead and save the file – it is no longer needed, so can be closed at this point. Once closed, crack open styles.css, and add the following rules at the bottom of the stylesheet:/* CSS Changes */span.intro {padding-right: 10px;vertical-align: baseline;}/* flags */section > span.en-us,section > span.fr-fr {padding: 2px 5px 0 0;}section > span.en-us > img,section > span.fr-fr > img {vertical-align: middle;padding: 3px;}section > span.en-us > img:hover,section > span.fr-fr > img:hover {cursor: pointer;}
- 9.
Save this file, and close it. At this point, we can now test the results! For this, browse to https://speech/reviewslang, then click Ask a question, and start to enter information as shown in the extract in Figure 5-4.

Our updated demo, with French as an option
See how easy it was to adapt our demo to allow us to speak French? The great thing about this is that the SpeechRecognition API supports a host of different languages, so we can drop in support for more languages very easily.
It’s important to note though that we’ve hard-coded a lot of what is needed in this demo; if we were to add in more languages, it would be worth optimizing our code, so we can reuse existing styles more effectively. This said, there were a couple of important changes made to support extra languages in this demo, so let’s take a moment to go through the code in more detail.
Dissecting the code
Over the course of the last couple of pages, we made several changes to our code. The first was to add in appropriate markup as scaffolding for our chosen flags (in this case, both US English and French). We then switched to the scripts.js file and added in some variables – two to help with configuring the API (speaking and chosenLang) and two as references to elements in the DOM: english and french.
Next up, we had to alter the default language for our instance of the API – as we can’t now use the default of 'us-en' (or US English), we need to tell it which language should be used. For this, we assigned the value of chosenLang to recognition.lang; this was set to 'en-us' as default (so maintaining the status quo). However, this will now be updateable through the use of the next two event handlers, for english and french. Here we set the recognition.lang to 'en-us' or 'fr-fr', depending on which flag is clicked; we also set the EN or FR text on screen to bold and deselect the other flag’s text.
We then rounded out the demo with some simple styling changes, to allow for the presence of the flags. These fitted perfectly under the transcript textarea element, but if we were to add in more, then we might want to consider the wider implications to the UI and move some of the other elements around for a better fit.
Okay, let’s change tack. Over the course of this chapter, we’ve made use of the Speech Recognition to implement the beginnings of a useful feedback mechanism, which could be adapted for use on any web site wanting to offer customers a chance to leave comments. This is a great way to get comments that we can use to help improve our offer, but it can come with a few gotchas that we need to consider. Let’s just say they could come back to bite us if we’re not careful! To see what I mean, let’s take a look at the wider picture in more detail.
Leaving reviews: A postscript
One of the first things we need to consider is how customers might react, particularly if they’ve had a poor experience! As part of any UX design, we should consider implementing some house rules. What if customers used profanities in their comments, for example? They might feel justified in expressing their opinions if they’ve had less than a perfect experience, but we clearly don’t want our review comments littered with unsavory words!
A second issue to consider is one of spamming – yes, it might seem a little odd, but with the advent of technology, there is technically nothing to stop people from spamming your feedback mechanism! Whether this does become a reality, only time will tell, but it is nevertheless something to think about when implementing a voice-activated review system for your web site.
The reliance on Google to support functionality for some browsers will be a concern – not because Google is likely to go out of business any time soon, but the simple fact that they may want to begin monetizing support that is currently offered for free. It does mean that we are somewhat at the mercy of Google when it comes to support; there may come a time when a language might not be supported, so we will have to react quickly to minimize any issues if support is removed.
In short, there may not be much we can do about these points, but we can build in some protection. For example, we might ask that users must log in to leave a review or build in something to monitor for instances of particular words that we could try to filter out when transcribing our content.
Also, that support? Well, we hardcoded our entries to prove our demo works, but this isn’t very efficient. Instead, we could make our code more dynamic – it can do a search for any entries present in a configuration file. Based on what it finds, it iterates through them and builds up the content automatically. It means that as long as media such as flags are present, all we need to do is turn support on or off; our code will work out automatically which languages to support and add the appropriate entries to our web page.
Okay, we’re almost at the end of this chapter, but there is one more thing to consider – what about developing our solution further? Of course, this is all dependent on both your requirements and how creative your imagination is; to get you started, let’s take a look at a few ideas on how you can add to your solution to help develop the experience for your customers.
Taking things further
- One element that is clearly missing from our demo is a rating – this is a good opportunity to allow customers to provide an objective figure, in addition to qualitative feedback. We could simply implement a suitable mechanism, such as the RateIt plugin from https://github.com/gjunge/rateit.js, but what about doing this verbally? How we achieve this will depend on the structure used, but it should be possible to provide the rating verbally and for it to be translated into the appropriate star rating. As an example, adding a rating could look like the example screenshot shown in Figure 5-5.
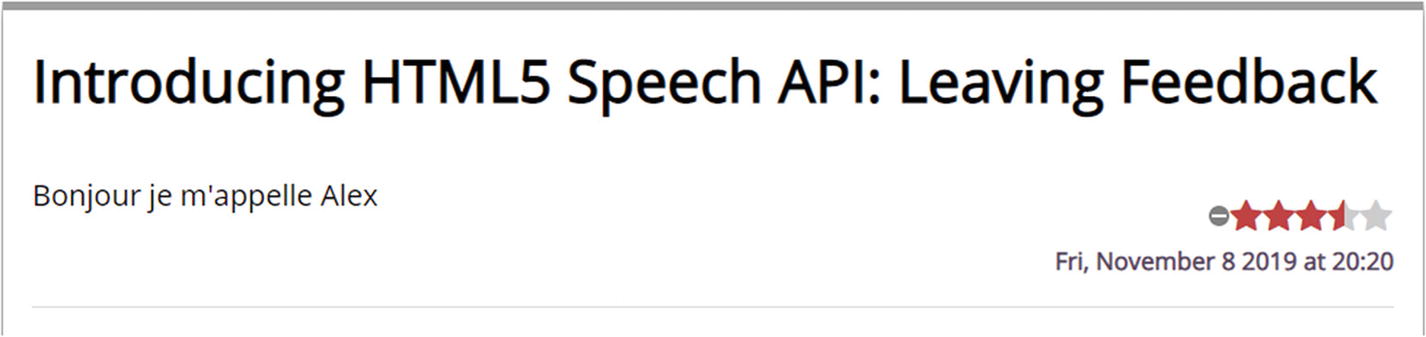 Figure 5-5
Our mocked-up rating stars
Our demo allows us to post reviews on a page, but this is only part of the story – we should absolutely look at using that feedback and potentially responding to the customer if this is appropriate. The latter though means we would need at least one method of getting in contact with them, such as an email address. How could we achieve this? One method might be to encourage customers to register for an account, so we can get that email address – this will of course have implications for privacy legislation such as GDPR, which we will need to consider.
If resourcing to support management of feedback from customers is an issue, then we could consider using an API such as Google Translate to at least convert our transcribed content into English or our native tongue (if it isn’t English). This does come with a cost – we can only hope to get a sense of what Google Translate provides as machine-translated content won’t be perfect!
These are just a few ideas to get you started – we could even look at adding extras such as avatars, if the type of site we operate is suitable for such an extra! It goes without saying though that if we do add in extra options, then these need to be tested thoroughly, to be sure that they offer value and don’t appear as a gimmick to our customers.
Summary
Customer feedback is essential for any business, no matter how small or large the operation – ultimately the success of our business will depend on the comments received and how we respond or the action we take to improve ourselves. Clearly it’s important to make the process of giving feedback as easy as possible – what better way than to leave verbal comments? We’ve covered the basic steps to achieve this over the course of this chapter; let’s take a moment to review what we have learned in more detail.
We kicked off by introducing the theme for this chapter, before quickly setting the scene and determining both how we will scope and build our demo. We then moved onto constructing the form, before exploring how the code worked in detail while making note of similarities from earlier chapters.
We then took a look at how we could incorporate this into a more real-world example, before delving into the subject of language support – we covered the steps required to alter our demo, before exploring some final points about the downsides of providing verbal feedback and where we can develop our project to introduce new features for our customers.
Okay, we’re not stopping here; it’s time to move on to our next chapter! Hands up how many of you own a smart assistant such as Google Assistant, Siri, or Amazon Alexa? Bill Gates, one of the co-founders of Microsoft, once said that voice and speech will become a standard part of the web interface – with the advent of Siri, Alexa, and Google Assistant, he was not wrong! We already have many of the techniques in place to build a simple version of Alexa for a web site. Intrigued on how? Stay with me, and I will reveal all and more in the next chapter.