
![]()
Using Flux to Structure a React Application
The previous chapter introduced you to the Flux project. Flux represents an efficient application architecture for React applications. You learned the basics of how Flux uses a dispatcher to send actions to the stores, which are then rendered into the DOM using React components. This was all finalized by taking a look at a trivial TodoMVC application that was structured utilizing Flux architecture. In this chapter, you will create a React application that is more involved than the TODO application and structure it according to Flux architecture.
Structuring Your Application
Before you get started creating the components and the Flux architecture for the application you are going to build, you need to define what it is you are going to make. In this example, we’ll showcase how data flows in a single direction when you use React and Flux. A great example for that purpose is a Chat application. A Chat application can come in any number of variations, but in this situation the Chat application that you want will look something like the Chat feature in the Facebook interface. You have a list of threads that show that you are communicating with a friend. A messages pane enables you to select a specific thread, follow the history of that thread, and then create new messages. Mocked up, this application might look similar to what is shown in Figure 6-1.
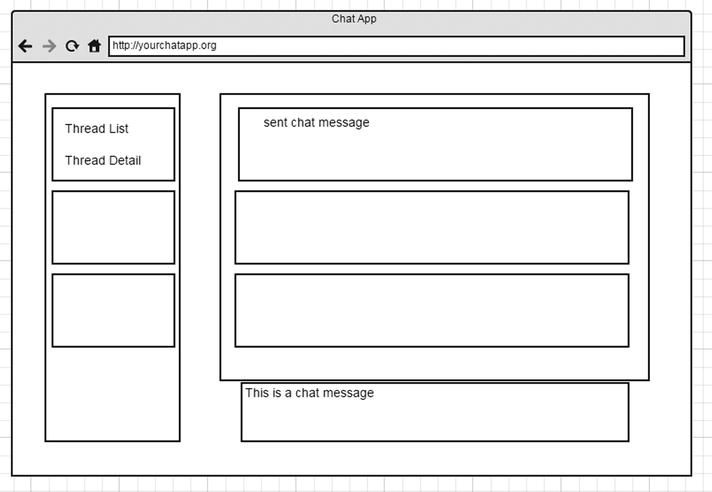
Figure 6-1. Wireframe of your application
Looking at the wireframe, you can decipher where you will be able to create React components for your application. The application as a whole will become the parent component. You can then create a message component.
A monolithic message component does not fit the atomic component architecture that you are accustomed to with React, so you need to split the messages portion into three React components. One is for creating the messages, the second is for managing the individual message items in the list, and the third is a container for those message items.
A similar design can be seen when thinking about the message threads on the left side of the wireframe. Here, you will have the threads container and the children of that container are the thread items.
Creating Dispatcher, Stores, Actions, and React Components for the Application
Now that you have a general idea of the application that you are going to create, you could build the React application and utilize whatever mechanism you choose to load the data into the components in order for them to be rendered. This is a valid method, but as you saw in the previous chapter, Flux provides an architecture for React that will make building a Chat application easier than it might be without the use of React and Flux. So now you can start to architect your application utilizing the Flux mindset.
Dispatcher
To start off, you need to create a dispatcher, which as you saw earlier, is just a new instance of the Flux dispatcher module that you can share in your application (Listing 6-1).
Stores
If you recall, stores in Flux are regarded as a sort of model that you might find in a typical MVC framework, only bigger. Rather than a model representation of a particular element, stores represent a place for all of the data in a logical domain. So, in terms of the Chat application, you can encapsulate all of the message data into a single store, as shown in Listing 6-2.
MessageStore represents all the data for the messages you will be creating or fetching in your Chat application. The first thing that the store must do is register a callback with the dispatcher, which it does with ChatAppDispatcher.register(). That callback becomes the only method to input data into the store. You will see that the callback contains a big switch statement that in this case is keyed off of the different action types that are sent to the callback. Once the applicable case in the switch is encountered, the store will be able to do something with the action and can then send emitChange(), which will then communicate to the views that they can then fetch the new data from the stores.
It is noteworthy to see that the store does not contain any public method to set the data, meaning everything is accessed through getters. This means you don’t have to worry about data leaking into your store from another part of the application. This makes the store a literal storage bin for your data. It will be able to take care of your messages and update them via the dispatcher callback, and then notify you of changes. This can be seen in MessageStore, where the actionType is ActionTypes.RECEIVE_RAW_MESSAGES. Once this is received, MessageStore will add the messages via its private _addMessages function, mark the messages in that thread as read, and finally emit the changes via EventEmitter.
Now that you have seen MessageStore, you need to be able to control which threads you have available to you in your Chat application. This is done with ThreadStore (Listing 6-3).
ThreadStore, just like MessageStore, has only public getter methods and no setter methods. ThreadStore registers a callback with the dispatcher, which contains the switch statement that will control how the store reacts to the actions that are sent via the dispatcher. The switch statements respond to the particular ActionTypes sent via the dispatcher and then send the emitChange() event.
Related to ThreadStore is UnreadThreadStore (Listing 6-4). This store will be referenced in the ThreadSection component and bound to the _onChange event. This way the component can update the state when the threads are marked as unread.
That is it for the stores. They get data from the dispatcher in the form of an object literal via a registered callback and then emit events. Next you will examine the actions, or in this case the action creators, that will be invoked from your React views.
Actions
Actions drive the one-way data flow of your Flux Chat application. Without the actions, the views will not receive updates from the stores because nothing is passed to the dispatcher to call the stores’ callbacks. The actions in this example are in the form of action creators. These creators can create an action from React’s views or you can get a message from a WebAPI on your server. In Listing 6-5, you will not need to create a server to serve Chat requests, but the following code snippet highlights how you might create a ServerAction. This exports some methods that would fetch, or retrieve, the data from your server and then dispatch that data to the Flux application via the .dispatch() function.
Another functionality of action creators is that they can become a utility to pass information from the views to the server and the dispatcher. This is precisely what happens with MessageAction in this Flux example (Listing 6-6). The MessageComposer component, which you will see in the next section, calls MessageAction to create a message. This will first send the message data to the dispatcher, and also call the API utilities that you have in your application to update the data on the server, as shown in Listing 6-6.
In your Chat application, the only remaining action to account for is what happens when someone clicks a thread. This action is handled by the ThreadActionCreator, which is shown in Listing 6-7.
React Components
The React components are not dissimilar from what you have previously seen in this book; however, they do involve utilizing the state more aggressively to account for the Chat application and its Flux architecture. Let’s start by creating the ThreadSection component. In order to that, you will need to create the ThreadListItem (Listing 6-8), which will be added during the render() process of the ThreadSection. The ThreadListItem also calls ThreadAction for ThreadClick to send the event to the dispatcher.
![]() Note The cx component is being deprecated, but a standalone for class manipulation can be found at https://github.com/JedWatson/classnames. If you choose to utilize this sort of class manipulation, you can also find a solution at http:// reactcss.com.
Note The cx component is being deprecated, but a standalone for class manipulation can be found at https://github.com/JedWatson/classnames. If you choose to utilize this sort of class manipulation, you can also find a solution at http:// reactcss.com.
Now that you have the ThreadListItems, you can gather these into your ThreadSection, as shown in Listing 6-9. This ThreadSection fetches the threads from ThreadStore and UnreadThreadStore during the component’s lifecycle event called getInitialState. This will then set the state to control how many ThreadListItems are created in the render function.
You have now used React and Flux to create the thread section of your application. The MessageSection is next and it requires that you create a MessageListItem component as well as a MessageComposer component, as shown in Listing 6-10.
The MessageComposer component is a textarea that will bind its change event to the state.text and keydown events. The keydown event will look for the Enter key on the keyboard. If it has been pressed, MessageComposer will call the ChatMessageActionCreators.createMessage() function to create the action to send to the API server and the dispatcher.
MessageListItems (Listing 6-11) is just an HTML list item that contains the message data that is passed to it from MessageSection.
The MessageSection in Listing 6-12 first fetches the state from the stores via the getInitialState React lifecycle. This fetches the current thread and gets its messages. Once the component mounts, in componentDidMount, MessageStore and ThreadStore both bind listeners to the _onChange event. This change event this.setState(getStateFromStores()); is called again, just as if the initial state is set. This is the quintessential takeaway from both React and Flux. It’s a single directional data flow in which every render comes from the fetch of state from the stores, and only one method to update the stores. MessageSection also aggregates the messages added to the state object and creates new MessageListItems for each message.
You now have the completed MessageSection and ThreadSection of the application. The only remaining item is to put these all together in the ChatApp component shown in Listing 6-13.
Writing Tests
As you saw earlier in the book, Jest is a useful tool for writing tests. Listing 6-14 is a simple test that you can use as a model. This test is written for UnreadThreadStore, and it ensures that there is a proper count of unread threads. It also ensures that the callback is registered with the dispatcher.
Running the Application
You can run this application from the root of the repository found at https://github.com/cgack/flux/tree/master/examples/flux-chat. Once you have cloned the repository, or the parent of that fork, you can run npm install from the flux-chat directory. This will pull down all the needed dependencies. After that, simply run npm test to run the tests.
To finally run the application, use the npm start command. Doing so will start the watcher and convert all of the app.js bootstrap code to the bundle.js file. You then just need to navigate your browser to the index.html file to see the Chat application in action.
Summary
In this chapter, you saw a more contrived example of how React and Flux work together. This example showed more React components and uses of the state and illustrated a single directional data flow. This example is a great jumping-off point to start building your own great React components and applications, with or without Flux.
This book set out to introduce you to React and get you accustomed to seeing web development through the lens of React’s components. I hope that you have enjoyed the book and found it useful.