
Chapter 8. Isomorphic view rendering
- Creating an entry point for the browser code that renders your React components
- Serializing the data so the browser code can start up (bootstrap) with the state from the server
- Deserializing the data in the browser to hydrate your code
- Including information from the original server request in your serialized data to maintain a consistent state between the browser and the server
- Transitioning to a single-page application (SPA) experience to handle user interactions in the browser
Throughout this chapter, you’ll build the browser portion of the isomorphic view render. You’re focusing on the lower half of the image in figure 8.1. You’ve seen this figure many times, but I’m revisiting it here to give context to this chapter.
Figure 8.1. This chapter focuses on the lower half of the flow, everything that happens after the server render (the browser render and the SPA logic).

All the code for this chapter is in the same GitHub repo that’s used in chapter 7, which can be found at http://mng.bz/8gV8. After you’ve pulled down this code, switch to chapter-8.1.1 (git checkout chapter-8.1.1), which has the code for the first section of the chapter. Each branch provided in a section includes the skeleton code needed from previous sections, but not what will be added in that specific section. The next section’s code will contain the complete code from previous sections. Each time you need to switch branches, I’ll let you know.
Remember that you need to run the start command each time you want to build the code (and after you make any changes):
$ npm start
The app runs at http://localhost:3000 in your browser.
8.1. Setting up the browser entry point
The first thing you need to do to render your code in the browser is to set up your browser entry point. This is called main.jsx. It’ll be where you bootstrap (initialize) your React code in the browser. Your main.jsx entry point will end up being responsible for several things, including the following:
- Deserializing the server state
- Initializing Redux with the current state
- Setting up React Router
- Rendering React components in the browser
8.1.1. Referencing the browser code
To get the browser code loading, you need to make sure to reference it from your HTML. It needs to be included as a script in the page, at the end of the body. That ensures it doesn’t block page loading and rendering. Because the page was already rendered once on the server, your user won’t know the script hasn’t loaded yet!
The code in the branch (chapter-8.1.1) already includes the webpack configuration. When you run npm start, the browser code is created by webpack and is available to use in the app. Open the html.jsx file and use the code from the following listing to add a reference to the bundled browser file. Note that in production, you’d want to make this URL configurable to wherever your static asset files will live.
Listing 8.1. Adding your browser source code—src/components/html.jsx
  <body>
    <div
      id="react-content"
      dangerouslySetInnerHTML={{ __html: props.html }}
    />
    <script
      type="application/javascript"
      src="browser.js"
    />                                                 1
  </body>
- 1 Insert a script tag that points to your JavaScript bundle.
After you’ve done this, restart the server. To check whether the browser.js file is properly loading, use the Network tab in Chrome DevTools to see if it loaded. Figure 8.2 shows what to look for.
Figure 8.2. Using the Network tab of Chrome Developer Tools to confirm that your JavaScript code is loading in the browser

You should also try adding a console.log statement or setting a breakpoint to verify that your script is loading. After you get this working, you’re ready to render your React components in the browser.
8.1.2. Rendering React in the browser
This section covers how to render React in the browser. We already covered this in chapter 3, when you learned all about using React. I’m going to revisit the core implementation details here. Also, I’ll demonstrate why this step is necessary.
Let’s start with the /cart route because it’s already built out from chapter 7. In case you don’t remember, figure 8.3 shows what it looked like by the end of chapter 7.
Figure 8.3. The Cart page of your application before rendering in the browser or adding SPA functionality
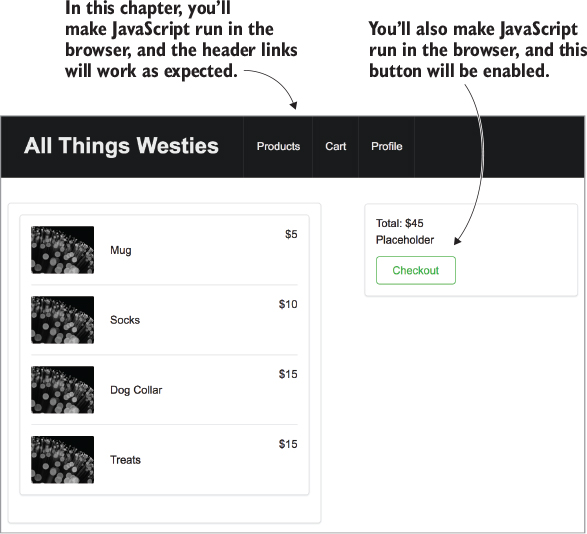
So far, you’ve made this render only on the server. Some things don’t yet work, such as the Checkout button, which has a button handler with additional logic. The first step to getting that hooked up in the browser is to call ReactDOM.render in the browser. You’re going to add a simple render call that displays a Browser Render message after the browser code is executed and rendered. Figure 8.4 shows what this looks like.
Figure 8.4. The expected output after you render a simple div and message in the browser

To get this output, you need to set up main.jsx with React and then call render. Listing 8.2 shows your entry point file rendering a simple div with a message. Add the code from the listing to main.jsx. If you need to catch up, all the code up to this point is on the branch called chapter-8.1.2 (git checkout chapter-8.1.2). Or you can keep working on your code that you have up to this point.
Listing 8.2. Rendering an HTML element in the browser—src/main.jsx
import React from 'react';                             1
import ReactDOM from 'react-dom';                      1

function init() {                                      2
  ReactDOM.render(
    <div>                                              3
      Browser Render
    </div>,
    document.getElementById('react-content'));         4
}

init();                                                2
- 1 You must include React and React DOM to call render in this file.
- 2 Create an init function so you can add asynchronous code to your entry point.
- 3 Call render function with a simple div element.
- 4 Pass in the DOM element; React will render your div into.
The obvious problem with this code is that your application has disappeared! That’s not what you want to happen. Open your developer tools and select the Sources tab to set a breakpoint in your main.jsx file. (Use Cmd-P and search for main.jsx—then you’ll be able to set the breakpoint.) Figure 8.5 shows what your Chrome DevTools will look like after setting the breakpoint.
Figure 8.5. Set a breakpoint on line 5 of main.jsx in the Sources tab of Chrome Developer Tools. This lets you view the browser output before the browser JavaScript runs.

Now that you’ve set the breakpoint, refresh your browser. The code execution will pause on your breakpoint. Look at your app in the main browser window. It’ll look correct, with the cart route rendered (as in figure 8.3). If your app is loading but you notice a React error in the console output, don’t worry about it for now (something like “React attempted to reuse markup in a container”). I’ll explain that later in the chapter.
Compare the DOM markup from the two states to see what’s going on before and after the browser render. Figure 8.6 shows the markup before and after the browser render call is made.
Figure 8.6. Comparing the DOM from the server render with the DOM from the div rendered in main.jsx

In this section, you’ve set up the browser code to run and added a simple React render to the browser. This illustrates the interaction between the server render and the initial browser render. In the next section, we’ll walk through using the server state in the browser.
8.2. Matching server state on the first render
To make the app isomorphic, you need to re-create the state from the server. Follow these steps:
1. Serialize the state of the app on the server and send it down in the stringified DOM markup.
2. Deserialize the state on the browser so it’s a consumable JSON object.
3. Initialize Redux with the app state (JSON object).
4. Pass the initialized Redux store into your React components.
Figure 8.7 shows this flow in the context of the All Things Westies app.
Figure 8.7. The flow of the state serialization/deserialization

It’s important to remember that the state created on the server needs to exactly match the state used to bootstrap your React code on the browser. That ensures that there’s no need to update the browser DOM during the initial load of the page.
First, let’s set up the data on the server—both serializing it and then sending it down to the browser to be consumed.
8.2.1. Serializing the data on the server
In this section, you’ll update the code in renderView.jsx (created in chapter 7). The first step is to capture and serialize the current app state.
Definition
Serialization is the act of taking data (often JSON in JavaScript) and converting it to a format that can be sent between environments. In this case, you send it from the server to the browser via a network request.
By the end of this section, you’ll be able to access your server state in the console because you’ll be putting the server state on the window object. Figure 8.8 shows this output in Chrome Developer Tools.
Figure 8.8. The serialized state in the browser

You can switch to the chapter-8.2.1 branch to get the base code for this section (git checkout chapter-8.2.1), or keep following along with the code you’ve added so far. The branch has all the code listings so far. The following listing walks you through how to get and serialize your app’s current state in your renderView middleware. Add this new code to the renderView middleware.
Listing 8.3. Capture and serialize current app state—src/middleware/renderView.jsx
Promise.all(promises).then(() => {
  const serverState = store.getState();                       1
  const stringifiedServerState
   = JSON.stringify(serverState);                           2
  const app = renderToString(
    <Provider store={store}>
       <RouterContext routes={routes} {...renderProps} />
    </Provider>
  );
  const html = renderToString(
    <HTML
      html={app}
      serverState={stringifiedServerState}
    />                                                        3
  );
  return res.send(`<!DOCTYPE html>${html}`);
= JSON.stringify(serverState); 2
const app = renderToString(
<Provider store={store}>
<RouterContext routes={routes} {...renderProps} />
</Provider>
);
const html = renderToString(
<HTML
html={app}
serverState={stringifiedServerState}
/> 3
);
return res.send(`<!DOCTYPE html>${html}`);
- 1 Get current state of the Redux store—getState() is a helper method that returns the store.
- 2 Serialize the state by creating a string from the JSON.
- 3 Pass the serialized state into the HTML component as a serverState prop.
Now that you’ve created the string representation of the current app state, you need to set it in the DOM markup. You do that using dangerouslySetInnerHTML and a script tag. The following listing shows the code to add to html.jsx.
Listing 8.4. Set the serialized state in the DOM—src/components/html.jsx
<body>
  <div
    id="react-content"
    dangerouslySetInnerHTML={{ __html: props.html }}
  />                                                           1
  <script
    dangerouslySetInnerHTML={{                                 2
      __html: `
        window.__SERIALIZED_STATE__ =                          3
         = JSON.stringify(${props.serverState})              4
      `
    }}
  />                                                           1
  <script type="application/javascript" src="browser.js" />
</body>
- 1 Should be placed at end of body (so it isn’t render blocking) but before main JavaScript executes—browser.js depends on the state being available on the window object.
- 2 Set innerHTML of script tag so the string of JSON is placed inside the script tag.
- 3 Set state on the __SERIALIZED_STATE__ property of window.
- 4 Assign stringified server state.
Upon restarting the server, you’ll be able to see your app state stringified and printed in the browser console (as in figure 8.8) by running the following:
window.__SERIALIZED_STATE__
Although it’s cool that you can now see your state in the browser, this isn’t useful. In the next two sections, we’ll walk through how to take this state and use it with Redux and your React components.
8.2.2. Deserializing the data in the browser
If this sounds complicated and scary, don’t fear! It’s simple. In fact, it’s easier than serializing the state in the first place. The goal is to take the stringified data that the server sends down and get it into a state that the app can work with. You take a string input and turn it back into a JavaScript object.
Definition
Deserialization is the act of taking serialized data and converting it to a format that’s usable by the current environment. In this case, you take a string and convert it to a JavaScript object.
The following listing shows the code you need to add to main.jsx to get the state off the window object. Parse the window.__SERIALIZED_STATE__ value and save it to a variable.
Listing 8.5. Getting the state in the browser—src/main.jsx
import React from 'react'; import ReactDOM from 'react-dom'; const initialState
- 1 Parse string into an usable object.
- 2 Add log statement to see that it worked in the console.
If you view the browser console, you’ll see the state. That’s all there is to deserializing the app state. Next, you’ll take this state and inject it into Redux so your app starts up in the same state as on the server.
8.2.3. Hydrating the store
Now that you have the state deserialized, you need to initialize Redux with the state that was generated on the server. You don’t need to add any new Redux code; everything you created in chapter 7 works perfectly here. The branch for this section is chapter-8.2.3 (git checkout).
Note
If you’re using React Router 4, check out appendix A for an overview of setting up the routes and related router code. The appendix shows the main.jsx setup code compared to the Router code in listing 8.6 in this chapter.
All you need to do in main.jsx is initialize Redux with the correct state. The following listing shows you how to pass in the state to the init Redux function. You should update main.jsx with this code (replacing the placeholder code from the previous sections).
Listing 8.6. Setting up Redux and the component tree—src/main.jsx
import React from 'react';
import ReactDOM from 'react-dom';
import { Provider } from 'react-redux';                           1
import { browserHistory, Router } from 'react-router';            2
import initRedux from './shared/init-redux.es6';                  3
import sharedRoutes from './shared/sharedRoutes';                 4

const initialState = JSON.parse(window.__SERIALIZED_STATE__);
console.log(initialState);

const store = initRedux(initialState);                            5

function init() {
  ReactDOM.render(
    <Provider store={store}>                                      6
      <Router
        routes={sharedRoutes}
        history={browserHistory}
       />                                                         7
    </Provider>,
   document.getElementById('react-content'));
}

init();
- 1 Include the Provider component from React Redux so components have access to the store as needed.
- 2 Include the Router component from React Router, which configures Routes from sharedRoutes, and include the correct history for the browser environment.
- 3 Include Redux bootstrapping code.
- 4 Include sharedRoutes.
- 5 Create Redux store based on deserialized state.
- 6 Pass store into the Provider component as a prop.
- 7 Pass sharedRoutes and browserHistory into Router as props.
Main.jsx imports initRedux from initRedux.jsx. The code in the initRedux.jsx module takes in the state and creates the store. That’s how you hydrate the store. You added this code in chapter 7. It’s shown here as a reminder, but it’s already in the repo for you in src/shared/init-redux.es6:
export default function (initialStore = {}) {
  const reducer = combineReducers({
    products,
    cart
  });
  const middleware = [thunkMiddleware, loggerMiddleware];
  return compose(
      applyMiddleware(...middleware)
    )(createStore)(reducer, initialStore);
}
Notice that the initialStore param that’s passed into the function is used in the createStore function to initialize the Redux store. Because this happens before your components are created, the first render of your components ends up using the state from the server.
With the state from the server, React is able to calculate that the initial virtual DOM matches the DOM attached to the root container provided to the render function. It knows that making any browser DOM updates is unnecessary.
Now that you’ve successfully rendered the view in the browser, let’s explore potential gotchas around the details of the first render in the browser. Note that up to this point, you’ve only set up the code that handles the initial render. Later in the chapter, you’ll add support for getting data when routing in the browser.
8.3. Performing the first load
At this point, it should be clear how to get your app loading in the browser. It’s also important to understand what happens during the initial render in the browser, because it’s different from what happens later as the user interacts with the app.
8.3.1. The React lifecycle on the first load
This section walks you through the first render of React in the browser. React begins to bootstrap in your main.jsx file when you call ReactDOM.render. Each component that’s being initiated goes through the following steps:
1. The constructor is called.
2. componentWillMount is triggered.
3. The render method is called.
4. componentDidMount is called.
Remember that this starts with the root components, which all come from third-party libraries (React Redux and React Router). It then moves on to the components that React Router calculates need to be loaded for the current route. Then any of their child components are rendered.
Initial render differences
It’s important to understand that componentWillMount is called on the first load for every component on both the server and the browser! Any code you have in it needs to be truly isomorphic. For example, if you were to add the following code to src/components/app.jsx, your server would break and be unable to load any routes:
componentWillMount() {
  window.test = true;
}
That’s because your server can’t find a global variable called window. The window object doesn’t exist in Node.js. If you put this code into any of the methods that run during the first render (constructor, componentWillMount, or render), it’ll break on the server.
Conversely, componentDidMount, which runs after the first render is complete, is called only in the browser. This distinction becomes powerful when you need to update a component after reaching the browser but you don’t want to break the isomorphic render.
8.3.2. Isomorphic render errors
You may have noticed a big red warning in the console early in this chapter. Figure 8.9 shows what that looks like.
Figure 8.9. The isomorphic warning log that React issues when it’s detected an isomorphic render that isn’t truly isomorphic. This happens when the virtual DOM from the initial render cycle and the browser DOM don’t match.

This isn’t a fun error. (To be fair, errors aren’t usually fun.) It sounds hard to debug the first time you read it: “the checksum was invalid”—what the bleep does that mean?
It means React rendered the component tree in the browser, compared it to the DOM that already exists, and found it to be different. But React is smart and knows that if there are already children inside the DOM element that you told it to render into, this is an isomorphic render. The two DOMs should match on the first render. But something broke, and they didn’t match!
The experiment that broke the render
At work, we often run a/b tests to experiment with various design and UX implementations to find out what works best to meet our goals with the product. One day we went to test our Login button. We wanted to find out whether we should call it “Login” or “Signup.” Even though the team is experienced in working with an isomorphic app, the experiment still ended up being run inside componentWillMount of our header component, and the isomorphic render warning started getting thrown.
Adding to our problems, another update was made to the code (around the same time) that changed the app state inside componentWillMount. It turns out that React will display this warning only for the first instance it runs into, which meant that when we fixed the first problem, we uncovered the second problem.
It’s surprisingly easy to get into this situation. One small change in the browser to the app state anytime in the first render (inside your constructor, componentWillMount, or render) can cause the error. The most common reason I’ve seen for getting into this situation is changing state based on cookies.
Warning
Cookies are global state that lives outside your app code. They’re a powerful and important tool for web app development. But they can complicate your initial app state. You either should account for the cookies on the server, or make sure to deal with them at the correct time in the browser. Chapter 10 covers this in more depth.
The reason you should care about this warning is that you lose all the positive benefits of your isomorphic render. You still have the good perceived performance—the UI and content is shown right away—but it can take a noticeably long time for the page to become usable, causing frustration for your user.
This is where componentDidMount becomes a powerful tool in your application. The next section explores how to use it to avoid isomorphic render errors.
8.3.3. Using componentDidMount to prevent isomorphic load errors
Let’s say you wanted to save a user preference in the cookies. A common use case is whether to show a site-wide dismissible banner. This is beneficial to the user because it allows for global, easily accessible state in the browser. But you must be vigilant about when to check for these cookies to prevent isomorphic errors.
Note
This example and solution assume you don’t want to read cookies on the server. In some apps, it may be more practical to read the cookies on the server and start with the correct app state in the server. We’ll walk through these trade-offs in more depth in chapter 10.
In this example, you’ll add a banner that informs users of a semi-annual sale. The rules for showing the banner are: show it to a user if they’ve never seen it before, and continue showing it until they dismiss it. You track whether they’ve seen it by writing a cookie in the browser. Figure 8.10 shows what you want this to look like.
Figure 8.10. Adding a banner to the bottom of the page

Now you need to add a banner. If you want to check out the base code, switch to branch 8.3.3 (git checkout chapter-8.3.3), which has all the code added in this chapter so far and already has this banner component created for you (writing this component isn’t important to understanding this concept, but I’ve provided it for you in the following listing so you have some context).
Listing 8.7. Banner component—src/components/banner.jsx
class Banner extends React.Component {

  handleDismissBanner() {                         1
    // will do something
  }

  render() {
    return (
      <div className=="banner" }>
        <div className="dismiss">                 2
          <button
            className="btn-reset"
            onClick={this.handleDismissBanner}    3
          >
            X
          </button>
        </div>
        <div className="content">
          {this.props.children}                   4
        </div>
      </div>
    );
  }
}
- 1 Click handler placeholder for the dismiss button.
- 2 Dismiss button lives here.
- 3 onClick handler references the handleDismissBanner function.
- 4 Parent component sets children for banner (making it more reusable).
Additionally, the following code has been added after the header in src/components/app.jsx (~line 13):
<Banner show>
  <h3>Check out the semi-annual sale! Up to 75% off select Items</h3>
</Banner>
Now you need to add the code that decides whether to show this banner when the page loads. That involves checking a cookie and then telling the banner to be visible or stay hidden. The following listing shows how to update banner.jsx to make this work.
Listing 8.8. Showing the banner component—src/components/banner.jsx
class Banner extends React.Component {

  constructor(props) {
    super(props);
    this.state = {                                                1
      show: false
    };
    this.handleDismissBanner = this.handleDismissBanner.bind(this);
  }

  componentDidMount() {
    const cookies = document.cookie;                              2
    const hideBanner = cookies.match('showBanner=false');         2
    if (!hideBanner) {
      this.setState({                                             2
        show: true
      });
    }
  }

  handleDismissBanner() {
    document.cookie = 'showBanner=false';                         3
    this.setState({                                               3
      show: false
    });
  }

  render() {
    const bannerClasses = classnames(
                            { show: this.state.show },
                            'banner'
                          );                                      4
    return (
      <div className={bannerClasses}>                             4
        <div className="dismiss">
          <button
            className="btn-reset"
            onClick={this.handleDismissBanner}
          >
            X
          </button>
        </div>
        <div className="content">
          {this.props.children}
        </div>
      </div>
    );
  }
}
- 1 Create initial state in constructor—to match the server, banner should be hidden by default.
- 2 Get cookies, see if user has previously dismissed the banner—if not, set state to show banner (will trigger re-render).
- 3 When user dismisses the browser, write cookie to page and set state to hidden.
- 4 Use state to generate banner classes.
Using state to generate banner classes will add a class called show when the banner is visible. The CSS for this class changes the display to block so the component becomes visible.
Generally, you don’t want to set state in componentDidMount. But in this case, the isomorphic render makes it the best place to update the state, because we want to ensure that the first render matches the server state. Be careful setting state in this function—you can easily get into a situation where you cause unnecessary re-renders of your component.
8.4. Adding single-page app interactions
Congrats, you’ve made it! Your app loads and renders from the server and successfully renders in the browser. Sadly, it still doesn’t do anything in the browser because you haven’t told it to do anything. Let’s make the app load data in the browser when routing between routes.
8.4.1. Browser routing: data fetching
The routes you’ve set up will make the routes at the top of the page work. But if you navigate first to the root or to /products and then click Cart, you’ll find that the cart loads without any items. That’s because you haven’t set up the SPA portion of the app to fetch any data. Figure 8.11 shows what this looks like.
Figure 8.11. Loading the cart from the Products page results in an empty state.

To get the app fetching data in the browser, you’ll take advantage of the prefetchActions static function to fetch the data on each route. React Router provides callbacks for various portions of its own lifecycle. There’s an onChange callback that can be configured. The function provided will be called before each route is rendered, giving you the opportunity to fetch any data from your API that’s needed for the route.
Note
If you’re using React Router 4, check out appendix A for an overview of setting up the routes and related router code. It also shows how to prefetch the data on the browser and handle route changes in the React lifecycle instead of the React Router lifecycle.
If you want to check out the base code, switch to branch 8.4.1 (git checkout chapter-8.4.1). The following listing shows the code to add to sharedRoutes.jsx.
Listing 8.9. Fetching data in the browser—src/shared/sharedRoutes.jsx
let beforeRouteRender =
- 1 Declare onChange handler, which takes in the dispatch function from Redux and parameters provided from React Router, prevState, and nextState.
- 2 Pull routes array from nextState so you can iterate over the components and get the actions from prefetchActions
- 3 Create a routes function that returns the routes, letting you pass in the onChange handler.
- 4 Assign onChange handler to top-level route—all changes between children routes will trigger this handler.
- 5 Default export of module is now a function, requires Redux store passed in.
- 6 Bind dispatch to onChange handler.
- 7 Returns routes function with onChange handler passed in.
Passing in the onChange handler is necessary because you need to bind dispatch to it in the browser. This function is exported so the server code can call it. A couple of things are important here. First, you need to add the onChange handler only to the top-level route. That’s because onChange fires whenever a subroute changes. When the user changes between cart or products, it’ll be fired. This also means it won’t fire on the initial render. That would be unnecessary because the data is already available from the server state.
The most complicated piece of this logic is getting the prefetchActions array from the components. This is where the routes variable from nextState is important. The routes variable is an array of objects. Each route has a component listed on it. From this, it’s possible to collect all the actions that need to be called for the route. The following listing shows the last piece of code you need in order to make all this work. Add the code to sharedRoutes.jsx. You’ll notice it’s similar to the code in renderView.jsx.
Listing 8.10. Call prefetchActions on route change—src/shared/sharedRoutes.jsx
let beforeRouteRender = (dispatch, prevState, nextState) => {
  const { routes } = nextState;

  routes.map((route) => {                                          1
    const { component } = route;                                   2
    if (component) {
      if (component.displayName &&
        component.displayName

         .toLowerCase().indexOf('connect') > -1                  3
      ) {
        if (component.WrappedComponent
         .prefetchActions) {                                     4
          return component.WrappedComponent.prefetchActions ();
        }
      } else if (component.prefetchActions) {                      3
        return component. prefetchActions();
      }
    }
    return [];
  }).reduce((flat, toFlatten) => {                                 5
    return flat.concat(toFlatten);
  }, []).map((initialAction) => {                                  6
    return dispatch(initialAction());
  });
};
- 1 Use map to iterate over each route in the array (root app route and whatever route was requested).
- 2 Grab the component from route.
- 3 Check if component is HOC connect component—if so, grab subproperty of component.
- 4 If component has WrappedComponent property, call prefetchActions.
- 5 Take results of map, which can be a nested array of arrays, and reduce them to single array.
- 6 Use map to iterate over the final flattened array; on each item call dispatch with the action.
You may notice that the structure of sharedRoutes has changed quite a bit. That’s because you need access to the dispatch method from Redux to trigger actions. In both main.jsx and renderView.jsx, you need to update the way you’re accessing the shared routes. The following listing shows the change that needs to be made in main.jsx.
Listing 8.11. Updating Main to call sharedRoutes—src/main.jsx
function init() {
  ReactDOM.render(
    <Provider store={store}>
      <Router routes={sharedRoutes(store)} history={browserHistory} />
    </Provider>, document.getElementById('react-content'));
}
Instead of directly plugging in the routes, the default export is now a function. Here you call the function, passing in the store so that sharedRoutes can pass dispatch into the onChange handler.
The change to the renderView middleware is similar to the change in main.jsx. But you have to first change the import because on the server you don’t need to do the onChange logic—it’ll never fire. The following listing demonstrates what needs to change.
Listing 8.12. Updating renderView to use routes—src/middleware/renderView.jsx
...additional code
import { match, RouterContext } from 'react-router';
import { routes } from '../shared/sharedRoutes';            1
import initRedux from '../shared/init-redux.es6';
import HTML from '../components/html';


export default function renderView(req, res, next) {
  const matchOpts = {
    routes: routes(),                                       2
    location: req.url
  };
  ...additional code
}
- 1 Include routes instead of the default export—the server doesn’t need to initialize the onChange handler because it’ll never be called on the server.
- 2 Call the routes function to get the shared routes.
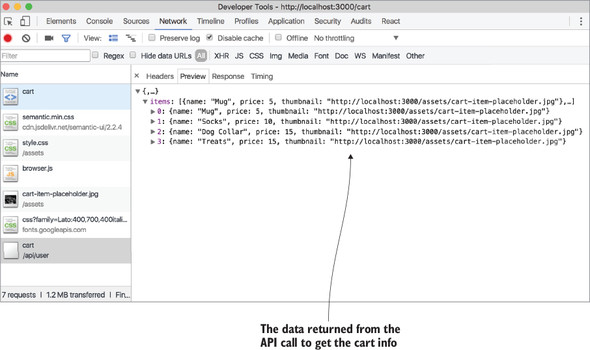
With everything configured to load data on the server, you should see the cart populated. Additionally, if you view the Network tab, you’ll see the cart data being fetched from the server. This will be shown only if you load the app via /products first and then select Cart from the navigation. Figure 8.12 shows what you’re looking for.
Figure 8.12. Now that the browser fetches data, you see the XHR call in the Network tab of the Chrome Developer Tools.
Now that you’ve built out the browser portion of the code, you can review the complete code for this chapter on branch chapter-8-complete (git checkout chapter-8-complete).
Summary
In this chapter, you learned how to build the browser portion of an isomorphic app. You added a browser entry-point file called main.jsx and handled the initialization logic required to make the app start in the browser in the same state that it was rendered on the server.
- The initial server state is added to the DOM as a string and sent down as part of the server-rendered page.
- The browser entry point handles deserializing the server-created state, initializing Redux, and rendering the React component tree into the DOM.
- The server attaches the state of the app to the DOM as a string.
- The browser reads the string into an object that can be passed into Redux.
- Redux can be initialized with a base state, which is the deserialized state from the server.
- React’s component lifecycle can make or break an isomorphic render. It’s important to make updates to the app state at the correct point in the lifecycle.
- The browser code also needs to handle data fetching for the single-page application portion of the app.