
JUnit is a Java test-driven development (TDD) framework. Traditional software development starts with some sort of requirement documents, followed by massive amounts of programming, and finishes off with some sort of manual or automated testing. Test-driven development starts with requirements, followed by the writing of automated tests, and concludes with the creation of the computer program that allows the previously written tests to pass.
The mental reordering that test-driven development requires can make you dizzy at first. It is not for every company. However, test-driven development leads to well-thought-out programs that are easier to maintain than the spaghetti that result from no planning.
JUnit also works for regression testing and more casual testing efforts. Create regression tests by finding bugs in your code. Next, create a test that fails because of the bug. Finally, fix the program, and the test passes. Leave the tests in place, and run these tests frequently to ensure that the bugs do not reappear.
Regression testing is great for projects with lots of developers working on the same code. If the project is managed without clear definitions as to who owns and makes changes to specific code, a programmer may fix a bug that creates other bugs. When another programmer comes along and fixes those other bugs, the programmer may introduce the original bug while fixing the new bug(s). This cycle goes around and around, frustrating developers and their management.
Write a regression test before fixing a test. If you have introduced a new bug inadvertently, the programmer who fixes it will not fix it by reintroducing the old bug. The key is to run these tests as part of every bug fix and to consider the bug still open if the fix does not pass the regression tests.
JUnit is nearly synonymous with testing Java code. In this appendix, I give an introductory example of JUnit's use and explain how to integrate testing with JUnit into Xcode.
The JUnit team realized that programmers are always busy. A deadline is always looming. They knew that if JUnit wasn't easy to use, JUnit wouldn't be used. As a result, implementing JUnit tests requires little new knowledge. By learning one annotation and one method call, you can successfully write complex test suites. You just can't get much easier than that.
Note
JUnit is open-source software. JUnit is licensed under Common Public License - v 1.0. The current JUnit license is located at http://junit.sourceforge.net/cpl-v10.html.
Note
The JUnit home is located at http://www.junit.org/.
To implement a JUnit test, follow these steps:
Choose a class with methods you want to test.
Create a class to do the testing.
I call this the test class.
Create methods to perform tests.
Use the annotation
@Testfor test methods.Do not put the
@Teston support methods that do not assert anything.Use assertion methods to perform the tests.
Run JUnit using the java command. The target main class is org.junit.runner.JUnitCore. JUnitCore is followed by a space-separated list of test classes. Running tests from the command line takes the following form:
java -cp <tests and JUnit> org.junit.runner.JUnitCore <test classes>
I give a working example of using JUnit from the Terminal later in this appendix.
Note
The Terminal application is located in /Applications/Utilities/.
JUnit integrates with most build environments. Integrating JUnit with Xcode does not get as much attention as integrating with Eclipse or NetBeans, so few (if any) tutorials explain Xcode/JUnit integration. This section fills the gap by explaining how to integrate JUnit with Xcode. I use JUnit 4.6 and Xcode 3.2 for the following example.
Note
The Xcode project for this example is on the book's Web site. Download the Xcode project for this appendix to avoid creating the XcodeAndJUnit project manually.
Begin by creating a Java Tool project in Xcode for this integration example:
Select File
New Project from the Xcode menu bar.
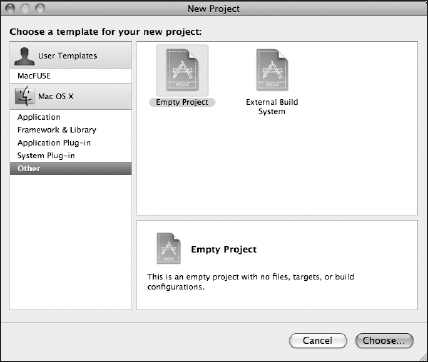
Select Empty Project from the Other templates group on the left, as shown in Figure B.1.
Open your new project folder in the Finder.
Create src , resources, and lib folders in your project folder.
Adding the new folders to your project is a little tricky.
Select your XcodeAndJUnit project in the Groups & Files tree, Control-click Add
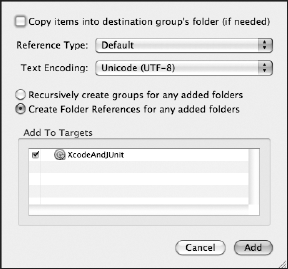
Existing Files... from the context menu, select the new folders, and add them. When the dialog box appears asking for information on how to add the folders, add them using Create Folder References for any added folders, as shown in Figure B.2.Create a file called build.xml at the root of your project in the XcodeAndJUnit directory. Create the XML file from within Xcode by selecting XcodeAndJUnit and Control-clicking. Select Add
New File... from the context-sensitive menu. Choose Empty File from the Other template catalog and create the build.xml file as part of the XcodeAndJUnit project.This is your Ant build file. With this setup, Xcode uses Ant when building your project.
Fill build.xmlwith the following code.
This Ant build is based loosely on the Xcode 3.1 Java tool template, but should work with the latest version Xcode.
Note
I explain additional details of Xcode project creation in Chapter 3.
<?xml version="1.0" encoding="UTF-8"?>
<!--
Based off Xcode 3.1 Java Console Application Project
This is standard Ant, and will work in Xcode 3.2 also.
-->
<project
      name="XcodeAndJUnit"
      default="install"
      basedir=".">
   <property name="src" location="src"/>
   <property name="bin" location="bin"/>
   <property name="jars" location="jars"/>
   <property name="lib" location="lib"/>
   <property name="dist" location="dist"/>
   <property name="resources" location="resources"/>
   <property name="resources_macosx"
             location="resources_macosx"/>
   <property name="compile.debug" value="true"/>
   <!-- lib directory should contain any pre-built jar files
   needed to build the project -->
   <fileset id="lib.jars" dir="${lib}">
      <include name="**/*.jar"/>
   </fileset>
   <path id="lib.path">
      <fileset refid="lib.jars"/>
   </path>
   <!-- Initialization target, for any prelimary setup needed
   to build -->
   <target name="init" description="Preparation">
      <mkdir dir="${src}"/>
      <mkdir dir="${lib}"/>
   </target>
   <target
         name="compile"
         depends="init"
         description="Compile code">
      <mkdir dir="${bin}"/>
      <javac
               deprecation="on"
               srcdir="${src}"
               destdir="${bin}"
               source="1.6" target="1.6"
includeAntRuntime="no" classpathref="lib.path" debug="${compile.debug}"> </javac> </target> <target name="jar" depends="compile" description="Build jar"> <mkdir dir="${jars}"/> <jar jarfile="${jars}/${ant.project.name}.jar" basedir="${bin}" manifest="${resources}/Manifest"> <!-- Inject resources --> <fileset dir="${resources}/" excludes="${resources}/Manifest"/> <!-- Merge library jars into final jar file --> <zipgroupfileset refid="lib.jars"/> </jar> </target> <target name="install" depends="jar" description= "Put all the pieces together in the dist directory"> <mkdir dir="${dist}"/> <!-- Copy jars --> <copy toDir="${dist}"> <fileset dir="${jars}"> <include name="*.jar"/> </fileset> </copy> </target> <target name="run" depends="install" description="Run the tool"> <java classname="${ant.project.name}" classpath="${bin}" fork="true"> </java> </target> <target name="clean" description="Remove build and dist directories"> <delete dir="${bin}"/><delete dir="${jars}"/> <delete dir="${dist}"/> </target> </project>Create XcodeAndJUnit.java in your src directory. Create the Java file from within Xcode by selecting src and Control-clicking. Select Add
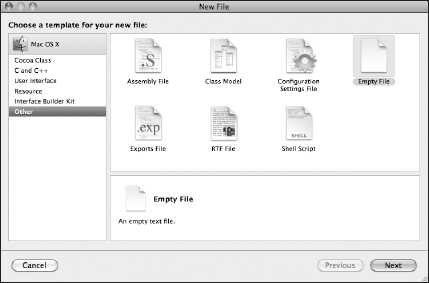
New File... from the context-sensitive menu. Choose Empty File from the Other template catalog as shown in Figure B.3 and create it in the src directory. If there is an extra reference to the file in the Groups & Files tree, remove the reference.Add the following source to the XcodeAndJUnit.java file.
import java.util.*;
import com.genedavis.*;
public class XcodeAndJUnit
{

   public static void main (String args[])
   {
      BillOfMaterials bom = new BillOfMaterials();

      bom.addGlass(6);
      bom.addSteel(10);
      bom.addOil(1);

      bom.printBill();
   }
}
Add a Manifest file to the resources directory. Create the Manifest file from within Xcode by selecting resources directory and Control-clicking. Select Add
New File... from the context-sensitive menu. Choose Empty File from the Other template catalog and create the Manifest file as part of the ConsoleApp project in the resources directory. If there is an extra reference to the file in the Groups & Files tree, remove the reference.The source for the Manifest is simply this:
Main-Class: XcodeAndJUnit
Your project is not quite ready to use. There are still a few steps to complete. You need an Executable and a Target.
These steps give you a properly configured Target:
Control-click the Targets node of the Groups & Files tree.
Select Add
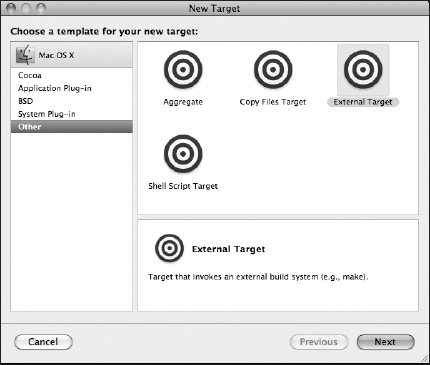
New Target...Select External Target from the Other group, as shown in Figure B.4. Name your new target XcodeAndJUnit, and add it to your XcodeAndJUnit project.
Double-click your new XcodeAndJUnit Target.
This brings up the Target: XcodeAndJUnit dialog box.
Set the Build Tool to /usr/bin/ant.
Set the Arguments to -emacs $(ACTION), as shown in Figure B.5.

Your Target is ready to use. This allows building and cleaning of the project. Before the next step, temporarily comment out the code in your XcodeAndJUnit class main() method and the import statements, and then click Build
Next, from inside Xcode, create the Executable by taking these steps:
From the Executables context menu, select Add
New Custom Executable....Name your executable java.
Select the path to your java command.
That is
/usr/bin/java.Add the new Executable to your project.
Open your new java executable by double-clicking it.
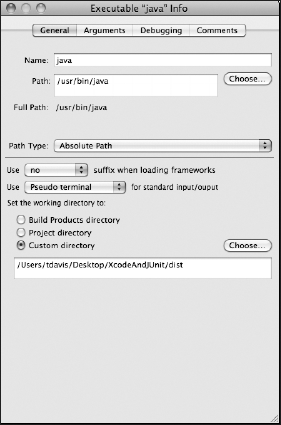
Select the General tab, shown in Figure B.6, and set Custom directory to your project's dist directory.
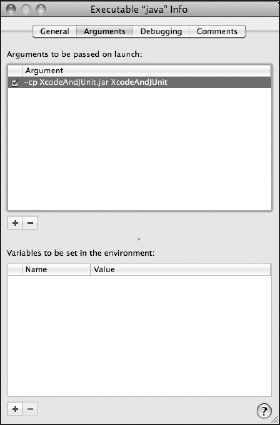
Select the Arguments tab shown in Figure B.7, and add the argument -cp XcodeAndJUnit.jar XcodeAndJUnit.
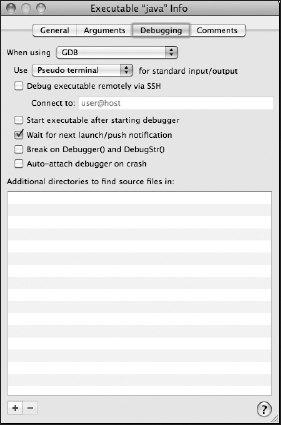
Select the Debugging tab shown in Figure B.8. Set the Java Debugger to the default debugger. Select Wait for next launch/push notification. Deselect all other check boxes.
Your project is almost ready to use. In fact, if you select Run
Next, I explain adding JUnit to your project.
JUnit is conveniently packaged as a single JAR. The junit.jar is available from http://www.junit.org/. The junit.jar is named junit-<version number>.jar. I refer to it as the junit.jar for simplicity.
If you are working from a previously built Xcode project, your project contains a jar directory. When including the junit.jar in an Xcode project, placing the junit.jar in the project's jars/ directory may be your first impulse. Xcode's build.xml contains a clean target that deletes the jars/ directory. If you place the junit.jar in the jars/ directory, every time you clean your project, you also have to add JUnit back to the project.
A closer look at build.xml shows the comment "lib directory should contain any pre-built jar files needed to build the project." Place the junit.jar in the lib/ directory. Any JAR'ed libraries used to build the project should be placed in the lib/ directory.
All JAR'ed libraries placed in the lib/ directory end up repackaged in the project JAR. In our case, that is the XcodeAndJUnit.jar. Bundling junit.jar is fine during development, but it should be avoided for release builds. Also, remove test classes from release builds.
For this section's example, I jar junit.jar and the test classes in the build. If you want to prevent junit.jar and test classes from being built, you can place them in separate test directories, and then create and name the directories something like test_lib and test_src so they are easily identifiable. Then create a new external target and modify the build.xml file so that Ant builds and bundles the tests only when the new target is used.
Note
I discuss Ant and build.xml files at length in Chapter 4.
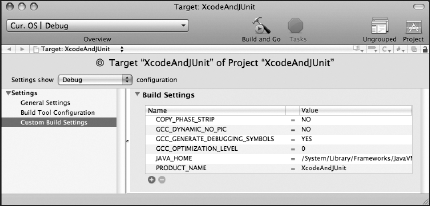
The example code in this section requires Java 1.6. The Java target in Xcode uses Ant. On some OS X distributions, Ant—when run from Xcode—defaults to an older version of Java that cannot build this example's source. A quick fix is to include the JAVA_HOME property in the Target's Build Settings, as shown in Figure B.9, with the value being the path to /System/Library/Frameworks/JavaVM.framework/Versions/1.6.0/Home or a similar Java Home directory.
Note
Java home paths are discussed in detail in Chapter 2.
In this book, I harp on never hard coding JAVA_HOME. However, development environments are usually personalized to individual projects, computers, and developers. It is very likely that you do not want the target's version of Java in your project to change when you change the Java Preferences. This is one of those rare cases where hard coding JAVA_HOME makes sense.
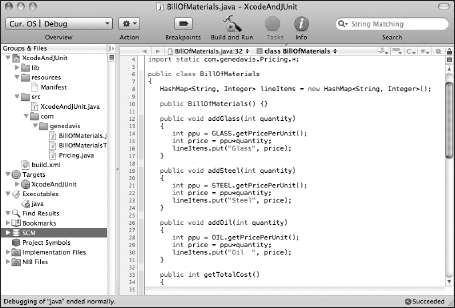
The code example for this appendix consists of three classes and an enum. This Xcode project represents a rudimentary bill of materials generator. The code is contained in XcodeAndJUnit.java, Pricing.java, BillOfMaterials.java, and BillOfMaterialsTest.java.
Note
If you have not yet uncommented the code in the XcodeAndJUnit class, do so now.
The XcodeAndJUnit class creates and prints a bill of materials. This class contains the main() method. XcodeAndJUnit is not used during the JUnit test. Deleting this class has absolutely no affect on running the test. This class demonstrates the use of the BillOfMaterials class that is the object of the example test.
Once again, here is the code for XcodeAndJUnit:
import java.util.*;
import com.genedavis.*;
public class XcodeAndJUnit
{

   public static void main (String args[])
   {
      BillOfMaterials bom = new BillOfMaterials();

      bom.addGlass(6);
      bom.addSteel(10);
      bom.addOil(1);

      bom.printBill();
   }
}
The Pricing enum contains three materials (STEEL, OIL, and GLASS) that are initialized to a unit price in cents. In a real accounting program, I might use BigDecimal, but ints representing cents work in this limited example. The single method, getPricePerUnit(), is provided.
Here is the code for Pricing:
package com.genedavis;
public enum Pricing
{
   STEEL (5000),
   OIL   (100),
   GLASS (1500);
   private final int pricePerUnit;

   private Pricing(int ppu)
   {
      this.pricePerUnit = ppu;
   }
   public int getPricePerUnit()
   {
      return pricePerUnit;
   }
}
The class I will test with JUnit is BillOfMaterials. BillOfMaterials offers methods for adding units of glass, oil, and steel to the current bill of materials. The added items are stored in the lineItems HashMap<String,Integer>. The printBill() method calls the getTotalCost() method and the getBillBody() methods and then prints the results.
Here is the source for BillOfMaterials:
package com.genedavis;
import java.util.*;
import static com.genedavis.Pricing.*;
public class BillOfMaterials
{
   HashMap<String, Integer> lineItems =
      new HashMap<String, Integer>();

   public BillOfMaterials() {}

   public void addGlass(int quantity)
   {
      int ppu = GLASS.getPricePerUnit();
      int price = ppu*quantity;
      lineItems.put("Glass", price);
   }

   public void addSteel(int quantity)
   {
      int ppu = STEEL.getPricePerUnit();
      int price = ppu*quantity;
lineItems.put("Steel", price);
}
public void addOil(int quantity)
{
int ppu = OIL.getPricePerUnit();
int price = ppu*quantity;
lineItems.put("Oil", price);
}
public int getTotalCost()
{
int total = 0;
for(Map.Entry<String,Integer> entry : lineItems.entrySet())
{
int value = entry.getValue();
total += value;
}
return total;
}
public String getBillBody()
{
String billBody = "";
for(Map.Entry<String,Integer> entry : lineItems.entrySet())
{
int value = entry.getValue();
int dollars = value / 100;
String cents = Integer.toString(value);
cents = cents.substring(cents.length() - 2);
String product = entry.getKey();
billBody += product+" $"+dollars+"."+cents+"
";
}
return billBody;
}public void printBill()
{
int total = getTotalCost();
String billBody = getBillBody();
int dollars = total / 100;
int cents = total % 100;
System.out.print(billBody);
System.out.println("
total: $"+dollars+"."+cents);
}
}Finally, I can show you the actual test class, BillOfMaterialsTest. Comparing the test method of BillOfMaterialsTest with the main() method of XcodeAndJUnit, you see a strong correspondence. Both create and set up a BillOfMaterials. However, BillOfMaterialsTest attempts to assert the value of the BillOfMaterials getTotalCost() method.
The @Test annotation and the assertTrue() method make this test work. The packages imported are org.junit.* and org.junit.Assert.*. Once imported, the assertTrue() method and the @Text annotation are available. The @Test annotation marks a method as being a JUnit test. The assertTrue() method is the actual test. Using only one annotation and one method, you can build very powerful unit tests for your projects.
Tip
Many other assert methods are available. See the JUnit documentation available on the JUnit Web site for more information about available assert methods and combining JUnit tests.
Here is the source code for the JUnit test class, BillOfMaterialsTest:
package com.genedavis;
import org.junit.*;
import static org.junit.Assert.*;
public class BillOfMaterialsTest
{
   @Test
   public void testBillOfMaterials()
   {
      BillOfMaterials testBom = new BillOfMaterials();
testBom.addGlass(6);
testBom.addSteel(10);
testBom.addOil(1);
int testTotal = testBom.getTotalCost();
assertTrue(testTotal == 59100);
}
}If you have not yet done so, add these three new classes () to the src/com/genedavis directory of your project. You need to create the com and genedavis directories. After you add these classes to your src/ directory, shown on the far left of Figure B.10, click Build and Run from the Xcode Console. This verifies that the project is working properly. After running your project, you are ready to test.
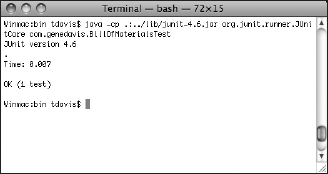
If you want to run JUnit only from the command line at this point, these instructions will take care of running the BillOfMaterialsTest:
You should see a result similar to Figure B.11.
Running the test from inside of Xcode is not much different, and it may be even easier after it has been configured. The following instructions configure and run the JUnit test from Xcode:
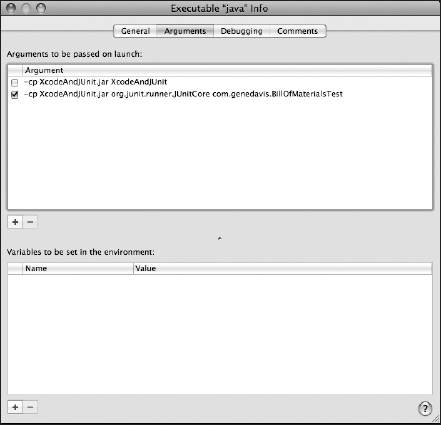
Double-click the Executables java leaf of the Group & Files tree on the left side of your Xcode project window.
This brings up the Executable "java" Info dialog box.
The Arguments tab is shown in Figure B.12.
Add another -cpargument that reads as follows:
-cp XcodeAndJUnit.jar org.junit.runner.JUnitCore com.genedavis.BillOfMaterialsTest
Select the new -cp argument, and unselect the original -cp argument.
Do not delete the old argument, because you will want to use it when rebuilding the project. Only one of these
-cparguments may be selected at a time.
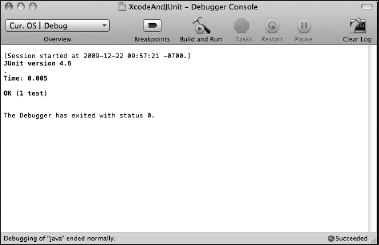
Clicking Build and Run in the Xcode Console should result in output similar to Figure B.13.
In this appendix, I explained the uses of JUnit. JUnit is written with test-driven development in mind. JUnit works well for regression testing and more casual testing strategies also.
JUnit is designed for simplicity of use. By learning as little as one annotation and one assertion method, you can create complex test suites. The annotation is @Test, and the assertion method is assertTrue().
Integrate JUnit with Xcode by placing the junit.jar in the build path. Create one or more JUnit test classes. The last step is to add a new -cp XcodeAndJUnit.jar org.junit.runner.JUnitCore <tests list> argument to the Java executable and run the tests.