
No computer matches the support for Java out of the box that you find in a Mac. OS X ships with support for Java applets in Safari, natively packaged Java applications, a Java-friendly IDE, native-interface APIs, and several Java tools and applications. Support for Java upgrades is integrated into the directory structure and system updates. Apple even maintains and builds an optimized version of Java just for the Mac.
Java configuration is different on Macs than on other computer systems. Setting up extensions and version preferences is easy, but it requires some explanation. Knowledge of the Terminal application and the shell environment is useful too.
In this chapter, I cover the nuances of Java configuration on OS X. This includes installing JAR and JNI libraries, setting the default JVM, and properly setting JAVA_HOME. I also introduce the Terminal application, environment properties, dot files, and storage of system configurations.
Effective Java programming on OS X requires an understanding of the Finder and the Terminal applications. Navigation of directories and running of applications by users (like you and me) is accomplished through either the Finder or the Terminal. The Finder and Terminal applications provided essentially the same service to users. One is GUI based. The other is command-line based.
The Finder application is the GUI directory and file browser for OS X. Many beginning OS X users do not even know they are using an application to browse their desktop or hard drive.
The Finder is always open. Otherwise, you could not browse directories and files. The Finder is a permanent part of the Dock. On the Dock, it is has the square smiley face icon on the far left, as shown in Figure 2.1.

Finder is an application that can be restarted just like any other application without restarting the whole computer, which is nice and modular, just the way programmers like it. To restart your Finder without restarting your computer, follow these steps:
Knowing how to restart the Finder comes in handy later in the chapter when I discuss environment variables. Also, on the very rare occasion when the Finder stops working properly, relaunching it may fix your problem.
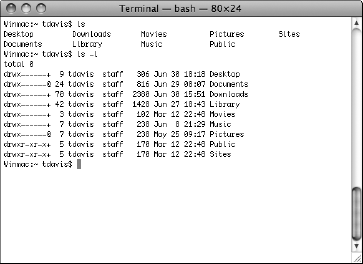
The Terminal application, shown in Figure 2.2, is very similar in purpose to the Finder. The Terminal allows command-line browsing of directories and files. It is analogous to the DOS window in Windows. Applications of all sorts are launched from the command line in the Terminal application.
The Terminal application is a little tricky to find. You will use the Terminal constantly throughout this book, and you'll find it invaluable after you are familiar with its use. To find the Terminal application, open your Applications folder in a Finder window. Look for a folder called Utilities. The Terminal application is in the Utilities folder.
Now that you can open the Terminal application, it is time to find and configure Java on your computer.
Finding Java for the first time on OS X is a bit tricky. If you are an experienced Java programmer, you might decide to check the JAVA_HOME environment variable first. From the Terminal on my default install of OS X, executing echo $JAVA_HOME produces no results. No JAVA_HOME variable is set.
If you are an experienced Unix programmer, you might think to check the location of the java command-line tool. However, which java returns:
/usr/bin/java
Usually the java command is in a bin directory under JAVA_HOME. If you list the /usr directory, it reveals a directory that looks nothing like a typical JAVA_HOME, because it isn't. Enter ls -la /usr/bin/java to find out if this is actually the java command, and you discover that /usr/bin/java is actually a link to:
/System/Library/Frameworks/JavaVM.framework/Versions/
Current/Commands/java
By following links to links to links, eventually anyone persistent enough finds a real JAVA_HOME. In fact, poking around the directory system exposes several versions of Java with several Home directories. Explore this directory for an interesting exercise:
/System/Library/Frameworks/JavaVM.framework/Versions/
In addition, executing /usr/libexec/java_home returns the following:
/System/Library/Frameworks/JavaVM.framework/Versions/1.6.0/Home
Also, there is the /Library/Java/Home directory that turns out to be linked to:
/System/Library/Frameworks/JavaVM.framework/Home
Warning
If you are well versed in the art of links with ln, you may be tempted to modify the links to java tools, /Library/Java/Home or other directories. Using ln to modify Java configuration links may cause issues with using Java or Java updates later on.
You are probably wondering which path you should use for JAVA_HOME when requested by an installation program. The correct answer is execute:
/usr/libexec/java_home
This returns the correct version path to your currently set Java home. This little app is handy when you don't want to fire up the JVM to find the path of home. You also can use it to dynamically set JAVA_HOME in shell scripts. The returned value changes based on your Java Preferences setting.
Note
Terminal creation and use of shell scripts are explained in greater detail in Chapter 4, which is about building Java apps, but the shell scripting information found there can be applied to situations other than setting up Java builds.
This is the perfect excuse to test Xcode for the first time, while verifying that /usr/libexec/java_home actually agrees with your JVM about its home directory. The following code example requires Xcode. If you have not yet installed the OS X developer tools, install Xcode now.
Note
The JavaHome Xcode project is available on the book's Web site. Download the Chapter 2 code from the book's Web site to access the JavaHome Xcode project.
Note
In Chapter 3, I explain Java tool project creation with Xcode, and an alternative approach with Organizer.
Below, I explain how to start Xcode, and "Build and Run" the Java tool project called JavaHome. A Java tool is a simple Java application that normally starts with the java command. Typically Java tools are used by scripts or from the command line, though no rules or regulations prevent you from expanding a basic Java tool to be a fully windowed event-driven application.
The JavaHome project prints the location of the running JVM's home directory. Because this tool does not have a Window or Dialog to display the information, I describe how to build and run the application in the Xcode Console window. This provides a display for standard output. Follow these steps:
Note
Instructions for installing the free OS X developer tools were given in Chapter 1.
Start Xcode.
Xcode is located in
/Developer/Applications. You find theDeveloperfolder by double-clicking your default startup disk.Click File
Open....
You now see the Open dialog box.
Select the JavaHome Xcode projects in the
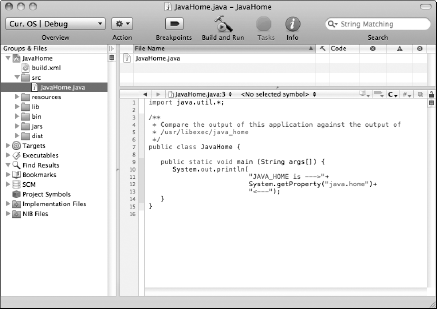
JavaHomeproject, as shown in Figure 2.3.Select the
JavaHomeclass in the Group & Files panel on the left side of the Project window, as shown in Figure 2.4.Ensure the
main()method contains the following code.The following code queries the JVM for the
java.homeSystem property.public static void main (String args[]) { System.out.println( "JAVA_HOME is --->"+ System.getProperty("java.home")+ "<---"); }Open the Xcode Console window found in Run
Console, and click Build and Run.You should see a similar result to that shown in Figure 2.5.

Note
Xcode projects are explained in detail in Chapter 3.
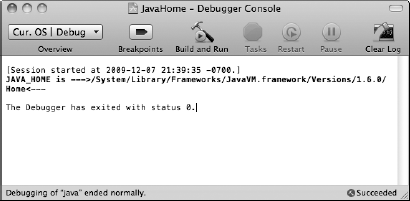
This program verifies that your Java tool executing from Xcode and java_home executing from the Terminal agree. In the next section, I explain how to change the Java version pointed to by java_home and java.home.
As I mention above, the Java home path given by the java_home application varies based on your settings in Java Preferences. You may run into a circumstance where you must use a specific version of Java on the OS and want to ignore the directory returned by java_home.
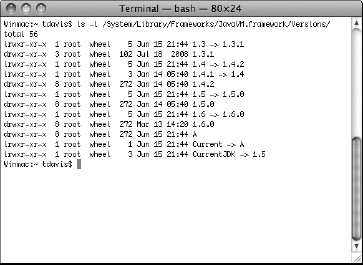
A simple solution is to hardcode the path to the Home directory of a specific version of Java. In the /System/Library/Frameworks/JavaVM.framework/Versions/ directory, you see additional directories named after several versions of Java, as shown in Figure 2.6. Some of these have Home directories in them. If you need a specific version of Java, hardcode your path to the Home directory of the Java version you want to use.
Using the version option of the java_home command-line tool is a better solution than hardcoding the path of a specific Home directory. For example:
/usr/libexec/java_home -v1.5
produces the path to the 1.5 Home directory:
/System/Library/Frameworks/JavaVM.framework/Versions/1.5.0/Home
To see the manual for java_home, enter man java_home in a Terminal window. man is a command-line tool for viewing command-line tool manuals. Use the up and down arrows to browse up and down in man manuals. Type q to quit the man application.
Warning
Hardcoding paths to specific versions of JVMs is discouraged. The path may change later with a system update. However, in some cases this still may be the solution you prefer. The preferred method to find a path to a specific Java version is to pass a JVM version to java_home command-line tool.
Note
Application bundles provide an Info.plist you can configure to require or suggest a version of Java that the Java application uses. Chapter 5 provides information on Info.plist configuration.
Java Preferences is found in the Applications/Utilities directory. Starting the application, you see a window with four tabs: General, Security, Network, and Advanced. The General preferences tab, shown in Figure 2.7, contains the option to specify the version of Java that you want to use with either applets or Java applications.
To specify your preferred version of Java to use, drag the Java version up or down the list. The top entry is the most preferred version of Java to use. If an application cannot be run with the preferred version, then the next most preferred version is used.
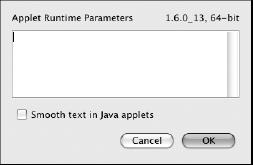
The Java Applet Plugin section of the General preferences tab has the additional ability to specify options to use when starting applets. Click the Options... button, and the Applet Options dialog box becomes visible, as shown in Figure 2.8. From here, you can set applet runtime parameters in a text box. Also, you can select to smooth text in Java applets.

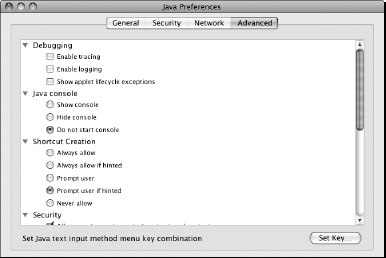
Click the Advanced tab at the top of the Java Preferences window. This tab contains a host of useful configuration settings, as shown in Figure 2.9. The advanced options include enabling tracing, logging, and showing applet lifecycle exceptions. You can configure whether to show or even start the Java console. You can configure many security settings as well.
Note
If you are using a 32-bit version of Safari, then applets running inside of Safari must use a 32-bit version of Java. This means that you are reverted to J2SE 5.0, instead of using Java SE 6, which is available only in 64-bit on OS X. However, Web Start applications started from a 32-bit Safari still run in Java SE 6 if desired.
Tip
If you set Java Applications to the latest version of Java in the Java Preferences, but a Java application is ignoring this setting, check the Info.plist setting for the application. If the application has an Info.plist setting specifying the use of an older version of Java, the Info.plist overrides the preferred setting in Java Preferences.
Java programmers speak of the classpath, clumping all classpaths into one category. Java actually has three categories of classpaths. Each of the three classpath types has a distinct purpose and should be used properly. The purpose of this section is to review the categories of classpaths in Java and explain their locations and uses.
The three classpath categories are user, extension, and bootstrap. These also are called the application classpath, the optional classpath, and the core classpath, respectively. Most Java developers mean all three when they say classpath. However, developers often only manipulate the user classpath, avoiding the other two as much as possible.
The core classpath is reserved for the JVM's JAR files. Only the actual implementer of the Java Virtual Machine should be populating this classpath. The system property for the core path is sun.boot.class.path, and it can be retrieved at runtime by the following command:
System.getProperty("sun.boot.class.path");The core path is located in the same directory as the Home directory. It is in the Classes directory.
I mentioned earlier in this chapter that the location of the active Home directory varies based on the setting in Java Preferences. As mentioned earlier, you can find the location of the active Home directory by calling the command-line tool /usr/libexec/java_home. Modify the resulting directory path by replacing Home with Classes, and you have created the active core classpath's path. On my system the active core path is as follows:
/System/Library/Frameworks/JavaVM.framework/Versions/
1.6.0/Classes
On your system, it may be different.
The optional classpath (or extension classpath) stores JARs that extend Java. These are JARs that are intended for use by applications running on the computer that do not actually install the libraries. For instance, if you create the newest and sleekest widget that everyone assumes is available for their applications, you install the JAR'ed widget in the proper optional classpath, and every application and applet running on the computer has instant access to it.
On OS X, three optional classpaths are active at any given time. You may be familiar with the traditional lib/ext directory located in the active Java home. This directory exists on OS X, but should not be used.
Warning
Do not use the Java Home directory's lib/ext directory for Java optional packages. System Update tends to change the location of this directory or even delete this directory without warning.
These are the two other optional classpaths:
/Library/Java/Extensions

/System/Library/Java/Extensions
The second path, starting with System, is for Apple's exclusive use. That leaves /Library/Java/Extensions for developer and application to use. /Library/Java/Extensions has a huge benefit: If the user changes the preferred version of Java on the Mac, this optional classpath stays active. Dependent applications keep on working. (Thanks Apple!)
The system property for the extension classpath is java.ext.dirs. Access the java.ext.dirs property at runtime with this command:
System.getProperty("java.ext.dirs");User (or application) classpaths are defined by default as the directory the application is started from or the current JAR from which the application is running. If the classpath option of the java command is redefined, then the current directory or JAR's path must be included in the new path.
The application classpath provides the application with the locations of additional libraries specific to it.
Warning
If the application classpath contains classes that already exist in one of the other classpaths, then the JVM ignores the duplicates in the application classpath.
The system property for the user classpath is java.class.path. To access the application classpath at runtime, use this command:
System.getProperty("java.class.path");You will need to include JARs or native libraries in your Java applications, eventually. Two common methods for including JARs are available. The first is to modify the java classpath option to include the JARs. When modifying the java classpath option on OS X, path separators are colons (:) and directory separators are forward slashes (/). The second method of loading needed libraries is to place your JARs in the appropriate directory, so the JRE loads them when needed.
To make your JARs or native libraries available to all Java applications, place them in /Library/Java/Extensions. Java class files are not recognized in this directory unless they are in JARs. Native libraries used in Java Native Interface (JNI)-based applications can be placed in /Library/Java/Extensions loose. Shared native libraries do not require packaging of any sort load from the Extensions directory.
Tip
On OS X, Java Native Interface libraries follow the naming convention lib<lib name>.jnilib. This naming convention differs slightly from Linux or Windows.
Any JAR file works as a library. To create a custom library using Xcode, use the JavaHome project from earlier in this chapter and remove the main() method. Creating native libraries is not much more difficult. Use the JniTest project from the book's Web site to create native libraries. Later in this book, I explain details of Ant project creation for JNI. For now, use the Xcode project that I provide.
Creating custom libraries sounds easy because it is. Still, the following demonstration clears up potential confusion. This simple example uses an Xcode-generated JNI project. JNI scares many developers, but there isn't much to it. I will go easy on you for our first JNI example.
Note
Chapter 9 covers JNI on OS X in depth.
Note
In Chapter 3 I explain creating Java tool projects with Xcode and Organizer.
As a reminder, JNI applications use Java code to call a natively compiled (usually C) library. This comes in very handy when you need to interface your application with prebuilt libraries to save the time and expense of rewriting the libraries in pure Java. Also, if you have small chunks of code that need optimizing in C, JNI works for that too.
In this sample, I use a default JNI Xcode project called JniTest. Xcode 3.2 does not currently have a simple JNI project template, but I had one hanging around from Xcode 3.1. It works fine with Xcode 3.2 and with a little tweaking makes a great base template for JNI development in Xcode 3.2.
After compiling and testing the JniText project, I move the native library to the Extensions folder and the Java class to the Desktop. At this point, running the class from the command line works because the jnilib is in the optional classpath. Follow these steps:
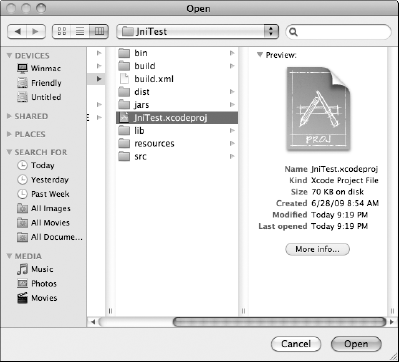
Open Xcode and choose File
Open...Choose the JniTest project file from the JniTest project, as shown in Figure 2.10.
Open the projectby clicking the Open button.
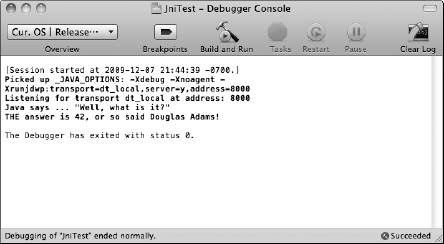
Open the Xcode Console by selecting Run
Console.Click Build and Run at the top of the console, as shown in Figure 2.11.
This creates the native library and class we need for our test.
Navigate in the Finder to the
bindirectory in your project.The
bindirectory should contain theJniTest.classand thelibJniTest.jnilibfiles.Copy the
JniTest.classto the Desktop and thelibJNITest.jnilibto/Library/Java/Extensions.Open a Terminal window and navigate to the desktop by typing
cd Desktopafter opening the Terminal window.Enter
java JniTestin the Terminal.The output should read:
Java says ... "Well, what is it?"
THE answer is 42, or so said Douglas Adams!
Tip
JNI builds with Xcode on OS X 10.5 seem to require a 32-bit JVM. If Xcode fails to build the built-in JNI template on your Mac, just change the preferred JVM to a 32-bit JRE in the Java Preferences application.
Every program you write has variables contained in it. You are already familiar with the creation of variables in Java. In addition, Java gives programs access to JVM-specific system variables called properties. Earlier in this chapter, I discussed the sun.boot.class.path, java.ext.dirs, and java.class.path properties.
The environment that starts a Java program (or any other program) also has variables associated with it. These OS X variables are called environment variables. Earlier, I described both the Terminal and the Finder. Both applications have environment variables. These variables are inherited by applications opened through them.
When you type any command into the Terminal, the command is executed by a shell program. Bash is the shell that runs by default in the Terminal window. These instructions assume bash is your shell and running any scripts you execute. If you discover you are using a different shell, consult the documentation for that shell. Documentation for all the common shells is just an Internet search away.
Bash contains two types of variables: environment variables and shell variables. Environment variables are inherited by applications opened from a Terminal window. Shell variables are not inherited by programs opened from the Terminal window.
Tip
Application bundles you normally open with a double-click in the Finder can be opened from the Terminal by using the open command. For example, use open/Developer/Applications/Xcode.app.
By running applications from the Terminal, you change the set of inherited environment variables to match the parent Terminal window instead of the Finder. Opening from the Terminal allows you to modify applications' environment variables from the shell.
Check the Terminal's environment variables by entering env in the shell. Check the shell variables by typing set in the Terminal window. Notice that the shell variables include the list of environment variables.
When set or displayed in bash, variables start with a name followed by an equal sign followed by a value. Do not place spaces directly before or directly after the equal sign. By convention, the names of environment variables are always completely uppercase. (Sysadmins shout a lot.) Words in variable names are typically separated by underscores.
Tip
Type env in the Terminal, and you see the full list of environment variables. Look at the variable names and values. One variable is named SHELL. Notice SHELL's value. If you have a default installation, it is probably bash. This is a handy way to check which shell is running.
Create a new environment variable in a Terminal window for practice. Use this form:
export MY_VARIABLE="some value"
The export command makes variables available to the environment. Quotes are only needed if the value contains spaces. The variable does not appear in other Terminal windows.
Note
Shells and shell scripts are discussed in detail in Chapter 4.
As mentioned earlier, a common environment variable often available in Terminal windows is JAVA_HOME. JAVA_HOME is discouraged on OS X in favor of other options mentioned earlier. OS X does not come with the environment variable JAVA_HOME set by default.
Many Java-based servers and complex Java applications look for a JAVA_HOME variable when running installation shell scripts or startup scripts. Ideally, set these applications to point to the correct home via the java_home command-line application discussed earlier.
If you cannot get around the requirement for a JAVA_HOME environment variable, set JAVA_HOME locally in a startup script for the application that needs it. Most applications that need JAVA_HOME are using a script to start. The script begins with a line similar to this:
#!/bin/bash
Place the exported variable somewhere after this declaration line.
Setting JAVA_HOME locally in a startup script allows other applications that require JAVA_HOME to have the variable set to a different value without accidentally having an application use the wrong value.
Of course, you can hardcode the JAVA_HOME value; however, dynamically setting it to match Java Preferences is better. Setting JAVA_HOME locally in a shell script or from the command line to equal java_home is accomplished with this command:
export JAVA_HOME=`/usr/libexec/java_home`
Notice the backticks. The backticks execute java_home and provide the return value as the value of JAVA_HOME.
I explained setting environment variables for the Terminal in the preceding section. These variables affect only the Terminal or applications that start from the Terminal. If you double-click an application in the Finder, the Terminal environment variables are ignored in favor of Finder's environment variables.
There is an easy fix for this situation. You can set environment variables for both the Terminal and the Finder. First, you need some background information.
On OS X, and other Unix systems, users have a home directory. When you log in via telnet or ssh or open a Terminal window, you are located in your home directory. To return to your home directory after changing your current directory, simply enter one of the following:
cd

cd ~
The tilde at the beginning of a directory path represents your home directory.
Browsing directories in the Finder hides many files and folders from your view. This is especially true of your home directory and the root directory. For example, open a Finder window and navigate to the root of your default hard drive and then open a Terminal window and go to the same location and list the root directory using these commands:
cd /
ls
You find that the directories beginning with lowercase names are visible to the Terminal, but not immediately visible or navigable by the Finder. To get to these hidden directories in the Finder use the Go
Complex applications store user state, serial numbers, preferences, file paths, URLs, and a great deal of other information in property files that are changed constantly. By convention on OS X and other Unix platforms, user-specific information and application state is often stored in dot files or dot folders in the user's home directory.
Dot files (or folders) are hidden from casual users even in the Terminal. If a file or folder has a name that begins with a dot, such as .my-folder, the Finder does not display it. Also, the ls command entered in a Terminal window does not display dot files and dot folders.
To display dot files in the Terminal, use this command:
ls -a
To display dot files in the Finder, you need to issue the following command in a Terminal window:
defaults write com.apple.finder AppleShowAllFiles -bool true
Then relaunch the Finder either through the Force Quit Applications window (explained earlier in this chapter) or by restarting your computer. To hide dot files in the Finder (because you will get tired of the clutter quickly), use the following command in the Terminal, followed by a relaunch of the Finder:
defaults write com.apple.finder AppleShowAllFiles -bool false
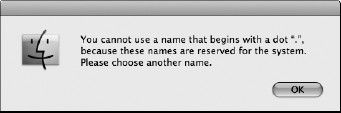
Notice that the only difference between the two commands is the Boolean value at the end of the command. You cannot create dot files or folders from the Finder, as shown in Figure 2.12. Instead, use the Terminal. Follow these steps to see a demonstration:
The three commands mentioned above are: mkdir,touch, and ls. mkdir means make directory. touch(in this case) means create a new file by this name.ls means list. These commands are common on my Unix operating systems.
Note
The touch command line utility modifies access and modification times of files. Creating files is not its purpose. However, creating non-existent files is a useful side effect of touch.
I've given you some basic background on hidden files on OS X and a brief explanation of the home directory, so you are now ready to understand global environment properties.
Earlier, I mentioned that setting environment variables in Terminal windows affects only that Terminal where the change is made and the applications launched from that Terminal window. The Finder remains unaffected by changes made to Terminal environment variables.
Apple understood the need for setting environment variables in both Terminal and Finder spawned applications. Their solution is a hidden property file that does not exist by default on OS X. The file is:
~/.MacOSX/environment.plist
From my earlier discussion of the home directory and hidden folders, you probably recognize that the tilde represents your home directory and the directory beginning with a dot is a hidden directory.
Check to see if the ~/.MacOSX directory exists by typing ls ~/.MacOSX in the Terminal. If the directory exists, and you have an environment.plist file in the directory already, then you may navigate to it by using the Go to Folder... menu item under the Go menu in the Finder application. Once there, double-click the environment.plist file to open the Property List Editor.
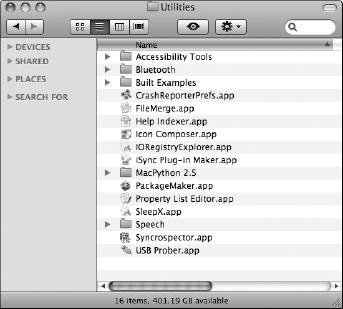
If the file or folder does not exist, you can create it from the Property List Editor. The Property List Editor is one of the developer tools installed with Xcode. The path to Property List Editor is as follows:
/Developer/Applications/Utilities/Property List Editor.app
The Utilities directory, shown in Figure 2.13, contains the Property List Editor application and several other useful utilities.
Tip
When giving a path from the root directory / in the Terminal, remember the Finder equivalent is found by opening your startup drive and browsing from there.
You can edit many types of Mac property files with Property List Editor. In this case, the property file is environment.plist. You will learn other types of property files that the Property List Editor manipulates throughout this book.
Warning
Don't forget to restart your computer after saving changes to environment.plist.
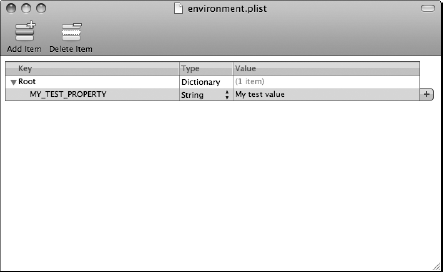
As shown in Figure 2.14, the environment.plist is an XML file with a Root node of type Dictionary. Add children to the Root by clicking the Add Child icon at the top of the window. When you restart the computer, all the children of Root load into your global user environment.
Save your changes to the environment.plist to the path ~/.MacOSX/. This seems fairly straight forward, but remember that you cannot see .MacOSX, because it is hidden! Three methods seem easiest for getting around this problem.
Warning
Remember to save environment.plist in XML Property List format. That is the default format.
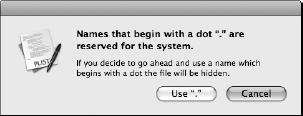
First, if .MacOSX does not exist, you can create it from inside Property List Editor's Save dialog box. Ignore the warning about dot folders shown in Figure 2.15, and create the directory. You will automatically be placed in that directory and can save your file there.
Second, if the .MacOSX folder exists and the environment.plist exists, navigate to the directory using Go
Third, if the .MacOSX folder exists, but the environment.plist does not, modify Finder temporarily to display dot folders as described earlier in this chapter. Then you may navigate to .MacOSX to save your new environment.plist at will.
Note
Restarting is required to reload the current values of environment.plist. If you are setting variables globally for both the Finder and the Terminal, you probably won't do it often enough for restarting to become a problem.
Tip
When debugging environment settings for the Finder, I suggest using the open command from the Terminal to simulate opening from Finder. Changing environment variables in the Terminal is quick and easy between application launches.
Now that you can modify environment variables for a given user account using environment.plist, it is time to look at using these variables in your Java programs.
Earlier, I explained that several Java-specific properties are accessible through the System.getProperty() method. It might seem obvious to look for some standard property that changes based off the environment variable name.
It turns out that accessing environment variables is much simpler than that. The method is System.getenv(), and it takes a String for its only argument. If you have an environment variable named MY_PROJECT_HOME, accessing it at runtime is simply a matter of calling System.getenv() as follows.
String path = System.getenv("MY_PROJECT_HOME");In this chapter, I explained configuring Java and Java applications. Java ships with multiple versions of Java. New versions of Java are installed from the system updates, on occasion. Finding a correct path to a desired Java Home directory is as simple as using the /usr/libexec/java_home tool. Set your preferred version of Java through the Java Preferences application.
Add optional Java libraries to all Java applications by adding them to the /Library/Java/Extensions directory. Class files must be in JARs in this directory. Native libraries for JNI do not need JAR'ing.
Access system environment variables in Java by way of the System.getenv() method. Set environment variables locally for a specific Terminal window and applications started from that window, or set them globally for all applications started by the user.