
Writing code is important, but any code you write is irrelevant until it is built. During initial research phases of projects, you may have only five or ten classes to worry about building. Early on, you may even build one class at a time. In the beginning, you easily manage your build process.
As your project progresses, you accumulate more classes and libraries. You start giving your manager or testers packaged builds. You integrate your code with that of other developers. In short, your build becomes complex. With time, the building and packaging of your code can take an hour or even several hours. Spending more time building and packaging code rather than writing it becomes a reality.
You do not want to spend hours of your day building and packaging code for your manager or testers. You are busy and don't have time for that. The more automation you put into your build process, the less time you spend away from your code. This chapter explores automating Java builds on OS X so you can focus on coding.
Automated Java builds on OS X fall into three categories: IDE project builds, build tool scripts, and shell scripts. Xcode is an excellent IDE, freely available to OS X developers. You can use Xcode's default JNI Library template to set up your initial Java project build. Default builds are used mostly in simple projects that do not involve complex packaging for delivery to your manager, testers, or clients.
Ant is a common build utility for OS X. Using Ant provides quick builds and delivery of code to your end user. Xcode uses Ant in building Java projects. This means that any Ant builds you write may also integrate into your Xcode project for use with just a click of a button in the Xcode IDE.
Shell scripts provide a third method for automating your build. OS X contains all the common UNIX tools necessary for creating complex scripted builds. Integrating your shell scripts into an existing Ant or Xcode project is simple and provides more options for your build process.
You also may use shell scripts and Ant builds standalone or integrated into a cron job that results in a nightly or weekly build. Shell scripts and Ant projects both integrate with other common Java IDEs besides Xcode. In this section, however, I focus on building, running, and debugging projects from Xcode. Later in this chapter, I give much more detail on scripting builds.
To fully master Xcode builds on OS X, you need to understand the Xcode build cycle, customizing builds with Ant, and getting down and dirty with shell scripting. With these three skills, you will not encounter a Java build that cannot be fully automated.
In this section, I explain basic builds with Xcode. I also discuss Xcode's tools for running and debugging projects. Testing builds by running and debugging is essential to successful development cycles.
Begin with a simple project. Create a new Xcode JNI Library project with the assistant. For this project, follow these steps:
Click the File menu.
Select New Project ...
Browse the Framework & Library templates.
Choose the JNI Library.
Name your project MyApp.
Note
The JNI project that the Xcode assistant can create is detailed in Chapter 3. Chapter 3 also details creation of Java Swing applications, JApplets, and Java Console applications with Xcode.
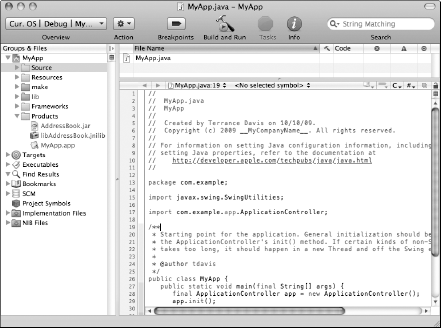
Look at the Groups & Files tree, as shown in Figure 4.1, on the left of your main Xcode window. Folders and files are red, especially in the Products folder. Red indicates empty or non-existent. If you look in all your project folders, you will find files, except in the folders with red names.
Click the Build and Run button in the Xcode window to see what the template gives you. After clicking Build and Run, notice the red named files in the Products folder turn black as they are created.
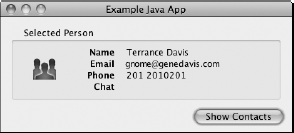
As Figure 4.2 shows, you now see a fully functional, though limited, Java JNI and Swing application execute. Build and Run is the quickest way to run your applications or find newly coded bugs. The keyboard shortcut is
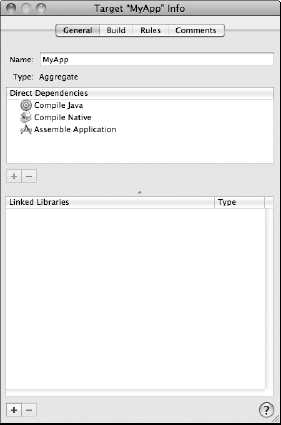
In the Groups & Files table again, look for the red circles icon that looks like a bull's eye. Next to it is the name Targets. Expand Targets, and you will see the MyApp target, named after your project. Double-click the MyApp target, and the Target window opens, as shown in Figure 4.3.
Click the General tab in the MyApp target window. Notice that it contains three direct dependencies: Compile Java, Compile Native, and Assemble Application. These three dependencies are listed as targets in the Target folder of the Groups & Files tree. Each of these targets does what its name implies. Compile Java and Compile Native take care of the Java and Objective-C compilation for your JNI application. Assemble Application integrates the rest of the application, but it does not assemble the application bundle.
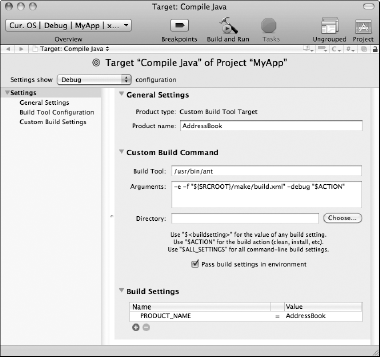
Close the MyApp target, and open the Compile Java target, as shown in Figure 4.4. This Target window details how the Java portion of your application builds. Normally, you do not want to change any of these settings, but you need to understand the basics in case you do need to customize your build.
Notice that under the Custom Build Command, the build tool selected is /usr/bin/ant. Ant is used to build all the Java projects in Xcode. If you chose to use Maven or shell scripts instead of Ant, this is where you make that change.
Tip
Look in your project's build.xml file. It is in the make folder. The Ant targets you find include clean and compile. These are the bare minimum targets to implement in a custom build script if you integrate a custom Ant build into Xcode.
The instructions for the actual Ant build are found in the build.xml file. Find this file under your project's make folder. Click the build.xml file to see its source. You may recognize the source as XML. If you want to customize what your Java target results are, make customizations in the build.xml file. I discuss how to understand and create build files in great detail later in this chapter. All that XML in the build file will make sense soon.
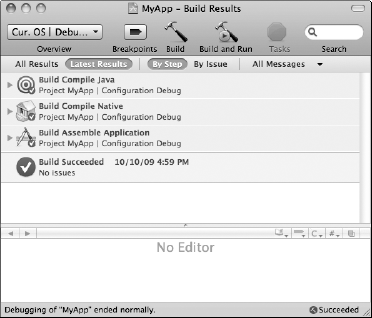
So far I have shown the build from inside the Project window. Another useful view of the build is the Build Results window. To get to the Build Results window, select Build Results under the Build menu. The Build Results window opens, as shown in Figure 4.5, with an overview of the build in the top half of the window.
Tip
The default organization of Xcode behaves much like a Web browser without tabs. Clicking icons and buttons often opens new windows. If you lose track of your main project window, press zero while holding down the
Click Build at the top of the Build window. You see an overview of the steps used to build your project. The steps are presented as a collapsible tree. The root nodes are the targets I just described. These expand to give detailed transcripts of your build. The transcripts and the overview are great resources for keeping track of what each of your targets is actually doing during a build. All this information is useful when you need to find obscure bugs during a bad build.
Each successful step of the build is marked with a green check mark in the overview. If the build fails, there are red exclamation points next to the steps that failed to complete.
Deliberately introduce a broken line of code into your MyApp.java file by removing a semicolon. Now, build your application by clicking the Build tool at the top of the Build Results window. The build fails with a satisfying red exclamation point next to the node "Run external build tool." Expand that node, and scroll down to see the actual error. In my case, it was this:
/Users/tdavis/Desktop/MyApp/src/java/com/example/
app/Actions.java:16: ';' expected
import javax.swing.*
As you know, after you have your project building, you are ready to run. If there are any obvious flaws in your program, running the code is the first method of finding them. Running in Xcode is similar to other IDEs.
At this point you have built your application, which is called MyApp. Building your application created a double-clickable Mac OS X application to run your Java code. You don't need to search the file system for the double-clickable application, though. There is an easier approach to quickly jump into the project folders.
To see your application in a Finder window:
Navigate to the Products folder in the Groups & Files tree on the left in your Project window.
Open the Products folder to reveal the MyApp.app application.
Control-click MyApp.app, or right-click if you have a two button mouse.
A context menu opens, as shown in Figure 4.6.
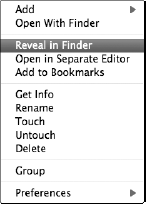
You should now have a Finder window open showing your fully functional OS X Java application. Having access to the build is nice, but it's not as useful as running and debugging inside of your IDE. There are several different ways to run your application from inside Xcode.
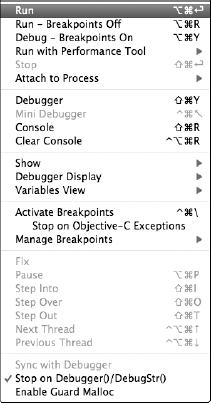
Returning to the project window, take a look at the menu items under the Run menu shown in Figure 4.7. Running with and without debugging are the two obvious choices. However, do not miss the Run with Performance Tool submenu. Xcode is integrated with several advanced performance tools. For instance, select CPU Sampler from the Run with Performance Tool submenu, and you receive real-time feedback about what your JNI application is doing with your computer.
Optimize the application you run against quickly for release or for debugging. Locate the Build Configuration drop-down menu at the top of either the project window or the top of the Build Results window. Use this menu to select your Active Configuration. Your two default choices are Debug and Release.
As you may guess, if Debug is selected, your MyApp.app application builds with more debug information embedded. While the resulting application may be suitable for limited testing by select users, typically you don't want a debug build to get out to your general user base. The Release selection optimizes your application and removes much of the debugging information from the application, speeding up your application in the process. Ship Release builds, and test with Debug builds. It can't get much easier than that.
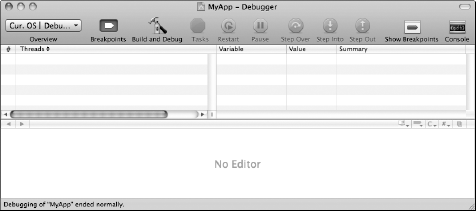
After you have found the easily spotted problems in your program by running it, it is time to examine the workings of the code in detail. Like most modern IDEs, Xcode contains great support for debugging. Using the debugger, you can examine any section of code at runtime to determine if the actual behavior matches the desired behavior of your program.
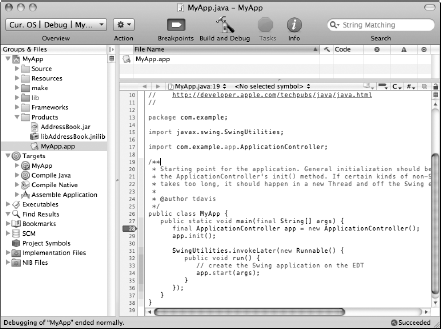
Debugging in Xcode is not too different from other IDEs common in the Java world. You start with a breakpoint and create a breakpoint by clicking to the left of code, the same way you would in other IDEs such as Eclipse. As shown in Figure 4.8, you see an arrow pointing to the code that pauses the Debugger. For this discussion, I have placed my breakpoint at the left side of the new ApplicationController() constructor in the main method of MyApp.java.
Note
Clicking a breakpoint deactivates the breakpoint but does not remove it. To remove a breakpoint, right-click (or Control-click) the breakpoint and select Remove Breakpoint.
Tip
By default, Xcode has line numbers turned off. To turn line numbers on, select Xcode
Open the Debugger window by clicking Debugger in the Run menu. If you click Build and Debug at this point, you will be disappointed. Your breakpoint is ignored. You must first select the Java Debugger for your executable, as shown in Figure 4.9.
Navigate to your Xcode project window.
Double-click the MyApp executable.
Select the Debugging tab in the Executable configuration.
Select Java Debugger from the "When using" drop-down list.
Now you are ready to debug. Click Build and Debug in the Debugger window. Your application stops at your breakpoint.
Tip
Click the Breakpoints button at the top of the Debugger window to open the Breakpoints window. The Breakpoints window contains information about specific breakpoints you have selected.
Tip
For direct access to the Java Debugger, click the Console button at the top right of the Debugger window.
In the realm of Java programming Ant and Maven are the two most common cross-platform build tools. Ant is installed along with Xcode and the other OS X developer tools. Java builds in Xcode use Ant. Because of Ant's availability and integration into Xcode, I focus on Ant builds in this section instead of other build tools such as Maven.
In this section, I discuss enough about Ant to enable you to put together highly complex and full-featured professional quality builds. After reading this section, you will be able to create Ant builds that satisfy your employer's need to automate builds and to deploy your code.
This section contains a review of XML. I discuss Ant projects, targets, properties, attributes, and values. I discuss the depends attribute and the creation of multi-targeted builds. This section also covers numerous task elements needed for building, cleaning, and deploying projects. Also, I cover the exec task for integrating Ant with shell scripts and other tools.
The contents of this section do not cover all advanced Ant topics. This section does not cover conditionals, error handling, interactive user input, and creating custom Ant modules. These topics were left out due to space considerations and because many users have no desire to explore these topics.
Note
Maven can use Ant tasks for added flexibility, so learning Ant is a good first step to learning Maven also.
Ant is a tool for compiling, cleaning, and deploying Java builds. Customizing Java builds in Xcode requires a firm grasp of Ant. Ant builds created for OS X usually work on other operating systems that support Java. This section introduces Ant.
Ant was created by James Duncan Davidson. Ant stands for Another Neat Tool. Think of actual ants and how they do simple repetitive tasks over and over to produce complex results. That was the inspiration for Ant. Ant is excellent at automating repetitive tasks that waste your time as a developer.
When you create a bunch of code, many steps must happen before your customers use the code. You first must compile the classes. You need to create JARs, WARs, or EARs. You must copy images, XML, and property files to your deployment folder or folders. Often, you need to run JUnit to test the finished version of the application before customers see it. You may even have to copy the results to a remote server for distribution.
Note
JARs, WARs, and EARs are all essentially zip files. JARs package Java libraries and resources for any type of Java application. WARs and EARs provide packaging for Web-based applications.
If you have ever had to deploy or partially deploy a program over and over and over while trying to debug one line of code, you know that you can spend far more time with the list of tasks that need to happen during compiling and deploying than you actually do coding. Worse yet, you may find out later that your bug was really just an error in your deployment process, caused by repeating the same brainless tasks over and over at 2 A.M.
Wouldn't it be nice to have an intern or junior coder take care of these brainless tasks that are drawing your attention away from solving bugs and writing code? Wouldn't it be nice to make a trip to the vending machines while the tasks unrelated to fixing code were done for you?
That is what Ant is all about. Consider Ant your friendly helper. Using Ant, you can automate builds, copying resources, run tests, and deploy finished code. You set it up once and literally type three letters...ant. That's all.
In the Java community, Ant has gained lots of popularity, which is not surprising. Ant frees up time for programmers so they can attend to more important tasks, such as chatting at the water cooler. Ant is used mainly to script build processes. Ant is a Java application, so it is available on any system with Java. Of course, that includes OS X.
Note
Ant is a build tool. If you are more interested in a full project management tool, look into Ant combined with Ivy, or Maven standalone. Ivy and Maven are popular Java-based project management tools maintained by the Apache Software Foundation. Maven is similar in functionality to Ant plus Ivy.
I do not discuss Maven or Ivy in this book, but you may want to explore their features on the Web. The project home for Ivy is at http://ant.apache.org/ivy. The project home for Maven is at http://maven.apache.org.
As mentioned earlier, Xcode uses Ant to build Java applications, so an understanding of Ant opens up the full power of Xcode's build process to the developer. Every Java project created from an Xcode template comes with an Ant build.xml file that you can open and modify. Also, double-clicking your Java target in the project window of Xcode opens the Target window with configuration information for how Ant is set up in the project.
Note
In Chapter 3, I give three examples of integrating custom Ant builds with new Java projects.
Check to see if you have Ant on your system. Open a Terminal window. Type ant -version. If the result is a line telling the version and compile date of the version on your system, you have Ant. Ant should be installed, if you have Xcode on you computer. You can check for new versions of Ant at the Apache Ant project home (http://ant.apache.org). However, Apple does a great job of keeping the Xcode tools up to date with recent versions of Ant, so you won't need to make checking for new versions of Ant a priority.
In this section, I discuss the basics of Ant build files. The Ant tool parses a build file to determine how to proceed with building, cleaning, or deploying code. Understanding build files is the first step to understanding how to use Ant.
The default build file for Ant is named build.xml and is placed in the directory that the Ant command is issued. The default build file is build.xml, but don't feel constrained by this. You can change the file that is executed by specifying the -buildfile option at the command line. With your build file named my_project.xml, your command line looks like this:
ant -buildfile my_project.xml
Tip
The arguments -f and -file have the same function as -buildfile. Using the command ant -f my_project.xml causes Ant to execute using my_project.xml instead of build.xml.
Build files for Ant are XML files. XML consists of a prolog, elements, attributes, comments, and text. Nest elements between other elements in a similar fashion to HTML to form more complex XML documents.
Note
XML is a standard for defining markup languages. The XML standard defines tag construction and how to define tag elements and attributes. The tags used in different implementations of XML differ, but the way tags are defined, constructed, and interoperate remains the same from version to version.
Looking at an Xcode generated build.xml file, you will note that the first line is as follows:
<?xml version="1.0" encoding="UTF-8"?>
This is the prologue. Every XML file should start with a prologue similar to it. Notice, it contains the version of XML used and the encoding. The encoding in this case is UTF-8, representing the character set used. You don't need to memorize this prologue; you can just write it once and copy and paste it everywhere else you use it. It isn't likely to change.
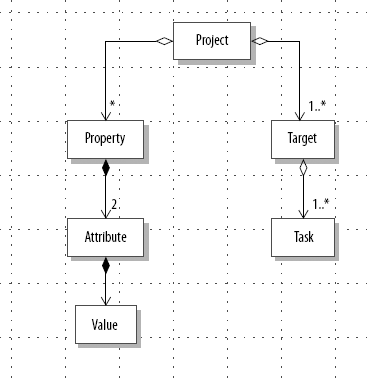
XML element tags follow the prologue. Figure 4.10 shows the relationship among elements in Ant. Elements take two forms: paired opening and closing tags such as <project></project> or single tags such as <property />. Look for the placement of the forward slash to determine paired or single XML tags. In paired tags, the first tag doesn't have a forward slash, but the second tag starts with a forward slash. The first tag in a paired element is called the opening tag. The second tag in a paired element is called the closing tag. In single tags, the tag ends with a forward slash.
Elements may be nested between opening and closing tags. The outer elements are called parents and the inner elements are called children. Single element tags may not hold other elements. In the case of paired tags, the opening and closing tags must both be enclosed by the same element tags. For instance, the following is valid:
<target>
   <echo>
   </echo>
</target>
However, the following is NOT valid XML, because the enclosed echo element does not have a closing tag nested between the opening and closing target elements:
<target>
   <echo>
</target>
   </echo>
Also, the following is NOT valid XML, because you don't place an element inside of another element:
<property <echo /> />
Tip
ML elements follow almost exactly the same rules as traditional HTML. The two main differences are that elements such as <p> in HTML can get away without a closing tag (</p>) and non-paired elements like <br> in HTML often don't need a trailing slash (<br />).
You may have already guessed that XML supports elements being presented as paired elements or as single elements. For instance, the following are equivalent, and you can use them interchangeably:
<echo></echo>

<echo />
Attributes are always associated with an element's opening tag. Attributes are never in a closing tag. Attributes consist of a name and a value. The value is surrounded by double or single quotes. Attributes take the following form:
name="the_actual_name"
When the name attribute is used in a project element tag, it looks like this:
<project name="some_cool_name">
</project>
I have discussed prologues, elements, and attributes. They are all pretty simple to understand and use. None of them is as simple as the last part of XML: text.
Text is just what it says. Text is nested in a paired element tag. Text is never outside of enclosing element tags.
Let's use the echo element as an example again. If you use echo with an element tag and an attribute, it looks like this:
<echo message="I'm a an echoed message">
However, you may use text instead of an attribute. In the case of echo, it replaces the message attribute, thus the following is a valid use of text in XML:
<echo>I'm a an echoed message</echo>
Comments are another form of tag. Instead of housing an element type, they have comments. Comments begin with <!-- and end with -->. Comments may be nested at any level in your XML. Anything appearing in a comment tag is ignored by Ant during the build, just as you would expect. Be careful not to place a comment inside another comment, or Ant will not know how to interpret it. Even a double dash (--) without the closing angle bracket will foul up the comment, so don't do it.
Warning
Programmers commonly use the XML comments to disable chunks of XML during debugging of a script. Just be careful that the XML you comment out does not already have a comment in it, or surrounding the XML in a comment tag will result in illegal XML that will not parse properly.
As I have discussed, the default build file for Ant is build.xml. The build files are XML. They follow all the rules mentioned above about XML and additional Ant-specific rules. The Ant-specific rules apply to what are and are not valid names for elements and attributes. The Ant-specific rules also cover the description of valid placements of different types of XML elements that it uses to determine the build process it executes.
Create a simple Java file to manipulate with Ant:
Populate AntExample.java with the following code:
public class AntExample
{
   public static void main (String args[])
   {
      System.out.println("Ant done!");
   }
}
Place this shiny new Java file in a directory by itself.
You want it by itself so other files do not inadvertently interfere with your example Ant build.
You can easily build and run this file from either Xcode or from the command line using the javac and java commands. Instead, use the ant command. If you cd to the directory that contains AntExample.java, type ant, and press enter, you wait a second or so and get the following message.
build.xml does not exist!
Build failed
No harm done. Your next step is to make the requested build.xml file:
Create a file named build.xml.
Place it in the same directory as the AntExample.java file.
Fill the build file with the following text:
<?xml version="1.0" encoding="UTF-8"?>
<project default="compile">
   <target name="compile">
      <javac srcdir="." />
   </target>
         </project>
Now when you issue the Ant command from that directory, you get the following:
Buildfile: build.xml
compile:
    [javac] Compiling 1 source file
BUILD SUCCESSFUL
Total time: 0 seconds
You have written your first Ant build script. Issuing the ls command confirms that the AntExample.class file exists. Now do the following:
Take a deep breath.
Stretch your legs.
Stop by the water cooler.
Brag to all your co-workers.
It's okay. They already know you are a geek.
Looking at the build file, you will see three XML tags: project, target, and javac. Project is the root element. Project defines the default command to execute. In the case of your build file, that is the compile command.
Note
XML documents are set up like trees. The root element is like a trunk with nested elements representing branches. Terminal data and attributes represent leaves.
The target element is a collection of actions collected in one command. In your file, the command is compile. It is no accident that the project default value and the target name are the same. The ant command checks the build file for a project root element, and checks project for a default target name to run. After finding what target name it should run, Ant makes all the requested actions in the named target happen.
In your build file, the target contains only one action: javac. javac is the same as the Java javac command. The javac element requires at minimum a source directory specified by the name srcdir. AntExample.java is in the same directory as build.xml, so use a period for your source directory. You also could use a fully qualified path to the directory.
Think of the build file in terms of Java programs. The project element is like a Java class. The target is like a method. The contents of the target are similar to the commands in a method.
Placing all your project files into one directory gets confusing. You can separate your source and destination directories. The shell command for creating a new directory is mkdir. Conveniently, the command for creating a directory in Ant is the same. The following line creates a new directory called build in the directory that the Ant build runs:
<mkdir dir="build/">
Next, you need to let your Ant javac element know to place your compiled classes there. Add the destdir attribute to the javac element. The entire build file looks like this:
<?xml version="1.0" encoding="UTF-8"?>
<project default="compile">
   <target name="compile">
      <mkdir dir="build/" />
      <javac srcdir="." destdir="build/" />
   </target>
</project>
Execute this build with the Ant command from the directory that contains your Java file and build.xml. You should see, among other comments, the comment BUILD SUCCESSFUL. The build directory is now created, and the AntExample class is in it.
Tip
The mkdir task in Ant does not error if the directory already exists. In this case, the mkdir command is quietly ignored.
Ant supports multiple targets in one project. Each target is enclosed by an opening and closing target tag. Below you see an example of a project with two targets. Your options for running the following build script are ant and ant test, which both do the same thing because test is specified as the project's default target. Also, ant init is a valid command to run the init target below. You can always specify which target you want to use, even if you want to override the project's default target.
<project default="test">
   <target name="init"
           description="Normally would do important things">
      <echo message="Initializing..."/>
   </target>
   <target name="test"
           depends="init"
           description="Testing multiple targets">
      <echo message="other elements go here"/>
   </target>
</project>
Notice that the test target element contains the depends attribute. Using the depends attribute tells Ant that the specified target or targets must execute first. When the test target executes, first the depends attribute is checked. Any targets that test relies on are executed before the test target runs. The depends effect cascades, so that if the init target depended on other targets, those targets would execute before init.
Tip
Think of depends as you would a Java method call. depends essentially calls another target, which may in turn call yet other targets with its own depends attribute.
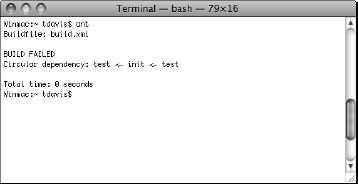
Avoid circular dependencies when setting up depends attributes. If two targets depend on each other, then the Ant command outright fails with a message signaling that the offending targets have circular dependencies. For instance, if the above project were changed to specify the init target depending on the test target, you would see the error shown in Figure 4.11 when attempting to execute Ant.
Warning
Multiple targets should never depend on each other. This is called a circular dependency. Creating a loop of target calls will cause Ant builds to fail.
To specify multiple targets in the depends attribute, just separate the targets with commas, like this:
depends="init, compile"
If you did not have the depends attribute in the targets above, you could still execute init and then test targets in that order from the command line. You may specify multiple targets with Ant from the command line. Execute the targets init and test from the command line like this:
ant init test
Running Ant executes any given target only once. For instance, suppose you have three targets: init, clean, and build, defined like this:
<target name="init"></target>
<target name="clean" depends="init"></target>
<target name="build" depends="init, clean"></target>
If the target clean depended on init and the target build depended on init and clean, you would not need to worry about the init target being executed multiple times when ant build is executed. The target init is specified in two different depends attributes but executes only once.
Tip
If a target is called by multiple depends attributes during a build, it is executed the first time only. In this way, depends is different from a Java method call.
At times, you want to discourage command-line use or misuse of a target, for instance, if a target generally runs from within a target instead of using a depends attribute. Or perhaps the target should conditionally execute after some tasks have first executed.
In these cases, include a dash at the beginning of the target name. For example, if you have two targets, -init and compile, you can set compile's depends attribute to the following:
depends="-init"
This allows -init tasks to execute when ant compile executes, but not directly from the command line.
When discouraging use of targets, avoid using the description attribute in the target. In this way, the target is left out of the description of the project created by the command, ant -projecthelp.
Tip
Use both a dash to start a target name and leave the description attribute out of a target when you want to discourage the target's public use.
Notice the description attribute in the targets above. Remember when your professors told you to always comment your code? In Ant build files, you can comment your code in the regular XML fashion:
<!-- some comment here -->
For targets, you also can include a one line description attribute. It functions like the XML comment, except it is an attribute. The description attribute has the added benefit of appearing in the list of targets provided by the -projecthelp option of Ant. You can quickly list all targets of a build file along with its default target by typing either of the following:
ant -projecthelp

ant -p
An added benefit of using the description attribute is that XML tools recognize the description attribute and associate it with the proper target element. A typical XML comment does not have this benefit. So use descriptions in any important build file.
Now I introduce a build file that matches a little more closely with the real world. In the real world, you use packages. In the real world, you don't know the package or class names when you write the Ant script. In the real world, at the very least, you want a double-clickable JAR file for quick testing. At the very minimum, you want a build file that performs clean builds.
Use a basic Java class such as the following. This time it is in a package.
package com.genedavis;
import javax.swing.*;
public class AntExample
{
   public static void main (String args[])
   {
      JOptionPane.showMessageDialog(null, "You clicked?");
   }
}
I place this Java file in a directory representing the package: com/genedavis.
Here is the build script. Do not worry if you don't understand it yet. I go over it in detail.
<project default="build">
   <target name="clean"
           description="Removes previous build">
      <echo message="Cleaning up old build..." />
      <delete file="AllOfIt.jar" />
      <delete verbose="true">
         <fileset dir="build">
            <include name="**/*.class" />
         </fileset>
      </delete>
      <delete dir="build" />
   </target>
   <target name="build"
           depends="clean"
           description="Build the project">
      <mkdir dir="build" />
      <javac srcdir="." destdir="./build" />
      <jar jarfile="AllOfIt.jar"
           basedir="build">
         <manifest>
            <attribute name="Main-Class"
                       value="com.genedavis.AntExample" />
         </manifest>
      </jar>
   </target>
</project>
Two targets exist in this build: clean and build. The default target is build. The target build does depend on clean, so clean is executed before the build tasks are executed. I describe the clean target first.
Tip
Remember, double-clickable JARs are JAR files that specify a Main-Class in their manifest file. For example, the JAR's manifest file may contain the single line Main-Class: com.genedavis.AntExample if the main method is found in that package and class.
You have seen the project, target, and echo elements before. delete, fileset, and include are all new. delete is used three different ways in this target. delete is used to remove a single file, to remove multiple files, and to remove a directory with all its contents.
Deleting the class files in this case was not strictly necessary, because I turn around and delete the directory which contains them. Deleting the directory would have deleted the class files and all other files, too. Deleting the build directory also recursively deletes all its subdirectories as well. The extra delete task was used, just to give an example of how it is set up.
Deleting a single file is straightforward. In this case, it was a JAR file. All you need is the delete tag and a file attribute. Here is the task:
<delete file="AllOfIt.jar" />
Deleting a single directory is also straightforward. Use the delete tag with a dir attribute, like this:
<delete dir="build" />
Tip
Use a combination of the <delete dir="some_directory"> and <mkdir dir="some_directory"> to quickly clean recursively all files from a build directory.
Deleting all the class files in the build directory, recursing through all the subdirectories in the process, is a little more complex. First, notice that I have set the verbose attribute of delete to true. So the opening delete tag is this:
<delete verbose="true">
If you do not have verbose set to true, then the files deleted are not enumerated. After the script is working the way you want, that is no problem, but while writing and debugging a build file, you want to know what is happening.
Nested in the paired delete tags, I have a set of fileset elements. The attribute is just a dir. Use the fileset tag only for specifying the directory from which you want files deleted.
Nested in the fileset tags is your include tag. Include specifies a pattern of the files that you want to remove. In this case, include looks like this:
<include name="**/*.class" />
The double asterisk matches zero or more directories and subdirectories. The single asterisk matches zero or more characters in a filename.
Note
For the complete list of directory and file patterns supported by Ant, check the official Ant Manual at http://ant.apache.org/manual/dirtasks.html#patterns.
Above, I store source and class files in separate directory trees, but many projects keep the source and builds in the same tree for convenience. It is common, though obviously undesirable, in legacy code to have files that are compiled for which the source is lost. Obviously, removing all compiled files is disastrous in such cases.
In projects where some (but not all) files of a given type should be removed, use the exclude tag. In your sample project, the exclude tag is placed on the line immediately after the include tag, so they are both nested in between the fileset tags. The exclude tag would look something like this, if you wanted to exclude all classes named MySpecial from being deleted:
<exclude name="**/MySpecial.class" />
To summarize, the sample clean target does the following:
It echoes "Cleaning up old build...".
It deletes a JAR.
It deletes all classes in the build directory.
It deletes the build directory.
Consider the build target. After the clean target is finished, the mkdir task is executed. The dir attribute specifies the name of the directory to create. In this case, the directory is build. The element looks like this:
<mkdir dir="build" />
Next, compile the Java code using the ant command for the Java tool javac. Not too surprisingly, the Ant element name is also javac. The attributes are srcdir and destdir, meaning source directory and destination directory, respectively. If you pay close attention to what the script is doing, you notice that <javac/> recurses through subdirectories and compiles everything it finds. In an actual project, you may get more files compiled than you anticipated unless you are careful not to have any Java files in subdirectories of the specified source directory.
Here is the javac element I used:
<javac srcdir="." destdir="build" verbose="true" />
The javac task above has only the attributes srcdir and destdir. Other useful attributes include debug, deprecation, and optimize. If you build for a code release, you might want your javac task to look more like this:
<javac srcdir="."
       destdir="build"
       verbose="true"
       debug="false"
       deprecation="true"
       optimize="true"
/>debug="false" prevents extra debug information from being placed in the compiled code. optimize="true" tells the compiler to optimize the code. deprecation="true" and verbose="true" add extra information to the output of the ant command. You may want verbose and deprecation set to false, if you already know this is a fully working release build.
For fun, swap out true with on or yes and false with off or no in the above javac task. You will see that those additional values work just as well.
Finally, use the Ant jar task to create a double-clickable JAR. The JAR name is specified by the jarfile element. The basedir attribute specifies which directory to recursively place into the JAR file.
The manifest is created with the nested manifest element, which in turn holds the attribute element. The name and value attributes of the attribute element are used to specify name/value pairs you want to appear in the final manifest file of the JAR file. I use it to specify the Main-Class: com.genedavis.AntExample name value pair that specifies which class to use when the JAR is double-clicked or run with the java -jar AllOfIt.jar. The full jar task looks like this:
<jar jarfile="AllOfIt.jar"
     basedir="build">
   <manifest>
      <attribute name="Main-Class"
                 value="com.genedavis.AntExample" />
   </manifest>
</jar>
The resulting manifest is named MANIFEST.MF and placed in the META-INF directory inside the JAR. If you extract the manifest, it will contain the following:
Manifest-Version: 1.0
Ant-Version: Apache Ant 1.7.0
Created-By: 1.5.0_16-133 (Apple Inc.)
Main-Class: com.genedavis.AntExample
Remember, if you double-click this JAR file, it has output to standard output only. To see the output when double-clicking it, instead of running it from the command line, open the Console application. The date and time of the application's output appears on a line with the resulting output. The Console application is located in the Utilities subdirectory of your Applications directory.
In this section, I discuss how Ant uses variables. I cover common variables accessible to Ant. I discuss various advanced tasks, such as the exec task. Also, I have a table of all the Ant tasks I have covered, for easy reference.
Variables in Ant are called properties. Properties can be defined inside and outside of project files. Properties are case sensitive.
Properties are defined with a name and a value in an XML element, like this.
<property name="some_name" value="some_value" />
A very common use for property elements is to define the path to a directory. This type of property has a location attribute instead of a value attribute and would look more like this:
<property name="some_place" location="actual_path" />
Properties are accessed with the notation ${some_property}. For instance, to create a build directory with a predefined property, the XML would look like this:
<property name="build_path" location="build" />
<mkdir dir="${build_path}" />
Properties can be defined outside of targets. If you change a property element's value inside of a target, the new value applies to the property even when accessed inside of other targets.
To demonstrate property use, here is another complete build.xml file:
<?xml version="1.0" encoding="UTF-8"?>
<project name="property_test"
         default="compile"
         basedir=".">
   <property name="build_message"
             value="building..."/>
   <property name="build_directory"
             location="build"/>
   <property name="source_directory"
             location="src"/>
   <target name="clean"
           description="Removes previous build">
<!-- remove the build directory -->
<delete dir="${build_directory}" />
</target>
<target name="compile"
depends="clean"
description="Compile code in new directory">
<mkdir dir="${build_directory}"/>
<echo message="${build_message}"/>
<javac srcdir="${source_directory}"
destdir="${build_directory}" />
</target>
</project>Notice that three properties are defined at the top of the project and all are outside of targets. This is the most common place to find properties defined. Two of the properties have location attributes, while a token third has a value attribute. The build_directory property is used in both the clean and the compile targets. The properties are all accessed inside of quotes as though they were the actual text that they are replacing. No special extra syntax is needed to access the properties other than the standard ${} syntax.
Note
All System properties available inside of Java are available to Ant when an Ant build is running.
Quite a few properties are predefined and can be accessed from within Ant. Some are from Java's system properties, and some are from Ant itself. Table 4.1 lists the more useful properties that you can access in Ant builds.
Table 4.1. Ant Accessible Properties
Property | Description |
|---|---|
Full path of this build file | |
Location of ant (same as which ant) | |
Version of Java being used | |
Value of project name attribute | |
Version and compile date of Ant | |
Directory that Ant executes from unless redefined | |
| |
All paths in the Java class path | |
All paths of Java extensions | |
Actual path to | |
Version and build of Java being used | |
| |
Hardware used by Java (probably i386) | |
Name of OS (Mac OS X) | |
Version of the OS | |
| |
user.dir | Directory user ran |
| |
Abbreviated version of login name |
After creating a JAR, you may want to copy it and additional resources, such as properties files, to a deployment folder. Perhaps you just want to place the JAR into an OS X application package. Ant provides the copy task for this.
The syntax for copy is simple. Provide a file to copy and then the directory to copy the file to. Also, specify whether you want to overwrite existing files in the destination directory.
In the following example task, the copy task copies the file our.jar from the current directory to the /Users/myhome/Desktop/release directory and overwrites any existing our.jar file.
<copy file="./our.jar"
      todir="/Users/myhome/Desktop/release"
      overwrite="true" />
If you test the copy task, you will notice that the task copies files but leaves the original behind. So it is copying in the true sense of the word. If you want to copy the file without leaving the file behind, use the move task. The move task has the file, todir, and overwrite attributes like copy.
If you write complex Ant builds, eventually you will want to run a Java application or execute a shell script or command-line tool from within the build. Never fear, Ant can do this too. The tasks for using Java and for executing a shell command look like this:
<java classname="com.genedavis.AntTest"
      classpath="build">
   <arg value="some_argument_for_java" />
</java>
<exec dir="/execute/command/from/here"
      executable="some_tool_to_execute">
   <arg line="-args -for -tool"/>
</exec>
The java task is probably obvious to you as a Java programmer. However, the exec task is a little trickier. The dir attribute is the directory that you want the command executed in. Imagine using the cd command in the Terminal to change your directory and then executing a command from the new directory. The executable attribute is the actual tool or shell script to execute. The arg element is used to pass command-line arguments to the shell script or tool.
Tip
The exec task is great for integrating Ant with shell scripts and command-line tools.
Tip
If you want to use exec to run a command-line tool and you don't know the path to that tool, use the which command. Type which followed by the name of the tool. For example, which ls reveals the location of the ls command in the directory structure.
Tip
Many developer tools that you normally think of as purely GUI tools also have a command-line interface built especially for scripting. Check your documentation, and you may be surprised to find your favorite GUI development tools can be integrated into Ant using the exec task or even their own custom Ant modules!
Here is an example of using the basic ls command from your current directory with the arguments -la.
<exec dir="."
      executable="ls">
   <arg line="-la"/>
</exec>
Later in this chapter, I present writing shell scripts in greater detail. Executing tools from inside Ant opens the full power of OS X to your build. If your computer can do it, your build can do it.
Tip
If you are using Ant from inside Xcode, you can access command-line tools and shell scripts from your Xcode Ant build, too.
Ant tasks fall into two large categories: core tasks and optional tasks. Core tasks are tasks like javac and copy that are available in Ant for build scripts to use. Optional tasks require at the very least an extra JAR to be included to become available for Ant to use. Optional tasks have additional library dependencies that core tasks do not have.
The scp task is an example of an optional task. scp cannot be used without including the jsch.jar. The jsch.jar can be obtained from here:
http://www.jcraft.com/jsch/index.html
You must include this JAR in the classpath available to Ant for the scp task to work. You can check the JARs in use by Ant by typing ant -diagnostics in the Terminal window. The actual use of the scp task is then something like this:
<scp file="mydeployment.jar"
     todir="username@remotehost:/my/webapps"
     password="scp_password"/>
Other optional tasks include such tasks as sound, splash, junit, and ftp. A good place to check for optional and core tasks not discussed in this section is on Ant's official project page at http://ant.apache.org.
Note
You may find the complete reference to core Ant tasks and optional Ant tasks in the official Ant manual on Apache's Ant page at http://ant.apache.org/manual/index.html.For quick reference, in Table 4.2 I list the tasks I have gone over while discussing Ant.
Other features of Ant that I cannot address here include conditionals, error handling, interactive user input, and creating custom Ant modules. Remember that Ant is used by Xcode to build Java projects, so all the power of Ant is available to you in creating Java builds for OS X Xcode projects. Ant builds also integrate with other Java IDEs such as Eclipse and NetBeans. Ant can take care of any build that you need on OS X.
Ant comes with several command-line options to customize the behavior of the tool. The command-line options vary from setting the verbosity of build output to specifying the name of the build file to something other than build.xml. Place Ant options before the names of the targets you execute. For example, if you run a target called clean in a build file called other_build.xml, issue the following command:
ant -f other_build.xml clean
Several of the options are not used with executed targets. For instance, use ant -h or ant -v without a target name.
ant -h displays the list of options shown in Table 4.3.
Table 4.3. Ant Options
Options | Use |
|---|---|
Displays the option list | |
Displays Ant's version | |
Displays project information | |
Overrides build.xml with custom build file | |
Finds build file looking up directory tree | |
Displays no debug information | |
Displays some debug information | |
Displays lots of debug information | |
-main <class> | Specifies a custom main for Ant |
-nice <number> | Main thread priority (5 is default) |
Produces unadorned logging information | |
-lib <path> | The search path for jars and classes |
Specifies the log file | |
Specifies a custom logger | |
Adds a project listener | |
Prevents failure of whole build on individual target failures | |
-D<property>=<value> | Specifies name/value pair for property |
-propertyfile <name> | Loads properties from a file properties specified with ant's -D option take precedence |
-inputhandler <class> | Chooses class to handle requested input |
Prevents interactive input | |
Ignores user JARs in ${user.home}/.ant/lib | |
Ignores CLASSPATH | |
Uses the proxy settings for your OS | |
Displays diagnostic information for Ant |
Another way to view the options and some additional help is to type man ant in the Terminal. Use the up and down arrow keys to see the full document. The q key is used to quit man. The man tool is used to display the manual for command-line tools on OS X.
Tip
The man tool displays manuals for command-line tool usage. Type man man (yes two mans) in the Terminal for a details manual of man's usage.
In this section, I explain the differences between shells, the Terminal, and command-line tools. I review Java's command-line tools, specifically javac, in detail. Ultimately, I steer this discussion to shell scripts and supply some details about the construction of shell scripts.
Shell scripts script command-line tools. Many complex projects rely solely on shell scripts to perform all compiling, configuring, and deploying of code. You can use shell scripts with cron jobs to create nightly or weekly builds of your project.
Shell scripting via the Terminal is a powerful and respected approach to compiling and deploying Java projects. If you chose to rely on shell scripting in your project, some programmers may disagree with your choice. However, no experienced programmer denies that shell scripting is a powerful and versatile tool that can supply any needs your project demands.
Note
While command-line tools are usually written in C and shell scripts are not, telling the difference based on their behavior is often difficult. No stigma in the OS X world is associated with using scripts instead of pre-compiled tools.
Many programmers who fall in love with OS X do it because of the Terminal application. The Terminal is easy to use, is highly configurable, supports standard cut and paste, and opens access to the shell and to a host of command-line tools that programmers find useful. Command-line tools are applications that are accessed via a keyboard instead of a GUI interface driven by a mouse.
Note
The terms Terminal, command-line tools, and shells can get a bit confusing. The Terminal is an application for accessing shell environments. Shell environments provide a way for you to navigate and use your OS from the keyboard. Command-line tools run inside a shell. Command-line tools are applications written specifically for shell environments.
Many diehard shell users actually get angry if an application requires them to use a mouse, because it slows down their typing. The intention of shells is to give users more powerful and precise tools than are accessible from GUIs. GUI applications are harder to script and configure than command-line tools in the opinion of most diehard shell users.
Be careful when using command-line tools in the shell. Command-line tools are less forgiving than their GUI cousins. If you tell your command-line tool to wipe out everything on your computer, it probably will, and it will do so cheerfully without asking if you're nuts. Shell users are expected to be careful and not depend on their environment to hold their hand asking if they are sure they want to do what they just chose to do.
Several shell environments exist, but the default on OS X is called Bash. Bash tends to be the most popular shell on most Unix systems. Most programs written for one shell will work in other shells, with the exception of some scripts. (I discuss shell scripts later in this chapter.)
Note
Programs and tools of all types are specifically written for shell environments. This includes word processors, programming tools, and even multiplayer networked games.
Java comes with a large set of command-line tools, and many more are available on the Internet. Table 4.4 shows the Java tools that are shipped with OS X. For additional tools, check out the MacPorts Project at http://www.macports.org/, and the Fink project at http://www.finkproject.org/.
Table 4.4. Java Tools Shipped with OS X
Tool | Description |
|---|---|
Appletviewer | Views applets without a Web browser |
extcheck | JAR versioning and conflict checker |
idlj | Java to CORBA interface generator |
java | Runs java applications |
javac | The Java compiler |
javadoc | Generates Java documentation |
javah | Generates C headers and stubs (JNI) |
javap | Disassembler for Java classes |
jar | Zips Java applications with the "jar" extension |
jarsigner | Signs JAR files |
jdb | A powerful Java Debugger |
keytool | Keystore and certificate tool |
native2ascii | Converts native languages to compilable Unicode Latin-1 |
Policy file manager | |
rmic | RMI stub and skeleton generator |
rmiregistry | RMI registry service |
rmid | RMI daemon |
serialver | RMI tool for serialVersionUIDs |
tnameserv | Naming service access |
All these tools have man pages. In the Terminal, you can type man followed by the name of the tool and see a short text-based manual explaining its use. Use the up and down arrow keys to navigate the man pages, and type q to quit reading the man page.
You will never use all these tools. However, javac is of particular interest in this discussion of building Java projects on OS X. In the next section, I introduce more details of the javac tool.
The four basic Java command-line tools that you should know when programming Java on OS X are java, javac, javadoc, and jar. I focus here on javac. The location of javac is found by typing, which followed by javac. You will see that which javac returns /usr/bin/javac.
Case closed? No.
Execute the command ls -la /usr/bin/javac in the Terminal and you see something like this:
lrwxr-xr-x  1 root  wheel  74 Mar 13 14:20 /usr/bin/java -> /System/Library/
    Frameworks/JavaVM.framework/Versions/Current /Commands/javac
Notice that the javac location, /usr/bin/javac, is followed by -> and then a much longer and unpleasant-looking address:
/System/Library/Frameworks/JavaVM.framework/Versions/Current/Commands /javac
This longer address looks like it is the actual location of the javac command. In fact, if you list the directory that contains the various versions, you discover that the actual directory is this:
/System/Library/Frameworks/JavaVM.framework/Versions/A/Commands/
The redirection is all done by links. Check the man page for link by typing man link in the Terminal window. Links are like aliases, except that links are tailored to work transparently with command-line tools and shells scripts.
Note
Links are to Terminal applications what aliases are to Finder applications.
Scripts and command-line tools are written to work with other tools and directories that are in predetermined locations. For instance, Ant can be written to assume that the javac command is in /usr/bin/. If the guys over at Apple changed javac's location with an automatic OS X update, Ant and a whole bunch of other applications would need to be reconfigured, or worse yet...rebuilt.
Links come to the rescue. If you link /usr/bin/javac to the actual location of javac (or in this case, a link to a link to the actual location), then no command-line tools or other applications break when the actual location is changed. The links just need to be kept up to date.
Warning
In extreme cases of debugging, you may need to change where the links in /usr/bin/ point. I don't recommend this, however. If you forget to change the links back, later you may see problems related to your version of the JVM that are hard to debug.
Several versions of the Java tools are on your OS. Apple rarely removes old versions (though sometimes they overwrite old versions) when a new one is installed. See the complete list of versions with this command:
ls -la /System/Library/Frameworks/JavaVM.framework/Versions
Your output will look something like this:
drwxr-xr-x  11 root  wheel  374 Aug 28 14:05 .
drwxr-xr-x  12 root  wheel  408 Aug 28 14:41 ..
lrwxr-xr-x   1 root  wheel    5 Aug 28 14:05 1.3 -> 1.3.1
drwxr-xr-x   3 root  wheel  102 Jul 20 17:35 1.3.1
lrwxr-xr-x   1 root  wheel   10 Aug 28 14:05 1.5 -> CurrentJDK
lrwxr-xr-x   1 root  wheel   10 Aug 28 14:05 1.5.0 -> CurrentJDK
lrwxr-xr-x   1 root  wheel    5 Aug 28 14:05 1.6 -> 1.6.0
drwxr-xr-x   8 root  wheel  272 Aug 28 14:41 1.6.0
drwxr-xr-x   9 root  wheel  306 Aug 28 14:41 A
lrwxr-xr-x   1 root  wheel    1 Aug 28 14:05 Current -> A
lrwxr-xr-x   1 root  wheel    3 Aug 28 14:05 CurrentJDK -> 1.6
Notice the many link (->) symbols in this list. If you explore these directories, you discover all the common Java tools and libraries for each version of Java listed. Having all these complete historical versions of Java allows older Java applications to run on user- or programmer-specified JVMs.
Using javac directly from the command line is useful when you need to modify only one or few classes. Using the javac tool directly speeds up some quick modifications and deadline-related hacks. It also helps debug your code in cases where you do not trust your build tools are working properly.
Table 4.5 displays the common javac options.
Table 4.5. Common Javac Options
Option | Description |
|---|---|
-Akey[=value] | Annotation processor options |
-bootclasspath <path> | Overrides bootstrap classes |
-classpath <path> | Locates classes and annotation processors |
-cp <path> | Same as -classpath |
-d <directory> | Build location |
-deprecation | Displays deprecation warnings |
-endorseddirs <dirs> | Overrides endorsed standards |
-extdirs <dirs> | Overrides extensions |
-g | Generates all debug information (more than default) |
-g:{lines,vars,source} | Generates specified debug information |
-g:none | Generates no debug information |
-help | Displays options with short descriptions |
-implicit:class | Classes generated for implicit references |
-implicit:none | No classes generated for implicit references |
-J<flag> | Runtime flags |
-nowarn | No warnings |
-proc:none | No annotation processing |
-proc:only | Only annotation processing |
-processor <class>[,<class>,...] | Annotation processors |
-processorpath <path> | Annotation processor path |
-s <directory> | Generated source file path |
-sourcepath <path> | Locates source files |
-verbose | Displays compiler actions |
-encoding <encoding> | Source file character encoding |
-source <release> | Accepted source version (1.3, 1.4, 1.5, 5, 1.6, or 6) |
-target <release> | Class compatible with this release |
-version | Displays Javac version |
-X | Displays nonstandard options |
The most common options that you will use are -cp (classpaths), -d (build path), and -sourcepath (only the paths, not the source files). All these options require a path or multiple paths. Providing these paths on OS X may be a bit different than you are use to.
On OS X relative paths start with a ./ or just a dot if you are referring to the current working directory. Indicate the path to a directory in the current working directory with a dot followed by a forward slash, followed by the directory name and another forward slash, such as ./some_directory/.
Specifying your build path is not exactly as you would think. If you want your class to build in the current directory, you need to use the option -d ., that is a dash "d" followed by a space and a period. However, if your class is in a package, the directories under the current directory are created and the class is placed in that directory rather than the current directory. This is annoying if you keep your classes and Java source in the same directory. Instead, compile the source without using the -d option. This places the source file in the current directory regardless of whether it is part of a package.
Explicit file paths on OS X always start with a forward slash (/). Fully qualified file paths do not begin with a drive name or letter. If you type ls / into the Terminal, you are listing what is referred to as the root directory. The root directory always represents the drive that the operating system started from.
The logical question is where are all the other drives located? There is a directory called Volumes in the root directory. Its path is /Volumes. (Note the capital V.) Volumes contains all the drives connected to your computer. If you ls -la /Volumes you even see a link to the root path with the name of your boot drive for the link name.
Warning
One warning about using the drives in the Volumes directory: If you have a raid attached to your computer, you may see the names of each of the raid drives listed in addition to the name of the raid. If the directory you want to access is on the raid, use the name of the raid, not the name of one of the drives in the raid, for your path.
You have already seen that the path to the root directory is a forward slash. The forward slash is also the default directory separator on OS X. The only time you see a backslash used in directory paths on OS X is preceding a space. Backslashes escape spaces in OS X paths. Forward slashes are used to separate directory and filenames in paths used in all Java commands, such as javac. If you are listing multiple paths, use a colon (:) for the separator between paths.
Tip
If you have a hard time remembering the difference between forward slashes and backslashes, you are not alone. Most programmers start out having a hard time remembering the difference. Always judge the direction of the slash based on the direction you draw them when writing English. Forward slashes lean forward toward the next word in a sentence, and backslashes lean backward toward words you already read. In other words, if gravity took over, forward slashes would tip forward and backslashes would fall over backward.
A sample javac command using the directory information I have just discussed might look like this:
javac -cp .:/my classes:/my other classes -d /build MyApp.java
A source file for the class MyApp is compiled using two class paths inside directories called my classes and my other classes at the root. The resulting class is placed into a directory called build, also at the root.
You do not really want to place a build, class libraries, and sources files in the root directory. However, placing this build in the root directory shows how to use paths on OS X with Java command-line tools' options.
Many Java developers on OS X prefer to script builds directly in the shell. Recall that the shell is used to execute commands, such as javac or ant, and then see the results of executing those commands.
You may run these same shell scripts from inside of Xcode by setting the Java target build tool from /usr/bin/ant to the path and name of the shell script as the new build tool.
You also may use shell scripts from inside of Ant by using the exec tag as described earlier in this chapter.
The default shell used by the Terminal is called Bash. If you issue the command which bash in the Terminal, you see that bash is located in the /bin directory. Bash is not the only shell offered in a default install of OS X and OS X tools. Other popular shells are TENEX C shell (tcsh), KornShell (ksh), and Z shell (zsh). You can learn details about each of these shells by typing the command man followed by the shell, for instance man tcsh. Here, I use bash because it is the default for OS X, even though I am somewhat partial to tcsh.
Note
An advantage of scripting over writing a C application for the command line is the ease of interacting with existing tools. Scripts incorporate other tools and scripts as easily as a C program includes C libraries.
Scripting directly in the shell, gives direct access to all the shell tools without using special commands, such as exec in Ant. Because javac and other Java tools are directly available to shells, scripting is a powerful and quick way to set up Java builds. Browsing the Internet, you can find many open-source Java projects that use shell scripts to build their projects on OS X.
Shell scripts are just text files. They do not need an extension (such as .txt) though. By convention, shell scripts either have no extension or preferably a .sh extension.
Create a text file called test.sh, and add the following lines to it.
#!/bin/bash
# my comment
clear
echo building the test file
javac -d . Test1.java
echo build complete
Immediately, you recognize the javac command. It is entered exactly the same as it is entered from the command line. This true of most of the commands entered into shell scripts.
The first line of the shell script, #!/bin/bash, just declares which of the shell environments you want to execute your script. The default is bash anyway, so this line can be left out when you know the script will always be executed in the shell it is written for. Simple scripts run on all the common shells, so you may not need to specify which shell to use while executing simple scripts.
The pound symbol (#) indicates a comment follows. Comments last until the newline. The # behaves similar to a // in Java. If you wanted to put the comment after a command like clear, just end the command with a semicolon and then proceed with your comment. It looks like this:
clear;#clearing now
The echo command works like System.out.println("") in Java. It is best to surround your output with double quotes, although for pure text, going without quotes usually does not change the output.
Other common commands used in shell scripts are cp (copy), mv (move), mkdir (make directory), and rm (remove).
BE CAREFUL with rm. System Admins are often making jokes involving rm because of its power. A slip of the fingers while using rm can wipe out your entire hard drive. No joke.
Now that you have been cautioned about rm, you can use it...carefully. Using rm followed by a filename removes the file from your computer. It won't come back, and it is not in the Trash folder. You do not get a chance to say you did not want to do that.
If you try using rm on a folder, it fails unless you use the proper options. If you wanted to remove a folder called my_trash_2_toss and all of the files and folders in that folder, then this would be the command:
rm -rf my_trash_2_toss
Warning
The most common joke about misusing rm is to use this command on the root directory. Be careful. This is an easy mistake to make while typing. If you start typing rm/something/something, but you finger slips on the Return key just after typing rm /, you will accidentally destroy most everything on your hard drive (and maybe lose your job in the process.) I advise always typing in the file or folder name and path before typing rm so that a stray pinky hitting the Return key does not cause such dire results.
Done.The mkdir command is used to create directories. Follow the mkdir command with the new folder's name.
The cp and mv command work much the same. Type the command followed by the source and then the destination. A nice trick is to make the destination name different from the source name. (Try that with drag and drop!)
The extension of the shell script does not make it executable. Instead, you need to use the command chmod to make the file executable. If you are in the same folder as a shell script called test.sh, type either of the following commands:
chmod 755 test.sh

chmod +x script.sh
The version with 755 tends to be more "old school" than the version with +x. So if you want to prove yourself young and edgy, use the second version. I am neither young nor edgy, so I use 755.
Executing the new script is now just a matter of typing it in. Entering ./test.sh executes the script. If you don't like using the ./ before the script, you can place the script in a directory defined by the PATH environment variable or add the script's directory to the PATH variable. Typically, that behavior is not wanted, because too many executables in the path can lead to command name collisions, and then all kinds of confusion ensues.
Shell scripting provides command-line arguments, variables, functions, user input, and conditionals as you would expect in any programming language.
Variables are defined without being strongly typed as you would see in Java. If the variable is a string, use quotes to surround the value. If the value is a number, no quotes are necessary.
For instance, the following defines a string and a number:
my_special_var="This is a string value."
YOU_ARE_NUMERO=1
Typically, variable names are all caps with underscores separating words. Lowercase letters are also acceptable, though.
To recover the value of a variable, precede the name with a dollar sign. Using the YOU_ARE_NUMERO variable from above would echo the value 1:
echo $YOU_ARE_NUMERO
Special variables are used for retrieving command-line arguments passed to the script. $# retrieves the number of arguments passed to the script. Each variable passed in is stored in a variable of the number of argument it is. If you typed ./test.sh I have 4 arguments, then echo $# would echo 4, meaning there were four command-line arguments. echo $2 would output the value have, the second command-line argument. Also, echo $4 would print the value arguments, which is the fourth command-line argument. Notice these variables are not zero based as the main() method's array is in Java. The value of $0 is the actual name and path of the shell script that is being executed.
Tip
One way to remember $0 as the name and path of the shell script is to think of the command to execute the shell script as the first argument in a zero-based array of arguments and $# as returning the highest valid argument index.
Functions in Bash are defined in multiple ways, but the easiest for Java programmers to remember is the name of the function followed by parentheses and the code surrounded by curly braces.
my_function() {
   echo hi
}
To call this function, simply add this line to your script:
my_function
The function must be defined prior to use, in a similar way to C functions. (Not very Java-like, really.)
To pass arguments to functions, just tack on the arguments like you do to any command-line tool. As mentioned earlier, access the number of the arguments passed to the function by using $# and access each argument from its number. So the third argument is echoed by a line, echo "The third argument is $3".
Note
Because arguments and total argument count are retrieved the same way for functions and the script itself, you might expect $0 to retrieve the name of the function as $0 retrieves the name of the script.
It doesn't. It just returns the name of the script.
You must return values from Bash functions as numeric values. The command return followed by a number terminates a function. To retrieve the return value of a function, use $? immediately after the function call. The return command immediately exits the function.
The command exit works the same way as return except that it exits the whole script. The exit command takes a numeric value to return also.
Tip
The exit command is a great way to get out of a function when the purpose of the function is complete.
Getting user input and placing it into a variable is easy. Simply use the read command followed by a variable name. The variable does not need to be previously defined to be used by read. Here is a complete example:
#!/bin/bash
echo -n "Build the Test1 class? "
read my_answer
echo "Your answer was, $my_answer"
javac -d . Test1.java
echo build complete
Notice the option -n in the first echo. The -n option suppresses the newline after the echoed print.
The above code really needs some sort of check for "yes" versus "no." You need conditionals. Bash scripts provide for conditionals. The if and else are present in Bash scripts but different from Java. Here is a short example:
MY_VAR1=1
MY_VAR2=2
if [ $MY_VAR1 == $MY_VAR2 ]; then
echo "equal"
else
echo "not equal"
fi
The space after the if and before the first square bracket is not optional. No space after the if means you have a broken script.
Warning
Remember to place the closing fi and the space between if and the square brace in Bash if statements.
Other differences from Java exist. There are no curly braces. Square brackets are used to contain the actual condition. The condition is followed by ; then. This takes the place of the opening curly brace you would see in Java. To close the else, I have the strange-looking backward if, fi. The fi takes the place of a closing curly brace that you see in Java. Other than being totally different, it is just like Java.
The arithmetic comparisons are like Java. They are <, >, <=, >=, ==, and !=. Bash scripts have a set of logical operators specifically for strings. The script comparisons are = (equals), != (not equals), < (less than), > (greater than), -n (not empty), and -z (empty string).
Using what I have now discussed about Bash scripting conditionals, you can rewrite the example above that asks if you really want to compile Test1:
#!/bin/bash
echo -n "Build the Test1 class? "
read my_answer
if [ -z $my_answer ]; then
   echo -n "Your answer must be yes or no: "
   read my_answer
fi
if [ $my_answer = "no" ]; then
   exit 0;
fi
javac -d . Test1.java
echo build complete
Now, if you type no for your response to the question, the build is not performed and the script exits. Also, notice the check for an empty string. The -z $my_answer check is equivalent to Java's my_answer.isEmpty().
In this chapter, you learned to use Xcode, Ant, and shell scripts to fully automate your builds. Xcode comes with a JNI template that already has a useful Ant build created. Custom Ant builds allow you to expand the types of Java projects that Xcode can handle. For simple projects, Xcode's default build script is enough.
Xcode uses Ant to build your project. With Ant, you can make extensive modifications to default Xcode Ant builds. You can even create your own standalone Ant builds from scratch, if you do not wish to use Xcode to perform your builds.
You also may choose to use shell scripts to perform your build. Shell scripts allow you to take full advantage of all the UNIX command-line tools that OS X contains. You may integrate shell scripts with an Ant build or stick with a pure shell script solution for your project's build.