
Even if you use Eclipse or NetBeans as your primary IDE on OS X, Xcode contains many useful templates for native OS X integration. Integrating your Java application with Objective-C, com.apple.eawt packages, Cocoa Frameworks, or screensavers starts with Xcode.
I use Xcode for many programming examples in this book. Understanding Xcode simplifies learning native OS X application integration. Xcode provides programmer resources including a quick-start welcome screen, means for modifying the view of the IDE, macro editing, and many other features that increase your productivity.
In this chapter, I provide an overview of creating Java projects in Xcode. I explain Xcode features that improve your development experience. Also, I explore the Organizer, a tool for managing and running projects.
As of version 3.2, Xcode supplies one Java template. It is called the JNI Library. The name "JNI Library" is deceiving. This library is actually a fully integrated Java/Cocoa application template. If you want to see how a fully integrated Java OS X application looks in Xcode, you want to start with the JNI Library.
The JNI Library is overwhelming, if all you want is a basic Java project for pure or mostly pure Java development. For instance, you may plan on doing some Objective-C work and you want to stick to one IDE rather than switching between a Java-specific IDE and Xcode constantly.
For this reason, I start this chapter by explaining Java project creation in Xcode. This section explores Java console project creation, Java Swing project creation, and Java applet project creation from within Xcode. These projects allow Xcode to build, clean, and run the projects.
Finally, I give an overview of the JNI Library project. I explain the project creation and the overall set up of this powerful template.
Console-based applications and tools are extremely popular among Unix developers. Many users choose Mac OS X because it has a wonderful Terminal to complement its wonderful GUI. This was the feature that pulled me back from the Linux world to a Mac OS X prerelease version in 1999, and I have heard similar stories from other OS X developers.
A great example of a popular console application is grep. The grep tool is used to match patterns and is combined with other command-line tools to perform searches in files, such as logs, or directories. It is probably the favorite tool of die-hard Unix users and sysadmins.
I start with an explanation of creating an Xcode Java console application project. Typically, Java-based console applications require a longer Java command to start than their C-based counterparts. This is easily fixed with a wrapper shell script.
Note
I explain how to wrap Java console applications with shell scripts at the end of Chapter 4.
To create a Java console application project with Xcode 3.2, follow these instructions:
Select File
New Project from the Xcode menu bar.
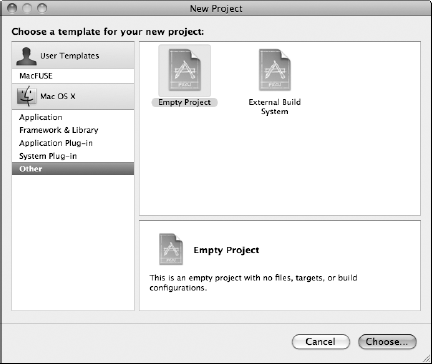
Select Empty Project from the Other templates group on the left, as shown in Figure 3.1.
Name the new project
ConsoleApp.Open your new project folder in the Finder.
Create
src,resources, andlibfolders in your project folder.Adding the new folders to your project is a little tricky.
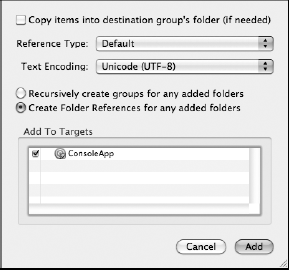
Select your
ConsoleAppproject in the Groups & Files tree, control-click AddExisting Files... from the context menu, select the new folders, and add them. When the dialog box appears asking for information on how to add the folders, add them using Create Folder References for any added folders, as shown in Figure 3.2.Create a file called
build.xmlat the root of your project in the ConsoleApp directory. Create the XML file from within Xcode by selectingConsoleAppand Control-clicking. Select AddNew File... from the context-sensitive menu. Choose Empty File from the Other template catalog, and create thebuild.xmlfile as part of theConsoleAppproject.This is your Ant build file. With this setup, Xcode uses Ant when building your project.
Fill
build.xmlwith the following code.This Ant build is based loosely on the Xcode 3.1 Java tool template, but should work with the latest version Xcode.
Tip
If you create a custom build.xml, include the install, run, and clean targets.
Note
I explain Ant builds in Chapter 4.
<?xml version="1.0" encoding="UTF-8"?>
<project name="ConsoleApp"
        default="install"
         basedir=".">
   <!-- setting up classpath for install -->
   <fileset id="lib.jars" dir="lib">
      <include name="**/*.jar"/>
   </fileset>
   <path id="lib.path">
      <fileset refid="lib.jars"/>
   </path>
   <target name="install"
           description="Exactly what the name says.">

      <mkdir dir="bin"/>
      <javac deprecation="on"
             srcdir="src"
             destdir="bin"
             source="1.6"
             target="1.6"
             includeAntRuntime="no"
             classpathref="lib.path"
             debug="true">
      </javac>
<!-- Assembling final JAR file -->
<mkdir dir="jars"/>
<jar jarfile="jars/${ant.project.name}.jar"
basedir="bin"
manifest="resources/Manifest">
<fileset dir="resources/"
excludes="resources/Manifest" />
<zipgroupfileset refid="lib.jars"/>
</jar>
<!--
Create the 'dist/' directory, and
assemble in the 'dist/' directory
-->
<mkdir dir="dist"/>
<copy toDir="dist">
<fileset dir="jars">
<include name="*.jar"/>
</fileset>
</copy>
</target>
<target name="run"
depends="install"
description="Run the console application">
<!-- Run the assembled application -->
<java classname="${ant.project.name}"
classpath="bin"
fork="true">
</java>
</target>
<target name="clean"
description="Delete all compile directories">
<delete dir="bin"/>
<delete dir="jars"/>
<delete dir="dist"/>
</target>
</project>Create
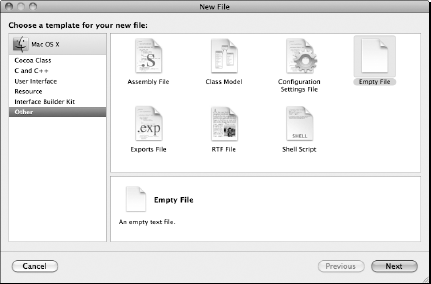
ConsoleApp.javain yoursrcdirectory. Create the Java file from within Xcode by selectingsrcand Control-clicking. Select AddNew File... from the context-sensitive menu. Choose Empty File from the Other template catalog as shown in Figure 3.3, and create it in thesrcdirectory. If there is an extra reference to the file in the Groups & Files tree, remove the reference.Add the following source to the
ConsoleApp.javafile.import java.util.Scanner; /** * Java based console application. * * @author T. Gene Davis */ public class ConsoleApp { public static void main (String[] args) { System.out.print( "What is your name? " ); Scanner scn = new Scanner( System.in ); String name = scn.nextLine(); System.out.println( "Hello " + name + "!" ); } }Add a
Manifestfile to theresourcesdirectory. Create theManifestfile from within Xcode by selectingresourcesdirectory and Control-clicking. Select AddNew File... from the context-sensitive menu. Choose Empty File from the Other template catalog and create theManifestfile as part of theConsoleAppproject in theresourcesdirectory. If there is an extra reference to the file in the Groups & Files tree, remove the reference.The source for the Manifest is simply this:
Main-Class: ConsoleApp
Your project is ready to use. In fact, if you prefer building from the command line, cd to your project root in Terminal and type ant to build your project, ant run to run your project, and ant clean to clean your project.
If you prefer to build, run, and clean your project from inside of Xcode, you use a few more steps to polish off your project setup. You need an Executable and a Target.
These steps give you a properly configured Target:
Control-click the Targets node of the Groups & Files tree.
Select Add
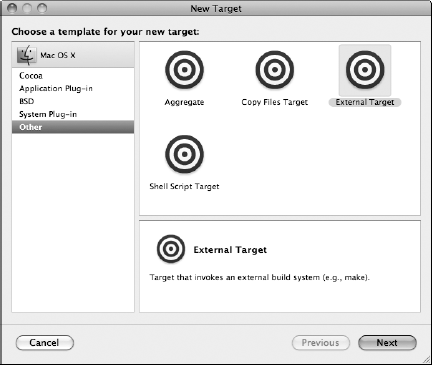
New Target...Select External Target from the Other group, as shown in Figure 3.4. Name your new target
ConsoleApp, and add it to yourConsoleAppproject.Double-click your new ConsoleApp Target.
This brings up the Target: ConsoleApp dialog box.
Set the Build Tool to
/usr/bin/ant.Set the Arguments to
-emacs $(ACTION), as shown in Figure 3.5.
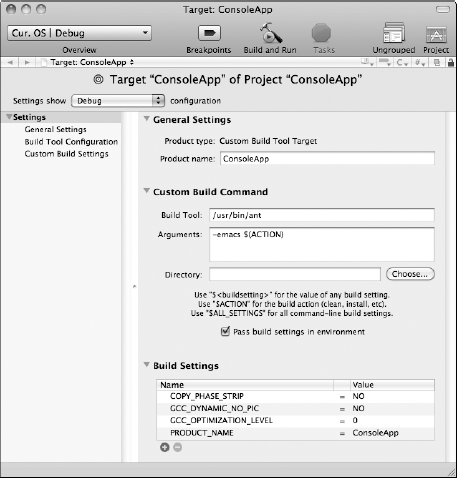
Your Target is ready to use. This allows building and cleaning of the project. Before the next step, click Build
From the Executables context menu, select Add
New Custom Executable...Name your executable
java.Select the path to your
javacommand.That is
/usr/bin/java.Add the new Executable to your project.
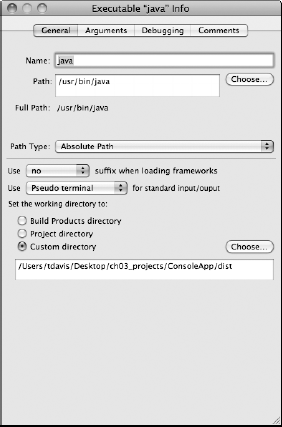
Open your new
javaexecutable by double-clicking it.Select the General tab, shown in Figure 3.6, and set Custom directory to your project's
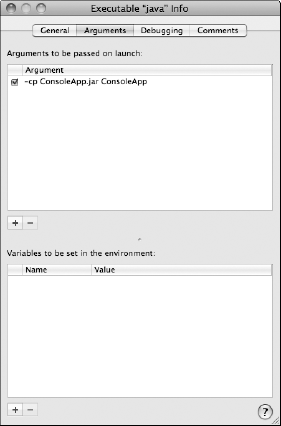
distdirectory.Select the Arguments tab shown in Figure 3.7, and add the argument
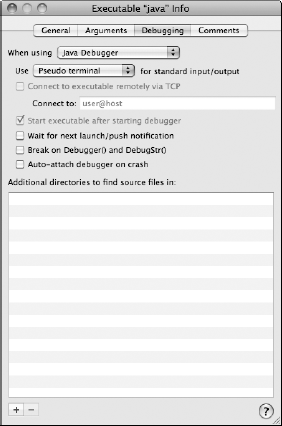
-cp ConsoleApp.jar ConsoleApp.Select the Debugging tab shown in Figure 3.8. Set the Java Debugger to the default debugger. Select Wait for next launch/push notification. Deselect all other check boxes.
Your project is now set to run from Xcode. Open the Console by selecting Run
Console applications have their uses, but typical end-users prefer nice point-and-click interfaces. The current version of Xcode is missing a pure Swing project template. Still, setting up a pure Swing project in Xcode is fairly easy. In fact, the console application project I explained in the preceding section easily morphs into a GUI application by replacing all console input and output with a Swing or AWT interface.
In this section, I explain setting up a Swing Xcode project in detail.
Begin creating a Java Swing application project for Xcode 3.2 by following these instructions:
Select File
New Project from the Xcode menu bar.Select Empty Project from Other templates, as shown in Figure 3.1.
Name the new project
GuiApp.Open your new project folder in the Finder.
Create
src,resources, andlibfolders in your project folder.Copy the
resources_macosxfrom the book's Web site Chapter 3GuiAppsource code.
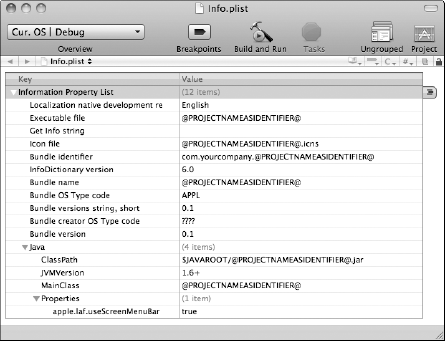
The resources_macosx folder contains a default icon file named after the project and an info.plist with the properties displayed in Figure 3.9. You also can create these two items from scratch instead of downloading the files from the book's Web site.
Note
The resources_macosx folder for this project is on the book's Web site.
Note
Icon creation is detailed in Chapter 5.
Note
info.plist files are detailed in Chapter 5.
Add the new folders, including
resources_macosx, to your project. This is a little tricky. Select yourGuiAppproject in the Groups & Files tree. Control-click and select AddExisting Files... from the context menu. Then select the new project folders and add them. A dialog box comes up asking for how to add the folders. Add the folders using Create Folder References for any added folders, as shown in Figure 3.2.Create a file called
build.xmlat the root of your project.This is your Ant build file. With this setup, Xcode uses Ant when building your project.
Fill
build.xmlwith the following code.This Ant build is based off the Xcode 3.1 Java application template, but it should work with the latest version Xcode. If you create a custom
build.xml, include theinstall, runandcleantargets. I explain Ant builds in Chapter 4.<?xml version="1.0" encoding="UTF-8"?> <!-- Based on Xcode 3.1 Java application template --> <project name="GuiApp" default="install" basedir="."> <property name="jvm.framework" location="/System/Library/Frameworks/JavaVM.framework"/> <property name="apple.appstub" location="${jvm.framework}/Resources/MacOS/¬ JavaApplicationStub"/> <property name="application.macos" location="dist/${ant.project.name}.app/Contents/¬ MacOS"/> <property name="application.macos.stub" location="${application.macos}/${ant.project.¬ name}"/> <property name="application.resources" location="dist/${ant.project.name}.app/Contents/¬ Resources"/> <property name="application.resources.java" location="dist/${ant.project.name}.app/Contents/¬ Resources/Java"/><fileset id="lib.jars" dir="lib"> <include name="**/*.jar"/> </fileset> <path id="lib.path"> <fileset refid="lib.jars"/> </path> <!-- Call mkdir and javac --> <target name="compile" description="Run javac"> <mkdir dir="src"/> <mkdir dir="lib"/> <mkdir dir="bin"/> <javac deprecation="on" srcdir="src" destdir="bin" source="1.6" target="1.6" includeAntRuntime="no" classpathref="lib.path" debug="true"> </javac> </target> <!-- Create application JAR --> <target name="jar" depends="compile" description="Jar everything"> <mkdir dir="jars"/> <jar jarfile="jars/${ant.project.name}.jar" basedir="bin" manifest="resources/Manifest"> <!-- Inject resources --> <fileset dir="resources/" excludes="resources/Manifest" /> <!-- Merge library jars into final jar file --> <zipgroupfileset refid="lib.jars"/> </jar> </target> <!-- Create the '*.app' package and copy resources --> <target name="install" depends="jar" description="Make application bundle"> <mkdir dir="dist"/> <mkdir dir="${application.resources.java}"/> <mkdir dir="${application.macos}"/> <copy toDir="${application.resources.java}"> <fileset dir="jars"><include name="*.jar"/> </fileset> </copy> <copy file="${apple.appstub}" toFile="${application.macos}/${ant.project.name}"/> <!-- file permissions set --> <exec executable="/bin/chmod"> <arg line="755 '${application.macos.stub}'"/> </exec> <copy file="resources_macosx/Info.plist" toFile="dist/${ant.project.name}.app/Contents/¬ Info.plist"> <filterset> <filter token="PROJECTNAMEASIDENTIFIER" value="${ant.project.name}"/> </filterset> </copy> <copy file="resources_macosx/${ant.project.name}.icns" toDir="${application.resources}"/> </target> <!-- The 'open' tool runs the application --> <target name="run" depends="install" description="Run application bundle"> <exec dir="dist" executable="/usr/bin/open" os="Mac OS X"> <arg line="${ant.project.name}.app"/> </exec> </target> <target name="clean" description="Clean by deleting all compile¬ directories"> <delete dir="bin"/> <delete dir="jars"/> <delete dir="dist"/> </target> </project>Create
GuiApp.javain yoursrcdirectory. Create the Java file from within Xcode by selectingsrcand Control-clicking. Select AddNew File... from the context-sensitive menu. Choose Empty File from the Other template catalog, as shown in Figure 3.3, and create it in thesrcdirectory. If there is an extra reference to the file in the Groups & Files tree, remove the reference.Add the following source to the
GuiApp.javafile.import java.awt.Color; import java.awt.Container; import java.awt.Graphics; import javax.swing.JFrame; import javax.swing.JPanel; /** * Java based GUI application. * * @author T. Gene Davis */ public class GuiApp { public static void main(String[] args) { JFrame appWindow = new JFrame("GuiApp"); appWindow.setSize(600, 400); Container content = appWindow.getContentPane(); content.add(new MyPanel()); appWindow.setVisible(true); } private static class MyPanel extends JPanel { public void paint(Graphics g) { g.setColor(Color.BLUE); g.drawString("Put your app here", 10, 100); } } }Add a
Manifestfile to theresourcesdirectory. Create theManifestfile from within Xcode by selectingresourcesdirectory and Control-clicking. Select AddNew File... from the context-sensitive menu. Choose Empty File from the Other template catalog and create theManifestfile as part of theGuiAppproject in theresourcesdirectory. If there is an extra reference to the file in the Groups & Files tree, remove the reference.The source for
Manifestis simply this:Main-Class: GuiApp
Your project is ready to use. If you prefer building from the command line, cd to your project root in the Terminal and type ant to build your project, ant run to run your project, and ant clean to clean your project.
If you prefer to build, run, and clean your project from inside of Xcode, you need to do a few more steps to polish off your project setup. You need an Executable and a Target. The following steps give you a properly configured Target:
Select Add
New Target...Select External Target from the Other group, as shown in Figure 3.4. Name your new target GuiApp, and add it to your GuiApp project.
Double-click your new GuiApp Target.
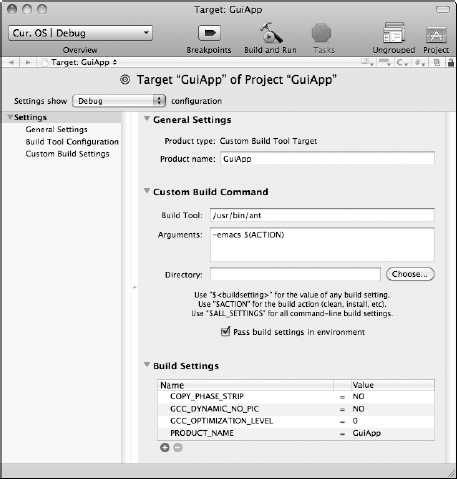
This brings up the Target dialog box titled Target: GuiApp.
Set the Build tool to
/usr/bin/ant, as shown in Figure 3.10.Set the Arguments to
-emacs $(ACTION).
Your Target is ready to use. This allows building and cleaning of the project. Before the next step, select Build
Control-click on Executables to see the context menu, and select Add
New Custom Executable...Name your executable
GuiApp.Select the path to your
dist/GuiApp.appcommand.That is your newly built application bundle.
Add the new Executable to your project.
Open your new
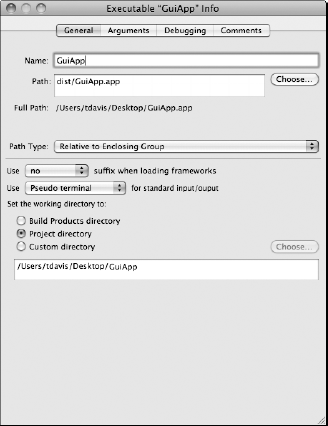
javaexecutable by double-clicking it.Select the General tab.
The default settings should work, but if not, compare your settings to Figure 3.11.
No customization of the Arguments tab or the Debugging tab is necessary. Your project is now set to run from Xcode. Click the Build and Run button at the top of the project window. You also can open your new Swing application from inside of the Finder by double-clicking the application bundle your project's dist folder.
Note
If the GuiApp project fails to build and run properly, double-check the project against the version of the project from the book's Web site. Check the directory names, source code, and package contents for differences that may prevent proper building or running of the project.
Applets are a staple of Java development for the Web. Commonly, Applets supply a client tier to multi-tier Web applications. Some Applets provide useful graphing and scientific utilities to researchers. Applets provide simple Web-based distribution of a variety of Java applications.
As with Swing applications and Terminal applications, Applet development is easy to set up in Xcode. As of Xcode 3.2, no built-in template for Applet project creation is available, but with a few pointers, building and running Applets from inside Xcode is relatively painless.
To create a Java Applet application project with Xcode 3.2, follow these instructions:
Select File
New Project from the Xcode menu bar.Select Empty Project from Other templates, as shown in Figure 3.1.
Name the new project
BasicApplet.Open your new project folder in the Finder.
Create
src,resources, andlibfolders in your project folder.Add the new folders to your project. Select your
BasicAppletproject in the Groups & Files tree, and Control-click AddExisting Files... from the context menu. Then select the new folders and add them. A dialog box comes up asking for how to add the folders. Add the folders using Create Folder References for any added folders, as shown in Figure 3.2.Create a file called
build.xmlat the root of your project.This is your Ant build file. With this setup, Xcode uses Ant when building your project.
Fill
build.xmlwith the following code.This Ant build is based loosely on the Xcode 3.1 Java Applet template, but it should work with the latest version Xcode.
<?xml version="1.0" encoding="UTF-8"?>
<!-- Based off Xcode 3.1 Applet template build.xml -->
<project name="BasicApplet"
default="install"
         basedir=".">
   <property name="jarfile"
                location="jars/${ant.project.name}.jar"/>
   <property name="html.file"
                location="resources/basic_applet.html"/>
   <fileset id="lib.jars" dir="lib">
      <include name="**/*.jar"/>
   </fileset>
   <path id="lib.path">
      <fileset refid="lib.jars"/>
   </path>
   <!-- Call mkdir, javac and jar -->
   <target name="compile"
              description="mkdir, javac and jar">
      <mkdir dir="lib"/>
      <mkdir dir="bin"/>
      <mkdir dir="jars"/>

      <javac srcdir="src"
                destdir="bin"
                source="1.6"
                target="1.6"
                includeAntRuntime="no"
                classpathref="lib.path"
                debug="true">
      </javac>
      <jar jarfile="${jarfile}"
              basedir="bin">
              <!-- Merge final JAR -->
         <zipgroupfileset refid="lib.jars"/>
      </jar>
   </target>
   <!-- Create and fill dist directory -->
   <target name="install"
              depends="compile"
              description="Create and fill dist directory">
      <mkdir dir="dist"/>
      <copy toDir="dist">
         <fileset dir="jars">
            <include name="*.jar"/>
         </fileset>
      </copy>
      <copy file="${html.file}" todir="dist"/>
   </target>
   <!--
The project Executable actually opens the appletviewer. This target is here for Ant purists. --> <target name="run" depends="install" description="Run the JApplet in Applet Viewer."> <exec dir="dist" executable="/usr/bin/appletviewer" os="Mac OS X"> <arg value="basic_applet.html"/> </exec> </target> <target name="clean" description="Delete build directories."> <delete dir="bin"/> <delete dir="jars"/> <delete dir="dist"/> </target> </project>Create
BasicApplet.javain yoursrcdirectory. Create the Java file from within Xcode by selectingsrcand Control-clicking. Select AddNew File... from the context-sensitive menu. Choose Empty File from the Other template catalog, as shown in Figure 3.3, and create it in thesrcdirectory. If there is an extra reference to the file in the Groups & Files tree, remove the reference.Add the following source to the BasicApplet.java file:
import java.awt.Color;
import java.awt.Graphics;
import javax.swing.JApplet;
/**
 * Xcode Applet project template.
 *
 * @author T. Gene Davis
 */
public class BasicApplet extends JApplet
{
   public void paint(Graphics g)
   {
      g.setColor(Color.GREEN);
      g.drawString(
         "Put your JApplet here",
         10,
         100);
   }
}
Add an HTML file called
basic_applet.htmlto theresourcesdirectory. Use the same process as Step 9.The source for the HTML file is as follows:
<html>
<head>
   <title>Basic Applet</title>
</head>
<body>
   <applet archive="BasicApplet.jar"
              code="BasicApplet"
              width=600
              height=400>
      <a href="http://java.com">Java</a> required.
   </applet>
</body>
</html>
Your Applet project is ready to use. If you prefer building from the command line, cd to your project root with the Terminal and type ant to build your project, ant run to run your project, and ant clean to clean your project.
If you prefer to build, run, and clean your project from inside of Xcode, you need to follow a few more steps to polish off your project setup. You need an Executable and a Target. The following steps give you a properly configured Target:
Control-click the Targets node of the Groups & Files tree.
Select Add
New Target...Select External Target from the Other group, as shown in Figure 3.4. Name your new target
BasicApplet, and add it to yourBasicAppletproject.Double-click your new
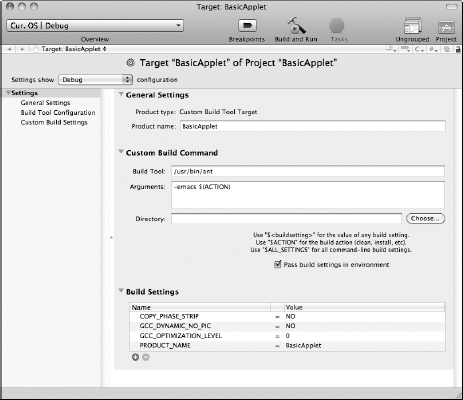
BasicAppletTarget.This brings up the Target dialog box titled Target: BasicApplet.
Set the Build tool to
/usr/bin/ant.Set the Arguments to
-emacs $(ACTION), as shown in Figure 3.12.
Your Target is ready to use. This allows building and cleaning of the project. Before the next step, click Build
From the Executables context menu, select Add
New Custom Executable...Name your executable
appletviewer.Select the path to your
appletviewercommand.That is
/usr/bin/appletviewer.Add the new Executable to your project.
Open your new
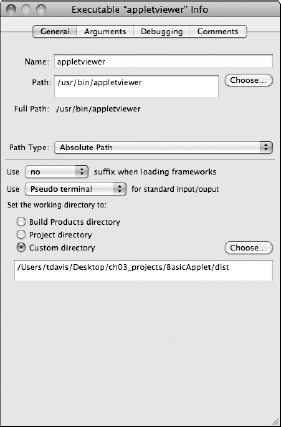
appletviewerexecutable by double-clicking it.Select the General tab, and set Custom directory to your project's
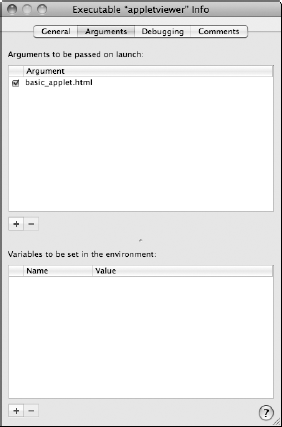
distdirectory as shown in Figure 3.13.Select the Arguments tab, and add the argument 'basic_applet.html' by clicking the "+" button below the Arguments table as shown in Figure 3.14.
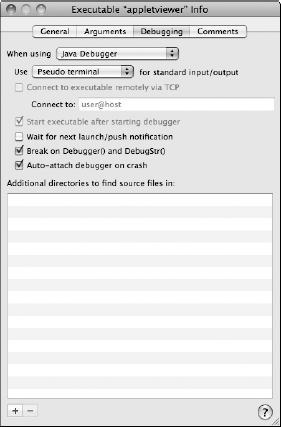
Select the Debugging tab. Set the Java Debugger to the default debugger. Use the default setting for this tab as shown in Figure 3.15.
Your project is now set to run from Xcode. Click the Build and Run button at the top of the project window. The Applet Viewer opens your HTML file and displays your Applet based on the HTML file's applet tag.
Xcode provides one type of Java template: the JNI Library project. The name JNI Library is misleading. This project gives developers a fully Cocoa Framework integrated template showing Address Book integration by way of JNI.
Looking at the JNI Library project, you quickly realize it is far more complex than the three example projects that I explained earlier in this chapter. In fact, you may need to read Chapters 4, 7, 8, and 10 before taking full advantage of the JNI Library project. It is not a project for beginners.
Note
Chapter 9 contains a thorough explanation of JNI and tips for use of JNI with Objective-C.
However, despite the JNI Library's complexity, you need to start somewhere. In this section, I explain how to set up the JNI Library project. I also give you a brief overview of the parts of the JNI Library.
To create a default JNI Library project follow these instructions:
Select File
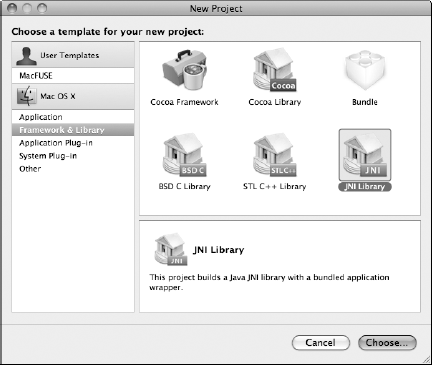
New Project... in Xcode.Select the Java project named JNI Library from the New Project dialog box, as shown in Figure 3.16.
Click the Choose... button.
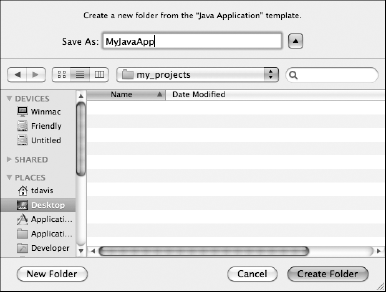
Select a location, and name your new project an appropriate name such as
MyJNIApplication.Click the Save button.
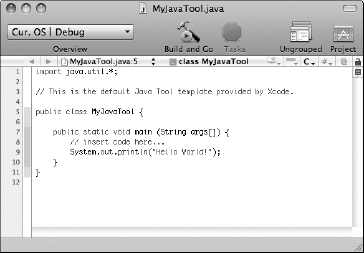
The result is a spiffy new JNI Library project. Click the Build and Run icon at the top of the Xcode window to make sure your new project runs properly. You should see an application window that looks something like Figure 3.17.
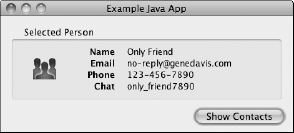
The Example Java App that Apple integrated with the JNI Library is a common Model View Controller (MVC). If you followed the instructions in this section for creating the JNI Library project, then your main() method is in com.example.MyJNIApplication. Your main() method sets up the controller. The main controller is the ApplicationController class. After constructing the ApplicationController, the main() method initializes the view and model using ApplicationController's init() method.
Your initial view is a typical JFrame constructed by the MainWindowController class. The object name is, not too surprisingly, mainWindow. Nothing too inspiring.
The model is where the cool factor of this project comes to play. The model for the JNI Application project is the local Address Book. Access to the local model is handled in the NativeAddressBook class. The NativeAddressBook class loads the AddressBook library and contains the native methods getMyUID() and getNativeAddressBookContacts().
Note
The file extension *.m indicates an Objective-C file. The file extension of *.mm indicates an Objective-C++ file. Objective-C files have header files with an *.h extension, just as their C counterparts do.
The Objective-C implementations of the getMyUID() and getNativeAddressBookContacts() methods are in the NativeAddressBook.m file. Look for the two JNIEXPORT method implementations near lines 47 and 68. The implementation names are very long and contain the Java package name, class name, and the method names. The local Cocoa AddressBook.framework is accessed in these two functions.
If you look at the targets for this project, you see three targets: the Compile Java target, the Compile Native target, and the Assemble Application. If you are already familiar with Ant builds, you may wonder why three targets were used instead of a single Ant build. You certainly can arrange the entire build and clean from an Ant script. The three targets in the JNI Library project allow for closer integration with Xcode.
Setting the Xcode Java Compiler
Whether you inherit an older Xcode Java project or create a brand new JNI Library project, you may find that generics, annotations, Java's foreach loops, or even newer Java syntax additions may prevent you from compiling a Java project. Never fear. Here is a quick project fix to get you compiling and running.
To get your project compiling with new Java syntax, make two changes. Change the build.xml compile target to use your desired source and target Java version. Also, add your desired JAVA_HOME to the project target Build Settings.
Open your project's build.xml file. The build.xml file specifies the source version and target versions of Java to compile against. Skim down the list of targets until you see the compile target. It looks something like this:
<target name="compile"
   depends="init"
   description="Compile code">
   <mkdir dir="${bin}"/>
   <javac deprecation="on"
   srcdir="${src}"
   destdir="${bin}"
      source="1.3" target="1.2"
      includeAntRuntime="no"
      classpathref="lib.path"
   debug="${compile.debug}">
   </javac>
</target>
Notice that the source and target are set to 1.3 and 1.2 respectively. (If you are using the default build.xml found in the Xcode 3.2 JNI Library, they both are set to 1.5.) For a Java 6 project, I change these settings to 1.6. After the change, the compile target looks like this:
<target name="compile"
depends="init"
description="Compile code">
   <mkdir dir="${bin}"/>
   <javac deprecation="on"
   srcdir="${src}"
   destdir="${bin}"
      source="1.6" target="1.6"
      includeAntRuntime="no"
      classpathref="lib.path"
   debug="${compile.debug}">
   </javac>
</target>
The second change is necessary for Java projects created with versions of Xcode before 3.2 or if you intend for Xcode to use a different version of the JVM than your system uses. The change is adding a JAVA_HOME property to the Debug and Release versions of your Java project's target. Follow these steps:
Open your project's target by double-clicking the target bull's eye on the left side of your project window.
Navigate to Custom Build Settings.
This dialog box displays the properties that pass to Ant when executing tasks such as
compile.Add a new property by clicking the plus icon below the Build Settings table.
Set the name of your new property to
JAVA_HOME.Set the value of your new property to your desired Java home.
Use a static rather than dynamic value here. If you are unsure of the correct location of your desired Java home, use the java_home tool to discover the correct directory. For instance,
/usr/libexec/java_home 1.6
displays
/System/Library/Frameworks/
JavaVM.framework/
Versions/1.6.0/Home
on OS X 10.5.7. Your Custom Build Settings should now contain JAVA_HOME as shown in the figure.
JAVA_HOME in Custom Build Settings
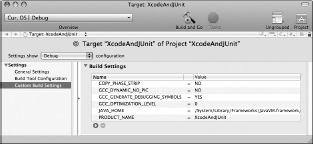
Remember to add the JAVA_HOME property to Debug and Release settings for your target!
Sometimes IDEs are forced on us by a project requirement or an employer requirement. Most experienced computer programmers have an IDE preference. Several Java IDEs are available for OS X, but only Xcode completely embraces the OS X experience. The native OS X features and feel of Xcode draw many developers to use Xcode exclusively for their work.
In this section, I explore Xcode's features above and beyond providing Java projects and Java syntax coloring. I introduce the Welcome to Xcode screen, view customization, creating class models, and shortcuts for common tasks. This section introduces the heart of the Xcode experience.
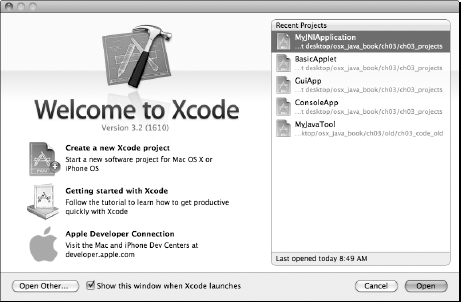
The first time you open Xcode, you see the Welcome to Xcode window, as shown in Figure 3.18. The window provides quick links to recent projects, as well as quick links to common tasks performed when launching Xcode.
The link most interesting to new OS X developers is probably "Getting started with Xcode". You may use a different IDE than Xcode for your Java development, but the preconfigured projects in Xcode provide a wonderful starting point for applications that integrate with OS X. I suggest learning the basics of Xcode even if you use Eclipse or NetBeans for most of your Java development.
Clicking the link labeled Getting started with Xcode on the Welcome to Xcode window brings up the Xcode Quick Start window, shown in Figure 3.19. Glancing at this window reveals it is more about general OS X development resources than Xcode.

The Welcome to Xcode window provides three quick starts for coding. The link labeled Create a new Xcode project is a shortcut to the File
Tip
If you uncheck the box for Show this window when Xcode launches in the Welcome To Xcode window and later want to see the window at launch again, select Help
I am not sure whether any standard software development tool has more names and multiple interpretations of its acronyms than source version control does. A Source Configuration Management (SCM), or Software Control Management (SCM), or Software Configuration Management (SCM), also known as a Version Control System (VCS), or simply as a repository, provides Time-Machine-like features to software developers. It seems fitting that versioning software has so many versions of its own identity.
SCMs have been around for many years longer than Time Machine and do not require an extra hard drive to set up. Source Code Management focuses on source files, such as *.java files and *.xml files, though any type of file can be versioned in a source code repository.
Version control is useful for teams of developers or individuals working solo. If you are working alone on a project, you may get to a point in development where you realize you should not have made certain changes to your source code. You wish you could go back to an earlier version that worked better, or you simply don't want to start completely over to get rid of some changes you made.
With version control, this situation is no big deal. You look up your code history, pick a version you committed sometime in the past, and revert to your earlier version of the code that you actually like.
Version Control Systems work locally on your local hard drive or remotely served by another computer. Remote setups work nicely as a backup of your source. If you catch a virus, or your hard drive flakes out on you, you simply install a new hard drive and check out your project to the new hard drive. You are up and running with minimal hassles.
If you are working on multiple computers, say a home computer and an office computer, you commit your code to the version control server before shutting down your computer. When you start working on your alternate computer, check out the code you last committed to the current computer. At this point, you have the newest version and continue developing as though you are using the same computer.
All these benefits apply to team development. Also, if all code for a project is committed regularly to the same repository, integrate frequent automated builds and tests to keep code conflicts from slowing development.
The best part about Version Control Systems is that developers working on the same file (such as a java file) can work completely independent of each other, and when they check in their code, the merging of the code often happens without any verbal or written communication. This is not always the case, but often automatic merges do work smoothly.
Xcode supports three Version Control Systems. They are Subversion (also known as SVN), CVS, and Perforce. Perforce is a commercial SCM with per user licensing, educational licensing, and free open-source licensing. CVS is open-source software, licensed under a GNU General Public License. SVN is also open-source software, using an Apache style license.
Tip
Subversion, CVS, and Perforce all support remote versioning of code. This means that developers at different sites working on different operating systems can all develop against the same code base.
Perforce competes against two widely supported, top-notch, free version control systems. That's some tough competition. Perforce holds its own by producing an excellent product with better features than its free competitors. Perforce excels at branching and merging branches. Automated merging is a strong feature. Perforce also supports several cross-platform development environments.
Note
The Perforce Web site is http://www.perforce.com/.
CVS is likely the most widely used version control system. It was released in 1990 and is free (as in food and speech.) Age and price have both contributed to its popularity. However, CVS is a powerful and stable piece of technology. All other version control system developers compare their products to CVS.
Note
The CVS Web site is http://www.nongnu.org/cvs/.
CollabNet Inc created Subversion (SVN) to replace CVS. Early adopters of Subversion felt CVS was buggy and lacked features. The creators of SVN wanted to create a better CVS. Personally, I was an early adopter of SVN because I liked the SVN rename feature.
Note
SVN saw rapid initial development. SVN developed so fast that about one year after development began, it was used to version its own code. The pace of development allowed for a large user base in a short time.
As mentioned earlier, Xcode supports SCM but does not come pre-configured with a repository for your projects. After you install the OS X developer tools, you have access to both SVN and CVS. For the following example, I use SVN.
If you are working with a team, you probably already have a repository. Ask for the connection information. For the following example, I use the HSQLDB Java project hosted on sourceforge.com. This example retrieves the current Java source of HSQLDB and adds it to the newly created MyDB project. Follow these steps:
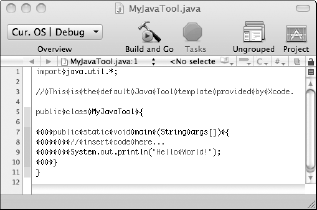
Create a Java Tool project as described earlier in this chapter.
Name the project
MyDB.Select SCM
Configure SCM Repositories... from the SCM menu.This opens the Xcode Preferences with the SCM tab selected.
Click the plus button under the Repositories list on the left side of the window.
The Repositories list is empty until you click the Add button.
Select a name for the repository.
I selected
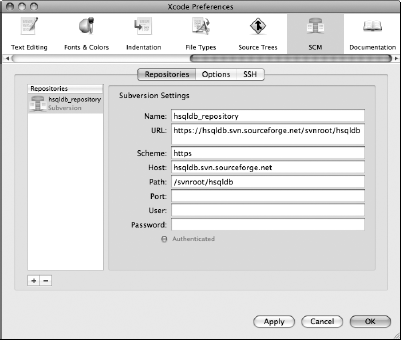
db_repository.Fill in the URL. For HSQLDB, the repository is at
https://hsqldb.svn.sourceforge.net/svnroot/hsqldb.Entering this URL causes the scheme, host, and path to automatically fill, as shown in Figure 3.20.
Select SCM
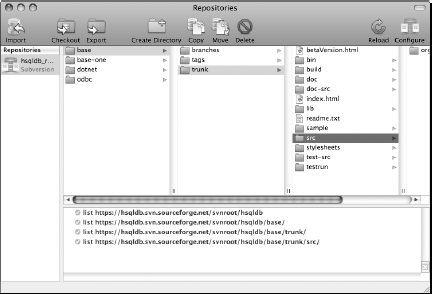
Repositories from the Xcode menu.The Repositories window opens. The directories found in the repository may take a short while to become visible depending on the speed of the SVN server. Be patient.
Select
srcunder thebase/trunkdirectory, as shown in Figure 3.21.Select the Export icon at the top of the Repositories window.
Navigate to the
MyDBproject directory, and select it; click the Export button, and replace the currentsrcdirectory in theMyDBproject.
If you open the src folder from Xcode, you see the source for HSQLDB in addition to the original source file created by Xcode's Java Tool template. You cannot commit any changes back to the HSQLDB project. This example only lets you retrieve the code anonymously.
The following example assumes that you have already created a project to import and added a repository for importing into. Adding and configuring a repository are described in the preceding example. To import a new project into a repository, follow these steps:
Select SCM
Repositories from the Xcode menu.This opens the Repositories window.
Select the repository for your import, and navigate to the directory you will import your project into.
Click the Import icon at the top left of the window.
Navigate to the Project directory, and click the Import button.
If you have commit permissions to the repository, then your project is added to the repository.
Like other modern IDEs, Xcode's view is customizable. You can tune it to suit your tastes or your current project. Besides splitting and resizing panes, you can quickly change syntax coloring, code folding, and the toolbar buttons.
Various layout and shortcut options are available from the menu at View

Tip
To remember the behavior of the status bar and favorites bar in Xcode, think of their Safari counterparts the Safari status bar and the Safari bookmarks bar.
View
View
Toggle the favorites bar in the Xcode window by selecting View
Creating a favorite on your favorites bar is not hard. Here's how:
Toggle on your favorites bar while the Project window is in focus by selecting View
LayoutShow Favorites Bar from the menu.Browse to a configuration file or source-code file in the Groups & Files tree.
Drag the file to the bar.
Xcode's project window can display the source-code editor, or double-clicking a Java file opens a detached source-code editor. If you prefer editing in a detached window instead of the Xcode project window, you can reduce the project window to display just the Group & Files tree.
Toggle on the Page Control buttons while the Project window is in focus by selecting View
LayoutShow Page Control from the menu.Click the Morph button in the Page Control at the top of Xcode's project window.
Optionally, hide the Page Control by selecting View
LayoutHide Page Control from the menu.
Now you see the Groups & Files tree and optionally the favorites bar and your customized toolbar, as shown in Figure 3.24.
Tip
When using two monitors, reserve one for tools and the primary monitor for coding. To do this, morph the Project window so that only the toolbars and Group & Files tree are visible, and then place the resulting window on a second monitor. Then open your source editor by double-clicking the file in the morphed Projects window, and maximize the source editor on your primary monitor.
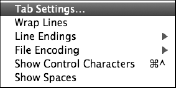
The display and formatting of source in editor windows is configurable, too. Selecting View
Tip
If the text in a source file looks wrong because of an extra line between every line of code or certain characters don't appear to display properly until retyped, try messing around with the settings in View
Showing control characters and spaces are exceptionally useful for debugging Java property and configuration files. Sometimes, unseen control characters or extra spaces in a configuration files are a real hassle to track down. Toggling Show Control Characters and Show Spaces reduces debug time in these cases. The result is similar to Figure 3.26.
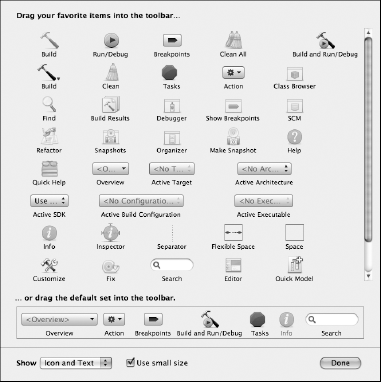
Customizing the Xcode Project window's toolbar is another great view change that makes development with Xcode pleasant. To quickly get to the Customize Toolbar dialog box, follow these steps:
Control-click to the left of the Build and Run icon or to the right of the Info icon on the Project window's toolbar.
In other words, Control-click the toolbar, but not on an icon it contains.
Select the Customize Toolbar menu item in the context menu that pops up.
Drag icons to the toolbar from the Customize Toolbar dialog box.
The Customize Toolbar dialog box, shown in Figure 3.27, and the toolbar are intuitive to use. Remove icons the same way you remove them from the Dock. Just drag them off, and watch for the satisfying puff of smoke. The icons and text available for adding to the toolbar include drop-down menus, spaces, and a default toolbar to replace your custom setup. Drag them on to the Project window's toolbar as desired. Rearrange the icons on the toolbar by dragging them to their new positions.
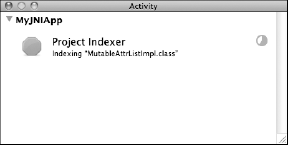
The status bar at the bottom of the Xcode Project window is great for seeing the state of builds in Xcode. The status bar does not detail all of Xcode's activities, though. For instance, when you create a new project, Xcode proceeds to index it. Indexing allows quick refactoring of the code. The indexing activities of Xcode are not mentioned on the status bar. To see the state of indexing, you need to open the Activity window, shown in Figure 3.28.
To open Activity Viewer, select Window
Apple includes class modeling tools in Xcode. Class models help software designers and architects to visualize code. Class models turn code into pictures. You quickly understand relationships between classes with a well-organized model.
You can approach creating class models with Xcode in two ways. One is Quick Model, and the other is Project Class Model. The end result is the same.
To create a Quick Model, follow these steps:
Expand your
src(orSource/java) folder in the Groups & Files tree.Select the Java class(es) you desire to model.

Select Design
Class ModelQuick Model from the Xcode menu.
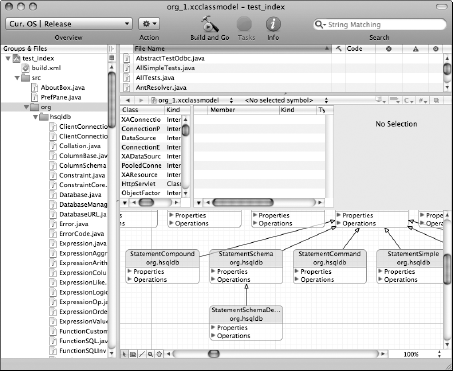
The result should be a model that looks something like Figure 3.29. You can save a Quick Model as a permanent part of your project at any time by selecting File
Note
The class model figures in this section are based on the source for HSQLDB located at http://hsqldb.org/. HSQLDB is release under a BSD style license.
Note
Both Quick Models and Project Models save as *.xcclassmodel files.
Tip
Save and commit your *. xcclassmodel files to your version control system to give other developers a quick understanding of how your code is put together.
A detail-oriented alternative to Quick Model is the Project Model approach. Project Models create a model file as part of your chosen project. Project Models also provide a nice selection list of classes to add to your model.
To create a Project Model, follow these steps:
Select File
New File ... from the Xcode menu bar.In some versions of Xcode, you must open the New File dialog box from a Group & Files folder's context-sensitive menu. The contents of the New File dialog box may vary based on how it is opened.
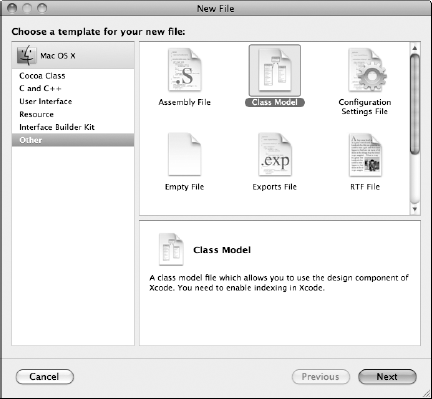
Select Class Model from the Other category of file template types, as shown in Figure 3.30.
Click next.
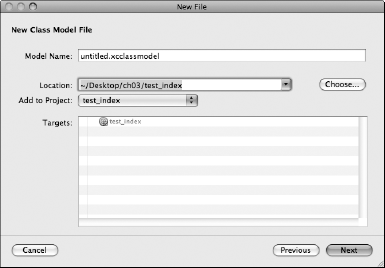
Choose a model name, location, and project to add your model into, as shown in Figure 3.31.
Click the Next button.
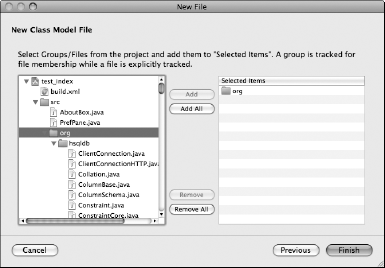
Add *.java files to your initial Class Model. Browse the given project tree. Select
*.javafiles, and click the Add button, as shown in Figure 3.32.Click the Finish button.
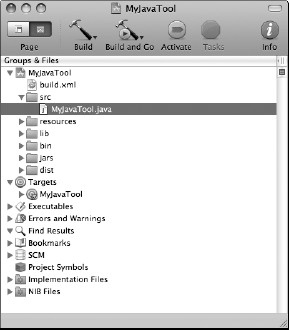
You now have a customized class model in your project directory. You see it in the Group & Files section of your Xcode Project window.
Project Models are saved to a file during creation. Quick Models are not saved to a file unless you explicitly chose to save them from the File
Warning
Models created with Xcode are actually packages. Packages are folders that behave like a single file. For all practical purposes, they are a file. However, if you try e-mailing the package or placing it in on a Web site, zipping it first. Otherwise, you may not see your class model shared the way you intend.
I discuss SCMs in Xcode earlier in this chapter. During the SCM discussion, I introduced the Xcode Preferences window. Now let's explore the Xcode Preferences window in more depth.
To open the Xcode Preferences, select Xcode
Tip
To include a preferences window like Xcode does in your own Java applications, start from the Java JNI Library template I discussed earlier in this chapter. The ApplicationController class is responsible for handling Preference MenuItem events. See the showPreferences() method in ApplicationController. It lacks an actual window when set up from the template, but that is just a matter of adding code to the showPreferences() method.
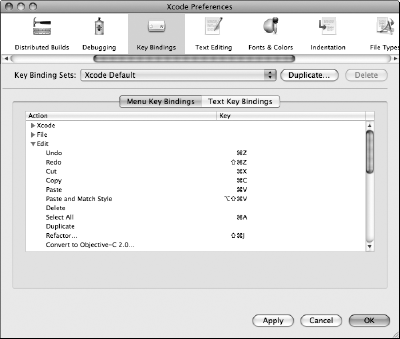
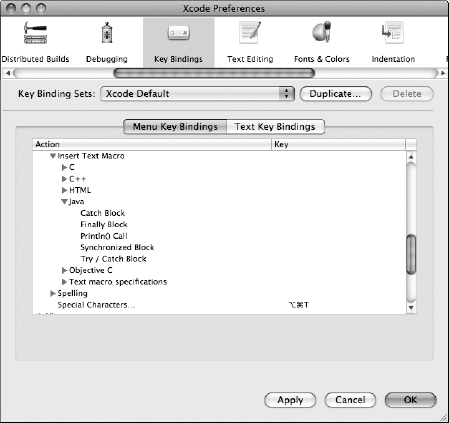
Key bindings in Xcode are all customizable. Select the Key Bindings icon in the Xcode Preferences to see the Menu Key Bindings and Text Key Bindings options, as shown in Figure 3.33. Xcode comes with four sets of predefined key bindings available from the Key Bindings Sets drop-down list. The predefined sets of key bindings are Xcode Default, BBEdit Compatible, Metrowerks Compatible, and MPW Compatible.
BBEdit, Metrowerks, and MPW are well known to longtime developers of OS X applications. If none of these presets are of interest to you, create a new key binding set and customize it to your heart's content.
Note
You cannot modify any of the four initial key sets provided by Xcode. Instead, duplicate a desired key set by selecting it and clicking the duplicate button. Then make your changes to the duplicate key set.
Here is an example of creating a custom key binding set with Control+C set to copy instead of
Open the Xcode Preferences window by selecting Xcode
Preferences....Select the Key Bindings icon To open the Key Bindings panel.
Click the Duplicate button to create a duplicate of the current key binding set.
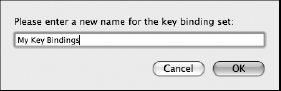
Name your new set
My Key Bindings, as shown in Figure 3.34.Double-click the key column next to the Copy Action in the Menu Key Bindings tab.
This selects the old key binding, if any exists.
Press Control+c.
You have set your new key binding for the Copy command.
Click the OK button to apply the changes and close the Xcode Preferences window.
Now you can copy text in the Xcode's editor window using Control+c. Somewhere an Apple developer is rolling over in his grave.
You may revert to the original key bindings by opening the Key Bindings preference panel and selecting Xcode Default from the Key Binding Sets drop-down list. Apply the changes by clicking the OK button.
Tip
Remove custom Key Binding Sets by selecting the set from the Key Binding Sets drop-down list and clicking the Delete button. You can delete only custom Key Binding Sets. The Delete button deactivates when you select one of the four default Key Binding Sets
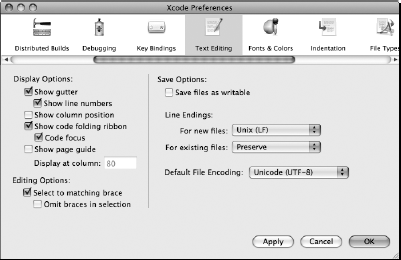
Click the Text Editing icon of the Xcode Preferences window to see options for display, editing, and saving. If you want to toggle line numbers, this is your panel. I can't live without line numbers, so this is my favorite preference.
The Text Editing panel, shown in Figure 3.35, has options for setting the new line character(s) and the default file encoding. Between these settings you can probably match any file encoding you ever run into. You also have the option of preserving or changing the new line character for existing files you open.
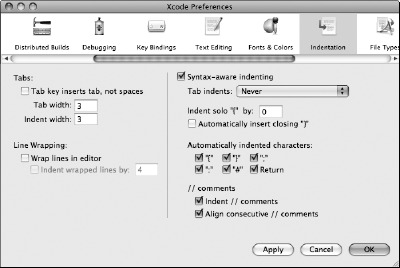
The Indentation preference panel, shown in Figure 3.36, is available by clicking the icon of the same name. The Indentation preferences include tab settings, line wrap settings, and syntax-aware indenting preferences. Setting tabs to spaces or literal tabs is available from this pane. Also, you can set lines to wrap with a set indent from this pane.
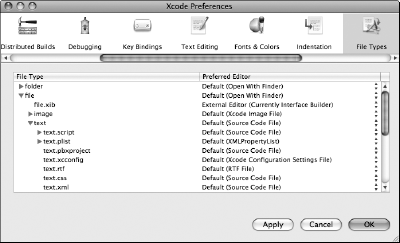
You may not find File Type preferences, shown in Figure 3.37, immediately obvious. This preference pane lists all the file extensions that Xcode is aware of with the accompanying application with which Xcode opens the file type. If you want to open a certain file extension with a custom application instead of editing it from within Xcode, make that change here.
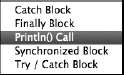
Xcode comes with several built-in macros and shortcuts for entering common Java code. In the Xcode menu, select Edit
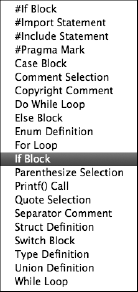
Do not limit yourself to the Java text macros. Java is a C-based language. Several of the C macros, shown in Figure 3.39, also conform to Java syntax. For instance, selecting Edit
Now, you may wonder what good it does you to have to navigate through multiple menus when you could just type the code quicker. Remember my description of key binding sets earlier in this chapter? You guessed it. All these macros are available in the Xcode Preferences Key Bindings preferences panel, as shown in Figure 3.40. Make them accessible at your fingertips with a convenient key binding of your choosing.
Tip
When typing a class name or object name followed by a period, use Control+. (period) to find known method or attribute completions of the code you are typing. Cycle through known completions by repeatedly typing Control+.(period).
Tip
Type
Most IDEs allow developers to manage multiple projects. Xcode goes a step beyond managing multiple projects. Xcode provides the Organizer.
With Organizer, add projects, folders, and files to the convenient Projects & Source tree. In Organizer, you can create new Java templates based on the Xcode Java Templates. You can build, clean, and run any projects managed by Xcode in Organizer. Also, the toolbar at the top of the Organizer window is customizable in the same way as the Project window.
Tip
Control-click the Organizer toolbar to bring up the associated context menu. Select Customize Toolbar... to view the Customize Toolbar dialog box for Organizer.
Open the Organizer window from the Xcode menu by selecting Window

Adding projects, templates, and files to the Projects & Sources list is effortless. This example shows you how to add a project to Organizer:
Open the Organizer window by selecting Window
Organizer in Xcode.You do not need to have an Xcode project open in order to open Organizer.
Select the plus icon at the bottom left of the Organizer window, as shown in Figure 3.42.
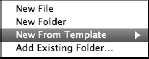
Selecting the plus icon opens a drop-down list containing New File, New Folder, New From Template, and Add Existing Folder....
Select Add Existing Folder.... to bring up a standard file dialog box.
Choose a project folder, and click the Open button.
The selected project becomes available in Organizer.

With Organizer, you not only have access to the source files for multiple projects, but you also can run any of the projects you add to Organizer. Select the root folder of the project you want to execute, and click the Run button on Organizer's toolbar.
If you select a project to run in Organizer and click Run, make sure you have already built the project first. You may be in the habit of using the Build and Run button from in the Project window. The Organizer does not have a Build and Run button. Nothing too terrible happens if you have not built your project before you click Run. Typically, you get an Xcode Console window with an error saying "Task not found at path."
Organizer has another trick up its sleeve. You can create Java projects with Organizer. The projects that Organizer creates are all Ant-based projects, but from inside Organizer you can build, run, and clean those Ant projects just as you do normal Xcode projects in the Xcode project window.
Earlier in this chapter I explained the creation of Java projects in Xcode. Most of those examples involved creating a empty Xcode project and adapting the empty project to work with an Ant-based Java project. If you choose, you can do the same for each of these Organizer Java project templates.
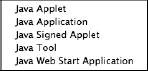
Organizer comes with five built-in Java project templates. The Java project templates, shown in Figure 3.43, are:
Create the Java project of your choice in Organizer by following these steps:
Select the "+" menu at the bottom-left corner of the Organizer window.
Select New From Template, as shown in Figure 3.44.
Select Java Templates. This is the only menu to choose. You can't miss it.
Select a Java template, such as Java Application.
Choose a name and location for your new Ant-based Java project, as shown in Figure 3.45.
After you create your new Java project, it appears in the Organizer window. You can now run, build, and clean your application from the Organizer window.
Tip
The Java projects created from the Organizer templates are standard Ant-based projects. This means that other IDEs besides Xcode can use these projects, too.
Note
I explain Ant projects in depth in Chapter 4.
In this chapter, I described pure Java template projects and the hybrid JNI Library project. Creation of pure Java application, Applet, and command-line applications from scratch is simple and clearly documented with sample projects on this book's Web site. The JNI Library project is a great place to start for more advanced users who need full OS X native framework support.
I also discuss preferences, shortcuts, and view customizations available in Xcode. Xcode includes support for three common version control systems. Xcode also contains built-in class diagramming tools for program architecting and design.
Finally, I discuss managing and running projects with Organizer. With Organizer, you manage multiple projects and source files. Organizer also allows you to build and run the projects you manage with it.