C H A P T E R 1
Writing Your First Java Program
To write a program in Java, you need the Java Development Kit (JDK). Strictly speaking, the JDK is all you need; however, other tools can make writing a Java application easier. Most software developers like to use an Integrated Development Environment (IDE). One of the most popular IDEs is Eclipse. Fortunately, both the JDK and Eclipse are free downloads. This chapter describes how to download and install both products and how to set up your first Java project in Eclipse. By the end of this chapter, you will have typed in and run your first Java program.
Installing the JDK
JDK is a collection of programs that enables you to write programs in Java. The two programs you'll use most are javac.exe and java.exe. The javac.exe program is the compiler, which means it's the program that turns code you can read (the code you write in Java) into code your computer can read (the collection of 0s and 1s that a computer needs when it runs a program). The java.exe program runs the programs that you write. After javac.exe compiles them, java.exe starts them and manages all the things a program needs (a connection to the operating system, handles for files, and a lot of other things). Because you'll use Eclipse (which we discuss shortly), you don't need to run javac.exe and java.exe. Eclipse does that for you. But it's handy to know what they do, so that you can run programs directly from a command window when you want to do so.
Before you can install it, you have to download it, of course. To get the latest version of the JDK, follow these steps:
- Open
http://www.oracle.com/technetwork/java/javase/downloads/index.htmlin a web browser. - Click the Download JDK button.
- Follow the instructions provided by the web site.
- Run the installer and accept any defaults.
![]() Note If you don't have administrator rights on your computer, clear (that is, uncheck) the checkbox that lets you install the program for all users. This enables you to still install the JDK.I would provide more details, but the web site changes from time to time, so more detailed instructions would probably be wrong (and confusing and irritating).
Note If you don't have administrator rights on your computer, clear (that is, uncheck) the checkbox that lets you install the program for all users. This enables you to still install the JDK.I would provide more details, but the web site changes from time to time, so more detailed instructions would probably be wrong (and confusing and irritating).
You can put the JDK anywhere you'd put any other program. The default location works just fine.
Installing Eclipse
Eclipse is an IDE. Basically, it provides a convenient tool for writing and testing your programs. Among other things, it identifies your errors as you make them, which makes correcting them much easier and faster than writing code in a text file and compiling it from the command line. Eclipse also colors parts of your code. After you get used to the color scheme (which happens very quickly), you'll be able to write code more quickly.
Again, before you can install Eclipse, you have to download it. To do so, follow these steps:
- Open
http://www.eclipse.org/downloads/in a web browser. - Find the Eclipse IDE for Java Developers choice and select the 32-bit version.
 Note If you have a 64-bit operating system, choose the 32-bit version of Eclipse anyway. At the time of this writing, the 64-bit version of Eclipse has issues that make Java development more difficult than it needs to be.
 - Follow the instructions provided by the web site.
- Run the installer and accept any defaults.
Again, I would try to provide more detail, but the web site changes from time to time, so more detailed instructions would probably be wrong (and so confusing and irritating).
You can put Eclipse anywhere you'd put any other program. Again, the default location works just fine.
Creating Your First Project
When you use Eclipse, you have to create a separate project for each program. That way, Eclipse can keep the details of one program separate from another. Each project consists of the source code files you write for your program and, potentially, a number of other resources that you might attach to a program. For example, you might include images and files that contain settings to load at run time and many other possible items.
After you've started Eclipse, you can make a new project as follows:
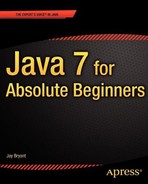
- From the File menu, select New, and then select Project. The New Project window appears, as shown in Figure 1-1.
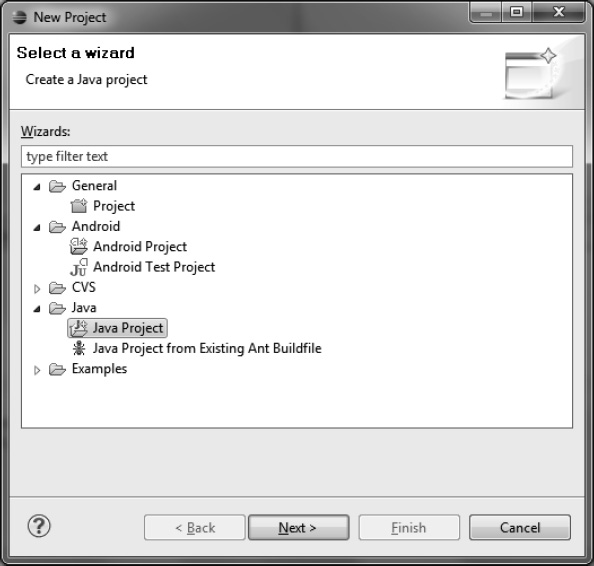
Figure 1-1. Eclipse's New Project window.
- In the New Project window, double-click Java Project. The New Java Project window appears, as shown in Figure 1-2.
- Type
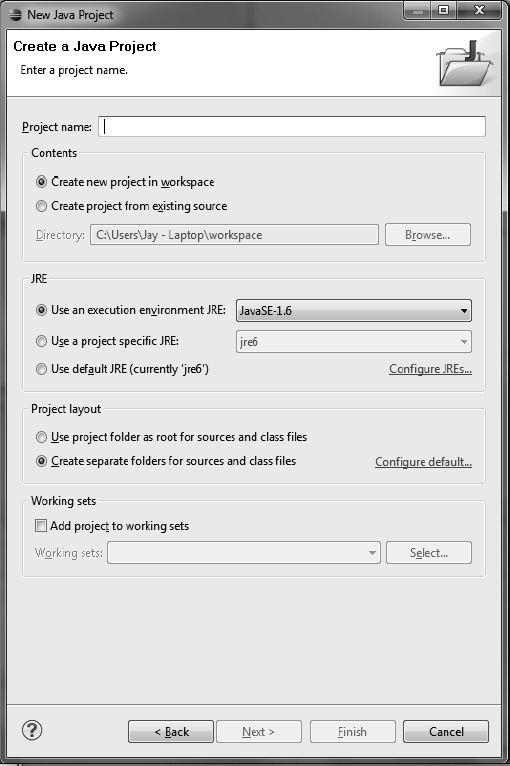
Helloin the Project name field. Note Be careful to pick meaningful names. I've chosen Hellofor this example because the first program we're going to write is one that saysHello. One common mistake for new software developers is to choose names such asProject1andProject2. It probably won't be long before you can't remember the details of any of them. Instead, if you're writing a minesweeper game, call your projectMinesweeper. Then, when you're also working on an instant messaging program, you can distinguishMinesweeperfromInstantMessengermuch more readily than you can distinguishProject1fromProject2. - Click OK. You can change a number of other options here. However, for our purposes, the default settings work just fine. You should now have a window that looks something like the one in Figure 1-3.
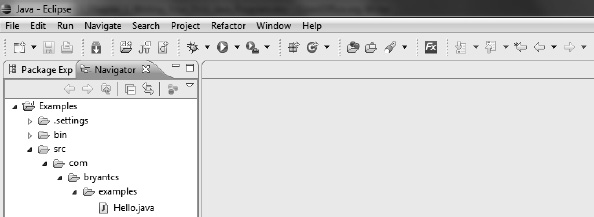
Figure 1-3. The main area of the Eclipse IDE.
Creating the Program
Every Java program has one class that is the program's starting point .(often called an entry point). A class is a bit of code that groups other bits of code together in a particular way. We'll get to classes in the next chapter. The thing that makes that class special is the existence of the main method. A method is a bit of code that does one particular thing – in this case, it starts the program. We'll cover methods in the next chapter, too. The main method accepts inputs and starts the program. Ever Java program has one and only one main method.
![]() Note That said, some code bases actually have a number of
Note That said, some code bases actually have a number of main methods. They exist so that classes can be tested individually. Strictly speaking, each one starts a separate Java program, even though the people working on them might think of them as just parts of the larger program. For our purposes, just remember that a Java program must have a main method.
The class that contains the main method .determines the name of the program. The name of the program is the name of that class. For example, the program we write later in this chapter is called Hello because the class that holds its main method is named Hello. (Of course, the marketing department can call it anything, but it's the Hello program to Java and Java developers.) This naming arrangement happens because of the way Java programs are started: The Java runtime engine requires the name of a class that contains a main method.
![]() Note The file that holds a Java class must have exactly the same name as the Java class. For example, the
Note The file that holds a Java class must have exactly the same name as the Java class. For example, the Hello class must be stored in a file named Hello.java. If the file were named hello.java, it wouldn't work. A lowercase h is not an uppercase H, and the Java compiler won't recognize that hello.java contains the Hello class.
To create a class with a main method for your first program, follow these steps:
- Right-click the
Helloproject in the Eclipse Package Explorer, choose New, and then choose Class. The New Java Class window displays, as shown in Figure 1-4.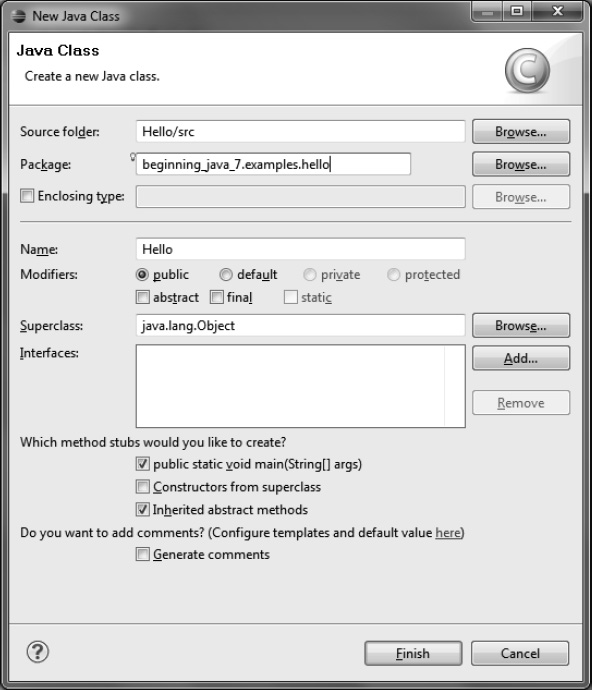
- In the Package field, type whatever you like for the package, but remember to use a name you can remember and keep it separate from your other projects. A package is a way to group classes together. For small projects, you don't need them. Large projects would be impossible to manage without them, though. We'll cover classes in the next chapterIn the Name field, type
Hello. This is the name of your class. - Check the checkbox that gives you a
mainmethod (public static void main (String args[])). When you're done, you should have a class similar to the one in Listing 1-1.
Remember that Java is case-sensitive. “Hello” is not the same as “hello” to Java.Listing 1-1: Preliminary Hello class
package com.bryantcs.examples.hello;


public class Hello {


  /**

   * @param args

   */

  public static void main(String[] args) {

    // TODO Auto-generated method stub


  }


} - Remove the comments. We don't need a comment (the lines that start with /* and end with /* and the line that starts with //), and we're about to fill in that autogenerated stub.
- Within the
mainmethod, type:System.out.println("Hello, World!");
Your class should now look similar to Listing 1-2.
Listing 1-2: Basic Hello program
package com.bryantcs.examples.hello;


public class Hello {


  public static void main(String[] args) {

    System.out.println("Hello, World!");

  }


}
That's a complete Java program. You can now run your program by clicking the Run button in the toolbar or by choosing Run from the Run menu. Figure 1.5 shows where to find the Run button.
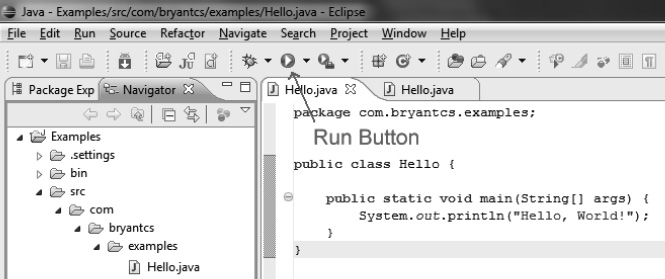
Figure 1-5. Where to find the Run button.
Eclipse then displays a console panel under the code area that shows the output of your program. In this case, it says, “Hello, World!” Writing a program that outputs “Hello, World!” is an old tradition, by the way. If you tell experienced developers that you're at the “Hello, World!” stage in learning how to program, they'll know that you've just taken your first steps on the road to being a software developer. Most software developers remember that day fondly.
The String[] args part is the mechanism that a Java program uses to read in options (more properly called arguments) that you can give to your program. The word String refers to a collection of characters that we can treat as a single object. A name is a classic example of a string. The [] indicates an array, which is a collection of values (strings in this case). The collection (that is, the array) of strings is called args. We add the capability to use an argument to our Hello program later in the chapter, we cover arrays in the next chapter, and we cover strings in Chapter 3, “Data Types.”
Adding More Functionality
Now that you have a working program, let's make it do more. Specifically, let's make it read in your name and say hello to you rather than to the whole world.
Look at the declaration for the main method. The args array holds all the values that were provided to the Java runtime engine when someone started your program. Often, these are configuration settings of various types. One common practice is to pass in the path to a file that contains more information (such as difficulty settings for a game or the most recently opened files for a word processor)—that is, the path to a configuration file. We read files later in the book. For now, we get the arguments from Eclipse. First, though, we need to write the code to read the arguments and put the first argument into our message. Listing 1-3 shows how to do this.
Listing 1-3: Reading arguments
package com.apress.java7forabsolutebeginners;


public class Hello {


  public static void main(String[] args) {

    System.out.println("Hello, " + args[0] + "!");

  }


}
![]() Note Computers start counting at 0 rather than 1. Consequently, the first member of an array can be found at 0. Typing
Note Computers start counting at 0 rather than 1. Consequently, the first member of an array can be found at 0. Typing args[1] here generates an out-of-bounds exception, by which Java means that it expects to find two strings, but you provided only one. You'll quickly get used to computers starting their counting at 0.
System.out.println accepts a single String object as its argument. In this case, we've got three String objects, but the plus signs concatenate them together to create a single string, satisfying the requirement (for just one string) of the println method. The plus sign is Java's string concatenation operator (in addition to being a plus sign when used for mathematical operations). We cover operators in Chapter 4, “Operators.”
To provide a value for the argument in Eclipse, follow these steps:
- From the Run menu, choose Run Configurations. The Run Configurations window appears. Figure 1.6 shows the Run Configurations window.
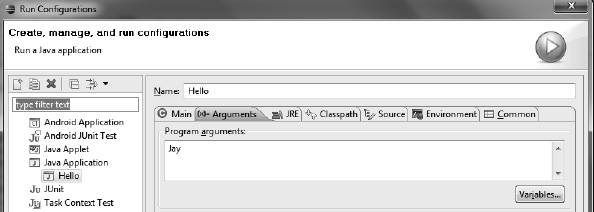
Figure 1-6. The Run Configurations window.
- In the Arguments tab, type your name.
- Click the Run button.
This time, your program says hello to you.
Congratulations. At this point, you've created a program that does the basic things all programs do: accepts input, modifies the input to accomplish something, and produces output. It might not seem like much, but it's the first step on a fun path. We do much more before we're done.
Further Development
Just for fun, let's tack on a bit more functionality. When programs generate console output, they often include the date and time. Formatting a date takes more code than most people would expect until they've had to do it. That's because the real world has so many different date formats. In the United States, month/day/year (MDY) format prevails. In Europe, day/month/year (DMY) prevails. In addition to the date formats used by people, computer systems also have various ways of representing dates, from simple variations such as year/month/day (YMD) to far more arcane arrangements. Java, having inherited from C, uses the same date storage technique as C and Unix (which was originally coded mostly in C) and Linux (which shares much with Unix). Consequently, Java stores dates as the number of seconds since January 1, 1970. In more detailed and technical terms, Java's “epoch” started at January 1, 1970, 00:00:00 GMT.
So, how do we turn the number of seconds since 1970 into a nicely formatted time stamp for our output? Listing 1-4 shows one way. (Part of both the joy and the pain of software development is that there's almost always more than one way to do something.) I explain more about the new pieces of code in the next section.
Listing 1-4: Adding a timestamp to Hello
package com.apress.java7forabsolutebeginners;


import java.text.SimpleDateFormat;

import java.util.Date;


public class Hello {


  public static void main(String[] args) {

    // First, get the date as seconds since 1/1/1970

    // Note that a Date object also contains time information

    Date now = new Date();

    // Second, create a formatter object

    SimpleDateFormat formatter =

      new SimpleDateFormat("EEE, MMM dd, yyyy HH:mm:ss");

    // Third, apply the formatter to the date

    String formattedDate = formatter.format(now);

    // Finally, add our formatted date to our output

    System.out.println(formattedDate + "> Hello, " + args[0] + "!");

  }


}
When you run this program, you'll see a date and time stamp before your other output.
About Java Objects
Notice how we had to use two kinds of objects (Date and SimpleDateFormat) to create a nicely formatted date. Date and SimpleDateFormat are defined by class files, just as your Hello program is defined by a class file. We told our Java program where to find those classes with the import statement near the top of the file. Your program cannot run without them, so we have to tell Java where to find them.
For any class or other bit of code that's part of the Java standard libraries, you can learn all about it from the Javadoc that Oracle maintains for each version of Java. Javadoc is a special document format that lets Java programmers embed documentation directly into code. That way, you can look at the documentation for classes you want to use as you program your own classes. As you do more programming, you'll spend a lot of time reading this documentation. As a good learning exercise, look up the SimpleDateFormat class and look at all the options you can use when formatting a date.
For Java 7, you can find the API (short for Application Programming Interface) documentation at http://download.oracle.com/javase/7/docs/api/.
![]() Note Eclipse provides the Javadoc information for items in the standard API. Hover your mouse over any method or object that you're using, and you'll see the Javadoc information for that item. When you see the Javadoc, press F2 to open a separate window that lets you see more.
Note Eclipse provides the Javadoc information for items in the standard API. Hover your mouse over any method or object that you're using, and you'll see the Javadoc information for that item. When you see the Javadoc, press F2 to open a separate window that lets you see more.
Summary
In this chapter, we did the following tasks:
- Downloaded and installed the Java Development Kit
- Downloaded and installed Eclipse, which we use to write Java programs
- Created the code for our first program within Eclipse
- Ran our first program (“Hello, world!”)
- Modified the first program to do a bit more (say hello to you specifically)
- Modified the program still more (to include the date and time)
- Learned where to find more information about the other code used in future programs
Many of these tasks constitute the day-to-day work of full-time software developers. We spend a lot of time (more than we'd like, usually) setting up tools. We also spend most of our time either writing new classes or (far more often) rewriting existing classes, either to add new functionality or to correct a problem. We also certainly spend plenty of time reading documentation or wishing we had more documentation to read.
I guarantee that you'll find yourself returning to these tasks many, many times if you stick with software development, whether as a hobby or as a profession. You'll also do some of these tasks (especially writing and modifying code) as you work your way through this book. I hope you find it to be fun. I usually do.