
Chapter 1. Getting Started: Compiling and Running Java
1.0 Introduction
This chapter covers some entry-level tasks that you need to know how to do before you can go on. It is said you must crawl before you can walk, and walk before you can ride a bicycle. Before you can try out anything in this book, you need to be able to compile and run your Java code, so I start there, showing several ways to do that: the JDK way, the Integrated Development Environment (IDE) way, and the build tools (Ant, Maven, etc.) way. Another issue people run into is setting CLASSPATH correctly, so that’s dealt with next. Deprecation warnings follow after that, because you’re likely to encounter them in maintaining old Java code. The chapter ends with some general information about conditional compilation, unit testing, assertions, and debugging.
If you don’t already have Java installed, you’ll need to download it. Be aware that there
are several different downloads. The JRE (Java Runtime Environment) was, up until Java 8, a smaller download for end users.
Since there is far less desktop Java than there once was, the JRE was eliminated in favor
of jlink to make a custom download (see Recipe 15.8).
The JDK or Java SDK download is the full development environment,
which you’ll want if you’re going to be developing Java software.
Standard downloads for the current release of Java are available at Oracle’s website.
You can sometimes find prerelease builds of the next major Java version on http://jdk.java.net. The entire JDK is maintained as an open source project, and the OpenJDK source tree is used (with changes and additions) to build the commercial and supported Oracle JDKs.
If you’re already happy with your IDE, you may wish to skip some or all of this material. It’s here to ensure that everybody can compile and debug their programs before we move on.
1.1 Compiling and Running Java: Standard JDK
Problem
You need to compile and run your Java program.
Solution
This is one of the few areas where your computer’s operating system impinges on Java’s portability, so let’s get these issues out of the way first.
JDK
Using the command-line Java Development Kit (JDK) may be the best way to keep up with the very latest improvements in Java. Assuming you have the standard JDK installed in the standard location and/or have set its location in your PATH, you should be able to run the command-line JDK tools. Use the commands javac to compile and java to run your program (and, on Windows only, javaw to run a program without a console window), like this:
C:javasrc>javac HelloWorld.java

C:javasrc>java HelloWorld
Hello, World

C:javasrc>
If the program refers to other classes for which source is available (in the same directory) and a compiled .class file is not, javac will automatically compile it for you. Effective with Java 11, for simple programs that don’t need any such co-compilation, you can combine the two operations by simply passing the Java source file to the java command:
$ java HelloWorld.java
Hello, Java
$
As you can see from the compiler’s (lack of) output, both javac and java compilation works on the Unix “no news is good news” philosophy: if a program was able to do what you asked it to, it shouldn’t bother nattering at you to say that it did so.
There is an optional setting called CLASSPATH, discussed in Recipe 1.5, that controls where Java looks for classes. CLASSPATH, if set, is used by both javac and java. In older versions of Java, you had to set your CLASSPATH to include “.”, even to run a simple program from the current directory; this is no longer true on current Java implementations.
Sun/Oracle’s javac compiler is the official reference implementation. There were several alternative open source command-line compilers, including Jikes and Kaffe but they are, for the most part, no longer actively maintained.
There have also been some Java runtime clones, including Apache Harmony, Japhar, the IBM Jikes Runtime (from the same site as Jikes), and even JNODE, a complete, standalone operating system written in Java, but since the Sun/Oracle JVM has been open-sourced (GPL), most of these projects have become unmaintained. Harmony was retired by Apache in November 2011.
Mac OS X
The JDK is pure command line. At the other end of the spectrum in terms of keyboard-versus-visual, we have the Apple Macintosh. Books have been written about how great the Mac user interface is, and I won’t step into that debate. Mac OS X (Release 10.x of Mac OS) is built upon a BSD Unix (and “Mach”) base. As such, it has a regular command line (the Terminal application, hidden away under /Applications/Utilities), as well as both the traditional Unix command-line tools and the graphical Mac tools. Mac OS X users can use the command-line JDK tools as above or any of the modern build tools. Compiled classes can be packaged into “clickable applications” using the Jar Packager discussed in Recipe 15.6. Mac fans can use one of the many full IDE tools discussed in Recipe 1.3. Apple provides XCode as their IDE, but out of the box it isn’t very Java-friendly.
1.2 Compiling and Running Java: GraalVM for better performance
Problem
You’ve heard that Graal is an alternate-and faster-JVM from Oracle, and want to try it out. Graal promises to offer better performance, the ability to mix-and-match programming languages, and the ability to pre-compile your Java code into executable form for a given platform.
Solution
Download and install GraalVM.
Discussion
GraalVM bills itself as “a universal virtual machine for running applications written in JavaScript, Python, Ruby, R, JVM-based languages like Java, Scala, Clojure, Kotlin, and LLVM-based languages such as C and C++.”
Note that Graal is undergoing rapid change. While this recipe reflects the latest information at press time (late 2019), there may be newer versions and changed functionality by the time you are ready to install.
As we go to press, GraalVm is based on OpenJDK 11, which means you can use Modules and other Java 9, 10, 11 features, but it doesn’t have support for Java 12, 13 or 14 features You can build your own Graal on later releases, since the complete source is on Github.
See The Graal VM web site for more information on GraalVM. See also this presentation by Chris Thalinger, who has worked on JVMs for a decade and a half.
Start at the downloads page. You will have to choose between the community edition and the Enterprise version. To avoid any licensing issues, this recipe starts with the community edition. You can download a tarball for Linux, MacOS X and MS-Windows. There is no formal installer at this point. To install it, open a terminal window and try the following (the directory chosen is for MacOS):
$ cd /Library/Java/JavaVirtualMachines
$ tar xzvf ~/Downloads/graalvm-ce-NNN-VVV.tar.gz # replace with actual version
$ cd
$ /usr/libexec/java_home -V # Mac OS X only
11.0.2, x86_64:    "OpenJDK 11.0.2"
    /Library/Java/JavaVirtualMachines/jdk-11.0.2.jdk/Contents/Home
1.8.0_221, x86_64:    "GraalVM CE 19.2.0.1"
    /Library/Java/JavaVirtualMachines/graalvm-ce-19.2.0.1/Contents/Home
$
On other systems, do the install in a sensible place. On most versions of Linux, after installing a JDK, you can use the standard Linux alternatives command to make this your default. On MacOS, the java_home command output above confirms that you have installed GraalVM, but it’s not your default JVM yet. To do that, you have to set your PATH:
export JAVA_HOME=<where you installed GraalVM>/Contents/Home
export PATH=$JAVA_HOME/bin:$PATH
Be very sure to include the :$PATH at the end of the line - no spaces - or all your
standard command-line tools will appear to disappear
(if you made this mistake, just logout and back in to restore your path).
I suggest you don’t update your login scripts until you are sure the settings you have are correct.
Now you should be running the Graal version of Java. Just to confirm it:
$ java -version
openjdk version "1.8.0_222"
OpenJDK Runtime Environment (build 1.8.0_222-20190711112007.graal.jdk8u-src-tar-gz-b08)
OpenJDK 64-Bit GraalVM CE 19.2.0.1 (build 25.222-b08-jvmci-19.2-b02, mixed mode)
Your output may differ, but as long as it says “GraalVM” you should be good.
Graal includes a number of useful tools, including native-image which can
in some cases translate a class file into a binary executable for the
platform it’s running on, optimizing startup speed and also reducing
the download size needed to run a single application.
The native-image tool must be downloaded separately using
gu install native-image.
We’ll explore running the other non-Java languages in Recipe 18.4.
1.3 Compiling, Running, and Testing with an IDE
Problem
It is cumbersome to use several tools for the various development tasks.
Solution
Use an integrated development environment (IDE), which combines editing, testing, compiling, running, debugging, and package management.
Discussion
Many programmers find that using a handful of separate tools—a text editor, a compiler, and a runner program, not to mention a debugger—is too many. An IDE integrates all of these into a single toolset with a graphical user interface. Many IDEs are available, ranging all the way up to fully integrated tools with their own compilers and virtual machines. Class browsers and other features of IDEs round out the ease-of-use feature sets of these tools. It has been argued many times whether an IDE really makes you more productive or if you just have more fun doing the same thing. However, today most developers use an IDE because of the productivity gains. Although I started as a command-line junkie, I do find that the following IDE benefits make me more productive:
- Code completion
-
Ian’s Rule here is that I never type more than three characters of any name that is known to the IDE; let the computer do the typing!
- “Incremental compiling” features
-
Note and report compilation errors as you type, instead of waiting until you are finished typing.
- Refactoring
-
The ability to make far-reaching yet behavior-preserving changes to a code base without having to manually edit dozens of individual files.
Beyond that, I don’t plan to debate the IDE versus the command-line process; I use both modes at different times and on different projects. I’m just going to show a few examples of using a couple of the Java-based IDEs.
The three most popular Java IDEs, which run on all mainstream computing platforms and quite a few niche ones, are Eclipse, NetBeans, and IntelliJ IDEA. Eclipse is the most widely used, but the others each have a special place in the hearts and minds of some developers. If you develop for Android, the ADT has traditionally been developed for Eclipse, but it has now transitioned to IntelliJ as the basis for “Android Studio,” which is the standard IDE for Android, and for Google’s other mobile platform, Flutter. All three IDEs are plug-in based and offer a wide selection of optional and third-party plugins to enhance the IDE, such as supporting other programming languages, frameworks, file types, and so on. While the following shows creating and running a program with Eclipse, the IntelliJ IDea and Netbeans IDEs all offer similar capabilities.
Perhaps the most popular cross-platform, open source IDE for Java is Eclipse, originally from IBM and now shepherded by the Eclipse Foundation, the home of many software projects including Jakarta, the follow-on to the Java Enterprise Edition. The Eclipse Platform is also used as the basis of other tools such as SpringSource Tool Suite (STS) and IBM’s Rational Application Developer (RAD). All IDEs do basically the same thing for you when getting started. The example in Figure 1-1 shows starting a new project. The Eclipse New Java Class Wizard shown in Figure 1-2 shows creating a new class.

Figure 1-1. Eclipse: New Project Wizard
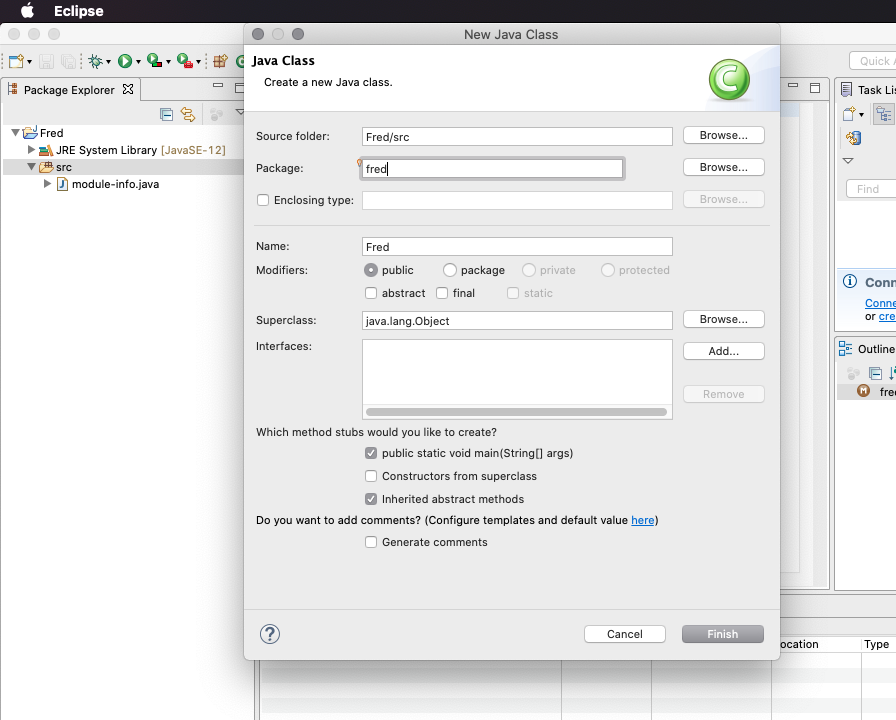
Figure 1-2. Eclipse: New Java Class Wizard
Eclipse, like all modern IDEs, also features a number of refactoring capabilities, shown in Figure 1-3.

Figure 1-3. Eclipse: Refactoring
And, of course, all the IDEs allow you to run and/or debug your application. Figure 1-4 shows running an application; for variety and neutrality, this is shown using IntelliJ IDEa.

Figure 1-4. IntelliJ program output
Mac OS X includes Apple’s Developer Tools. The main IDE is Xcode. Unfortunately, current versions of Xcode do not really support Java development, so there is little to recommend it for our purposes; it is primarily for those building non-portable (iOS-only or OS X–only) applications in the Swift or Objective-C programming languages. So even if you are on OS X, to do Java development you should use one of the three Java IDEs.
Microsoft VSCode (formerly part of Visual Studio) has been getting some attention in Java circles lately, but it’s not a Java-specific IDE. Give it a try if you like.
How do you choose an IDE? Perhaps it will be dictated by your organization or chosen by majority vote of your fellow developers. Given that all three major IDEs (Eclipse, NetBeans, IntelliJ) can be downloaded free and are 100% open source, why not try them all and see which one best fits the kind of development you do? Regardless of what platform you use to develop Java, if you have a Java runtime, you should have plenty of IDEs from which to choose.
See Also
Each IDE’s web site maintains an up-to-date list of resources, including books. See Table 1-1 for the website for each.
| Product name | Project URL | Note |
|---|---|---|
Eclipse |
Basis of STS, RAD |
|
IntelliJ Idea |
Basis of Android Studio |
|
Netbeans |
Run anywhere JavaSE does |
These major IDEs are extensible; see their documentation for a list of the many, many plug-ins available. Most of them allow you to find and install plug-ins from within the IDE. For Eclipse, use the Eclipse Marketplace, near the bottom of the Help menu. As a last resort, if you need/want to write a plug-in that extends the functionality of your IDE, you can do that too, and in Java.
For Eclipse, I have some useful information at https://darwinsys.com/java including a list of shortcuts to aid developer productivity.
1.4 Running Java with JShell
Problem
You want to try out Java expressions and APIs quickly, without having to create a file with public class X { public static void main(String[] args) { … } every time.
Solution
Use JShell, Java’s REPL (read-evaluate-print-loop) interpreter.
Discussion
Starting with Java 11, jshell is included as a standard part of Java.
JShell allows you to enter Java statements and have them evaluated
without the bother of creating a class and a main program.
You can use it for quick calculations, or to try out an API to see how it works,
or almost any purpose; if you find an expression you like, you can copy it into a
regular Java source file and make it permanent.
JShell can also be used as a scripting language over Java, but the overhead of
starting the JVM means that it won’t be as fast as awk, Perl or Python for quick scripting.
REPL programs are very convenient, and hardly a new idea (LISP languages from the 1950’s
included them). You can think of command line interpreters (CLIs) such as the Bash or Ksh
shells on UNIX/Linux, or Command.com on Microsoft Windows, as REPLs for the system
as a whole. Many interpreted languages like Ruby and Python can also be used as REPLs.
Java finally has its own REPL, JShell. Here’s an example of using it:
$ jshell
|  Welcome to JShell -- Version 11.0.2
|  For an introduction type: /help intro

jshell> "Hello"
$1 ==> "Hello"

jshell> System.out.println("Hello");
Hello

jshell> System.out.println($1)
Hello

jshell> "Hello" + sqrt(57)
|  Error:
|  cannot find symbol
|    symbol:   method sqrt(int)
|  "Hello" + sqrt(57)
|            ^--^

jshell> "Hello" + Math.sqrt(57)
$2 ==> "Hello7.54983443527075"

jshell> String.format("Hello %6.3f", Math.sqrt(57)
   ...> )
$3 ==> "Hello  7.550"

jshell> String x = Math.sqrt(22/7) + " " + Math.PI +
   ...> " and the end."
x ==> "1.7320508075688772 3.141592653589793 and the end."

jshell>
You can see some obvious features and benefits here:
-
The value of an expression is printed, without needing to call System.out.println every time, but you can call it if you like.
-
Values that are not assigned to a variable get assigned syntetic identifiers like
$1, which can be used in subsequent statements. -
The semicolon at the end of a statment is optional (unless you type more than one statement on a line);
-
If you make a mistake, you get a helpful message immediately.
-
You can get completion with a single tab, as in shell filename completion
-
You can get the relevant portion of the Javadoc documentation on known classes or methods with just a double tab
-
If you omit a close quote, parenthesis or other punctuation, JShell will just wait for you, giving a continuation prompt (
…). -
If you do make a mistake, you can use “shell history” (i.e. up-arrow) to recall the statement so you can repair it.
JShell is also useful in prototyping Java code. For example, I wanted one of those health-themed timers that reminds you to get up and move around a bit every half hour.
$ jshell
|  Welcome to JShell -- Version 11.0.2
|  For an introduction type: /help intro

jshell> while (true) { sleep (30*60); JOptionPane.showMessageDialog(null, "Move it"); }
|  Error:
|  cannot find symbol
|    symbol:   method sleep(int)
|  while (true) { sleep (30*60); JOptionPane.showMessageDialog(null, "Move it"); }
|                 ^---^
|  Error:
|  cannot find symbol
|    symbol:   variable JOptionPane
|  while (true) { sleep (30*60); JOptionPane.showMessageDialog(null, "Move it"); }
|                                ^---------^

jshell> import javax.swing.*;

jshell> while (true) { Thread.sleep (30*60); JOptionPane.showMessageDialog(null, "Move it"); }

jshell> while (true) { Thread.sleep (30*60 * 1000); JOptionPane.showMessageDialog(null, "Move it"); }

jshell> ^D
I then put the final working version into a Java file called MoveTimer.java,
put a class statment and a main() method around the main line,
told the IDE to reformat the whole thing, and saved it into my darwinsys-api repository.
So go ahead and experiment with JShell. Read the built-in introductory tutorial for
more details!
When you get something you like, either use /save, or copy and paste it into a Java program and save it.
Read much more about JShell at the OpenJDK JShell Tutorial.
1.5 Using CLASSPATH Effectively
Problem
You need to keep your class files in a common directory, or you’re wrestling with CLASSPATH.
Solution
Set CLASSPATH to the list of directories and/or JAR files that contain the classes you want.
Discussion
CLASSPATH is a list of class files in any of a number of directories, JAR files, or ZIP files. Just like the PATH your system uses for finding programs, the CLASSPATH is used by the Java runtime to find classes. Even when you type something as simple as java HelloWorld, the Java interpreter looks in each of the places named in your CLASSPATH until it finds a match. Let’s work through an example.
The CLASSPATH can be set as an environment variable. You set it the same way you set other environment variables, such as your PATH environment variable.
However, it’s usually preferable to specify the CLASSPATH for a given command on the command line:
C:> java -classpath c:ianclasses MyProg
Suppose your CLASSPATH were set to C:classes;. on Windows or ~/classes:. on Unix or Mac. Suppose you had just compiled a source file named HelloWorld.java (with no package statement) into HelloWorld.class in the default directory (which is your current directory)
and tried to run it. On Unix, if you run one of the kernel tracing tools (trace, strace, truss, ktrace), you would probably see the Java program open (or stat, or access) the following files:
-
Some file(s) in the JDK directory
-
Then ~/classes/HelloWorld.class, which it probably wouldn’t find
-
Finally, ./HelloWorld.class, which it would find, open, and read into memory
The vague “some file(s) in the JDK directory” is release-dependent.
You should not mess with the JDK files, but if you’re curious,
you can find them in the System Properties (see Recipe 2.2).
There used to be a variable named sun.boot.class.path but that is not found anymore.
Let’s look for any property with boot in its name:
jshell>System.getProperties().forEach((k,v)->{...if(((String)k).contains("boot"))System.out.println(k+"->"+v);})sun.boot.library.path->/usr/local/jdk-11/lib
The reason I and others suggest not setting the CLASSPATH as an environment variable is that we don’t like surprises. It’s easy to add a JAR to your classpath and then forget that you’ve done so; a program might then work for you but not for your colleagues, due to their being unaware of your hidden dependency. As well, if you add a new version to CLASSPATH without removing the old version, you may run into conflicts.
Note also that providing the -classpath argument causes the CLASSPATH environment
variable to be ignored.
If you still want to set CLASSPATH as an environment variable, you can. Suppose you had also installed the JAR file containing the supporting classes for programs from this book, darwinsys-api.jar (the actual filename if you download it may have a version number as part of the filename). You might then set your CLASSPATH to C:classes;C:classesdarwinsys-api.jar;. on Windows or ~/classes:~/classes/darwinsys-api.jar:. on Unix.
Notice that you do need to list the full name of the JAR file explicitly. Unlike a single class file, placing a JAR file into a directory listed in your CLASSPATH does not make it available.
Certain specialized programs (such as a web server running a Servlet container) might not use either bootpath or CLASSPATH exactly as shown; these application servers typically provide their own ClassLoader (see Recipe 17.5 for information on class loaders). EE Web containers, for example, set your web app classpath to include the directory WEB-INF/classes and all the JAR files found under WEB-INF/lib.
How can you easily generate class files into a directory in your CLASSPATH? The javac command has a -d dir option, which specifies where the compiler output should go. For example, using -d to put the HelloWorld class file into my $HOME/classes directory, I just type the following (note that from here on I will be using the package name in addition to the class name, like a good kid):
javac -d $HOME/classes HelloWorld.java
java -cp $HOME/classes starting.HelloWorld
Hello, world!
As long as this directory remains in my CLASSPATH, I can access the class file regardless of my current directory. That’s one of the key benefits of using CLASSPATH.
While these examples show explicit use of java with -classpath, it is generally more convenient
(and reproducible) to use a built tool such as Maven see (Recipe 1.7) or Gradle,
which automatically provide the classpath for both compilation and execution.
Note that Java 9 and later also have a module path (environment variable MODULEPATH,
command line argument --module-path entry[:,…] with the same syntax as the class path.
The module path contains code that has been modularized; the Java Module System is
discussed in Recipe 2.5 and Recipe 15.9.
1.6 Downloading and Using the Code Examples
Problem
You want to try out my example code and/or use my utility classes.
Solution
Download the latest archive of the book source files, unpack it, and run Maven (see Recipe 1.7) to compile the files.
Discussion
The source code used as examples in this book are included in a couple of source code repositories that have been in continuous development since 1995. These are listed in Table 1-2.
| Repository name | Github.com URL | Package description | Approx. size |
|---|---|---|---|
javasrc |
Java code examples/demos |
1,400 classes |
|
darwinsys-api |
A published API |
200 classes |
You can download these repositories from the GitHub URLs shown in Table 1-2.
GitHub allows you to download a ZIP file of the entire
repository’s current state, or to view individual files on the web interface.
Downloading with git clone instead of as an archive is preferred because you can then
update at any time with a simple git pull command.
And with the amount of updating this has undergone for the
current release of Java, you are sure to find changes after the book is published.
If you are not familiar with Git, see “CVS, Subversion, Git, Oh My!”.
javasrc
This is the largest repo, and consists primarily of code written to show a particular feature or API. The files are organized into subdirectories by topic, many of which correspond more or less to book chapters—for example, a directory for strings examples (Chapter 3), regex for regular expressions (Chapter 4), numbers (Chapter 5), and so on. The archive also contains the index by name and index by chapter files from the download site, so you can easily find the files you need.
The javasrc library is further broken down into half a dozen “Maven modules”
so that you don’t need all the dependencies for everything on your classpath all the time.
| Directory/Module Name | Description |
|---|---|
pom.xml |
Maven parent pom |
Rdemo-web |
R demo using a web framework |
desktop |
AWT and Swing stuff (not covered in this edition) |
ee |
Enterprise stuff (not covered in this edition) |
graal |
GraalVM demos |
jlink |
JLink demos |
json |
JSON processing |
main |
“Main” module, i.e., the bulk of it, “everything else” |
restdemo |
REST service demo |
spark |
Apache Spark demo |
testing |
Code for testing |
unsafe |
Demo of “Unsafe” class |
xml |
XML stuff (not covered in this edition) |
darwinsys-api
I have built up a collection of useful stuff, partly by moving some reusable classes from javasrc into my own API, which I use in my own Java projects. I use example code from it in this book, and I import classes from it into many of the other examples. So, if you’re going to be downloading and compiling the examples individually, you should first download the file darwinsys-api-1.x.jar (for the latest value of x) and include it in your CLASSPATH. Note that if you are going to build the javasrc code with Eclipse or Maven, you can skip this download because the top-level Maven script starts off by including the JAR file for this API.
A compiled JAR file of darwinsys-api is available in
Maven Central; find it by searching for darwinsys.
The current Maven artifact is:
<dependency>
   <groupId>com.darwinsys</groupId>
   <artifactId>darwinsys-api</artifactId>
   <version>1.1.3</version>
</dependency>
This API consists of about two dozen com.darwinsys packages, listed in Table 1-4.
The structure vaguely parallels the standard Java API; this is intentional.
These packages now include around 200 classes and interfaces. Most of them have javadoc documentation
that can be viewed with the source download.
| Package name | Package description |
|---|---|
|
A demonstration Ant task |
|
Classes for comma-separated values files |
|
Classes for dealing with databases in a general way |
|
Comparison utilities |
|
Generic GUI stuff |
|
Classes relating to country codes, provinces/states, and so on |
|
Graphics |
|
Classes (only one so far) for dealing with HTML |
|
Classes for input and output operations, using Java’s underlying I/O classes |
|
Java EE JSP tags |
|
Classes for dealing with standard features of Java |
|
Pessimistic locking API |
|
Classes for dealing with email, mainly a convenience class for sending mail |
|
Sample data Models |
|
Networking |
|
Presentations |
|
Reflection |
|
Regular expression stuff: an REDemo program, a Grep variant, and so on |
|
Security |
|
Servlet API helpers |
|
Classes for dealing with SQL databases |
|
Classes for helping construct and use Swing GUIs |
|
A few interesting LayoutManager implementations |
|
Test data generators |
|
Testing tools |
|
Unix helpers |
|
A few miscellaneous utility classes |
|
XML utilities |
Many of these classes are used as examples in this book; just look for files whose first line begins:
package com.darwinsys;
You’ll also find that many of the other examples have imports from the com.darwinsys packages.
General notes
Your best bet is to use git clone to download a copy of both the git projects, and do a git pull every few months to get updates. Alternatively, you can download a single intersection subset of both libraries that is made up almost exclusively of files actually used in the book, from this book’s catalog page. This archive is made from the sources that are dynamically included into the book at formatting time, so it should reflect exactly the examples you see in the book. But it will not include as many examples as the three individual archives, nor is it guaranteed that everything will compile because of missing dependencies, nor will it get updated often. But if all you want is to copy pieces into a project you’re working on, this may be the one to get.
You can find links to all of these from my own website for this book; just follow the Downloads link.
The two separate repositories are each self-contained projects with support for building both with Eclipse (Recipe 1.3) and with Maven (Recipe 1.7). Note that Maven will automatically fetch a vast array of prerequisite libraries when first invoked on a given project, so be sure you’re online on a high-speed Internet link. However, Maven will ensure that all prerequisites are installed before building. If you choose to build pieces individually, look in the file pom.xml for the list of dependencies. Unfortunately, I will probably not be able to help you if you are not using either Eclipse or Maven with the control files included in the download.
If you have a version of Java older than Java 12, a few files will not compile. You can make up “exclusion elements” for the files that are known not to compile.
All my code in the two projects is released under the least-restrictive credit-only license, the two-clause BSD license. If you find it useful, incorporate it into your own software. There is no need to write to ask me for permission; just use it, with credit. If you get rich off it, send me some money.
Tip
Most of the command-line examples refer to source files, assuming you are in src/main/java, and runnable classes, assuming you are in (or have added to your classpath) the build directory (e.g., usually target/classes). This will not be mentioned with each example, as doing so would waste a lot of paper.
Caveat Lector
The repos have been in development since 1995. This means that you will find some code that is not up to date, or that no longer reflects best practices. This is not surprising: any body of code will grow old if any part of it is not actively maintained. (Thus, at this point, I invoke Culture Club’s, “Do You Really Want to Hurt Me?”: “Give me time to realize my crime.”) Where advice in the book disagrees with some code you found in the repo, keep this in mind. One of the practices of Extreme Programming is Continuous Refactoring—the ability to improve any part of the code base at any time. Don’t be surprised if the code in the online source directory differs from what appears in the book; it is a rare month that I don’t make some improvement to the code, and the results are committed and pushed quite often. So if there are differences between what’s printed in the book and what you get from GitHub, be glad, not sad, for you’ll have received the benefit of hindsight. Also, people can contribute easily on GitHub via “pull request”; that’s what makes it interesting. If you find a bug or an improvement, do send me a pull request!
The consolidated archive on oreilly.com will not be updated as frequently.
1.7 Automating Dependencies, Compilation, Testing, and Deployment with Apache Maven
Problem
You want a tool that does it all automatically: downloads your dependencies, compiles your code, compiles and runs your tests, packages the app, and installs or deploys it.
Solution
Use Apache Maven.
Discussion
Maven is a Java-centric build tool that includes a sophisticated, distributed dependency management system that also gives it rules for building application packages such as JAR, WAR, and EAR files and deploying them to an array of different targets. Whereas older build tools focus on the how, Maven files focus on the what, specifying what you want done.
Maven is controlled by a file called pom.xml (for Project Object Model). A sample pom.xml might look like this:
<projectxmlns="http://maven.apache.org/POM/4.0.0"xmlns:xsi="http://www.w3.org/2001/XMLSchema-instance"xsi:schemaLocation="http://maven.apache.org/POM/4.0.0http://maven.apache.org/xsd/maven-4.0.0.xsd"><modelVersion>4.0.0</modelVersion><groupId>com.example</groupId><artifactId>my-se-project</artifactId><version>1.0-SNAPSHOT</version><packaging>jar</packaging><name>my-se-project</name><url>http://com.example/</url><properties><project.build.sourceEncoding>UTF-8</project.build.sourceEncoding></properties><dependencies><dependency><groupId>junit</groupId><artifactId>junit</artifactId><version>4.8.1</version><scope>test</scope></dependency></dependencies></project>
This specifies a project called my-se-project (my standard-edition project) that will
be packaged into a JAR file; it depends on the JUnit 4.x framework for unit testing
(see Recipe 1.10), but only needs it for compiling and running tests.
If I type mvn install in the directory with this POM, Maven will
ensure that it has a copy of the given version of JUnit (and anything
that JUnit depends on), then compile everything (setting CLASSPATH
and other options for the compiler), run any and all unit tests,
and if they all pass, generate a JAR file for the program;
it will then install it in my personal Maven repo (under ~/.m2/repository)
so that other Maven projects can depend on my new project JAR file.
Note that I haven’t had to tell Maven where the source files live,
nor how to compile them—this is all handled by sensible defaults,
based on a well-defined project structure.
The program source is expected to be found in src/main/java,
and the tests in src/test/java; if it’s a web application, the web
root is expected to be in src/main/webapp by default. Of course, you can override these.
Note that even the preceding config file does not have to be, and was not, written by hand; Maven’s “archteype generation rules” let it build the starting version of any of several hundred types of projects. Here is how the file was created:
$ mvn archetype:generate
    -DarchetypeGroupId=org.apache.maven.archetypes
    -DarchetypeArtifactId=maven-archetype-quickstart
    -DgroupId=com.example -DartifactId=my-se-project

[INFO] Scanning for projects...
Downloading: http://repo1.maven.org/maven2/org/apache/maven/plugins/
    maven-deploy-plugin/2.5/maven-deploy-plugin-2.5.pom
[several dozen or hundred lines of downloading POM files and Jar files...]
[INFO] Generating project in Interactive mode
[INFO] Archetype [org.apache.maven.archetypes:maven-archetype-quickstart:1.1]
    found in catalog remote
[INFO] Using property: groupId = com.example
[INFO] Using property: artifactId = my-se-project
Define value for property 'version':  1.0-SNAPSHOT: :
[INFO] Using property: package = com.example
Confirm properties configuration:
groupId: com.example
artifactId: my-se-project
version: 1.0-SNAPSHOT
package: com.example
 Y: : y
[INFO] ------------------------------------------------------------------------
[INFO] Using following parameters for creating project from Old (1.x) Archetype:
    maven-archetype-quickstart:1.1
[INFO] ------------------------------------------------------------------------
[INFO] Parameter: groupId, Value: com.example
[INFO] Parameter: packageName, Value: com.example
[INFO] Parameter: package, Value: com.example
[INFO] Parameter: artifactId, Value: my-se-project
[INFO] Parameter: basedir, Value: /private/tmp
[INFO] Parameter: version, Value: 1.0-SNAPSHOT
[INFO] project created from Old (1.x) Archetype in dir: /private/tmp/
    my-se-project
[INFO] ------------------------------------------------------------------------
[INFO] BUILD SUCCESS
[INFO] ------------------------------------------------------------------------
[INFO] Total time: 6:38.051s
[INFO] Finished at: Sun Jan 06 19:19:18 EST 2013
[INFO] Final Memory: 7M/81M
[INFO] ------------------------------------------------------------------------
Alternately, you can do |mvn archetype:generate+ and select the default from a rather long list of choice. The default is a quickstart java archetype which makes it easy to get started.
The IDEs (see Recipe 1.3) have support for Maven. For example, if you use Eclipse, M2Eclipse (m2e) is an Eclipse plug-in that will build your Eclipse project dependencies from your POM file; this plug-in ships by default with current Java Developer builds of Eclipse, and is also available for some older releases; see the Eclipse website for plug-in details.
A POM file can redefine any of the standard “goals.” Common Maven goals (predefined by default to do something sensible) include:
- clean
-
Removes all generated artifacts
- compile
-
Compiles all source files
- test
-
Compiles and runs all unit tests
- package
-
Builds the package
- install
-
Installs the pom.xml and package into your local Maven repository for use by your other projects
- deploy
-
Tries to install the package (e.g., on an application server)
Most of the steps implicitly invoke the previous ones—e.g., package
will compile any missing .class files, and run the tests if that
hasn’t already been done in this run.
The default deploy expects to find a distributionManagement element in the POM file or a -DaltDeploymentRepository
on the command line to specify a “standardized” deployment location.
There are application-server–specific targets provided by the app server vendors;
as a single example, with the WildFly Application Server (known as JBoss AS a decade or more ago),
you would install some additional plug-in(s) as per their documentation, and then deploy to the app server using:
mvn wildfly:deploy
instead of the regular deploy. Since I use that frequently, I have a shell alias or batch file mwd to
automate even that.
Maven pros and cons
Maven can handle complex projects and is very configurable. I build the darwinsys-api and javasrc projects with Maven and let it handle finding dependencies, making the download of the project source code smaller (actually, moving the download overhead to the servers of the projects themselves). The only real downsides to Maven is that it takes a while to get fully up to speed with it, and the fact that it can be a bit hard to diagnose when things go wrong. A good web search engine is your friend when things fail.
One issue I fear is that a hacker could gain access to a project’s site and modify, or install a new version of, a POM. Maven automatically fetches updated POM versions. However, it does use hash signatures to verify that files have not been tampered during the download process, and all files to be uploaded must be signed with PGP/GPG, so an attacker would have to compromise both the upload account and the signing keys. I am not aware of this ever having happened.
See Also
Start at http://maven.apache.org.
1.8 Automating Dependencies, Compilation, Testing, and Deployment with Gradle
Problem
You want a build tool that doesn’t make you use a lot of XML in your configuration file.
Solution
Use Gradle’s simple build file with “strong, yet flexible conventions.”
Discussion
Gradle is the latest in the succession of build tools (make, ant, and Maven).
Gradle bills itself as “the enterprise automation tool,”
and has integration with the other build tools and IDEs.
Unlike the other Java-based tools, Gradle doesn’t use XML as its scripting language, but rather a domain-specific language (DSL) based on the JVM-based and Java-based scripting language Groovy.
You can install Gradle by downloading from the Gradle website, unpacking the ZIP, and adding its bin subdirectory to your path.
Then you can begin to use Gradle. Assuming you use the “standard” source directory (src/main/java, src/main/test) that is shared by Maven and Gradle among other tools, the example build.gradle file in Example 1-1 will build your app and run your unit tests.
Example 1-1. Example build.gradle file
#SimpleGradleBuildfortheJava-basedDataVisprojectapplyplugin:'java'#SetupmappingsforEclipseprojecttooapplyplugin:'eclipse'#TheversionofJavatousesourceCompatibility=11#Theversionofmyprojectversion='1.0.3'#ConfigureJARfilepackagingjar{manifest{attributes'Main-class':'com.somedomainnamehere.data.DataVis','Implementation-Version':version}}#optionalfeature:like-Dtesting=truebutonlywhenrunningtests("test task")test{systemProperties'testing':'true'}
You can bootstrap the industry’s vast investment in Maven infrastructure by adding lines like these into your build.gradle:
#TellGradletolookinMavenCentralrepositories{mavenCentral()}#Weneeddarwinsys-apiforcompilingaswellasJUnitfortestingdependencies{compilegroup:'com.darwinsys',name:'darwinsys-api',version:'1.0.3+'testCompilegroup:'junit',name:'junit',version:'4.+'}
See Also
There is much more functionality in Gradle. Start at Gradle’s website, and see the documentation.
1.9 Dealing with Deprecation Warnings
Problem
Your code used to compile cleanly, but now it gives deprecation warnings.
Solution
You must have blinked. Either live—dangerously—with the warnings, or revise your code to eliminate them.
Discussion
Each new release of Java includes a lot of powerful new functionality,
but at a price: during the evolution of this new stuff, Java’s
maintainers find some old stuff that wasn’t done right and shouldn’t
be used anymore because they can’t really fix it. In the first major
revision, for example, they realized that the java.util.Date class
had some serious limitations with regard to internationalization.
Accordingly, many of the Date class methods and constructors are
marked “deprecated.”
According to the American Heritage Dictionary, to deprecate something means
to “express disapproval of; deplore.”
Java’s developers are therefore disapproving of the old way of doing
things. Try compiling this code:
importjava.util.Date;/** Demonstrate deprecation warning */publicclassDeprec{publicstaticvoidmain(String[]av){// Create a Date object for May 5, 1986@SuppressWarnings("deprecation")// EXPECT DEPRECATION WARNING without @SuppressWarningsDated=newDate(86,04,05);System.out.println("Date is "+d);}}
What happened? When I compiled it (prior to adding the @SuppressWarnings() annotation),
I got this warning:
C:javasrc>javac Deprec.java
Note: Deprec.java uses or overrides a deprecated API.  Recompile with
"-deprecation" for details.
1 warning
C:javasrc>
So, we follow orders. For details, recompile with -deprecation to see the additional details:
C:javasrc>javac -deprecation Deprec.java
Deprec.java:10: warning: constructor Date(int,int,int) in class java.util.Date
has been deprecated
                Date d = new Date(86, 04, 05);          // May 5, 1986
                         ^
1 warning

C:javasrc>
The warning is simple: the Date constructor that takes three
integer arguments has been deprecated. How do you fix it? The answer
is, as in most questions of usage, to refer to the javadoc documentation
for the class. The introduction to the Date page says, in part:
The class
Daterepresents a specific instant in time, with millisecond precision.Prior to JDK 1.1, the class Date had two additional functions. It allowed the interpretation of dates as year, month, day, hour, minute, and second values. It also allowed the formatting and parsing of date strings. Unfortunately, the API for these functions was not amenable to internationalization. As of JDK 1.1, the
Calendarclass should be used to convert between dates and time fields and theDateFormatclass should be used to format and parse date strings. The corresponding methods inDateare deprecated.
And more specifically, in the description of the three-integer constructor,
the Date javadoc says:
Date(int year, int month, int date)Deprecated. As of JDK version 1.1, replaced by
Calendar.set(year + 1900,month,date)orGregorianCalendar(year + 1900,month,date).
Of course, the older Date class is replaced by LocalDate and LocalDateTime
(see Chapter 6),
so you’d only see that particular example in legacy code, but the principles of
dealing with deprecation warnings matter, because many new releases of Java add
deprecation warnings to parts of the API that were previously “OK” to use.
As a general rule, when something has been deprecated, you should not use it in any new code and, when maintaining code, strive to eliminate the deprecation warnings.
In addition to Date (Java 8 includes a whole new Date and Time API; see Chapter 6), the main areas of deprecation warnings in the standard API are the really ancient “event handling” and some methods (a few of them important) in the Thread class.
You can also deprecate your own code, when you come up with a better
way of doing things. Put an @Deprecated annotation immediately
before the class or method you wish to deprecate and/or use a
@deprecated tag in a javadoc comment (see Recipe 15.2).
The javadoc comment allows you to explain the deprecation,
whereas the annotation is easier for some tools to recognize
because it is present at runtime (so you can use Reflection
(see Chapter 17).
See Also
Numerous other tools perform extra checking on your Java code. See my Checking Java Programs web site.
1.10 Maintaining Code Correctness with Unit Testing: JUnit
Problem
You don’t want to have to debug your code.
Solution
Use unit testing to validate each class as you develop it.
Discussion
Stopping to use a debugger is time consuming, and finding a bug in released code is much worse! It’s better to test beforehand. The methodology of unit testing has been around for a long time; it is a tried-and-true means of getting your code tested in small blocks. Typically, in an OO language like Java, unit testing is applied to individual classes, in contrast to “system” or “integration” testing where a complete slice or even the entire application is tested.
I have long been an advocate of this very basic testing methodology. Indeed, developers of the software methodology known as Extreme Programming (XP for short) advocate “Test Driven Development” (TDD): writing the unit tests before you write the code. They also advocate running your tests almost every time you build your application. And they ask one good question: If you don’t have a test, how do you know your code (still) works? This group of unit-testing advocates has some well-known leaders, including Erich Gamma of Design Patterns book fame and Kent Beck of eXtreme Programming book fame. I definitely go along with their advocacy of unit testing.
Indeed, many of my classes used to come with a “built-in” unit test. Classes that are not main programs in their own right would often include a main method that just tests out the functionality of the class.
What surprised me is that, before encountering XP, I used to think I did this often, but an actual inspection of two projects indicated that only about a third of my classes had test cases, either internally or externally. Clearly what is needed is a uniform methodology. That is provided by JUnit.
JUnit is a Java-centric methodology for providing test cases that you can download for free. JUnit is a very simple but useful testing tool. It is easy to use—you just write a test class that has a series of methods and annotate them with @Test (the older JUnit 3.8 required you to have test methods’ names begin with test). JUnit uses introspection (see Chapter 17) to find all these methods, and then runs them for you. Extensions to JUnit handle tasks as diverse as load testing and testing enterprise components; the JUnit website provides links to these extensions. All modern IDEs provide built-in support for generating and running JUnit tests.
How do you get started using JUnit? All that’s necessary is to write a test. Here I have written a simple test of my Person class and placed it into a class called PersonTest (note the obvious naming pattern):
publicclassPersonTest{@TestpublicvoidtestNameConcat(){Personp=newPerson("Ian","Darwin");Stringf=p.getFullName();assertEquals("Name concatenation","Ian Darwin",f);}}
JUnit 4 has been around for ages, and works well. JUnit 5 is only a few years old,
and has some improvements.
A simple test like this PersonTest class will be the same in JUnit 4 or 5 (but with different imports).
Using additional features, like setup methods to be run before each test,
do require different annotations between JUnit 4 and 5.
To show you running PersonTest manually, I compile the test and invoke the command-line test harness TestRunner:
$ javac PersonTest.java
$ java -classpath junit4.x.x.jar junit.textui.TestRunner testing.PersonTest
.
Time: 0.188

OK (1 tests)

$
In practice, running tests that way is incredibly tedious, so I just put my tests in the “standard directory structure” (i.e., src/test/java/) with the same package as the code being tested, and run Maven (see Recipe 1.7), which will automatically compile and run all the unit tests, and halt the build if any test fails, every time you try to build, package or deploy your application. Gradle will do so too.
All modern IDEs provide built-in support for running JUnit tests;
in Eclipse, you can right-click a project in the Package Explorer and select Run As→Unit Test
to have it find and run all the JUnit tests in the entire project.
The MoreUnit plugin (free in the Eclipse Marketplace) aims to simplify
creation and running of tests.
The Hamcrest matchers allow you to write more expressive tests, at the cost of an additional download.
Support for them is built into JUnit 4 with the assertThat static method, but you need to
download the matchers from Hamcrest or via the Maven artifact.
Here’s an example of using the Hamcrest Matchers:
publicclassHamcrestDemo{@TestpublicvoidtestNameConcat(){Personp=newPerson("Ian","Darwin");Stringf=p.getFullName();assertThat(f,containsString("Ian"));assertThat(f,equalTo("Ian Darwin"));assertThat(f,not(containsString("/")));// contrived, to show syntax}}
See Also
JUnit offers considerable documentation of its own; download it from the website listed earlier.
An alternative Unit Test framework for Java is TestNG; it got some early traction by adopting
features such as Java annotations before JUnit did, but since JUnit got with the annotations program,
JUnit has remained the dominant package for Java Unit Testing.
Another package of interest is AssertJ, which appears to offer similar power to the combination of JUnit with Hamcrest.
Finally, one often needs to “mock up” or create substitute objects for use by the class being tested (the “dependencies” of the class under test). While you can code these by hand, in general I encourage use of packages such as Mockito which can generate “mock objects” dynamically, have these mocks provide fixed return values, verify that the dependencies were called correctly, and so on.
Remember: Test early and often!
1.11 Maintaining Your Code with Continuous Integration
Problem
You want to be sure that your entire code base compiles and passes its tests periodically.
Solution
Use a Continuous Integration server such as Jenkins/Hudson.
Discussion
If you haven’t previously used continuous integration, you are going to wonder how you got along without it. CI is simply the practice of having all developers on a project periodically integrate (e.g., commit) their changes into a single master copy of the project’s “source.” This might be a few times a day, or every few days, but should not be more than that, else the integration will likely run into larger hurdles where multiple developers have modified the same file.
But it’s not just big projects that benefit from CI. Even on a one-person project, it’s great to have a single button you can click that will check out the latest version of everything, compile it, link or package it, run all the automated tests, and give a red or green pass/fail indicator. Better yet, it can do this automatically every day or even on every commit to the master branch.
It’s not just code-based projects that benefit from CI. If you have a number of small websites, putting them all under CI control is one of several important steps toward developing an automated, “dev-ops” culture around website deployment and management.
If you are new to the idea of CI, I can do no better than to plead with you to read Martin Fowler’s insightful (as ever) paper on the topic. One of the key points is to automate both the management of the code and all the other artifacts needed to build your project, and to automate the actual process of building it, possibly using one of the build tools discussed earlier in this chapter.1
There are many CI servers, both free and commercial. In the open source world, CruiseControl and Jenkins/Hudson2 are among the best known among the CI servers that you deploy yourself. There are also hosted solutions such as TravisCI, TeamCity, or CircleCI. These hosted ones eliminate the need for setting up and running your own CI server. These hosted systems also tend to have their configuration right in your repo (travis.yml etc.) do deployment to them is simplified.
Jenkins runs as a web application, either inside a Jakarta EE server or in its own “standalone” web server. Once it’s started, you can use any standard web browser as its user interface. Installing and starting Jenkins can be as simple as unpacking a distribution and invoking it as follows:
java -jar jenkins.war
This will start up its own tiny web server. If you do that, be sure to configure security if your machine is reachable from the Internet!
Many people find it more secure to run Jenkins in a full-function Java EE or Java web server; anything from Tomcat to JBoss to WebSphere or Weblogic will do the job, and let you impose additional security constraints.
Once Jenkins is up and running and you have enabled security and are logged in on an account with
sufficient privilege, you can create “jobs.” A job usually corresponds to one project, both in terms of origin (one source code checkout) and in terms of results (one war file, one executable, one library, one whatever). Setting up a project is as simple as clicking the “New Job” button at the top-left of the dashboard, as shown in Figure 1-6.

Figure 1-6. Jenkins: Dashboard
You can fill in the first few pieces of information: the project’s name and a brief description. Note that each and every input field has a “?” Help icon beside it, which will give you hints as you go along. Don’t be afraid to peek at these hints! Figure 1-7 shows the first few steps of setting up a new job.

Figure 1-7. Jenkins: Creating a new job
In the next few sections of the form, Jenkins uses dynamic HTML to make entry fields appear based on what you’ve checked. My demo project “TooSmallToFail” starts off with no source code management (SCM) repository, but your real project is probably already in Git, Subversion, or maybe even CVS or some other SCM. Don’t worry if yours is not listed; there are hundreds of plug-ins to handle almost any SCM. Once you’ve chosen your SCM, you will enter the parameters to fetch the project’s source from that SCM repository, using text fields that ask for the specifics needed for that SCM: a URL for Git, a CVSROOT for CVS, and so on.
You also have to tell Jenkins when and how to build (and package, test, deploy…) your project. For the when, you have several choices such as building it after another Jenkins project, building it every so often based on a cron-like schedule, or based on polling the SCM to see if anything has changed (using the same cron-like scheduler). If your project is at GitHub (not just a local Git server), or some other SCMs, you can have the project built whenever somebody pushes changes up to the repository. It’s all a matter of finding the right plug-ins and following the documentation for them.
Then the how, or the build process. Again, a few build types are included with Jenkins, and many
more are available as plug-ins: I’ve used Apache Maven, Gradle, the
traditional Unix make tool, and even shell or command lines.
As before, text fields specific to your chosen tool will appear once you select the tool.
In the toy example, TooSmallToFail, I just use the shell command /bin/false
(which should be present on any Unix or Linux system) to ensure that the project does,
in fact, fail to build, just so you can see what that looks like.
You can have zero or more build steps; just keep clicking the Add button and add additional ones, as shown in Figure 1-8.

Figure 1-8. Jenkins: Configuration for SCM and adding build steps
Once you think you’ve entered all the necessary information, click the Save button at the bottom of the page, and you’ll go back to the project’s main page. Here you can click the funny little “build now” icon at the far left to initiate a build right away. Or if you have set up build triggers, you could wait until they kick in, but then again, wouldn’t you rather know right away whether you’ve got it just right? Figure 1-9 shows the build starting.

Figure 1-9. Jenkins: After a new job is added
Should a job fail to build, you get a red ball instead of a green one. Actually, a successful build shows a blue ball by default (the go bulb in Japanese traffic lights, where Kohsuke lives, is blue rather than green), but most people outside Japan prefer green for success, so the optional “Green Ball” plug-in is often one of the first to be added to a new installation.
Beside the red or green ball, you will see a “weather report” ranging from sunny (the last several builds have succeeded), cloudy, rainy, or stormy (no recent builds have succeeded).
Click the link to the project that failed, and then the link to Console Output, and figure out what went wrong. The usual workflow is then to make changes to the project, commit/push them to the source code repository, and run the Jenkins build again.
There are hundreds of optional plug-ins for Jenkins. To make your life easier, almost all of them can be installed by clicking the Manage Jenkins link and then going to Manage Plug-ins. The Available tab lists all the ones that are available from Jenkins.org; you just need to click the checkbox beside the ones you want, and click Apply. You can also find updates there. If your plug-in addtion or upgrade requires a restart, you’ll see a yellow ball and words to that effect; otherwise you should see a green (or blue) ball indicating plug-in success. You can also see the list of plug-ins directly on the Web.
I mentioned that Jenkins began life under the name Hudson. The Hudson project still exists, and is hosted at the Eclipse website. Last I checked, both projects had maintained plug-in compatibility, so many or most plug-ins from one can be used with the other. In fact, the most popular plug-ins appear in the Available tab of both, and most of what’s said in this recipe about Jenkins applies equally to Hudson. If you use a different CI system, you’ll need to check that system’s documentation, but the concepts and the benefits will be similar.
1.12 Getting Readable Stack Traces
Problem
You’re getting an exception stack trace at runtime, but most of the important parts don’t have line numbers.
Solution
Be sure you have compiled with debugging enabled.
Discussion
When a Java program throws an exception, the exception propagates up the call stack until there is a catch clause that matches it. If none is found, the Java interpreter program that invoked your main() method catches the exception and prints a stack traceback showing all the method calls that got from the top of the program to the place where the exception was thrown. You can print this traceback yourself in any catch clause: the Throwable class has several overloads of the method called printStackTrace().
The traceback includes line numbers only if they were compiled in. When using javac, this is the default. If you
add the -g option, javac will also include local variable names and other information in the compiled code,
which will make for better debugging information in the event of a crash.
1.13 Finding More Java Source Code
Problem
You want to build a large application and need to minimize coding, avoiding the “Not Invented Here” syndrome.
Solution
Use the Source, Luke. There are thousands of Java apps, frameworks, and libraries available in open source.
Discussion
Java source code is everywhere. As mentioned earlier, all the code examples from this book can be downloaded - see Recipe 1.6.
Another valuable resource is the source code for the Java API. You may not have realized it, but the source code for all the public parts of the Java API are included with each release of the Java Development Kit. Want to know how java.util.ArrayList actually works? You have the source code. Got a problem making a JTable behave? The standard JDK includes the source for all the public classes! Look for a file called src.zip or src.jar; some versions unzip this and some do not.
If that’s not enough, you can get the source for the
whole JDK for free over the Internet, either by the Mercurial source code librarian
at openjdk.java.net or from the git mirror
at AdoptOpenJDK at github.com.
This includes the source for the public and nonpublic parts of the API, as well as the
compiler (written in Java) and a large body of code written in C/C++
(the runtime itself and the interfaces to the native library). For example,
java.io.Reader has a method called read(), which reads bytes of data
from a file or network connection. There is a version of this written in C for
each operating system because it calls down to
the read() system call for Unix, Windows, Mac OS, or whatever. The
JDK source kit includes the source for all this stuff.
And ever since the early days of Java, a number of websites have been set up to distribute free software or open source Java, just as with most other modern “evangelized” languages, such as Perl, Python, Tk/Tcl, and others.
1.14 Finding Runnable Java Libraries
Problem
You want to re-use a published library rather than reinventing a well-known solution to your problem at hand.
Solution
Use the internet to find reusable software.
Discussion
Although most of this book is about writing Java code, this recipe is about not writing code, but about using code written by others. There are hundreds of good frameworks to add to your Java application—why reinvent the flat tire when you can buy a perfectly round one? Many of these frameworks have been around for years and have become well rounded by feedback from users.
What, though, is the difference between a library and a framework? It’s sometimes a bit vague, but in general, a framework is “a program with holes that you fill in,” whereas a library is code you call. It is roughly the difference between building a car by buying a car almost complete but with no engine, and building a car by buying all the pieces and bolting them together yourself.
When considering using a third-party framework, there are many choices and issues to consider. One is cost, which gets into the issue of open source versus closed source. Most “open source” tools can be downloaded for free and used, either without any conditions or with conditions that you must comply with. There is not the space here to discuss these licensing issues, so I will refer you to Understanding Open Source and Free Software Licensing (O’Reilly).
Much open-source software is available in compiled library form on Maven Central, as discussed in “Maven Central: Mapping the World of Java Software”.
Some well-known collections of open source frameworks and libraries for Java are listed in Table 1-5. Most of the projects on these sites are “curated”—that is, judged and found worthy—by some sort of community process.
| Organization | URL | Notes |
|---|---|---|
Apache Software Foundation |
Not just a web server! |
|
Eclipse Software Foundation |
home of IDE and of Jakarta EE |
|
Spring framework |
||
JBoss community |
Not just a Java EE app server! |
|
Codehaus |
— |
See footnotea |
a Codehaus itself went offline a few years ago. As of 2019, the domain is owned by the Apache Software Foundation but does not respond to browser requests. There is also a | ||
There are also a variety of open source code repositories, which are not curated—anybody who signs up can create a project there, regardless of the existing community size (if any). Sites like this that are successful accumulate too many projects to have a single page listing them—you have to search. Most are not specific to Java. Table 1-6 shows some of the open source code repos.
| Name | URL | Notes |
|---|---|---|
Sourceforge.net |
One of the oldest |
|
GitHub |
“Social Coding”; probably most heavily used; now owned by Microsoft |
|
BitBucket |
||
GitLab |
||
Maven Central |
Has compiled jar, source jar and javadoc jar for each project |
That is not to disparage these—indeed, the collection of demo programs for this book is hosted on GitHub—but only to say that you have to know what you’re looking for, and exercise a bit more care before deciding on a framework. Is there a community around it, or is it a dead end?
Finally, I maintain a small Java site, which may be of value. It includes a listing of Java resources and material related to this book.
For the Java enterprise or web tier, there are two main frameworks that also provide “dependency injection”: JavaServer Faces (JSF) and CDI, and the Spring Framework “SpringMVC” package. JSF and the built-in CDI (Contexts and Dependency Injection) provides DI as well as some additional Contexts, such as a very useful Web Conversation context that holds objects across multiple web page interactions. The Spring Framework provides dependency injection and the SpringMVC web-tier helper classes. Table 1-7 shows some web tier resources. Spring MVC and JSF are far from the only web frameworks; the list in Table 1-7 includes many others, which may be a better fit for your application. You have to decide!
| Name | URL | Notes |
|---|---|---|
Ians List of 100 Java Web Frameworks |
||
JSF |
Java EE standard technology for web pages |
Because JSF is a component-based framework, there are many add-on components that will make your JSF-based website much more capable (and better looking) than the default JSF components. Table 1-8 shows some of the JSF add-on libraries.
| Name | URL | Notes |
|---|---|---|
BootsFaces |
Combines BootStrap with JSF |
|
ButterFaces |
Rich components library |
|
IceFaces |
Rich components library |
|
OpenFaces |
Rich components library |
|
PrimeFaces |
Rich components library |
|
RichFaces |
Rich components; no longer maintained |
|
Apache Deltaspike |
Numerous code add-ons for JSF |
|
JSFUnit |
|
|
OmniFaces |
JSF Utilities add-on |
There are frameworks and libraries for almost everything these days. If my lists don’t lead you to what you need, a web search probably will. Try not to reinvent the flat tire!
As with all free software, be sure that you understand the ramifications of the various licensing schemes. Code covered by the GPL, for example, automatically transfers the GPL to any code that uses even a small part of it. Consult a lawyer. Your mileage may vary. Despite these caveats, the source code is an invaluable resource to the person who wants to learn more Java.
1 If the deployment or build includes a step like “Get Smith to process file X on his desktop and copy to the server,” you probably don’t quite get the notion of “automated”.
2 Jenkins and Hudson began as Hudson, largely written by Kohsuke Kawaguchi, while working for Sun Microsystems. There was later a cultural spat that resulted in Jenkins splitting off from Hudson, creating a new “fork” or split of the project. Kohsuke works on the half now known as Jenkins. I’ll just use the name Jenkins, because that’s the one I use, and because it takes too long to say “Jenkins/Hudson” all the time. But almost everything here applies to Hudson as well.