
If there is no struggle, there is no progress.
—Frederick Douglass, 1857
- 1.
Finding base I/O libraries for various forms of base I/O, that is, digital I/O (a.k.a. GPIO), serial, I2C, and SPI upon which devices libraries can be built
- 2.
Finding or creating device libraries for your devices, which require one or more forms of base I/O
Finding base I/O libraries
Selecting the base I/O library, or libraries, for your project and for this book
Getting base I/O libraries into NetBeans
Finding device libraries
Porting non-Java device libraries to Java
Find Base I/O Libraries for Java
Follow down Pi4J and you’ll find it to be a wrapper around the wiringPi library (written in C).
Follow down jRXTX and you’ll find it to be an “easier-to-use” wrapper around RxTx.
But you are not done yet. I’ve found that sometimes, for unclear reasons, you have to search for other base I/O types to get a complete picture. So, for example, even if you are not interested in I2C, you probably should search for it and then follow down a new trail of links to see if you turn up anything else. Do so, and you’ll turn up a lot of references to Pi4J. You will also turn up references to device I/O (a.k.a. DIO) and diozero. Pi4J, DIO, and diozero all support everything: GPIO, serial, I2C, and SPI. You might also have to look for I2C support in C and find pigpio, which supports everything. Dig into pigpio, and you’ll find there is a Java “wrapper” for pigpio called pigpioj. I think you can see my point; generally, you have to do a quite broad, exhaustive search to get a complete picture.
Select the Best Base I/O Library
Functional coverage
Performance
Support
Ease of use
Functional Coverage
The Raspberry Pi has two forms of serial I/O: USB serial via the USB ports and TTY serial via the RX/TX pins on the GPIO header. usb4java supports only the USB ports, while others mentioned earlier support both forms.
Some GPIO libraries offer support for pull-up and pull-down resistors for digital I/O; some don’t.
Usually, you can determine functional coverage from documentation. However, I’ve found that testing is sometimes necessary. For example, in 2017, testing showed Pi4J I2C support could only do block reads starting at register address 0, forcing the use of the underlying wiringPi in some situations.
Performance
Performance is actually two pronged. The first question is “Does the option work reliably?” For example, testing jRXTX in 2017 indicated it worked but behaved erratically; I never determined why. Clearly not the best choice.
The second question is “Does the option work fast?” You certainly don’t want to waste time or resources. If one option performs a task much faster than others, it is likely the best choice. For example, testing Pi4J serial and jSerialComm in 2017 showed that jSerialComm was much faster than Pi4J (or that I could not configure Pi4J correctly).
You should gather from this discussion that you must be prepared to not only test that a library works reliably but that it works with adequate performance in your project.
Support
Support is a somewhat ambiguous catchall. There are a few things to consider. Any library you find was created by and may be supported by an individual, a team of individuals, or an organization. Generally, the larger the creating and supporting entity, the better.
jSSC did not appear to have been updated since 2013.
I found no updates to, and indeed no mention of, RxTx since 2017.
The author of wiringPi had deprecated it, which, in effect, deprecated the then current version (1.2) of Pi4J.
usb4java was actively supported as late as 2018.
jRXTX appeared to have active support and updates.
jSerialComm appeared to have active support and updates.
DIO appeared to be little used.
diozero had active support and updates.
pigpio had active support and updates, as did the pigpioj wrapper.
Pi4J 2.0 was under construction.
So, fair warning, what I find and recommend for the purposes of this book may change by the time you read the book. You should do your own research.
Another consideration is the user community size. The bigger the better, though this can be difficult to determine (a search engine can help). A large user community offers more opportunity for finding usage examples and getting help with unusual use cases or anomalous behavior. A large user community is no guarantee of “best,” however. Pi4J appears to have the largest user community of any base I/O library, but remember, the current version should be considered deprecated (not only is the underlying wiringPi library deprecated, some parts of Pi4J 1.2 do not work on Java version 9 or greater).
Ease of Use
Ease of use is subjective and ambiguous and can include many aspects. For example, ideally, to use the library, you can acquire a single jar file and you are done. Some libraries achieve that. On the other hand, some can require you to build C code on the Raspberry Pi, install other code on the Pi, mess with Java permission files, or other activities that eat into the time you can spend on your project.
Another aspect was touched on earlier. Some libraries support more than one type of I/O. If all the types you require are all satisfied by a single library, that option could be “best,” unless contraindicated by other criteria. Life is simpler with a single library; for example, you have a single source of documentation and a single contact point for support issues.
Other aspects include the presence and quality of documentation, existence of code examples, and the complexity of the API. All of these can impact how quickly you can get up and running with a library.
The Base I/O Choice for This Book
For better or worse, this book is mostly a set of individual device-focused projects rather than a single project. In part, the approach is due to the difference between robotics projects, which usually require several devices, and IoT projects, which often require just one or two devices. In part, it is due to the desire to demonstrate all forms of base I/O for the Raspberry Pi. So, for the purposes of the book, I will look for a library that supports all base I/O capabilities available on the Raspberry Pi, that is, GPIO, serial, I2C, and SPI.
pigpioj (see https://github.com/mattjlewis/pigpioj)
diozero (see https://www.diozero.com)
It is at this point where the final decision gets very interesting. Figure 1-1 shows the idealized software architecture applicable for this book, and the related text describes the nature of the architecture’s four layers. We’ll use that architecture to compare the candidates. I assert that when comparing pigpioj and diozero, there is no need to consider the Application layer because you’ll always have to write the programs in the Application layer.
A Look at pigpioj

Software architecture with pigpioj
The Device layer represents the device libraries you find or write. They expose device-specific APIs to applications. They use the pigpioj base I/O API.
The combination of pigpio and pigpioj provides an interesting feature – remote I/O. That means you can run your application on a different computing platform but perform the I/O on the target Raspberry Pi. This of course is an alternative to remote development with NetBeans. See the pigpioj documentation for details.
A Look at diozero
Figure 6-2 shows the software architecture of Figure 1-1, minus the Application layer, when using diozero. Compare Figure 6-2 to Figure 6-1 and you see similarities, but also significant differences. While not necessarily obvious in Figure 6-2, in contrast to the relative simplicity of pigpioj, diozero is an extensive framework providing a range of interesting features.
All statements in this book regarding diozero were true as of version 1.3.0; however, in summer 2021, diozero was under active development, with new and improved features released frequently. Thus, later versions may exhibit differences. In addition, all code in the following chapters was tested against 1.3.0; later versions may require or benefit from code updates.
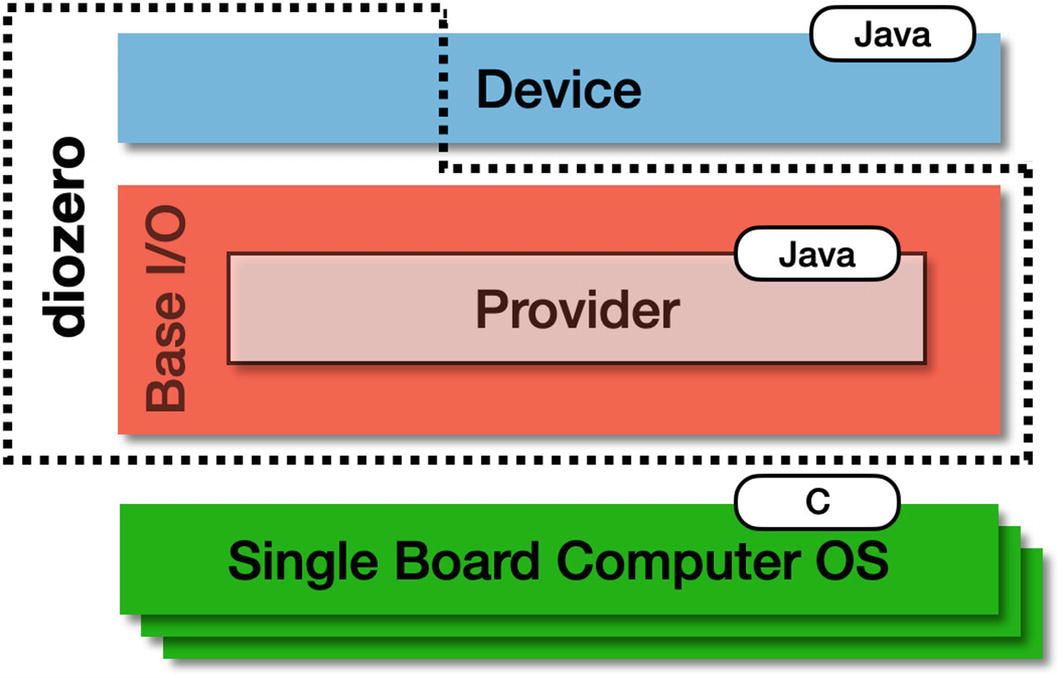
Software architecture with diozero
With diozero, the base I/O layer consists of the diozero provider. The diozero provider adapts, to the extent possible, the underlying SBC base I/O capabilities to provision the base I/O API exposed by the base I/O layer. The provider exposes the Java base I/O API you use to create device libraries. It uses the more primitive SBC OS C API for base I/O.
Built in: Offers the optimal choice of function and performance within the bounds of the Pi base I/O capabilities. The built-in provider is universal.
pigpio: Uses the pigpio C library. The pigpio provider is Pi specific.
diozero remote: Offers a form of remote computing with the application running on a host platform and I/O operations running on the Pi. The diozero-remote provider is universal. The diozero-remote provider is an alternative for remote development.
pigpio remote: Offers a form of remote computing with the application running on a host platform and I/O operations running on the Pi. The pigpio-remote provider is Pi specific. The pigpio-remote provider is also an alternative for remote development.
You can find more about the providers for the various SBCs in the diozero documentation.
In Figure 6-2, the Device layer represents device libraries with their exposed device APIs; they use the base I/O layer (a.k.a. Provider) API. Another great feature of diozero is that it includes a broad set of device libraries that you don’t have to write! Of course, if diozero does not support your device, you can use the base I/O programming interfaces to create a device library. The best of both worlds! You can find the list of supported devices in the diozero documentation.
This subsection describes only the aspects of diozero relevant to the Raspberry Pi and similar SBCs. diozero supports other computing platforms as well, for example, the Arduino and the Particle Photon. See the diozero documentation for more detail.
Evaluating the Choices
Now I’ll use the four criteria mentioned previously to evaluate pigpioj and diozero to choose between them.
Functional Coverage
pigpioj gives you a robust base I/O layer for creating device libraries on the Raspberry Pi. That’s it.
A robust base I/O layer for creating device libraries
Multiple providers, supplying differing characteristics, for the base I/O layer
An existing set of device libraries, for devices such as an LED, a button, environmental sensors, motor controllers, and even IMUs
Support for additional computing platforms, for example, Odroid C2 and BeagleBone Black
Clearly diozero has much superior functional coverage.
Performance
As mentioned, pigpioj is a thin wrapper on pigpio. Thus, the performance is as good as you can get in Java for what pigpio does.
One of the providers offered by diozero is pigpio. The diozero built-in provider offers GPIO performance roughly seven times that of the pigpio provider, with I2C, SPI, and serial performance of the two providers roughly equal. Thus, it is certainly reasonable to claim that diozero offers superior performance.
Support
If you read the documentation for pigpioj and diozero carefully, you’ll notice the libraries were created by the same individual. So, support is likely a tie. On the other hand, diozero is a much more comprehensive endeavor, and thus, support is perhaps more difficult to provide on a timely basis.
Ease of Use
As for ease of use, pigpioj is pretty good. You have to install pigpio on your Raspberry Pi before attempting to use pigpioj; doing so is quite simple, however. You have to acquire the pigpioj jar file on your workstation. To build and run applications, you must add the jar file to your NetBeans project(s).
Using pigpioj comes with a caution, however. The underlying pigpio library must be run with root privileges. Thus, you have to run your Java application as superuser via the sudo command. As a consequence, your application could unintentionally cause havoc. While not likely, it is possible.
The ease of use for diozero is pretty good as well. You have to acquire three or four jar files depending on the provider you use. To build and run applications, you must add the jar files to your NetBeans project(s). As you will see in the following, NetBeans makes that easy.
Both pigpioj and diozero support all base I/O in their Base IO layer, that is, GPIO, serial I/O, I2C, and SPI. Documentation for diozero is a bit better and naturally more extensive. While neither base I/O programming interface is difficult to use, I find the diozero API a bit easier to use, but just as effective. diozero also offers some useful convenience methods and functions not available in pigpioj.
Altogether, the two roughly tie for this criterion, though I feel diozero has a slight edge.
The Final Choice – diozero
As far as support and ease of use, there is no strong distinction between pigpioj and diozero. However, diozero can greatly outperform pigpioj in GPIO. The functional coverage of diozero, with its numerous compelling features, far exceeds pigpioj. Thus, the device libraries developed in this book use diozero. Of course, you could choose differently.
Keep in mind that unless you are adamant about keeping your base I/O options open, you only need the library or libraries required to support your project’s devices. While diozero is a great choice for the book due to its extensive framework and admirable performance, a key factor in that choice is support for all base I/O. If you need only one specific form of base I/O, for example, serial, diozero is quite likely at least a fine candidate, but you might want to do your own assessment against other candidates.
I want to emphasize that diozero does not target robotics or IoT. It is a general-purpose framework supporting base I/O capabilities for any sort of device.
Configure diozero in NetBeans
Now diozero is identified as the base I/O library for the book; I’ll show you how to make diozero available to NetBeans so that for your projects, you can either use existing device libraries from diozero or develop device libraries with diozero.
I mentioned in Chapter 5 that I discovered only the Ant project management/build tool supports efficient remote computing in NetBeans “out of the box.” Thus, I’ll show you how to get set up for Ant-based projects.1
First, you need to download the required diozero jar files. The easiest way is to get the diozero “distribution ZIP” file, which contains all the diozero JAR files plus all JAR files for diozero dependencies, plus the dependencies for the dependencies, and so on.
Before downloading, you have to consider what version of diozero you want to use. Unless you have a really good reason not to do so, you should use the latest release (the highest version number). I’ve found three easy ways to download the distribution ZIP file for released versions of diozero. First, bring up the diozero documentation (https://www.diozero.com). If you want the latest diozero release, select Creating Your Own Application in the navigation panel on the left. Click the link called diozero-distribution ZIP file (just below the XML listing) to download the latest distribution ZIP file immediately. If you think you might want an earlier diozero release, after you bring up the documentation, scroll down until you see the section Maven Dependency/Download Link. The section describes two ways for finding and downloading the distribution ZIP for all released versions of diozero.
Download the distribution ZIP for your chosen version using one of the ways mentioned earlier. You’ll download a file named something like diozero-distribution-i.j.k-bin.zip, where i.j.k stands for the version number, for example, 1.3.0. You may have to unzip the file; on macOS, it was automatically unzipped, and all the included JAR files placed in the folder Downloads/diozero-distribution-i.j.k. If you are using Windows, downloading and unzipping (if necessary) should result in a subfolder (with the same name) full of JAR files.
diozero-core-i.j.k.jar (includes the built-in provider; it depends on the next two)
tinylog-api-m.n.o.jar and tinylog-impl-m.n.o.jar (the version number of these two is the same; the number will likely be different than the version number of diozero core)

NetBeans Ant Library Manager dialog

New Library dialog

Browse JAR/Folder dialog

Ant Library Manager dialog with DIOZERO library
Click OK to create the DIOZERO library. The Ant Library Manager dialog closes and the library is ready to use.
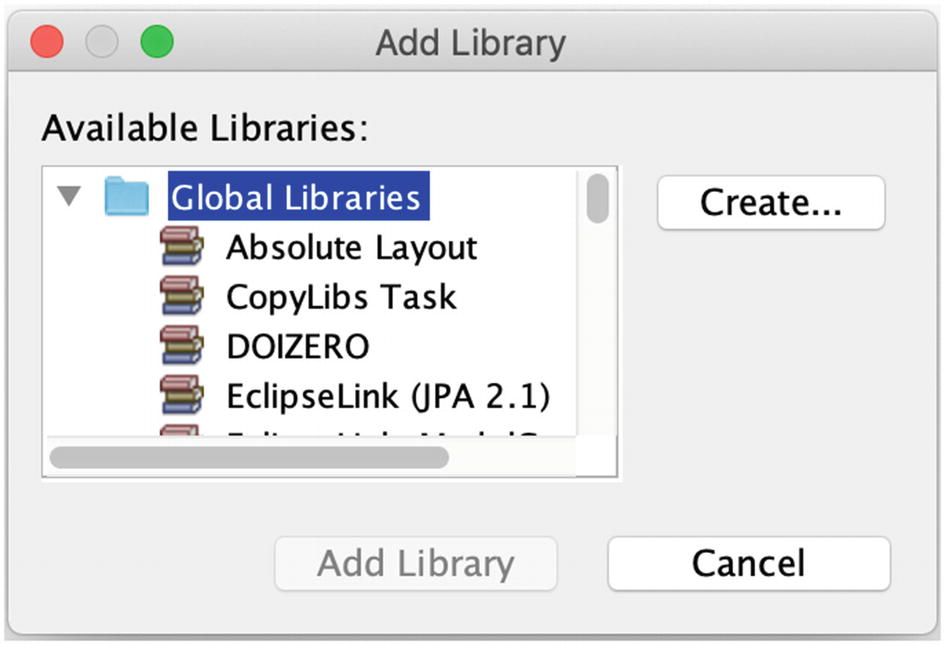
Add Library dialog
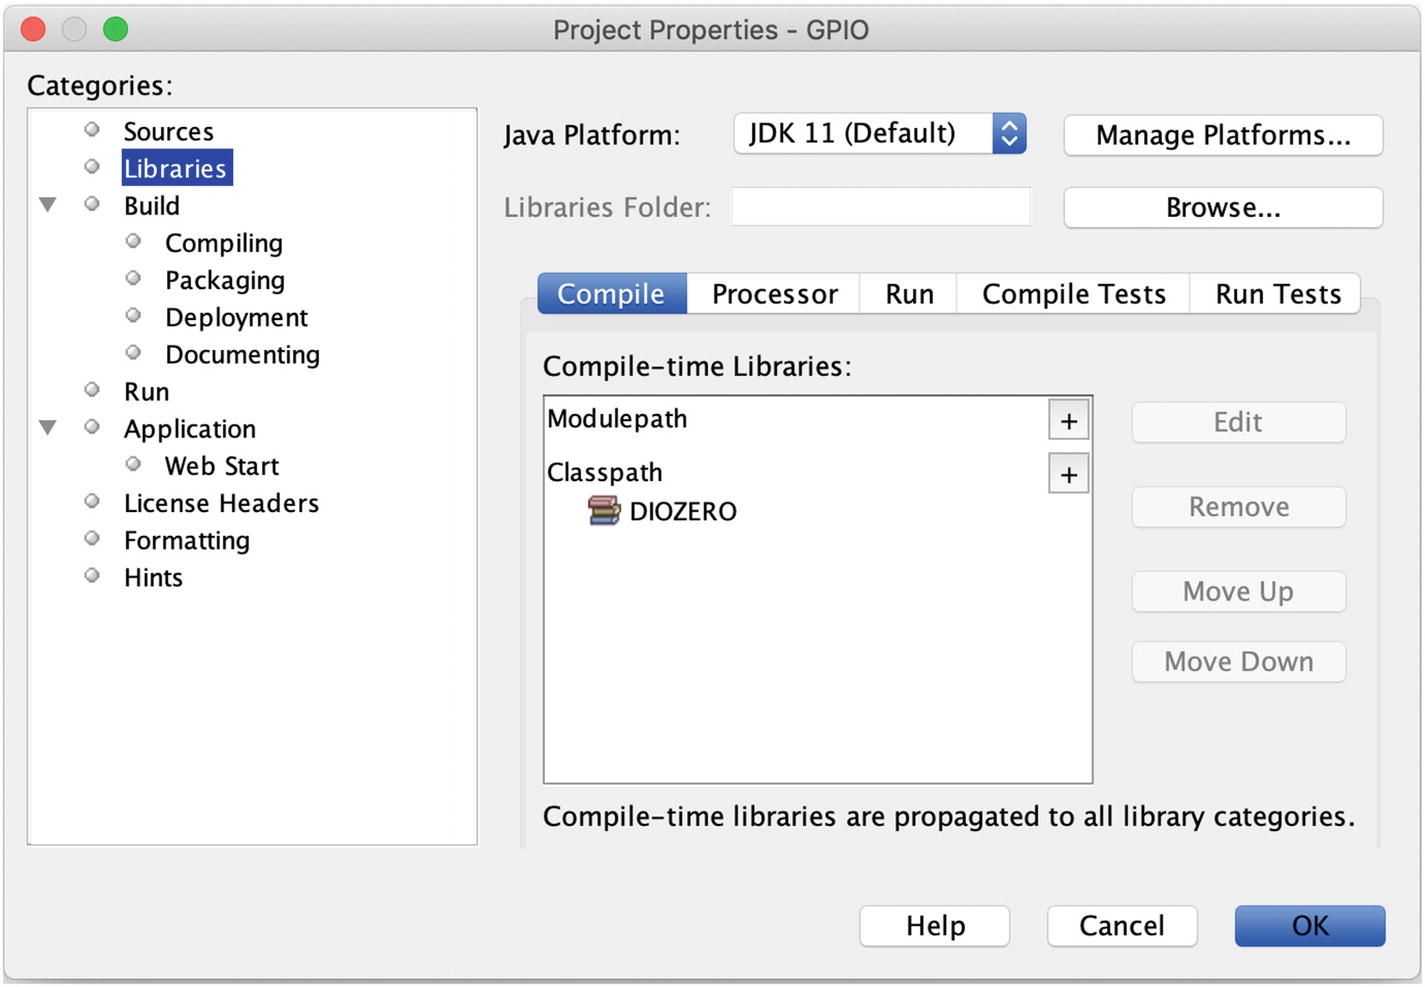
Result of adding DIOZERO library to project
You’ll need to also set Build ➤ Packaging ➤ Copy Dependent Libraries property for the project. Click OK. Now you can write an application that uses some of the device libraries included in diozero, or you can write your own device library using the diozero base I/O API, or maybe both! The next section helps you decide what to do and how.
Find (and Port) Device Libraries
Check the diozero device library list for your device (see https://www.diozero.com and www.javadoc.io/doc/com.diozero/diozero-core/latest/com/diozero/devices/package-summary.html).
Search the Internet for a Java device library for your device that uses the diozero base I/O layer.
Search for Java device libraries that use other Raspberry Pi providers of base I/O support, for example, Pi4J or pigpioj.
Search for Java device libraries more generally. The search should pick up support on other computing platforms as well as the Raspberry Pi.
Search for a non-Java library for your device from the seller, the manufacturer, or anywhere else.
Implement a library for your device from scratch.
You could find yourself in one (or more) of several situations. The following subsections discuss the situations more or less in order of desirability.
Before examining the situations, I must mention a couple of points. The first point is an important reality. Even in the best of situations, there may be requirements differences that could mandate work on your part. Sometimes a device library surfaces too little of the device’s capability; for example, an IMU library might not support the FIFO common in such devices. Sometimes a device library does too much; in one of my projects, I used only the gyroscope z-axis from a 9-axis IMU. Sometimes, sadly, you find “lazy programming”; in one example, the developer coded console output in the case of errors instead of a more robust approach. No matter the situation, you must always be prepared to fix such requirements differences yourself, unless your project works fine with them present.
The second point is an important opportunity. In Chapter 1, I asserted you should consider yourself lucky to find one library for some devices. If you do find one library, or even multiple libraries, you can choose to port, or you can choose to start from scratch. The latter could be a better choice depending on the device complexity, the language in which an existing device library is written, how much of an existing library you really need to use, and other factors. One thing you should always consider, however, is actually running an existing library if you have the necessary resources. You can simply check that the device actually works the way you expect. You can compare the behavior or results from the existing library to your library as you create it. If you have the ability, via an IDE, you can debug to allow you to more deeply understand the existing library.
With those two points in mind, we’ll now look at the possible situations.
Java Device Library and diozero Base I/O
You find a device library included in diozero.
You find a non-diozero device library that uses diozero base I/O.
In these highly desirable cases, you need to do no work! Well, no work besides addressing the requirements differences mentioned earlier.
If you don’t find either of these cases, you should check if diozero provides a device library for a device similar to yours. Classes of devices often share some common characteristics. Depending on the differences between the diozero-supported device and your device, you might be able to adapt that library (e.g., change I2C addresses, register addresses, control constants). At a minimum, you might be able use it as guidance.
There is a way to ensure you end up in this fortuitous situation. Prior to choosing devices for your project, examine the devices supported by diozero and use them where possible. No work!
Java Device Library and Non-diozero Base I/O
In this situation, you find a Java device library that uses a non-diozero base I/O library. The device library might target the Raspberry Pi or a different SBC. The most likely base I/O library is Pi4J due to its popularity and its coverage of all base I/O. Other possibilities include pigpioj for all base I/O and jSerialComm for serial.
You can replace calls to the non-diozero base I/O API with an appropriate combination of logic and calls to the diozero base I/O API.
You can create adapter methods that mimic the non-diozero base I/O API in its interface and encapsulate the appropriate combination of logic and calls to the diozero base I/O API. You can even group such methods in a class. This is desirable if you need multiple device libraries that use the same non-diozero base I/O API.
I must express a warning about this situation, however. The Java device libraries I’ve found tend to be embedded in a larger framework. Sometimes it is easy to ignore the larger framework and use the majority of the library; sometimes it is not. Just be cautious about the effort involved if alternatives exist.
C/C++ Device Library
There is a good chance you can find a C/C++ device library that uses a C/C++ base I/O library. My experience suggests the most common form of device libraries will be Arduino C++ libraries, due to the massive popularity of the Arduino. These are typically referenced on the device vendor’s website, on the manufacturer’s website, or both. You can sometimes find device libraries that use pigpio or wiringPi. These almost always come from individuals or small teams that have no affiliation with the vendor or manufacturer.
Understanding the non-diozero base I/O API as well as the diozero base I/O API
Dealing with the syntactic differences between C/C++ and Java (e.g., class definition, addresses and pointers, malloc/free)
Handling differences is variable types; for example, there are no unsigned types in Java, but they exist in C/C++
None of these items is a lot of effort, but in total, this situation obviously requires more work than most pure Java situations. The amount of work involved depends on the complexity of the device, the competence of the C/C++ library developer (e.g., comments in the code), your knowledge of C/C++, and perhaps other factors.
Python Device Library
There is a chance that you can find a Python (or some variant) device library that uses some Python base I/O library, primarily because Python is the default programming language for the Raspberry Pi. There are a few base I/O libraries for Python; the most popular appear to be RPi.GPIO and gpiozero. There is also a Python wrapper for the C pigpio library; like pigpioj, the Python pigpio library (yes, it has exactly the same name as the C library) exposes exactly the pigpio interfaces.
With Python, the design should be usable, but obviously you have to port Python syntax and semantics to Java. You’ll face all the issues of porting a C/C++ library, and the pain may be exaggerated (think loose typing vs. strong typing). Unless you are well versed in Python, porting a Python device library will require more work than a C/C++ library and thus more work than Java situations. That said, porting a Python library likely takes less work than starting from scratch.
No Device Library
If you find no suitable library after all the searching, you obviously have to do all the work. In some ways, this is liberating. You have a clean slate, and you can design and implement precisely the capability you need from your device. You don’t need to worry about understanding a non-diozero base I/O API. You don’t have to worry about translating between languages.
Perhaps the biggest difference from the other situations is that you must become extremely well educated about your device (i.e., read the datasheet – at least twice), but that is not necessarily a bad thing. You should search for application notes for the device and anything else that might help you interpret the sometimes-terse datasheet for the device. Remember that you might be able to get guidance by looking at device libraries for similar devices.
Summary
The search techniques for finding support for base I/O capabilities
The criteria for selecting the best of the candidates for your project
The base I/O choice for this book, namely, diozero
The configuration of NetBeans for development with diozero
The search techniques for finding device libraries
The effort involved in porting those libraries to Java, if needed, and to use your chosen base I/O library, if needed
The effort when you can find no library
Now you are armed with some techniques and guidelines that allow you to deal with any situation. In Chapter 7, we’ll look in a bit more detail at the diozero base I/O API. After that, we’ll find or create some device libraries!