
13. Ajax-Enabled Rich Internet Applications
… the challenges are for the designers of these applications: to forget what we think we know about the limitations of the Web, and begin to imagine a wider, richer range of possibilities. It’s going to be fun.
—Jesse James Garrett
Dojo is the standard library JavaScript never had.
—Alex Russell
To know how to suggest is the great art of teaching. To attain it we must be able to guess what will interest …
—Henri-Fredreic Amiel
It is characteristic of the epistemological tradition to present us with partial scenarios and then to demand whole or categorical answers as it were.
—Avrum Stroll
O! call back yesterday, bid time return.
—William Shakespeare
13.1 Introduction
Despite the tremendous technological growth of the Internet over the past decade, the usability of web applications has lagged behind compared to that of desktop applications. Every significant interaction in a web application results in a waiting period while the application communicates over the Internet with a server. Rich Internet Applications (RIAs) are web applications that approximate the look, feel and usability of desktop applications. RIAs have two key attributes—performance and a rich GUI.
RIA performance comes from Ajax (Asynchronous JavaScript and XML), which uses client-side scripting to make web applications more responsive. Ajax applications separate client-side user interaction and server communication, and run them in parallel, reducing the delays of server-side processing normally experienced by the user.
There are many ways to implement Ajax functionality. “Raw” Ajax uses JavaScript to send asynchronous requests to the server, then updates the page using the DOM (see Section 13.5). “Raw” Ajax is best suited for creating small Ajax components that asynchronously update a section of the page. However, when writing “raw” Ajax you need to deal directly with cross-browser portability issues, making it impractical for developing large-scale applications. These portability issues are hidden by Ajax toolkits, such as Dojo (Section 13.8), Prototype, Script.aculo.us and ASP.NET Ajax, which provide powerful ready-to-use controls and functions that enrich web applications, and simplify JavaScript coding by making it cross-browser compatible.
Traditional web applications use XHTML forms (Chapter 2) to build simple and thin GUIs compared to the rich GUIs of Windows, Macintosh and desktop systems in general. We achieve rich GUI in RIAs with Ajax toolkits and with RIA environments such as Adobe Flex, Microsoft Silverlight and JavaServer Faces. Such toolkits and environments provide powerful ready-to-use controls and functions that enrich web applications.
Previous chapters discussed XHTML, CSS, JavaScript, dynamic HTML, the DOM and XML. This chapter uses these technologies to build Ajax-enabled web applications. The client-side of Ajax applications is written in XHTML and CSS, and uses JavaScript to add functionality to the user interface. XML is used to structure the data passed between the server and the client. We’ll also use JSON (JavaScript Object Notation) for this purpose. The Ajax component that manages interaction with the server is usually implemented with JavaScript’s XMLHttpRequest object—commonly abbreviated as XHR. The server processing can be implemented using any server-side technology, such as PHP, ASP. NET, JavaServer Faces ot Ruby on Rails.
This chapter begins with several examples that build basic Ajax applications using JavaScript and the XMLHttpRequest object. We then build an Ajax application with a rich calendar GUI using the Dojo Ajax toolkit.
13.2 Traditional Web Applications vs. Ajax Applications
In this section, we consider the key differences between traditional web applications and Ajax-based web applications.
Traditional Web Applications
Figure 13.1 presents the typical interactions between the client and the server in a traditional web application, such as one that uses a user registration form. First, the user fills in the form’s fields, then submits the form (Fig. 13.1, Step 1). The browser generates a request to the server, which receives the request and processes it (Step 2). The server generates and sends a response containing the exact page that the browser will render (Step 3), which causes the browser to load the new page (Step 4) and temporarily makes the browser window blank. Note that the client waits for the server to respond and reloads the entire page with the data from the response (Step 4). While such a synchronous request is being processed on the server, the user cannot interact with the client web page. Frequent long periods of waiting, due perhaps to Internet congestion, have led some users to refer to the World Wide Web as the “World Wide Wait.” If the user interacts with and submits another form, the process begins again (Steps 5–8).
Fig. 13.1 | Classic web application reloading the page for every user interaction.
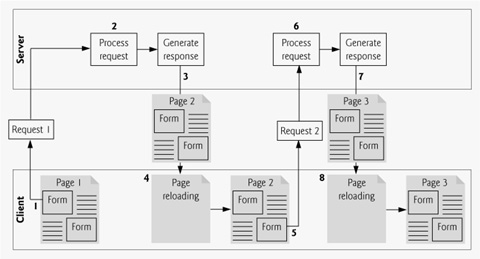
This model was originally designed for a web of hypertext documents—what some people call the “brochure web.” As the web evolved into a full-scale applications platform, the model shown in Fig. 13.1 yielded “choppy” application performance. Every full-page refresh required users to re-establish their understanding of the full-page contents. Users began to demand a model that would yield the responsive feel of desktop applications.
Ajax Web Applications
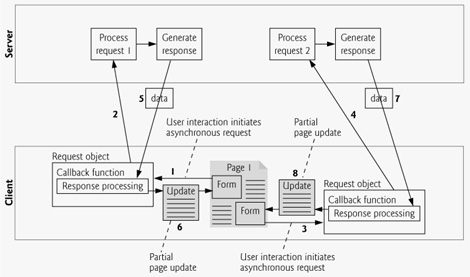
Ajax applications add a layer between the client and the server to manage communication between the two (Fig. 13.2). When the user interacts with the page, the client creates an XMLHttpRequest object to manage a request (Step 1). The XMLHttpRequest object sends the request to the server (Step 2) and awaits the response. The requests are asynchronous, so the user can continue interacting with the application on the client-side while the server processes the earlier request concurrently. Other user interactions could result in additional requests to the server (Steps 3 and 4). Once the server responds to the original request (Step 5), the XMLHttpRequest object that issued the request calls a client-side function to process the data returned by the server. This function—known as a callback function—uses partial page updates (Step 6) to display the data in the existing web page without reloading the entire page. At the same time, the server may be responding to the second request (Step 7) and the client-side may be starting to do another partial page update (Step 8). The callback function updates only a designated part of the page. Such partial page updates help make web applications more responsive, making them feel more like desktop applications. The web application does not load a new page while the user interacts with it.
Fig. 13.2 | Ajax-enabled web application interacting with the server asynchronously.
13.3 Rich Internet Applications (RIAs) with Ajax
Ajax improves the user experience by making interactive web applications more responsive. Consider a registration form with a number of fields (e.g., first name, last name e-mail address, telephone number, etc.) and a Register (or Submit) button that sends the entered data to the server. Usually each field has rules that the user’s entries have to follow (e.g., valid e-mail address, valid telephone number, etc.).
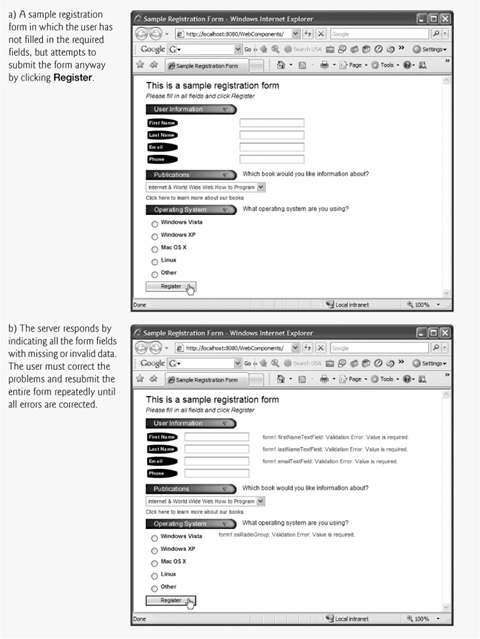
When the user clicks Register, a classic XHTML form sends the server all of the data to be validated (Fig. 13.3). While the server is validating the data, the user cannot interact with the page. The server finds invalid data, generates a new page identifying the errors in the form and sends it back to the client—which renders the page in the browser. Once the user fixes the errors and clicks the Register button, the cycle repeats until no errors are found, then the data is stored on the server. The entire page reloads every time the user submits invalid data.
Fig. 13.3 | Classic XHTML form: User submits entire form to server, which validates the data entered (if any). Server responds indicating fields with invalid or missing data.
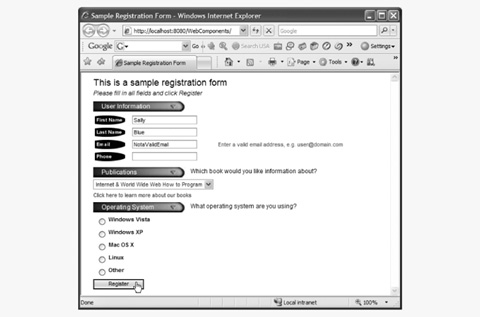
Ajax-enabled forms are more interactive. Rather than sending the entire form to be validated, entries are validated dynamically as the user enters data into the fields. For example, consider a website registration form that requires a unique e-mail address. When the user enters an e-mail address into the appropriate field, then moves to the next form field to continue entering data, an asynchronous request is sent to the server to validate the e-mail address. If the e-mail address is not unique, the server sends an error message that is displayed on the page informing the user of the problem (Fig. 13.4). By sending each entry asynchronously, the user can address each invalid entry quickly, versus making edits and resubmitting the entire form repeatedly until all entries are valid. Asynchronous requests could also be used to fill some fields based on previous fields (e.g., automatically filling in the “city” and “state” fields based on the zip code entered by the user).
Fig. 13.4 | Ajax-enabled form shows errors asynchronously when user moves to another field.
13.4 History of Ajax
The term Ajax was coined by Jesse James Garrett of Adaptive Path in February 2005, when he was presenting the previously unnamed technology to a client. The technologies of Ajax (XHTML, JavaScript, CSS, the DOM and XML) have all existed for many years.
Asynchronous page updates can be traced back to earlier browsers. In the 1990s, Netscape’s LiveScript made it possible to include scripts in web pages (e.g., web forms) that could run on the client. LiveScript evolved into JavaScript. In 1998, Microsoft introduced the XMLHttpRequest object to create and manage asynchronous requests and responses. Popular applications like Flickr and Google’s Gmail use the XMLHttpRequest object to update pages dynamically. For example, Flickr uses the technology for its text editing, tagging and organizational features; Gmail continuously checks the server for new e-mail; and Google Maps allows you to drag a map in any direction, downloading the new areas on the map without reloading the entire page.
The name Ajax immediately caught on and brought attention to its component technologies. Ajax has become one of the hottest web-development technologies, enabling webtop applications to challenge the dominance of established desktop applications.
13.5 “Raw” Ajax Example Using the XMLHttpRequest Object
In this section, we use the XMLHttpRequest object to create and manage asynchronous requests. The XMLHttpRequest object (which resides on the client) is the layer between the client and the server that manages asynchronous requests in Ajax applications. This object is supported on most browsers, though they may implement it differently—a common issue in JavaScript programming. To initiate an asynchronous request (shown in Fig. 13.5), you create an instance of the XMLHttpRequest object, then use its open method to set up the request and its send method to initiate the request. We summarize the XMLHttpRe-quest properties and methods in Figs. 13.6–13.7.
Fig. 13.5 | Asynchronously display content without reloading the page. (Part 1 of 3.)
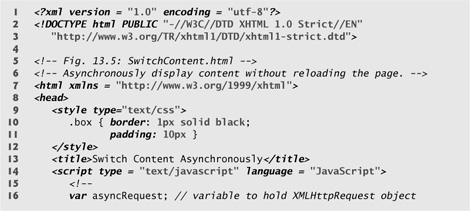
Fig. 13.5 | Asynchronously display content without reloading the page. (Part 2 of 3.)
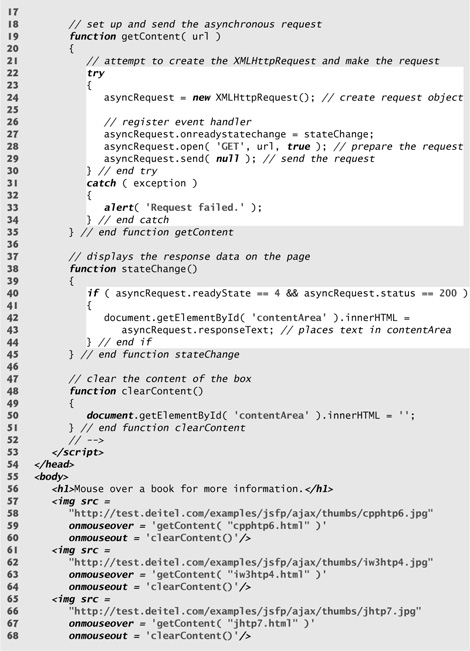
Fig. 13.5 | Asynchronously display content without reloading the page. (Part 3 of 3.)
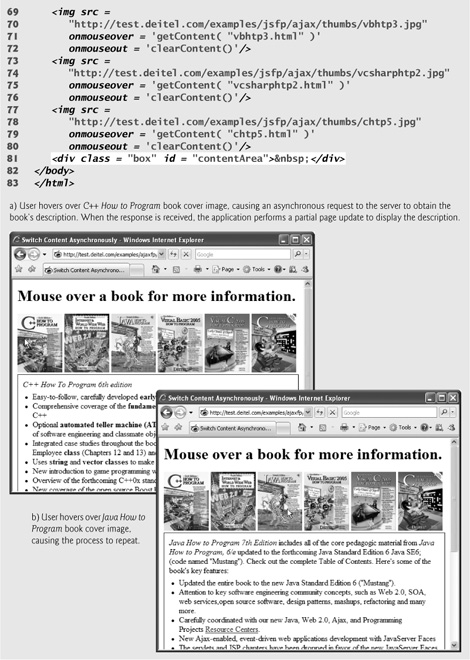
Fig. 13.6 | XMLHttpRequest object properties. (Part 1 of 2.)
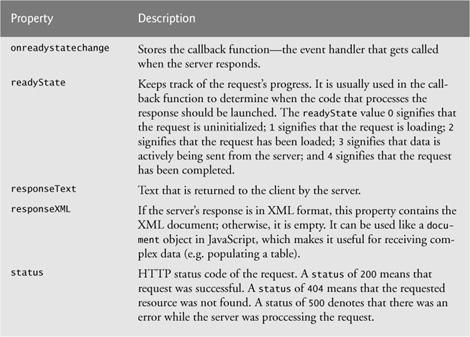
Fig. 13.6 | XMLHttpRequest object properties. (Part 2 of 2.)

Fig. 13.7 | XMLHttpRequest object methods.
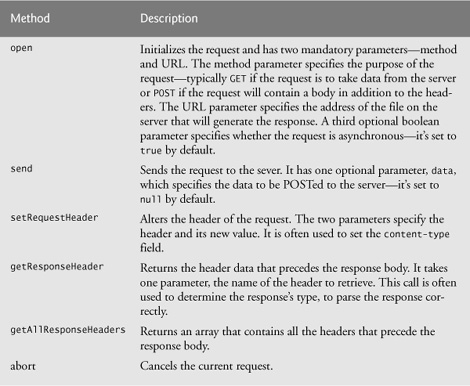
Figure 13.5 presents an Ajax application in which the user interacts with the page by moving the mouse over book-cover images. We use the onmouseover and onmouseout events (discussed in Chapter 11) to trigger events when the user moves the mouse over and out of an image, respectively. The onmouseover event calls function getContent with the URL of the document containing the book’s description. The function makes this request asynchronously using an XMLHttpRequest object. When the XMLHttpRequest object receives the response, the book description is displayed below the book images. When the user moves the mouse out of the image, the onmouseout event calls function clearContent to clear the display box. These tasks are accomplished without reloading the page on the client. You can test-drive this example at test.deitel.com/examples/jsfp/ajax/fig13_05/.
SwitchContent.html
![]()
Performance Tip 13.1
When an Ajax application requests a file from a server, such as an XHTML document or an image, the browser typically caches that file. Subsequent requests for the same file can load it from the browser’s cache rather than making the round trip to the server again.
![]()
Software Engineering Observation 13.1
For security purposes, the XMLHttpRequest object doesn’t allow a web application to request resources from domain names other than the one that served the application. For this reason, the web application and its resources must reside on the same web server (this could be a web server on your local computer). This is commonly known as the same origin policy (SOP). SOP aims to close a vulnerability called cross-site scripting, also known as XSS, which allows an attacker to compromise a website’s security by injecting a malicious script onto the page from another domain. To learn more about XSS visit en.wikipedia.org/wiki/XSS. To get content from another domain securely, you can implement a server-side proxy—an application on the web application’s web server—that can make requests to other servers on the web application’s behalf.
Asynchronous Requests
The function getContent (lines 19–35) sends the asynchronous request. Line 24 creates the XMLHttpRequest object, which manages the asynchronous request. We store the object in the global variable asyncRequest (declared at line 16) so that it can be accessed anywhere in the script.
Line 28 calls the XMLHttpRequest open method to prepare an asynchronous GET request. In this example, the url parameter specifies the address of an HTML document containing the description of a particular book. When the third argument is true, the request is asynchronous. The URL is passed to function getContent in response to the onmouseover event for each image. Line 29 sends the asynchronous request to the server by calling XMLHttpRequest send method. The argument null indicates that this request is not submitting data in the body of the request.
Exception Handling
Lines 22–34 introduce exception handling. An exception is an indication of a problem that occurs during a program’s execution. The name “exception” implies that the problem occurs infrequently—if the “rule” is that a statement normally executes correctly, then the “exception to the rule” is that a problem occurs. Exception handling enables you to create applications that can resolve (or handle) exceptions—in some cases allowing a program to continue executing as if no problem had been encountered.
Lines 22–30 contain a try block, which encloses the code that might cause an exception and the code that should not execute if an exception occurs (i.e., if an exception occurs in a statement of the try block, the remaining code in the try block is skipped). A try block consists of the keyword try followed by a block of code enclosed in curly braces ({}). If there is a problem sending the request—e.g., if a user tries to access the page using an older browser that does not support XMLHttpRequest—the try block terminates immediately and a catch block (also called a catch clause or exception handler) catches (i.e., receives) and handles an exception. The catch block (lines 31–34) begins with the keyword catch and is followed by a parameter in parentheses (called the exception parameter) and a block of code enclosed in curly braces. The exception parameter’s name (exception in this example) enables the catch block to interact with a caught exception object (for example, to obtain the name of the exception or an exception-specific error message via the exception object’s name and message properties). In this case, we simply display our own error message ‘Request Failed’ and terminate the getContent function. The request can fail because a user accesses the web page with an older browser or the content that is being requested is located on a different domain.
Callback Functions
The stateChange function (lines 38–45) is the callback function that is called when the client receives the response data. Line 27 registers function stateChange as the event handler for the XMLHttpRequest object’s onreadystatechange event. Whenever the request makes progress, the XMLHttpRequest calls the onreadystatechange event handler. This progress is monitored by the readyState property, which has a value from 0 to 4. The value 0 indicates that the request is not initialized and the value 4 indicates that the request is complete—all the values for this property are summarized in Fig. 13.6. If the request completes successfully (line 40), lines 42–43 use the XMLHttpRequest object’s responseText property to obtain the response data and place it in the div element named contentArea (defined at line 81). We use the DOM’s getElementById method to get this div element, and use the element’s innerHTML property to place the content in the div.
XMLHttpRequest Object Properties and Methods
Figures 13.6 and 13.7 summarize some of the XMLHttpRequest object’s properties and methods, respectively. The properties are crucial to interacting with asynchronous requests. The methods initialize, configure and send asynchronous requests.
13.6 Using XML and the DOM
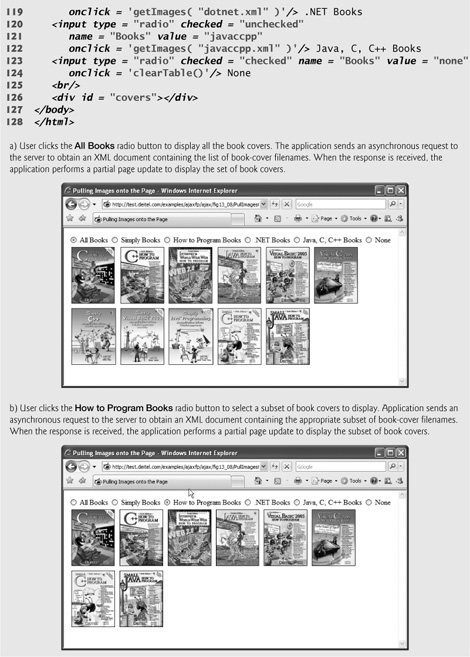
When passing structured data between the server and the client, Ajax applications often use XML because it is easy to generate and parse. When the XMLHttpRequest object receives XML data, it parses and stores the data as an XML DOM object in the responseXML property. The example in Fig. 13.8 asynchronously requests from a server XML documents containing URLs of book-cover images, then displays the images in an HTML table. The code that configures the asynchronous request is the same as in Fig. 13.5. You can test-drive this application at test.deitel.com/examples/jsfp/ajax/fig13_08/ (the book-cover images will be easier to see on the screen).
PullImagesOntoPage.html
Fig. 13.8 | Image catalog that uses Ajax to request XML data asynchronously. (Part 1 of 4.)
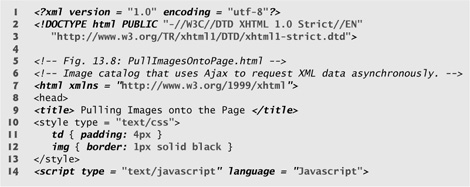
Fig. 13.8 | Image catalog that uses Ajax to request XML data asynchronously. (Part 2 of 4.)
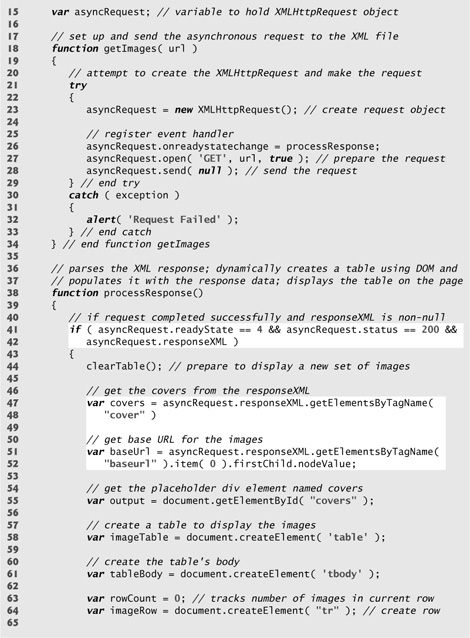
Fig. 13.8 | Image catalog that uses Ajax to request XML data asynchronously. (Part 3 of 4.)
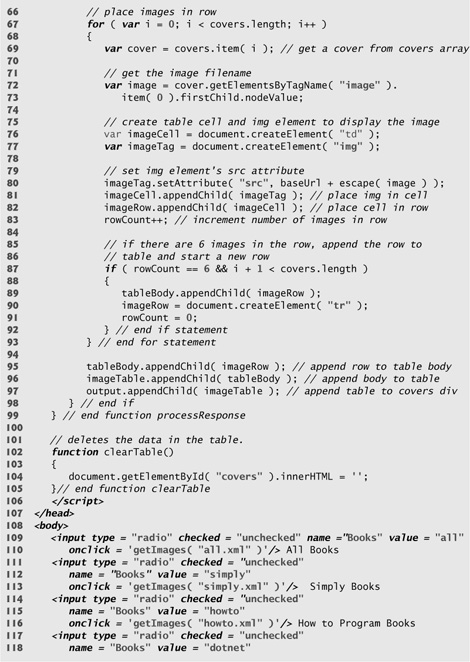
Fig. 13.8 | Image catalog that uses Ajax to request XML data asynchronously. (Part 4 of 4.)
When the XMLHttpRequest object receives the response, it invokes the callback function processResponse (lines 38–99). We use XMLHttpRequest object’s responseXML property to access the XML returned by the server. Lines 41–42 check that the request was successful, and that the responseXML property is not empty. The XML file that we requested includes a baseURL node that contains the address of the image directory and a collection of cover nodes that contain image filenames. responseXML is a document object, so we can extract data from it using the XML DOM functions. Lines 47–52 use the DOM’s method getElementsByTagName to extract all the image filenames from cover nodes and the URL of the directory from the baseURL node. Since the baseURL has no child nodes, we use item(0).firstChild.nodeValue to obtain the directory’s address and store it in variable baseURL. The image filenames are stored in the covers array.
As in Fig. 13.5 we have a placeholder div element (line 126) to specify where the image table will be displayed on the page. Line 55 stores the div in variable output, so we can fill it with content later in the program.
Lines 58–93 generate an XHTML table dynamically, using the createElement, set-Attribute and appendChild DOM methods. Method createElement creates an XHTML element of the specified type. Method setAttribute adds or changes an attribute of an XHTML element. Method appendChild inserts one XHTML element into another. Lines 58 and 61 create the table and tbody elements, respectively. We restrict each row to no more than six images, which we track with variable rowCount variable. Each iteration of the for statement (lines 67–93) obtains the filename of the image to be inserted (lines 69–73), creates a table cell element where the image will be inserted (line 76) and creates an <img> element (line 77). Line 80 sets the image’s src attribute to the image’s URL, which we build by concatenating the filename to the base URL of the XHTML document. Lines 81–82 insert the <img> element into the cell and the cell into the table row. When the row has six cells, it is inserted into the table and a new row is created (lines 87–92). Once all the rows have been inserted into the table, the table is inserted into the placeholder element covers that is referenced by variable output (line 97). This element is located on the bottom of the web page.
Function clearTable (lines 102–105) is called to clear images when the user switches radio buttons. The text is cleared by setting the innerHTML property of the placeholder element to the empty string.
13.7 Creating a Full-Scale Ajax-Enabled Application
Our next example demonstrates additional Ajax capabilities. The web application interacts with a web service to obtain data and to modify data in a server-side database. The web application and server communicate with a data format called JSON (JavaScript Object Notation). In addition, the application demonstrates server-side validation that occurs in parallel with the user interacting with the web application. You can test the application at test.deitel.com/examples/jsfp/ajax/fig13_09_10/.
AddressBook.html
Using JSON
JSON (JavaScript Object Notation)—a simple way to represent JavaScript objects as strings—is an alternative way (to XML) for passing data between the client and the server. Each object in JSON is represented as a list of property names and values contained in curly braces, in the following format:
{ "propertyName1" : value1, "propertyName2’": value2 }
Arrays are represented in JSON with square brackets in the following format:
[value1, value2, value3 ]
Each value can be a string, a number, a JSON representation of an object, true, false or null. You can convert JSON strings into JavaScript objects with JavaScript’s eval function. To evaluate a JSON string properly, a left parenthesis should be placed at the beginning of the string and a right parenthesis at the end of the string before the string is passed to the eval function.
The eval function creates a potential security risk—it executes any embedded JavaScript code in its string argument, possibly allowing a harmful script to be injected into JSON. A more secure way to process JSON is to use a JSON parser. In our examples, we use the open source parser from www.json.org/js.html. When you download its Java-Script file, place it in the same folder as your application. Then, link the json2.js file into your XHTML file with the following statement in the head section:
<script type = "text/javascript" src = "json2.js" >
You can now call function JSON.parse, which receives a JSON string and converts it to a JavaScript object.
JSON strings are easier to create and parse than XML, and require fewer bytes. For these reasons, JSON is commonly used to communicate in client/server interaction. For more information on JSON, visit our JSON Resource Center at www.deitel.com/json.
Rich Functionality
The previous examples in this chapter requested data from static files on the server. The example in Fig. 13.9 is an address-book application that communicates with a server-side application. The application uses server-side processing to give the page the functionality and usability of a desktop application. We use JSON to encode server-side responses and to create objects on the fly.
Fig. 13.9 | Ajax-enabled address-book application. (Part 1 of 10.)
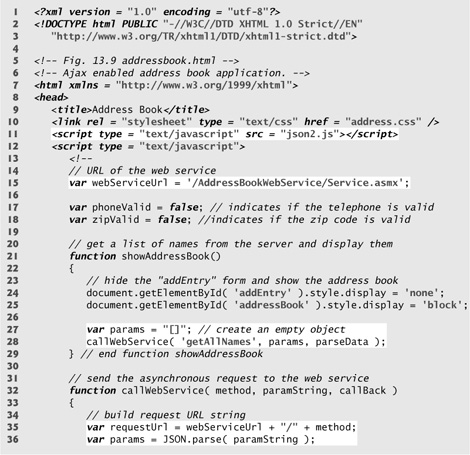
Fig. 13.9 | Ajax-enabled address-book application. (Part 2 of 10.)
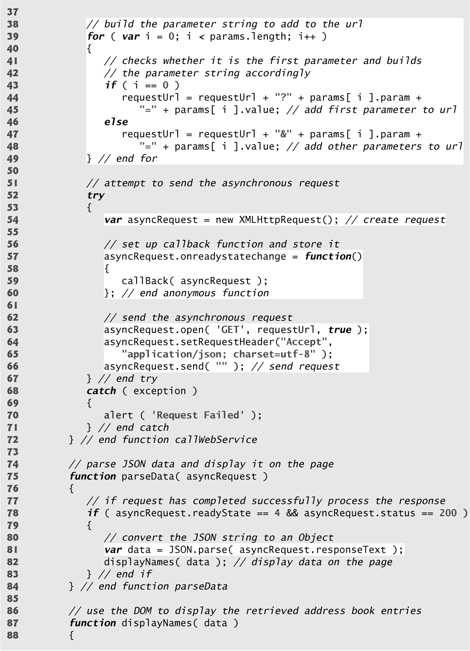
Fig. 13.9 | Ajax-enabled address-book application. (Part 3 of 10.)
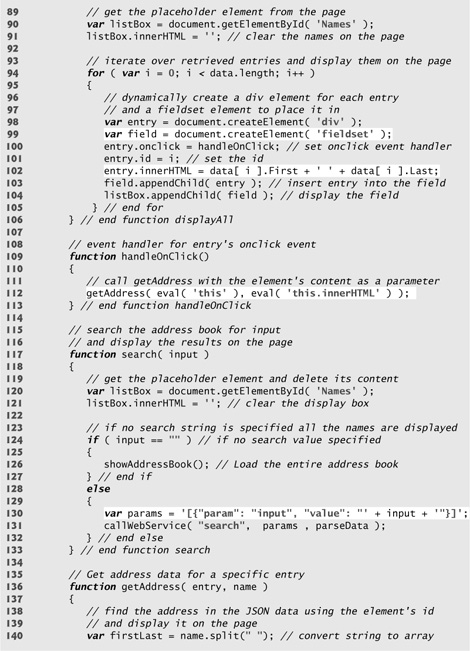
Fig. 13.9 | Ajax-enabled address-book application. (Part 4 of 10.)
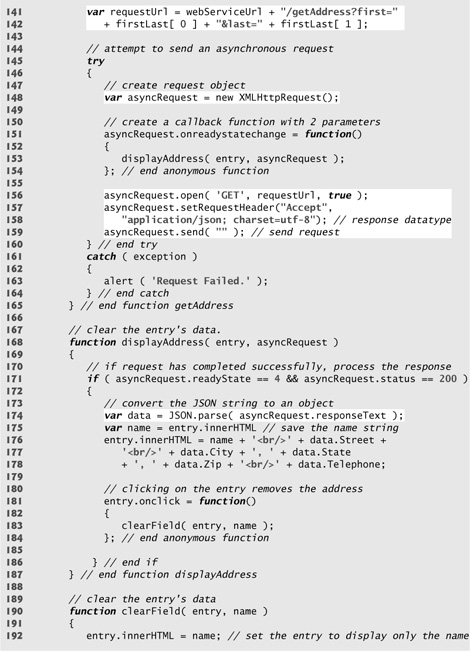
Fig. 13.9 | Ajax-enabled address-book application. (Part 5 of 10.)
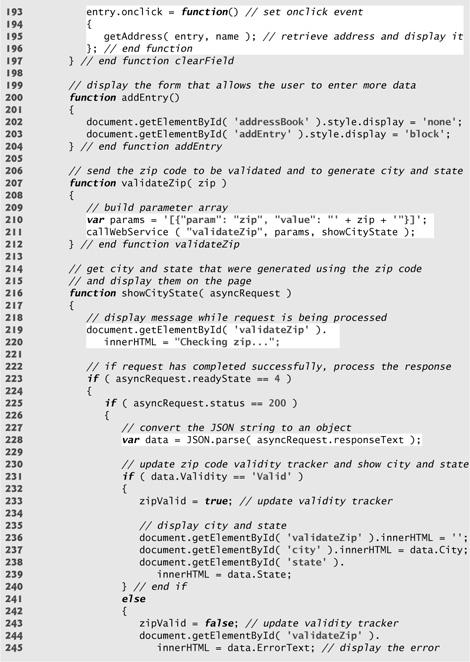
Fig. 13.9 | Ajax-enabled address-book application. (Part 6 of 10.)
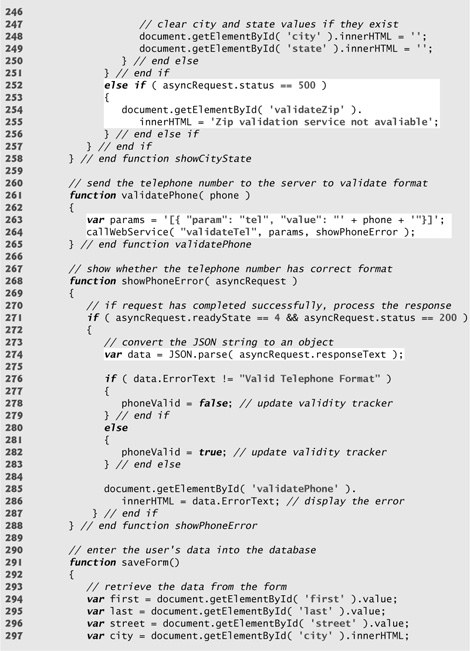
Fig. 13.9 | Ajax-enabled address-book application. (Part 7 of 10.)
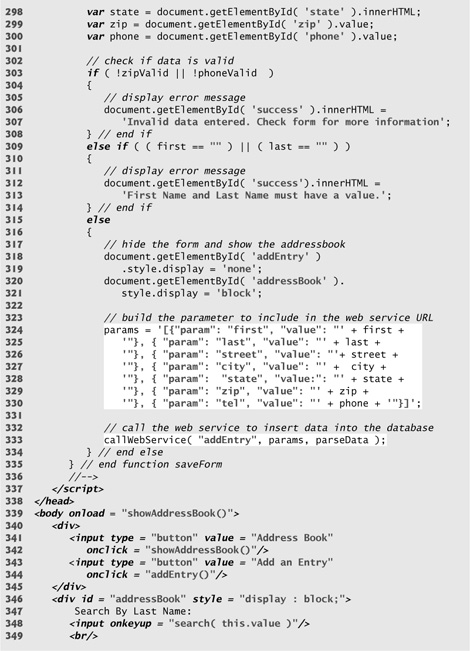
Fig. 13.9 | Ajax-enabled address-book application. (Part 8 of 10.)
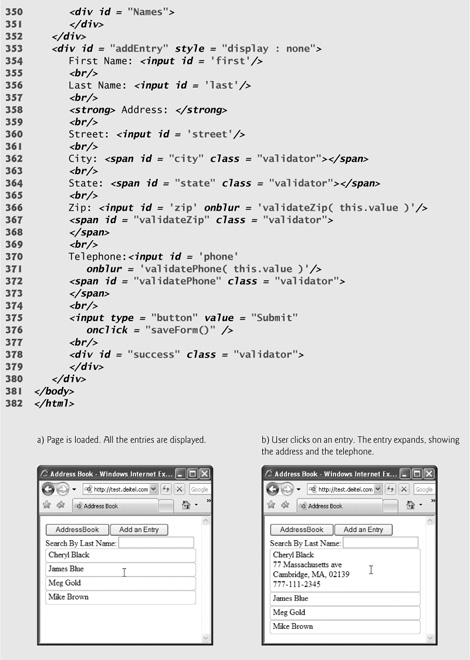
Fig. 13.9 | Ajax-enabled address-book application. (Part 9 of 10.)
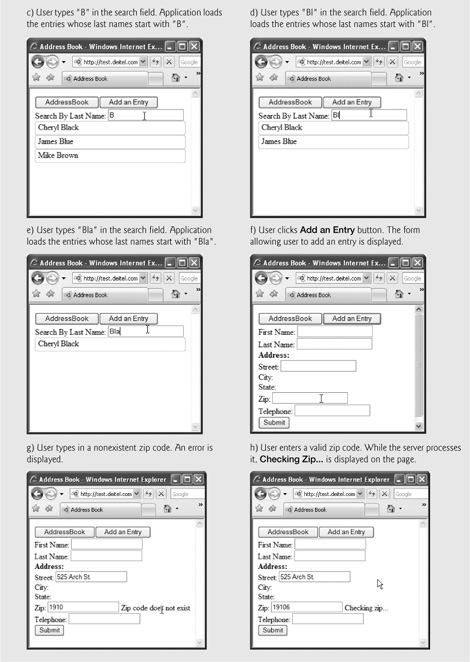
Fig. 13.9 | Ajax-enabled address-book application. (Part 10 of 10.)
Initially the address book loads a list of entries, each containing a first and last name (Fig. 13.9(a)). Each time the user clicks a name, the address book uses Ajax functionality to load the person’s address from the server and expand the entry without reloading the page (Fig. 13.9(b))—and it does this in parallel with allowing the user to click other names. The application allows the user to search the address book by typing a last name. As the user enters each keystroke, the application asynchronously displays the list of names in which the last name starts with the characters the user has entered so far (Fig. 13.9(c), Fig. 13.9(d) and Fig. 13.9(e))—a popular feature called type ahead.
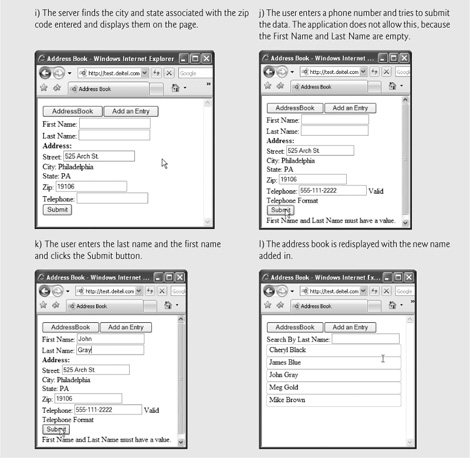
The application also enables the user to add another entry to the address book by clicking the addEntry button (Fig. 13.9(f)). The application displays a form that enables live field validation. As the user fills out the form, the zip-code value is validated and used to generate the city and state (Fig. 13.9(g), Fig. 13.9(h) and Fig. 13.9(i)). The telephone number is validated for correct format (Fig. 13.9(j)). When the Submit button is clicked, the application checks for invalid data and stores the values in a database on the server (Fig. 13.9(k) and Fig. 13.9(l)). You can test-drive this application at test.deitel.com/examples/jsfp/ajax/fig13_09_10/.
AddressBook.html
Interacting with a Web Service on the Server
When the page loads, the onload event (line 339) calls the showAddressBook function to load the address book onto the page. Function showAddressBook (lines 21–29) shows the addressBook element and hides the addEntry element using the HTML DOM (lines 24–25). Then it calls function callWebService to make an asynchronous request to the server (line 28). Function callWebService requires an array of parameter objects to be sent to the server. In this case, the function we are invoking on the server requires no arguments, so line 27 creates an empty array to be passed to callWebService. Our program uses an ASP.NET web service that we created for this example to do the server-side processing. This web service is hosted at test.deitel.com. The web service contains a collection of methods that can be called from a web application. Our web service also invokes another web service from www.webservicex.net that validates a zip code and returns the corresponding city and state.
![]()
Software Engineering Observation 13.2
Keep in mind that when building systems that depend on web services, you are depending on the servers that host those services to be available, and you are introducing more potential points of failure into your system.
Function callWebService (lines 32–72) contains the code to call our web service, given a method name, an array of parameter bindings (i.e., the method’s parameter names and argument values) and the name of a callback function. The web-service application and the method that is being called are specified in the request URL (line 35). When sending the request using the GET method, the parameters are concatenated URL starting with a ? symbol and followed by a list of parameter=value bindings, each separated by an &. Lines 39–49 iterate over the array of parameter bindings that was passed as an argument, and add them to the request URL. In this first call, we do not pass any parameters because the web method that returns all the entries requires none. However, future web method calls will send multiple parameter bindings to the web service. Lines 52–71 prepare and send the request, using similar functionality to the previous two examples. There are many types of user interaction in this application, each requiring a separate asynchronous request. For this reason, we pass the appropriate asyncRequest object as an argument to the function specified by the callBack parameter. However, event handlers cannot receive arguments, so lines 57–60 assign an anonymous function to asyncRequest’s onreadystatechange property. When this anonymous function gets called, it calls function call-Back and passes the asyncRequest object as an argument. Lines 64–65 set an Accept request header to receive JSON formatted data. Line 66 starts the asynchronous request.
Parsing JSON Data
Each of our web service’s methods in this example returns a JSON representation of an object or array of objects. For example, when the web application requests the list of names in the address book, the list is returned as a JSON array, as shown in Fig. 13.10. Each object in Fig. 13.10 has the attributes first and last.
Fig. 13.10 | Address-book data formatted in JSON.

Line 11 links the json2.js script to the XHTML file so we can parse JSON data. When the XMLHttpRequest object receives the response, it calls function parseData (lines 75–84). Line 81 calls the JSON.parse function, which converts its JSON string argument into a JavaScript object. Then line 82 calls function displayNames (lines 87–106), which displays the first and last name of each address-book entry passed to it. Lines 90–91 use the DOM to store the placeholder div element Names in the variable listbox, and clear its content. Once parsed, the JSON string of address-book entries becomes an array, which this function traverses (lines 94–105).
Creating XHTML Elements and Setting Event Handlers on the Fly
Line 99 uses an XHTML fieldset element to create a box in which the entry will be placed. Line 100 registers function handleOnClick as the onclick event handler for the div created in line 98. This enables the user to expand each address-book entry by clicking it. Function handleOnClick (lines 109–113) calls the getAddress function whenever the user clicks an entry. The parameters are generated dynamically and not evaluated until the getAddress function is called. This enables each function to receive arguments that are specific to the entry the user clicked. Line 102 displays the names on the page by accessing the first (first name) and last (last name) fields of each element of the data array.
Function getAddress (lines 136–166) is called when the user clicks an entry. This request must keep track of the entry where the address is to be displayed on the page. Lines 151–154 set the displayAddress function (lines 168–187) as the callback function, and pass it the entry element as a parameter. Once the request completes successfully, lines 174–178 parse the response and display the address. Lines 181–184 set the div’s onclick event handler to function clearField (lines 190–197) to hide the address data when that div is clicked again. Lines 192–196 reset the entry’s content and its onclick event handler to the values they had before the entry was expanded.
Implementing Type-Ahead
The input element declared in line 348 enables the user to search the address book by last name. As soon as the user starts typing in the input box, the onkeyup event handler calls the search function (lines 117–133), passing the input element’s value as an argument. The search function performs an asynchronous request to locate entries with last names that start with its argument value. When the response is received, the application displays the matching list of names. Each time the user changes the text in the input box, function search is called again to make another asynchronous request.
Function search (lines 117–133) first clears the address-book entries from the page (lines 120–121). If the input argument is the empty string, line 126 displays the entire address book by calling function showAddressBook. Otherwise, lines 130–131 send a request to the server to search the data. Line 130 creates a JSON string to represent the parameter object that is passed to function callWebService. Line 131 converts the string to an object and invokes callWebService. When the server responds, callback function parseData is invoked, which calls displayNames to display the results on the page.
Implementing a Form with Asynchronous Validation
When the Add an Entry button (lines 343–344) is clicked, the addEntry function (lines 200–204) is called, which hides the addressBook element and shows the addEntry element that allows the user to add a person to the address book. The addEntry element (lines 353–380) contains a set of entry fields, some of which have event handlers that enable validation that occurs asynchronously as the user continues to interact with the page. When a user enters a zip code, the validateZip function (lines 207–212) is called. This function calls an external web service to validate the zip code. If it is valid, that external web service returns the corresponding city and state. Line 210 builds a parameter object containing validateZip’s parameter name and argument value in JSON format. Line 211 calls the callWebService function with the appropriate method, the parameter object created in line 210 and showCityState (lines 216–258) as the callback function.
Zip-code validation can take a long time due to network delays. The showCityState function is called every time the request object’s readyState property changes. Until the request completes, lines 219–220 display "Checking zip code..." on the page. After the request completes, line 228 converts the JSON response text to an object. The response object has four properties—Validity, ErrorText, City and State. If the request is valid, line 233 updates the zipValid variable that keeps track of zip-code validity (declared at line 18), and lines 237–239 show the city and state that the server generated using the zip code. Otherwise lines 243–245 update the zipValid variable and show the error code. Lines 248–249 clear the city and state elements. If our web service fails to connect to the zip-code validator web service, lines 252–256 display an appropriate error message.
Similarly, when the user enters the telephone number, the function validatePhone (lines 261–265) sends the phone number to the server. Once the server responds, the showPhoneError function (lines 268–288) updates the validatePhone variable (declared at line 17) and shows the message that the web service returned.
When the Submit button is clicked, function saveForm is called (lines 291–335). Lines 294–300 retrieve the data from the form. Lines 303–308 check if the zip code and telephone number are valid, and display the appropriate error message in the Success element on the bottom of the page. Before the data can be entered into a database on the server, both the first-name and last-name fields must have a value. Lines 309–314 check these fields. If they are empty, an appropriate error message is displayed. Once all the data entered is valid, lines 318–321 hide the entry form and show the address book. Lines 324– 333 build the parameter object using JSON and send the data to the server using function callWebService. Once the server saves the data, it queries the database for an updated list of entries and returns them; then function parseData displays the entries on the page.
13.8 Dojo Toolkit
Developing web applications in general, and Ajax applications in particular, involves a certain amount of painstaking and tedious work. Cross-browser compatibility, DOM manipulation and event handling can get cumbersome, particularly as an application’s size increases. Dojo is a free, open source JavaScript library that takes care of these issues. Dojo reduces asynchronous request handling to a single function call. Dojo also provides cross-browser DOM functions that simplify partial page updates. It covers many more areas of web development, from simple event handling to fully functional rich GUI controls.
To install Dojo, download the Dojo version 0.4.3 from download.dojotoolkit.org/release-0.4.3/ to your hard drive. Extract the files from the archive file you downloaded to your web development directory or web server. Including the dojo.js script file in your web application will give you access to all the Dojo functions. To do this, place the following script in the head element of your XHTML document:
<script type = "text/javascript" src = " path /Dojo.js">
where path is the relative or complete path to the Dojo toolkit’s files. The documentation for this version of Dojo is located at
dojotoolkit.org/book/dojo-book-0-4
[Note: More recent versions of Dojo are available from dojotoolkit.org; however, the example in this section will work only with version 0.4.3.]
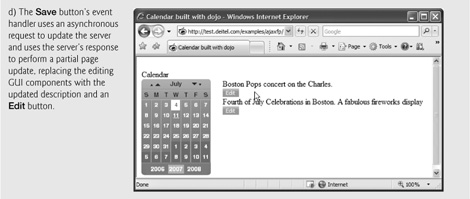
Figure 13.11 is a calendar application that uses Dojo to create the user interface, communicate with the server asynchronously, handle events and manipulate the DOM. The calendar control (see the screen captures in Fig. 13.11) displays six weeks of dates. Various arrow buttons allow the user to traverse the calendar. When the user selects a date, an asynchronous request obtains that date’s scheduled events. There is an Edit button next to each scheduled event. When it is clicked, the item is replaced by a text box with the item’s content, a Save button and a Cancel button. When the user presses Save, an asynchronous request saves the new value to the server and displays it on the page. This feature, often referred to as edit-in-place, is common in Ajax applications. You can test-drive this application at test.deitel.com/examples/jsfp/ajax/fig13_11/calendar.html.
Fig. 13.11 | Calendar application built with Dojo. (Part 1 of 7.)
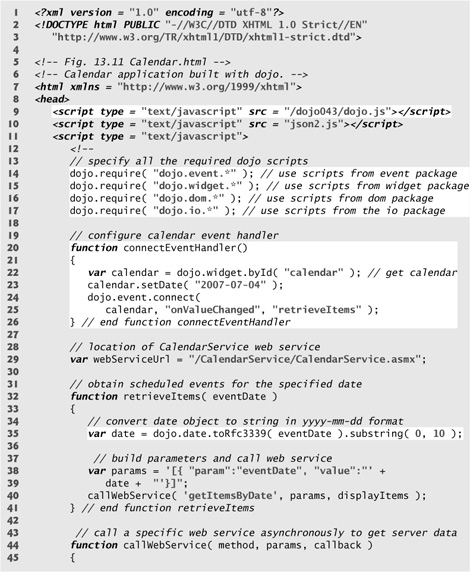
Fig. 13.11 | Calendar application built with Dojo. (Part 2 of 7.)
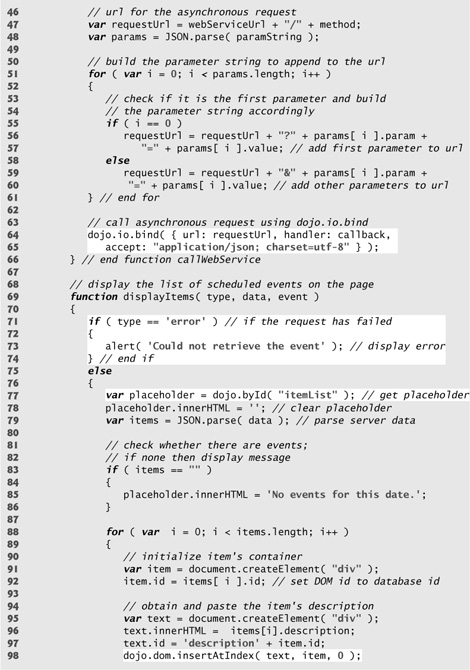
Fig. 13.11 | Calendar application built with Dojo. (Part 3 of 7.)
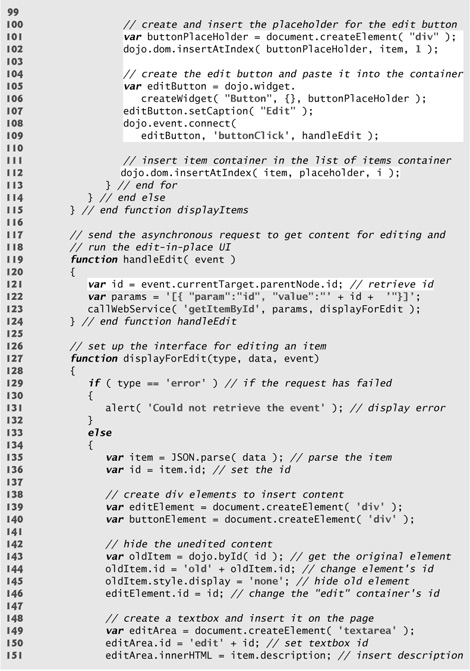
Fig. 13.11 | Calendar application built with Dojo. (Part 4 of 7.)
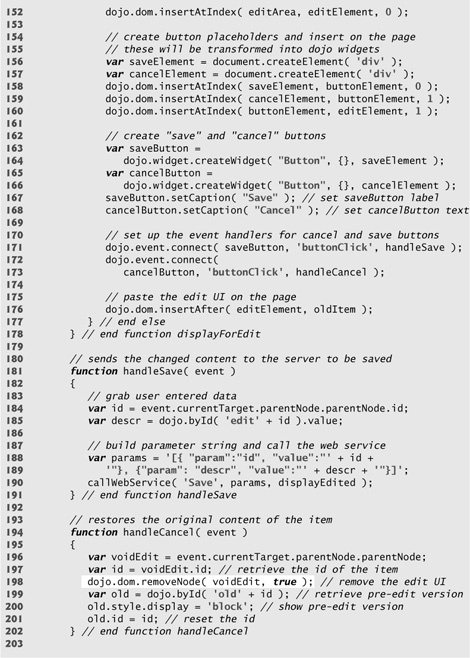
Fig. 13.11 | Calendar application built with Dojo. (Part 5 of 7.)
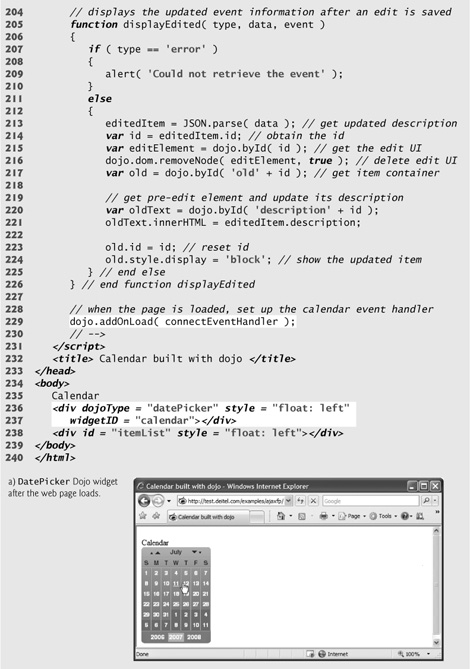
Fig. 13.11 | Calendar application built with Dojo. (Part 6 of 7.)
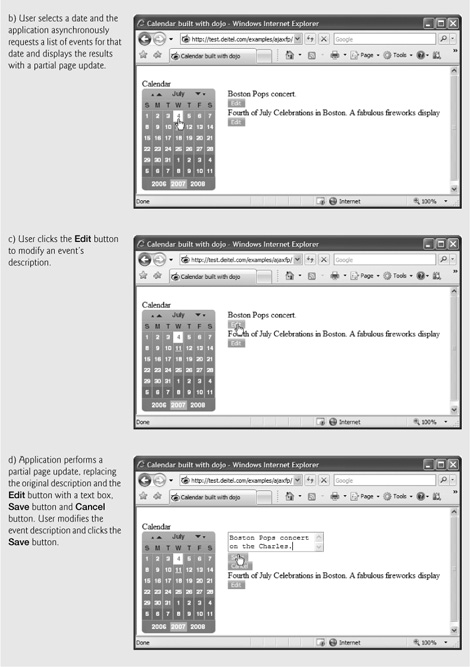
Fig. 13.11 | Calendar application built with Dojo. (Part 7 of 7.)
Loading Dojo Packages
Lines 9–17 load the Dojo framework. Line 9 links the dojo.js script file to the page, giving the script access to all the functions in the Dojo toolkit. Dojo is organized in packages of related functionality. Lines 14–17 use the dojo.require call, provided by the dojo.js script to include the packages we need. The dojo.io package functions communicate with the server, the dojo.event package simplifies event handling, the dojo.widget package provides rich GUI controls, and the dojo.dom package contains additional DOM functions that are portable across many different browsers.
The application cannot use any of this functionality until all the packages have been loaded. Line 229 uses the dojo.addOnLoad method to set up the event handling after the page loads. Once all the packages have been loaded, the connectEventHandler function (lines 20–26) is called.
Using an Existing Dojo Widget
A Dojo widget is any predefined user interface element that is part of the Dojo toolkit. The calendar control on the page is the DatePicker widget. To incorporate an existing Dojo widget onto a page, you must set the DojoType attribute of any HTML element to the type of widget that you want it to be (line 236). Dojo widgets also have their own widgetID property (line 237). Line 22 uses the dojo.widget.byId method, rather than the DOM’s document.getElementById method, to obtain the calendar widget element. The dojo.events.connect method links functions together. Lines 24–25 use it to connect the calendar’s onValueChanged event handler to the retrieveItems function. When the user picks a date, a special onValueChanged event that is part of the DatePicker widget calls retrieveItems, passing the selected date as an argument. The retrieveItems function (lines 32–41) builds the parameters for the request to the server, and calls the callWeb-Service function. Line 35 uses the dojo.date.toRfc3339 method to convert the date passed by the calendar control to yyyy-mm-dd format.
Asynchronous Requests in Dojo
The callWebService function (lines 44–66) sends the asynchronous request to the specified web-service method. Lines 47–61 build the request URL using the same code as Fig. 13.9. Dojo reduces the asynchronous request to a single call to the dojo.io.bind method (lines 64–65), which works on all the popular browsers such as Firefox, Internet Explorer, Opera, Mozilla and Safari. The method takes an array of parameters, formatted as a JavaScript object. The url parameter specifies the destination of the request, the handler parameter specifies the callback function, and the mimetype parameter specifies the format of the response. The handler parameter can be replaced by the load and error parameters. The function passed as load handles successful requests and the function passed as error handles unsuccessful requests.
Response handling is done differently in Dojo. Rather than calling the callback function every time the request’s readyState property changes, Dojo calls the function passed as the “handler” parameter when the request completes. In addition, in Dojo the script does not have access to the request object. All the response data is sent directly to the call-back function The function sent as the handler argument must have three parameters—type, data and event.
In the first request, the function displayItems (lines 69–115) is set as the callback function. Lines 71–74 check if the request is successful, and display an error message if it isn’t. Lines 77–78 obtain the place-holder element (itemList), where the items will be displayed, and clear its content. Line 79 converts the JSON response text to a JavaScript object, using the same code as the example in Fig. 13.9.
Partial Page Updates Using Dojo’s Cross-Browser DOM Manipulation Capabilities
The Dojo toolkit (like most other Ajax libraries) provides functionality that enables you to manipulate the DOM in a cross-browser portable manner. Lines 83–86 check if the server-side returned any items, and display an appropriate message if it didn’t. For each item object returned from the server, lines 91–92 create a div element and set its id to the item’s id in the database. Lines 95–97 create a container element for the item’s description. Line 98 uses Dojo’s dojo.dom.insertAtIndex method to insert the description element as the first element in the item’s element.
For each entry, the application creates an Edit button that enables the user to edit the event’s content on the page. Lines 101–109 create a Dojo Button widget programmatically. Lines 101–102 create a buttonPlaceHolder div element for the button and paste it on the page. Lines 105–106 convert the buttonPlaceHolder element to a Dojo Button widget by calling the dojo.widget.createWidget function. This function takes three parameters—the type of widget to be created, a list of additional widget parameters and the element which is to be converted to a Dojo widget. Line 107 uses the button’s set-Caption method to set the text that appears on the button. Line 112 uses the insertAt-Index method to insert the items into the itemList placeholder, in the order in which they were returned from the server.
Adding Edit-In-Place Functionality
Dojo Button widgets use their own buttonClick event instead of the DOM onclick event to store the event handler. Lines 108–109 use the dojo.event.connect method to connect the buttonClick event of the Dojo Button widget and the handleEdit event handler (lines 119–124). When the user clicks the Edit button, the Event object gets passed to the event handler as an argument. The Event object’s currentTarget property contains the element that initiated the event. Line 121 uses the currentTarget property to obtain the id of the item. This id is the same as the item’s id in the server database. Line 123 calls the web service’s getItemById method, using the callWebService function to obtain the item that needs to be edited.
Once the server responds, function displayForEdit (lines 127–178) replaces the item on the screen with the user interface for editing the item’s content. The code for this is similar to the code in the displayItems function. Lines 129–132 make sure the request was successful and parse the data from the server. Lines 139–140 create the container elements into which we insert the new user-interface elements. Lines 143–146 hide the element that displays the item and change its id. Now the id of the user-interface element is the same as the id of the item that it’s editing stored in the database. Lines 149–152 create the text-box element that will be used to edit the item’s description, paste it into the text box, and paste the resulting text box on the page. Lines 156–173 use the same syntax that was used to create the Edit button widget to create Save and Cancel button widgets. Line 176 pastes the resulting element, containing the text box and two buttons, on the page.
When the user edits the content and clicks the Cancel button, the handleCancel function (lines 194–202) restores the item element to what it looked like before the button was clicked. Line 198 deletes the edit UI that was created earlier, using Dojo’s removeNode function. Lines 200–201 show the item with the original element that was used to display the item, and change its id back to the item’s id on the server database.
When the user clicks the Save button, the handleSave function (lines 181–191) sends the text entered by the user to the server. Line 185 obtains the text that the user entered in the text box. Lines 188–190 send to the server the id of the item that needs to be updated and the new description.
Once the server responds, displayEdited (lines 205–226) displays the new item on the page. Lines 214–217 contain the same code that was used in handleCancel to remove the user interface used to edit the item and redisplay the element that contains the item. Line 221 changes the item’s description to its new value.
13.9 Web Resources
www.deitel.com/ajax
Our Ajax Resource Center contains links to some of the best Ajax resources on the web from which you can learn more about Ajax and its component technologies. Find categorized links to Ajax tutorials, tools, code, forums, books, libraries, frameworks, conferences, podcasts and more. See our comprehensive list of developer toolkits and libraries. Visit the most popular Ajax community web-sites and blogs. Explore many popular commercial and free open-source Ajax applications. Download code snippets and complete scripts that you can use on your own website. Also, be sure to visit our Resource Centers with information on Ajax’s component technologies, including XHTML (www.deitel.com/xhtml/), CSS 2.1 (www.deitel.com/css21/), XML (www.deitel.com/XML/) and JavaScript (www.deitel.com/javascript/). For a complete Resource Center list, visit
www.deitel.com/ResourceCenters.html