20 Time
In this chapter, you will learn how to work with time to schedule Web Audio API sound playback points, how to create loops, and how to automate parameter changes.
 The Timing Clock
When you invoke a new instance of the audio context, the Web Audio API’s internal timing clock begins to tick. This timing reference is in seconds and is expressed as a decimal number. The timing clock is tied to your computer’s internal audio hardware subsystem, giving it a degree of precision that can align with sounds at the sample level. If you want to see the current value of the audio clock, you can use the currentTime property of the audio context.
console.log(audioContext.currentTime);
When you play an audio event, the Web Audio API requires you to schedule it. Remember that the unit you use for time value scheduling is seconds. If you want to schedule an event immediately, you can use the currentTime property of the audio context.
You have already had some exposure to scheduling the playback of sounds in previous chapters, such as in the following example code:
sound.start(audioContext.currentTime); // Play immediately
sound.start(audioContext.currentTime + 2); /*Play audio buffer two
seconds into the future*/
The start Method
The start method is used to begin a sound playing. The start method takes three arguments. The first argument schedules when the sound plays, either immediately or in the future. The second argument sets a start point that determines where to begin playback from in the audio buffer. The third argument sets when a sound ceases to play. For a real-world example, imagine you were playing back a 4/4 drum loop and 0.5 seconds into the loop the drummer hit the snare drum. If you want to start playback from this point, you set the second argument of start() to 0.5.
sound.start(audioContext.currentTime,0.5);
The third argument sets how much of the sound will play. If you have a sound that is 4 seconds long and you only want to hear the first 2 seconds, then you set the third argument to 2.
sound.start(audioContext.currentTime,0, 2);
Looping Sounds
To loop sounds, you set the loop property of an audio buffer source node to true. To set the start point of a loop, you use the property loopStart. To set the end point of a loop, you use the property loopEnd.
sound.loop = true;
sound.loopStart = 1; /*Set loop point at one second after
beginning of playback*/
sound.loopEnd = 2; /*Set loop end point at two seconds after
beginning of playback*/
Sometimes when trying to discern playback and loop points, it is useful to know the length of an audio file. You can get this information using a property of the sound buffer named duration.
var sound = audioContext.createBufferSource();
sound.buffer = buffer;
sound.buffer.duration; // length in seconds of audio file
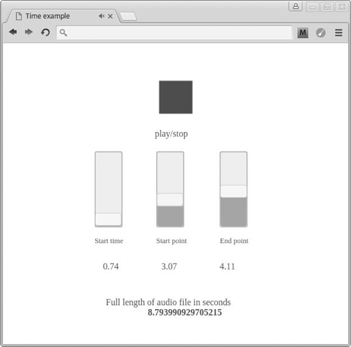
Included in the code examples for this chapter is an application that allows you to modify the playback and loop points of an audio file in real time using interactive sliders.
Update Your Audio Loader Library
The play() method of your audio loader library is not designed to access the second and third arguments of the start method. You can make these arguments available with the following modifications to your code:
soundObj.play = function(time, setStart, setDuration) {
playSound = audioContext.createBufferSource();
playSound.buffer = soundObj.soundToPlay;
playSound.connect(audioContext.destination);
playSound.start(audioContext.currentTime + time || audioContext.
currentTime, setStart || 0, setDuration || soundObj.soundToPlay.
duration);
};
The start and end point settings are now available.
sounds.snare.play(0, 1, 3);
Changing Audio Parameters over Time
Up to this point you have changed audio parameters by directly setting the value property to a number.
var osc = audioContext.createOscillator();
osc.frequency.value = 300;
The Web Audio API comes with a collection of methods that allow you to schedule audio parameter values immediately or at some point in the future. The following code shows a list of these methods.
setValueAtTime(arg1,arg2)
exponentialRampToValueAtTime(arg1,arg2)
linearRampToValueAtTime(arg1,arg2)
setTargetAtTime(arg1,arg2,arg3)
setValueCurveAtTime(arg1,arg2,arg3)
You can use these methods in place of setting the value property of an audio parameter.
osc.frequency.value = 100; // Set value directly
osc.frequency.setValueAtTime(arg1,arg2); /*Set value with audio
parameter method*/
The Audio Parameter Methods
The setValueAtTime Method
The setValueAtTime method allows you to create an abrupt change of an audio parameter at a future period in time. The first argument is the value the parameter will be changed to, and the second argument is the time that it will take to change to that value. In the following example, 5 seconds after the code is run, a gain node parameter value is abruptly changed from 1 to 0.1.
var osc = audioContext.createOscillator();
var volume = audioContext.createGain();
osc.connect(volume);
volume.gain.value = 1;
volume.gain.setValueAtTime(0.1,audioContext.currentTime + 5);
osc.start(audioContext.currentTime);
volume.connect(audioContext.destination);
To use any of the other audio parameter methods that are described next, you must first initialize their settings using setValueAtTime(). This is shown in the code examples for each method.
The exponentialRampToValueAtTime Method
The exponentialRampToValueAtTime() method allows you to create a gradual change of the parameter value. Unlike the abrupt change of setValue AtTime(), this method follows an exponential curve. The following code demonstrates this by changing an oscillator’s frequency from 200 Hz to 3 kHz over the course of 3 seconds.
var osc = audioContext.createOscillator();
var volume = audioContext.createGain();
osc.frequency.value = 200;
osc.frequency.setValueAtTime(osc.frequency.value, audioContext.
currentTime); //____Set initial values!
osc.frequency.exponentialRampToValueAtTime(3000, audioContext.
currentTime + 3);
osc.start(audioContext.currentTime);
osc.connect(audioContext.destination);
The linearRampToValueAtTime Method
The linearRampToValueAtTime method is similar to exponentialRampToValueAtTime() but follows a gradual linear curve instead of an exponential curve.
var osc = audioContext.createOscillator();
var volume = audioContext.createGain();
osc.frequency.value = 200;
osc.frequency.setValueAtTime(osc.frequency.value, audioContext.
currentTime); // Set initial values
osc.frequency.linearRampToValueAtTime(3000, audioContext.
currentTime + 3);
osc.start(audioContext.currentTime);
osc.connect(audioContext.destination);
The setTargetAtTime() Method
The setTargetAtTime() method takes three arguments. The first argument is the final value of the audio parameter, the second argument is the time the change will begin, and the third argument is a time constant that determines how long the change will take to complete. The larger the number of the third argument, the longer the change takes to complete.
var osc = audioContext.createOscillator();
var volume = audioContext.createGain();
osc.frequency.value = 200;
osc.frequency.setValueAtTime(osc.frequency.value, audioContext.
currentTime); // Set initial values
osc.frequency.setTargetAtTime(3000, audioContext.currentTime,2);
osc.start(audioContext.currentTime);
osc.connect(audioContext.destination);
The setValueCurveAtTime() Method
The setValueCurveAtTime() method allows you to create a custom curve based on a collection of audio parameter values stored in an array. This method takes three arguments. The first argument is an array of values. The array used is a special kind of array called a float32Array(), which is a typed array. Typed arrays are better performing than conventional arrays and allow some Web Audio APIs to work directly with binary data. The syntax for a float32Array() requires you to explicitly set the number of index values and looks like the following code:
var waveArray = new Float32Array(10); //__Set number of index values
waveArray[0] = 20;
waveArray[1] = 200;
waveArray[2] = 20;
waveArray[3] = 200;
waveArray[4] = 20;
waveArray[5] = 200;
waveArray[6] = 20;
waveArray[7] = 200;
waveArray[8] = 20;
waveArray[9] = 200;
The second argument represents when you want the changes to begin, and the third argument is the time span you want the changes to take place within. The following code demonstrates this by toggling the frequency of an oscillator from 100 to 500 Hz and back again over the course of 3 seconds. This creates a wobble effect.
var waveArray = new Float32Array(10);
waveArray[0] = 100;
waveArray[1] = 500;
waveArray[2] = 100;
waveArray[3] = 500;
waveArray[4] = 100;
waveArray[5] = 500;
waveArray[6] = 100;
waveArray[7] = 500;
waveArray[8] = 100;
waveArray[9] = 500;
var osc = audioContext.createOscillator();
var volume = audioContext.createGain();
osc.frequency.value = 500;
osc.frequency.setValueAtTime(osc.frequency.value, audioContext.
currentTime); // Set initial values
osc.frequency.setValueCurveAtTime(waveArray, audioContext.
currentTime + 1, 3);
osc.start(audioContext.currentTime);
osc.connect(audioContext.destination);
Summary
In this chapter, you learned the fundamentals of working with time. You learned how to loop and schedule sound playback, as well as how to schedule parameter value changes. In the next chapter, you will learn how to create audio visualizations using the Analyser node.