Chapter 10: Using Project Automation
To draw on a food analogy, so far you have had your appetizer, salad, and main course over the first nine chapters of this book. And now, I consider project automation to be our dessert!
Automation can bring incredible power to your Jira Work Management (JWM) project and the work associated with it.
Maybe you want to automate routine and/or repetitive tasks. Maybe you want to auto-assign work to dedicated users, or even create a round-robin schedule for your team assignments. Maybe you want the system to keep subtasks synchronized with their parent. Or maybe you even want to use a formula to calculate a new value based on the sum of multiple fields.
Regardless of what excites you most about automation, you can eat your fill of a variety of automated goodness. All with the simplicity of a tool that is mostly point-and-click, with no coding needed!
In this chapter, you will learn about the concept of automation, including what it is and how it can be used. You will also learn how to create simple automation rules to become immediately productive. As well as creating these rules, you will also learn how to access existing automation templates that will give you an even more powerful start.
Finally, you will learn about some common automation use cases, such as synchronizing parent and children issues, auto-assigning work, scheduling rules, and sending emails.
In this chapter, we are going to cover the following main topics:
- What is automation?
- Creating automation rules
- Using automation templates
- Common automation use cases
Technical requirements
As JWM is only available in the Jira Cloud environment, the technical requirements for this chapter are simple:
- Access to the Jira Cloud environment
If you already have access to Jira Cloud, that's great – you are ready to go! If not, Atlassian provides a free JWM account for up to 10 users. You can create your account by following the instructions at https://www.atlassian.com/try/cloud/signup?bundle=jira-core&edition=free.
Now, let's get started.
What is automation?
Automation is a tool provided with all Jira Cloud instances as part of any type of subscription you have. It can extend your JWM work by simplifying the manual processes that you need to perform.
Automation works by creating point and click rules which contain triggers, conditions and actions. These rules can be very powerful in the amount of time it saves you by reducing extra manual edits and calculations.
However, we also need to mention a few limitations related to the rules. There are unlimited rule executions for single project rules – meaning the rule runs against a single project. However, there are limits or levels of executions for global or multi-project rules available in relation to your subscription type, which we will discuss later in the chapter.
Automation allows project administrators and Jira administrators to save time by setting up rules that fire based on various system events. Some examples of system events include the following:
- Issues transitioning from one status to another
- The updating of a field in an issue
- The creation of a new issue
- A scheduled trigger that runs at a pre-determined time or is manually executed by a user
Rules can have conditions applied that narrow their focus. These conditions can include branching for sub-groups of issues or specifying the actions that a rule can execute provides extra flexibility for conditions.
An entire book could be written about project automation in Jira, but for this chapter, we will only touch on some of the main points of the tool to get you started.
Automation rules have a standard set of components or parts which make up the steps of the rule. Next, we briefly describe each part. Later, in the Creating automation rules section, we will see how to create a rule using each component:
- Triggers: Triggers are the first step in your rule. They act as event listeners for the rule and will fire based on a variety of events, such as an issue being created or transitioned, the value of a field changing, or many others.
- Conditions: You can add an optional condition so that once the initial trigger fires, you can have additional checks that determine if the rule should continue to run. If the condition fails, the rule stops. These checks can be based on simple criteria such as the value of a field or date ranges. Or, you can include more complex conditions, such as advanced compares, Jira Query Language (JQL) queries, and more.
- Actions: Finally, actions result in some kind of change to your project based on the rule, such as a field value change, automatically transitioning an issue, calculating number values, assigning issues to a user, or sending an email or other notification.
Next, we will discuss how to set up automation, and you will be able to create your first rule.
Creating automation rules
There are a couple of ways to navigate to the list of rules for automation. As a Jira administrator, you have access to all rules within your Jira instance through the system settings screen. Start by clicking the gear icon in the upper right-hand corner of the top navigation bar and selecting System, as shown in Figure 10.1:

Figure 10.1 – System settings
Then scroll to the bottom of page and click Automation rules on the left. Clicking this will take you to the Automation window, where examples of rules are available organized by subject in the Library tab. Figure 10.2 shows the initial Automation window Library tab, as well as the other options available for the automation tool:
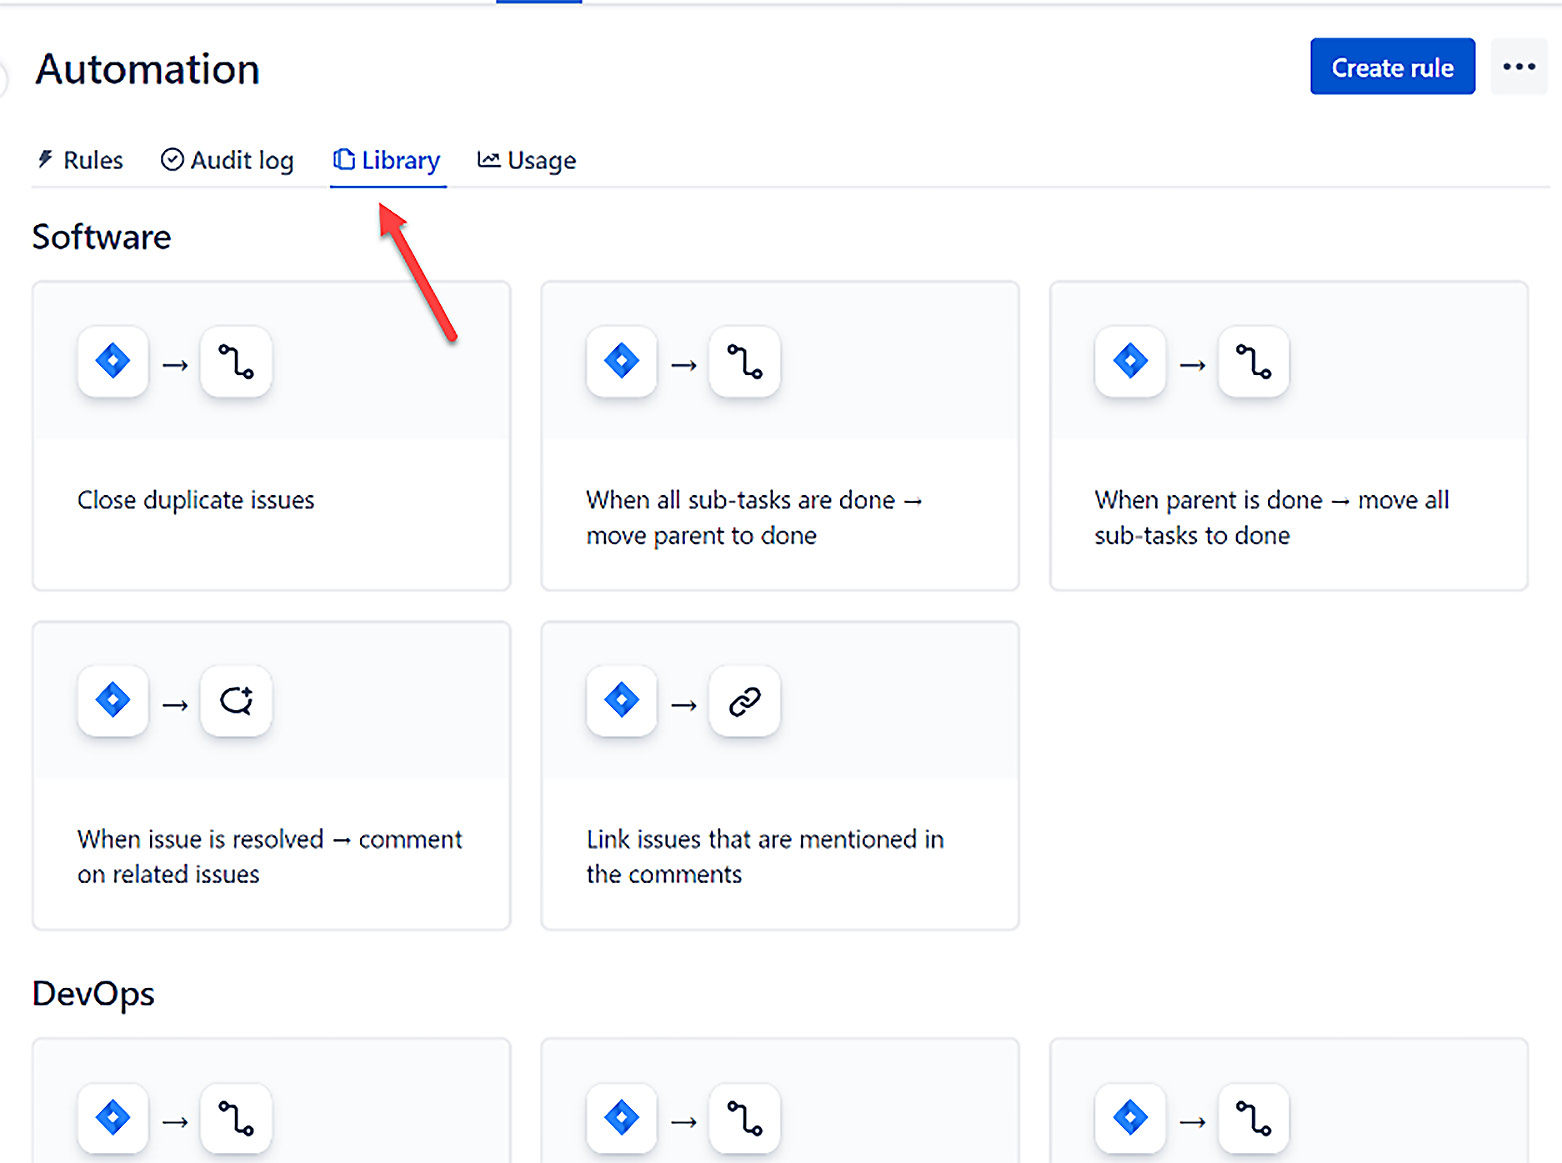
Figure 10.2 – The Automation window Library tab
The automation library can be a good starting place to see a handful of available rules and become familiar with the automation rule syntax and style. You are encouraged to look through the rules to see what's available.
Another path is limited to just rules that run against a single project. These rules are accessed through the Project settings window for the project.
Now, we will turn our attention to the building blocks of creating a rule. Click the Rules tab in the upper left, as shown in Figure 10.3:

Figure 10.3 – The Automation window Rules tab
Let's walk through the process of creating a simple rule:
- First, click the Create rule button in the upper right, as shown in Figure 10.3.
- This brings us to the list of triggers, as shown in Figure 10.4:

Figure 10.4 – Adding triggers to an automation rule
Here, we see some of the most popular and recommended triggers. We will select Field value changed for our example and base it on the Presentation Date field.
- Once selected and saved, let's add a condition. Again, we see the recommended conditions. We will select the Issue fields condition option, as shown in Figure 10.5. For our example, we will check to see if the Issue status is in Progress. Also, notice how the rule is being generated and displayed with each part on the left-hand side:

Figure 10.5 – Adding conditions to an automation rule
- Finally, let's add a new action to send an email notifying the assignee that the issue they are working on now has a new Presentation Date value. We will select the Send email option from the available actions, as shown in Figure 10.6:
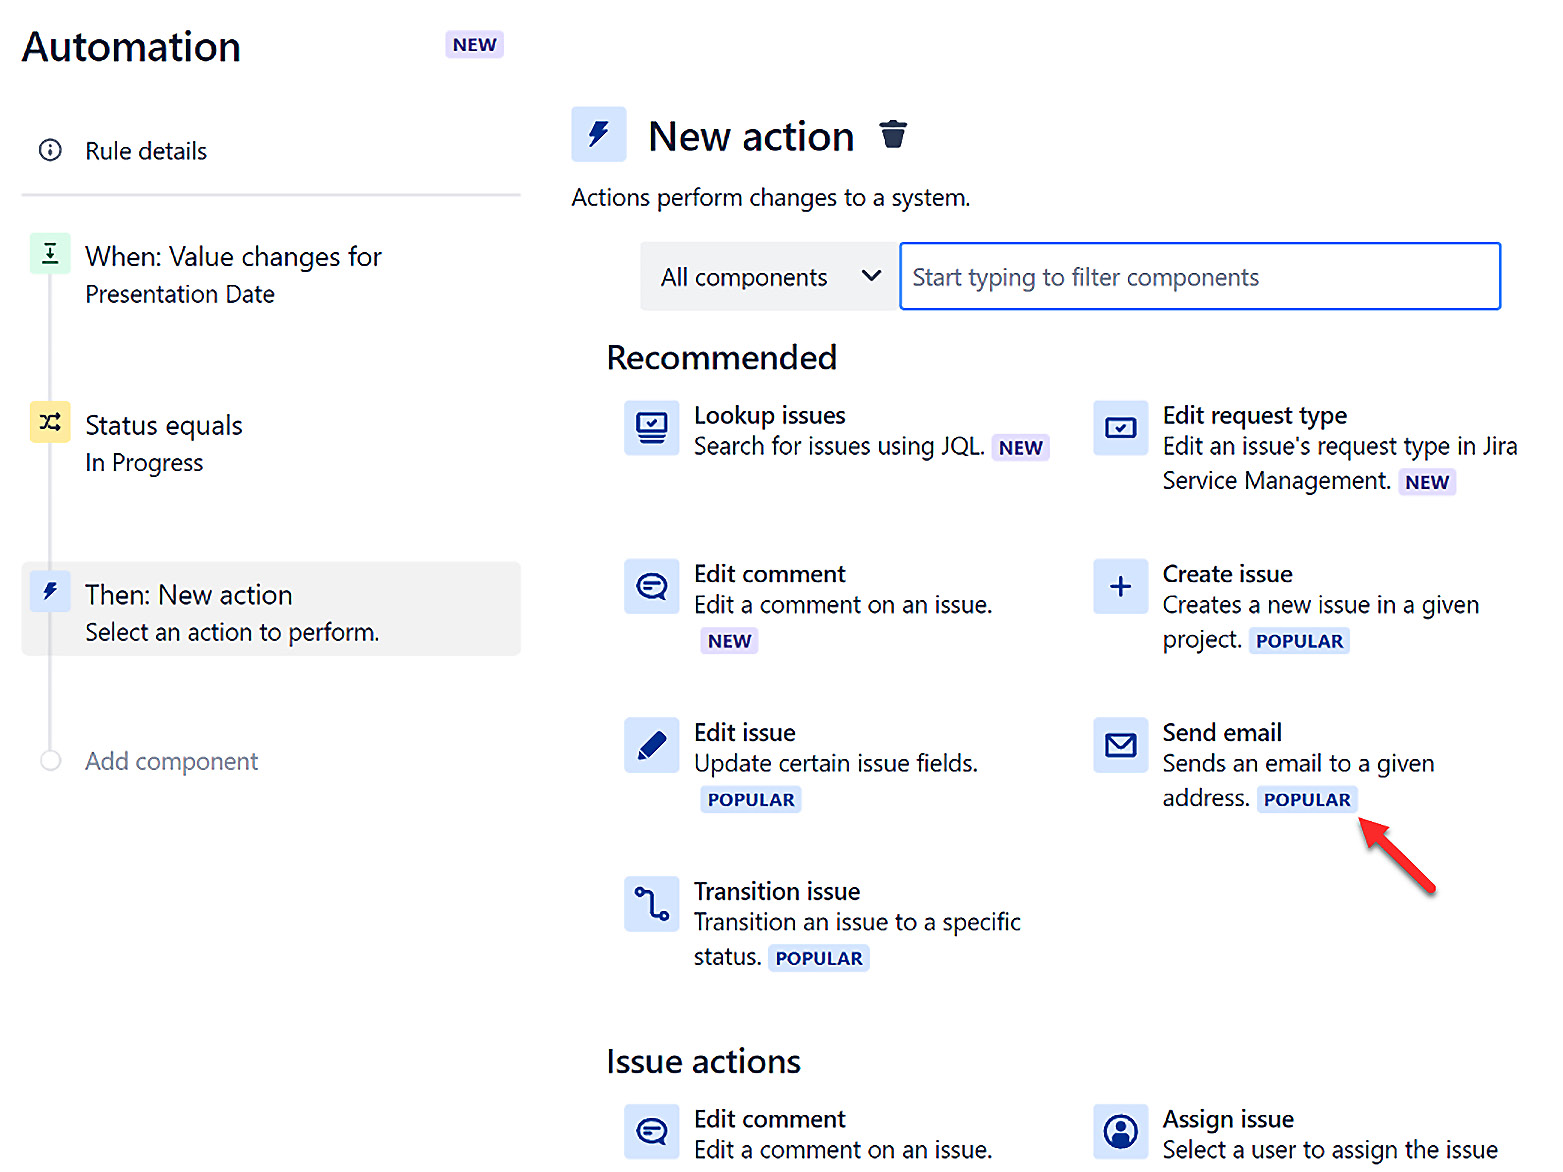
Figure 10.6 – Adding actions to an automation rule
- Our final step will be to save the rule and link it to a project. We will use our Staff Meeting project and enter the name of the rule as Send email when Presentation Date changes. We can see our final rule, along with the rule name and the project it links to, in Figure 10.7:

Figure 10.7 – Adding an automation rule name and linking a project
Next, we'll take a look at how we can make use of existing templates to get our automation going quickly.
Using automation templates
As we already saw in our discussion of projects, templates can provide a quick and easy way to get started with whatever type of object you are creating. This is also true of automation templates for business teams. Figure 10.8 shows some of the default automation templates available:
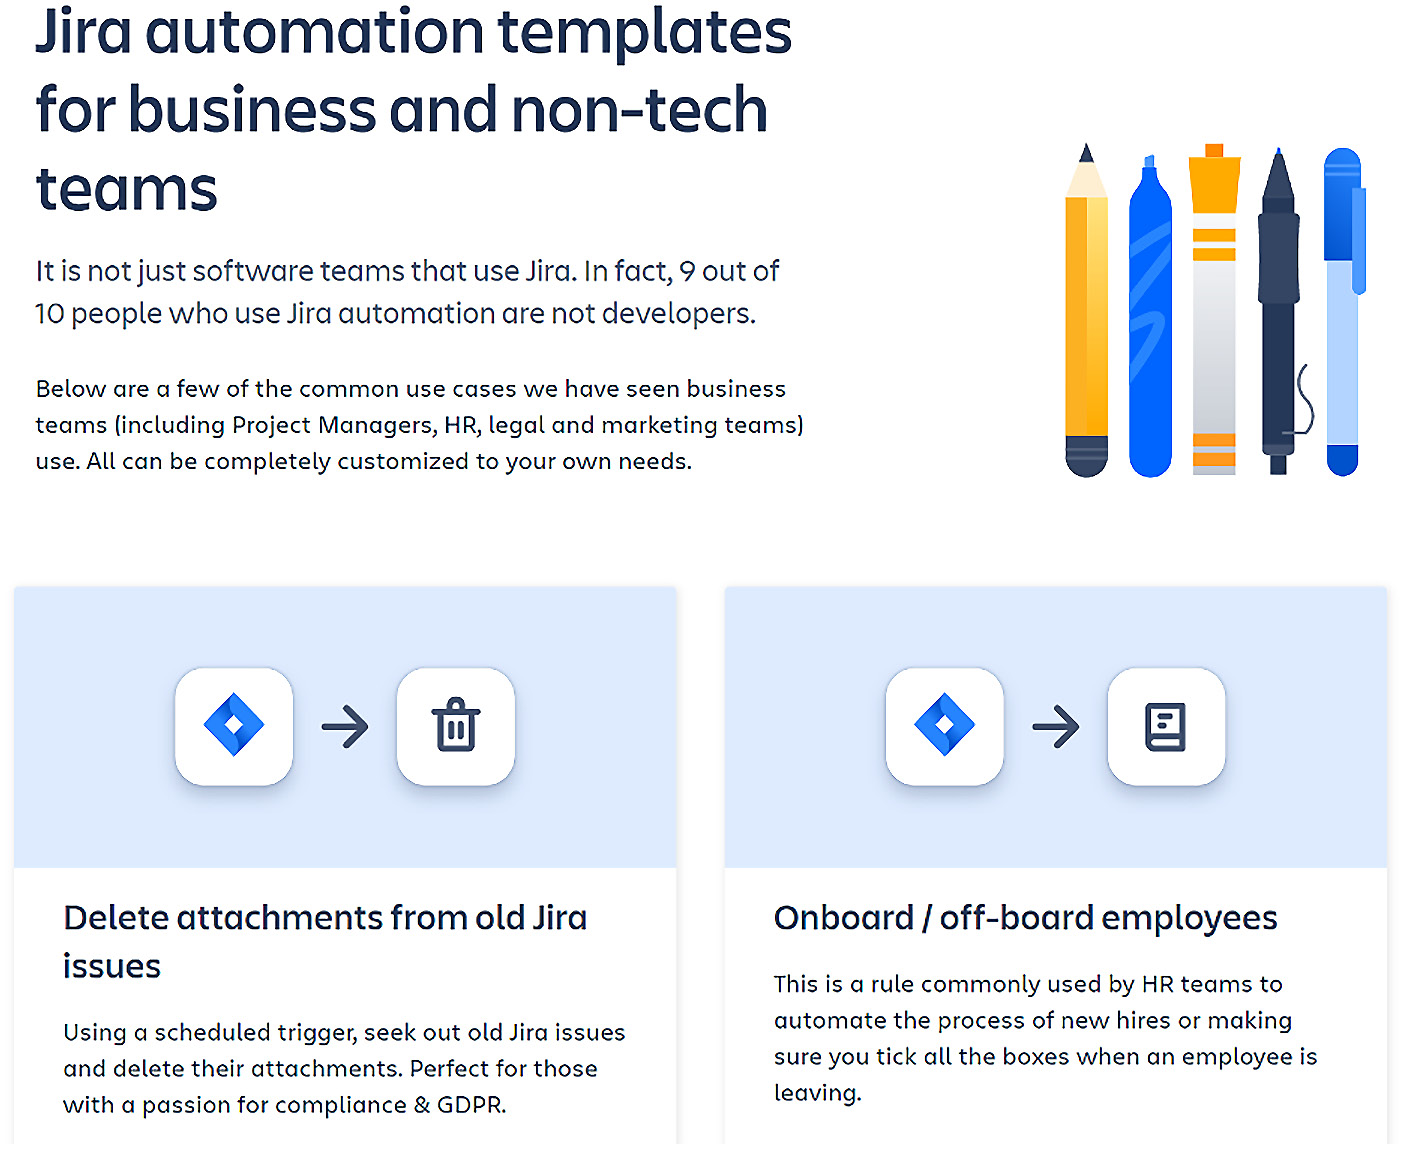
Figure 10.8 – Jira automation templates
Figure 10.9 also displays additional Jira templates available for business projects. These include templates for adding security levels and a possible Slack integration:
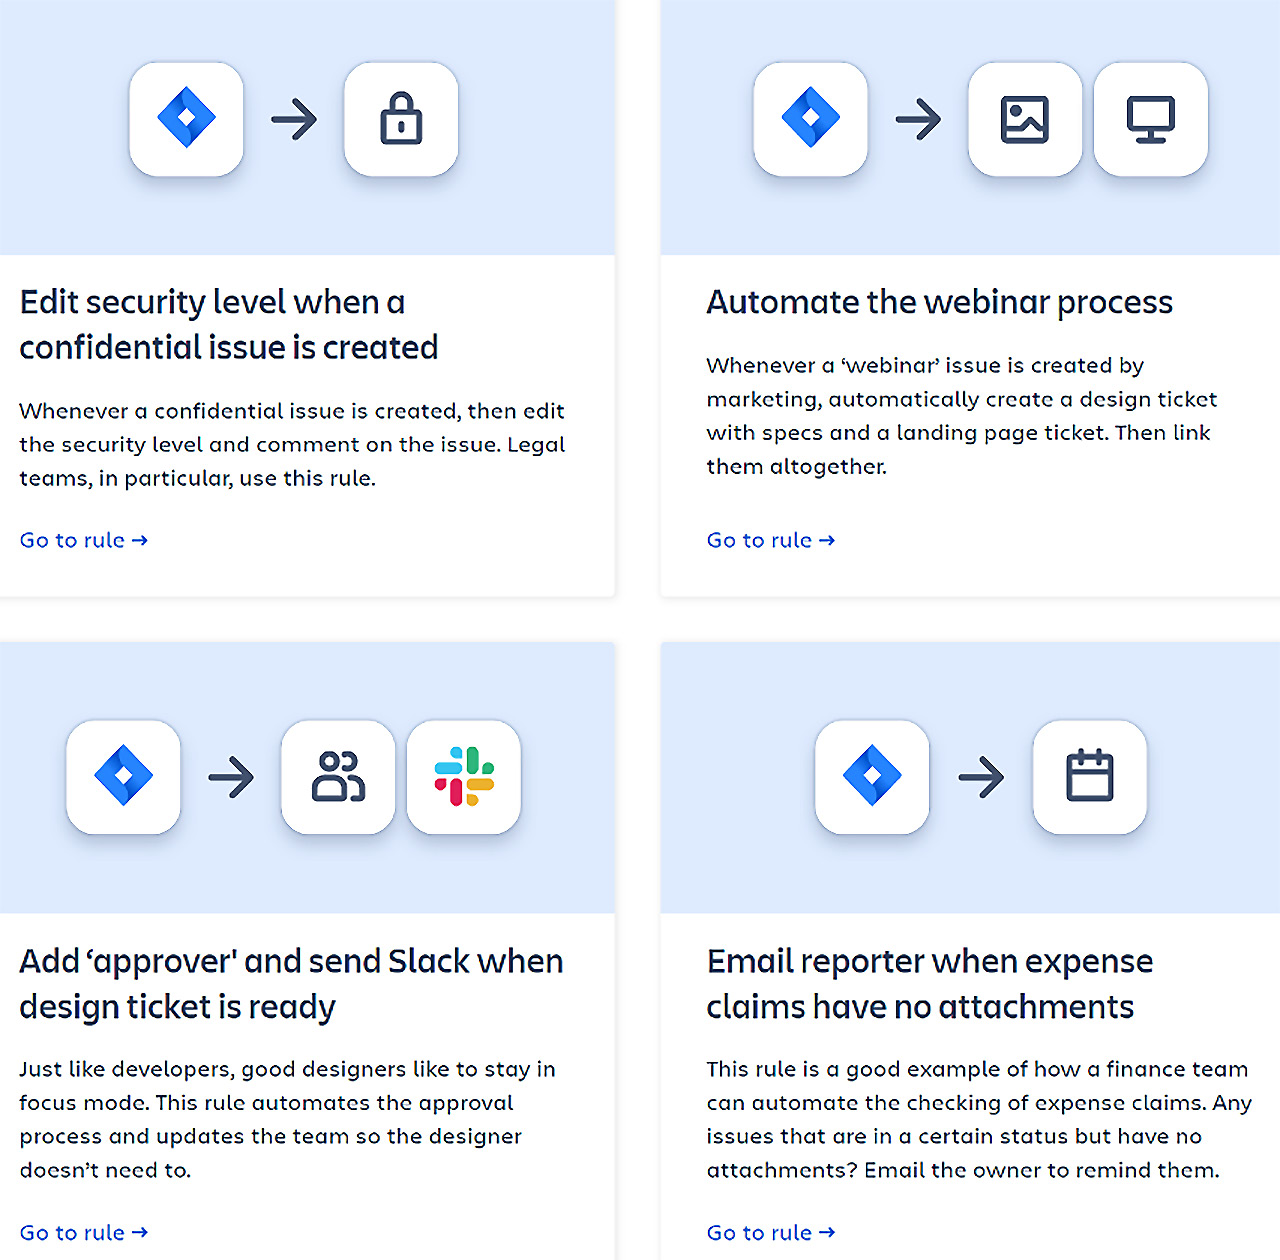
Figure 10.9 – Jira business project templates
Automation templates will continue to be added by Atlassian as new ideas and suggestions come to light. To access the templates, go to https://www.atlassian.com/software/jira/automation-template-library#/rule/new.
Another handy feature is the Jira Automation Playground. At the bottom of the automation template website shown in Figure 10.8 and Figure 10.9, there is a Jira sandbox. Here, you can look at many existing rules, try your hand at creating rules in a safe environment away from your production site, and generally learn the syntax for how the parts of a rule can be used. You can see the Automation Playground in Figure 10.10:
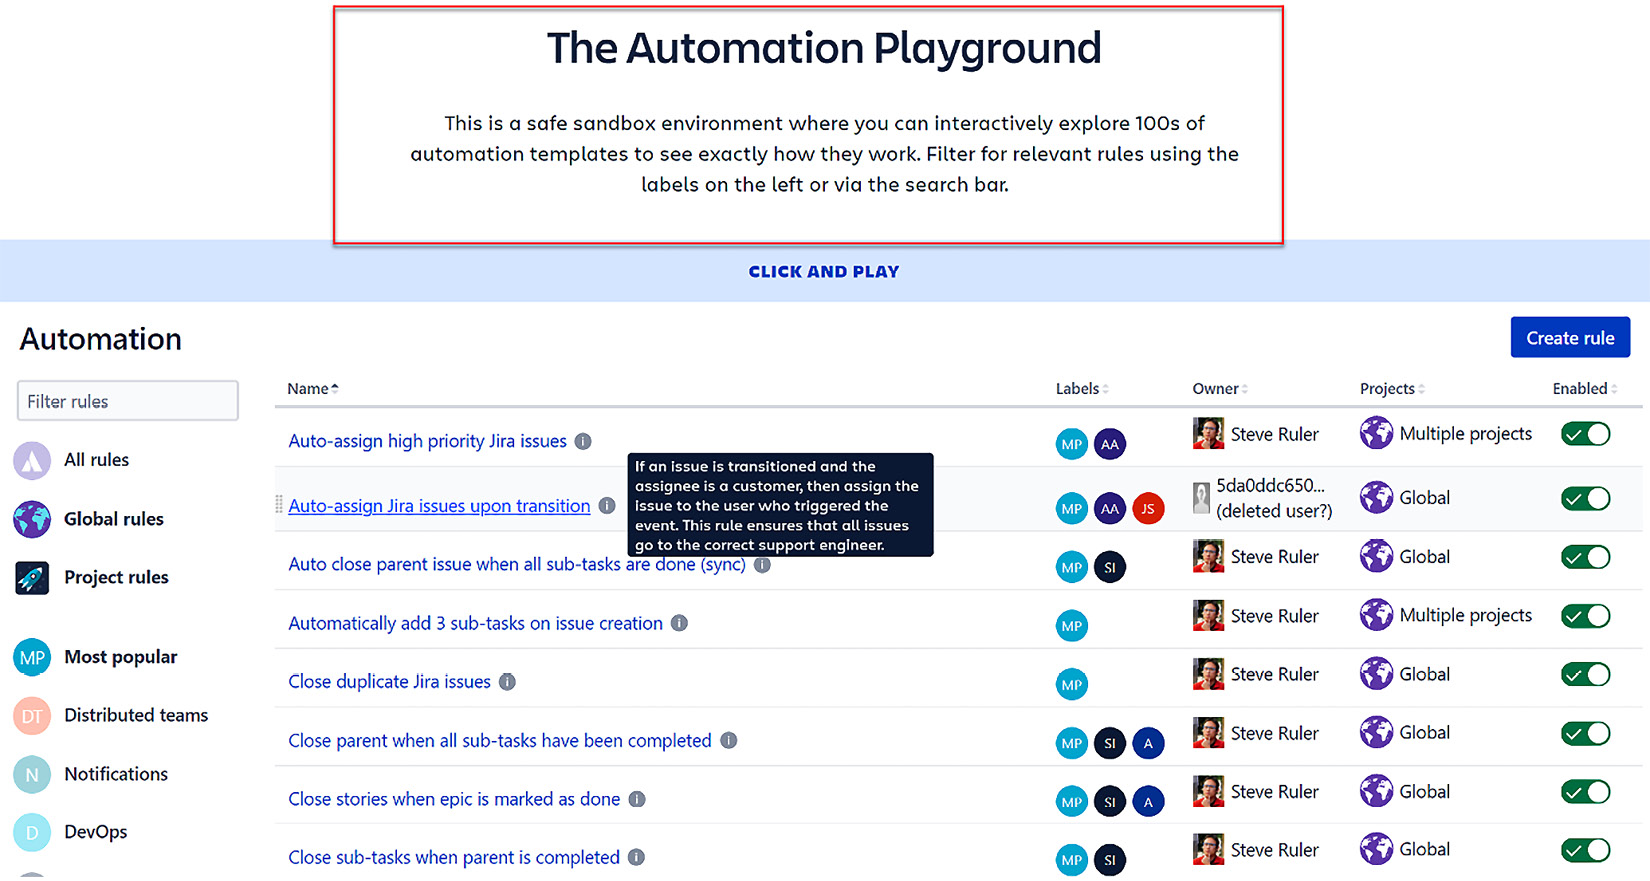
Figure 10.10 – The Jira Automation Playground
Next, we will finish the chapter by looking at some of the most common automation use cases.
Common automation use cases
Although we have already discussed automation templates and the automation library, it will help to look at some common use cases specifically. These use cases have come about based on frequent questions in the Atlassian Community user support environment and previous Atlassian support requests.
So, let's take a look at some of the most common ones:
- Keeping parent issues and subtasks in sync: As many of the JWM project templates include subtasks in the initially created issue type scheme, auto-transition of the parent tasks can be based on the movement of the subtasks. In other words, when the first subtask moves to In Progress, the automation rule will move the parent into the In Progress status. The same can happen when the final open subtask is closed, as we move the parent issue to Done, as shown in Figure 10.11:

Figure 10.11 – A parent and child automation task rule
- Assigning an issue to a user automatically when the issue is created: There are a number of ways to automatically assign a user to an issue in JWM. However, creating an automation rule to do this allows greater flexibility – you can assign a user directly, or you can use options such as creating round-robins, balanced workloads, or even random assignments. Figure 10.11 shows a round-robin being used:
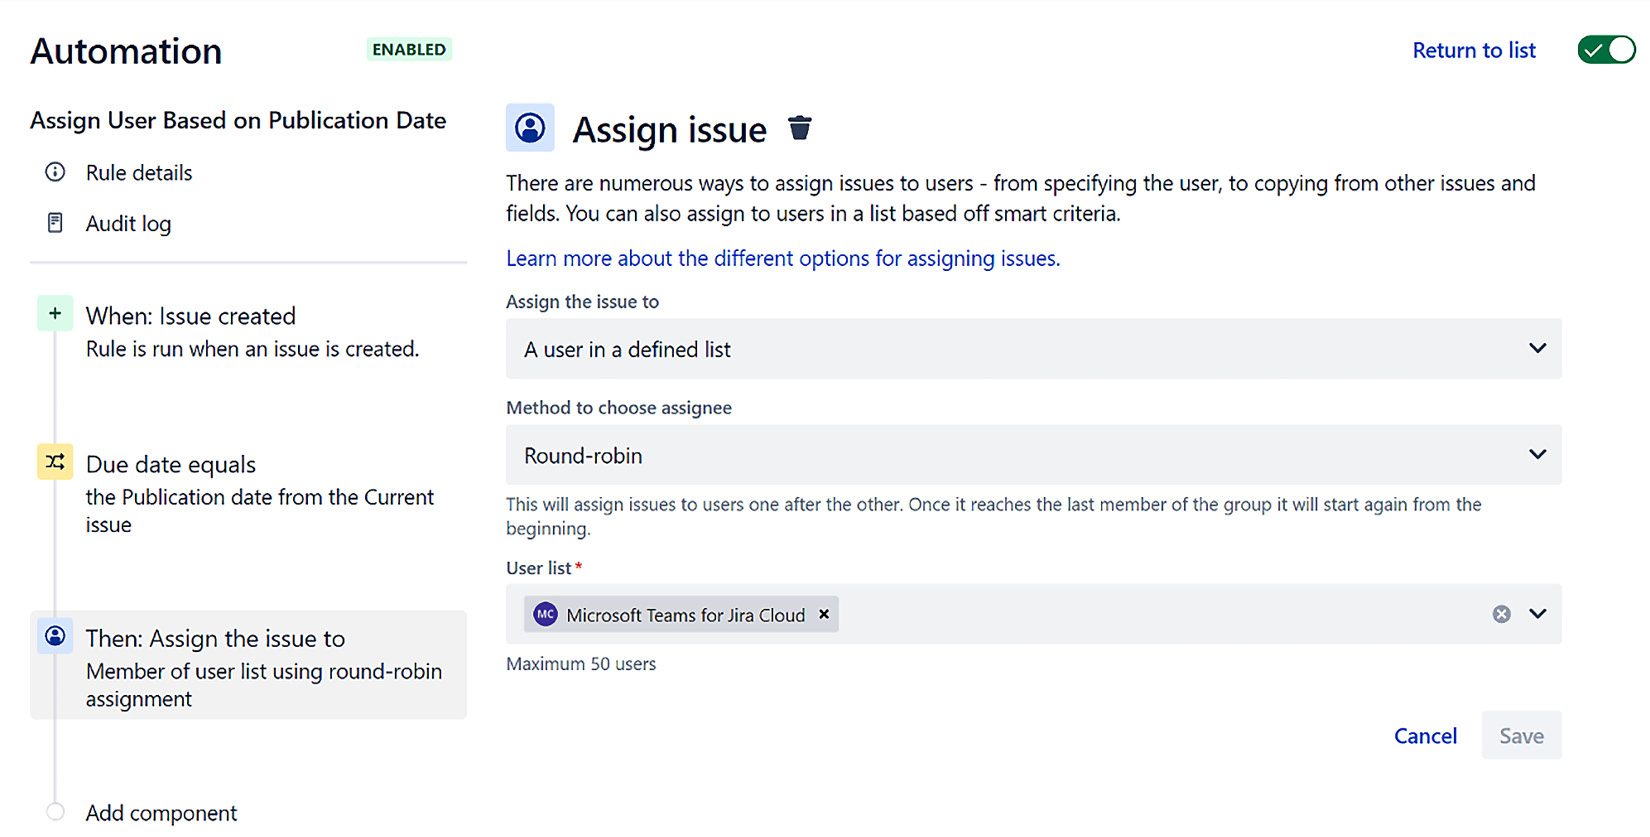
Figure 10.12 – An assign issue automation rule
- Scheduling a process to happen at specific times: Scheduled rules are a great way to send notifications based on date fields or other criteria from a JQL query. They can be set up to run at specific times, including on a daily, weekly, or monthly basis, or they can be more specific. This is also a great way to handle recurring tasks in your project.
Figure 10.12 shows a visual of how to set up a scheduled rule:

Figure 10.13 – A scheduled automation rule example
So, as you can see, automation rules can be very powerful in extending your JWM projects, but having some common automation use cases already identified and built for you can make you immediately productive.
Automation rule executions and usage limitations
Now that we see the huge benefit we can gain by using automation, let's briefly describe some potential usage limits to the number of rule executions you can perform on a monthly basis.
Global and multi-project rules represent automations that run in your entire Jira instance or against two or more projects at the same time. In this case, there is no execution usage difference for the number of projects you use in your rule, assuming there are at least two projects.
You are given an identified number of monthly rule executions for free, and after that, there are no more executions allowed for the remainder of the month for global and multi-project rules. The current usage limits can be seen in the following table:

Table 10.1 – Automation rule execution limits
Latest Plan Usage Limits
The most up-to-date usage limits can be seen at https://support.atlassian.com/jira-cloud-administration/docs/explore-jira-cloud-plans/.
New terms learned in this chapter
Let's conclude the chapter by through the new term we learned in this chapter:
- Project automation: A built-in tool in JWM that allows project administrators and Jira administrators to create automation rules.
Summary
In this chapter, we learned what automation in JWM is and how it can help us extend the power of JWM projects to increase productivity in our work. We learned the different components of an automation rule, how to quickly create rules from scratch, and how to use existing automation rule templates. Then, we became familiar with some common automation use cases that apply to many JWM projects and how we can replicate those rules in our own Jira instance.
With these new skills, you will be able to save time by letting automation take care of repetitive tasks and mundane work. By auto-assigning work or using auto-transitions for issue transitions, you and your coworkers will stay up to date with the status of your project.
I sincerely hope you have enjoyed your journey through this book. Keep in mind that the JWM product is still a work in progress and many new and exciting features will continue to be added in the future.
Further reading
- Smart values
For more advanced work with automation rules, you will want to become familiar with smart values. This functionality extends your rules by applying formats to your data, use of JSON, return of multiple issues in a list, and more. You can learn about smart values here: https://support.atlassian.com/jira-software-cloud/docs/what-are-smart-values/.
- Basic search functionality
If you are not familiar with the Jira Query Language (JQL), this article will help you learn the basics and get started immediately with searches: https://support.atlassian.com/jira-software-cloud/docs/perform-a-basic-search/.
- Jira product family blog for changes
To help you keep track of all changes related to the JWM product, Automation, Jira software, and more, be sure to subscribe to the Jira Cloud release notes blog found here: https://confluence.atlassian.com/cloud/blog.
Finally, we would like to share some helpful resources you can turn to when you have problems, want to know more, or generally just have some questions.
- Jira Work Management Cloud Support
This is the standard location within Atlassian's support structure to find things like documentation, suggestions and bug reports, and more. Find it all here: https://support.atlassian.com/jira-work-management/.
- Atlassian User Community
As an Atlassian Community Leader, I would be sorely remiss if I did not encourage you to explore and join the Atlassian Community! The Community is designed to help all users across the Atlassian family of products. It's a place to ask questions and get helpful advice and solutions from other Atlassian users.
And best of all, there is a dedicated space for those new to JWM. As one of the leaders for this group, I highly encourage you to take a look around, introduce yourself, and get the benefits of all things Community.
You can access the New to Jira Work Management group here: https://community.atlassian.com/t5/New-to-Jira-Work-Management/gh-p/newtojwm.
We will see you in the Atlassian Community!