14. Designing Default Output Individually
Content management systems have the task of managing content in a structured way and outputting it in the same organized form. On the Web, we need HTML code for this output. Now, you know which parts of the code you can determine yourself. But the actual content is output by the system with predefined code. If you are not happy with this output, you can it by using template overrides. Even if you do not want to do so, the default output is part of the template, and it too must be formatted via CSS.
Inspecting the Default Output
To be able to directly influence the design of the default code using CSS, you should know its structure, setup, and the CSS classes used. So you need to have a closer look at the automatically generated code. Thanks to Firebug, this should not be difficult. Joomla! focuses on a well-structured, semantically correct HTML code and therefore offers a good basis for conforming to standards and creating accessible Web sites featuring neat structures.
During the development phase, this structure was closely scrutinized. In addition to accessibility, an important aim was to keep the design as flexible as possible using CSS without unnecessarily inflating the code. The CSS classes usually have descriptive names to make them easy to use.
In naming classes, the words should be separated by a dash to achieve a uniform convention of usage—for example, .items-more. The appendix contains a list of the CSS classes used and a brief description of their functions.
You will get a first impression of the default code if you look at the HTML structure of the article columns on the homepage. In older Joomla! versions, this multicolumn design was achieved using tables. Starting with the Beez template in version 1.5, the display was controlled using positioning div containers. As of version 1.6, there are no longer table layouts. The design is now up to the template designer—a very sensible approach, even if it requires slightly more knowledge of CSS.
The Page Class Suffix
I mentioned the Module Class Suffix in Chapter 13, “Modules—Dynamics within the Presentation,” when discussing the modules. The Page Class Suffix is basically an extension of this system.
Joomla! offers a number of ways to vary the display content, such as the blog view, the article view, and the featured view. All these views can be formatted using CSS. Despite these options, you sometimes have to display a few in a different way. Many Web developers solve this problem by assigning a body id.
Let’s build a simple example to illustrate this concept.
Normally, all second-level headings (h2) should be displayed in red. Only in very special cases is black preferable for a heading. For technical reasons, it is not possible to assign an individual CSS class to this heading, but in this special case, we can assign an id to the body element of the page.
This gives us the option of accessing the h2 via context selectors:
...
<body id="black">
<h2> My black heading</h2>
...
For displaying the red heading on all other pages, we simply note in our CSS:
h2 {color:#990000} start page
And via
#black h2
{color:#000}
we achieve the special formatting for the page with the black heading.
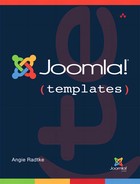
Since version 1.5, Joomla! offers a similar method. Using the Page Class Suffix you can assign individual class names for certain page areas. The Page Class Suffix is assigned via the menu item of the page you want to design. You can find it under Page Display Options.
Open the back end, navigate to the main menu, and open the homepage link. In Page Display Options, enter the word test in the Page Class field (see Figure 14.1). Then save the link.
Figure 14.1. Localizing the parameter in the Menu Manager
To see what happens to this parameter, you need to look at the source code of the homepage. The simplest way to do this is to use Firebug.
As you can see in Figure 14.2, the suffix you chose is appended to the class of the div container that surrounds the content of the homepage.

Figure 14.2. Generated HTML code after assigning suffix
Without this suffix, the container would only have the class .blog-featured. With the suffix, this class becomes .blog-featuredtest. All contents in this container can now be styled individually via the context selector .blog featuredtest.
For example:
.blog featuredtest h2
{color:#000}
If you do not want the suffix to be appended directly to the existing class, but instead you want to create a new class, you need to ensure that your suffix starts with a space. The result would be:
<div class="blog-featured test">
All views used in Joomla! are integrated into the page via the menu and can be equipped with such a suffix. Usually we add a suffix to the HTML elements that enclose content and can therefore be styled using context selectors.
The technical basis for this behavior can be found in the views of the individual components. In our case, the content component com_content is responsible. If you want to use template overrides later on, you will certainly come across this suffix.
The featured view described here can be found under Your_Installation/components/com_content/views/featured/tmpl/default.php.
At the top of the file you can see how the suffix is integrated into the code:
<div class="blog-featured<?php echo $this->pageclass_sfx;?>">
Table 14.1 shows an overview of all views including HTML elements that can get a suffix.
Table 14.1. Layout Views Showing Where Page Suffixes Are Added


Template Overrides
Up to Joomla! version 1.5, template designers were only able to determine the output of the frame document—that is, the HTML code specified in the template’s index.php file. The contents of the system were output with surrounding HTML code whose design you were unable to influence. Most of the contents were stuck in a table design.
It was a huge drawback because Web designers had very little influence on the code. This changed with Joomla! 1.5 with the introduction of the template override system, which allowed direct manipulation of the default output without affecting the system itself. The template contained its own HTML folder whose content was processed and circumvented the actual Joomla! output.
At that time, this feature was particularly relevant, because the default code generated by the system was obsolete and not very standards conforming. The Beez template in version 1.5 demonstrated how you could use template overrides. The result was a standards-conforming, clean, and semantically correct code.
With version 2.5, the default output of all components and modules was significantly improved. Now you can build a XHTML Strict or HTML5 template without having to touch the code.
If you have a close look at the Beez template code in version 1.5 and compare it to the Joomla! default output, you will see immediately that the structure is very similar. Only a few CSS classes have been renamed, and the output has been expanded with a few useful parameters. This means that a template from version 1.5 based on Beez can be integrated relatively easily into newer Joomla! versions. You just have to adapt a few CSS statements.
Despite the new and improved HTML concept, it can sometimes be necessary to overwrite the default output. I have done this myself in the beez5 template in order to use HTML5 elements on the lower levels.
Model-View-Controller
The system of template overrides is possible only because it uses the model-view-controller principle. This approach ensures that the application logic and the presentation of contents are cleanly separated. Each component and each module in Joomla! follows this system. This principle consists of three components:
1. The model contains the data to be represented and the logic itself.
2. The view, the presentation layer, takes care of the actual presentation.
3. The controller controls it all.
The template designer is really only interested in the view, because that is where the output of contents is located. I explain the override system using the example of the most important component, the com_content. The overrides control the output of the content.
If you create a menu item in the Joomla! back end, you can choose among different views. The com_content has the following views:
• Featured Articles: special view for display on the homepage
• Category Blog: displays articles of a selected category
• Category List: displays a table with contents of a selected category
• List All Categories: lists all available categories
• Archived Articles: displays archived articles
• Single Article: direct article view
• Create Article (Form): form for creating an article
You can influence these views directly using the template overrides.
Have a quick look at the file level now and navigate to the components and from there to the com_content: your_Installation/components/com_content. You will see the picture shown in Figure 14.3.

Figure 14.3. Structure of com_content
The folder we are interested in is, as mentioned earlier, the one with the name views, because it contains the actual output of the content. Please navigate directly to this folder (see Figure 14.4).

Figure 14.4. com_content/views
In the views folder you will once again find a folder for each view. The term form indicates it is the form for creating and editing an article. Let’s first look at the folder article, which is a less complex presentation (see Figure 14.5).

Figure 14.5. com_content/views/article
This time, we are interested in the folder tmpl, because it contains the file we may want to change (see Figure 14.6).

Figure 14.6. com_content/views/article/tmpl
Regardless of which view you want to edit later, the first file called by the system is always the default.php file. References to other files, where necessary, always start there.
In the article view you will find only this one file because the display of this view requires relatively little code.
Imagine the following scenario: in the default display, the article heading has an h2, but we would like to use an h3 in that place. The page heading should be output as h2, but the default is h1. As you may know, you can enable or disable this page heading via the menu items. This is then displayed in the article heading. To achieve this, you need to shift the output to the template.
Shifting Output to the Template
If you look at the structure of the Beez template you have renamed, you will find a folder with the name html. It specifies, among other things, the output for the module. This folder is also the place where the overrides are saved.
Go to this folder and create a subfolder with the name com_content. Then create a subfolder with the name article and copy the default.php and index.html files from com_content/views/article/tmpl/ into it. You may recall that the index.html file is empty and exists only for security reasons.
Once you have done this, Joomla! will automatically know that it should no longer use the default output but instead the article/default.php from the template for the article view display. Now you can adapt the file as you wish. The result will be immediately visible.
With this method it is particularly important that you arrange the folder structure correctly. The actual com_content also contains the intermediate level tmpl, which you will not find in the overrides. You should copy the contents of tmpl directly into the article folder.
Structure com_content
com_content
article
tmpl
default.php
default.xml
index.html
metadata.xml
view.html.php
index.php
Structure template
html
com_content
article
default.php
index.html
Adapting Output
If you now open html/com_content/article/default.php from your template, you will see that the file contains a mixture of HTML and PHP code, which you can easily adapt. At the top you will find the following code:
<?php if ($this->params->get('show_page_heading', 1)) : ?>
<h1>
<?php echo $this->escape($this->params->get('page_heading')); ?>
</h1>
<?php endif; ?>
If the option show_page_heading is active, the pageheading is output, enclosed by an h1. You select this option when you create a menu item.
As soon as the parameter Show Page Heading is enabled (as in Figure 14.7), the text specified in the Page Heading field is output. If the field provided for this is empty, the system uses the title of the menu item and outputs it.

Figure 14.7. Creating an article in the back end
If you now want to replace the h1 with an h2, you can go ahead and do it. Then save the file, and you are done.
<?php if ($this->params->get('show_page_heading', 1)) : ?>
<h2>
<?php echo $this->escape($this->params->get('page_heading')); ?>
</h2>
<?php endif; ?>
You can proceed in the same way with the article heading. Just replace the h2 with an h3:
<?php if ($params->get('show_title')|| $params->get('access-edit'))
: ?>
<h3>
<?php if ($params->get('link_titles') && !empty($this->item->
readmore_link)) : ?>
<a href="<?php echo $this->item->readmore_link; ?>">
<?php echo $this->escape($this->item->title); ?></a>
<?php else : ?>
<?php echo $this->escape($this->item->title); ?>
<?php endif; ?>
</h3>
<?php endif; ?>
The scenario is very simple, and you could probably think of far more complex cases, up to a complete restructuring of the content. But this would exceed the scope of this book.
New—A View with Different Output
You may sometimes want to use more than one override for a view. This is absolutely possible. The aim is to design the output as flexibly as can be done. To do this, all views and modules should have the parameter Alternative Layout available. Let’s use an example to make the function easier to illustrate.
First, we will stay in article view. If you create an article in the Joomla! back end, you will find the parameter Alternative Layout at the bottom of the category Article Options on the right (as shown in Figure 14.8).

Figure 14.8. Choosing Alternative Layout in an article
Thanks to this parameter, you can choose between several layouts.
The folder Your_Name/html/com_content/article/ currently contains only the default.php file. If you copy this file and rename it as you wish, the file will be available for selection in the article view, as shown in Figure 14.9. You can edit the content and individually adapt the output of the contents.

Figure 14.9. The new file is shown in the overview and is available for selection.
Now you can assign the customized view to your article. This means that the normal override file (default.php) will not be used for the output; the file you just customized will be used instead.
I named the file buch.php (buch is German for “book”).
Easy, isn’t it? This useful concept not only works in article view but can also be applied in the categories, the contact component, the Web links, the newsfeed, and all other modules.