Chapter 3
Your First Project

In this chapter I’ll introduce you to the use of functions, and then we’ll use a few small projects to learn how to interact with the Raspberry Pi Zero’s GPIO pins using C and an external library. (As it happens, all of these projects will work on any Pi you have around; I decided to use the Zero because if you don’t currently have a Pi, the Zero is a small and cheap board.)
Functions
You learned the concept of functions in the Hello, world program in Chapter 2, “Your First Programs”:
void main()
{
    . . . .
}
Here, main() is an example of a function. Functions encapsulate tasks within your program, allowing you to condense many instructions into a single line of code. Most programming languages have many built-in functions that you use without realizing it: printf() in C, for example, is a function.
The best way to illustrate functions is to write a few. Suppose we wanted to write a program that asks the user for a type of shape, and then computes the area of that shape. We could use different functions—one for circles, one for squares and rectangles, and one for triangles. We could start with this:
#include <stdio.h>
#include <string.h>
void main()
{
    int x, y;
    double area;
    char shape[10];
    printf("What shape would you like to find the area of?
");
    scanf("%s", &shape);
}
What the program does next depends on what shape the user inputs, so we’ll use a separate function for each possibility. Continuing on the next line:
    if (strcmp(shape, "circle") == 0)
  {
      printf("Enter radius: ");
      scanf("%d", &x);
      area = circle(x);
  }
Here we’re using the string.h library we included to compare the user’s input with the string "circle". If they’re the same (if strcmp equals 0), then we ask for the radius and call the circle() function, using the radius (x) as a parameter. Continuing:
    else if (strcmp(shape, "rectangle") == 0
        || strcmp(shape, "square") == 0)
  {
      printf("Enter height: ");
      scanf("%d", &x);
      printf("Enter width: ");
      scanf("%d", &y);
      area = square(x, y);
  }
Here, the double pipe (||) means OR. If the user inputs "square" or "rectangle", we get the height and width from them and call the square() function with those parameters. Finally:
    else if (strcmp(shape, "triangle") == 0)
    {
        printf("Enter base: ");
        scanf("%d", &x);
        printf("Enter height: ");
        scanf("%d", &y);
        area = triangle(x, y);
    }
    else
    {
        printf("Sorry, I don't recognize that shape.
");
        return;
    }
Now we just have to write the functions that will compute the areas. The circle() function will look like this:
double circle(int r)
{
    return 3.14159 * r * r;
}
The first line states that the function circle() returns a double, and the parameter that was passed in was an integer that will be called r in the body of the function. Then the function calculates the area, returns it, and stores it in the variable area in the main() function.
The square() function will look like this:
double square(int h, int w)
{
    return h * w;
}
Here, the x and y parameters we passed in are called h and w, in that order, and the function multiplies them together and returns the result in the area variable. The triangle() function is just as easy:
double triangle(int b, int h)
{
    return 0.5 * b * h;
}
Finally, we can add the last line to our main() function:
    printf("The area of the %s is %f
", shape, area);
Bear in mind that each of the functions we wrote could be much more complex. The idea is the same, however; each function encapsulates a particular set of calculations or blocks of code.
To test your program, compile it with gcc -o shape shape.c and then run it with ./shape.
blink
Now that you’ve been introduced to functions, let’s write some code for the Pi Zero, starting with the old Arduino favorite, blink.
Start by downloading and installing the pigpio library. Make sure you’re connected to the Internet and enter the following commands in your Pi’s terminal:
pi@raspberrypi:~ $ wget abyz.co.uk/rpi/pigpio/pigpio.zip
pi@raspberrypi:~ $ unzip pigpio.zip
pi@raspberrypi:~ $ cd PIGPIO
pi@raspberrypi:~ $ make
pi@raspberrypi:~ $ sudo make install
If you’re using a Pi Zero, the make command may take a few minutes.
The pigpio library enables you to access the Pi’s GPIO pins using a variety of programming languages, including C. Let’s start with a simple program to make two LEDs blink on and off, similar to the Arduino’s basic blink sketch. Start a new document, blink.c, and enter the following:
#include <stdio.h>
#include <pigpio.h>
void main()
{
    if (gpioInitialise() < 0)
    {
        printf("pigpio initialization failed
");
        return;
    }
    gpioSetMode(14, PI_OUTPUT);
    gpioSetMode(15, PI_OUTPUT);
    while (1)
    {
        gpioWrite(14, 1);
        gpioWrite(15, 1);
        time_sleep(0.5);
        gpioWrite(14, 0);
        gpioWrite(15, 0);
        time_sleep(0.5);
    }
    gpioTerminate();
}
After including the necessary pigpio header file, the program makes sure that everything is initialized correctly. Then it sets pins 14 and 15 to be outputs. (The pigpio library refers to all GPIO pins with their Broadcom numbers, not their physical pin numbers—see the following sidebar.) Finally, in the while(1) loop, it sends 1s and 0s (ON and OFF signals, respectively) to the two pins.
You remember how we compiled our first hello.c program:
gcc -o hello hello.cIn this statement, the -o is called a compiler flag. This command tells the compiler to compile hello.c and to call the resulting executable, hello. Compiler flags are used to influence how the compiler does its work, from using particular libraries, to naming executables, to optimizing the compilation process to take advantage of a particular computer’s architecture. There are literally hundreds of flags available; to take a look at them, in your Linux terminal enter
man gccand spend some time scrolling. I’ll wait.
When we compile blink.c, we use a few new flags, so let’s look at them briefly.
gcc -Wall -pthread -o blink blink.c -lpigpio -lrtThe first flag used here is -Wall and, strictly speaking, is not really necessary. -Wall (which is a contraction of warning:all) enables all of the compiler’s warning messages. This means warnings that don’t affect the compilation process are now displayed. I don’t often use this flag, but if you’re learning a new language it can be very illustrative to see the process and the errors that may arise.
The -pthread flag adds support for multithreading by utilizing the pthreads library. Although this may not seem to be a big deal with our little program here, it’s necessary when compiling various header files that pigpio uses.
The -o flag you’ve seen—it just names the executable blink.
The last two flags both begin with -l, which specifies a library that gcc should link to during compilation. In this case, -lpigpio informs gcc that it should link to pigpio’s library files, which are the files that are placed on your machine during the installation process. -lrt refers to the librt library, which deals with various interfaces to the POSIX.1b Realtime Extensions Library.
Compile your program with the previous command, but don’t try to run it yet—without some LEDs hooked up, you won’t see anything!
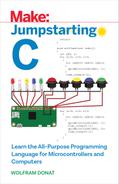
To hook up your LEDs, simply connect the anodes (the long, positive legs) of two LEDs to pins 14 and 15, and connect their cathodes (the short, negative legs) to a ground pin. Your setup should look like Figure 3-1.

Figure 3-1: Setup for blink
Once you’ve got everything set up, enter sudo ./blink in your terminal, and you should be treated to the lights blinking on and off. The program needs to be run as root, since you’re accessing the GPIO pins. Press Ctrl-C to cancel the program when you’ve seen enough.
Read a Button Press
For our last simple project, let’s read from a GPIO pin to see whether or not a button has been pressed.
Start a new script and call it read.c.
#include <stdio.h>
#include <pigpio.h>
void main()
{
    int x;
    if (gpioInitialise() < 0)
    {
        printf("pigpio initialization failed
");
    }
    gpioSetMode(14, PI_INPUT);
    gpioSetPullUpDown(14, PI_PUD_UP);
    while (1)
    {
        x = gpioRead(14);
        if (x == 1)
        {
            printf("Button is not pushed.
");
        }
        else
        {
            printf("Button is pushed.
");
        }
        time_sleep(0.5);
    }
    gpioTerminate();
}
Here again we initialize the pigpio library, and then set pin 14 to be an input. We also set a pull-up resistor on that pin so that it will always read 1 (or HIGH) unless it’s directly connected to ground. Then, in the while(1) loop, we simply read the value of pin 14 and determine whether or not the button has been pushed.
To wire this up, you’ll need a momentary pushbutton switch. Connect one side of the switch to pin 14 on the Pi, and connect the other to ground (Figure 3-2).

Figure 3-2: Momentary switch connection
Compile your program with
gcc -Wall -pthread -o read read.c -lpigpio -lrtAnd then run it with sudo ./read. You should be greeted with a line of text scrolling up your terminal, changing depending on whether or not you’re pushing the button (Figure 3-3).

Figure 3-3: Reading a button push
That completes our simple projects using C and the pigpio library. In the next chapter, we’ll do something a bit more complicated: a game!