In the last chapter, we learned about the development process on and with Kubernetes and discussed the pros and cons of the different approaches. We started out with development approaches where the developer ignored the fact that the application is developed for Kubernetes and moved toward approaches where they are fully aware of the final deployment and target environment Kubernetes. Now let us move on to the final fourth step “All-in on K8s” of our journey to Kubernetes-native development that we introduced in Chapter 3. While in the first three steps of the journey our developers moved between the two extremes of ignoring or being fully aware of Kubernetes, the same thing can be applied to the application itself. On one hand, we could write applications that do not know anything about the fact that they are running on Kubernetes. On the other hand, we could write applications that can access Kubernetes via its API to retrieve information about its environment, react to changes in the environment, or even manipulate resources in Kubernetes. The two models induce a trade-off between complete independence from Kubernetes and fully leveraging Kubernetes services.
In this chapter, we will look at applications that are fully aware of Kubernetes. We will learn why and how an application should interact with Kubernetes and what the respective benefits will be. Then, we will demonstrate how we can write our own Custom Resource Definitions (CRDs) to extend Kubernetes by our own application-specific resource types. These CRDs can be used for advanced configuration but also as an abstraction on top of your application’s Kubernetes resources.
The Kubernetes Downward API – Who Am I? And If So, How Many?
In order to deploy an application to Kubernetes, we first need to create the different manifests based on the resource types we learned about in Chapter 1 such as Kubernetes Deployments and Kubernetes Services. Eventually, after a successful deployment, every component of the application runs in a container as part of a Pod. At this point in time, our application gets instantiated, and we transition into the runtime phase of the development lifecycle. At runtime, our application could be interested in all kinds of information that does not exist at build time. If we are using Java, we could, for example, be interested in information about the JVM environment. We could, for example, ask the Runtime1 object questions like how many processors are or how much memory is available (or still free) to the JVM. But what if we knew more than just the language runtime, what if we knew that we are running in Kubernetes? In this case, our application could ask questions like
What is the name or IP of the Pod I am currently running in? – Knowing its name, for example, feedscraper_de-1234, the application could conclude certain aspects such as which role it plays in a certain environment (e.g., by applying a role suffix in the name) or to determine the specific instance of our application. This could become handy if the application needs to store some instance-specific data in a central data store such as the number of analyzed feeds per Pod. We could use the Pod name as the key for our metric.
What is the Namespace of the Pod I am running in? – Possibly, we have instantiated our application several times in different Namespaces, but there might still be shared information between all instances. To distinguish the different tenants, our application must know the Namespace.
What is the uid of the Pod I am running in? – When we stop and recreate a Pod, for example, during the deployment of a new version of our application, our Pod will get a new uid (unique identifier), for example, aae3d267-c60c-4998-bd8c-0185478134d9. Our application is then aware of this fact and could act accordingly. The uid is a cluster-wide unique characteristic which is not the case for names that are only unique in combination with their Namespace.
Which labels or annotations have been added to the Pod I am running in? – There are many use cases for reading information about labels and annotations. For example, you could set a label such as “environment = dev” in your Pod, and in this case, the application would present additional web pages or other means for developers to debug the application.
What is the name or IP of the node the Pod is running on? – The application could remember where it ran and when it would be scheduled to the same node as before and leverage this to retrieve data it has already stored to the node’s local volume.
What is my memory or CPU request or limit? – Retrieving this information allows us to configure the language runtime in terms of memory or the number of threads dynamically. We could, for example, set the memory allocation pool of the JVM to the memory limit specified in the Pod.
How Can Our Application Access This Information?
There are two ways to access the information described earlier: using environment variables or volume files. Both need to be configured in the YAML file of the Pod manifest, respectively the Deployment manifest. In the environment variable approach, we just map the information into an environment variable that can then be read by our application. In the volume file approach, we store the information in a file that can then be read by our application. Let us now look at an example from the Local News application, more specifically our Quarkus-based News-Backend. A label in our Pod defines whether the Pod is running in a development or a production environment. If the Pod is labeled as dev=true, the application should run with dev profile and live coding enabled. This allows, among others, for remote debugging from our local IDE.
To run in development mode inside a container environment (a.k.a. remote development mode), Quarkus requires a so-called mutable-jar. This jar file contains additional deployment time parts. To build a mutable-jar, you will need to set quarkus.package.type=mutable-jar in your maven package command. For the sake of our Local News example, we provide a prebuilt image with the tag latest-dev.
News-Backend Kubernetes Deployment with prod/dev Switch
News-Backend Deployment File with prod/dev Switch
News-Backend Pod Logs Showing the Dev Profile
We can see that Quarkus has been started in development mode. If you now change Kubernetes label “dev” to false in the file snippets/chapter4/downward/news-backend-deployment.yaml and apply the changes to the Deployment with “kubectl -n news-backend-prod-dev apply -f snippets/chapter4/downward/news-backend-deployment.yaml”, the application will start with the Prod profile.
News-Frontend Deployment Using the Downward API
News-Frontend Service Manifest Using Type NodePort
Let us summarize what we have learned about the Downward API so far. On one hand, it provides limited information about the Kubernetes environment our application is running in. On the other hand, it introduces minimal dependencies between our application and Kubernetes. The interface is just a simple environment variable or a file mapped as a volume. However, the application must also read and process the environment variables or files defined in the Pod to make use of it. Depending on how general or specific the purpose of the environment variable is, this could lead to weaker or stronger dependencies. In our example, we used an existing environment variable provided by the Quarkus framework and injected the boolean value into it. Instead, we could have defined a new NAMESPACE variable to pass in the current Namespace, for example, with the postfix prod or dev. In this example, the application would be fully aware of the fact that there is something like a Kubernetes Namespace, and the coupling increases.
Simply reading the information of the environment of one Pod is still pretty basic. What if we would like to read information or even create, modify, or delete other resources? This brings us to the next topic.
Cleaning Up
In order to make the subsequent exercises work, clean up by deleting the Namespace with “kubectl delete namespace news-backend-prod-dev”.
Interacting with the Kubernetes API
The Kubernetes API gives us full access to all resources managed by Kubernetes and not only a limited read-only subset provided by the Downward API – In many cases, we just need more information about other resources which are not available via the Downward API. An example would be reading configuration values from a ConfigMap or a Secret instead of using the volume mapping or environment variable approach. The downside is the Kubernetes dependency; a benefit, however, is that we could react to configuration changes by watching the ConfigMap or Secret resource.
Controlling its own infrastructure – When the application is able to collect information about its underlying infrastructure and the context it runs in, why not also control this infrastructure? Examples could be scaling or availability issues, among others, where we need to change the infrastructure dynamically: spawning new Pods on demand or cleaning up certain resources when uninstalling the applications are common examples.
Automating updates – An update of our application could get quite complicated, and it is obvious that the application itself should be able to control this. For instance, an application could create database migration jobs when it discovers that there is still an old schema in place.
In order to manage Kubernetes resources from our application, we must talk to the Kubernetes API server. In Chapter 1, we have already created several resources via kubectl which also communicates with the API server. In this case, we as humans used kubectl as a command-line tool. In this section, we will describe how an application can communicate with the Kubernetes API. To get a better understanding of the concept of the Kubernetes API, let us do a quick recap.
The RESTful Kubernetes API
<protocol://hostname:port>/apis/GROUP/VERSION/RESOURCETYPE – Returns a list of all instances of the resource type
<protocol://hostname:port>/apis/GROUP/VERSION/namespaces/NAMESPACE/RESOURCETYPE – Returns a list of all instances of the resource type in the given namespace
<protocol://hostname:port>/apis/GROUP/VERSION/namespaces/NAMESPACE/RESOURCETYPE/NAME – Returns the resource in the given namespace with the given name
If the resource is cluster scoped and thus not namespace scoped, just remove the namespaces/NAMESPACE part from the URLs.
To access the Kube-apiserver in Minikube, we use the same approach that has been introduced in Chapter 1 and run “kubectl proxy --port 8080” which makes the Kubernetes API available at localhost:8080.
Deploy the Local News Application
Now we can retrieve all of our Deployments directly via the Kupe-apiserver. To do this, we first need the group and version which can be derived from the apiVersion attribute of our YAML resource files. The group for the Deployment resource type is apps, and the version is v1. With the rules described earlier, we will get http://localhost:8080/apis/apps/v1 which will return a list of all resources managed under the same group and version. Let us add our Namespace part and the resource type, and we will obtain the following URL: http://localhost:8080/apis/apps/v1/namespaces/localnews/deployments.
Put it into your browser, and the response will be a DeploymentList showing all of our Deployments in this Namespace. If we would like to see a particular Deployment, let’s say the one for the news-backend, we can just append its name: http://localhost:8080/apis/apps/v1/namespaces/localnews/deployments/news-backend.
We will then get the resource represented as a JSON string. If we would like to create a Deployment instead of retrieving it, we can just send a POST request to the previous URL (without the resource name news-backend because this will already be derived from the name attribute in the POST body as part of the resource YAML, respectively its JSON representation). But wait, what we just did was again driven by us and not the application itself. Quit the proxying of the Kubernetes API to our localhost with Ctrl+C in the terminal, and let us then look at how an application would ideally interact with the Kubernetes API.
Using Client Libraries to Access the API
While we could just install and use a REST client library to interact directly with the Kubernetes API as described earlier, it is much simpler to use a Kubernetes client library. There is a rich ecosystem of libraries for different languages and platforms: Java, Python, Go, JavaScript, and many more. But what would that look like in a real-world scenario? Assume we need a new feature for our Local News application to scrape additional RSS Feeds such as the ones from Al Jazeera, CNN, The New York Times, and others. We would like to create new feed scraping processes using our existing frontend application, for example, by adding a form to submit the feed URLs to be analyzed.
The most obvious approach would be to connect our JavaScript-based News-Frontend directly with the API server. However, this is not the best idea since the News-Frontend is a client application and thus runs on the end user’s machine. To implement this, we would need to expose the Kube-apiserver to our end users, and they should not necessarily know that our application runs on Kubernetes, not to mention the security risk in doing so.

The frontend calls the backend REST which in turn creates a Deployment via the API server
The News-Backend component is written in Java, and we decided to use the Quarkus framework to implement its functionality (as explained in Chapter 2). Although there are many different Java-based Kubernetes client libraries, we decided to use the one called Fabric8 Kubernetes Client2 because it can be easily included via a Quarkus extension3 and because it provides an elegant programming model as we will see in the following.
News-Backend ScraperController Java Class Excerpt
The new controller can be called via the URI path /scraper using a POST request with a JSON array as the request body. Once called, it will create a new Kubernetes Deployment resource in the same Namespace as the backend. In order to do this, we first load an existing YAML manifest which is then used to make the Kubernetes Deployment. We have omitted the details of this method for brevity, but you can find its details in our Git repository in the folder components/news-backend/src/main/java. It makes use of the Kubernetes client which is injected via CDI5 (Jakarta Context and Dependency Injection) into the controller class. The deployment object is then modified, for example, the name and Namespace are changed and the RSS Feed URLs passed in via the request body are added as an environment variable SCRAPER_FEEDS_URL into the new Deployment of the Feed-Scraper. Finally, we use the deployment object to create the resource via the client. To do so, the client – as depicted in Figure 4-1 – sends a POST request to the API server with the JSON representation of the deployment object. This POST request is sent when invoking the createOrReplace method on the kubernetesClient object with the deployment object as a parameter.
You can test the API server access described earlier quite easily directly from your IDE. You only need to make sure that you can access the API server via kubectl. The Fabric8 Kubernetes Client will then reuse your existing configuration. This allows you to develop and test against the API quite easily. Please also compare the development models described in Chapter 3. Let us quickly test the scenario by running “mvnw compile quarkus:dev” from the project root folder components/news-backend (make sure that the previous proxy process to port 8080 is stopped). Then send the following curl command “curl -X POST -H ‘Content-Type: application/json’ -d ‘[“http://rss.cnn.com/rss/edition_world.rss”]’ localhost:8080/scraper”. This will create a new Feed-Scraper Deployment which you can check by running “kubectl get deployments”. Since we started the News-Backend directly from our IDE and hence outside our Kubernetes cluster, the Deployment is in the default Namespace.
Authenticate and Authorize Against the API
Make an (Unauthorized) POST Request to the Kube-apiserver
Logs from the News-Backend
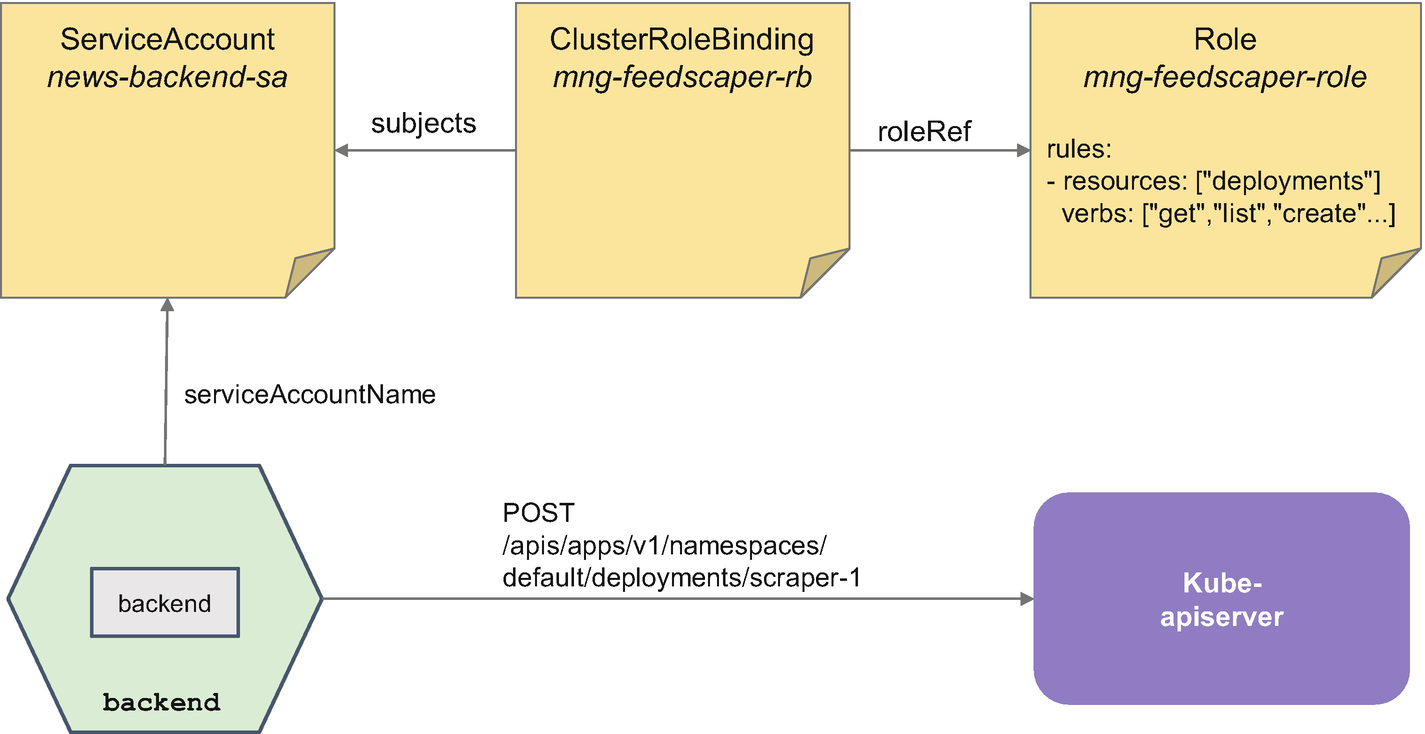
Authorizing the News-Backend to create Deployments
Excerpt of News-Backend Deployment Specifying a Nondefault ServiceAccount
When we send the same POST request from Listing 4-8 to the News-Backend, we will get a 200 OK status now, and we will see the JSON representation of the newly created Deployment in the body of our response. This new Deployment of the Feed-Scraper should now be active as scraper-1, which can be checked by running “kubectl -n localnews get deployments”. Moreover, the news items from the two additional feed URLs should soon be processed, and the corresponding news should appear on the map of the frontend. Check it by running “minikube service news-frontend -n localnews”.
The approach that we’ve outlined here, the direct access from an application to the Kubernetes API, certainly introduces more dependencies between our application and Kubernetes compared to the Downward API. Still, if you carefully design the architecture of your application, you could avoid unnecessary dependencies. In the case of our Local News example, the only dependency to Kubernetes is the inclusion of the Fabric8 Kubernetes Client library. If our application would run in a non-Kubernetes environment, the worst thing that could happen is that someone calls our new scraper controller which would result in an internal server error because there is no such thing as a Kubernetes API. However, all other controllers will still work. This is not self-evident; depending on the application, there could be stronger dependencies, for example, if the application would access the Kubernetes API during startup, it would fail to start and become completely unavailable.

The user interface for managing feed scraping from the News-Frontend
Cleaning Up
Cleaning Up
Defining Our Own Kubernetes Resource Types
Let’s imagine we were administrators and would not like fancy web user interfaces at all but prefer to use a CLI. How could we add the News from other RSS Feeds to our list without an extension in the News-Frontend or custom POST requests to the backend?
Feed-Scraper Deployment YAML with a New RSS Feed URL
Custom Kubernetes Resource for FeedAnalysis

Raising expressiveness and conciseness with a Custom Resource
Note that the apiVersion key in Listing 4-13 has changed to an endpoint that Kubernetes does not provide by default but has been created by us, and the same is true for the kind key. We will explain how to create it in a second, but just to illustrate the effect: you could now, for instance, run kubectl -n localnews get feedanalyses or access this API endpoint like we did when explaining how the Kube-apiserver works. The benefits would be that we as administrators would not need to know much about the Feed-Scraper and its Kubernetes resources. We would just define FeedAnalysis resources, for example, add a new URL to an existing FeedAnalysis resource or create another FeedAnalysis resource to express whether we want to start a new analysis. This new resource allows us to hide implementation details, for example, whether a Deployment or a Kubernetes Job resource is used to deploy the application. Another benefit is that we can define a schema for our FeedAnalysis resource that will be validated by Kubernetes when we create the resource. For example, it can be validated whether a key in a certain part of the Custom Resource is allowed or whether the data type is correct. This is not possible in a Deployment with an environment variable, for example, if we would make a typo in the key of the environment variable, the URL would just not be set. We would realize this not before this instance of the Feed-Scraper has been deployed. Let us now look at how we can define our own Custom Resource Definition.
The Custom Resource Definition (CRD) – Schema for Your Custom Resource
To create our own resource, we must first define a Custom Resource Definition . It defines a type for our Custom Resources. The relationship between a Custom Resource Definition and a Custom Resource is similar to that of a class and an object in an object-oriented programming language. It defines metadata such as the name and a version for your resource type. The latter becomes quite handy when your Custom Resource Definition changes with the requirements of your application. This allows you to version the different alternatives, and hence you can manage to use multiple versions at the same time, for example, one Custom Resource could refer to the v1 of your Custom Resource Definition and another could refer to the new v2.
There are some conventions for Kubernetes API versioning6 that should be considered when developing your own CRDs. Four levels of stability and support are distinguished: development, alpha, beta, and stable. These vary in the grade of upgradeability, completeness, reliability, and support. In contrast to the other levels, development does not follow specific conventions; however, v1 and v2 are examples for stable versions, and v1alpha1 and v1alpha2 are examples for alpha-level versions which have been predecessors to the stable v1 version. The same applies to the beta level: v1beta1 and v2beta1 could be predecessors for v1 and v2 stable versions.
Custom Resource Definition Manifest in YAML
Custom Resource Definition Schema Section
The schema is defined by the OpenAPI Version 3 specification7 which is a well-known standard for defining HTTP APIs. In this case, we define that the resource must contain a spec property with a nested urls property of type array. The items of this array must be of type string to represent the feed URLs. After applying this resource, we are now able to create FeedAnalysis resources. But we can even do more. We can just interact with our FeedAnalyses resources as with any other Kubernetes resource via kubectl. Let us again create a Namespace by running “kubectl create ns localnews” and demonstrate this by creating an instance of our CRD, more specifically the CR shown in Listing 4-13, via “kubectl -n localnews create -f snippets/chapter4/crd/my-feed-analysis.yaml” and list it with “kubectl get feedanalyses -n localnews”.
Kubectl vs. User Interface
With kubectl as a command-line interface, we can manage FeedAnalyses with ease. As with other resources, we can create, apply, get, list, modify, and delete FeedAnalyses. We do not need to put any effort into writing frontend code nor writing an additional REST backend, and thus we do not need to maintain it anyway. But there is much more than this!
The advantage of this approach is that we can specify which feed to analyze declaratively in a YAML file instead of relying on a user interface. Why is this better? It is reproducible in a consistent manner. If we click around in our user interface and add or delete news feeds, this is not reproducible; at least it is not easy to do so and involves manual steps such as analyzing the logs. With the YAML manifest, we can capture all the information in a text format which is a perfect means to be stored, side by side with our code, in our version control system. And we will see in Chapters 5 and 6 how we could automate the synchronization between manifests in a Git repository and Kubernetes with GitOps.
When we created our FeedAnalysis CRD, Kubernetes added an endpoint for this new resource type. Start the proxy with “kubectl proxy --port 8080”. You will find a new endpoint at http://localhost:8080/apis/kubdev.apress.com/v1/. Furthermore, you could query the FeedAnalysis resource you have just created via http://localhost:8080/apis/kubdev.apress.com/v1/namespaces/localnews/feedanalyses.
CRDs are a great way to extend Kubernetes and automate certain operations. But wait, didn’t we miss something? Yes, right, where is the logic behind the CRD? How can we define what happens when a new FeedAnalysis is created? Let us elaborate on this in the following.
Attempt 1 – Let the Backend Do the Job

The backend watches the FeedAnalysis CRD and creates a Deployment
FeedAnalysis Java Class to Watch the New CRD
watchOnCrd Method with the Fabric8 Kubernetes Client
Deploying the New News-Backend Logic
New Feed-Scraper Deployment Triggered via Custom Resource
The approach works quite well because we have already implemented the logic for creating the respective Deployments via the Kubernetes API. But as you might remember, the primary intention to choose the backend to implement this was driven by the requirement to provide a REST interface for our user interface. Let us reflect on this. Is the backend really the right component to implement the logic behind the CRD? In the end, we would like to control the Feed-Scraper, why not add the logic directly to the Feed-Scraper then?
Attempt 2 – Extending the Feed-Scraper
Extending the Feed-Scraper with a New Java Class to Use the New CRD

The Feed-Scraper watches the FeedAnalysis CRD and starts its Camel route
Deploying the New Feed-Scraper Route
Logs of the Feed-Scraper Deployment Scraping Two RSS Feeds
The approach described here is more lightweight than the previous one because the logic behind our CRD is placed directly in the component that contains the logic the CRD targets at. This is, however, not always the case. We could also write more comprehensive CRDs which could target the functionality of several components. Another drawback is that we now make the Feed-Scraper aware and thus dependent on Kubernetes which would not be necessary if we placed our logic somewhere else. But where could that be? How about a separate component?
Attempt 3 – Writing a Custom Controller

The analysis controller watches the FeedAnalysis CRD and starts a Camel route via an HTTP POST request using the REST API of the Feed-Scraper
Code to Extend Feed-Scraper with a REST Endpoint
Enable CrdRoute to Make REST Calls
Deploying the New Custom Controller
Logs of the Custom Controller
As you can see, the approach adheres quite well to the separation of concerns principle. The logic is separated, and our components such as Feed-Scraper, News-Frontend, and News-Backend stay untouched and are thus not even aware that they are running on Kubernetes. If our CRD evolves, we can release new versions of our controller, and if we decide not to run our application on top of Kubernetes, we can just deploy all components except the controller (because it is Kubernetes specific and cannot run outside).
The drawback is that it is a bit cumbersome to interact with the Feed-Scraper, and we need this extra API to connect the controller with our component. Maybe we can get rid of this as well. What if we deployed the Feed-Scraper as a Kubernetes Job instead of using a Deployment? We discussed the topic Deployment vs. Job for the Feed-Scraper already in Chapter 3 when we ran the Feed-Scraper as a Kubernetes Job to trigger some action in the Location-Extractor which ran our local machine but was connected to the News-Backend in the cluster. So let us see how the job-based approach resonates with our controller approach.
Attempt 4 – Let the Kubernetes Job Do the Job

The analysis controller watches the FeedAnalysis CRD and creates a Job via the Kubernetes API
Adapting the Camel Route
Deploying the New Controller That Creates a Job
Deploying the New Controller That Creates a Job
Cleaning Up
The hands-on parts of this chapter are now over. Therefore, don’t forget to clean up to have a fresh environment ready for the next chapter. The easiest way to do it is to run a “minikube delete” and then start Minikube again with a command such as “minikube start --addons=ingress --vm=true --kubernetes-version=‘v1.22.3’ --memory=‘8g’ --cpus=‘4’ --disk-size=‘25000mb’ ”. Alternatively, it may suffice to remove the Namespace from the last example via “kubectl delete namespace attempt4” and the earlier one via “kubectl delete ns localnews”.
What Is a Kubernetes-Native Application?
After demonstrating several aspects of Kubernetes-native applications such as retrieving and modifying resources via the Kubernetes API and extending Kubernetes by new application-specific resource types, let’s step back and think about what actually qualifies an application as being Kubernetes native.
Before Kubernetes became popular, we often heard the term Cloud-native application which is abstractly spoken and according to Bill Wilder8 an application that fully leverages the advantages of a cloud platform. When we follow this definition, we can similarly conclude that a Kubernetes-native application is an application that fully leverages the advantages of Kubernetes. But what are the advantages of Kubernetes we could actually leverage?
Everything Is a Resource – So Treat It Like That
In Kubernetes, everything is described as a resource and thus can be managed via its API. This is the main topic of this chapter, and we have already demonstrated several ways how to leverage this by the example of the Local News application. Our journey showed that the most native way to dig into this is to extend the existing Kubernetes resources such as Deployments, Services, or Jobs by application-specific resources to raise the level of abstraction and, thus, leverage the key concepts of Kubernetes. This enables administrators of our application to declaratively define what should be done instead of describing how that must be done, for example, they could just create new FeedAnalysis resources to define which feeds should be analyzed without having to define how this will be implemented.
Don’t Reinvent the Wheel – Make Use of Kubernetes’ Capabilities Whenever Possible
Configuration management – We have already learned three ways how to manage application configuration with Kubernetes: ConfigMaps, Secrets, and Custom Resource Definitions. This allows us to shift environment-specific configuration properties into the environment.
Autoscaling – We can just scale instances of our application up and down depending on the resource usage such as that of the memory or CPU. Kubernetes does not only offer a special resource called Horizontal Pod Autoscaler for this but also comes with various services such as DNS and internal load balancing.
Rolling updates – As described in the context of the Deployment resource in Chapter 1, we can quite easily configure rolling updates which help to replace the old version of our application one by one with the new one without any downtime.
Self-healing – With the help of liveness probes, Kubernetes can observe the liveness of our application and can automatically restart it if it is unhealthy. What we need is just a health check URL provided by our application.
Wrapping It Up
To wrap up this chapter, let us briefly recap where we actually are on our journey to Kubernetes-native applications. We started discussing the requirements and ingredients for our applications’ architecture, runtimes, and frameworks. Then, we discussed various ways to develop applications running in and on Kubernetes.
In this chapter, we elaborated on the key aspects of fully leveraging the power of Kubernetes by making our application aware of the fact that it is running on Kubernetes. With this knowledge and a way to access the Kubernetes API either directly or indirectly (via the Downward API), our application becomes fully aware of the context it is running in. Moreover, it is able to control its own or even other resources which paves the way to control its environment and to address, among others, also operational aspects such as updates, data migration, and more. Furthermore, we showed how we can extend Kubernetes by application-specific resource types to increase the abstraction level and to be able to manage our application via kubectl.
In the next step on our Kubernetes-native journey, we will move on from the development topics to the aspect of building applications in a Kubernetes-native way to reach our goal of bringing our Kubernetes-native application into production, ideally in a continuous and automated way.