


Implementing LDAP through IBM Copy Services Manager
This chapter explains how to implement Lightweight Directory Access Protocol (LDAP) remote authentication for the IBM DS8880 system through IBM Copy Services Manager (CSM). It starts with a review of the architecture and highlights the differences with the new, native LDAP implementation.
Because the CSM-based method is not the preferred authentication method for the DS8900F system, we show the configuration that is based on the DS8880 GUI, but this configuration also applies to the DS8900F system.
This chapter covers the following topics:
9.1 Architecture for remote authentication through CSM
As described in 1.2, “Storage Authentication Service by using CSM as an LDAP proxy” on page 2, you need at least one CSM instance to enable remote authentication for the DS8900F system with a code bundle earlier than 89.10.92.0, or for any DS8880 or DS8870 systems. For redundancy, deploy two CSM instances.
|
Tip: There is no restriction on the number of DS8000 systems that may connect to a CSM instance for remote authentication.
|
For remote authentication, you can use the HMC embedded CSM instance, which is available with any DS8900 or DS8880 system, and a CSM instance that is installed on an independent distributed server (also referred to as external CSM). You can mix the embedded and external CSM servers in your configuration.
Figure 9-1 shows an example of a remote authentication implementation that is using two CSM instances for the remote authentication when the login is done through the Storage Manager GUI or DS Command-Line Interface (DS CLI). Only the two CSM servers are connecting through the LDAP protocol to the directory server. All DS8000 HMCs communicate with the CSM instance to authenticate the users.
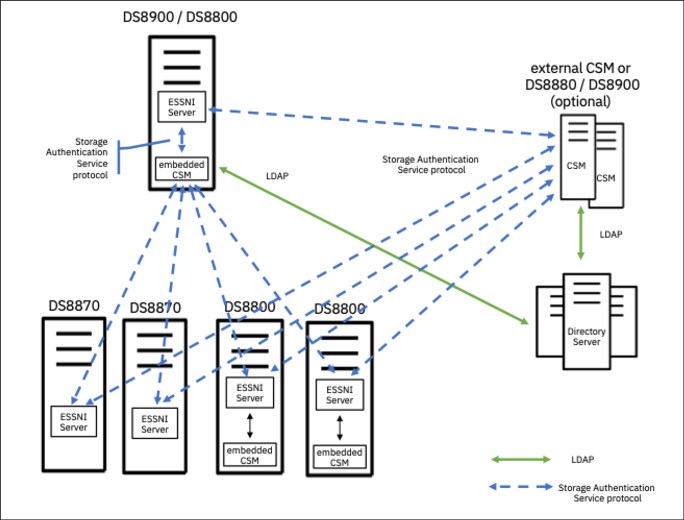
Figure 9-1 Overview of a remote authentication implementation with CSM
For this implementation, you must set up LDAP in CSM and create a single version of the keystores, which then can be deployed to all DS8000 systems in the environment. Using this approach can reduce the administrative overhead to maintain several CSM servers that you might use only for remote authentication.
9.2 Differences between embedded and external CSM
There are some important differences between embedded and external CSM instances to which you must pay close attention for a successful implementation.
9.2.1 Communication and IP ports to use
|
Important: Make sure that you review the ports in use in accordance with your configuration.
|
Table 9-1 shows the CSM IP ports that are required for configuring authentication.
Table 9-1 CSM IP ports that are required for configuring authentication
|
Tool
|
Non-changeable port CSM on the DS8900 / DS8880 HMC
|
Default port CSM on a distributed system
|
|
CSM GUI
|
443
|
9559
|
|
CSM Authentication Service (CSMAuth)
|
443
|
9562
|
|
CSM command-line interface (CLI)
|
443
|
9560
|
|
Active/Standby
|
443
|
9561
|
The DS8900F and DS8880 security settings require that the CSM is reachable through port 443 only, as described in 9.1, “Architecture for remote authentication through CSM” on page 100. For more information, see IBM Knowledge Center.
The port reassignment is done within the DS8000 HMC web server to serve different web services through port 443 and provide one common TLS certificate for all available services. You must take special care when you export the certificates for later use.
9.2.2 Certificates to use for building the truststore
When creating the truststore file that is required to use the Storage Authentication Service (SAS) method, you must carefully consider which certificates are placed in this truststore:
•When using an external CSM instance, you can use the Export Truststore for Remote Connection option from the CSM Settings → Advanced Tools menu.
•When using an embedded CSM instance on a DS8900F or DS8880 HMC, you must build the truststore file on your own by using the communication certificate from the individual HMC.
For more information about how to create the truststore, see 9.3, “Creating a truststore” on page 102.
9.3 Creating a truststore
For the communication between the DS8000 and the CSM authentication servers, the required secure certificates are stored in a file that is called the truststore.
The truststore file contains the certificate of each CSM server that is used by the DS8000 system for the LDAP authentication. The certificates in the truststore are used to secure the connection between the DS8000 HMC and the CSM server.
The truststore file is a Java KeyStore (JKS) file that is maintained by using the keytool command, or iKeyman, which is available in the IBM Java distribution only. In the keystore file, you store the certificates of the CSM servers that are used for remote authentication.
|
Important: If you reinstall the CSM server without a backup or if the HMC is rebuilt by
IBM Service personnel, new certificates might be created. In this case, you must create a truststore file and import those certificates by using the DS GUI or DS CLI. |
If you are using an external CSM server, complete the instructions in 9.3.1, “Obtaining the truststore files for external CSM servers” on page 102. If you are using the HMC embedded CSM server, go to 9.3.2, “Creating the truststore files for an embedded CSM server” on page 104.
9.3.1 Obtaining the truststore files for external CSM servers
When creating the truststore, you must differentiate among several scenarios:
•Obtaining the truststore for two external CSM servers.
•Using one external CSM server.
•Using one or two embedded CSM servers on a DS8900 or DS8800 HMC or one embedded and one external CSM server.
Synchronizing the truststore file when using two external CSM servers
|
Note: This step is required only if you have two external CSM servers. Otherwise, go to 9.3.2, “Creating the truststore files for an embedded CSM server” on page 104.
|
When you have two external CSM servers, you can use the CSM GUI or csmcli to copy the certificate that is used for the authentication service from one CSM server to the other CSM server.
Complete the following steps:
1. Log in to CSM and go to Settings → Advanced Tools, and then click Synchronize, as shown in Figure 9-2 on page 103.
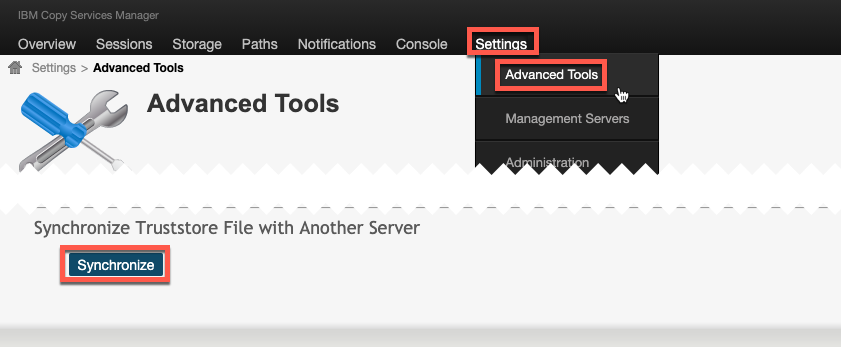
Figure 9-2 CSM GUI: Settings - Advanced Tools section to synchronize the truststore file
2. In the Synchronize Server dialog box that is shown in Figure 9-3, enter the details of the second CSM server. After you click Synchronize, the truststore for the remote authentication is overwritten on the CSM server that is specified.

Figure 9-3 CSM GUI: Synchronize Server to specify the access information to your other CSM server
3. To ensure that the synchronization of the truststore was successful, check the CSM console log for an IWNR4980 message.
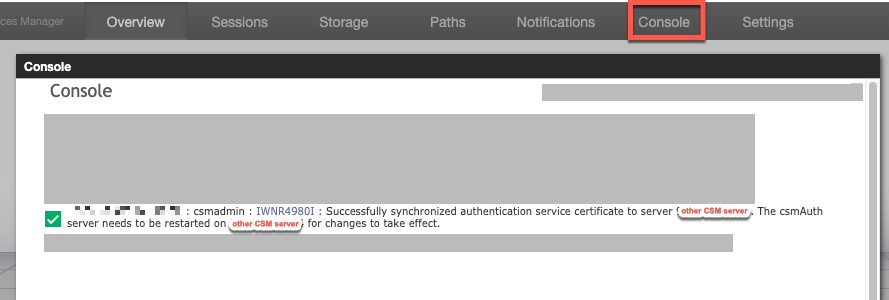
Figure 9-4 CSM GUI: Console showing a successful synchronization
4. After you confirm that the synchronization is complete, restart the csmAuth component of the other CSM server. (You must stop and start the CSM authentication server.) To complete this task, see the following resources:
5. You successfully completed the synchronization of the certificate that is required for the remote authentication. Because both CSM servers now have the same certificate, you can continue the setup.
The synchronization of the truststore can also be performed running the CSMcli syncauthservice command.
Exporting the truststore from the CSM server
|
Attention: This step is required only if you work with one or two external CSM servers. Do not perform those actions if you are using CSM on a DS8880/DS8900 HMC.
|
After you synchronize the truststore as described in “Synchronizing the truststore file when using two external CSM servers” on page 102, you must perform the following steps on only one CSM server, as though you were dealing with only one external CSM server.
You must export the truststore from your CSM server through the CSM GUI. The export function is under the Settings → Advanced Tools menu. Figure 9-5 shows the Export Truststore for Remote Connections section in the Advanced Tools window.
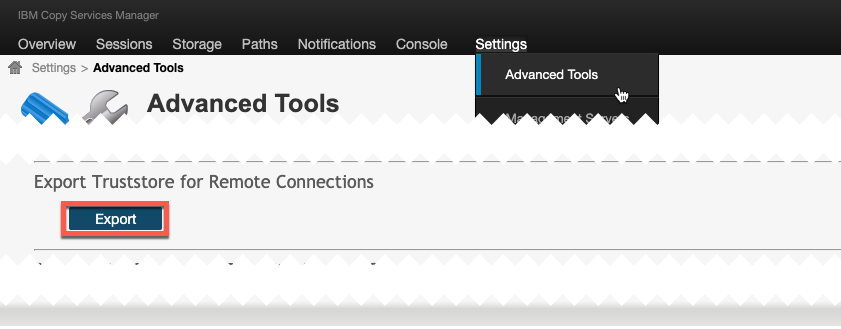
Figure 9-5 CSM GUI: Settings - Advanced Tools section to export the truststore file
After you click Export, the file dialog of your browser opens, and you can download the truststore file to the system running the browser.
Use the truststore file that you downloaded as the truststore file to configure SAS-type remote authentication on your DS8000. The password for the truststore file is passw0rd.
9.3.2 Creating the truststore files for an embedded CSM server
|
Attention: This section applies when you are using an embedded CSM server on the DS8880 or DS8900 HMCs or you are working in a mixed setup of embedded and external CSM servers.
|
When working with a DS8000 HMC embedded CSM, the certificates that are used by CSM are replaced by the HMC certificate. Therefore, the CSM on-board methods for synchronizing and exporting the truststore do not apply. In the following sections, we explain how to obtain the DS8000 certificates and how to create the truststore files. To create the truststore, you need the DS8000 certificates in Privacy Enhanced Mail (PEM) format. The PEM certificate file is Base64 encoded and can be opened in a text editor.
Obtaining the certificate
You can obtain the certificate in different ways:
•Run the openssl command.
•Use a web browser.
•If a certificate authority (CA) signed certificate is installed on your HMCs, ask the person who installed the certificates for a copy of the CA signed certificate and the certificate chain.
The most convenient way is to use the openssl command. The openssl tool is part of the most Linux and Unix distributions. On Windows systems, you can install an openssl port for Microsoft Windows or use the web browser.
Obtaining the certificate with openssl
To obtain the HMC certificate and the certificates of the certificate chain, run the following command:
openssl s_client -showcerts -connect [HMC_IP_or_FQDN]:443
Copy each certificate block into a separate file, including the lines containing BEGIN CERTIFICATE and END CERTIFICATE. Example 9-1 shows a single certificate block.
Example 9-1 PEM format of a certificate that is obtained by running openssl
-----BEGIN CERTIFICATE-----
MIIDvzCCAqegAwIBAgICUYgwDQYJKoZIhvcNAQELBQAwezELMAkGA1UEBhMCVVMx
CzAJBgNVBAgMAlRYMQwwCgYDVQQKDANJQk0xGzAZBgNVBAsMEkRTODAwMCBEZXZl
bG9wbWVudDE0MDIGA1UEAwwrRFM4MDAwIERldmVsb3BtZW50IEludGVybWVkaWF0
ZSBDZXJ0aWZpY2F0ZTAgGA8yMDIwMTAxMjAwMDAwMFoXDTIwMTAxNTE1MTgyOVow
gYkxCzAJBgNVBAYTAlVTMQswCQYDVQQIDAJBWjEPMA0GA1UEBwwGVHVjc29uMQww
CgYDVQQKDANJQk0xFTATBgNVBAsMDGRlZmF1bHRWYWx1ZTEXMBUGA1UEAwwObXlE
UzhrLmlibS5jb20xHjAcBgkqhkiG9w0BCQEWD25vcmVwbHlAaWJtLmNvbTCCASIw
DQYJKoZIhvcNAQEBBQADggEPADCCAQoCggEBAL89IC5KXwzKI+Xx0qRcVyP5Ef/X
JCDUf+rXEttCwFNfid930i6Pk9qmcujf0TqyaqxEFjloXT3U4C0ag0fP1JWaHbCM
tHyu4+PeL5Glyb5yXDdsmAykUlFf0Km4eZnzscZXSleJ9qJncIHR18omyflH4BVV
44O9edfxw/jGBCKdtxiY6NCiizqFRvT95JmD6STGvEnXqZ3ijuhrqRuuAbgM0p31
Zbkkd0N6J4ktgftOlVMP5Ie0Xt/kF+WNq2kCMkKMow4cQi3ETfzNmtsxiAAJcF2u
4HMq3k5AEf9ew6ek8xhEPBZOKT3YXxJ/cqdp5u6ViBQw+txcLxWGwcybIcECAwEA
AaM8MDowCQYDVR0TBAIwADAOBgNVHQ8BAf8EBAMCBaAwHQYDVR0lBBYwFAYIKwYB
BQUHAwEGCCsGAQUFBwMCMA0GCSqGSIb3DQEBCwUAA4IBAQCPUPiqdK3FbejrJllE
MJ7UA18PEuibpHuqRShpeOKuHsmx/lcqHalNYFRH2vmhwVvbNr0VVTcWH9u0TbVi
x5az7MlyadypwOF1bOvCA+UQhB0ITotwACD8Ohq8G+ij5pGt4o8B0NZyo2G/ErCI
dCfNfvXZt5b7+e2qYoVp798+SXw7blw6AMUjXKJQstNq3vINs+lJGnuUxELWCRqd
fq1Ra9DTeJdYJ3gyh5UOrTxMfhrM9bIbXERABs6WTLTXMW9Yng+EH8O2Tza2f67R
GJ295N0q2HMGCg/iO/OUhDIXsRzBcwJejJWsoGl4QrHlemw2tr+RBCF4x8atk0eZ
ujAw
-----END CERTIFICATE-----
You must store all certificates in separate files because you must import the certificates one by one into your truststore later.
If you want to obtain the certificate from the external CSM server, you must use the same openssl command, but you specify port 9562 instead:
openssl s_client -showcerts -connect CSM_Server:9562
Obtaining the certificate by using a web browser
For our example of obtaining the certificate by using a web browser, we use Mozilla Firefox as the browser. To use Microsoft Edge or Google Chrome, see Appendix C, “Exporting secure certificates by using the Google Chrome and Microsoft Edge web browsers” on page 147.
Complete the following steps:
1. Open the web browser and connect to the correct URL for the DS8000 system to retrieve the certificate that you want to export. Figure 9-6 shows the DS8000 login window.

Figure 9-6 DS8000 login window
2. Click the lock next to the URL. A new window opens, as shown in Figure 9-7 on page 107.

Figure 9-7 Secure connection: Firefox
3. Click the arrow on the right. Figure 9-8 shows that the certificate is verified.
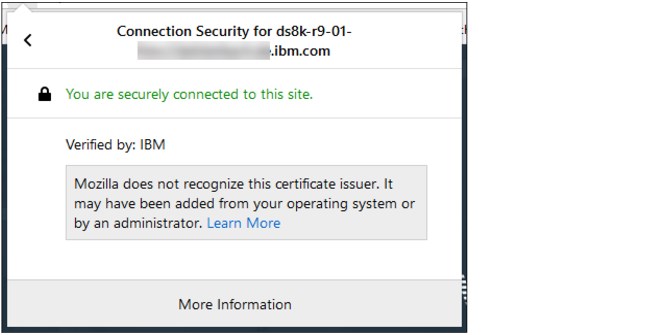
Figure 9-8 Certificate verification
4. Click More Information. Data that is related to the website, privacy, history, and technical details is shown. Figure 9-9 shows an example.
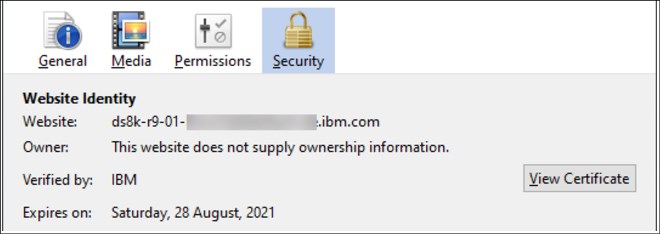
Figure 9-9 Website Identity abbreviated
5. Click View Certificate. Information that is related to the certificates is displayed. There also are links to download the PEM (cert) if the HMC is using a self-signed certificate, or to download the PEM (chain) if the HMC is using a certificate that is signed by a CA.
The file must be downloaded and saved. Figure 9-10 shows a modified view of the certificate page.

Figure 9-10 PEM certificate and chain
6. Verify that the PEM file successfully downloaded, as shown in Figure 9-11 on page 109.

Figure 9-11 Saved PEM files
If you must obtain the certificate for the CSM authentication service from your external CSM server, use the following URL scheme:
https://my_external_CSM:9562
The browser might present a potential security risk due to a self-signed certificate that is presented from the CSM server. This behavior is expected, so you can accept the risk for the connection on port 9562.
The chain file has two or more certificates, and the file must be split with a text editor. Each file should contain one certificate section, as shown in Example 9-1 on page 105.
Building the truststore file
To build the truststore, you must meet the following requirements:
•Be able to run the keytool command, which is part of each Java distribution, or the iKeyman program, which is part of the IBM Java distribution.
•You need all certificates from the HMC or CSM server and the certificate chain in the individual files.
After you obtain the certificate files in the PEM format, you must add each individual certificate to the truststore by running the following command:
keytool -importcert -keystore [truststore_file_name].jks -noprompt -storepass [tuststore_password] -alias [unique_alias] -file [PEM_FILE]
|
Important: The alias that is specified in the -alias option must be unique.
|
When you create the file while adding the first certificate, you are prompted for the password of the keystore. This password is also required when you import the truststore to the DS8000 system later. Example 9-2 shows a certificate being added to a truststore file.
Example 9-2 Creating and adding the first certificate to the truststore file
% keytool -importcert -keystore myCSM_LDAP_truststore.jks -noprompt -storepass XXXXXXXXXX -alias r9-hmc1 -file r9-hmc1.pem
Certificate was added to keystore
Run the same keytool command for all the certificate files that you created.
If you try to import a certificate that is already in the keystore, the keytool command issues a message.
You can use the -list option of the keytool command to display the fingerprints of the certificates in the keystore:
keytool -list -keystore [truststore_file_name].jks -storepass [tuststore_password]
Example 9-3 shows how to display the content of your keystore.
Example 9-3 Listing all the keys in the keystore
keytool -list -keystore myCSM_LDAP_truststore.jks -storepass XXXXXXXXXX
Keystore type: jks
Keystore provider: SUN
Your keystore contains four entries
r9-hmc2, MMM DD, YYYY, trustedCertEntry,
Certificate fingerprint (SHA1): EB:AE:E3:EA:D0:F4:38:DD:68:80:79:BF:9E:45:F4:CD:FC:38:03:E2
interm, MMM DD, YYYY, trustedCertEntry,
Certificate fingerprint (SHA1): 6E:B8:29:1F:E2:E5:11:DC:55:50:6E:1F:16:74:7E:4D:34:71:60:FB
root, MMM DD, YYYY, trustedCertEntry,
Certificate fingerprint (SHA1): 27:E1:A7:9E:34:8B:B1:21:7B:90:B4:2A:C0:7F:1B:F0:08:32:98:5B
r9-hmc1, MMM DD, YYYY, trustedCertEntry,
Certificate fingerprint (SHA1): 69:42:E0:18:C6:E6:D0:8F:31:CA:2B:8B:E2:C3:06:CF:40:44:BF:CB
After you add all the certificates, you create your truststore successfully.
9.4 Configuring the CSM servers for LDAP authentication
You can configure LDAP authentication on a CSM server by using the CSM GUI or the CSM CLI.
9.4.1 Configuring LDAP by using the CSM GUI
To configure LDAP on CSM, you must use a CSM user ID with an Administrator role. For the example in this paper, the default user ID csmadmin is used.
From a web browser, open the CSM GUI and run the following commands:
•For CSM that is embedded on the DS8880 or DS8900 HMC:
https://<HMC_IP_or_FQDN>/CSM/
•For CSM stand-alone servers:
https://<server_IP_or_FQDN>:9559/CSM/
Figure 9-12 shows the CSM GUI login dialog box.
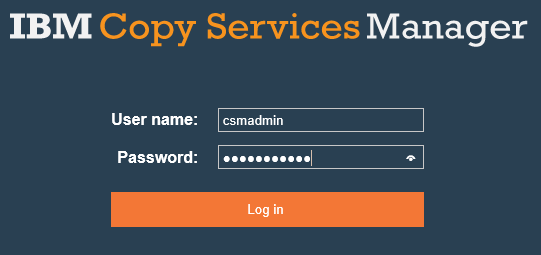
Figure 9-12 CSM GUI login dialog box
After the credentials are authenticated by CSM, select Settings → Administration, and then click Modify. Figure 9-13 shows an example where we need to provide the following information.

Figure 9-13 Basic LDAP configuration
•Authentication method:
– Select Active Directory if you use a Microsoft Active Directory (AD) Server.
– Select LDAP for any other server other than Microsoft AD.
•Authentication servers
Specify the IP address or server name and the port. For redundancy, specify more than one server.
•Bind user ID
Specify the Bind user ID in the full Distinguished Name (DN) format. For Microsoft AD, you also can specify the userPrincipleName of the Bind user ID.
•Bind password
The LDAP password for the user that is entered in the Bind User ID field.
•Search base for users and groups.
In Figure 2-2 on page 13, the search base is dc=ds8ksme,dc=ibm,dc=com. The search base instructs CSM to look for users and groups that are stored on any part of the domain ds8ksme.ibm.com.
•Enable SSL
You must upload a file that contains all the certificates in PEM / Base64 format. You can obtain the certificates by using the openssl tool, or you can ask your LDAP administrator for the certificates, including the certificate chain in PEM format. Then, you can create that file by using a simple text editor and copying gall certificates into a single file. For more information, see IBM Knowledge Center.
Figure 9-14 shows the complete configuration dialog box and the Load Certificate button that you use to upload the certificate text file.
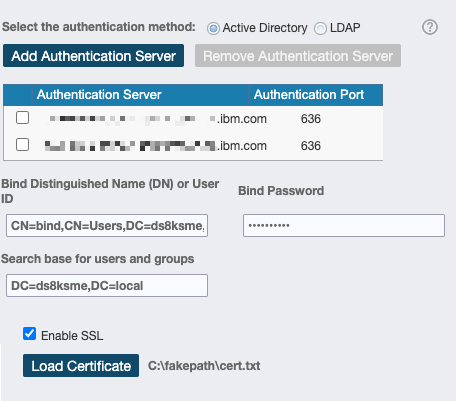
Figure 9-14 Basic LDAP Tab: Completed configuration dialog box
Example 9-4 illustrates the advanced LDAP configuration by using the Advanced tab. If you must replicate the same LDAP configuration to another CSM server, you can use the Basic tab to create the initial configuration. As soon as it is tested and saved, you can copy the content of Advanced tab to paste it to all the other CSM servers on which you want to have LDAP configured.
Example 9-4 Advanced LDAP configuration
<server description="IBM Copy Services Manager LDAP Registry">
<ldapRegistry baseDN="DC=ds8ksme,DC=ibm,DC=com" bindDN="CN=bind,CN=Users,DC=ds8ksme,DC=ibm,DC=com" bindPassword="{aes}----encrypted-password-here----------" host="xxxxxx.xxxxx.xx.ibm.com" id="ldapregistry" ignoreCase="true" ldapType="Microsoft Active Directory" port="636" realm="ldapregistry" sslEnabled="true" sslRef="ldapsslref">
<failoverServers name="failoverServers">
<server host="xxxxxx.xxxxx.xx.ibm.com" port="636"/>
</failoverServers>
</ldapRegistry>
</server>
Click Test to verify that CSM can communicate with LDAP servers. Figure 9-15 shows a successful communication.

Figure 9-15 CSM successfully contacts the LDAP servers
Click Save to save the LDAP configuration.
At this stage, the necessary configuration to make the CSM servers available to be used as authentication servers by DS8000 is complete. Also, if you use CSM for Copy Services management, it is ready for LDAP authentication.
Nested group support
Starting with CSM V6.2.10, the CSM authentication server can search in nested group structures.
To take advantage of this feature, you must add the configuration option recursiveSearch="true" into the XML structure of the Advanced LDAP configuration tab or modify ldapregistry.xml on an external CSM server.
For more information, see IBM Knowledge Center.
9.4.2 Configuring LDAP by using the CSM command line
The CSM command line (csmcli) is automatically installed on the CSM server during the normal installation process.
If you want to use csmcli from a remote workstation or server, you must download it from
IBM Fix Central.
IBM Fix Central.
The process for csmcli installation and the initial configuration are described in
IBM Knowledge Center.
IBM Knowledge Center.
From the CSM command line, you can use two different commands for LDAP configuration based on your LDAP server type:
•mkadcfg: Used only to configure the Microsoft AD server-based authentication.
•mkldapcfg: Used to configure any LDAP server other than Microsoft AD.
The lsauthcfg command is used to show the current authentication configuration.
|
Note: If you want to enable SSL for a Microsoft AD server on CSM, you must use the CSM GUI because that option is available only for the mkldapcfg command.
|
Example 9-5 shows the process of configuring an LDAP server on CSM by using the command line.
Example 9-5 Configuring an OpenLDAP server on CSM by using the csmcli tool
Enter a username for logging on to the server
csmadmin
Enter a password for logging on to the server
>
IBM Copy Services Manager Command-Line Interface (CLI)
Copyright 2007, 2015 IBM Corporation
CLI Client Version: 6.2.10, Build: a20200915-0935
Authentication file: csmcli-auth.properties
Connected to:
Server: yyyy.yy.ibm.com Port: 9560 UseREST: false
Server Version: 6.2.9.1, Build: a20200804-1704
csmcli> lsauthcfg
IWNR4962W [Oct 20, 2020 7:48:14 AM] No LDAP configuration found.
csmcli> mkldapcfg -server xxx.xx.ibm.com:636;xxx.xx.ibm.com:636 -baseDN "DC=ds8ksme,DC=ibm,DC=com" -bindDN "CN=bind,DC=ds8ksme,DC=ibm,DC=com" -password XXXXX -keyfilepath /home/master/cert.txt
IWNR4950I [Oct 20, 2020 7:48:14 AM] Successfully updated the LDAP configuration.
csmcli> lsauthcfg
Server Port Role Type
================================
xxx.xx.ibm.com 636 Primary LDAP
xxx.xx.ibm.com 636 Failover LDAP
csmcli>
9.5 Configuring the DS8000 system for LDAP authentication
To configure the DS8000 system for LDAP authentication, you can use either the DS GUI or the DS CLI. The LDAP and CSM servers must be running and the CSM servers must be configured as described in 9.4, “Configuring the CSM servers for LDAP authentication” on page 110.
9.5.1 Using the DS Storage Manager GUI
To configure the DS8000 LDAP authentication on systems, complete the following steps. Make sure that you have the latest recommended code running on your DS8880 system when configuring remote authentication. The following procedure was documented on a DS8880 system running Licensed Machine Code (LMC) bundle 88.56.9.0.
1. Open the DS GUI (https://DS8000_HMC_IP) and log in with an administrative user ID and password, and then click Log in (Figure 9-16).
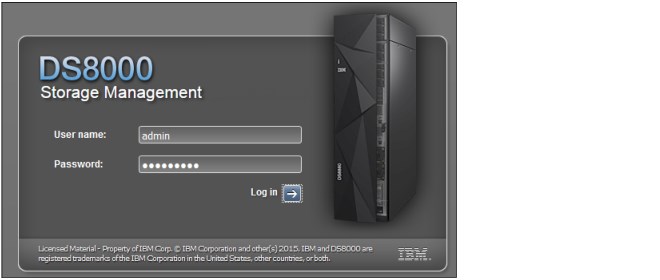
Figure 9-16 DS8000 Storage Management login window

Figure 9-17 Security settings

Figure 9-18 Remote Authentication option
4. The Welcome window of the Remote Authentication wizard opens. Click Prerequisites to display and review the prerequisites for enabling remote authentication. (Figure 9-19).
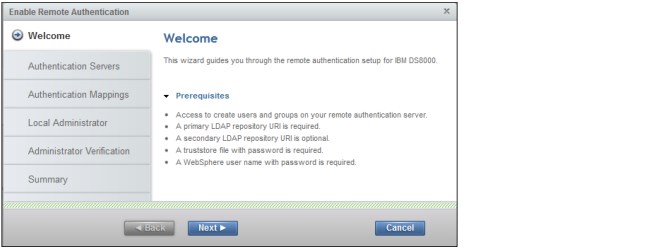
Figure 9-19 Prerequisites for enabling remote authentication
5. Click Next to open the Authentication Servers tab to enter the authentication servers configuration, as shown in Figure 9-20.
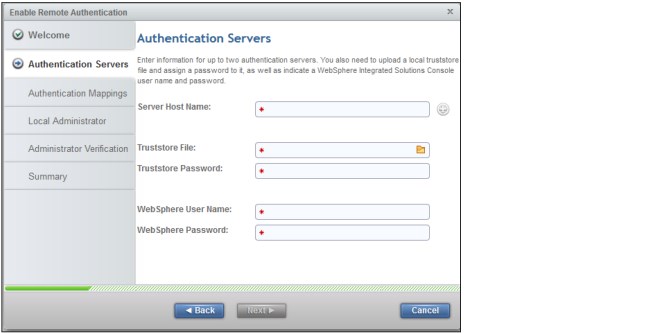
Figure 9-20 Authentication servers configuration
Enter the following information:
– For Server Host Name, you can add up to two authentication servers that DS8000 can use for LDAP authentication. The Uniform Resource Identifier (URI) for each authentication server must be provided. Which URI to use depends on where the CSM server is installed:
• For an embedded CSM on the DS8000 HMC, use:
https://FQDN_or_IP_of_CSM/CSMAuth/TokenService
|
Note: Do not specify any port for using an embedded CSM. With HTTPS, the standard port 443 is used because it is the only allowed port for the embedded CSM instance.
|
• For an external CSM server, use:
https://FQDN_or_IP_of_CSM:9562/CSMAuth/TokenService
|
Note: 9562 is the predefined port for the CSM Authentication Service. This port might be different in your installation. To verify the correct port, speak to your CSM admin.
|
• If you are planning to use embedded and external CSM servers, you might have an URI that contains the CSM Authentication Service port and one URI without the port.
– For Truststore File, click the Folder icon to select the truststore file where the CSM secure certificates are stored. For more information about the truststore file, see 9.3, “Creating a truststore” on page 102.
– For Truststore Password:
• If you created your truststore file by following the instructions in 9.3.1, “Obtaining the truststore files for external CSM servers” on page 102, use the passw0rd (with a zero instead of the letter O) password.
• If you created the truststore file by following the instructions on 9.3.2, “Creating the truststore files for an embedded CSM server” on page 104, enter the password that was defined when the truststore was created.
– For WebSphere User Name, enter an existing LDAP user ID to be used by the DS8000 to authenticate on the CSM servers.
|
Note: You can use any existing LDAP user ID for authentication service. However, It is a best practice to use the same CSM bind user ID that is defined in 9.4.1, “Configuring LDAP by using the CSM GUI” on page 110. For example, if during the CSM LDAP configuration you used bind user ID CN=bind,DC=ds8ksme,DC=ibm,DC=com for the WebSphere User Name, use the user ID bind.
|
– For WebSphere Password, enter the password that is defined for the WebSphere User Name (in our example, it is the password for the LDAP user ID bind).
Figure 9-21 shows an example of configuration where two stand-alone CSM servers are used for LDAP authentication.
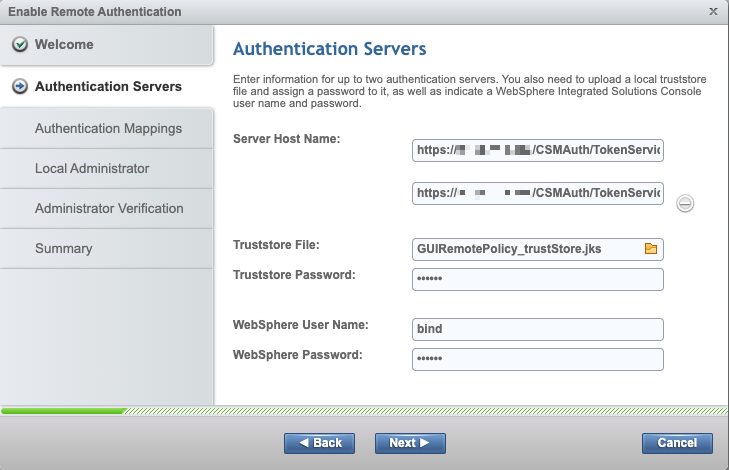
Figure 9-21 Example of a configuration that uses two stand-alone CSM servers for authentication
6. Click Next to display the Authentication Mappings window (Figure 9-22). You must assign DS8000 roles to the LDAP remote users or groups that you want to grant access to log in on the DS8000 system.
Click Add Remote Mapping to create an authentication mapping and to select the DS8000 role that you want to map.

Figure 9-22 Authentication Mappings window
7. In the Create Authentication Mapping window (Figure 9-23 on page 119), complete these fields:
a. Select the DS8000 user role to be mapped from the Select the user role on the DS8000 to be mapped menu. If you need detailed information about each DS8000 user role, see Figure 3-5 on page 22.
|
Note: The secadmin role can be managed only by a DS8000 user that already belongs to that role (such as the default user secadmin). For more information about how to map an LDAP user to the Security Administrator role, see 9.6, “Mapping LDAP users and groups to the DS8000 Security Administrator role” on page 129.
|
b. For Mapping Type, select the LDAP object type (User or User Group) that you want to use for mapping to a DS8000 role.
c. For User Name or Group Name, enter the name of user ID or group ID that exists in the LDAP directory and for which you want to grant access to the DS8000 system.
d. Click Add. To add new mappings, repeat the steps from this section. For more information about user groups and roles, see 3.1, “DS8000 basic user management and access” on page 18.

Figure 9-23 Creating an authentication mapping
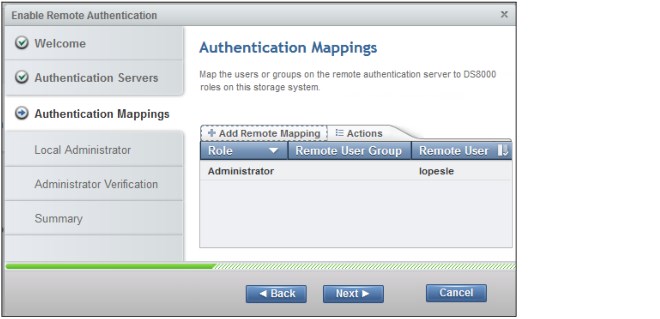
Figure 9-24 Example of an authentication mapping
9. In the Local Administrator window (Figure 9-25), you can define an existing DS8000 local administrator that remains active for recovery if the remote authentication servers (LDAP, CSM, or both) are not available.
Select the Allow checkbox to enable the local administrator feature. Then, select one of the existing DS8000 local users with the administrator role to be used as the recovery user. The current password that is configured for the local user that you selected is used. Therefore, make sure that the correct password is configured before proceeding to the next steps. After the remote authentication is enabled, you cannot change the password for the recovery user.
Assigning an administrator role helps to avoid a situation where you activate remote authentication with an LDAP server with no defined mapping for an administrator account. If you activated remote authentication without a defined mapped administrator and then log out, you cannot log back in to add remote authentication mappings.
.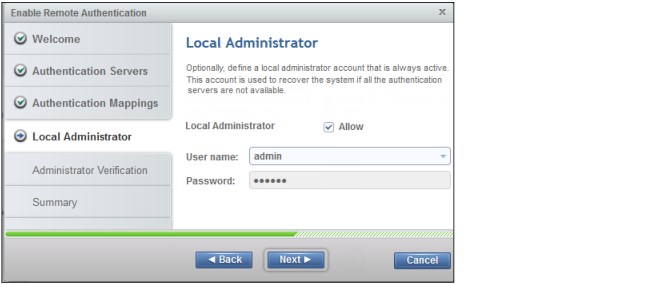
Figure 9-25 Enabling the local default DS8000 user “admin” to be used for recovery
|
Note: As a best practice, use the default local DS8000 admin user as the recovery user ID (local administrator). Also, note the password.
|
If you must disable remote authentication on the remote LDAP/CSM servers, you must log in by using the valid credentials of the recovery user. If you do not have these credentials, call IBM and request that a person from the remote IBM support team connect to your system and reset the credentials for the default admin user. This process can take some time, and you cannot connect to the DS8000 system until the reset is performed remotely.
|
Note: Decide whether you need to map users to the secadmin role by following the steps in 9.6, “Mapping LDAP users and groups to the DS8000 Security Administrator role” on page 129.
|
10. Click Next to display the Administrator Verification window.
11. During the remote authentication activation, the DS8000 system tries to authenticate with the LDAP server by using the LDAP users that you previously mapped to the Administrator role (step 7 on page 126) to validate that the configuration is working. In the Administrator Verification window (Figure 9-26), you must specify one of the LDAP users that you mapped as a DS8000 administrator and provide its LDAP credentials.
If the LDAP username you provided was not previously mapped to the DS8000 Administrator role or the provided password for it is not correct, the remote authentication activation fails.

Figure 9-26 LDAP user that is mapped to the DS8000 Administrator role to be used for verification
12. Click Next to open the Summary window. Review all the selections (Figure 9-27) before you finalize the remote authentication setup. Click Back to make changes, if necessary. Otherwise, click Finish to enable the remote authentication.

Figure 9-27 Configuration summary for remote authentication
If remote authentication was successfully enabled, you get the status “Task completed”, and the DS GUI automatically disconnects your session, which indicates that the authentication policy changed (Figure 9-28). The default internal name for the remote authentication policy that is created by the DS GUI is GUIRemotePolicy.
You can now log in to the DS GUI by using any LDAP user ID that you mapped during the remote policy configuration.
If you need to add mappings to DS8000 roles, follow the steps in 3.1, “DS8000 basic user management and access” on page 18.
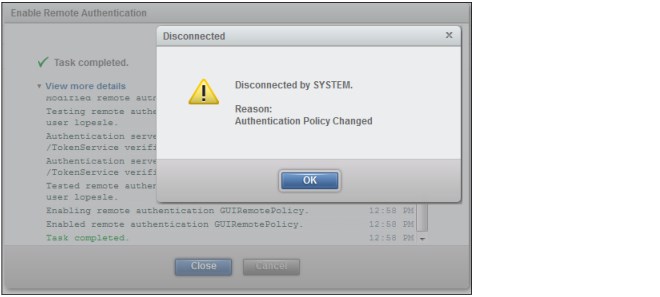
Figure 9-28 Message that is received when remote authentication is successfully enabled
Using the GUI to disable remote authentication
To disable remote authentication and re-enable DS8000 local authentication, complete the following steps:
1. Log in to the DS GUI (https://DS8000_HMC_IP) by using an external LDAP user that has DS8000 administrator privileges or use the local DS8000 administrator user ID that you configured for contingency/recovery. Select Settings → Security → Remote Authentication (Figure 9-29).

Figure 9-29 Enabling Remote Authentication
2. For Remote Authentication, select Disabled and provide the credentials of any existing DS8000 local administrator user (it can be the recovery/contingency username itself or any previous local administrator for which you know the credentials).
Click Enable to re-enable the DS8000 local authentication (Figure 9-30).

Figure 9-30 Providing the credentials to enable DS8000 local authentication
3. Click Yes to confirm that you want to enable the DS8000 local authentication and disconnect any user who is currently logged in and is using remote authentication (Figure 9-31).

Figure 9-31 Warning message while enabling DS8000 local authentication
4. If remote authentication is successfully enabled, you see the status “Task completed”, and the DS GUI automatically disconnects your session with the reason “Authentication Policy Changed” (Figure 9-32).

Figure 9-32 Concluding the tasks for enabling DS8000 local authentication
You can now log in to the DS GUI by using any valid DS8000 local user.
9.5.2 Configuring DS8000 LDAP authentication by using the DS CLI
Rather than using the DS GUI, you can configure the DS8000 external authentication policy through the DS CLI by completing the following steps:
1. Open the DS CLI command window and connect to your DS8000 system by using the credentials from a local DS8000 administrator user (such as the default admin user ID).
2. To see the existing authentication policies, enter the lsauthpol command, as shown in Example 9-6. As you can see, the default initialPolicy is set to Basic (local authentication).
Example 9-6 Listing the authentication policies
dscli> lsauthpol
name type state
==========================
initialPolicy Basic active
3. Create an empty policy. Where -type sas specifies the authentication policy type, enter the mkauthpol -type sas itsopolicy command that is shown in Example 9-7. Currently, SAS is the only valid value for this parameter, and it is required. Also, itsopolicy defines the name for the new policy.
Example 9-7 Creating a policy
dscli> mkauthpol -type sas itsopolicy
CMUC00365I mkauthpol: The authentication policy itsopolicy has been created.
Example 9-8 Listing of the available policies
dscli> lsauthpol
name type state
============================
initialPolicy Basic active
itsopolicy SAS inactive
5. Add the authentication servers to itsopolicy, as shown in Example 9-9. Enter the setauthpol command with the -action setauthserver and -loc parameters, where -loc contains the URI for the CSM servers. In this example, we add two CSM stand-alone servers.
Example 9-9 Setting the CSM authentication servers
dscli> setauthpol -action setauthserver -loc https://my_embedded_CSM_on_HMC_1/CSMAuth/TokenService,https://my_embedded_CSM_on_HMC_2/CSMAuth/TokenService itsopolicy
CMUC00366I setauthpol: The authentication policy itsopolicy has been modified.
For the -loc parameter, you can add up to two authentication servers that the DS8000 system requests for LDAP authentication. The URI for each authentication server should be provided. Which URI to use depends on where your CSM server is installed:
– If the CSM server is installed on the DS8000 HMC, use the following URI:
https://my_embedded_CSM_on_HMC/CSMAuth/TokenService
– If the CSM server is installed on a stand-alone server, use the following URI:
https://my_external_CSM:9562/CSMAuth/TokenService
|
Important: If one of your CSM servers is installed on a stand-alone server and one is installed on the HMC, you must use the corresponding URI. For example:
•URI for the primary CSM (a stand-alone server):
https://my_external_CSM:9562/CSMAuth/TokenService
•URI for the secondary CSM (installed on HMC):
https://my_embedded_CSM_on_HMC/CSMAuth/TokenService
The only requirement for this configuration is that you must create the Java truststore file containing the secure certificates from both CSM servers according to the procedure in 9.3.2, “Creating the truststore files for an embedded CSM server” on page 104.
|
6. Add the keystore file to the itsopolicy policy. Enter the setauthpol command with the -action settruststore and -loc parameters, where the value is the location of the truststore file (see 9.5, “Configuring the DS8000 system for LDAP authentication” on page 114). Use the -pw parameter for the truststore file password, as shown in Example 9-10.
Example 9-10 Setting the key
dscli> setauthpol -action settruststore -loc c:key_itso.jks -pw passw0rd itsopolicy
CMUC00366I setauthpol: The authentication policy itsopolicy has been modified.
7. Enter the credentials of an existing LDAP user that will be used by the DS8000 to authenticate with the CSM servers by using the setauthpol command with the -action setsasuser parameter, as shown in Example 9-11. In this example, we use an LDAP user that is called csmldapuser (with the password LDAP$3cret).
Example 9-11 Setting the SAS user
dscli> setauthpol -action setsasuser -username csmldapuser -pw LDAP$3cret itsopolicy
CMUC00366I setauthpol: The authentication policy itsopolicy has been modified.
|
Note: Although you can use any existing LDAP user ID for authentication, as a best practice, use the same CSM bind user ID that is defined in 9.4.1, “Configuring LDAP by using the CSM GUI” on page 110.
For example, if during the CSM LDAP configuration you used bind user ID CN=csmldapuser,CN=Users,DC=itso,DC=ibm,DC=com, then use csmldapuser for the WebSphere User Name.
|
8. Map existing users and user groups from the LDAP server to user groups on the DS8000 system by running the setauthpol -action setmap command with the -extuser or -extgroup parameters that are associated to the specific DS8000 groups (-dsgroup), as shown in Example 9-12.
Example 9-12 Mapping a user to a group
dscli> setauthpol -action setmap -extuser lopesle,omarhass -dsgroup admin itsopolicy
CMUC00366I setauthpol: The authentication policy itsopolicy has been modified.
dscli> setauthpol -action setmap -extgroup ldapmonitors -dsgroup monitor itsopolicy
CMUC00366I setauthpol: The authentication policy itsopolicy has been modified.
In Example 9-12, we add three mappings:
– The LDAP users lopesle and omarhass are being mapped to the DS8000 Administrator role.
– All the LDAP users that belong to the LDAP group ldapmonitors are mapped to the DS8000 Monitor role.
For more information about user groups and roles, see 3.3, “Planning for LDAP user groups and mappings” on page 31.
|
Note: Decide here whether you need to map users to the secadmin role. Follow the steps in 9.6, “Mapping LDAP users and groups to the DS8000 Security Administrator role” on page 129.
|
9. Starting with code bundle 87.50.114.0, you can allow a local administrator to access the system when a remote authentication policy is configured and the external LDAP servers are inaccessible. If your code bundle supports this feature, run the setauthpol command with the -action setlocaladmin parameter, as shown in Example 9-13.
In this example, the default DS8000 local user admin is configured as the recovery ID.
Example 9-13 Setting the contingency/recovery ID
dscli> setauthpol -action setlocaladmin -username admin -enable itsopolicy
CMUC00366I setauthpol: The authentication policy itsopolicy has been modified.
Example 9-14 Showing the details about the itsopolicy
dscli> showauthpol itsopolicy
name itsopolicy
type SAS
state inactive
location https://csm01.itso.ibm.com:9562/CSMAuth/TokenService,https://csm02.itso.ibm.com:9562/CSMAuth/TokenService
truststore itsopolicy_trustStore.jks
sasuser csmldapuser
localAdmin admin
11. Test the configuration by running the testauthpol command and the credentials from one of the LDAP users that you mapped as a DS8000 administrator in the previous steps, as shown in Example 9-15.
Example 9-15 Testing the configuration
dscli> testauthpol -username lopesle -pw MySecur3Pas$ itsopolicy
CMUC00371I testauthpol: The authentication policy itsopolicy has been authenticated on location https://csm01.itso.ibm.com:9562/CSMAuth/TokenService.
CMUC00371I testauthpol: The authentication policy itsopolicy has been authenticated on location https://csm02.itso.ibm.com:9562/CSMAuth/TokenService.
12. If the test completes successfully, you can activate the policy by running the chauthpol command with the -activate parameter and the credentials from one of the LDAP users that you mapped as a DS8000 administrator, as shown in Example 9-16.
The basic authentication is inactive, and you see a command execution time-out message after some time (about 5 minutes). This message is expected, and you must log off from the DS CLI and reconnect by using the LDAP credentials.
Example 9-16 Activating the itsopolicy
dscli> chauthpol -activate -username lopesle -pw MySecur3Pas$ itsopolicy
CMUC00370W chauthpol: Are you sure that you want to modify the authentication policy itsopolicy? [y/n]:y
CMUN00015E chauthpol: Command execution timeout
13. Connect again to the DS CLI by using an LDAP user with the Administrator role and check the state for the policy by running the lsauthpol command (Example 9-17).
Example 9-17 Listing the available policies
ddscli> lsauthpol
name type state
============================
initialPolicy Basic inactive
itsopolicy SAS active
Disabling the remote authentication policy by using the DS CLI
To disable a remote authentication policy by using the DS CLI, complete the following steps:
1. Open the DS CLI command window and connect to your DS8000 system by using the credentials from a DS8000 administrator user (or the recovery ID - Local Administrator feature).
2. To see the existing authentication policies, run the lsauthpol command, as shown in Example 9-18. In this example, the remote authentication policy GUIRemotePolicy is active (enabled) and the local authentication policy initialPolicy is inactive (disabled).
Example 9-18 Listing authentication policies
dscli> lsauthpol
name type state
==============================
GUIRemotePolicy SAS active
initialPolicy Basic inactive
3. To disable a remote authentication policy, enable the local authentication (the basic initialPolicy). Run the chauthpol command with the -activate parameter for the initialPolicy and provide the credentials from one DS8000 local administrator user, as shown in Example 9-19. All remote users who are currently logged in are logged out.
Example 9-19 Enabling the local authentication policy
dscli> chauthpol -activate -username admin -pw Adm1nP4S$ initialPolicy
CMUC00370W chauthpol: Are you sure that you want to modify the authentication policy initialPolicy? [y/n]:y
CMUC00369I chauthpol: The authentication policy initialPolicy has been modified.
dscli> lsauthpol
name type state
==============================
GUIRemotePolicy SAS inactive
initialPolicy Basic active
9.6 Mapping LDAP users and groups to the DS8000 Security Administrator role
To map any LDAP user or group to the Security Administrator role, complete the following steps:
1. Make sure that the remote authentication policy that you want to change is disabled (inactive), as shown in Example 9-20. If it is enabled, any user with Storage Administrator authority must disable it by using the steps that are detailed in “Disabling the remote authentication policy by using the DS CLI” on page 128, “Using the GUI to disable remote authentication” on page 123, and “Disabling the remote authentication policy by using the DS CLI” on page 128.
2. Open the DS CLI command window and connect to your DS8000 system by using the credentials from a local DS8000 security administrator user (for example, the default secadmin user ID).
|
Tip: The commands cannot run on the embedded DS CLI. You must use an external DS CLI session.
|
3. To see the existing authentication policies, run the lsauthpol command, as shown in Example 9-20. In this example, the only available remote authentication policy GUIRemotePolicy is inactive (disabled).
Example 9-20 Listing the available authentication policies
dscli> lsauthpol
name type state
==============================
GUIRemotePolicy SAS inactive
initialPolicy Basic active
4. Map any existing users and user groups from the LDAP server to the DS8000 Security Administrator group by running the setauthpol -action setmap command with the -extuser or -extgroup parameters, as shown in Example 9-21.
In this example, the LDAP user ldapsecadminuser is associated to the DS8000 Security Administrator role.
Example 9-21 Mapping an LDAP user to the DS8000 Security Administrator group
dscli> setauthpol -action setmap -extuser ldapsecadminuser -dsgroup secadmin GUIRemotePolicy
CMUC00366I setauthpol: The authentication policy GUIRemotePolicy has been modified.
5. If you must create any extra mappings to the DS8000 Security Administrator role, repeat step 4. When you have create all the mappings that you need, disconnect from the DS CLI.
6. Inform your DS8000 Storage Administrator that the remote authentication policy was changed and that it can be activated. When the storage administrator activates the remote authentication policy, all the LDAP users that were mapped in step 4 can log in to the DS8000 system.
..................Content has been hidden....................
You can't read the all page of ebook, please click here login for view all page.