

Don’t become too fixed in your ideas about what makes a technically good photograph. Successful pictures don’t necessarily have to be blur-free, full of detail and an accurate record of what was in front of your camera. In fact, sometimes what at first seemed like an error can produce the sort of image that sums up an event or expresses a subject better than a completely controlled photograph that produces a predictable result. Happy accidents or the unexpected result mean that you can then explore this approach further, allowing you another chance to expand your picture-making skills. It’s also great fun.
Few of the techniques in this part call for equipment beyond a camera offering a ‘B’ setting shutter (long exposure), or a couple of small attachments such as lens filters. On the other hand, they are all suggestions for experiments, so you must be prepared to waste film on a trial-and-error basis. Or if you are a digital shooter, expect to shoot many images in order to obtain a couple that are usable.
Don’t let this idea worry you, as even professionals expect to shoot many frames for one good result. This is often called the ‘shooting ratio’. Areas like wildlife photography and sports journalism typically have high numbers of wasted photographs for every one or two acceptable pictures. For your experiments take a range of versions of your subject, making notes of the settings used. This way you can match the results with the techniques used to produce them. You can then, if necessary, make further experimental shots based on your best results.
Remember too that even after the shooting and processing stages there is still plenty you can do to alter and reconstruct pictures. This can be done by joining prints, combining slides, and hand-coloring black and white prints. A wider range of manipulative possibilities opens up if you are working with digital photographs and some of the special effects features of one of the many image editing software packages on the market.
The painter Paul Klee once said that ‘a line is a dot that has gone for a walk’. In photography, as soon as you allow the image to move, while it is exposing every dot, the highlights of the picture are drawn onto the photograph as a line. This image movement might be the result of shifting your camera during a long exposure, in which case the subject remains static and fixed and the camera moves (see Figure 38.1). Alternatively, the camera might remain still and the subject move. Or thirdly, interesting pictures can result when both the camera and subject are on the move, as in Figure 38.7.
We are all used to experiencing blur as a symbol of movement, from close objects rushing past the car window, to the streaks drawn behind characters in comic strips. A photograph can exaggerate speed by showing the subject with lengthy blur trails, created by allowing considerable image movement during a long exposure time. Your subject can appear to have bumpy or smooth motion too, according to the shape of the lines – something you can control by jerking or gliding the camera with its shutter open. In extreme instances (Figure 38.2, for example), the nature of the subject gets lost and what you create is an abstract pattern of color and light.
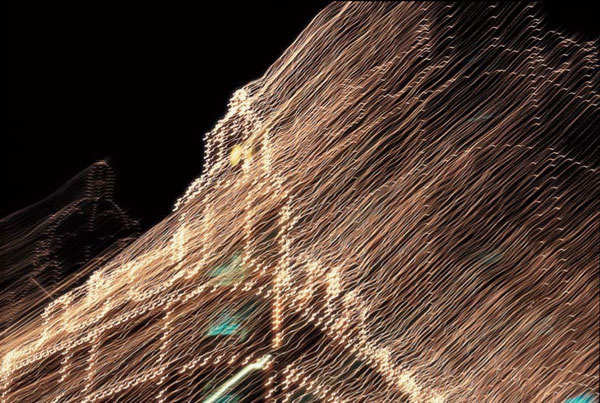
Figure 38.1 Not on fire – the camera was just shifted part way through exposure.
General technique
The best way to start experimenting is to shoot at night, picking scenes containing plenty of pinpoints of different colored light. Street lights, illuminated signs, decorative lamps on buildings or at the seaside, and moving traffic during the rush hour are all good raw material. Try to pick a clear night with intensely black sky. You will need a camera allowing timed exposures up to several seconds and/or a ‘B’ setting. A tripod and a cable or remote shutter release are also essential. If your camera doesn’t have the option for a cable release, try activating the self-timer option before the long exposure. This will give the camera time to stop moving before the shutter opens.
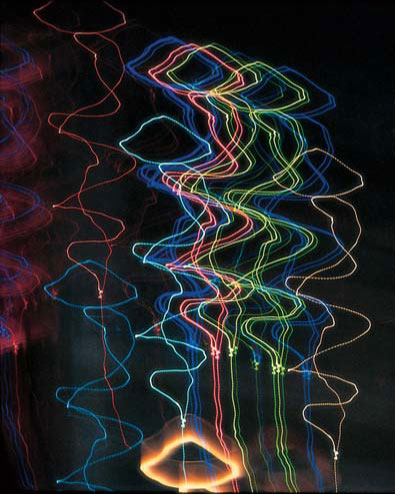
Figure 38.2 An abstract picture created from small lamps in a multi-colored sign. The camera was kept moving for 8 seconds.
Set a low ISO value (digital cameras) or load slow film and then select a small lens aperture. If your camera offers aperture priority, then choosing this mode should result in the slowest possible shutter setting without overexposing. If you have a manual camera, try exposures around 10 seconds at f16 for ISO 100 film or setting, or be guided by what was used for pictures on these pages.
Be careful, though, as some cameras do not measure exposure when set to ‘B’ – in which case, open the lens aperture fully until your camera indicates a timed exposure, then return the lens setting to f16 and double the time for each change of f-number as you go. For example, if opening the lens to f2 makes the meter respond with 1/8 second, then at f16 you should give 8 seconds held open on ‘B’.
Static subject, camera moved
One simple way of creating ‘drawn’ light patterns is to move around the street at night with your camera with the shutter open. In the example photograph (Figure 38.2), eight small groups of different colored bulbs in a sign were focused small in the frame. Then, as soon as the shutter was locked open, the camera was panned upwards and downwards, swaying side to side to form the tangle of shapes.
Interesting results happen with a lit subject at night when you give part of a (long) exposure with the camera first still and then moving. The ‘still’ part of the exposure records the general shape of your subject, avoiding total abstraction, and the moving part shifts all the highlights. In Figure 38.1, for example, the camera was loosely attached to a tripod. It was held firm for the first half of a 3-second exposure at f22, and then panned left at 45° throughout the final 1.5 seconds.
Static camera, subject moved
With night subjects like fairgrounds or busy highways, long exposures with the camera kept absolutely still can record static parts of a scene clearly but elongate bright moving subjects into streaking light trails. The nearer a particular light (or the slower its movement) the wider its trail will appear. Figures 38.3 and 38.4 show how two 5-second exposure pictures shot a minute or so apart record different patterns traced out by a fairground ride. Dusk shots of city lights combined with the remainder of the daylight can combine both the movement and color, as shown in Figure 38.5.
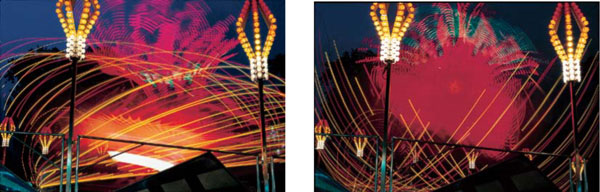
Figures 38.3 and 38.4 A fairground ride acts as a frantic drawing machine. Always try to include static elements too.
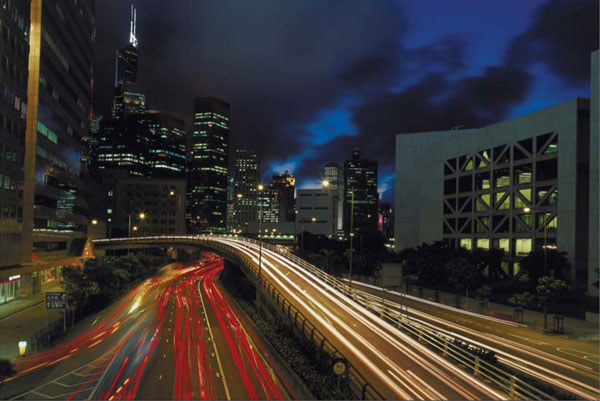
Figure 38.5 The long exposure needed to capture the falling light of dusk, combined with the movement of the traffic, creates streaking light trails against the city sky.
This ‘drawing with light’ can be developed further into ‘writing with light’ provided you have a steady hand. You will need to work outdoors at night or in a darkened room with a black background. Secure the camera to a tripod and mark out, on the ground, the left- and right-hand limits of your picture area. Your ‘performance’ must not exceed these extremes. Focus on something such as a newspaper, illuminated by a hand torch, held midway between the markers. Set the shutter for ‘B’ or an exposure of several seconds.
To produce the example in Figure 38.6, someone wearing dark clothes stood between the markers, facing the camera. Keeping on the move, they ‘wrote’ in the air with a lighted sparkler firework whilst the shutter remained open. A small, handbag-type torch makes a good light pen too, provided you keep it pointed towards the camera as you write. Torches with built-in color filters allow the lines to change color, or you can organize someone to use a series of filters over the camera lens.
Exposure varies according to the strength of light and speed of drawing. Test at about f16 for a total writing time of 10 seconds (ISO 100 setting or film). Write at a consistent speed – slower lines thicken through overexposure, fast lines record thin. Words and numbers will appear the wrong way round to the camera, so you should have the negative printed, or slide projected, through the back of the film (unless you can write backwards).
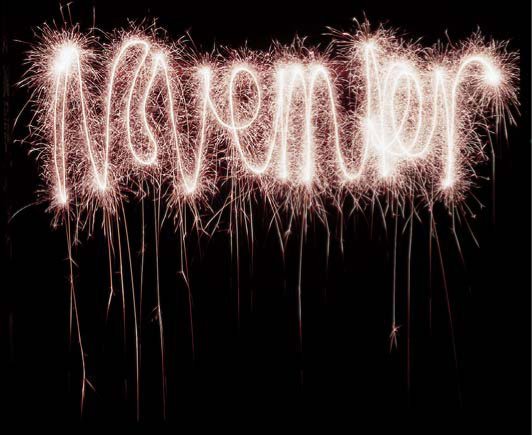
Figure 38.6 Writing in the air with a sparkler in the dark. Image courtesy of Frank Thurston.
Moving camera and moving subject
If you pan the camera whilst photographing a fast-moving subject, you can capture the subject as sharp against a blurred background. This technique is often used by motor sports photographers to isolate cars or bikes against distracting backgrounds. Panning is best attempted at a shutter speed of about 1/30 second, and is therefore within the capabilities of even quite simple cameras. As Figure 38.7 shows, the technique is that you hand-hold the camera, pivoting your body so that its movement is in a smooth sweep, then release the shutter halfway through the pan. If your camera has automatic exposure options, set these to shutter priority mode so that you can control the shutter speed (see Figure 38.8).
Static subject, static camera
Zooming is a way of making the image move and blur during exposure, while both your subject and the camera itself are completely stationary. You need a camera with a zoom lens, low ISO setting (or slow film) and a subject sufficiently dimly lit to need an exposure time of at least 3 seconds. Then, from beginning to end of the exposure time, you smoothly zoom the lens through its full focal length range. Figure 38.9 depicts a scene looking down on the lights of New York from the Empire State Building. The picture was shot in this way using the zoom-in technique.
Whether you zoom from wide to long or the reverse makes little difference, but check out both ends of the range before shooting. Digital shooters can practice smooth lens handling and can preview the amount of blur in each photograph, adjusting settings and zoom speed for different effects. For all zoom-motion work, a firm tripod is essential. Since all blur lines radiate from the precise center of the frame, it is this ‘bull’s-eye’ part of the scene that should contain a point of focus.
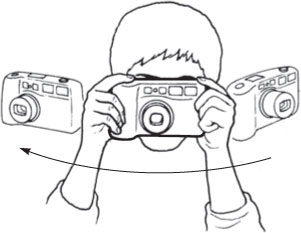
Figure 38.7 Technique for camera panning. Follow the subject with a smooth camera movement. Fire the shutter halfway through.
Star tracks
Stars in the night sky look quite static, but only because they move too slowly for us to notice. The sky in Figure 38.10 was exposed for 90 minutes at f16 on a setting of ISO 125. The camera was left on its tripod, pointing generally towards the pole star (around which all other stars appear to rotate). Pick a clear moonless night, and shoot somewhere well clear of light-polluting roads and towns. Open country or a coastal area is ideal. Be sure to include some landmark, such as the tree shown here, to counterpoint the star tracks. If you are using a digital camera make sure that you are careful not to place a light source in the frame, as the extended exposure can cause permanent damage to the image sensor.
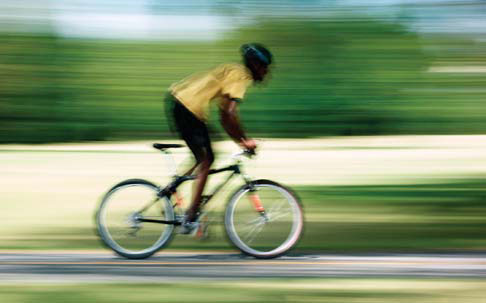
Figure 38.8 Panning the camera whilst photographing this cyclist produces a very characteristic photograph that is full of blurry movement but still retains enough detail that we can recognize the subject matter.
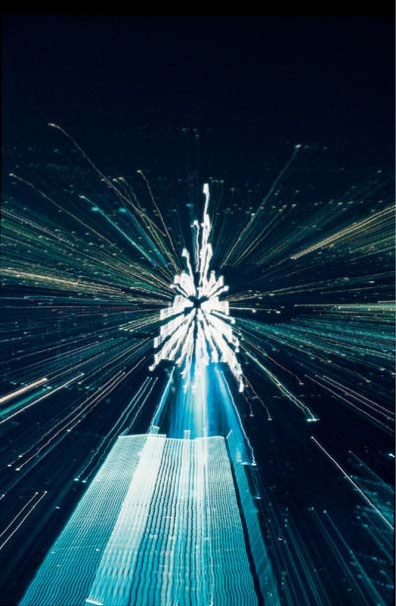
Figure 38.9 City at night. The camera’s lens was steadily zoomed during a 3-second exposure. The ‘Christmas tree’ shape resulted from a group of buildings more brightly lit than the rest, and imaged center frame.
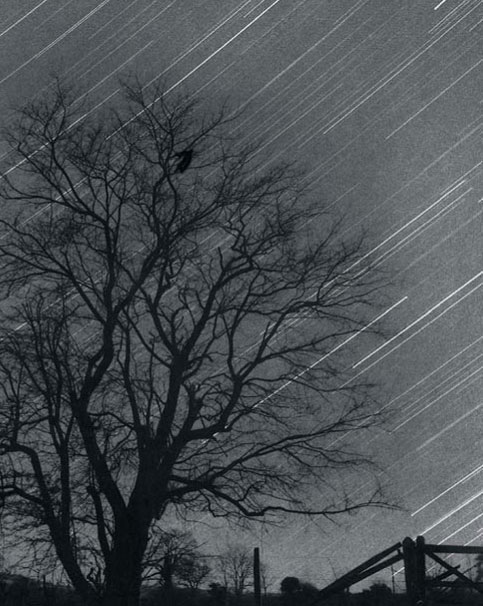
Figure 38.10 Star tracks recorded at night during a 90-minute exposure.
Some unusual and experimental pictures are possible without special know-how or any out-of-the-ordinary gear. They involve straightforward photography of what you can see in front of the camera, but by careful choice of viewpoint and framing you can create a picture with strange optical appearances. Results include distorted shapes, images with detail broken up in unfamiliar ways and combinations of two or more separate picture elements that form dream-like effects. All of these types of picture are based on photographing something either reflected or refracted. Everyday reflective surfaces include still water, glass windows and mirrors. Refraction alters the way things look when your subject is observed through things like patterned glass or clear or disturbed liquid.
Using water
Pictures like Figure 39.1 are best shot looking down into the clear water of a swimming pool, preferably outdoors, where light is plentiful. Using the long focus extreme of a zoom lens helps to fill up the frame. The appearance of this underwater swimmer changes every second due to the swirl of water altering refraction effects and the swimmer’s movements, so it is best to work at 1/250 second or faster (using shutter priority mode on an AE camera) and pick the right moment carefully. Auto-focus is helpful here, provided it does not accidentally pick up on the pool’s floor pattern some distance below the subject.

Figure 39.1 Distorted appearance due to reflection of light from the water surface.
Still water creates an almost mirror surface. By including only the far bank and sky reflected in a river and presenting this upside down (Figure 39.2), an impressionistic landscape image is formed. Remember that the reflection itself requires a lens focus setting different from the much nearer reflective surface. In a shot like this, focusing on the tree’s reflection and then setting a small lens aperture would have brought detail on the surface of the water into focus too. Specks of floating flotsam would break the dreamy illusion. This picture was therefore exposed at f2.8, taking great care to (manually) focus so that only tree and clouds were included within the depth of field.
Using glass
Large glass-fronted buildings, including shops, are good locations for mixing one element (behind the glass) with another (reflected from its surface). Lighting is important here. People passing in the street may be sunlit and so dominate over figures inside the building. But later in the day, the balance reverses as internal lighting comes on behind the glass.
Often, reflected images like this include things happening on three different planes. People might be sitting directly behind the window inside the building; others may be a reflection off the glass surface of action outside; and finally there may be those subjects directly included in the viewfinder (not reflected at all). Working with effectively three images like this allows you to make use of interesting mixtures of scale, and can fill up a frame of what would be sparsely occupied scenes if shot individually.
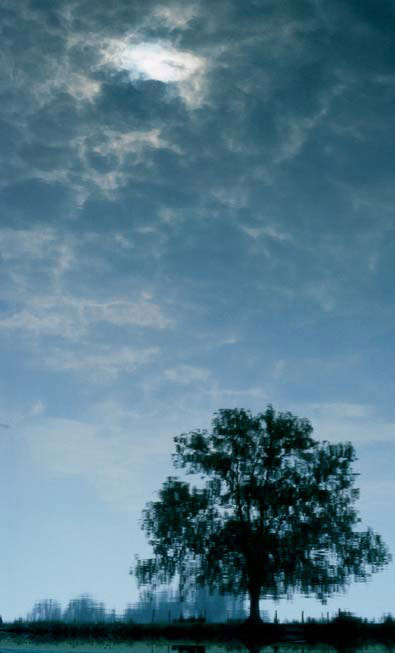
Figure 39.2 Reflection of the far bank in the smooth surface of a river. The result was turned upside down to make this picture.
Figure 39.3 mixes an advertising slogan in a New York city window with the reflection of people and traffic in a typical street. The lonely scene seems to give life to the consequences of living your life as the slogan suggests.
Similar possibilities apply to mirrors hung on walls or buildings clad with mirror-finished surfaces – these all allow you to relate two or more quite separate elements together in the same picture. Remember to set a small aperture (large DOF) if reality and reflections are all to appear sharp. You will probably have to set focus (manually) for somewhere between the two and, to prevent you and your camera appearing in the picture, shoot at a slight angle to the reflective surface. Where a square-on view is essential, use a long focal length lens. This will mean that you can shoot from well back from the surface and so appear as a small reflection in the final scene.
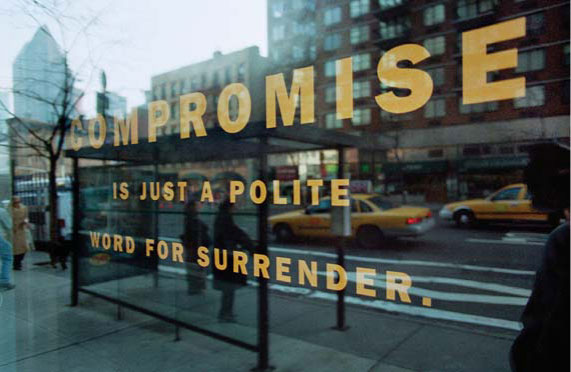
Figure 39.3 Intentionally capturing the reflections from a glass or shiny surface gives you the ability to combine both the two different scenes together. Here a slogan painted onto a shop window is combined with the reflection of the New York city street.
Another way of experimenting with the appearance of subjects is to fit a special effects attachment or filter over the front of your camera lens. This has the advantage that you can create strange results – repeat patterning, abstractions, offbeat coloring – from almost any scene, rather than work with long exposures or reflective surfaces. Some attachments optically soften or diffuse detail or split up the image whilst others, such as colored filters, tint all, or part, of your picture.
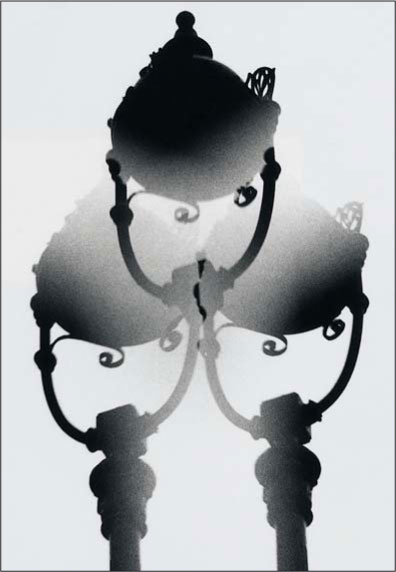
Figure 40.1 A single lamp-post against white sky, turned into overlapping shapes by a three-faceted prism lens attachment.
Typically, a lens attachment is a circular or square piece of optical plastic sufficiently large enough to cover the lens. Circular types may screw into a thread on the lens rim or, for cameras without this option, they fit via a clip-on holder (Figure 40.3). Failing this, you can also just hold the filter over the lens. For most types, it is important to be able to rotate the attachment freely because this is the way you alter how it interacts with the image. This means that you can alter the effect for each particular shot. Using an SLR camera will allow you to forecast exactly the effect produced. Digital users can shoot and then review the picture. When using a compact camera, first look directly at the subject through the attachment by eye, turning it to find the best effect, and then transfer it without further rotation to the camera’s lens.
Special effects attachments
Some optical attachments are made of clear plastic with faceted surfaces to give a multiple image of your subject. This way, you can repeat whatever is composed in the center of the frame into three or more separated but overlapping images, like Figure 40.1. Some filters work by having a parallel fluted pattern, which turns one narrow strip of the image into a row of repeats. Strips may run vertically (Figure 40.2) or at any angle you choose to rotate the attachment. When you are making multiple image shots, pick a subject with a strong, simple shape and plenty of plain background.
Another attachment, known as a starburst and made of etched or moulded clear plastic (Figure 40.3), spreads bright highlights in a scene into star-like patches with radiating ‘spokes’. Much used in the 1970s and 1980s, the starburst filter was seen as a good way to glamorize shots that contained brilliant but well-separated pinpoint highlights – for example, direct sunlight sparkling on water, disco spotlights and tight groups of lamps in dark interiors or at night.
As you rotate the attachment spokes rotate, so you can position them at the most interesting angle. Results from a softly lit scene, however, are disappointing, as the starburst just gives flat, slightly diffused results.

Figure 40.2 A reeded glass attachment, fluting set vertically here, repeats a single portrait profile.

Figure 40.4 Many of the ‘front of camera’ filters previously used to create visual effects in photographs have been replaced by digital versions, which are applied to the images back at the desktop. Here a Glass filter is added to a picture, producing a similar effect as if the original picture was photographed through a piece of rippled glass.
Almost all optical-effect attachments alter the image according to lens focal length and the aperture you set. An SLR camera with aperture preview button is the best way to make an exact check of image appearance at the f-number you will be using. There are dozens of different effects attachments made. They include types which just give soft focus around the edges of the picture. Others are bifocals containing a portion of close-up lens you can rotate to coincide with some small close object so it appears sharp when the camera’s main lens is focused on a more distant part of the background scene. This way, a foreground flower may record with as much detail as a landscape filling the other half of a shot.
Though all of these special effects filters are still readily available, much of their popularity has waned with the advance of digital photography. Many of the effects that were once only available as attachments for the camera lens can now be reproduced digitally via any good image editing package. Software packages like Adobe Photoshop and Photoshop Elements contain many of these styles of effects filters for you to experiment with (see Figures 40.4 and 40.5).
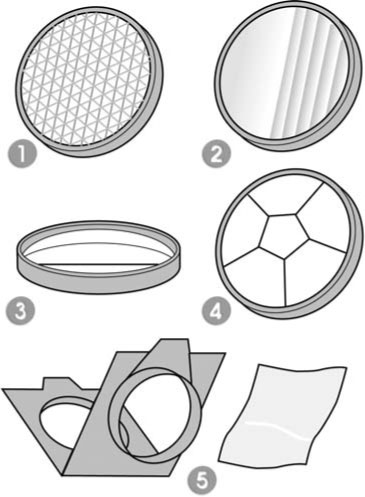
Figure 40.3 Lens attachments. (1) Starburst. (2) Fluted glass. (3) Half-lens (focuses a nearby object in part of the picture). (4) Five-facet prism. (5) Holder for filters.
‘Filters’ are so called because they remove some of the light that would enter the lens:
• Neutral density – A simple gray ‘neutral density’ (ND) filter just dims the whole image, useful for avoiding overexposure when you have fast film loaded but want to use a slow shutter speed or set a wide lens aperture.
• Polarizing filter – A polarizing filter offers this same advantage but, like Polaroid sunglasses, also subdues reflections at some angles from surfaces such as glass or water. The filter is also used to darken areas of blue sky at right angles to the direction of sunlight.
• Light-colored and gradient filters – A pale-colored filter will ‘warm up’ or ‘cool down’ the general mood of a scene. Both these and ND filters are available as ‘graduates’ – meaning their color or tone fades off in the lower half of the filter to tint or darken just sky and clouds in a landscape.
• Filters for black and white – Stronger, overall color filters have a special role in black and white photography, allowing you to alter how a particular subject color translates into a darker or paler gray tone. The rule here is that a filter lightens the appearance of colors closest to itself and darkens opposite or ‘complementary’ colors. An orange or red filter, for example, darkens blue sky, so that white clouds in a landscape record more clearly (see Figure 40.6).
• Color-correcting filters – In color photography, especially when using film, you may want to use a strong overall color filter to compensate for a fluorescent or other artificial light source when using daylight balanced film – instead of hoping the lab can do corrections in printing (see Table 27.1). Some special effects color filters, ‘tobacco’ hue for example, are made as graduates to tint as well as darken the sky area alone. They produce results suggesting dusk or dawn.
• Multi-color filters – ‘Dual color’ filters are split into contrasting halves. Often, good results depend on you composing a picture with the horizon in a straight line, located about halfway across the frame. The smaller your lens aperture, the more abrupt the division between the two colors appears.
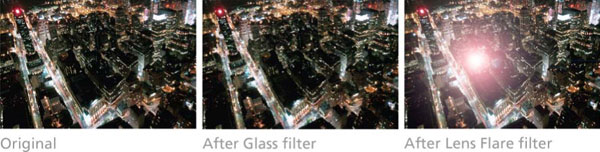
Figure 40.5 Hundreds of different digital filters can be found supplied as part of your favorite image editing package, such as Photoshop or Photoshop Elements. Some of these replicate existing traditional filter effects and others provide changes that have only become available with the advent of digital photography.
Most filters call for an increase in exposure. This is automatically taken into account, though, if you are using a camera that reads the light through the lens and therefore the filter as well. If this isn’t the case, you should override the suggested exposure by the maker’s rating on the filter.
There are no set ways of using most lens attachments, so experimenting is always worthwhile. For example, deep color filters intended for black and white work can produce strong effects in color photography. Try jazzing up the light trails from a moving camera or moving traffic at night by holding a filter over the lens during part of a long exposure. For Figure 40.7, red, green and blue squares of filter were taped edge to edge to form one long continuous strip. Then, throughout a 30-second exposure of distant highway traffic, the strip was kept moving its full length several times across the lens.
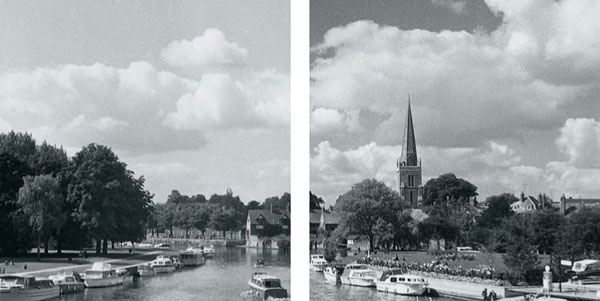
Figure 40.6 Darkening blue sky. (Left) No filter. (Right) Orange filter.
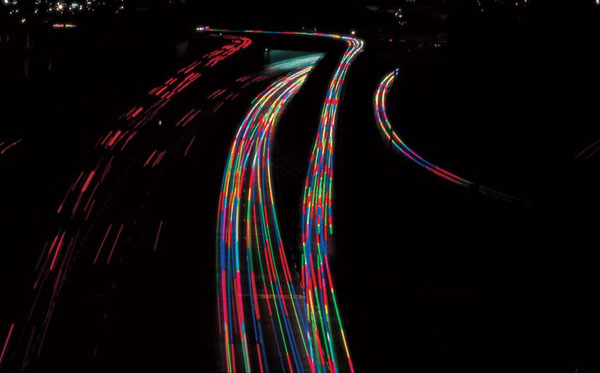
Figure 40.7 Traffic at night. Changing colors were created by a series of strongly tinted filters passed across the lens.
Photography allows you to combine records of separate scenes or subjects taken at quite different moments in time, place and scale into one picture. This fact gives you the freedom to construct images that never existed in reality. Results can be bold and eye-catching, like a poster, or haunting and strange, often making a statement in a visually more convincing way than something that is drawn or painted. Constructed images may differ radically from normal vision – or at first glance look normal but contain an odd and disturbing feature, like Figure 41.7.
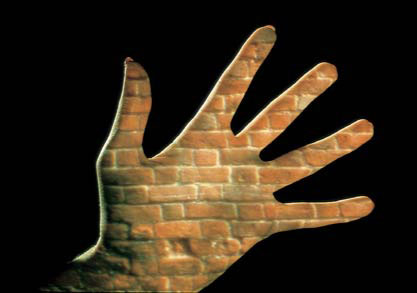
Figure 41.1 Color slide projected onto an actual hand.
As far as equipment is concerned, you will need a tripod and a cable release. Some techniques call for access to a slide projector and a filter; for others, you will need to use a camera that has a ‘B’ setting.
One way of combining images is by projecting a slide onto a subject, which is then photographed. Another is to sandwich two slides together, or make two exposures on the same frame of film. Other methods include the basic cutting and sticking together of photographic prints, or the popular (and some say easiest) method of using a computer and image editing software to cut and paste picture elements together.
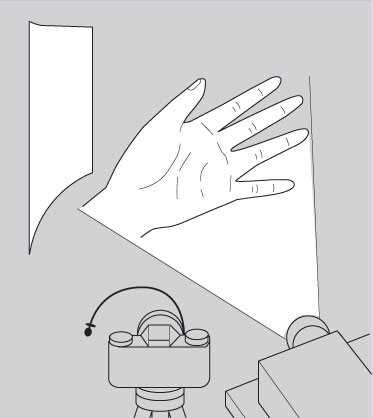
Figure 41.2 The set-up for the result in Figure 41.1.
Combining by projection
Using a projector, you can make a slide (or negative) image appear on the surface of any suitable light-toned object; the scene can then be photographed, with the result being recorded exactly as it appears to the eye. Work in a blacked-out room and if you are using daylight film add a bluish 80A filter on the camera to correct for the orangey light from the projector. In Figure 41.1, a slide of brickwork is projected onto a hand. By using a distant, black background, no brickwork appears elsewhere (see Figure 41.2). Your image-receiving surface could be flat or curved – one or more eggs perhaps, paper cups, wooden blocks or any object painted matt white especially for the purpose. Be careful not to make the result too complicated, though – if the image you project has a strong pattern then pick a receiving object that is simple in shape.
Strips of black card held about halfway between projector and receiving surface will restrict the image to where you want it to appear. Other lighting is needed to just suggest surroundings and the forms of your still-life objects, provided you keep the light off the projected image. Keep in mind that the fill light can’t be too strong, otherwise it will obscure the projected image.
‘Sandwiching’ simply means placing two slide film images together in face-to-face contact within the same (glass) mount. Details of one appear in the lighter parts of the other. You can then project your result, or send it for a print or scan the picture ready for use on the computer.
Be careful that the relative size of each image, as well as its positioning in the frame, suits the other slide. You don’t have the same flexibility to adjust size here as you do when projecting a slide onto an object. Another point to watch is that each slide should be slightly pale – overexposed by about one stop – otherwise your sandwich will be too dark. It is worth keeping a selection of reject slides for this possible purpose.
Quite often, one existing slide suggests another that needs taking to complete an idea. In this way, you can also ensure that size, lighting and subject placing are tailored convincingly. The sandwiched picture (Figure 41.4), for example, started as an experimental night shot of a distant town, the camera being tilted downward and wiggled for the second half of a 4-second exposure. The result seemed to suggest chaos and stress. Then another slide was planned and shot of a man with his hands to his head and silhouetted in front of white sky (Figure 41.3). This silhouette was slightly overexposed, so that when sandwiched it was not impenetrably black and some of the light trails could be seen ‘penetrating’ his head.

Figure 41.3 Man against white sky – a component of the picture in Figure 41.4.
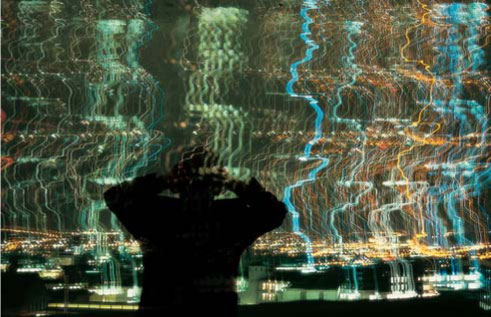
Figure 41.4 ‘Chaos and stress’. Sandwich of the slide in Figure 41.3 and camera-moved street lights.
The seaside is an ideal location for shooting several picture components because of the large plain background offered by ocean and sky. Figure 41.5 is a sandwich combining two ‘throwaway’ slides. One is a shot of the seashore with a blank, overcast sky. The other contains only blue sky and clouds, but sandwiching this film upside down creates a slightly unsettling, surreal effect.
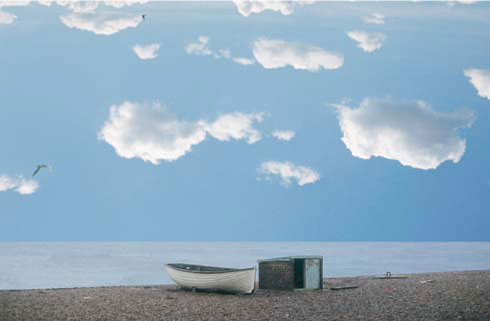
Figure 41.5 Surrealism at the seaside – via sandwiched slides.
Bear in mind that results similar to the combining of two pictures by sandwiching are now possible by digital means, using cloning or ‘layering’ software. Sizing and subject orientation problems are less of an issue when digital is used for composition, as this technology allows for the separate resizing and positioning of each image part.
Multiple exposures
Another way of mixing images together, involving only your camera, is to make several exposures onto one frame of film. When sandwiching slides, the details of one picture appear most strongly in the light parts of the other, but multiple exposures work the opposite way, one picture showing up most in the dark areas of the other (see Figure 41.6). Keep this idea in mind when you plan out your picture.

Figure 41.6 Double exposure – is she there or not?
Making two or more exposures is easiest if your camera has a multiple exposure button. This disengages the wind-on mechanism so that the film stays still and only the shutter resets after each exposure. Multiple exposure controls are provided on a number of compact and SLR cameras. On the other hand, any camera with a ‘B’ shutter setting can be used for this work provided it accepts a cable release, preferably with a locking screw. You will need to work with slow film, probably indoors, in order to make a time exposure necessary. A tripod is essential. Both Figures 41.6 and 41.7 were taken with a manual SLR camera, with the shutter set at ‘B’.
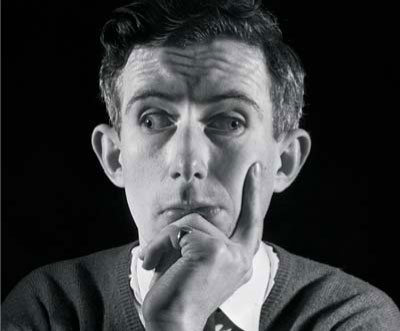
Figure 41.7 Man looking both ways, achieved by lighting change and double exposure.
For the picture in Figure 41.6 the girl sat in the chair for half the exposure, then got up (taking care not to shift the chair itself) so that the second half recorded it empty. Working indoors with dim light from a window and at smallest aperture, f16, the exposure required was 4 seconds. So, with the girl in place and keeping very still, the shutter was held open on ‘B’ for 2 seconds. Then, keeping the cable release pressed and locked, the lens was covered with a black card while the girl left. Next, it was uncovered again for a further 2 seconds before the shutter was finally closed.
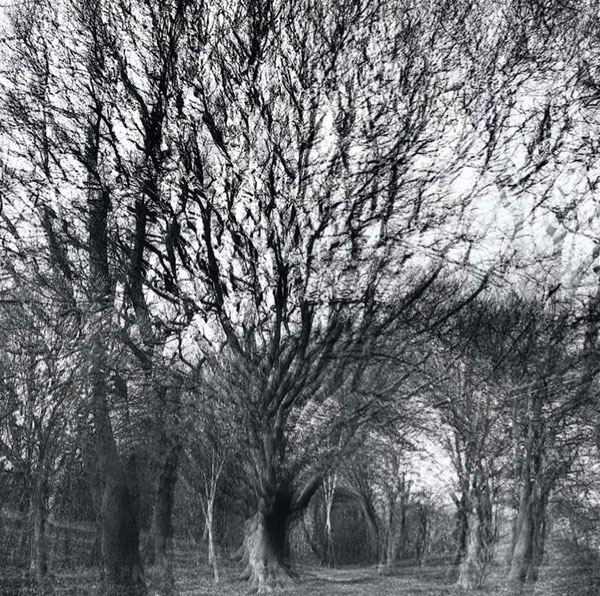
Figure 41.8 The wild wood. Three exposures on one frame of film. Image courtesy of Amanda Currey.
It is important to plan pictures like this in terms of where ‘lights’ and ‘darks’ will overlap. In Figure 41.6, the girl wore a plain dark dress and the chair was chosen for its lighter tones and patterned design, which would therefore ‘expose through’ her clothing. The cardigan, face and hands had the opposite effect – dominating over the shadowy part of the room behind.
The man looking two ways at once (Figure 41.7) is also the result of two superimposed exposures. If you cover up vertically half of the picture at a time you will see that, between exposures, he has simply moved his eyes. For the first exposure only, the left half of his face was illuminated (while he looked that way), then that light was switched out and another, illuminating the right half, was switched on instead.
For this technique you need a darkened room, or work outdoors at night. Have two lamps you can control from the camera, set up well to the left and right, or use a flashgun you fire manually on its ‘open flash’ button, holding it first at arm’s length to the left and then to the right. Only half of the face must be seen at a time, leaving the other totally shadowed. Give the full measured exposure to each half of your picture, since quite different parts of the head are illuminated at a time.
In Figure 41.8, the exposure needed was 1/60 second at f11. To achieve this effect, the shutter was fired three times at this setting onto the same frame of film, rotating the camera a few degrees about a horizontal axis between each one.
Using a computer of sufficient power, your photographic images can be combined and manipulated on screen. In only a few minutes it is possible to digitally combine two separate images to create a new constructed photograph. In Figure 41.9, the artichoke has been cut and pasted onto the shaven head and then blended into the skin of the skull. To add extra realism, the toning on the artichoke was altered to fit with the lighting of the head and shoulders photograph.
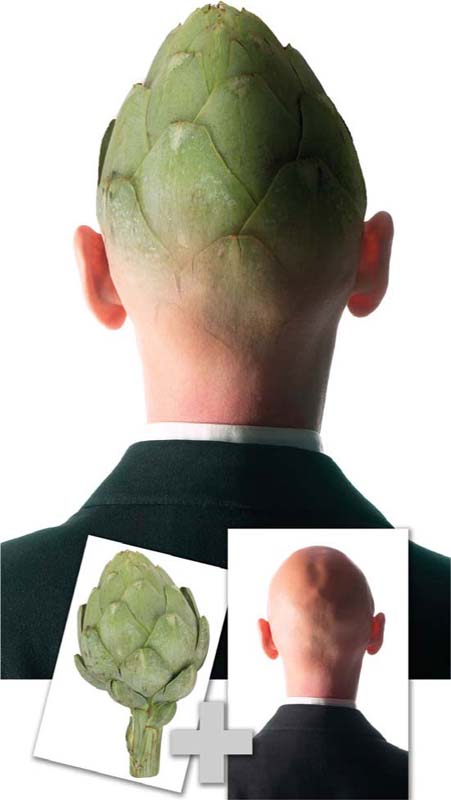
Figure 41.9 Many of the traditional techniques used to combine different images have been superseded by digital photography techniques. Here an artichoke is combined digitally with a portrait to create a new photograph. Such a task would take an experienced photographer about half an hour to complete. Producing the same image traditionally (non-digitally) would take considerably longer.
The digital montage process is handled by an image editing program such as Photoshop or Photoshop Elements. With this software two or more images can be slid as ‘layers’, one on top of the other, to superimpose wholly, or in part, with great precision (see Figure 41.10). Tools like the ‘eraser’ can then be used to remove sections of the upper image to reveal the detail from beneath. Using the selection tools, you can combine the main subject in one shot with the background of another. Any chosen elements in a picture can be multi-cloned, changed in size or color, reversed in tones or switched left to right, then returned to the shot. In fact, it’s tempting to overdo these and many other image-distorting controls just for their novelty value.
As we have already seen in Part 7 these types of image editing programs also have great usefulness for improving and ‘fine-tuning’ photographic results in more subtle ways. Retouching out any spots, disguising joins or removing obtrusive items from backgrounds is made easy by enlarging the image on screen and working on it pixel by pixel. Done well, changes are almost imperceptible and the results are easily accepted as straight and natural pictures.
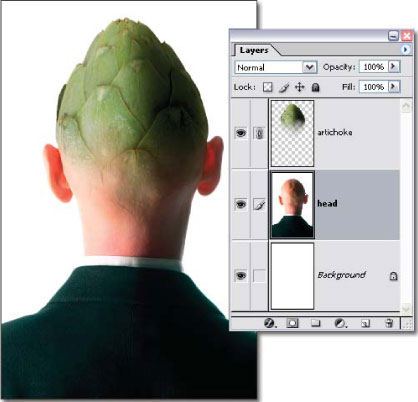
Figure 41.10 Montaging separate images digitally is made easier because a single photographic document can contain multiple layers, each with different content. In the example, the artichoke, head and white background are all stored on separate layers, but are seen as one complete picture in the final photograph.
Working digitally has not only changed the way that we capture, process and edit our photos, but it has also opened up a whole new world of creative possibilities for the photographer as well. Manipulation tasks that a few years ago would have been impossible for the average user are now well within the grasp of image makers with a computer and a good imaging program. The following techniques will provide you with a idea of what is possible when working creatively with digital files.
Convert to black and white
When film was king photographers had to make a conscious decision to capture in color or in black and white as deciding one way or the other determined the film stock that was loaded in the camera. Once the decision was made there was generally no turning back. In the digital era things are a little more flexible. Some cameras do contain a black and white mode but I would always recommend capturing in color and then converting back at the desktop where you have more control over the process. Though at first glance changing a color picture to grayscale may seem a simple one-step task, many conversions lack the contrast and drama of the color original. Here we look at several different methods for the task, providing you more creative choice when converting to gray.
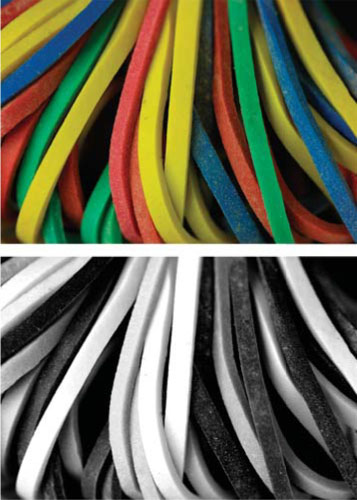
Figure 42.1 The trick to good conversions from color to grayscale is ensuring that the hues in the original picture are translated into distinct tones. For this reason no one conversion process will be suitable for all pictures. Whichever technique you use, make sure that the color contrast present in the original (top) is translated into monochrome contrast in the result (bottom).
A change of color mode is the simplest way to get rid of the color components of your picture. Be aware though that this technique changes the basic structure of the photo from three channels (red, green and blue) to a single channel (grayscale).
|
In Photoshop: Use the Image > Mode command. |

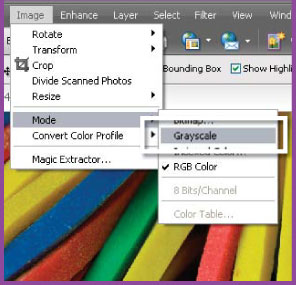
Step 1: Change color mode
Select the Grayscale option from the Mode section of the Image menu.
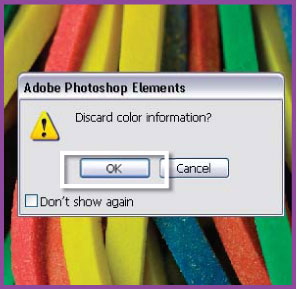
Step 2: Confirm changes
Click OK to the ‘Discard color information?’ question.
Desaturate the picture
If your aim is to add some color back to the black and white picture after the grayscale conversion, then you will need to use a technique that retains the basic red, green, blue structure. Both Photoshop and Photoshop Elements contain single-step features to handle this process.
|
In Photoshop: Use the Image > Adjustments > Desaturate command. |
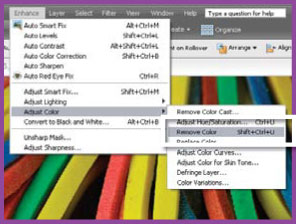
Desaturate the photo
Select Enhance > Adjust Color > Remove Color.
Russell Brown’s multi-layer technique
For those readers who want a little more control over the way that specific colors are converted to gray then this technique by Adobe’s Russell Brown provides more flexibility than the options we have looked at so far. Russell cleverly uses two Adjustment layers to make the changes, which means that the technique is also ‘non-destructive’ as it never changes the original pixels in the backgound layer.
|
In Photoshop: Use the same steps detailed here to create the multi-layer conversion using Hue/Saturation Adjustment layers. |
Step 1: Make first Hue/Saturation Adjustment layer
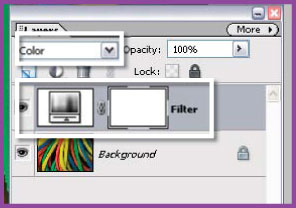
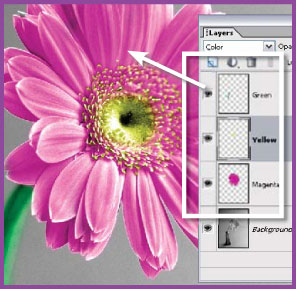
Make a new Hue/Saturation layer above your background. Don’t make any changes to the default settings for this layer. Set the mode of the Adjustment layer to Color. Label this layer ‘Filter’.
Step 2: Create a second layer
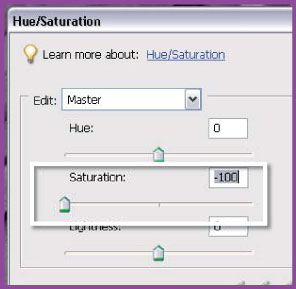
Make a second Hue/ Saturation Adjustment layer above the Filter layer and alter the settings so Saturation is -100. Call this layer ‘Black and White Film’. The monochrome image now on screen is the standard result we would expect if we just desaturated the colored original.
Step 3: Adjust the conversion
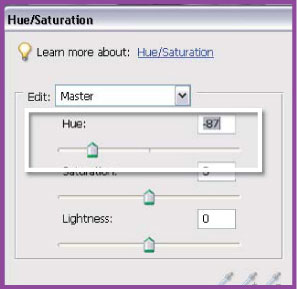
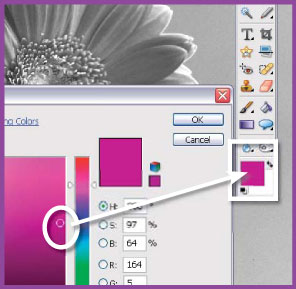
Next double-click on the layer thumbnail in the Filter layer and move the Hue slider. This changes the way that the color values are translated to black and white. Similarly if you move the Saturation slider you can emphasize particular parts of the image.
Step 4: Fine-tune the colors
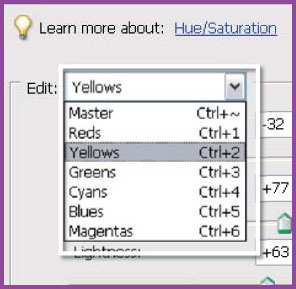
For more precise control of the separation of tones you can restrict your changes to a single color group (red, blue, green, cyan, magenta), by selecting it from the drop-down menu before manipulating the Hue and Saturation controls.
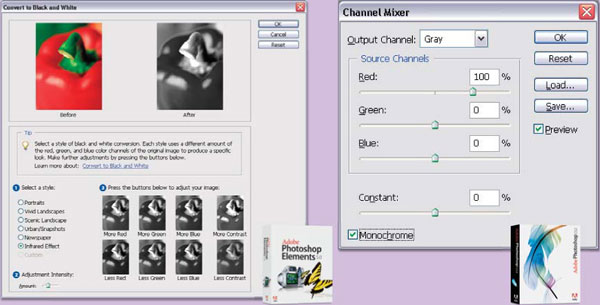
Custom grayscale conversions in Photoshop Elements and Photoshop:
Photoshop Elements 5.0 contains a custom Convert to Black and White feature (left) that lets you select from a range of conversion styles and then customize the grayscale mapping by adjusting how each color is converted. Photoshop users can get similar results using the Channel Mixer feature (right) with the Monochrome option selected. Just make sure that the total of each of the channel settings equals 100%. This will ensure that the brightness of the photo remains consistent through the conversion.
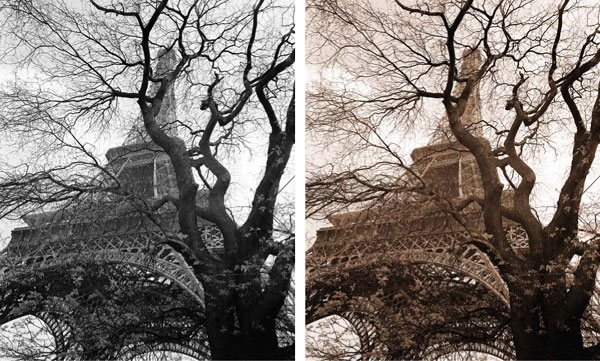
Figure 42.2 Many darkroom photographers wanting to make their images stand out from the crowd employed toning processes to alter the color of their black and white prints. As with many darkroom processes the look and feel of toned prints can be simulated digitally. Original black and white photo (left) and the same picture after digital sepia toning (right).
Toning photos
Normally associated with old or historic images, sepia or brown-toned photos have a unique appearance. Traditionally these pictures are created by taking the finished black and white print and passing it through one (or more) extra chemical processing steps. The result is an image where the gray tones are replaced by other colors such as the brown typically seen in sepia-toned photos. See Appendix P for more details on the traditional process for toning black and white prints.
As the black and white prints that exit our desktop printers are not based on silver it is not possible to alter their appearance using these chemical processes. Instead digital toning occurs before printing as a part of the enhancement process. Using the color control features that can be found in most image editing packages, digital photographers can easily replicate the results of these old processes. In addition, it is also possible to create sophisticated split-toning with more control than was ever possible in the darkroom. Here I explain several different approaches to toning your digital photos.
Simple single color changes
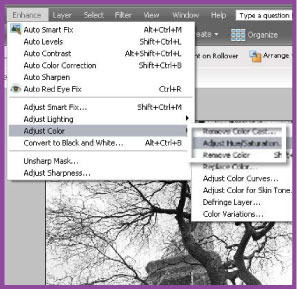
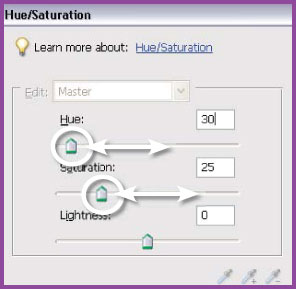
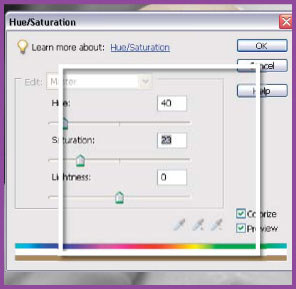
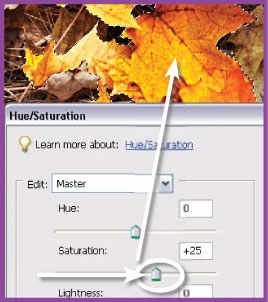
The simplest and fastest way to add color is to use the Hue/Saturation control (Enhance > Adjust > Color > Hue/Saturation). This can be applied directly to the whole image or as an Adjustment layer (Layer > New Adjustment Layer > Hue Saturation). To change the feature into a toning tool click the Colorize option in the bottom right of the box. The picture will switch to a single color monochrome (one color plus white and black). The Hue slider now controls the color of your tone.
The sepia look in the example is a value of 30 on the Hue slider. The Saturation slider varies the strength of the color. The Saturation value used in the example was 25. The Lightness slider adjusts the brightness of the image but changes of this nature should be left for the Levels feature.
The predictability of this digital toning system means that you can achieve the same tint in each image for a whole series of pictures. The recipes for regularly used tones, or favorite colors, can easily be noted down for later use or if toning using an Adjustment layer then the layer can be dragged from one image to another.
Step 1: Use Hue/Saturation
Select the Hue/Saturation control from the Enhance menu. For grayscale images change the mode to RGB color first (Image > Mode > RGB Color).
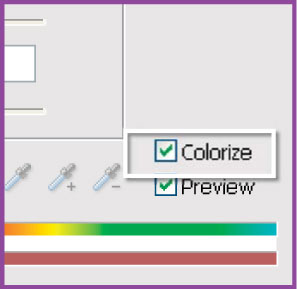
Step 2: Select Colorize
Place a tick in the Colorize and Preview checkboxes.
Step 3: Fine-tune the tint
Adjust the Hue slider to change tint color and the Saturation slider to change tint strength. You can also use a Hue/Saturation Adjustment layer for a non-destructive toning process.
|
In Photoshop: As Photoshop contains the Hue/Saturation feature you can use the same steps detailed here to create a simple toned print effect. |
Two or more colors creating a split-tone effect
Once you have mastered the art of digitally toning your pictures it is time to spread your ‘tinting’ wings a little. One of my favorite after-printing effects back in my darkroom days was split toning. This process involved passing a completed black and white print through two differently colored and separate toning baths. This resulted in the print containing a mixture of two different tints.
For example, when an image is split toned with sepia first and then blue toner the resultant picture has warm (brown) highlights and midtones, and cool (blue) shadows. Getting the right toning balance between the two solutions was difficult and then trying to repeat the process uniformly over a series of images was even harder. Thankfully I can replicate the results of split toning in my digital picture with a lot less trouble and a lot more predictability.
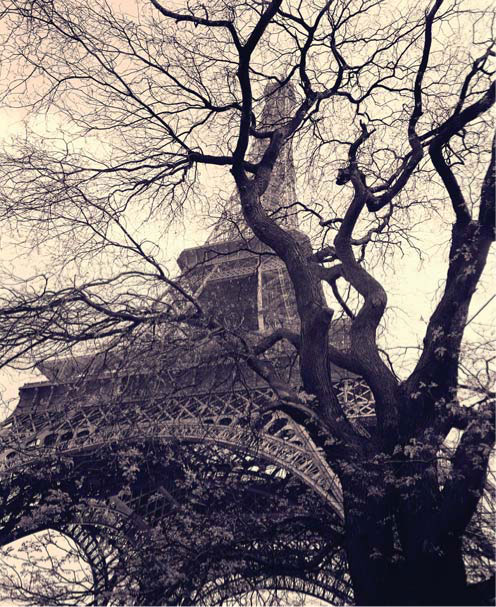
Figure 42.3 Split toning is when a different color or tint is added to highlights and shadows of the print. Here the highlight areas have been toned reddy-brown and the shadow parts of the picture blue.
Again the digital version of the process revolves around a tool that is common to both Photoshop Elements and Photoshop. Called the Color Variations feature (Variations in Photoshop), it is most commonly used for removing color casts from photos taken under mixed light sources. Color Variations is very helpful with these color correction tasks as the feature has the ability to isolate its color changes to specific tonal areas – highlights, midtone and shadows – and it is precisely this ability that we can use to create a split toning effect.
Using the feature the color or tint of highlights, midtones and shadows of grayscale photos (that have been stored in the RGB Color mode) can be individually adjusted. Replicating the sepia/blue split tone I produced in the darkroom is a simple matter of selecting the highlight tones and adding brown tint, and then selecting the shadow areas and altering these to blue.
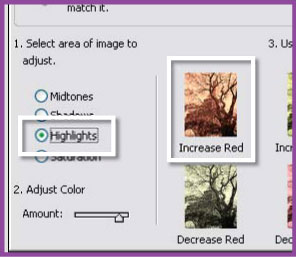
Step 1: Tint the highlights
Star by ensuring that the monochrome photo is in RGB Color mode. If not, change the mode using the options under the Image > Mode menu. Next select the Color Variations feature from the Enhance > Adjust Color menu. Select the Highlights setting and then click on the Increase Red and Decrease Blue thumbnail.
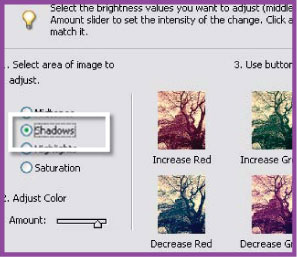
Step 2: Color the shadows
Now to the shadows. Without closing the Color Variations dialog, select the Shadows setting and click on the Increase Blue thumbnail. Alter the Amount slider to increase or decrease the degree of change made with each thumbnail click.
|
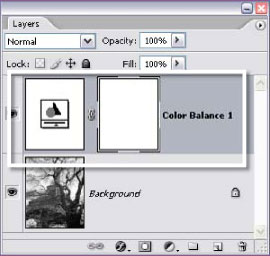
In Photoshop: As well as using Image > Adjustments > Variations, Photoshop users can also apply the Color Balance Adjustment layer feature to split tone their photos nondestructively. |
As well as controlling which group of tones is tinted it is also possible to restrict the effect to just a selected area of the photograph. Using the selection tools in Photoshop or Photoshop Elements you can outline a portion of the photo and then apply the toning to just this area. If the color change is added to the picture using a Hue/Saturation Adjustment layer then a special mask (the size and shape of your selection) is added to this layer to restrict the effect of the layer.
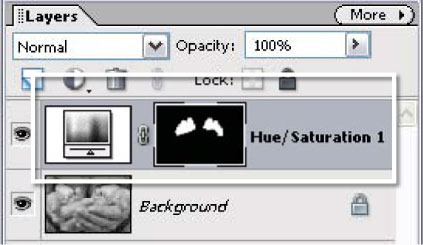
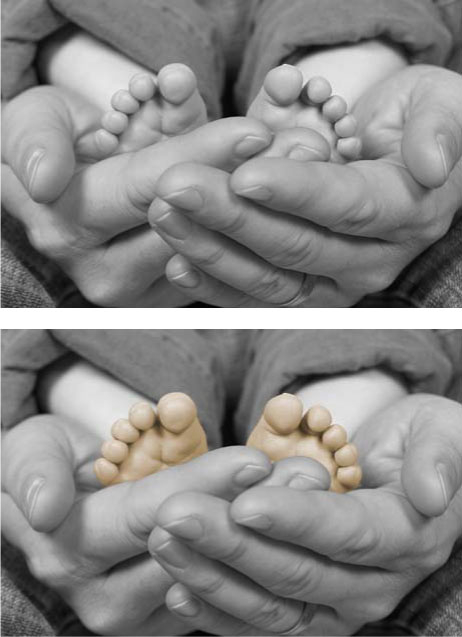
Figure 42.4 To restrict the toning action to a specific area of the photo start by selecting a picture portion with one of the selection tools (Lasso, Marquee, Magic Wand, etc.) and then use the Hue/Saturation control to apply the tinting. Before selective tinting (top) and after (bottom).
|
In Photoshop: The main selection tools are the same in Photoshop as they are in Photoshop Elements. The Hue/Saturation feature is also contained in both packages. |
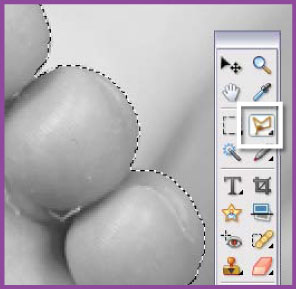
Step 1: Select area to be toned
Start by using one of the selection tools (Lasso, Magic Wand, Marquee, Selection Brush – Elements only) to isolate the picture part to be toned.
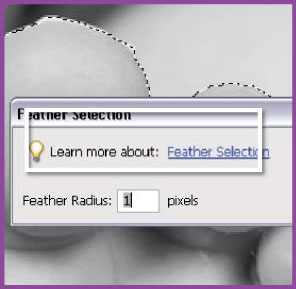
Step 2: Feather the selection
Next, feather the selection (Select > Feather) with a 1 pixel setting to soften the edge of the selection and make the border between toned and untoned areas less sharp.
Step 3: Apply the tinting
With the selection still active, choose the Hue/Saturation command from the Enhance > Adjust Color menu. Select the Colorize setting and adjust the Hue and Saturation sliders.
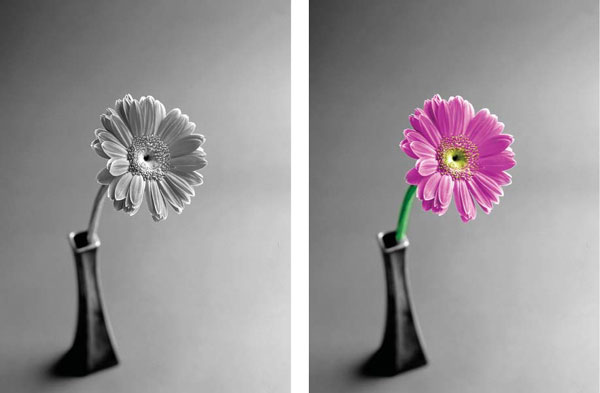
Figure 42.5 With digital hand coloring you can add back vibrant hues to black and white images. Original black and white photo (left) and after hand coloring of flower and stem (right).
Hand coloring – the digital way
Before the days of color photography studio photographers employed artists to paint washes of color onto their black and white prints to simulate the hues of the photographed scene. The previous few techniques looked at how to tint black and white photographs but, in this technique, we will reproduce the effect of hand coloring by using the Brush tool to apply a color tint to a photograph.
This sounds simple except that if you just select a color and then paint onto the picture the color will obscure the picture details beneath. Adjusting the opacity of the paint doesn’t solve the problem so, instead, to ensure that the detail from the image shows through the coloring we must modify the way the hue is added. By switching the Brush mode (this is similar to the Layers blend mode options) from its Normal setting to a specialized Color setting the paint starts to act more like traditional watercolor paint. When the hue is applied the detail is changed in proportion to the tone beneath. Dark areas are changed to a deep version of the selected color and lighter areas are delicately tinted.
To start it will be easier to apply the color directly to the image layer, but as you become more confident with the technique and want a little more control, try creating a new layer for each color in the document. Change the Blend Mode of the layer to Color and switch the Brush mode back to Normal. Now select a layer and choose a paint color and start to color the photo.
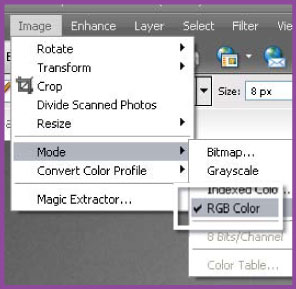
Step 1: Check the Color mode
With your image open in Elements check to see what Color mode the picture is stored in. Do this by selecting Image > Mode and then locate which setting the tick is next to. For most black and white photographs the picture will be in Grayscale mode. If this is the case change it to RGB Color (Image > Mode > RGB Color). If you are starting with a color photo use the Desaturate (Photoshop) or Remove Color (Photoshop Elements) commands to convert the picture to monochrome but keep it in the RGB Color mode.
Step 2: Start painting
Now double-click on the foreground color swatch in the toolbox and select a color appropriate for your picture. Next select the Paint Brush tool from the toolbox and adjust its size and edge softness using the settings in the options bar. In order for the brush to just color the picture (keeping the details from beneath) the tool must be in the Color mode. To make the change click on the Mode drop-down menu in the options bar and select the Color option towards the bottom of the list.
Step 3: Using layers
For more control create a new layer (Layer > New Layer) for each color and change the Blend Mode of the layer to Color. Switch the Brush mode back to normal and proceed to paint the colors onto each individual layer. Use the Opacity control for each layer to adjust the strength of the colors.
|
In Photoshop: Photoshop includes all the tools and features detailed in this technique. |
Color and black and white together
So far in this section we have looked at a range of creative techniques that have their roots in effects that were possible with traditional photography. Now we will examine some options that are digital only.
Contemporary photographers now have the option to include both black and white and color picture parts in the same photo. Using the selection and grayscale conversion techniques detailed in the previous sections it is a comparatively simple step to create just such a hybrid photo.
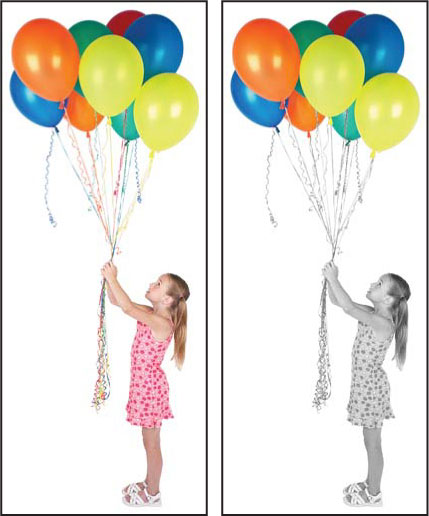
Figure 42.6 Starting with a color photo it is possible to convert just a section of the image to monochrome, producing a result where black and white and color can coexist in a single picture.
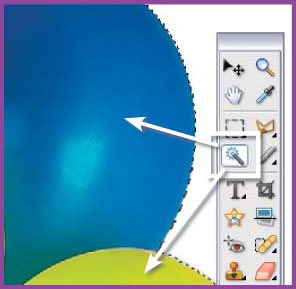
Commence the process with a full color photo. Next you will need to use one of the selection tools (Lasso, Magic Wand, Marquee) to isolate the picture part that you want to remain in color. To ensure a smooth transition between colored and grayscale image areas the selection is then feathered (Select > Feather). Changing to grayscale at this point would convert the area that you want to remain in color so the selction must be flipped to include all but these portions of the photo. This is easily achieved using the Select > Invert option. With the selection you can now use a Hue/Saturation Adjustment layer to convert the rest of the picture to gray.
Step 1: Select color area
Start by selecting the areas of the picture that are to remain in color. Depending on the complexity this task may require you to use several different selection tools and to add to (hold down the Shift key) or take away from (hold down the Alt key) your selection as you go. Be careful with this part of the process as the quality of the selection will determine the quality of the result overall.

Step 2: Feather the selection
Whenever you are making changes to your photos through pre-made selections it is worth applying a small feather to the selection edge first. Here I used a radius of 1 pixel to help smooth the transition between colored and non-colored or black and white areas. The Feather is located under the Select menu.
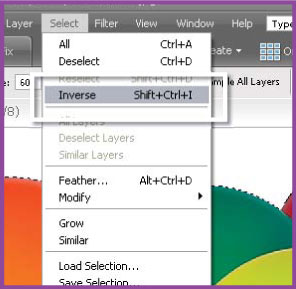
Step 3: Invert the selection
At this point you should have a feathered selection around the areas that you want to remain in color. In order to change the rest of the picture to black and white we need to switch the selection from its current position to the rest of the image. We do this by inverting the selection (Select > Inverse).
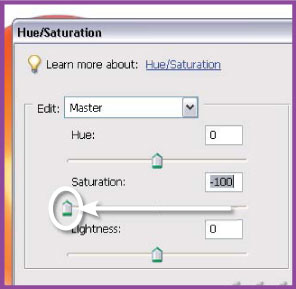
Step 4: Convert to gray
With the selection still active, create a new Hue/Saturation Adjustment layer (Layer > New Adjustment Layer > Hue/ Saturation) above the background. When the dialog opens drag the Saturation slider all the way to the left to remove the color from the selected area.
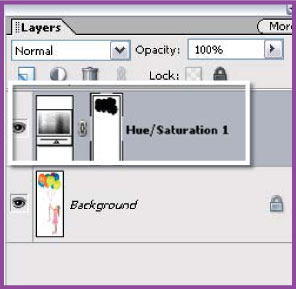
Step 5: Non-destructive changes
Adding an Adjustment layer whilst a selection is active automatically creates a mask through which the changes are applied. This is a preferred way to work as the original picture remains untouched at the bottom of the layer stack.
|
In Photoshop: The selection tools and selection menu options such as Inverse and Feather are all present in Photoshop. Creating masks from selections with Adjustment layers also works in the same way as the Photoshop Elements steps detailed above. |
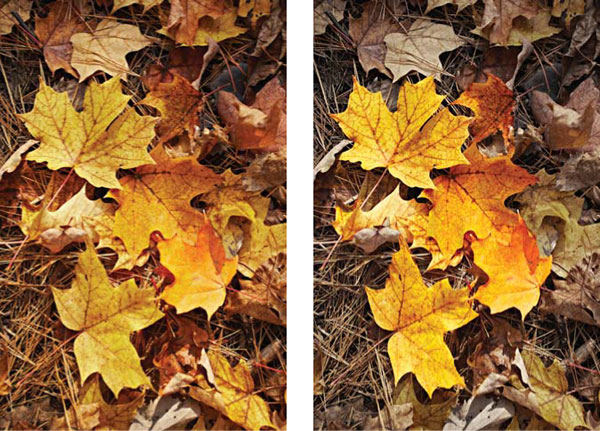
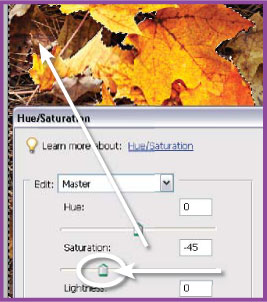
Figure 42.7 Add emphasis to your photos by selectively increasing and decreasing saturation in specific parts of the picture. Original photo (left) and the same picture with increased saturation in the leaves and decreased saturation everywhere else (right).
Using color for emphasis
Using a similar technique, involving a feathered selection and the Hue/Saturation control, you can also partially saturate and desaturate portions of a picture and in so doing draw the viewer’s attention to this image part.
Start by selecting the picture parts that you want to emphasize and then increase the saturation of these areas by applying a Hue/Saturation Adjustment layer change. Then inverse the selection and apply a second Hue/Saturation Adjustment layer, this time reducing the saturation of the rest of the photo. Remember with this technique it is not about creating a monochrome versus color contrast. Instead you want to subtly increase the vibrancy of the color in one area whilst decreasing it in another.
Step 1: Increase saturation
Select the picture area for increased saturation. Feather the selection and then with the selection active, add a Hue/Saturation Adjustment layer. Drag the saturation slider to the right to increase the vibrancy of the selected areas. Click Okay to close the dialog and apply the setting.
Step 2: Decrease saturation
Hold down the Control key and click on the mask thumbnail in the Hue/Saturation layer to reload the selection. Next choose Select > Inverse and add a new Hue/Saturation Adjustment layer. Drag the Saturation slider to the left to decrease the vibrancy of the rest of the photo. Click Okay to apply the changes.
|
In Photoshop: Hue/Saturation Adjustment layers, selection tools and the Feather command are all standard features in Photoshop. |
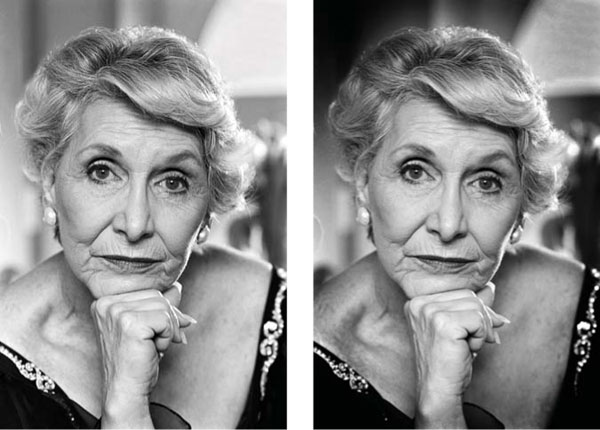
Figure 42.8 Darkening the corners of a print to keep the viewer’s attention on the subject is a technique that has been popular with photographers for many years. The technique is called vignetting. In this example an oval selection was used as the basis of the vignette. The original photo (left) and how it appears after the corners have been darkened (right).
Creating a digital vignette
Vignetting, or the darkening of the edges of the print to concentrate the viewer’s attention on the main subject, is not a new technique but it is an effective one. Creating a vignette traditionally meant adding extra light to the edges of the photo after the main exposure was completed. In the digital world similar results can be obtained by creating a feathered oval selection of the subject, inverting the selection and then darkening the selected areas with a Levels Adjustment layer.

Step 1: Create feathered selection
Use the Elliptical Marquee tool to draw an oval selection over the area of the image that is to remain the same brightness. Feather the selection with a large pixel value to ensure a very soft blend once the effect has been applied. Inverse the selection so that only the edges of the photo are selected.

Step 2: Darken corners
With the selection still active add a Levels Adjustment layer above the background. Drag the midpoint input slider to the right to darken the selected areas. To darken white highlights more dramatically you can also drag the white output slider towards the center of the histogram.
|
In Photoshop: Use the steps above along with the Elliptical Marquee tool, Feather and Inverse commands and the Levels Adjustment layer to create a same effect in Photoshop. |
Texture is a traditional photographic visual element that is often overlooked when working digitally. All but the highest quality professional films have visible grain when they are printed. This is especially true when the print size goes beyond the standard 6 × 4 inches. In fact we are so familiar with the idea that grain is part of the photographic process that putting a little texture into an otherwise grainless digital picture can lend a traditional ‘look and feel’ to the image. Many photographers add a little texture to their pictures as part of their regular image editing process. Some go beyond this and produce photographs with huge clumps of grain that resemble the results often seen with prints made from old-style high ISO films.
The simplest method for adding texture to your picture is to use the Add Noise filter (Filter > Noise > Add Noise). The feature is provided with a preview dialog which allows you to alter the ‘Amount’ of noise that is added to the photograph, the style of noise – Gaussian or Uniform – and whether the noise is random colored pixels or just monochrome. As with most filters it is important to use this feature carefully as once the filter is applied and the file saved you will not be able to undo its effects. For this reason, it pays to make a duplicate file of your picture which you can texturize without risk of destroying the original image.
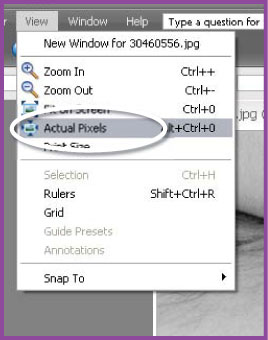
Step 1: View at 100%
Zoom in so that the picture is at least at 100% view. Select the Add Noise filter from the Filter menu.

Step 2: Add texture
Adjust the Amount slider to change the strength of the effect and pick the noise type and color.
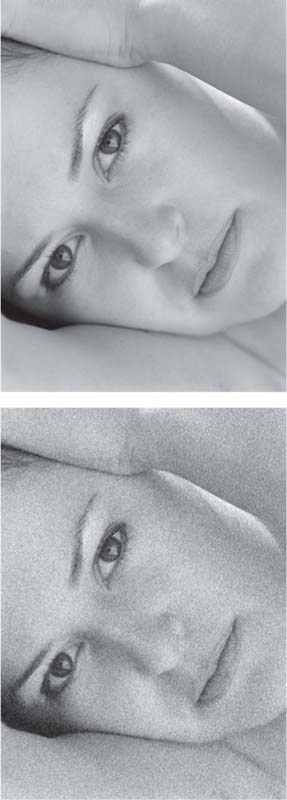
Figure 42.9 Filters like Add Noise or Grain simulate the look of high ISO films. The original photo (top) and after the Add Noise filter has been applied (bottom).
|
In Photoshop: Photoshop contains both the Add Noise and Grain filters. |
Even with the advent of digital photography, there is still plenty of scope for physically experimenting with images after you get your prints back from the processing lab. If you are good at handwork and have an eye for design, there are various possibilities of montage – pictures constructed from different paper prints arranged so that they join, overlap or blend with each other. Your aim may be simply an original form of pattern and decoration, or the assembly of a panorama otherwise impossible to shoot ‘straight’ without special equipment. You can construct a picture of a crowd of people or a fantastic landscape, create a caricature or a visual pun.
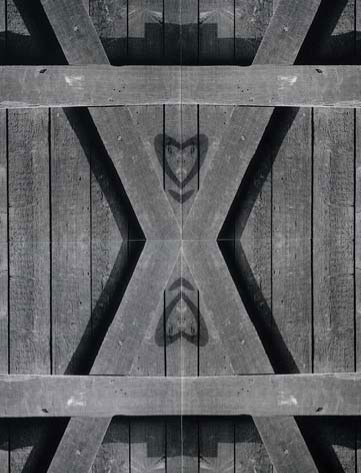
Figure 43.1 Four prints from the same negative make up a pattern montage.
Similarly, the hand coloring of monochrome photographic prints opens up possibilities of color pictures in which every individual hue is under your control. Realistic or bizarre, colored in full or limited to just a suggestion here and there, you have a free hand. Watercolors, retouching inks and translucent oil paints can all be applied to the surface of black and white prints to give a hand-colored effect. Despite its heritage as a way to record color in a picture before color films were invented, this technique is best used for interpretive effect.
Assembled, montaged or colored, once your handworked print is complete you can copy it – either using your camera or through a high-quality photocopying machine or scanner. Results will then be free of joins or irregular surface finish.
Montaging
Like slide sandwiching and multiple exposure work, a print montage can combine elements or events that did not in fact occur together in real life. One person with eyes shut in a group can be pasted over with a cut-out print from another negative that is bad of everyone else. A strong foreground lead-in to a landscape can be combined with a distant main subject, when they were really hundreds of miles apart and shot on different days.
Again, most of these forms of manipulation are now handled digitally, but there is still plenty of scope for those who prefer to work in a more handcrafted manner.
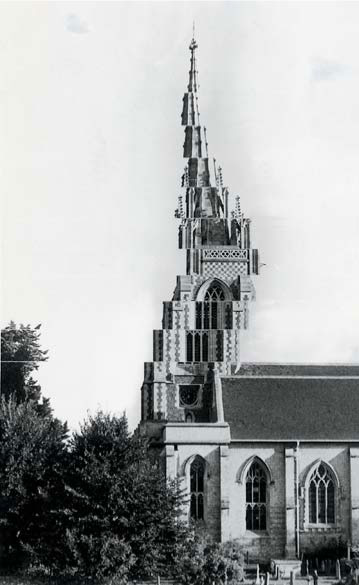
Figure 43.2 With slice and reassembly you can redesign any building.
Another form of reconstruction is to carefully dissect a single print into a regular pattern of slices, concentric discs, squares, etc., and then reassemble them in some different way, like the church architecture shown in Figure 43.2. In Figure 43.1, four prints have been butt-mounted to create one pattern. Look at the bottom left-hand quarter only and you will find that the subject is simply the inside of a shed door, including the shadow of the handle. It was constructed using two normal prints and two printed through the back of the negative.
The landscape (Figure 43.3) shows a more subtle form of repeat patterning – two butt-joined prints, one enlarged through the back of a negative and one from another negative, straight. Notice that having the dog on only one half breaks up the symmetry of the final result, making you wonder if the scene is real or constructed. Pictures like this need to be planned out before they are shot. If possible, make them pose a question or express some point of view. Figure 43.4, for example, says something about the fact that we work with hard edges to our pictures, unlike scenes observed by eye. A print of the man was pasted onto a seascape print and the shadow by his feet painted in with watercolor.
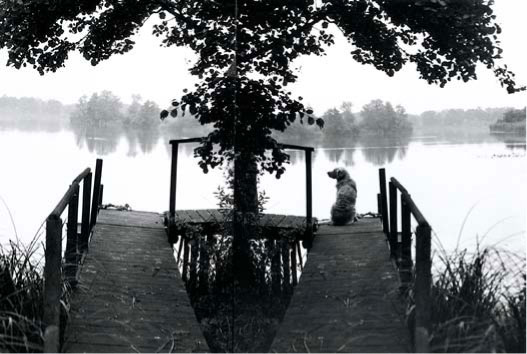
Figure 43.3 Constructed landscape.
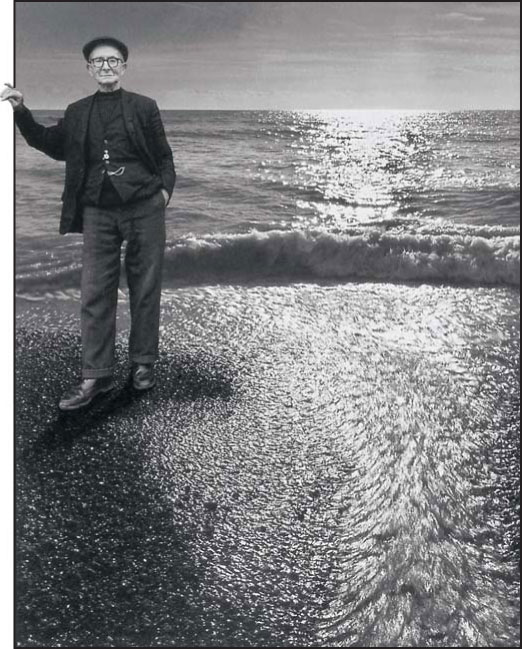
Figure 43.4 Montage (courtesy Graham Smith).
Hand coloring
Hand-tinting monochrome prints allows you to choose to leave some parts uncolored and suppressed, with others picked out strongly like the girl’s eyes in Figure 43.5, irrespective of original appearance. Have your print made on fiber-based paper (if possible, make the print yourself and sepia tone it). The print should be fairly pale because underlying dark tones desaturate your colors. Choose paper which is matt, not glossy – the latter’s extra gelatin top coat often gives uneven results. Remember too that big prints take longer to color than small ones. Begin with a size you know you can finish in one session.
Work with either transparent photographic dyes or ordinary watercolors. Dyes give stronger hues and you can build them up by repeated application, but unlike watercolors they are hard to blend and mistakes cannot be washed off. (A dye remover pen will erase small color areas.) Start off by slightly damping your whole print surface to swell the gelatin, and firmly attach it on all four sides to hardboard with gummed brown tape. Work on the largest areas first, with a color wash on cotton wool. Then color in smaller parts using a brush, size 0–4, or a hand-coloring dye pen. Explore local coloring by computer too.
Panoramas
A panorama can consist of two, three or more prints joined up to form one uninterrupted picture. This is a very successful way of showing an architectural interior or a landscape when you do not have a sufficiently wide-angle lens. Building up a panorama also gives you an impressively large image from what were only quite small images (see Figure 43.6).
For the most accurate-looking result you must work carefully at the shooting stage. Expose each picture for a panorama from exactly the same spot. Pick a viewpoint giving some kind of start and finish to your vista – perhaps trees at one end and a building at the other. Avoid showing objects close to you in the foreground and shoot with a normal or long focal length lens – otherwise it will be difficult to join up both the near and the far details in the prints. In any case, try to overlap the contents of each frame by at least 30 per cent so you need only use the central zone of each shot.
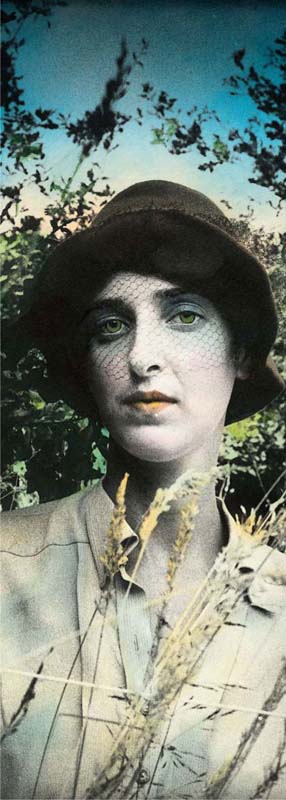
Figure 43.5 A hand-tinted black and white sepia-toned enlargement. A set of photo-coloring dyes is needed for this. Image courtesy of Sue Wilkes.
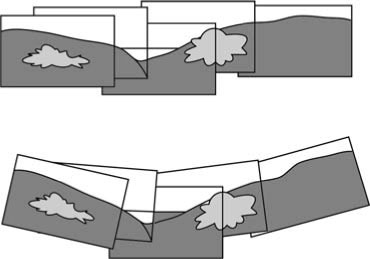
Expose your series of pictures as quickly as possible in case figure movements or fluctuating lighting conditions upset your results. A camera with motor drive will allow you to keep your eye to the viewfinder. If the panorama features a prominent continuous line, such as the horizon, keep your camera dead level. Pointing the camera slightly upwards or downwards results in prints that only join up to show this line curved (Figure 43.7).
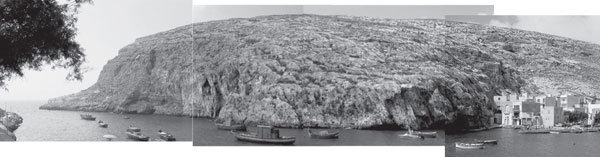
Figure 43.6 Panoramas are a quick, cheap way of making a big picture of a scene you cannot get in completely with one shot.
Auto-exposure cameras will change the exposure settings according to the different subjects entering the frame of the various source images. If this happens, then individual photographs then show continuous elements like sky as too dark or light, and they will not match up. So ensure that exposure remains unchanged by keeping to one manual setting or applying AE exposure lock. This same advice should be applied to the focus and zoom settings as well. Lock these both at the beginning of the shot sequence to avoid changes during the series of images.
For digital shooters, make sure that the white balance option is set to the dominant light source in the scene, such as ‘Daylight’. Leaving this option on ‘Auto’ can cause changes in color from one photograph to the next as the camera tries to eliminate color casts from a range of different subject-filled scenes.
Finally, if you are working with film and prints you can lay out your panorama images so that, when they overlap, details and tone values join up as imperceptibly as possible. Next, tack them down onto card with masking tape. Then, with a sharp blade, cut through each print overlap – either in a straight line or following the shape of some vertical feature. Discard the cut-off pieces and either tape together or butt-mount the component parts of your panorama. If necessary, trim or mask off the top and bottom as straight lines.
Those readers who have shot their source images digitally can use a stitching program to blend the edges of their photographs together. Image editing software like Photoshop Elements, as well as Photoshop itself, now contain a dedicated stitching feature, called Photomerge, built into the main program. Photomerge imports, sequences and positions the source images automatically, producing a stitched panorama. For problem picture sequences where adjacent images don’t quite match up, the user is able to fine-tune these blending areas with a series of manual controls. The end result is a new picture file that is compiled of all the stitched source files (see Figures 43.8 and 43.9).

Figure 43.8 The Photomerge feature found in both Photoshop and Photoshop Elements programs stitches together a series of overlapping images to form one complete panoramic photograph.
Joiners
Not every set of panorama images needs to marry up imperceptibly into one image. Another approach is to be much looser, abandon strict accuracy and aim for a mosaic that just suggests general appearance. The painter David Hockney explored composite image making this way by ‘spraying’ a scene with dozens of shots, often taken from more than one viewpoint and distance. The resulting prints, which he called ‘joiners’, both overlap and leave gaps. They have a fragmented jigsaw effect that suggests the passage of time and movement around the scene, concentrating on one thing after another.
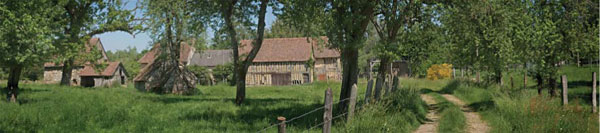
Figure 43.9 Photomerge, like other stitching software, matches and seamlessly blends the edges of adjacent images to form the final wide vista composition.
Figure 43.10 is a rough mosaic in the form of a single sheet of contact prints. It was made by contact (page 215) from a film of 20 consecutive exposures. The individual pictures, all shot from one position using a hand-held camera and 50 mm lens, collectively make up something approaching a fish-eye view (page 87). For this kind of result, pre-plan how many exposures are needed per row. Don’t overlap pictures – in fact, compose trying to leave gaps where the black horizontal bars (rows of perforations and film edges) will stretch across the final picture. The way that inaccuracies in a mosaic such as this restructure the architecture gives it individuality and life, but try to pick a camera position giving a symmetrical view to help hold it all together as one picture.
A similar technique can be employed when working digitally, but instead of composing the images as a contact sheet, simply create a large blank picture document onto which all the source photographs can be placed. Each picture can be imported as a separate layer, allowing the user to move, size and crop the images to suit the composition. Many image editing programs also have the option to display a grid on the picture surface to help with more precise alignment. Once the composition is complete, the grid can then be hidden from display.
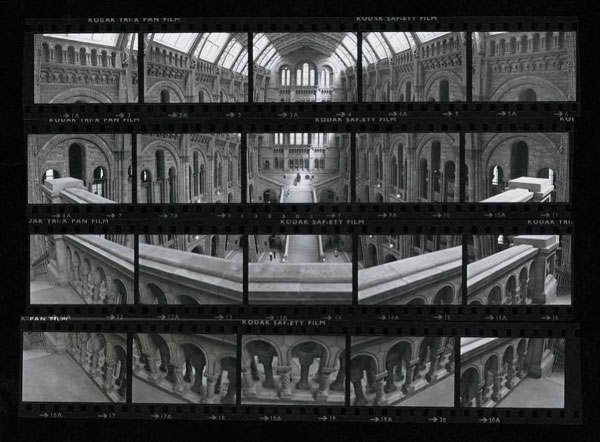
Figure 43.10 Mosaic-type panorama. A contact sheet printed from 20 exposures on one 35 mm film. Always start photographing at top left and finish bottom right.
1 Using a sequence of pictures, create a visual diary of ‘5 minutes’ in the life of a friend or relative. Try to make sure that each image is linked to the next so that the story flows more like a collection of stills from a movie rather than a bunch of individual pictures.
2 When shooting hand-held in low light, try using your flash together with a long shutter speed. The flash will freeze part of the frame and the long exposure time will create a sense of movement. This technique is often called ‘flash-and-blur’.
3 Shoot a series of architectural details concentrating on strong shapes, textures and colors. Then, select a single image and, if you are a film user, print it several times the correct way round as well as reversed. Arrange the prints to form a reflecting kaleidoscope composition. Digital users can achieve the same results by copying the original picture several times and then flipping several of the photographs so that they are mirror reflections. The various pictures can then be arranged into position to form the kaleidoscope.
4 When next on holiday, try making a ‘joiner’ of a famous landmark. Instead of trying to capture all of the texture, color and detail of the site in a single image, use a series of pictures that focus on various aspects of the scene. After returning home, montage the pictures together, either as prints or via the computer, to produce a rich visual description of the landmark.
5 Produce a series of pictures showing: (a) slow subjects – elderly people, milk floats, tortoises, fat animals, etc., apparently whizzing along; (b) fast subjects made to appear stationary or moving very slowly.
6 Walk around a fairground or lit traffic-filled street at night, holding the camera with its shutter open for 3–5 seconds (at f16, ISO 100 film or setting). Include plenty of pinpoint lights. Keep the camera still for part of each exposure.
7 Make a series of abstract images of the human figure. Consider the possibilities of focus, movement, blur, reflection, refraction and shooting through various semi-transparent materials.
8 Create ‘physiogram’ patterns. In a darkened room, rest your camera on the floor facing upwards, focused for 1 m and set for f8 (ISO 100 film or setting). Suspend a pen torch pointing downwards so that it hangs 1 m above the lens, on nylon cord firmly anchored to the ceiling. Make the torch swing freely in various directions within an area about 1 m square for 30 seconds with the shutter open.
9 By combining two or more images, construct a photograph of a fantastic landscape.
10 By means of a double exposure, produce either a double profile portrait or show the contents of a household appliance (crockery in a dishwasher, for example) inside its closed opaque unit.
11 Make an imaginative series of five pictures on one of the following themes. Either: (a) the tree as a dominant element in a landscape; or (b) railway and/or road patterns as a visual design feature.
12 Using three consecutive frames, carefully shoot an accurate panorama showing part of the interior of your room. Then use all the rest of the film, or space on the memory card, to shoot a loose ‘joiner’ of the whole room. Assemble the two results appropriately.
13 Create an interpretive photographic sequence of four to six pictures illustrating your concept of either: (a) transformation; or (b) harmony.
14 Shoot several interior scenes and landscapes, then use montage to combine the foreground of one with the background of another to give an inside/outside fantasy scene.
15 Using a montage of images, illustrate one of the following themes: the mob; stairs and entrances; family ties; street-wise; ecology rules!
16 Photograph three ureleated items under similar lighting conditions – bright, direct or soft, diffused light from the same direction – import all three photos into Photoshop or Photoshop Elements. Using the layer structure of the program and eraser or masking techniques montage the different subjects together in a single document.
17 Photograph a series of flowers against plain backgrounds. Convert all pictures to grayscale, paying particular attention to ensuring that the contrast present in the original photo is retained after the conversion. Digitally tone all the pictures and add some texture before outputting the final images as a small series.
18 Find a location with an old world feel. Photograph a historical object or costumed portrait sitter within the environment. After downloading the photograph, add a vignette, some texture and then convert the picture to grayscale before finally toning the photo sepia color.
19 Photograph a series of pictures where one common colorful object features in a range of locations. After downloading the photos to the computer work your way through each of the pictures selectively, converting all of the images except the object to grayscale.
20 Photograph either a landscape, cityscape or shopping mall. Download the photos and then remove all color from the pictures. Next try to recreate the look and feel of the scene by adding the hues back into the pictures using the hand-coloring techniques detailed in this part of the book.