

Everyone makes mistakes some time, but it is how you see these mistakes that will determine whether you will make the same mistakes later on. See each unexpected result as a chance to learn more about photography and its techniques. In fact, I would go so far as to say that if you are not making mistakes then you are probably not learning as much as you could about how to use your equipment and make better pictures.
The best approach when you receive unexpected results from processing or when viewing your day’s shooting on your computer is to identify what went wrong. Was it the film, or the camera, or (most likely) the way you used your equipment? Or maybe it’s all due to the lab that processed and printed your results? Identifying the source of the error will help you fix the problem, as well as ensure that the mistake doesn’t happen again.
48 Film users: assessing the results from the lab
a. Good exposure and development
Half the skill of being able to diagnose a problem negative is in being able to recognize a good negative in the first place. Here are a few hints.
The first place to look is the image area. This should contain a full range of tones – which translates to good detail in shadow, midtone and highlight areas. There should be very few, if any, parts of the frame that contain no detail. The rule of thumb is that if the negative is placed on a page of newsprint it should be still readable. No areas of text should be obscured by the darkness (density) of the image.

Figure 48.1 Well exposed and processed black and white negative.
The second area to examine is the edge of the film. Take particular notice of the frame numbers. As these numbers are exposed in the factory they can be a good guide to the quality of your processing (see Figure 48.1).
Underdevelopment is often confused with underexposure. Both scenarios give you weak, or thin, image area but only underdevelopment will result in light edge numbers. To correct this problem ensure that the developer is freshly mixed, not contaminated with other chemicals, is at the right temperature for processing and that you have calculated the right development time (see Figure 48.2).
Fault prevention: Ensure that the developer is fresh and correctly diluted. Check the temperature of the solution before calculating the development time.
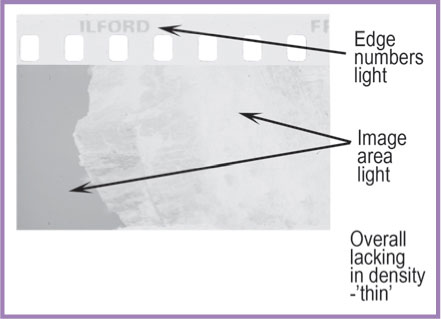
Figure 48.2 Underdeveloped black and white negative.
c. Overdeveloped
A big misconception in the world of photography is that it doesn’t matter too much if you overdevelop your negatives. Sure the effects are not as disastrous as underdevelopment, but careless overdevelopment will result in images that are difficult to print and will never display the beautiful and delicate tones obtained from a good negative. The most notable characteristics of this problem are the dark, bleeding edge numbers and highlight areas appearing as opaque (see Figure 48.3).
Fault prevention: Check to ensure that the developer solution wasn’t too strong, or too hot, or that the film was developed for too long.
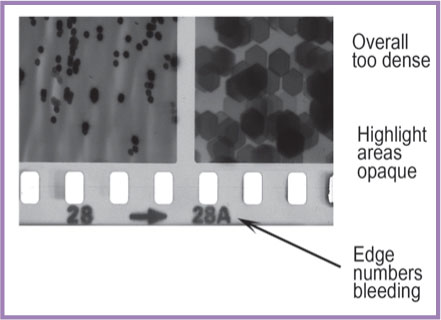
Figure 48.3 Overdeveloped black and white negative.
d. Under-fixed
Proper execution of the fixing step of the film processing sequence is just as important as development in the search for quality negatives. Under-fixing leads to fogging of both the image and edge areas of the film. A sure sign of this problem is if after fixing your film appears milky and the shadow areas are not clear. Refixing the film immediately can sometimes fix the problem, but the best cure is prevention (see Figure 48.4).
Fault prevention: Always make sure that your fixer is fresh and that you fix for the full recommended time for your brand of film.
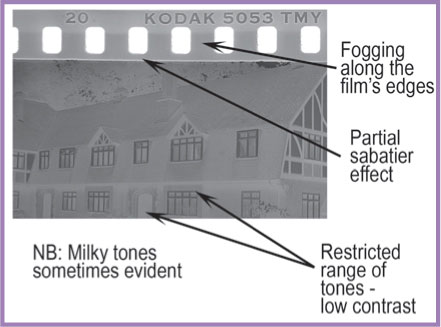
Figure 48.4 Under-fixed black and white negative.
This problem I sometimes call the ‘clear film syndrome’. No edge numbers and no image detail are not a sign of no exposure but of fixing the film before developing it. If exposure was the problem then the edge numbers would be apparent.
Fault prevention: Always label your processing chemistry and be sure of the processing sequence before you start.
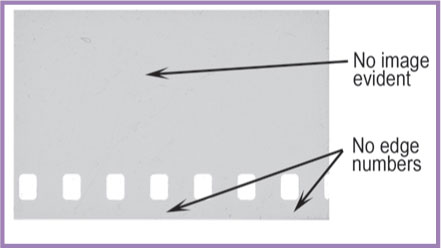
Figure 48.5 A black and white negative that was fixed first.
f. No agitation
Take it from me, regular and repeated agitation is good for your film. Some experts suggest four inversions of the canister every minute, others say twice every 30 seconds, the choice is yours. The important thing is that you do agitate your film and that once you have established an agitation routine you stick to it. Consistency is very important if you want to be able to repeat your results.
Uneven development and air bells (small clear circles on the film) are sure signs that your film has received too little agitation during the development stage of processing (see Figure 48.6).
Fault prevention: Check with the film and developer’s data sheets what the correct agitation duration and sequence is before starting to process the film.

Figure 48.6 A black and white negative processed with no agitation.
g. Stuck film leader
There is very little space between the grooves of a film spiral. There is enough width to allow free movement of chemistry but if the tongue is not secured at the edges then it can easily come in contact with other sections of the film. With two surfaces in such close contact processing cannot occur. The result is a clear section of the film in the shape of the tongue. To stop this occurring always ensure that the tongue is cut away before loading the spiral (see Figure 48.7).
Fault prevention: Cut the leader from the film before winding it onto the developing spirals.
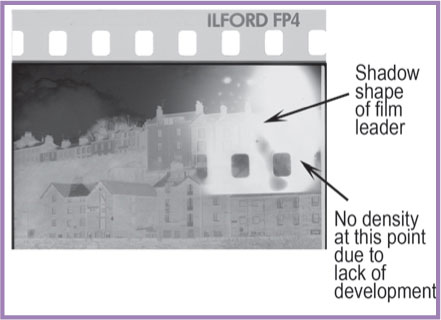
Figure 48.7 A film leader stuck to the surface of the roll stops the chemistry getting access to correctly develop the negative.
Even at the processing stage film is very sensitive to the smallest amounts of light. If your processing canister has a small crack or if the funnel-shaped lid is not properly secured then film fogging may occur. If the edges of the film, as well as some of the image area, show signs of exposure then light leak is probably the most likely explanation (see Figure 48.8).
Fault prevention: Preprocessing checks of equipment and careful securing of the processing canister should help prevent this problem from occurring.
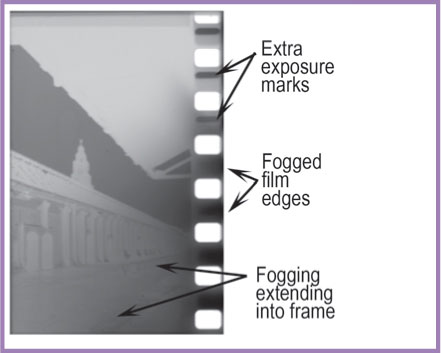
Figure 48.8 Processed negative suffering from light leak.
i. Underexposed
Often mistaken for underdevelopment, this problem is caused by not enough light reaching the film when you were shooting. You can be pretty confident that if your edge numbers are well defined but your image area is ‘thin’ then exposure, and not development, is the problem (see Figure 48.9).
Fault prevention: To stop this occurring again make sure that you always set the correct ISO for the film stock you are using and that your shutter speed and aperture settings are appropriate for the scene.

Figure 48.9 Film frame showing under exposure.
j. Overexposed
Edge numbers that are well defined, coupled with a very dark image area, is usually a sign of overexposure – the film receiving too much light at the time of shooting (see Figure 48.10).
Fault prevention: Again check your ISO setting whenever loading your camera and shutter speed and aperture settings before each shot.
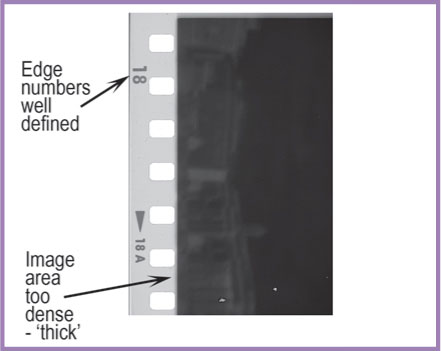
Figure 48.10 Film frame showing overexposure.
This problem looks very similar to ‘canister light leak’ – the edge area of the film is not clear and there appears to be extra exposure in the image area as well. The difference between the two problems is not the end result (fogging to the film) but the cause. In this instance light leaked through the top of a film canister that was being reused (see Figure 48.11).
Fault prevention: Bulk film loaders are a great idea and do save a lot of money but make sure that you check your canisters regularly to ensure light-tightness.

Figure 48.11 The sprocket area of the film has been fogged.
l. Crescent marks
Crescent marks on your negative are a sure sign that ‘all did not go well’ when you were loading your film onto the processing spiral. I’m sure we have all had times when the film will just not load, but forcing it will only result in kinking the film which, in turn, produces the tell-tale crescent-shaped marks (see Figure 48.12).
Fault prevention: To help avoid this situation firstly make sure that your spiral is completely dry – a wet-edged film will not load. Secondly, if your film refuses to continue to load try lightly taping the spiral on your forearm, or carefully flexing the spiral edges away from the film. Both these techniques are designed to ease the film away from the spiral track that might be causing the problem.

Figure 48.12 Kinking the film when loading can cause crescent-shaped marks on the processed negatives.
m. No exposure
If your edge numbers are evident but there is no sign of the image, this usually means that you have processed a film that you have not yet exposed. This type of negative can also be produced if you massively underexpose your film at the time of shooting, but most underexposure circumstances produce weak images, not none at all (see Figure 48.13).
Fault prevention: To stop this occurring check that the film is being advanced when you press the shutter button. Do this by watching the rewind lever move when each frame is advanced. Also make sure that you label your films to save processing mix ups.

Figure 48.13 A film frame showing no exposure.
If only a slit of your image is well exposed and the rest of the frame is blank and you have been shooting with a flash the problem is an incorrectly set shutter speed. All cameras have a recommended synchronization speed that is the fastest shutter speed that can be used whilst operating a flash. Check your camera manual for details. If you shoot with faster than the recommended speed then only a portion of the frame will be exposed. Unexposed areas can occur horizontally or vertically depending on the type of shutter mechanism your camera employs (see Figure 48.14).
Fault prevention: Double check to ensure that you are using the correct sync speed for your camera when working with flash.
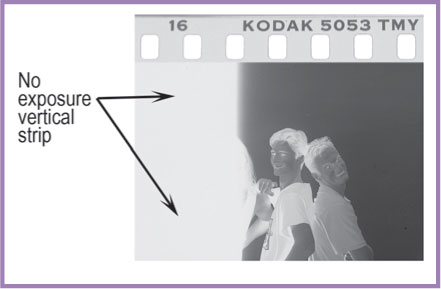
Figure 48.14 Incorrectly selected shutter speed coupled with flash can cause a portion of the frame to be correctly exposed and the rest underexposed.
o. Multiple exposure
If your film frame appears to contain more than one image, or if you are unable to make out spaces between frames, then your film has received some form of multiple exposure. This can occur if you accidentally reshoot a film that has already been used, if there is a problem with your film advance mechanism or if you have accidentally activated a multiple exposure option on your camera (see Figure 48.15).
Fault prevention: To avoid this problem make sure that you check your camera’s manual, label and process your films promptly, and if the problem persists have your camera checked by a service agent.

Figure 48.15 Multi-exposed film frame.
p. Unloading film
Another very common error is to open the camera before you have rewound your exposed film back into its light-proof cassette. Single-use cameras avoid these problems by having the film ready loaded and sealed in (see Figure 48.16).
Fault prevention: Always double check that you have wound back your film before opening the camera back.

Figure 48.16 Negative film completely black due to opening the camera back whilst the film was still loaded.
A fault most often experienced by beginners using film cameras happens during the loading of the film. If the leading edge of the film is not properly attached to the take-up spool in the camera or positioned in the area indicated for automatic cameras, then after closing the camera back the film remains stationary even though you wind on after each exposure. Then when you send the film for processing you will receive a blank (clear because it is unexposed) film in return (see Figure 48.17).
Fault prevention: Check that the film is winding on correctly by watching the film rewind lever turn when the film is advancing. Open and reattach the film if it is not turning with each newly advanced frame. Auto-winding cameras should warn of this fault via a beep or an indicator on the LCD panel.
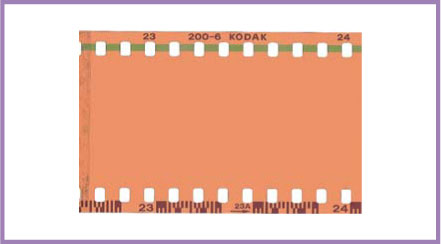
Figure 48.17 Negative film that is clear but shows edge numbers and data.
r. Marks on prints but not the negatives
When you notice a fault on a print, the first thing to do is to compare it very closely against the returned negative (the film that was initially exposed in the camera). If this negative looks normal and shows a lot more detail in the shadows or highlights than its associated print, or the print shows a blemish that cannot be seen on the negative, ask for a reprint. (If you have shot slides it is often easier to pin down faults, as the chain of processing does not then include possible printing errors.)
Fault correction: Take the offending image back to the processing lab along with the negative, point out the area of concern, such as a dust mark or blemish, and ask for a corrected reprint.
s. One frame black, the rest of the film clear
The film has one frame black, near the beginning. The rest is clear film, although data can be read along its edges. This film was correctly positioned for the first picture but then failed to move on because it became detached from the camera’s take-up spool. All your shots were therefore exposed on the one frame (see Figure 48.18).
Fault prevention: Check that the rewind is turning when advancing the film. Open and reattach the film if it is not turning with each newly advanced frame. Auto-winding cameras should warn of this fault via a beep or an indicator on the LCD panel.

Figure 48.18 One black frame, but the rest of the film with no pictures.
t. A line of white spots and beads
This ‘necklace’ of flare spots is caused by internal reflection within the lens when shooting towards the sun. This happens most easily when using a wide-angle or zoom lens. (On an SLR camera you may not actually see this defect if you are viewing the image at widest aperture.) The size and shape of spots alter as you change f-number (see Figure 48.19).
Fault prevention: Shade the lens with your hand or a lens hood, or shift the camera into the shadow of a building.

Figure 48.19 A line of white spots and beads.
u. Black hair shape
This is the result of a small hair being on the actual film surface when this shot was taken (or on a slide scanned into the computer; see Figure 48.20).
Fault prevention: Check the cleanliness of the space between lens and film plane in the (empty) camera. With an SLR, lock the shutter open on ‘B’ to access this area. Clean slides before scanning.
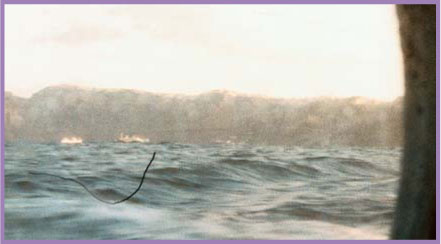
Figure 48.20 Black hair shape.
v. White hair shape
Unlike the previous fault, this is the result of a hair being temporarily on the negative surface during printing or scanning (see Figure 48.21).
Fault prevention and correction: Ensure that negatives are clean before they go into the enlarger. You may be able to disguise the mark by print spotting or via digital manipulation. If this picture was printed by a lab, then request a reprint.

Figure 48.21 White hair shape.
w. Pale print from overexposed negative
This can be caused by a faulty light measuring system or even batteries with a low charge. Similar results can be obtained if the ISO setting is too low for the film being used, if the lens aperture was stuck fully open or the shutter was sluggish (see Figure 48.22).
Fault prevention: Check over your camera functions, looking through the back of the (empty) camera body to ensure that all are working correctly. If in doubt, take the camera to a technician for a service.

Figure 48.22 Pale print from overexposed negative.
x. Print from underexposed negative
When a simple camera is loaded with slow film and used in dim lighting, the negative will be underexposed. The same effect will result if slow film is loaded in the camera but an ultra-fast ISO value is set on the camera (see Figure 48.23).
Fault prevention: Keep to sunny conditions when you are photographing with very basic equipment. If possible, check what ISO value the camera is set for. (As this is typical of the best print possible off a nearly transparent negative, you are unlikely to improve on the result.)
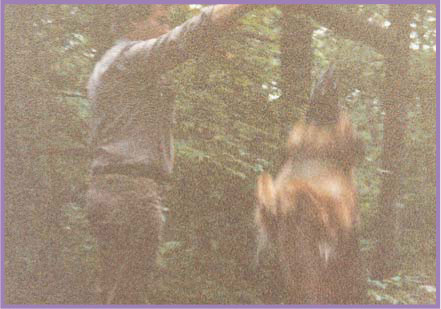
Figure 48.23 Print from underexposed negative.
a. Orange color
If your slides end up with an all-over orange color, it is generally because the film was exposed to a subject lit by domestic-type (tungsten) light bulbs (see Figure 49.1).
Fault prevention: Shoot with a blue (80A) filter over the lens. Daylight color negative film gives a print with a similar cast, but this can be given considerable correction during either darkroom or digital printing. Digital shooters can avoid these problems by selecting a tungsten or auto setting for the camera’s white balance feature.

Figure 49.1 Orange color.
Out of focus pictures can be caused by using a fixed focus lens camera too close to the subject (see Figure 49.2).
Fault prevention: Don’t exceed your camera’s closest focus limit – often only about 1 m.

Figure 49.2 Out of focus.
c. Red eye
Red eye is caused by the flash on the camera lighting up the pink retina at the back of the eyes when it is normally shadowed and therefore seen as black (see Figure 49.3).
Fault prevention: Use a camera with a flash unit higher or further to one side of the lens. Better still, bounce or diffuse the flash light.

Figure 49.3 Red eye.
d. Yellow color cast all over
An overall color cast can be caused by photographing under a colored (yellow) awning, or using bounced flash light that is reflecting off a colored (yellow) surface (see Figure 49.4).
Fault prevention and correction: To prevent this situation, recognize such lighting conditions and use an alternative way to light the scene. To correct the problem after shooting on color negative film, request that the lab reprint the photograph, giving the maximum correction of cast. Digital camera users should turn their white balance setting to automatic to minimize the cast.

Figure 49.4 Yellow color cast all over.
e. Only the background is sharply focused
This can occur when an auto-focus camera has been focused for the central zone of the picture, which happens to be the background, rather than the main subject, which is positioned off-center. A similar situation results when the AF mechanism is jammed or when the manual focus lens was set for the wrong distance (see Figure 49.5).
Fault prevention: Use AF lock for off-center subjects. With a manual lens, always set the distance for your main subject – and don’t move after focusing.

Figure 49.5 Only the background is sharply focused.
f. Wrong moment to shoot
Releasing the shutter just as someone or something unexpectedly barges into the picture (see Figure 49.6).
Fault prevention: Try to anticipate what is about to happen between camera and subject. A compact camera has the advantage that, through its viewfinder, you still see some of the scene just outside your picture limits. This lets you anticipate the action more easily. Also, make sure you have enough film left to allow several shots when people are swarming around you. But keep one or two of these ‘mistakes’ for a special place in the family album.

Figure 49.6 Wrong moment to shoot.
g. Large white hot spot
Inbuilt flash from the camera reflected straight off the plastic window of this baby’s incubator (see Figure 49.7).
Fault prevention: Do not shoot ‘flat on’ to windows, glass or plastic – angle your viewpoint. Where possible, shoot by natural daylight, loading fast film if necessary (or using a higher ISO value for digital users), to avoid using flash.
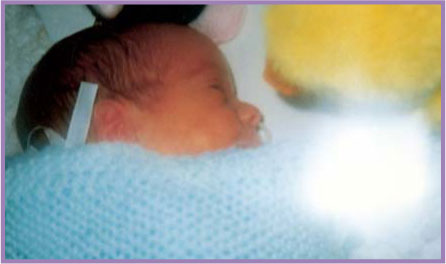
Figure 49.7 Large white hot spot.
h. Entire picture, even static elements, blurred and smudged
This situation is caused by camera shake. In poor light, with slow film, an auto-exposure camera may have selected a slow (1/8 second or longer) shutter speed, at which setting the camera could not be held sufficiently still by hand to record a sharp picture. An alternative explanation is that the firing button was jabbed hard instead of squeezing gently when exposing (see Figure 49.8).
Fault prevention: Use a higher ISO value (digital users) or load faster film when poor light is expected. Watch for ‘shake’ warning light with auto cameras – then improvise some firm support or use a tripod for shooting. With manually set cameras, select the widest lens aperture possible, to allow the use of the fastest possible shutter speed for the situation (without underexposing).

Figure 49.8 Entire picture blurred and smudged.
i. Ring of light
The picture was taken with the camera pointed directly towards the sun. The simple compact camera, having a shiny rim to its lens, reflected the sunlight into the picture (see Figure 49.9).
Fault prevention: Anticipate light flare from these conditions and adjust camera direction to account for them. In this example, tilting the camera downwards or shifting slightly to the right would allow the tree to shade the lens from the sunlight. Alternatively, you can fit a lens hood or shade the front of the lens with your hand.
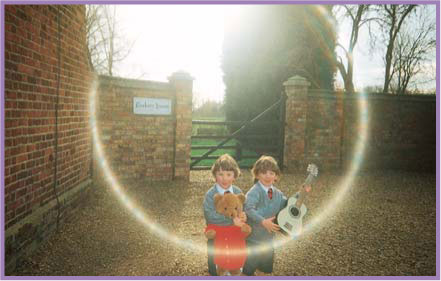
Figure 49.9 Ring of light.
j. Bands of orange or red, showing up most clearly in dark areas
Light has entered the camera or cassette and has fogged the film. Perhaps the back was opened, or there is a missing screw in the camera body itself (see Figure 49.10).
Fault prevention: Always fully rewind the film immediately after your final exposure, before anyone can open the camera. Never load your camera in strong sunlight.

Figure 49.10 Bands of orange or red, showing up most clearly in dark areas.
This is caused by an inaccurate framing through the viewfinder and generally occurs when using a compact camera quite close to the subject whilst ignoring its parallax correction guidelines (see Figure 49.11).
Fault prevention: Follow your camera’s instructions for viewfinder compensation when photographing near subjects. Always ensure your eye clearly sees all four corners of the rectangular frame line at one time, especially if you wear glasses. Digital users can more accurately frame using the LCD screen on the back of the camera rather than the viewfinder.

Figure 49.11 Mis-framed picture.
l. Main subject too dark
The camera’s overall light reading was influenced too much by a large, bright area in the scene. In this case, it is the window behind the main subject (see Figure 49.12).
Fault prevention: Read exposure from close to the figure, then apply the camera’s AE lock. Alternatively, use fill-in flash, or pick another background.

Figure 49.12 Main subject too dark.
m. White dog appears yellow
Fault in printing. The large area of strong blue background in this picture has confused the lab’s automatic printing equipment. It has intensified yellow to counteract what it measures as excess blue in the picture, turning the white coat cream (see Figure 49.13).
Fault correction: Return to the photo lab and have a corrected reprint made.

Figure 49.13 White dog appears yellow.
n. Subject appears distorted in shape
The subject was photographed with a short focal length (wide-angle). The nose of the horse was too close to the camera (see Figure 49.14).
Fault prevention: Move further back from the subject and then change to a longer focal length (or have the smaller image enlarged out of the center of your picture).
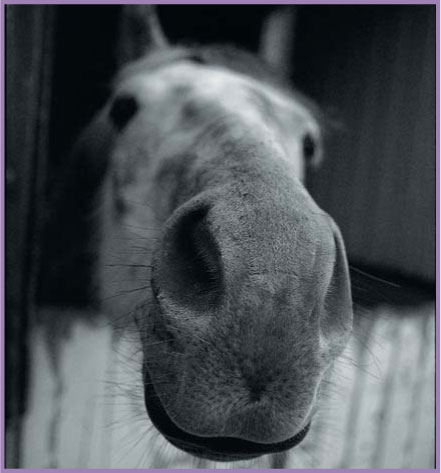
Figure 49.14 Subject appears distorted in shape.
50 Digital users: checking images on the desktop
a. Marks on the scanned picture
The photograph contains marks on the surface after scanning. This usually occurs because of dust or scratches on the glass plate on the top of the scanner or on the photograph or negative (see Figure 50.1).
Fault correction: Clean the glass plate and photograph carefully before placing and scanning your picture. If you still have marks, use a retouching tool to remove them (see Part 7 for more details about using image editing software to remove unwanted details).

Figure 50.1 Marks on the scanned picture.
b. The scanned color picture appears black and white
After scanning a color picture it appears black and white on screen. This is the result of the ‘original’ or ‘media’ option in the scanner software being set to black and white and not color.
Fault correction: Rescan the picture, making sure that the software is set to color original or color photograph.
c. The scanned picture is too bright
The picture looks too bright overall. Light areas of the photograph appear to be completely white with no details. The picture has been scanned with the wrong ‘exposure’ or ‘brightness’ setting (see Figure 50.2).
Fault correction: Rescan the picture, but this time move the brightness or exposure slider towards the dark end of the scale before scanning.

Figure 50.2 The scanned picture is too bright.
d. The scanned picture is too dark
The picture looks too dark overall. There is no detail in the shadow parts of the photograph. This results from the picture having been scanned with the wrong ‘exposure’ or ‘brightness’ setting (see Figure 50.3).
Fault correction: Rescan the picture, but this time slide the brightness or exposure slider towards the light end of the scale before scanning.
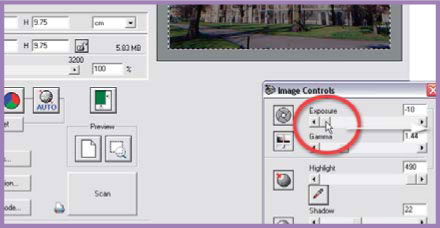
Figure 50.3 The scanned picture is too dark.
e. The scanned picture looks washed out
The picture has no vibrant colors and looks washed out. This occurs when the contrast control in the scanner software is set too low.
Fault correction: Rescan the photograph, altering the scanner’s contrast setting to a higher value.
f. Writing in the scanned picture is back to front
The message on a billboard in the picture is back to front. The cause of this problem is the negative or slide was placed into the scanner back to front.
Fault correction: Turn the film or slide over and scan again.
g. The scanned picture has too much contrast
The delicate light areas and shadow details of the picture can’t be seen and have been converted to completely white and completely black. This results from the contrast control in the scanner software being set too high (see Figure 50.4).
Fault correction: Rescan the photograph, altering the scanner’s contrast setting to a lower value.
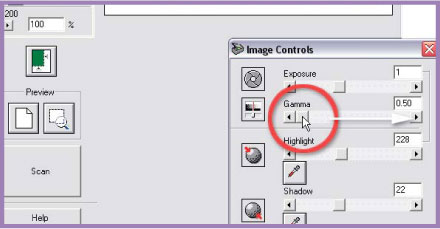
Figure 50.4 The scanned picture has too much contrast.
h. When I print my scanned picture it is fuzzy
The print of a scanned image is fuzzy, not very clear or is made up of rectangular blocks of color. To get the best quality prints from your scanned pictures you must make sure that you match the scan quality (resolution) with the output requirements. A fuzzy or unclear print is usually the result of using a scan quality setting that is too low.
Fault correction: Rescan the picture using a higher scan quality setting (resolution).
i. Surface puddling when printing
Prints with this problem show puddles of wet ink on the surface of the paper. This situation results from too much ink being applied to the surface (see Figure 50.5).
Fault correction: Select another paper or media type in the printer dialog that better suits the printing paper you are using.
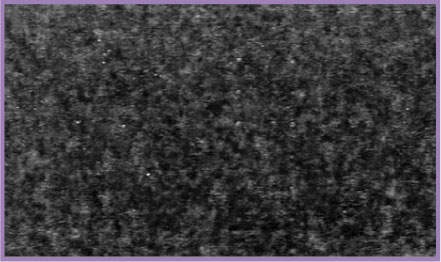
Figure 50.5 Surface puddling when printing.
j. Edge bleeding
The edges of the print appear fuzzy and shadow areas are clogged and too dark. This usually occurs when using a watercolor or uncoated paper (see Figure 50.6).
Fault correction: Try choosing a media or paper type such as ‘Plain Paper’ or ‘Backlit Film’. These measures will change the amount of ink being applied and the spacing of the ink droplets to account for the absorbency of the paper.

Figure 50.6 Edge bleeding.
k. Banding
Thin horizontal white lines appear across the surface of the photograph. This problem usually results from one or more of the print heads being clogged (see Figure 50.7).
Fault correction: Consult your printer’s manual to find out how to activate the cleaning sequence. Once completed, print a ‘nozzle test’ page to check that all are working correctly. If banding still occurs after several cleaning attempts, it may be necessary to install a new cartridge.

Figure 50.7 Banding.
The picture looks great on screen but prints with strange colors. Using inks not made by your printer manufacturer can cause the colors in your print to be radically different to those displayed on screen.
Fault correction and prevention: Replace non-genuine inks with those made by your printer manufacturer.
m. Low-contrast photos
The histogram of a photo taken on an overcast day or when the subject is situated in open shade normally displays a bunching of the pixels towards the center of the graph. This indicates that the photo is low in contrast or flat (see Figure 50.8).
Fault correction: Contrast can be added back to the image using the Levels feature in Photoshop or Photoshop Elements. Just drag the white and black input sliders towards the center of the graph until they meet the first lot of pixels.
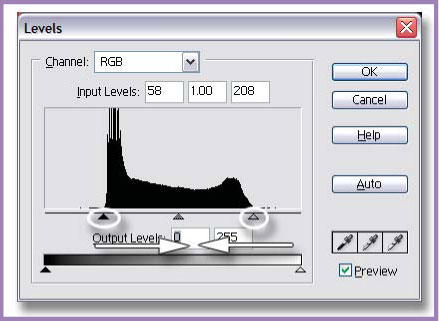
Figure 50.8 Increasing contrast in a low-contrast photo.
n. High-contrast photos
Photos taken on a bright sunny day will generally exhibit the opposite scenario where there is too much contrast in the photo. Typically the histogram will show bunches of pixels at either end of the graph with few in between (see Figure 50.9).
Fault correction: To make the photo less contrasty drag the black and white output sliders of the Levels feature towards the center of the graph.
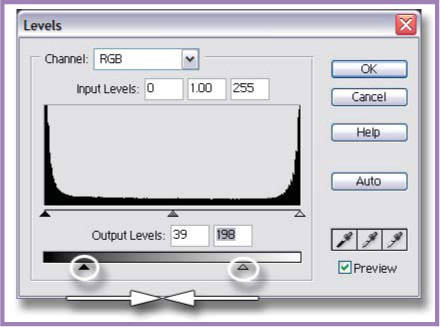
Figure 50.9 Decreasing contrast in a high-contrast photo.
o. Bright pictures
Overexposed photos will appear too light and bright. Use the Levels to redistribute the tones in the picture (see Figure 50.10).
Fault correction and prevention: To darken a bright photo, adjust the black and white point sliders first to ensure that the contrast is acceptable and then drag the midtone input slider to the right.
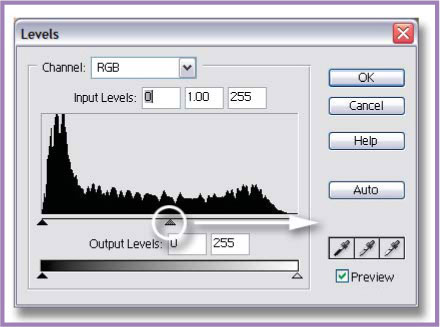
Figure 50.10 Darkening a bright photo.
When you view the histogram of images that are overly dark photos (mainly due to underexposure) you will see most of the pixels are bunched towards the left of the histogram. You can brighten a dark photo using the Levels feature in Photoshop or Photoshop Elements (see Figure 50.11).
Fault correction and prevention: To lighten a dark photo, adjust the black and white point sliders first to ensure that the contrast is acceptable and then drag the midtone input slider to the left.
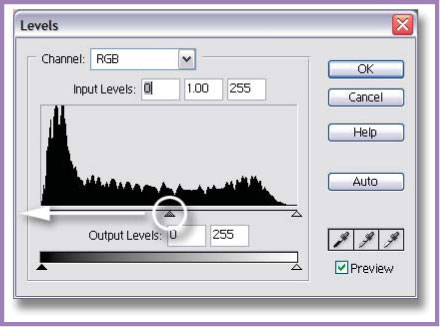
Figure 50.11 Brightening a dark photo.