
Best Practices in Java EE Web Development
All the evolution we know of proceeds from the vague to the definite.
—Charles Sanders Peirce
Every so often good solutions are invented. At times they are discovered. Invention and discovery are not synonyms,1 and they signify different objectives; however, both are realized through experience and expertise. Experience helps you achieve good solutions, and when you apply those good solutions to the same set of problems, patterns begin to emerge. Patterns are the catalog of good solutions that stem from the experience and expertise of developers.
An architect named Christopher Alexander observed that architects tend to solve the same problems in more or less the same way. This realization led him to write a book of design patterns for architects.2 He reflected in this book, “A design pattern describes a problem which occurs over and over again, and then describes the core of the solution to that problem, in such a way that you can use this solution a million times over, without ever doing it the same way twice.”
In 1994, the book Design Patterns: Elements of Reusable Object-Oriented Software, by Erich Gamma, Richard Helm, Ralph Johnson, and John Vlissides (Addison-Wesley, 1994) (the “Gang of Four” or “GoF”), applied Alexander’s ideas to software. This book expounded OO patterns and ushered in a wave of best-practice solutions, addressing a number of design requirements that surfaced over the years with a design strategy that is reusable across applications.
As server systems grew, enterprise infrastructure such as Java EE emerged that provided abstractions of technologies and services. However, using Java EE does not naturally lead to best-practice architecture and design. John Crupi, Dan Malks, and Deepak Alur first established Java EE design patterns based on their experience of architecting enterprise systems.
Applying these Java EE design patterns to the development of a Java EE–based application is de rigueur to achieving best-practice architecture and design. That said, ensuring best-practice architecture and design is not enough to ensure reusable, maintainable, extensible software. Even with the Java EE design patterns in place, a software project is often afflicted by a phenomenon called entropy, a measure of the degree of disorder. According to the Second Law of Thermodynamics, everything in the universe moves from low entropy (a state of order) to high entropy (disorder) and eventual chaos. Everything in nature is bound by this law of physics, and nature deals with this irrevocable law by means of evolution.
A software project too often tends to move from low entropy to high entropy, and to deal with the disordered state, it needs to keep evolving. That is not to say that evolving your project supersedes project management and methodologies; despite the most finely honed project management, sharp-edged methodologies, and a team with a keen sense of style, a software project may fall into a state of high entropy. Figure 3-1 presents the evolutionary steps in Java EE’s web tier that help deal with entropy in software projects.
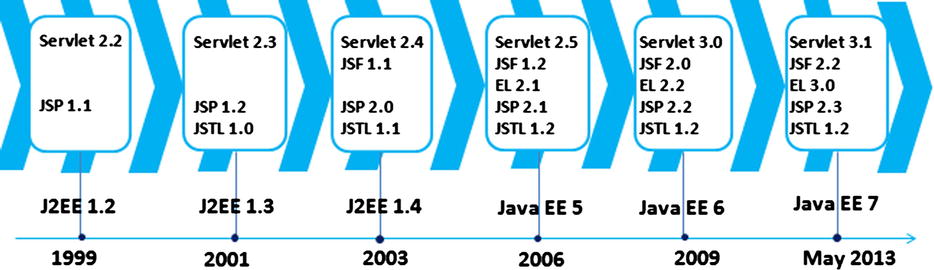
Figure 3-1. The evolution in the Java EE web tier
As you can see in Figure 3-1, not only have the technologies in the Java EE web tier evolved, but new ones are added with each new release. If you are still using J2EE 1.4, for instance, you will not have the unified EL (EL 2.1) in your toolbox. It is essential to keep up with the evolution of any technology to keep from falling into the eventual state of high entropy that can afflict any software project.
This chapter elucidates the importance of gradually evolving a project with any new technologies available with each new release of Java EE and using them to deal with high entropy in the project. The chapter then discusses the importance of the Java EE patterns and explains how the web applications can be made reusable, maintainable, and extensible by using Java EE web tier patterns. Next, the chapter shows how web frameworks relinquish you from using Java EE web tier patterns by providing you out-of-the-box best-practice solutions.
Best-Practice Solutions: Using EL and JSTL
Sun released the Servlet specification in 1998. The sole purpose of servlets was to help the Java web server generate dynamic content for the client. Listing 3-1 illustrates what the first servlet looked like.
Listing 3-1. The First Servlet
 1.import java.io.IOException;
 2.import java.io.PrintWriter;
 3.
 4.import javax.servlet.ServletException;
 5.import javax.servlet.http.HttpServlet;
 6.import javax.servlet.http.HttpServletRequest;
 7.import javax.servlet.http.HttpServletResponse;
 8.public class Hello extends HttpServlet {
 9.public void doGet(HttpServletRequest req, HttpServletResponse res)
10.throws ServletException, IOException {
11.res.setContentType ("text/html");
12.PrintWriter out = res.getWriter();
13.out.println("<HTML>");
14.out.println("<HEAD><TITLE>Hello World</TITLE></HEAD>");
15.out.println("<BODY>");
16.out.println("<BIG>Hello World</BIG>");
17.out.println("</BODY></HTML>");
18.}
19.}
Servlets worked fine for dynamic content generation but had one big problem. The view was hardwired into the servlet, as you can see in lines 13 to 17 in Listing 3-1. To solve this problem, JSP was born. JSP removes the need of hardwiring the view code into the business logic code. This separation of the view concern from the business-logic concern depends on the attributes shown in Listing 3-2 and Listing 3-3.
Listing 3-2. Using Attributes for Separation of Presentation(View) from Business(Servlet) Code
1.public void doPost(HttpServletRequest request, HttpServletResponse response)
2.throws IOException, ServletException {
3.String name = request.getParameter("userName");
4.request.setAttribute("name", name);
5.RequestDispatcher view = request.getRequestDispatcher("/result.jsp");
6.view.forward(request, response);
7.}
Listing 3-2 shows the fragment of a servlet that uses attributes.
- Line 3: This retrieves the userName from the request.
- Line 4: This sets the userName as an attribute in the request.
- Line 5: This retrieves the RequestDispatcher from the request.
- Line 6: This forwards to the view, passing request and response object. Note that this request object has an attribute set in it for the userName. The view can now make use of this attribute
Listing 3-3. The First JSP
1.<html><body> Hello
2.<%= request.getAttribute("name") %>
3.</body></html>
4.<html>
5.<body>
6.<% User u = (User) request.getAttribute("user"); %>
7.User  is: <%= u.getName() %>
8.</body>
9.</html>
The separation of the view from the business logic depends on the attributes, as illustrated in Listing 3-2 and Listing 3-3. JSP, in this manner, solved the problem of presentation cross-cutting business logic in servlets. But as you can see in Listing 3-4, with the scriptlets (Java code) intermingled in the presentation code (JSP), now the business logic cross-cuts the presentation concern.
Listing 3-4. Using a Scriptlet and an Expression in JSP
1.<% User u = new User(); %>
2.User  is: <%= u.getName() %>
- Line 1: The scriptlet creates an instance of a class called User.
- Line 2: This outputs the user name using Expression.
What went wrong? Scriptlets and expressions brought Java code into JSP. Prior to JSP, the presentation code cross-cut the business code. With JSP, the business code cross-cuts the presentation code. So JSP, inadvertently, didn’t actually solve anything but turned the problem of cross-cutting the business and presentation logic upside down. The scriptlet and expression in Listing 3-4 could indeed be easily replaced by JSP standard actions (<useBean>), as shown in Listing 3-5.
Listing 3-5. Using JSP Standard Action sand Expression Language
1.<jsp:useBean id="user" class="com.apress.User"/>
2.User  is: ${user.name}
Listing 3-5 does the same thing that Listing 3-4 does but without using any Java code inside the JSP page.
- Line 1: This line creates the instance of the class User using a standard JSP action.
- Line 2: This line introduces the key feature of Expression Language called an EL expression, which replaces the scripting element called expressions. The syntax shown in line 2 will be discussed in greater detail in the sections that follow.
JSP standard actions are, in general, far too limited, and consequently developers had to resort to using scriptlets to create function-rich web applications. Using Java code in the form of scriptlets in JSP leads to unmaintainable JSP pages. As a result, the JSP specification has evolved to support Java-free JSP pages. This support rests primarily on the JSP Expression Language (EL) and the JSP Standard Tag Library (JSTL). In the sections that follow, we will take a closer look at EL and JSTL.
Beauty without expression is lifeless, JSP without Expression Language is chaos. The underlying principle of the Expression Language is to provide scriptless JSP components. The Expression Language is used in two ways.
- To retrieve objects from scoped attributes (explained in the previous chapter). These objects are JavaBeans, maps, arrays, and lists that have been stored as attributes in any of the four scopes (also explained in the previous chapter). The EL searches the attributes first in the smallest scope, which is page scope; then in request and session; and finally in the largest scope, which is application scope.
- To access request parameters, request headers, cookies, context-initialization parameters, and pageContext objects.
An EL expression is formed by using the construct${expr} or #{expr}. Even though both the constructs are evaluated in the same way by the EL, the ${expr} construct is used for immediate evaluation, and the #{expr} construct is used for deferred evaluation.
- Immediate evaluation: The expression is compiled when the JSP page is compiled, and it is executed when the JSP page is executed.
- Deferred evaluation: The expression is not evaluated until its value is needed by the system.
Note Note In JSP 2.1 and newer, #{} expressions are allowed only for tag attributes that accept deferred expressions. #{expr} will generate an error if used anywhere else.
In the sections that follow, you will look at the syntax of EL and the reserved words of the language and see how to use it on a JSP page. After you have learned the basics, you’ll learn how to use EL to read values from JavaBeans, and in the final section you will learn how to use EL functions.
An EL literal can be the following types: Boolean, integer, floating-point, string, or null. Table 3-1 shows the valid values for each literal type.
Table 3-1. Literals in EL
Literal Type |
Valid Literal Value |
|---|---|
Boolean |
true or false |
Integer |
-11 |
Floating point |
4.21 |
String |
Both valid: "hello" and 'hello' |
Null |
null |
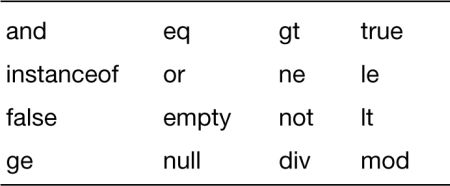
As with any other language, EL has words that are reserved and should not be used as identifiers. Table 3-2 lists the reserved words in EL.
Table 3-2. Reserved Words in EL
The EL operations are necessary to handle data manipulations. EL supports several operators such as relational, arithmetic, logical, and others.
Listing 3-6 illustrates some of these operators. You can use this code on a JSP file and run it on the server. Figure 3-2 illustrates the output.
Listing 3-6. Arithmetic Operators
<table border="1">
<tr>
<td><b>Arithmetic Operator</b></td>
<td><b>Boolean Result</b></td>
</tr>
<tr>
<td>${'${'}2 + 2 }</td>
<td>${2 + 2}</td>
</tr>
<tr>
<td>${'${'}2 - 2 }</td>
<td>${2 - 2}</td>
</tr>
<tr>
<td>${'${'}2 * 2 }</td>
<td>${2 * 2}</td>
</tr>
<tr>
<td>${'${'}2 / 2 }</td>
<td>${2 / 2}</td>
</tr>
<tr>
<td>${'${'}2 mod 2 }</td>
<td>${2 mod 2}</td>
</tr>
</table>
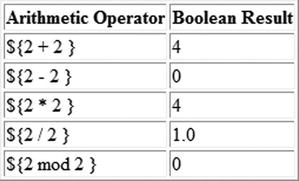
Figure 3-2. Arithmetic operators
These operators include ==, !=, <, >, <=, >=, eq, ne, lt, gt, le, and ge.
Listing 3-7 illustrates all these operators. You can use this code on a JSP file and run it on the server. The output is illustrated in Figure 3-3.
Listing 3-7. Relational Operators
<table border="1">
<tr>
<td><b>Relational Operator</b></td>
<td><b>Boolean Result</b></td>
</tr>
<tr>
<td>${'${'}10 < 20}</td>
<td>${10 < 20}</td>
</tr>
<tr>
<td>${'${'}10 > 20}</td>
<td>${10 > 20}</td>
</tr>
<tr>
<td>${'${'}10 >= 10}</td>
<td>${10 >= 10}</td>
</tr>
<tr>
<td>${'${'}10 <= 10}</td>
<td>${10 <= 10}</td>
</tr>
<tr>
<td>${'${'}10 == 10}</td>
<td>${10 == 10}</td>
</tr>
<tr>
<td>${'${'}10 != 20}</td>
<td>${10 != 20}</td>
</tr>
<tr>
<tr>
<td>${'${'}10 lt 20}</td>
<td>${10 lt 20}</td>
</tr>
<tr>
<td>${'${'}10 gt 20}</td>
<td>${10 gt 20}</td>
</tr>
<tr>
<td>${'${'}10 le 10}</td>
<td>${10 le 10}</td>
</tr>
<tr>
<td>${'${'}10 ge 10}</td>
<td>${10 ge 10}</td>
</tr>
<tr>
<td>${'${'}10 eq 10}</td>
<td>${10 eq 10}</td>
</tr>
<tr>
<td>${'${'}10 ne 20}</td>
<td>${10 ne 20}</td >
</tr>
</table>
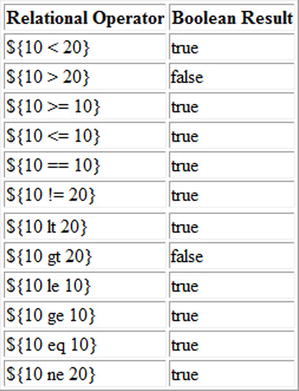
Figure 3-3. Relational operators
Listing 3-8 illustrates the logical operators like &&,||, and the not operator in action. You can use this code on a JSP file and run it on the server. The output is illustrated in Figure 3-4.
Listing 3-8. Logical Operators
<table border="1">
<tr>
<td><b>Logical Operator</b></td>
<td><b>Result</b></td>
</tr>
<tr>
<td>${'${'}true && false}</td>
<td>${true && false}</td>
</tr>
<tr>
<td>${'${'}true || false}</td>
<td>${true || false}</td>
</tr>
<tr>
<td>${'${'}not true}</td>
<td>${not true}</td>
</tr>
</table>
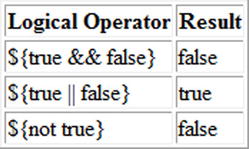
Figure 3-4. Logical operators
In this section, you will create a simple application based on the model of our bookstore application. This will not only show you how to use EL but also demonstrate its significance. Figure 3-5 illustrates the relationship between Book and Author in the application, implemented in Listings 3-9 and 3-10.

Figure 3-5. Relationship between Book and Author
Listing 3-9. Author.java
 1.package com.apress.chapter03.model;
 2.
3.public class Author {
 4.private String name;
 5.
 6.public String getName() {
 7.return name;
 8.}
 9.
10.public void setName(String name) {
11.this.name = name;
12.}
13.
14.}
Listing 3-10. Book.java
 1.package com.apress.chapter03.model;
 2.
 3.public class Book {
 4.
 5.private String bookTitle;
 6.private Author author;
 7.
 8.public String getBookTitle() {
 9.return bookTitle;
10.}
11.
12.public void setBookTitle(String bookTitle) {
13.this.bookTitle = bookTitle;
14.}
15.
16.public Author getAuthor() {
17.return author;
18.}
19.
20.public void setAuthor(Author author) {
21.this.author = author;
22.}
23.
24.}
The goal of the application is to show how to access the property of an attribute (the bookTitle property of Book in Figure 3-5) and the property of an attribute that is itself a property of the attribute (the name property of Author in Figure 3-5). In Figure 3-5,you need to output the value of the name property of the Author. It is not possible to do this using JSP standard actions, as you will see later in this section, and in such cases, scriptlets have been used. This is how scriptlets found their way into JSP. However, you should not use scriptlets because with the scriptlets (Java code) intermingled in the presentation code (JSP); the business logic cross-cuts the presentation concern, resulting in unmaintainable JSP, as explained earlier in Listing 3-4. Because JSP standard actions cannot access properties of an attribute that is itself a property of an attribute and because using scriptlets results in unmaintainable JSPs, you should use EL. In this section, you will learn how to use EL with the help of an example where Author class is the property of the Book class. Figure 3-5 shows the relationship between Book and Author. You will access the name property of Author from Book without using scriptlets.
Listing 3-9 illustrates the Author object with a single property called name with getters and setters. You need to output the value of the name property of Author.
Listing 3-10 illustrates the Book object with two properties, bookTitle and author, and their getters and setters. The author property in Book is the Author class, illustrated earlier in Listing 3-9. You need to access the name property of the author property.
The Book and Author objects serve as the model of the MVC application. Listing 3-11 illustratesthe controller of the application.
Listing 3-11. BookController.java
 1.package com.apress.chapter03.controller;
 2.
 3.import java.io.IOException;
 4.
 5.import javax.servlet.RequestDispatcher;
 6.import javax.servlet.ServletException;
 7.import javax.servlet.http.HttpServlet;
 8.import javax.servlet.http.HttpServletRequest;
 9.import javax.servlet.http.HttpServletResponse;
10.
11.import com.apress.chapter03.model.Author;
12.import com.apress.chapter03.model.Book;
13.
14.public class BookController extends HttpServlet {
15.
16.protected void doGet(HttpServletRequest request,
17.HttpServletResponse response) throws ServletException, IOException {
18.Book book = new Book();
19.book.setBookTitle("Learning Java Web");
20.Author author = new Author();
21.author.setName("Vishal Layka");
22.book.setAuthor(author);
23.
24.request.setAttribute("bookAttrib", book);
25.
26.RequestDispatcher view = request.getRequestDispatcher("/book.jsp");
27.view.forward(request, response);
28.}
29.
30.}
Listing 3-11 is the controller part of the MVC pattern. As you learned in Listing 3-2, the separation of the view concern from the business-logic concern depends on the attributes. Hence, you have to save the model object into the attributes for the view (JSP) to be able to access the model via attributes.
- Lines 19 to 22: In these lines you set the bookTitle and author properties of Book. Note that the name property of Author is already set on line 21.
- Line 22: This sets the author property of book.
- Line 24: This sets the Book object as an attribute in the request.
- Lines 26 to 27: Line 26 should now be familiar to you. In this line, you dispatch the request to book.jsp.
Listing 3-12 provides the deployment descriptor for this application.
Listing 3-12. web.xml
 1.<?xml version="1.0" encoding="UTF-8"?>
 2.<web-app xmlns:xsi="http://www.w3.org/2001/XMLSchema-instance"
 3. xmlns="http://java.sun.com/xml/ns/javaee"
 4. xmlns:web="http://java.sun.com/xml/ns/javaee/web-app_2_5.xsd"
 5. xsi:schemaLocation="http://java.sun.com/xml/ns/javaee
 6.http://java.sun.com/xml/ns/javaee/web-app_3_0.xsd" id="WebApp_ID" version="3.0">
 7.<display-name>chapter03</display-name>
 8.<servlet>
 9.<servlet-name>BookController</servlet-name>
10.<servlet-class>com.apress.chapter03.controller.BookController</servlet-class>
11.</servlet>
12.<servlet-mapping>
13.<servlet-name>BookController</servlet-name>
14.<url-pattern>/book</url-pattern>
15.</servlet-mapping>
16.<welcome-file-list>
17.<welcome-file>index.html</welcome-file>
18.</welcome-file-list>
19.</web-app>
Now the only key component that is missing in this web application is the JSP page, which is where the EL code is actually written. Before we get to the JSP page, we will look at the two key operators provided by EL to access encapsulated data: the [ ] and . (also called dot) operators. After learning about the [ ] and . operators, you will be able to write book.jsp. Figure 3-6 illustrates the directory structure of the application.
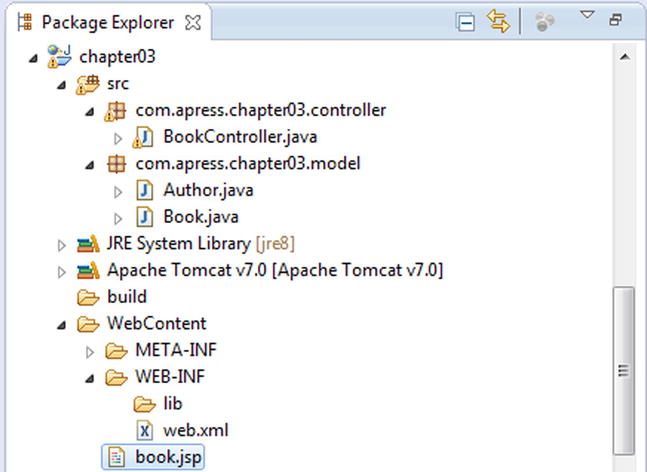
Figure 3-6. Directory structure
Using the . notation is shortcut for accessing an object’s property. The dot operator was introduced in Listing 3-5. For the sake of convenience, it is shown again in Listing 3-13.
Listing 3-13. Using the Dot Operator
1.<jsp:useBean id="user" class="com.apress.User"/>
2.User  is: ${user.name}
- Line 1: In Line 1, the class User is created using the <jsp:useBean> action. The user was set as the request attribute in the servlet code.
- Line 2: In Line 2, the value of name, which is a property of the User object is accessed using ${user.name}.
The variable user in the expression ${user.name} is an attribute stored in the request scope. The variable in the EL expression to which the dot operator is applied could be one of two kinds.
- An attribute that is stored in any of the four scopes, as it is in this case
- An EL implicit object, as explained later in this chapter
Whether this variable is an EL implicit object or an attribute stored in any of the four scopes, it can be either a JavaBean or a map. In Listing 3-13, this variable is a JavaBean that was set as an attribute in the request scope, and therefore name is the property of the JavaBean referenced by the variable user. Had the user variable been a map set as an attribute in any of the four scopes, the name would-be the key of the map.
Note The variable in the EL expression to which the dot operator is applied could be either an attribute set in any of the four scopes or an EL implicit object. Furthermore, regardless of whether this variable is an attribute set in any of the four scopes or is an EL implicit object, it could be either a JavaBean or a Map. If the variable is a JavaBean, it is followed by its property right after the dot operator; if the variable is a Map, it is followed by its key right after the dot operator.
So, now it should be clear that the variable in the EL expression is either a JavaBean or a Map. But what if you want to set an array as an attribute in any of the four scopes and access its elements using an EL expression? Or what if you want to set a list as an attribute in any of the four scopes and access its elements using an EL expression? The answer lies with the [] operator provided by EL.
The []operator is used for accessing arrays, lists, JavaBeans, and maps. That is, the variable to which the [ ] operator is applied can be an array, list, JavaBean, or map.
Inside the Brackets
There can be one of following inside the brackets of the [ ] operator:
- An index with or without quotes.
- A String literal.
- An EL implicit object or an attribute in any of the four scopes. The EL implicit object is explained later in this chapter.
- A nested expression.
If there is an index with or without quotes inside the brackets of the[ ] operator, the variable to which the [ ] operator is applied is either an array or a list. Listing 3-14 illustrates how to use the [ ] operator with a list or an array.
Listing 3-14. Using the [ ] Operator with a List or an Array
someArray["1"]
someArray[1]
someList["2"]
someList[2]
For example, the array in Listing 3-15 can be accessed as illustrated in Listing 3-16.
Listing 3-15. Setting an Array as an Attribute in the Servlet Code
1.   String [ ] books = {"Clojure", "Groovy ", "Java" , "Scala"} ;
2.   request.setAttribute("books", books);
Listing 3-16. Using the [ ] Operator
Book: ${books[0]}
The output displayed for Listing 3-16 is as follows:
Book: Clojure
Note Lists can be accessed in the same manner as arrays.
If there is a String literal inside the brackets of the [ ] operator, the variable to which the [ ] operator is applied is either a JavaBean or a Map. Listing 3-17 illustrates the code for setting a Map as an attribute in the Servlet.
Listing 3-17. Code Fragment for Setting a Map as an Attribute in the Servlet Code
1.Map<String, String>  bookMap  = new HashMap<>();
2.bookMap.put("Groovy", "Beginning Groovy");
3.bookMap.put("Java", " Beginning Java");
4.bookMap.put("Scala", " Beginning Scala");
5.request.setAttribute("books", bookMap);
In Listing 3-18, EL searches for the attribute bound to the name books in the scope. In Listing 3-17, books is a Map set in the request attribute. Therefore, EL searches for the key Groovy passed in the [ ] operator of Listing 3-18 and evaluates it.
Listing 3-18. Using the [ ] Operator
Book : ${books["Groovy"] }
The output displayed for Listing 3-8 is as shown here:
Book: Beginning Groovy
Both . and [] operator can be used with JavaBeans or Maps. For example, Listing 3-18 could be written using the . operator as shown here:
${books.Groovy}
If there is neither a String literal nor an index with or without quotes inside the brackets of the [ ] operator and if the content inside the brackets of the [ ] operator is not an EL implicit object, then the content is evaluated by searching for an attribute with that name in any of the four scopes. This is illustrated using Listing 3-19 and Listing 3-20.
Listing 3-19. Code Fragment for Setting a Map as an Attribute in the Servlet Code
1.Map<String, String>  bookMap  = new HashMap<>();
2.bookMap.put("Groovy", "Beginning Groovy");
3.bookMap.put("Java", " Beginning Java");
4.bookMap.put("Scala", " Beginning Scala");
5.request.setAttribute("books", bookMap);
6.request.setAttribute("java", "Java");
Listing 3-20. Using the [ ] Operator
Book : ${books[java] }
Let’s see how the evaluation works in Listing 3-20.
- In the code${ books[java] } of Listing 3-20, EL searches for an attribute bound by the name books in the scopes.
- EL finds this attribute in the request scope because books was set as a request attribute on line 5 in Listing 3-19.
- In Listing 3-20, the content of the [ ] operator is java, which is neither a String literal nor an EL implicit object; therefore, EL searches for an attribute bound by the name java in the scopes and finds it in the request scope because java was set as a request attribute on line 6 in Listing 3-19.
- Using the value Java of java on line 6 of Listing 3-19, the EL expression now becomes${ books["Java"] }.
- Now, because the books attribute is a Map set as a request attribute on line 5 in Listing 3-19, EL searches for the key Java, which is on line 3 in Listing 3-19. and prints its value as shown in the following output:
Book : Beginning Java
If there is an EL expression inside the brackets of the [] operator, the content inside the brackets, which is an EL expression in this case, is evaluated by the same rules applied to any EL expression. In other words, if the EL expression is using the dot operator or [] operator and if it is a [] operator, then the same rules as explained previously are applied. This is illustrated using Listing 3-21 and Listing 3-22.
Listing 3-21. Code Fragment for Setting a Map and an Array as Attributes in the Servlet Code
1.Map<String, String>  bookMap  = new HashMap<>();
2.bookMap.put("Groovy", "Beginning Groovy");
3.bookMap.put("Java", " Beginning Java");
4.bookMap.put("Scala", " Beginning Scala");
5.request.setAttribute("books", bookMap);
6.
7.String[ ] categories = {"Groovy", "Java", "Scala"};
8.request.setAttribute("category", categories);
Listing 3-22. Nested EL Expression
Book : ${ books[category[1]] }
Here’s the output:
Book : Beginning Java
Now that you have learned how far you can go with the . and [ ] operators, it is time to see why EL is so important. You will now see why it is so important by completing the application you started to create, specifically, by writing the JSP page. Listing 3-23 illustrates book.jsp. This JSP page uses scripting elements (scriptlets and expressions) and EL. The idea is to compare the two, i.e. scripting elements and EL. This comparison is illustrated in Figure 3-7.
Listing 3-23. book.jsp
 1.<%@page import="com.apress.chapter03.model.Book"%>
 2.<%@page import="com.apress.chapter03.model.Author"%>
 3.<%@ taglib uri="http://java.sun.com/jsp/jstl/functions" prefix="fn"%>
 4.<%@ taglib uri="http://java.sun.com/jstl/core" prefix="c"%>
 5.<html>
 6.<head>
 7.</head>
 8.<body>
 9.<table border="1">
10.<tr>
11.<th width= "20px">Description</th>
12.<th >code</th>
13.<th >output</th>
14.</tr>
15.<%
16.Book book = (Book) request.getAttribute("bookAttrib");
17.Author author = book.getAuthor();
18.%>
19.<tr>
20.<td>Author's Name using <b>Scriptlet and Expression</b>
21.</td>
22.<td>${fn:escapeXml("<%= author.getName() %>")}</td>
23.<td><%=author.getName()%></td>
24.</tr>
25.
26.<jsp:useBean id="bookAttrib" class="com.apress.chapter03.model.Book"
27.scope="request" />
28.<tr>
29.<td>Author's Name using <b> jsp:getProperty action </b>
30.</td>
31.<td>
32.<table border="1">
33.<tr>
34.<td>${fn:escapeXml("<jsp:getProperty name = "bookAttrib " property= "author " />")}</td>
35.</tr>
36.<tr>
37.<td>${fn:escapeXml("<jsp:getProperty name = "bookAttrib " property= "author.name " />")}</td>
38.</tr>
39.</table>
40.
41.</td>
42.<td>
43.<table border="1">
44.<tr>
45.<td><jsp:getProperty name="bookAttrib" property="author" />
46.</td>
47.</tr>
48.<tr>
49.<td>
50.<%--  <jsp:getProperty name ="bookId" property="author.name" />  - this code will yield run time exception --%>
51.Not possible
52.</td>
53.</tr>
54.</table>
55.</td>
56.</tr>
57.<tr>
58.<td>Author's Name using<b> EL </b></td>
59.<td>${fn:escapeXml("${bookAttrib.author.name}")}</td>
60.<td>${bookAttrib.author.name}</td>
61.</tr>
62.</table>
63.</body>
64.</html>
- Line 23: This outputs the name of the author using expressions.
- Line 50: This shows that it is not possible to output the name of the author using a JSP standard action.
- Line 60: This outputs the name of the author using EL.
Figure 3-7 illustrates what you will see when you run this application (http://localhost:8080/chapter03/book). Essentially, it is just not possible to display the value of the name property of Author using a standard JSP action; scripting elements would have been the only way to do it, had it not been for EL.
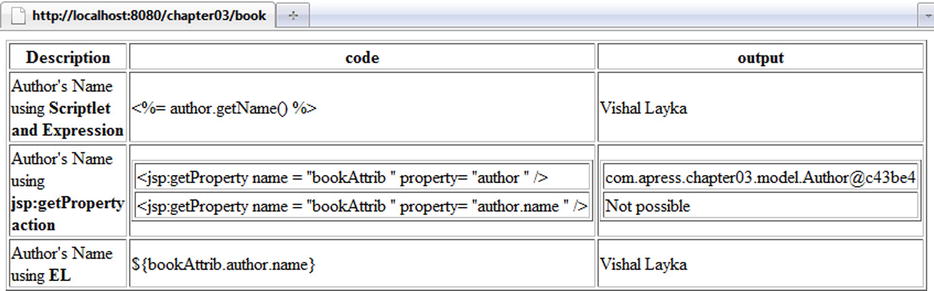
Figure 3-7. Comparing scriptlets, standard actions, and EL
Scriptlets have access to several JSP implicit objects, as explained in Chapter 2. These objects allow access to any variables that are held in the particular JSP scopes. EL also provides its own implicit objects called EL implicit objects. EL implicit objects are not the same as JSP implicit objects (except for pageContext). All of these EL Implicit objects are Maps that map the respective scope attribute names to their values. For instance, using the implicit objects param and paramValues, it is possible to access HTTP request parameters. Table 3-3 describes the EL implicit objects.
Table 3-3. Implicit Objects in EL
Implicit Object |
Description |
|---|---|
cookie |
Map: maps cookie names to a single Cookie object. |
header |
Map: contains the values of each header name |
headerValues |
Map: maps a header name to a string array of all possible values for the header. |
initParam |
Map: maps context initialization parameter names to their string parameter values. |
param |
Map: contains the names of the parameters to a page. |
paramValues |
Map: maps a parameter nameto a string array of all the values for the parameter. |
pageContext |
The PageContext object. |
applicationScope |
Map: contains all application-scoped variables. |
pageScope |
Map: contains all page-scoped variables. |
requestScope |
Map: contains all request-scoped variables. |
sessionScope |
Map: contains all session-scoped variables. |
Using EL Implicit Objects
Of the EL implicit objects listed in Table 3-3, applicationScope, pageScope, requestScope, and sessionScope are meant for specifying scope. These are used to access scoped attributes, that is, to access data from JavaBeans, maps, arrays, and lists that have been stored as attributes in any of the four scopes: page, request, session, and application.
The other implicit objects listed in Table 3-3 are used to access request parameters, request headers, cookies, context-initialization parameters, and pageContext objects. This section illustrates the usage of some of the EL implicit objects.
Listing 3-24 illustrates a simple form used to submit the request parameters through form.jsp.
Listing 3-24. form.jsp
 1.<body>
 2.<form action="books" method="post">
 3.<input type="hidden" name="action" value="books"/>
 4.<p>Book Title: <input type="text" name="bookTitle"></p>
 5.<p>Author 1 Name: <input type="text" name="authorName"></p>
 6.<p>Author 2 Name: <input type="text" name="authorName"></p>
 7.
 8.<input type = "submit"/>
 9.</form>
10.</body>
In Listing 3-24, the name property of the <input> tag is the same: authorName.
Listing 3-25 illustrates the usage of the EL implicit objects param and paramValues to retrieve the request parameter and display the result on the result.jsp page.
Listing 3-25. result.jsp
1.<p>Book Title: ${param.bookTitle}<br>
2.Author 1: ${paramValues.authorName[0]}<br>
3.Author 2: ${paramValues. authorName[1]}
4.</p>
- Line 1: This uses the EL implicit object param to get the Book title.
- Line 2 to Line 3: This code uses the EL implicit object paramValues to get the Author 1 and Author 2 names.
The EL implicit objects header and headerValues give you access to the header values that can be obtained using the request.getHeader() and request.getHeaders() methods.
Listing 3-26 illustrates accessing a header named user-agent, using the expression ${header.user-agent} or ${header["user-agent"]}.
Listing 3-26. Using EL Implicit Object Header
<span>${header["user-agent"]}</span>
Here’s the output:
Mozilla/5.0 (Windows NT 6.1; rv:12.0) Gecko/20100101 Firefox/12.0
The El implicit object cookie gives us access to the cookie. Listing 3-27 illustrates the cookie stored in the servlet.
Listing 3-27. Setting a Cookie in a Servlet
1.String userName = "vishal";
2.Cookie c = new Cookie("userName", userName);
3.c.setPath("/");
4.response.addCookie(c);
Listing 3-28 illustrates how to use an EL implicit object to access the cookie in the JSP page.
Listing 3-28. Using an EL Implicit Object Cookie
${cookie.userName.value}
The El implicit object sessionScope gives access to the attribute stored in the session scope. Listing 3-29 illustrates the attribute stored in the session in a servlet.
Listing 3-29. Setting a Session Attribute in a Servlet
HttpSession session = request.getSession();
Book book = new Book();
book.setBookTitle("Beginning Java");
session.setAttribute("book", book);
Listing 3-30 illustrates using an EL implicit object called sessionScope to access the book title in the JSP page.
Listing 3-30. Using EL Implicit Object sessionScope
<span>Book title in Session Scope ${sessionScope.book.bookTitle}</span>
EL functions let you call Java method from JSP without using scripting. An EL function is mapped to a static method of a Java class. This mapping is specified within a tag library descriptor (TLD), which is explained later in this section. Listing 3-31 illustrates a simple Java method that returns the current date and time.
Listing 3-31. Java Class with Public and Static Methods
 1.package com.apress.elfunction;
 2.
 3.import java.text.SimpleDateFormat;
 4.import java.util.Calendar;
 5.
 6.public class Now {
 7.
 8.public static String now() {
 9.Calendar currentDate = Calendar.getInstance();
10.SimpleDateFormat formatter = new SimpleDateFormat(
11."yyyy/MMM/dd HH:mm:ss");
12.String now = formatter.format(currentDate.getTime());
13.
14.return now;
15.}
16.}
17.
The key requirement for a Java method to be used in an EL function is that the method must be public and static. The three key players in an EL function are as follows:
- A Java method defined in a class
- A JSP page that invokes the Java method using EL
- A tag library descriptor file that maps the Java method in the Java class to the JSP code that calls this Java method
Listing 3-32 illustrates the tag library descriptor file. A TLD is an XML file that declares a tag library. This TLD file contains the declarations and mappings of one or more EL functions. Each function is given a name and a specific method in a Java class that will implement the function.
Listing 3-32. Tag Library Descriptor
 1.<?xml version="1.0" encoding="UTF-8"?>
 2.<taglib version="2.1" xmlns="http://java.sun.com/xml/ns/javaee"
 3.xmlns:xsi="http://www.w3.org/2001/XMLSchema-instance"
 4.xsi:schemaLocation="http://java.sun.com/xml/ns/javaee
 5.http://java.sun.com/xml/ns/javaee/webjsptaglibrary_2_1.xsd">
 6.<tlib-version>1.2</tlib-version>
 7.<uri>elFunction</uri>
 8.<function>
 9.<name>now</name>
10.<function-class>
11.com.apress.elfunction.Now
12.</function-class>
13.<function-signature>
14.String now()
15.</function-signature>
16.
17.</function>
18.</taglib>
- Line7: Line 7 is the URI of the function that will be used in the taglib directive in the JSP page.
- Lines 8 to 17: These lines specify the Java method that will be invoked with the signature and the Java class in which this method is defined.
A Java method can be called from JSP using EL in the following manner: ${prefix:function-name). The namespace prefix is declared by using the taglib directive in the JSP page. Listing 3-33 shows the JSP code.
Listing 3-33. Invoking an EL Function in JSP
1.<%@ taglib prefix="elf" uri="elFunction"%>
2.<html>
3.
4.<body>${elf:now() }
5.</body>
6.</html>
- Line 1: Line 1 is a taglib directive with the prefix elf and a URI. The URI is defined in the tag library descriptor.
- Line 4: This uses the prefix elf and invokes the function. This function name is defined in the tag library description.
You can create this application based on the first JSP application we created in Chapter 2. When this application is run (http://localhost:8080/elFunctions/elTest.jsp), it gives the output shown in Figure 3-8.
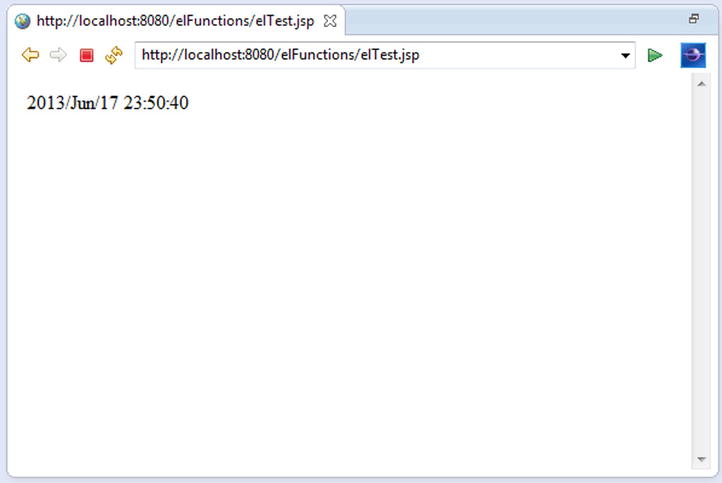
Figure 3-8. Output from invoking the EL function
The ultimate goal of the JSP Standard Tag Library (JSTL) is to help simplify the development of Java Server Pages. As discussed in the previous section, scriptlets lead to unmaintainable JSPs and can be replaced by JSP standard actions. However, standard actions are far too limited; an even better approach is for Java developers to create their own custom actions. Still, creating a custom action is a nontrivial task. JSTL provides such custom actions that can handle common recurring tasks, and JSTL includes a wide variety of actions divided into different functional areas. Table 3-4 lists the functional areas along with the URIs used to reference the libraries and the prefixes used in the JSTL specification.
Table 3-4. JSTL Tag Libraries
Functional Area |
URI |
Prefix |
|---|---|---|
Core |
c |
|
XML processing |
x |
|
I18N-capable formatting |
fmt |
|
Relational database access |
sql |
|
Functions |
fn |
Many JSTL actions export scoped variables that you can easily access through the Expression Language. As we saw in the previous chapter, scoped variables are objects stored in one of the JSP scopes: application, page, request, and session. When a JSTL action makes a scoped variable available to one or more JSP pages, it has an attribute named var that lets you specify the name of that scoped variable. Listing 3-34 illustrates the <c:set>action, available in the core tag library of JSTL, to set the value of a scoped variable.
Listing 3-34. Using<c:set>
<c:set var="name" value="hello" scope="session" />
Listing 3-34 sets a variable called name to the value hello and allows that variable to be visible in session scope. If the value for scope is not specified, the default scope is page scope. In the section that follows, you will learn all the actions in different functional areas provided in the core tag library.
Table 3-5 describes the core actions in the core tag library.
Table 3-5. Core Actions in the Core Tag Library
Action |
Description |
|---|---|
<c:catch> |
Catches exceptions thrown in the action’s body |
<c:choose> |
Chooses one of many code fragments |
<c:forEach> |
Iterates over a collection of objects or iterates a fixed number of times |
<c:forTokens> |
Iterates over tokens in a string |
<c:if> |
Conditionally performs some functionality |
<c:import> |
Imports a URL |
<c:otherwise> |
|
<c:out> |
Sends output to the current JspWriter |
<c:param> |
Specifies a URL parameter for <c:import> or <c:url> |
<c:redirect> |
Redirects a response to a specified URL |
<c:remove> |
Removes a scoped variable |
<c:set> |
Creates a scoped variable |
<c:url> |
Creates a URL, with URL rewriting as appropriate |
<c:when> |
Specifies one of several conditions in a <c:choose> action |
The JSTL core library can be divided into four distinct functional areas, as described in Table 3-6.
Table 3-6. JSTL Core Library
Description |
|
|---|---|
General-purpose actions |
Used to manipulate the scoped variables |
Conditional actions |
Used for conditional processing within a JSP page |
Iterator actions |
Used to iterate through collections of objects |
URL-related actions |
Used for dealing with URL resources in a JSP page |
The general-purpose actions provide the means to work with scoped variables. Table 3-7 describes the general-purpose actions in the core tag library.
Table 3-7. General-Purpose Actions
Action |
Description |
|---|---|
<c:out> |
Evaluates an expression and outputs the result to the JspWriter object |
<c:set> |
Sets the value of a scoped variable or a property of a target object |
<c:remove> |
Removes a scoped variable |
<c:catch> |
Catches a java.lang.Throwable thrown by any of its nested actions |
The <c:out> action evaluates an expression and displays the result. It’s equivalent to the JSP syntax <%= expression %>.
Here’s the syntax without a body:
<c:out value="value" [escapeXml="{true|false}"][default="defaultValue"] />
Here’s the syntax with a body:
<c:out value="value" [escapeXml="{true|false}"]>
default value
</c:out>Items in brackets are optional
Table 3-8 describes the attributes of <c:out>. Since this chapter covers JSTL comprehensively, I recommend you read the JSTL specification3 for a thorough understanding of how to use JSTL attributes.
Table 3-8. <c:out> Attributes
Name |
Type |
Description |
|---|---|---|
value |
Object |
This is the expression to be evaluated. |
escapeXml |
boolean |
This determines whether the characters <,>,&,’,” in the resulting string should be converted to their corresponding character entity codes. The default value is true. |
default |
Object |
This is the default value if the resulting value is null. |
The value to be written to the JspWriter is specified as a value attribute. You can use expressions in the value attribute.
- value: The expression to be evaluated is supplied via the value attribute, and the result is converted into a string before being returned as part of the response.
- default: You can optionally specify a default value that <c:out> sends to the current JspWriter if the specified value is null or is not a valid expression. You can specify the default value with the default attribute or in the body of the <c:out> action.
- escapeXml: The escapeXml attribute specifies whether to convert certain characters to the HTML character entity codes listed in Table 3-9. By default, the escapeXmlattribute is set to true. If you specify false for the escapeXml attribute, <c:out> will not convert these characters.
Table 3-9. Character Entity Codes
Character |
Character Entity Code |
|---|---|
< |
< |
> |
> |
& |
& |
' |
' |
" |
" |
Listing 3-35 illustrates replacing scripting elements with the <c:out> action.
Listing 3-35. Comparing <c:out> and Expression
<%= "hello" %>  // Ouput "hello" using Expression
<c:out  value = "hello"/> // Ouput "hello" using <c:out> action
The JSTL set tag or the <c:set> action sets the value of a scoped variable or a property of a target object. The <c:set> action is a better alternative to using the <jsp:setProperty> JSP action. Unlike <jsp:setProperty>, which allows you to set only the bean property, the <c:set> tag can do the following:
- Set bean properties
- Set Map values
- Create scoped variables on the page, request, session, or application scope
Table 3-10 describes the attributes of the <c:set> action.
Table 3-10. <c:set>Attributes
Name |
Type |
Description |
|---|---|---|
value |
Object |
Expression to be evaluated. |
var |
String |
Name of the exported scoped variable to hold the value specified in the action. |
scope |
String |
Scope for var. |
target |
Object |
Target object whose property will be set. This must evaluate to a JavaBeans object with the setter property property or to a java.util.Map object. |
property |
String |
Name of the property to be set in the target object. |
The <c:set> tag is used to do the following:
- Set the value of a scoped variable in any JSP scope.
- Set a property of a specified target object. The target must evaluate to a JavaBean or Map object.
Setting the Value of a Scoped Variable in Any JSP Scope
One of the tasks of the <c:set> action is to set variables that can be used by other actions on pages.
Here’s the syntax:
<c:set value=""value""var=""varName" " [scope=""{page|request|session|application}""]/>
Listing 3-36 shows an example of using <c:set>to set the value of the scoped variable helloVar.
Listing 3-36. Using <c:set>
<c:set var="helloVar" value="hello" />
Listing 3-36 creates an attribute named helloVar with the value "hello" in the default scope, which is page scope. You can also create attributes in another scope, say session scope; in that case, you need to specify the scope with <c:set> attribute scope="". Listing 3-37 creates a variable on session scope using <c:set>.
Listing 3-37. Using Scope
<c:set var="helloVar" value="hello" scope="session" />
We could also have expressed this by providing the value in the body content of the action, as illustrated in Listing 3-38.
Listing 3-38. Using <c:set>with Body
<c:set var="hello" scope="session" >
helloworld
</c:set>
The value of a variable can also be an EL expression, as illustrated in Listing 3-39.
Listing 3-39. Using an EL Expression in a Value
<c:set var="titleVar" value="${book.title}" scope="session" />
In Listing 3-39, the title property of the book bean is set in the titleVar variable.
Listing 3-40 shows the scriptlet equivalent of <c:set>, as illustrated in Listing 3-36.
Listing 3-40. Scriptlet Equivalent of <c:set>
<%
  String helloVar = "hello";
  pageContext.setAttribute("helloVar ", helloVar);
%>
Setting the Property of a Specified Target Object
To be able to set bean properties or map values using <c:set>, we need to use target and property, instead of var, which will define the bean and property name to be set. If target is map, for instance, then property is the name of the key and value is the value for that key.
Here’s the syntax:
<c:set value=""value""target=""target"" property=""propertyName""/>
- If using a target object, the target must evaluate to a JavaBean or a java.util.Map object.
- If the target is a JavaBean, it must contain the appropriate getter/setter methods.
Listing 3-41 illustrates how to set a map key using a<c:set> tag.
Listing 3-41. Setting a Map Key using the <c:set>Tag
<c:set target="bookMap" property="id" value="1">
This is equivalent to bookMap.put("id", "1");. You can also supply the value in the body of the <c:set> tag.
Listing 3-42 illustrates how to set bean properties using <c:set>.
Listing 3-42. Setting the bean property using the <c:set> Tag
<c:set target="book" property="book.title" value="Learning Java Web">
Listing 3-42 sets the title property of a bean named book to Learning Java Web. This is equivalent to book.setTitle("Learning Java Web");.
The <c:remove> action removes a variable from a specific scope. The variables set by <c:set> in any of the scopes can be removed using the <c:remove> action by specifying the variable name in the var attribute and the scope attribute.
Here’s the syntax:
<c:remove var="varName"[scope="{page|request|session|application}"]/>
Table 3-11 describes the attributes of the <c:remove> action.
Table 3-11. <c:remove> Attributes
Name |
Type |
Description |
|---|---|---|
var |
String |
Name of the scoped variable to be removed |
scope |
String |
Scope for var |
Listing 3-43 illustrates the simple usage of <c:remove>.
Listing 3-43. Using <c:remove>
<c:remove var=" helloVar " />
The <c:catch> action provides a way to catch java.lang.Throwableexceptions that are thrown by any nested actions. This action has a single var attribute that holds a reference to any java.lang.Throwable exceptions that occur during the execution of any of the nested actions.
Here is the syntax:
<c:catch [var="varName"]>
...nested actions in the body...
</c:catch>
Table 3-12 describes the attribute of the <c:catch> action.
Table 3-12. <c:catch> Attributes
Name |
Type |
Description |
|---|---|---|
var |
String |
Name of the exported scoped variable for the exception thrown from a nested action. |
The <c:catch> action can handle errors from any action by nesting those actions within <c:catch>. When an exception is thrown, it is stored in a page-scoped variable that is identified by the var attribute of the tag. Listing 3-44 illustrates the usage of <c:catch>.
Listing 3-44. Using <c:catch>
<body>

<c:catch var = "exception">
<% int i = 1/0;%>
</c:catch>

<c:if test = "${exception != null}">
<span> Exception : ${exception}</span>

</c:if>
</body>
Here’s the output:
Exception : java.lang.ArithmeticException: / by zero
The conditional tags provided by the JSTL core tag library provide an alternative to using scriptlets for generating dynamic content based on conditions. Table 3-13 describes the actions in this functional area.
Table 3-13. Conditional Actions in the Core Tag Library
Action |
Description |
|---|---|
<c:if> |
Evaluates its body content if the expression specified with the test attribute is true |
<c:choose> |
Provides the context for mutually exclusive conditional execution |
<c:when> |
Represents an alternative within a <c:choose> action |
<c:otherwise> |
Represents the last alternative within a <c:choose> action |
The <c:if> action is used for conditional processing and evaluates an expression, displaying its body content only if the expression evaluates to true.
Here’s the syntax without body content:
<c:if test="testCondition"
var="varName" [scope="{page|request|session|application}"]/>
Here’s the syntax with body content:
<c:if test="testCondition"
[var="varName"] [scope="{page|request|session|application}"]>
. . . body content . . .
</c:if>
Using the test attribute, a Boolean EL expression is evaluated. If the test condition evaluates to true, only then the body of the action is executed. The Boolean result of the expression evaluation is exported to a scoped variable using the var attribute. The default scope of the var is page, but using the scope attribute, the scope could be set to any of the JSP scopes.
Table 3-14 illustrates the attributes of the <c:if> action.
Table 3-14. <c:if> Attributes
Name |
Type |
Description |
|---|---|---|
test |
Boolean |
The test condition that determines whether the body content should be processed. |
var |
String |
The name of the exported scoped variable for the resulting value of the test condition. |
scope |
String |
The scope for var. |
Listing 3-45 illustrates using <c:if> with the body content.
Listing 3-45. Using <c:if> with Body Content
<c:set var="number" value="9"/>
<c:if test="${ number < 10}" >
<c:out value ="number is less than 10"/>
</c:if>
Here’s the output:
number is less than 10
The <c:choose>, <c:when>, and <c:otherwise> Actions
The <c:choose> action enables you to handle mutually exclusive conditions. It works like a Java switch statement and lets you choose between a number of alternatives, using <c:when> instead of case statements and <c:otherwise> to provide default action just like the switch statement does with a default clause.
The syntax for the <c:choose> action is as follows:
<c:choose>
body content (<c:when> and <c:otherwise>)
</c:choose>
As you can see, the <c:choose> action has two possible nested actions that form its body: <c:when> and <c:otherwise>. The syntax for each is as follows:
<c:when test="testCondition">
body
</c:when>
<c:otherwise>
body
</c:otherwise>
Table 3-15 illustrates the attributes of the <c:when> action.
Table 3-15. <c:when> Attributes
Name |
Type |
Description |
|---|---|---|
test |
Boolean |
The test condition that determines whether the body content should be processed |
Listing 3-46 illustrates a simple usage of <c:choose>.
Listing 3-46. Using <c:choose>
<body>
<c:set var="number" value="10"/>
<c:choose>
<c:when test="${number < 10}">
       Number is less than 10.
</c:when>
<c:when test="${number > 10}">
        Number is greater than 10.
</c:when>
<c:otherwise>
        Number is equal to 10
</c:otherwise>
</c:choose>
</body>
Here’s the output:
Number is equal to 10
JSTL offers two useful actions for looping and iteration: <c:forEach> for general data and <c:forTokens> for string tokenizing.
Table 3-16 illustrates the actions for looping and iteration.
Table 3-16. Looping and Iteration Actions in the Core Tag Library
Action |
Description |
|---|---|
<c:forEach> |
Iterates over a collection of objects |
<c:forTokens> |
Iterates over tokens, separated by the supplied delimiters |
The <c:forEach> action iterates over a collection of objects.
Here’s the syntax for iterating over a collection of objects:
<c:forEach[var="varName"] items="collection"
[varStatus="varStatusName"]
[begin="begin"] [end="end"] [step="step"]>
. . . body content . . . .
</c:forEach>
Here’s the syntax for iterating a fixed number of times:
<c:forEach [var="varName"]
[varStatus="varStatusName"]
begin="begin" end="end" [step="step"]>
. . . . body content . . .
</c:forEach>
Table 3-17 illustrates the attributes of the <c:forEach> action.
Table 3-17. <c:forEach> Attributes
Name |
Type |
Description |
|---|---|---|
var |
String |
Name of the exported scoped variable for the current item of the iteration. |
items |
” Arrays, Collection, Enumeration, Iterator, Map, String |
Collection of items to iterate over. |
varStatus |
String |
Name of the exported scoped variable for the status of the iteration. The object exported is of type javax.servlet.jsp.jstl.core.LoopTagStatus. |
begin |
int |
If items are specified, iteration begins at the item located at the specified index. The first item of the collection has index 0.If items are not specified, then iteration begins with index set at the value specified. |
end |
int |
If items are specified, then iteration ends at the item located at the specified index (inclusive).If items are not specified, then iteration ends when the index reaches the value specified. |
step |
int |
Iteration will process only every step item , starting with the first one. |
To iterate over a collection of objects, use the following syntax:
<c:forEach[var="varName"] items="collection" [varStatus="varStatusName"]
...body  content ....
</c:forEach>
To iterate a fixed number of times, use the following syntax:
<c:forEach [var="varName"] [varStatus="varStatusName"]
begin="begin" end="end" [step="step"]>
...body content ...
</c:forEach>
Listing 3-47 illustrates a simple usage of <c:forEach>.
Listing 3-47. Using <c:forEach>
<body>
<c:forEach var="i" begin="1" end="3">
   Item <c:out value="${i}"/><p>
</c:forEach>
</body>
Here’s the output:
Item 1
Item 2
Item 3
The <c:forTokens> action iterates over a string of tokens separated by a set of delimiters.
<c:forTokens items="stringOfTokens" delims="delimiters"
[var="varName"] [varStatus="varStatusName"]
[begin="begin"] [end="end"] [step="step"]>
. . . body . . . . . . . . .
</c:forTokens>
Table 3-18 describes all the attributes of <c:forTokens>.
Table 3-18. <c: for Tokens > Attributes
Name |
Type |
Description |
|---|---|---|
var |
String |
Name of the exported scoped variable for the current item of the iteration. |
items |
String |
String of tokens to iterate over. |
delims |
String |
Set of delimiters (the characters that separate the tokens in the string). |
varStatus |
String |
Name of the exported scoped variable for the status of the iteration. The object exported is of type javax.servlet.jsp.jstl.core.LoopTagStatus. |
begin |
int |
Iteration begins at the token located at the specified index. The first token has index 0. |
end |
int |
Iteration ends at the token located at the specified index (inclusive). |
step |
int |
Iteration will process only every step tokens, starting with the first one. |
The <c:forTokens> tag works with a string of characters separated by a delimiter. Listing 3-48 shows the usage of <c:forTokens>.
Listing 3-48. Using <c: for Tokens>
<body>
<c:forTokens items="Clojure,Groovy,Java, Scala" delims="," var="lang">
<c:out value="${lang}"/><p>
</c:forTokens>
</body>
Here is the output of Listing 3-48:
Clojure
Groovy
Java
Scala
The URL-related actions are for linking, importing, and redirecting in web applications. Table 3-19 describes all the URL-related actions in the core library.
Table 3-19. URL-Related Actions
Action |
Purpose |
|---|---|
<c:import> |
Imports the content of a URL-based resource. |
<c:param> |
Adds request parameters to a URL. This is a nested action of <c:import>, <c:url>, and <c:redirect>. |
<c:url> |
Builds a URL with the proper rewriting rules applied. |
<c:redirect> |
Sends an HTTP redirect to the client. |
Let’s take a look at these URL-related actions.
The <c:import> action imports the content of a URL-based resource, providing additional functionality over the <jsp:include> action. The syntax of the <c:import> action is as follows:
<c:import url ="url  [context="context"] [charEncoding="charEncoding"] [scope="application|page|request|session"] [var= "varName"] >
Optional body content for <c:param> sub tags
</c:import>
- The only required attribute is url, which is the URL of the resource to import.
- The <c:param> action, explained next, can be used as a nested tag in the body content of the <c:import>.
Table 3-20 describes all the attributes used with the <c:import> action.
Table 3-20. <c:import> Attributes
Name |
Type |
Description |
|---|---|---|
url |
String |
URL of the resource to import. |
context |
String |
Name of the context when accessing a relative URL resource that belongs to a foreign context. |
var |
String |
Name of the exported scoped variable for the resource’s content. |
scope |
String |
Scope for var. |
charEncoding |
String |
Character encoding of the content at the input resource. |
varReader |
String |
Name of the exported scoped variable for the resource’s content. |
In the previous chapter, we saw how the <jsp:include> action lets us encapsulate functionality in one JSP page and include it in another; for example, you could include a header and footer as illustrated in Listing 3-49.
Listing 3-49. Using the <jsp:include> Action
<body>
<jsp:include page='/WEB-INF/jsp/header.jsp'/>
<%-- content -%>
<jsp:include page='/WEB-INF/jsp/footer.jsp'/>
</body>
The <jsp:include> action is limited to including the resource that belongs to the same web application as the including page and specified as a relative URL.
You can use <c:import> instead of <jsp:include> to import resources in the same web application; Listing 3-50 illustrates how to use <c:import> instead of <jsp:include>.
Listing 3-50. Using <c:import>
<body>
<c:import url='/WEB-INF/jsp/header.jsp'/>
<%-- content --%>
<c:import url='/WEB-INF/jsp/footer.jsp'/>
</body>
With the <c:import> action, other than accessing resources in the same web application, you can also access external resources or resources in a foreign context. To access an external resource, you specify an absolute URL for the url attribute, and to access a resource in a foreign context, you specify a value for the context attribute that represents a context path for the foreign context along with the url attribute, which represents a context-relative path to the resource. Listing 3-51 illustrates how to use the <c:import> action to import a resource from a foreign context.
Listing 3-51. Importing a Resource from a Foreign Context
<c:import url='/jsp/book.jsp' context='/foreigncontext'/>
Note The charEncoding attribute is required when accessing absolute URL resources where the protocol is not HTTP and where the encoding is not ISO-8859-1.
The <c:import>, <c:url>, and <c:redirect> actions explained later in this section all deal with URLs. The <c:param> action is used to pass request parameters and is used as a nested tag in the body of either the <c:import>, <c:url>, or <c:redirect> action. The <c:param> action also does the URL encoding.
Here’s the syntax with a parameter value specified in the attribute value.
<c:param name="name" value="value"/>
Here’s the syntax with a parameter value specified in the body content.
<c:param name="name">
parameter value
</c:param>
Table 3-21 describes the attributes of <c:param>.
Table 3-21. <c:param> Attributes
Name |
Type |
Description |
|---|---|---|
name |
String |
Name of the query string parameter |
value |
String |
Value of the parameter |
Listing 3-52 illustrated how you can use <c:import> instead of <jsp:include>. You can also specify request parameters for included files with the <jsp:param> action, as shown in Listing 3-52.
Listing 3-52. Using <jsp:param>
<body>
<jsp:include page='/WEB-INF/jsp/company/companyHeader.jsp'>
<jsp:param name='user'
value='<%=session.getAttribute("userName")%>'/>
</jsp:include>
<%-- Page content goes here--%>
<jsp:include page='/WEB-INF/jsp/company/companyFooter.jsp'/>
</body>
Listing 3-53 illustrates how you can use <c:param> instead of <jsp:param>.
Listing 3-53. Using <c:param>
<body>
<c:import url='/WEB-INF/jsp/header.jsp'>
<c:param name='user'
value='${sessionScope.userName}'/>
</c:import>
<%-- body content --%>
<c:import url='/WEB-INF/jsp/footer.jsp'/>
</body>
The <c:url> action builds a URL with the proper rewriting rules applied. It can format a URL and store it in a variable specified by the var attribute.
Here’s the syntax without body content:
<c:url value [context] [var] [scope]/>
Here’s the syntax with body content to specify query string parameters:
<c:url value [context] [var] [scope]>
<c:param> actions
</c:url>
- The only required attribute is value, which is the URL to be processed.
- <c:param> subtags can also be specified within the body of <c:url> for adding to the URL query string parameters, which will be properly encoded if necessary.
The attributed of <c:url> are listed in the Table 3-22.
Table 3-22. <c:url> Attributes
Name |
Type |
Description |
|---|---|---|
value |
String |
URL to be processed. |
context |
String |
Name of the context when specifying a relative URL resource that belongs to a foreign context. |
var |
String |
Name of the exported scoped variable for the processed URL. |
scope |
String |
Scope for var. |
Listing 3-54 shows the simple usage of <c:url>.
Listing 3-54. Using <c:url>
<c:url var="homePage" scope="session"value="http://www.yourbookstore.com" />
If you specify a context-relative or page-relative URL for the value attribute, <c:url> prepends the context path of the web application to the URL; for example, if the context path of the web application is /bookWeb/books, the <c:url> action <c:url value='/book.jsp'/> will result inurl:/bookWeb/books/book.jsp.
The <c:redirect> action sends an HTTP redirect to the client, redirecting the browser to an alternate URL. The <c:redirect> action provides the URL rewriting with a redirect.
Here’s the syntax without body content:
<c:redirect url="value" [context="context"]/>
Here’s the syntax with body content to specify query string parameters:
<c:redirect url="value" [context="context"]>
<c:param> subtags
</c:redirect>
The <c:redirect>action has two attributes: the URL that will be used to redirect to and an optional context.
The attributes of <c:redirect> are listed in the Table 3-23.
Table 3-23. <c:redirect> Attributes
Name |
Type |
Description |
|---|---|---|
url |
String |
The URL of the resource to redirect to |
context |
String |
The name of the context when redirecting to a relative URL resource that belongs to a foreign context |
The URL, relative or absolute, follows the same URL rewriting rules as <c:url>. Listing 3-55 illustrates redirecting to an external resource, which is an absolute URL.
Listing 3-55. Using <c:redirect>
<c:redirect url="http://www.yourbookstore.com" />
You can redirect to a resource in a foreign context using the context attribute. The URL specified must start with a / as a context-relative URL, and as defined, the context name must also start with a /. Listing 3-56 illustrates redirecting to a foreign resource in a foreign context.
Listing 3-56. redirecting to a foreign resource in a foreign context.
<c:redirect url="/foreignresource.html" context="/foreigncontext" />
In this chapter, we have looked at the nuts and bolts of the Java EE machine in the web tier: the web components (servlets and JSP), the feature-rich Expression Language, and the ready-to-use custom actions (JSTL). Now we’ll talk about best-practice solutions using patterns.
Best-Practice Solutions: Using Patterns
While Java EE does a great job of standardizing the enterprise infrastructure, of providing an application model, and of providing components adequate to develop web applications, interacting directly with the Java EE components often results in massive amounts of boilerplate code and even code redundancy. Using Java EE does not naturally lead to best-practice architecture and design. To that end, Deepak Alur, John Crupi, and Dan Malks first established the Java EE design patterns based on their experience of architecting enterprise systems. In this section, you will be introduced to the Java EE patterns in the web tier established by Alur, Crupi, and Malks.
Note The book Core J2EE Patterns: Best Practices and Design Strategies by Alur, Crupi, and Malks (Prentice Hall, 2003) is highly recommended for learning about best-practice architecture and design. However, there have been substantial changes in the business and persistence JavaEE patterns with the Java EE 6 and Java EE 7. For instance, some patterns such as Service Locator have been dropped in favor of the Dependency Injection pattern. But the web tier patterns remain the same. You can find substantial literature on the new business and persistence Java EE patterns in Real World Java EE Patterns: Rethinking Best Practices (second edition) by Adam Bien.
The web tier encapsulates the presentation logic that is required to provide the service to the clients. The presentation tier does the following:
- Intercepts the client requests
- Provides functionality such as authentication, authorization, encryption, and session management, to name a few
- Accesses business services
- Constructs the response
- Renders the response to the client
In general, web application development requires you to address a common set of problems.
- When a request enters a web application, it often has to be preprocessed to provide certain functionality such as authentication, authorization, and encryption.
- The presentation tier and the business logic are often intermingled. This makes the presentation tier difficult to maintain.
- Views are often encoded with the view navigation logic. This results in intermingled view content and view navigation.
- There is no centralized component for view management, which results in code redundancy and code scattering across the views.
This is not a complete list of problems, but these are the most common of them in a web application. Fortunately, these problems in a web application can be addressed using web tier Java EE patterns. How to use these Java EE patterns differs with each problem. Table 3-24 describes these patterns.
Table 3-24. Presentation Tier Java EE Patterns
Presentation Tier Pattern |
Description |
|---|---|
Intercepting Filter |
Preprocessing and postprocessing of a client web request and response |
Front Controller |
Centralized access point for presentation tier request handling to support the integration of system services, content retrieval, view management, and navigation |
View Helper |
Encapsulating business logic so that it is not intertwined with the presentation logic |
Composite View |
Managing the layout of the view independent of the content |
Service to Worker |
Assembling a microframework of front controller and view helper with a dispatcher component |
Dispatcher View |
Assembling a microframework of front controller and view helper with a dispatcher component |
Note A good enterprise application consists of multiple tiers, and each tier concentrates on its own responsibilities/concerns, as explained in Chapters 1 and 2.
In the sections that follow we will look at each of these Java EE web tier patterns.
A web application receives different types of requests that require some kind of processing, for example, to check whether the client has to be authenticated before proceeding with navigation. The best technique to provide a processing mechanism for requests is to use a processing component called a filter. Filters are used when you need to provide request preprocessing or postprocessing functionalities. The Intercepting Filter pattern comes along with the introduction of filters to the Servlet specification. This pattern uses one or more filters plugged into the current application to provide services such as authorization, compression, encryption, and logging. Figure 3-9 illustrates the Intercepting Filter pattern.
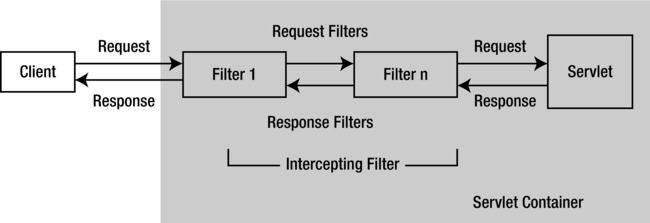
Figure 3-9. Intercepting Filter pattern
The Intercepting Filter pattern is used for preprocessing and postprocessing of client requests and also the responses by intercepting requests and responses. The filters are pluggable in the sense that you can add or remove them without changing the code.
One of the use cases for which the Intercepting Filter pattern is deemed best fit is when you want to enable theIE9 document mode of the browser by default. IE has two modes: browser mode and document mode. The browser always sends browser mode data to the server, and the server always responds with document mode data. The browser mode data consists of a user agent string with a version and trident token information, while the document mode data consists of metatags that dictate the mode in which the response will be rendered on the browser.
Listing 3-57 shows a simple response filter that enables the IE9 document mode of the browser by default.
Listing 3-57. Simple Response Filter
 1.package com.apress.filters
 2.import javax.servlet.*;
 3.import javax.servlet.http.HttpServletResponse;
 4.import java.io.IOException;
 5.import java.util.Enumeration;
 6.
 7./**
 8. * filter for enabling IE9 document mode by default
 9. *
10. */
11.public class ResponseHeaderFilter implements Filter {
12.    private FilterConfig filterConfig = null;
13.
14.    public void doFilter(ServletRequest aServletRequest, ServletResponse aServletResponse, FilterChain chain)
15.            throws IOException, ServletException {
16.
17.        HttpServletResponse response = (HttpServletResponse) aServletResponse;
18.
19.        // set the provided HTTP response parameters
20.        for (Enumeration e = filterConfig.getInitParameterNames(); e.hasMoreElements();) {
21.            String headerName = (String) e.nextElement();
22.            response.addHeader(headerName, filterConfig.getInitParameter(headerName));
23.        }
24.
25.        // pass the request/response on
26.        chain.doFilter(aServletRequest, response);
27.    }
28.
29.    public void init(FilterConfig aFilterConfig) {
30.        filterConfig = aFilterConfig;
31.    }
32.
33.    public void destroy() {
34.        filterConfig = null;
35.    }
36.}
- Line 20: This line fetches all the initialization parameters from the deployment descriptor.
- Line 22: This line adds these parameters to the response.
Listing 3-58 illustrates the configuration of the response filter in the deployment descriptor.
Listing 3-58. Configuring Simple Response Filter
 1.<filter>
 2.<filter-name>HTML5</filter-name>
 3.<filter-class>com.apress.filters.ResponseHeaderFilter</filter-class>
 4.<init-param>
 5.<param-name>X-UA-Compatible</param-name>
 6.<param-value>IE=edge,chrome=1</param-value>
 7.</init-param>
 8.</filter>
 9.<filter-mapping>
10.<filter-name>HTML5</filter-name>
11.<url-pattern>/*</url-pattern>
12.</filter-mapping>
For web applications to be maintainable, all requests must pass through a common central component. The lack of a centralized mechanism leads to the following problems:
- There is no centralized component for view management, which results in code redundancy and code scattering across the views.
- Views are often encoded with view navigation logic. This results in intermingled view content and view navigation.
The Front Controller pattern provides a centralized access for the request handling to provide content retrieval, view management, navigation, validation, error handling, centralized security control, and so on. The Front Controller pattern is best implemented with a servlet. Using a centralized servlet to handle all requests and responses provides the following advantages:
- It provides a single location from which to control decisions related to authentication and authorization.
- All URLs that the front controller is required to handle can be mapped to this servlet.
- It provides a centralized access point to support the view management and navigation.
- You can apply common logic to several views.
- It provides the separation of the presentation logic from the navigation and business logic. This leads to loose coupling between the two.
Figure 3-10 shows the structure of the Front Controller pattern.
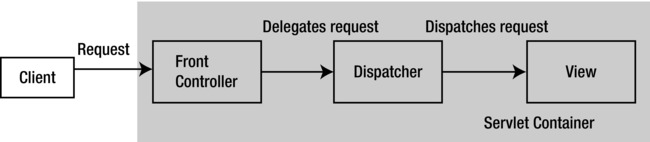
Figure 3-10. Front Controller class diagram
The components of the Front Controller pattern are as follows:
- Controller
- Dispatcher
- View
The controller is the initial point for handling a request and coordinates with a dispatcher component. The controller manages the following:
- Handling the request, including invoking security services such as authentication and authorization
- Delegating to the business service
- Handling errors
The view represents and displays information to the client.
Figure 3-11 illustrates the sequence diagram of the front controller.
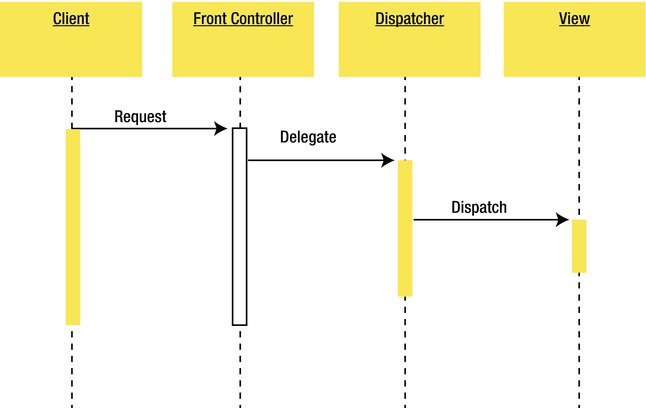
Figure 3-11. Front controller sequence diagram
In a web application, the presentation content (that is, the content of the JSP page) requires the processing of dynamic content. Presentation tier changes occur often and are difficult to develop and maintain when the business logic and presentation logic are intermingled. In fact, intermingling the business logic and presentation logic makes the presentation unmaintainable. The View Helper design pattern decouples the presentation tier from with the business tier and generates views based on a template. The components in the View Helper pattern are as follows:
- View
- View helper
A view contains the presentation formatting logic and delegates the business processing logic in the presentation to the helper.
The view helper does the following:
- A view helper can be implemented as a JavaBean implementation or a custom tag implementation. We used this pattern in Chapter 2.
- Helpers serve as the view’s intermediate data model.
- Helpers are responsible for getting data from a business service.
- Presentation business logic is encapsulated in the helper.
Figure 3-12 illustrates the structure of the View Helper pattern.

Figure 3-12. View Helper class diagram
In web applications, views are often built by embedding formatting code directly within each view. This makes modifying the layout of multiple views difficult. The Composite View pattern allows a parent view to be composed of subviews. Hence, the overall view becomes a composition of smaller subviews that are included dynamically in the overall view.
The components of the Composite View pattern are as follows:
- Basic view: This is the basic abstraction of the view.
- Composite view: This is a view that is composed of a number of subviews.
- The view: This is a simple view that has no subviews.
Figure 3-13 shows the basic structure for the Composite View pattern.
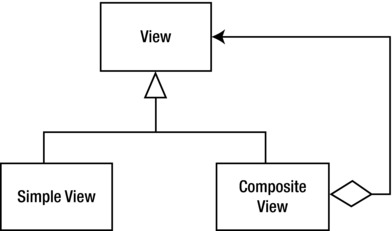
Figure 3-13. Composite View class diagram
Figure 3-14 illustrates the usage of the Composite View pattern.
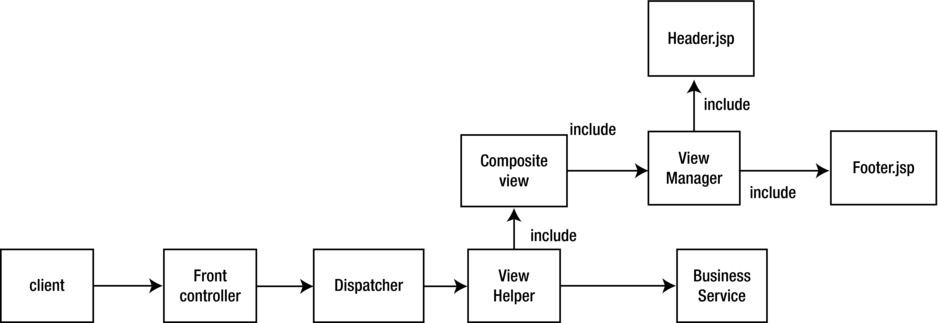
Figure 3-14. Composite View usage
The Dispatcher View design pattern assembles two patterns, Front Controller and View Helper, into a microframework with a dispatcher component to utilize the benefits associated with each pattern.
In the Dispatcher View pattern, the dispatcher is responsible for choosing and providing the mechanism to statically or dynamically present the subsequent view to the user.
The members of the Dispatcher View pattern, as illustrated in Figure 3-15, are as follows:
- Front controller
- Dispatcher
- Helper
- View
- View helper
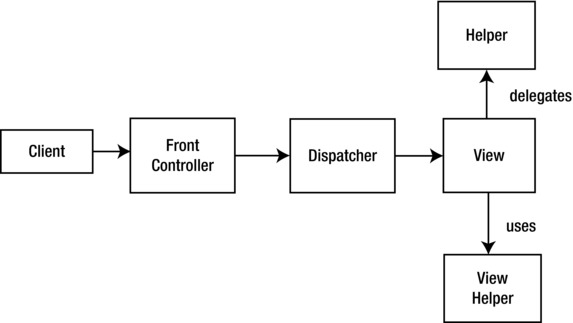
Figure 3-15. Dispatcher class diagram
The front controller does the following:
- Centralizes request processing
- Delegates to the view using the dispatcher
- Uses the view helper to separate the business logic concerns from the presentation logic concerns
The dispatcher does the following:
- Is responsible for view management and navigation
- Delegates to the view
- Uses a helper to push data into the view
The view does the following:
- Represents and displays information to the client
- Pulls the data from the data source using a view helper
Figure 3-16 illustrates the sequence diagram of the Dispatcher View pattern.
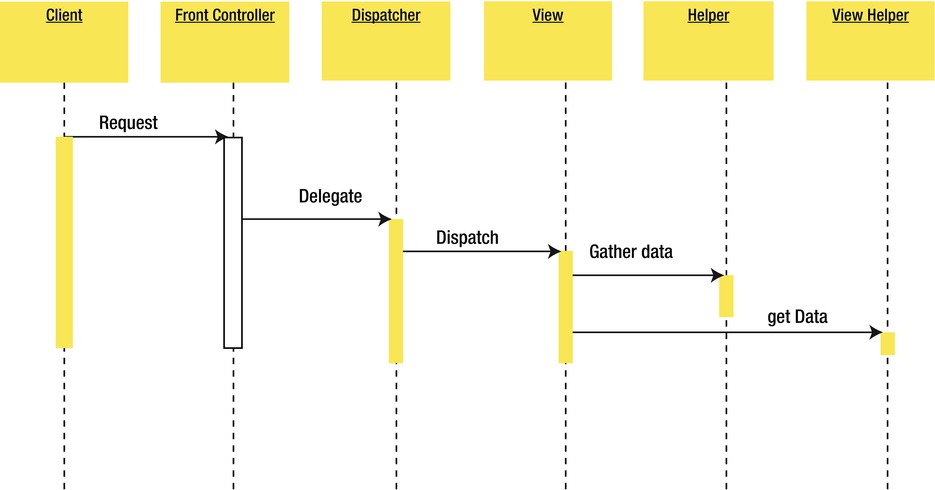
Figure 3-16. Dispatcher View sequence diagram
The Service to Worker design pattern assembles two patterns, Front Controller and View Helper, into a microframework with a dispatcher component to utilize the benefits associated with each pattern.
The Service to Worker pattern is a combination of a dispatcher with views and helpers to handle client requests and to generate dynamic content as the response. The Service to Worker pattern can be used in an application when the application requires dynamic content generation.
The members of the Service to Worker pattern, as illustrated in Figure 3-17, are as follows:
- Front controller
- Dispatcher
- Helper
- View
- View helper
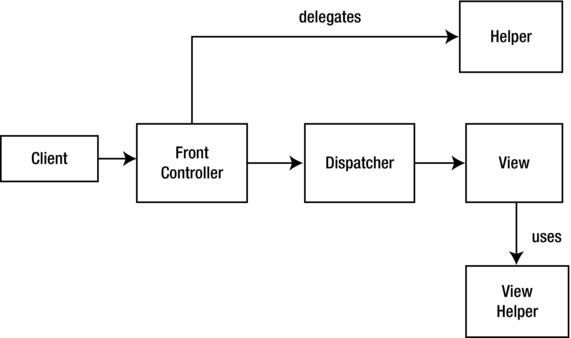
Figure 3-17. Service to Worker class diagram
The front controller does the following:
- Centralizes request processing
- Delegates to the view using the dispatcher
- Uses a view helper to separate the business logic concerns with the presentation logic concerns
The dispatcher does the following:
- Is responsible for view management and navigation
- Delegates to the view
- Uses a helper to push data into the view
The helper does the following:
- Helps the view or the controller to complete its processing
- Pushes data into the view
Figure 3-18 illustrates the sequence diagram of the Service to Worker pattern.
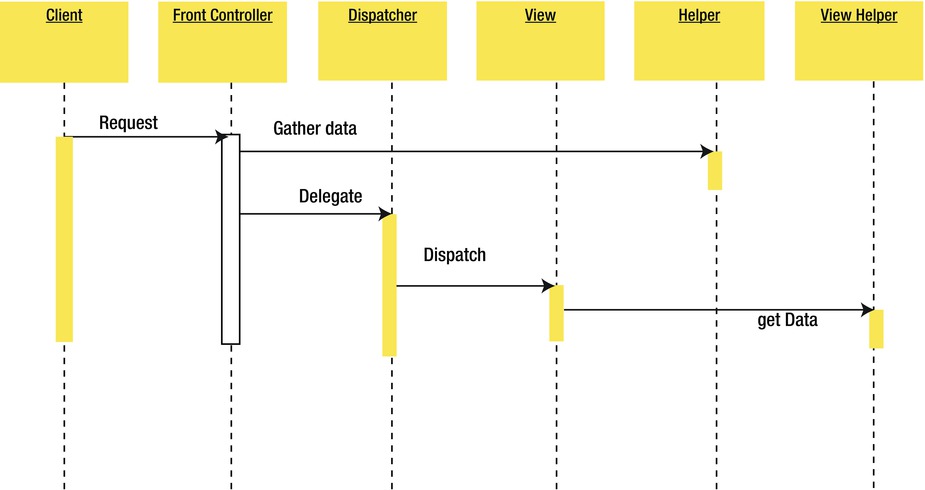
Figure 3-18. Service to Worker sequence diagram
The Service to Worker pattern, like the Dispatcher View pattern, consists of a combination of other patterns from the catalog. Both of these microframework patterns describe the combination of a controller and dispatcher with views and helpers, but the difference is that the Dispatcher View pattern delays content retrieval until dynamic view generation, while the Service to Worker pattern does content retrieval in the front controller.
We just covered all the Java EE web tier patterns. Using these patterns, you can address the architectural domain problem and business problem areas. However, you must also use OO patterns to address the architectural problem domain. Many design patterns can be applied to attain reusability, maintainability and extensibility. For instance, you can attain this trinity in the web application using OO patterns such as the following:
- Abstract Factory
- Builder
- Decorator
- Façade
- Template Method
Note In spite of applying the Java EE patterns and incremental evolution, some applications fail due to wrong architectural decisions. These wrong architectural decisions are documented so that you do not make the same mistake again. These documented wrong architectural decisions are called Antipatterns. J2EE Antipatterns by Bill Dudney, Stephen Asbury, Joseph K. Krozak, and Kevin Wittkopf (Wiley, 2003) is an excellent resource for Antipatterns.
You learned that MVC and the Java EE web tier patterns together facilitate the architectural foundation for building reusable, maintainable, and extensible web applications. As developers gather more experience, they start discovering generic objects that can be used over and over, and patterns begin to emerge. Once you have a collection of such generic objects, a framework begins to emerge. A framework is a collection of generic objects and other supporting classes that provide the infrastructure for application development. Frameworks are, essentially, a collection of design patterns guarded by the basic framework principles discussed next. A Java framework uses two types of patterns.
- OO patterns
- Java EE patterns
A framework uses OO patterns for its own construction to address the architectural problem domain, such as extensibility, maintainability, reusability, performance, and scalability. Both OO patterns and Java EE patterns address the business problem domainareas, such as processing requests, authentication, validation, session management, and view management to name a few. .Frameworks address these two major architectural and business problem areas by providing patterns based generic objects and supporting classes, closely guarded by the following key principles:
- Configurability: Configurability is the ability of the framework to be able to use the metadata to alter the behavior of the framework.
- Inversion of control: In traditional programming style, the problem domain code controls the flow of the application execution. Inversion of control refers to the technique where reusable code controls the execution of the problem domain code, thus controlling the flow of the application execution.
- Loose coupling: This principle refers to the independence of the collaborating classes in the framework with which each collaborating class can be altered without influencing the other collaborating class.
- Separation of concerns: This principle refers to the need to classify the problem domain areas and deal with them in an isolated manner so that the concerns of one problem area do not influence the concerns of another problem area. The multitiered Java EE architecture we saw in Chapter 1 is driven by the principle of the separation of concerns.
- Automating common functionalities: A framework provides mechanisms for automated solutions to the mundane functionalities of the domain.
While Java EE does a great job of standardizing the enterprise infrastructure and providing an application model, there are few major problems associated with it.
- Interacting directly with the Java EE components often results in massive boilerplate code and even code redundancy.
- You have to write code for dealing with common business domain problems.
- You have to write code for solving architectural domain problems.
You could roll your own framework to address the problems associated with building Java EE based web applications using OO patterns and Java EE patterns. But writing an in-house framework entails efforts that are orthogonal to the business goals of the application; in addition, the in-house framework is unlikely to be upgraded, and the new versions of the in-house framework will never see the sun, unlike mainstream frameworks that continuously evolve instead of falling into architectural entropy. With that in mind, it’s time to look at some of the available JVM-based web frameworks (see Table 3-25). This table is far from exhaustive; a myriad of frameworks are available, but this book will cover the most successful JVM-based web frameworks listed in the table.
Table 3-25. JVM-Based Web Frameworks
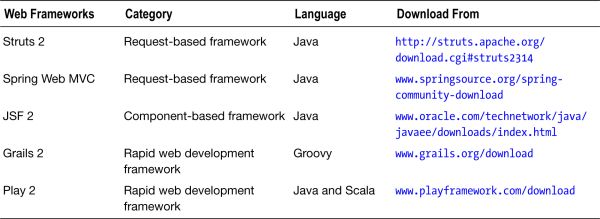
All the web frameworks listed in Table 3-25 follow the MVC Model-2 architecture, the basic architectural pattern you learned about in Chapter 2. In a typical web application, there are several tasks that you want to do for every incoming request, such as encryption. A single controller for the web application lets you centralize all the tasks that the controller has to perform in a web application, such as the following:
- Centralizing the logic for dispatching requests to views
- Checking whether the user requesting an operation has valid authorization
As the MVC-based web application grows larger with more and more views to display, the controller in the MVC-application model becomes a procedural object that takes too many decisions to render those views. This problem can be alleviated by using the front controller and configuration metadata, instead of using pure MVC architecture. This solution is illustrated in Figure 3-19.
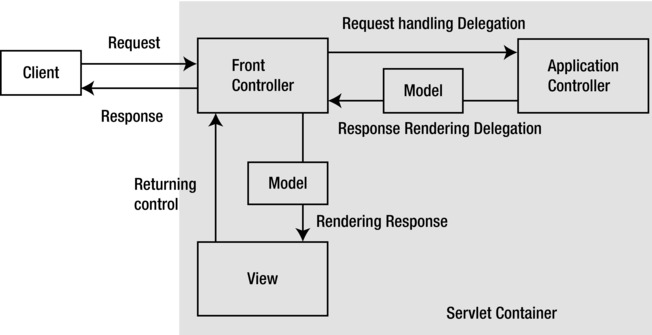
Figure 3-19. MVC with front controller
When the HTTP request arrives from the client, the front controller looks up in the configuration metadata file to decide on the right application controller that should handle theHTTP request. The application controller consists ofthe business logic invocations and presentation logic controls for the HTTP request.The difference between using pure MVC and the Front Controller pattern with MVC is that the front controller servlet looks up the configuration metadata to figure out the application controller that handles the HTTP request processing instead of itself deciding to call specific HTTP request handler objects.
In essence, this is the pattern that is common to many leading web frameworks. For instance, Struts 2 and Spring Web MVC are front controller–based MVC frameworks that delegate the control to the application controller using configuration metadata stored in, for example , an XML file. In Struts 2, the ServletFilter is a manifestation of the front controller in Figure 3-19. In JSF 2, it’s FacesServlet; in Spring Web MVC, it’s DispatcherServlet; and in Grails 2, it’s the subclass of DispatcherServlet.
This concludes the chapter. From the next chapter onwards, this book will navigate through the labyrinth of Web frameworks that capitalize on the strengths of Java EE and JVM.
Summary
This chapter focused on evolving the technologies and tools used in a Java EE project. The chapter introduced you to the common problems associated with developing a web application and showed how these problems can be solved and how web applications can be made reusable, maintainable, and extensible by using tools (such as unified EL) available with Java EE.
EL and JSTL are two picture-perfect implementations of the theory of the separation of business and view concerns, and they can be used to build reusable, easy-to-maintain, function-rich web applications. This chapter also introduced you to the Java EE web tier patterns and how these JavaEE patterns provide solutions to the recurring problems in a particular context. Then the chapter showed how frameworks address architectural and business problem areas by providing patterns-based generic objects and supporting classes. Finally, the chapter showed how web frameworks relinquish you from using Java EE design patterns by providing you out-of-the-box best-practice solutions.
1Invention means to create a new object from preexisting objects. Discovery is figuring out something that preexists but not creating new objects from it.
2A Pattern Language: Towns, Buildings, Construction by Christopher Alexander, Sara Ishikawa, and Murray Silverstein (Oxford University Press, 1977). See also The Timeless Way of Building by Christopher Alexander (Oxford University Press, 1979).
3http://java.coe.psu.ac.th/J2EE/JSTL1.2/jstl-1_2-mrel2-spec.pdf