
Component-Based Web Development Using JSF 2
It’s so beautifully arranged on the plate—you just know someone’s fingers have been all over it.
—Julia Child
JavaServer Faces (JSF) is a component-based framework for developing web applications. The distinctive feature that sets component-based frameworks apart is the ability to create and distribute reusable UI components. In general, a component represents an abstraction, a well-defined contract with the implementation details hidden from the user of the component. That is, the user of the component does not need to know the internal mechanisms of the component in order to be able to use it. Struts and Spring Web MVC alleviate the increasing complexities of building sophisticated user interfaces for the Web, but these web frameworks are not component-centric and therefore unqualified for engineering truly reusable UI components. To that end, different web frameworks, such as Tapestry and Wicket, emerged to offer a component-centric approach to web application development. However, because of a lack of existing standards for component-centric development, the ways in which these web frameworks implemented reusable UI components appeared to an experienced web developer to be tedious or limited.
JSF standardizes component-based web development and provides numerous and broad-ranging UI components to reduce the complexities in web application development. JSF provides out-of-the-box reusable UI components so that the application developers can concentrate on the application’s business logic rather than striving to develop and maintain dynamic and rich user interfaces. JSF is the evolution of a few frameworks such as Struts and was inspired by Swing’s component model. JSF represents, and requires, a paradigm shift to let you think in terms of components instead of requests and responses. Its goal is to make web development rapid by promoting and standardizing an ecosystem to engineer reusable UI components.
A JSF web framework uses the Model-View-Controller (MVC) design pattern like request-based web frameworks such as Struts and SpringMVC do. Figure 6-1 shows a high-level architecture of the JSF framework.
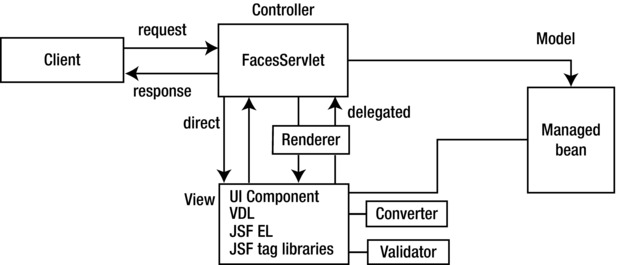
Figure 6-1. A high-level architecture of the JSF framework
Figure 6-1 presents several important parts of JSF that make its architecture rich and flexible. This architecture allows you to do the following:
- Plug in any view declaration language (VDL) such as JSP and Facelets
- Render the display in different devices, such as desktops, tablets, and so on
- Create pages using components
FacesServlet
FacesServlet is the controller in the MVC, as shown in Figure 6-1, and implements the Front Controller pattern that intercepts every interaction between Facelets (the view) and the model. FacesServlet is configured through annotations on managed beans, converters, components, renderers, and validators or optionally through the faces-config.xml descriptor file.
Managed Bean
Managed beans serve as the model for the UI component. They are responsible for the following:
- Synchronizing data with components
- Processing business logic
- Handling navigation between pages
JSF uses a view declaration language (VDL) to display a page to the client on various devices such as the desktop, portables, and so on. The default VDL for JavaServer Faces (JSF) is Facelets, but JSF allows multiple VDLs, such as JSP.
JSF EL
In the Hello World application in Chapter 5, you saw how to access managed bean properties and invoke managed bean actions using EL expressionswith the delimiters #{ and }. The EL used in JSF 1.0 and 1.1 (and later in JSP versions 1.2 and 2.0) was an extension of the EL that was part of the JSP Standard Tag Library (JSTL), as explained in Chapter 3. The difference in JSF EL and the JSP EL is that of evaluation. In JSP, as you have seen in Chapter 3, any ${} expression that appears in the page is evaluated immediately during page rendering. Such expressions are called immediate expressions.
JSF allows expressions to be available both during the rendering of the page and when that is posted back again. This type of expression in JSF is called a deferred expressionand is expressed with the delimiters #{}.
The standard JSF library consists of four parts that the page needs to access in order to use the JSF components.
- HTML components library: This defines elements that represent common HTML user interface components. The standard HTML library is accessible in Facelets and JSP as a tag library with a URI of http://java.sun.com/jsf/html and a default prefix of h.
- JSF core library: The standard core library is associated with the f: namespace and provides common application development utilities for validation and conversion.
- Facelets library: The standard Facelets templating library is accessible in Facelets as a tag library with a URI of http://java.sun.com/jsf/facelets and a default prefix of ui.
- Composite library: The standard composite component library is accessible in Facelets as a tag library with a URI of http://java.sun.com/jsf/composite and a default prefix of composite.
The standard JSF component libraries are part of the specification and also come with any standard JSF implementation such as the reference implementation or the MyFaces implementation. The section that follows shows how to download and install the JSF implementation, known as Mojarra, and integrate it into a web application.
UI Component
JSF has a rich component model provided in a standard UI component framework, as illustrated in Figure 6-2. The JSF component model includes the following:
- A rendering model that defines a myriad of forms in which the component can be rendered such as for desktop application devices and mobile app devices
- An event and event listener model that define how to handle component events
- A conversion model that defines the ways to register data converters to a component for data conversion
- A validation model that defines the ways to register validators to a component for the server-side validation
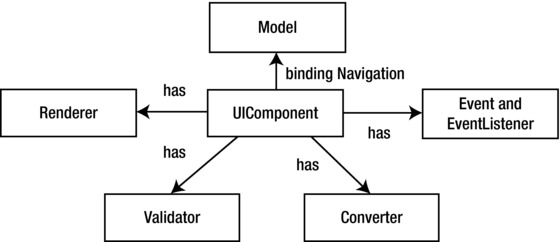
Figure 6-2. The JSF component model
The UI component model is the core of JSF; it allows you to develop the view of a web application from collections of standard, out-of-the-box UI components. These UI components are responsible for the behavior and are utilized in the JSF pages by including four tag libraries provided by JSF, depending on the type of UI component you want to use.
Renderer
The renderer is responsible for displaying a component, in other words, rendering the markup to the client and translating a user’s input into the component’s value. JSF supports two programming models for displaying components.
- Direct renderer model: When the direct model is used, components decode from, and encode to, the view. The decoding and encoding processes are explained in the next section.
- Delegated renderer model: When the delegated model is used, the decoding and encoding are delegated to a renderer.
Converter and Validator
JSF provides out-of-the-box converters to convert its UI component’s data to objects used in a managed bean, and vice versa. For example, they convert a component’s Date value to and from String values that come from the HTML markup.
JSF also provides out-of-the-box validators to validate its UI components to ensure that the value entered by the user is valid. These tags can, for example, validate a range of Long or the length of a string.
Events and Event Listeners
When the user clicks a button or link on the JSF page, a JSF UI component triggers an event. To handle such an event, an event listener is registered on the managed bean. The UI component calls the event notification on the event listener for the specific event.
As you have seen, JSF pages consist of a tree of components. This tree of components is managed by the JSF request-processing life cycle behind the scenes. To understand the JSF request-processing life cycle, first you will create a Hello World web application, and then through this application you will learn how the JSF life cycle works behind the scenes.
Getting Started with JSF
In this section, you will create a simple Hello World JSF web application using Eclipse 3.8 or newer, which supports JSF2.x. Create a dynamic web project as illustrated in Figure 6-3 by selecting File ![]() New
New ![]() Project
Project ![]() Web
Web ![]() Dynamic Web Project. Specify Apache Tomcat v7.0 in Target Runtime, select JavaServer Faces Project in the configuration, and click Next.
Dynamic Web Project. Specify Apache Tomcat v7.0 in Target Runtime, select JavaServer Faces Project in the configuration, and click Next.
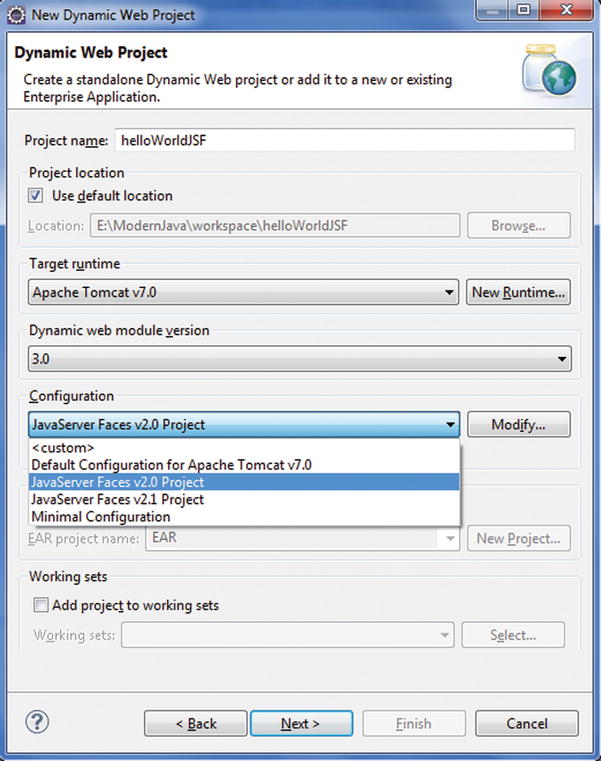
Figure 6-3. Creating a JSF project
Configure the project for building a Java application, as illustrated in Figure 6-4, and click Next.
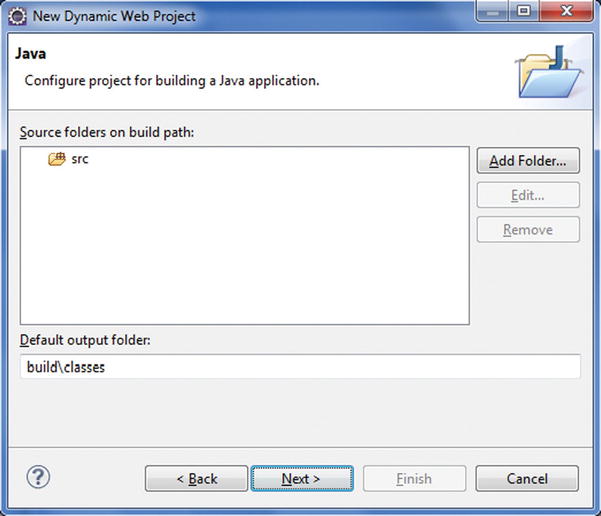
Figure 6-4. Configuring a dynamic web project
Configure the web module settings, as illustrated in Figure 6-5, and click Next.
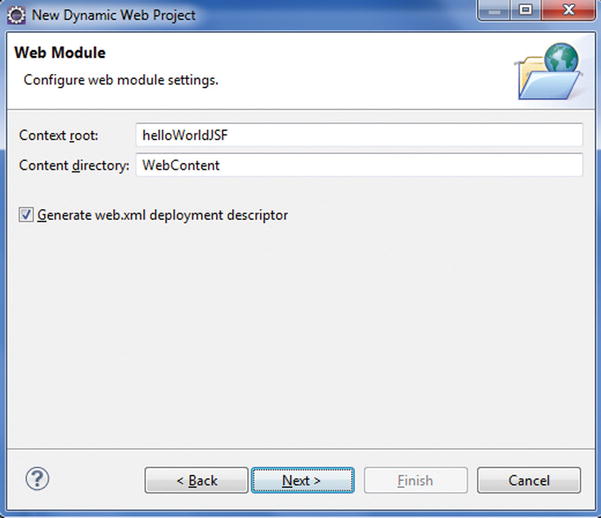
Figure 6-5. Configuring the web module settings
You need to select the JSF implementation library, as illustrated in Figure 6-6. You can do so by downloading the library by clicking Download.
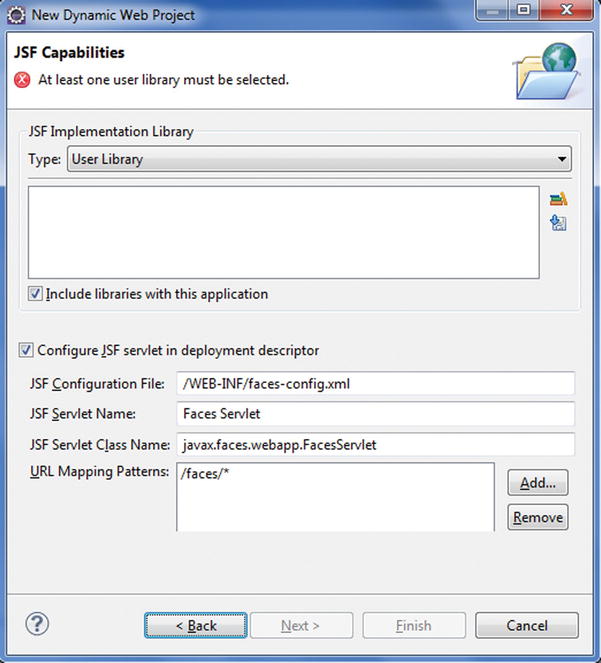
Figure 6-6. Downloading JSF implementation libraries
As illustrated in Figure 6-7, MyFaces and Mojarra are listed as two open source reference implementations of JSF 2.0.
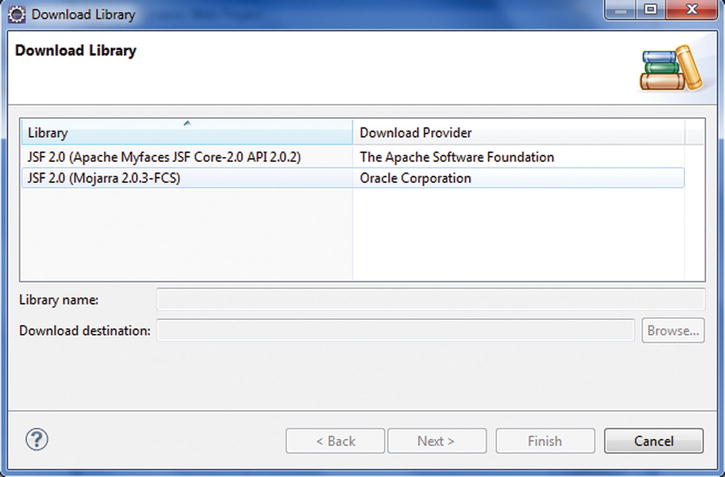
Figure 6-7. JSF implementation libraries
Select Mojarra, click Next, and accept the license terms, as illustrated in Figure 6-8.
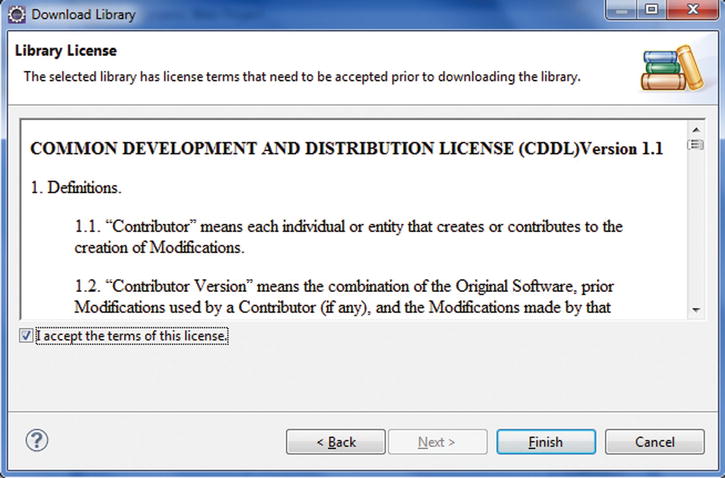
Figure 6-8. Accept the terms of license
Click Finish. Mojarra will be listed as the selected implementation library, as illustrated in Figure 6-9.
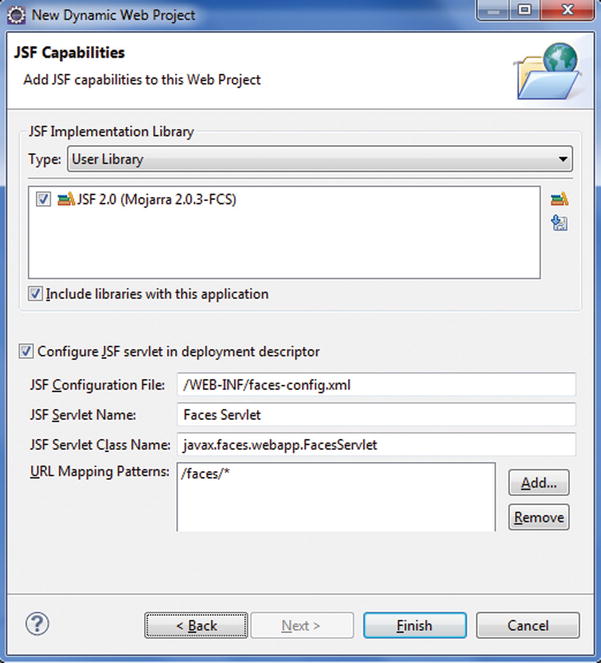
Figure 6-9. Adding JSF capabilities
Click Finish. The project is created, as illustrated in Figure 6-10.
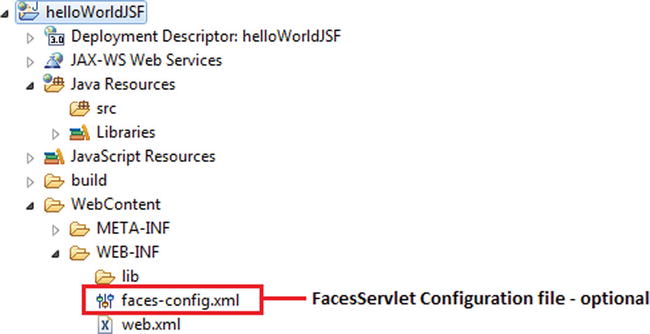
Figure 6-10. Directory structure of the created JSF project
You will create the following files in the project:
- Managed bean: HelloBean.java.
- form.xhtml: This is a view file that comprises JSF core tags and deferred EL. When the application is run, the form.xhtml file looks like Figure 6-11. This screen provides an input field and a Submit button.
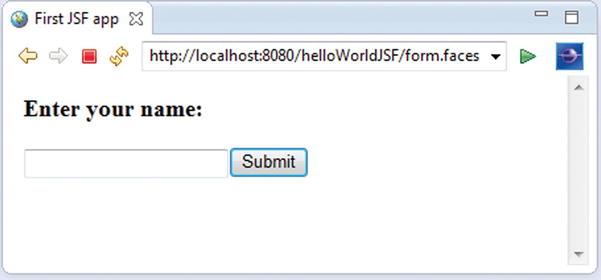
Figure 6-11. The form to enter the name
- hello.xhtml: When users enter a name and click the Submit button in form.xhtml, they are greeted by name. hello.xhtml displays the name of the user entered in form.xhtml along with the greeting, as illustrated in Figure 6-12.
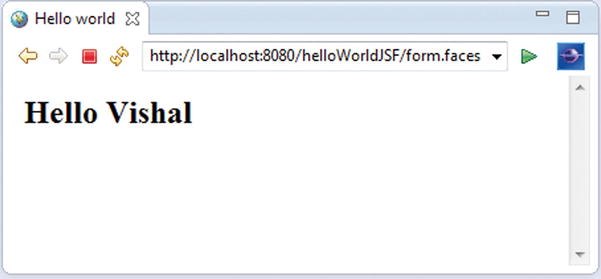
Figure 6-12. Hello screen
Listing 6-1 illustrates the code of the form.xhtml file.
Listing 6-1. form.xhtml
1.    <?xml version="1.0" encoding="UTF-8"?>
2.    <!DOCTYPE html >
3.    <html xmlns="http://www.w3.org/1999/xhtml"
4.    xmlns:h="http://java.sun.com/jsf/html">
5.
6.    <h:head>
7.         <title>First JSF app</title>
8.    </h:head>
9.    <h:body>
10.        <h3>Enter your name:</h3>
11.
12.        <h:form>
13.            <h:inputText value="#{helloBean.name}"></h:inputText>
14.            <h:commandButton value="Submit" action="hello"></h:commandButton>
15.        </h:form>
16.    </h:body>
17.    </html>
- Line 4: The xmlns attribute declares the JSF namespace.
- Lines 6, 9, 12, 13, and 14: Some tags have prefixes, such as h:head and h:inputText. These are JSF tags. The h:inputText and h:commandButton tags correspond to the text field and Submit button in Figure 6-11.
- Line 13: The input fields are linked to object properties. For example, attributevalue="#{helloBean.name}" tells the JSF implementation to link the text field with the name property of a user object.
- Line 14: The #{...} delimiters enclose expressions in the JSF expression language.
- Line 14: When you enter the name and click the Submit button, the hello.xhtml file is displayed, as specified in the action attribute of the h:commandButton tag.
Listing 6-2 illustrates the code of the hello.xhtml file.
Listing 6-2. hello.xhtml
1.    <?xml version="1.0" encoding="UTF-8"?>
2.    <!DOCTYPE html>
3.    <html xmlns="http://www.w3.org/1999/xhtml"
4.        xmlns:h="http://java.sun.com/jsf/html">
5.
6.    <h:head>
7.        <title>Hello world</title>
8.    </h:head>
9.    <h:body>
10.        <h2>Hello  #{helloBean.name}</h2>
11.    </h:body>
12.    </html>
- Line 10: When the page is submitted, JSF will find the helloBean and set the submitted name value via the setName() method. When hello.xhtml is displayed, JSF will find the helloBean and display the name property value via its getName() method.
Listing 6-3 illustrates the helloBean.
Listing 6-3. Managed Bean
1.    package com.apress.jsf.helloworld;
2.    import javax.faces.bean.ManagedBean;
3.    import javax.faces.bean.SessionScoped;
4.    import java.io.Serializable;
5.
6.    @ManagedBean
7.    @SessionScoped
8.    public class HelloBean implements Serializable {
9.
10.        private static final long serialVersionUID = 1L;
11.
12.        private String name;
13.
14.        public String getName() {
15.            return name;
16.        }
17.        public void setName(String name) {
18.            this.name = name;
19.        }
20.    }
- Line 6: A managed bean is a Java bean that is accessed from a JSF page. The @ManagedBean annotation specifies the name by which an object of this class is referenced in the JSF pages.
- Line 7: A managed bean must have a name and a scope. Session scope signifies that the bean object is available for one user across multiple pages.
Note There are two annotations for naming a bean. @Named is the best choice with a Java EE 6 and newer application server.
Like Struts and Spring MVC web applications, when you deploy a JSF web application inside an application server, you need to provide a deployment descriptor file named web.xml. Listing 6-4 shows this file. For the sake of brevity, the web-app declaration and the list of files in the welcome-file-list are not completely shown.
Listing 6-4. web.xml
1.    <web-app  ..... >
2.    <display-name>helloWorldJSF</display-name>
3.    <welcome-file-list>
4.        ...
5.    </welcome-file-list>
6.    <servlet>
7.    <servlet-name>Faces Servlet</servlet-name>
8.    <servlet-class>javax.faces.webapp.FacesServlet</servlet-class>
9.    <load-on-startup>1</load-on-startup>
10.    </servlet>
11.    <servlet-mapping>
12.    <servlet-name>Faces Servlet</servlet-name>
13.    <url-pattern>/faces/*</url-pattern>
14.    </servlet-mapping>
15.    <servlet-mapping>
16.    <servlet-name>Faces Servlet</servlet-name>
17.    <url-pattern>*.faces</url-pattern>
18.    </servlet-mapping>
19.    <context-param>
20.    <description>State saving method: 'client' or 'server' (=default). See JSF Specification 2.5.2</description>
21.    <param-name>javax.faces.STATE_SAVING_METHOD</param-name>
22.    <param-value>client</param-value>
23.    </context-param>
24.    <context-param>
25.    <param-name>javax.servlet.jsp.jstl.fmt.localizationContext</param-name>
26.    <param-value>resources.application</param-value>
27.    </context-param>
28.    <listener>
29.    <listener-class>com.sun.faces.config.ConfigureListener</listener-class>
30.    </listener>
31.    </web-app>
- Lines 11 to 14: The servlet-mapping element makes certain that all URLs with the prefix /faces are processed by FacesServlet.
- Lines 15 to 18: The servlet-mapping element makes certain that all URLs ending with the faces extension are processed by FacesServlet.
Figure 6-13 shows the directory structure of the Hello World web application.
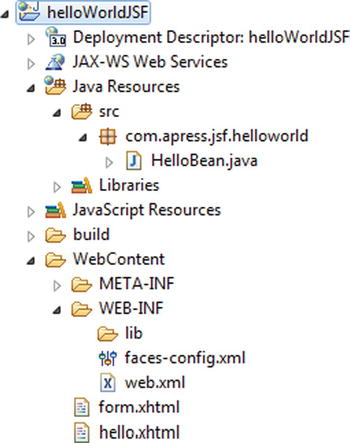
Figure 6-13. Directory structure of the Hello World web application
Life Cycle of a JSF Application
Unlike Struts and Spring Web MVC, the JSF life cycle performs the following request-processing tasks in well-defined phases during which specific tasks are performed:
- Checking whether the incoming data is valid
- Triggering application logic to fulfill the request
- Binding the field properties directly to properties of the model and having their values updated upon form submissions
- Rendering the response to the client
The following are the six phases of the JSF application life cycle, as illustrated in Figure 6-14:
- Restore View phase
- Apply Request Values phase
- Process Validation phase
- Update Model phase
- Invoke Application phase
- Render Response phase
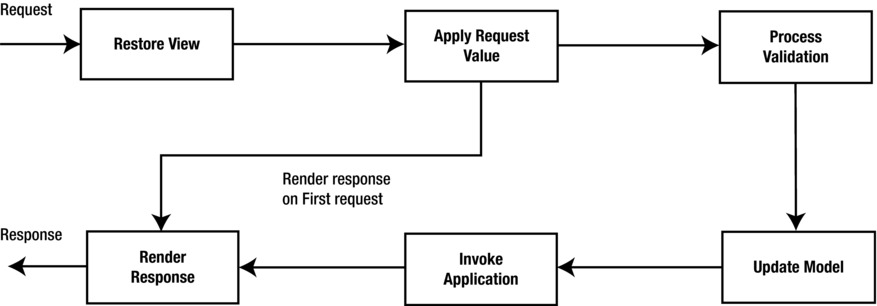
Figure 6-14. The phases of the JSF life cycle
JSF begins the Restore View phase as soon as a link or button is clicked and JSF receives a request. During this phase, JSF does the following:
- Builds a component tree from the page. This component tree contains the information associated with all components of the page. If the page is requested for the first time, JSF creates an empty view.
- Wires event handlers and validators to UI components.
- Saves the view in the FacesContext instance.
Phase 2: Apply Request Values
After the component tree is created/restored, the JSF runtime runs the decode method of each component in the component tree that extracts the values from the request parameters. The values that are extracted by the decode method are stored in the component, after performing data conversion if necessary. If the conversion fails, an error message is generated and queued on FacesContext.
Phase 3: Process Validation
During this phase, the JSF runtime processes validators registered on the component tree during the Restore View phase. If there are validation errors, JSF adds an error message to the FacesContext instance, skips the fourth and fifth phases, enters the Render Response phase, and displays the error messages.
Phase 4: Update Model
If there are no validation errors in the Process Validation phase, the JSF runtime updates the managed bean’s properties that are bound to the UI components with the new values of the UI components. The conversion is also performed in this phase if necessary.
Phase 5: Invoke Application
During this phase, the JSF runtime processes the application events by executing the corresponding event listeners. When the user submits a form, the JSF FacesServlet generates an application event that returns an outcome string that is passed to the navigation handler. The navigation handler looks up the next page to be rendered.
Phase 6: Render Response
In this phase, each component in the component tree renders itself, and the state of the response is saved so that the FacesServlet can access it during the Restore View phase, which will occur if subsequent requests are made to the same page.
Let’s look behind the scenes of the Hello World application from the viewpoint of the request-processing life cycle.
- The browser first connects to http://localhost:8080/helloWorldJSF/form.faces.
- The JSF implementation initializes the JSF code and reads the form.xhtml page. That page contains tags, such as h:form, h:inputText, and h: commandButton. Each tag has an associated tag handler class. When the page is read, the tag handler class associated with each tag is executed, and a component tree is constructed. This is the first phase: Restore View. Since this is the first request and the component tree does not already exist, a new but empty component tree is created instead of restoring the component tree. Figure 6-15 shows the component tree for the code fragment of the form.xhtml file in Listing 6-1.
<h:form>
<h:inputText value="#{helloBean.name}"></h:inputText>
<h:commandButton value="Submit" action="hello"></h:commandButton>
</h:form>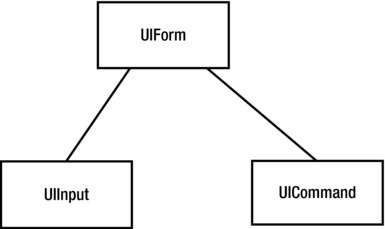
Figure 6-15. The component tree of form.xhtml
- Now the JSF runtime enters the second phase: Apply Request Values. The UIForm object corresponds to the h:form, the UIInput object corresponds to the h:inputText, and the UICommand object corresponds to h:commandButton in the JSF file. Since this is the first request to this page and there are no request parameters available or events to process, nothing to update the model with, nothing to convert and validate, and no application-level events, the JSF runtime skips the second, third, fourth, and fifth phases and enters the sixth phase: Render Response. Each component object in the created component tree has a renderer that generates HTML. This process of generating HTML by the renderer of the component is called encoding. This encoded page is then displayed in the browser.
- The user now fills in the name field in the form and clicks the Submit button.
- The browser sends the form data to the web server, formatted as a POST request. The JSF runtime enters the first phase again, Restore View, and the component tree is restored to reflect the values the user entered in the form. And then the JSF runtime enters the second phase, Apply Request Values.
- In the Apply Request Values phase, the JSF runtime performs the process called decodingin which each component in the component tree decodes the form data and the component stores this value. If the conversion fails while storing, an error message is generated and queued on FacesContext.
- The JSF runtime enters the third phase: Process Validation. At this point, the JSF runtime processes the validators registered with the component tree during the first phase. If there are any validation errors, such as if the name field in the Hello World application is empty, JSF adds an error message to the FacesContext instance, skips the other phases, and enters the sixth phase: Render Response. It also displays the error messages, such as “name field cannot be empty.” Since there is no validation in the Hello World application, the JSF runtime enters the fourth phase: Update Model.
- In the Update Model phase, the JSF runtime updates the managed bean, namely, helloBean’s property name, with the value entered on the form. The UIInput component updates the helloBean property name referenced in the value attribute and invokes the setter methods with the value that the user entered. In this phase, conversion is also performed if necessary via the converters registered with the component. Since the conversion is not necessary in this case, the JSF runtime enters the fifth phase, Invoke Application, or triggers an action event.
- In the Invoke Application phase, the UICommand component checks whether the button was clicked. If so, it triggers an action event, namely, the hello action referenced in the action attribute, which tells the navigation handler to look for the hello.xhtml page, and the JSF runtime enters the sixth phase: Render Response.
- FacesServletcreates a response component tree, and each component renders itself as the JSF runtime goes through the corresponding JSF tags. At the end of this phase, the state of the response is saved so that FacesServlet can access it during the Restore View phase of subsequent requests to the same page.
Managed Beans
A managed beanis a regular JavaBean class registered with JSF and managed by the JSF framework and serves as the model for the UI component. The managed bean contains the getter and setter methods, business logic, or a backing bean that is a bean that contains all the values of the form. The managed beans are responsible for the following:
- Synchronizing server-side data with components in the component tree
- Processing business logic
- Handling navigation between pages
The component is associated with a specific managed bean property or action by means of the EL. As you saw in the Hello World application, you do not need to write any code to construct and manipulate the HelloBean. The JSF runtime constructs the beans and accesses them. Managed beans can be easily registered in a JSF configuration file (that is, faces-config.xml) or using annotations.
Listing 6-5 illustrates registering a managed bean using XML configuration.
Listing 6-5. Registering a Managed Bean Using XML
<managed-bean>
<managed-bean-name>helloWorld</managed-bean-name>
<managed-bean-class>com..apress.jsf.helloWorld.HelloBean</managed-bean-class>
<managed-bean-scope>session</managed-bean-scope>
</managed-bean>
Listing 6-6 illustrates registering a managed bean using an annotation.
Listing 6-6. Registering Managed Bean Using an Annotation
@ManagedBean
@SessionScoped
public class HelloWorld {

}
Note Contexts and dependency injection (CDI) beans are much more powerful than managed beans. You should use CDI beans if you deploy your application in a Java EE application server such as Glassfish. A Java EE 6 and newer application server automatically supports CDI. The CDI beans are used in the same way as managed beans but instead of @ManagedBean, they are declared with the @Named annotation, as shown here:
@Named("helloBean")
@SessionScoped
public class HelloBean implements Serializable {
...
}
Facelets
Facelets was created to replace the use of JSP as a view declaration language for JSF; it was designed exclusively for JSF and provides templating and extensible tag libraries to refrain from using scriptlets (Java code) in the HTML pages. The significant differences between Facelets and JSP are that Facelets provides the ability to write pages in pure HTML markup and provides server-side templating.
You learned templating in Chapter 4 using the Tiles framework where you saw how templates encapsulate common layout to be used across all the pages, and you now understand how templates work. Facelets is similar to the Tiles framework for templating and composing pages. Consequently, templating is very much the same, other than six tags provided by Facelets for templating in the ui: tag library.
The ui:composition tag is used in template client files acting as template clients and indicates that enclosing content should be included in the UIComponent hierarchy at the specific point in the page. Listing 6-7 illustrates the syntax of ui:composition.
Listing 6-7. ui:composition Tag
<ui:composition template="optional">
The optional attribute declares a template to which the enclosed content should be applied using the template attribute.
The difference between the ui:decorate tag and the ui:composition tag is that, unlike ui:composition, ui:decorate causes surrounding content to be included in the page as well. Listing 6-8 illustrates the syntax of ui:decorate.
Listing 6-8. ui:decorate Tag
<ui:decorate template="required">
The ui:define tag is used inside a ui:composition tag in template client files to define a region that will be inserted into the composition at the point provided by the ui:insert tag. Listing 6-9 illustrates the syntax of ui:define.
Listing 6-9. ui:define Tag
<ui:define name="required">
The ui:insert tag is used in the template files to indicate where the ui:define in the template client should be inserted. Listing 6-10 illustrates the syntax of ui:insert.
Listing 6-10. ui:insert Tag
<ui:insert name="optional">
If no name is specified, the content in the body of the ui:insert tag is added to the view.
The ui:include can be used in the template files or template client files. Listing 6-11 illustrates the syntax of ui:include.
Listing 6-11. ui:include Tag
<ui:include src="required">
The ui:param tag is used inside ui:include tags to define name-value pairs for parameterized inclusion of the pages. Listing 6-12 illustrates the syntax of ui:param.
Listing 6-12. ui:param Tag
<ui:param name="required" value="required">
Next you will implement templating with Facelets. Create a JSF project similar to the Hello World project in the earlier section. In this application, you will create the header and sidebar template that will be used in the bookstore application. Figure 6-16 illustrates the directory structure of the application.
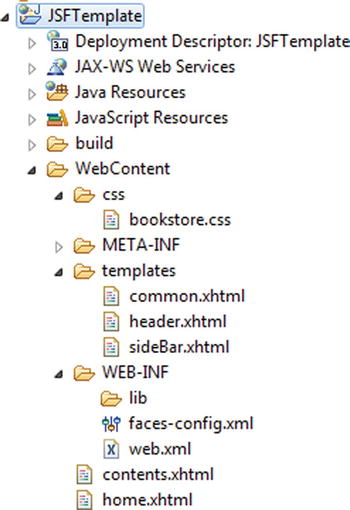
Figure 6-16. Directory structure of the JSFTemplate application
Listing 6-13 illustrates the template file common.xhtml.
Listing 6-13. common.xhtml
1.    <?xml version="1.0" encoding="UTF-8"?>
2.    <html xmlns="http://www.w3.org/1999/xhtml"
3.        xmlns:h="http://java.sun.com/jsf/html"
4.        xmlns:ui="http://java.sun.com/jsf/facelets">
5.    <h:head>
6.        <link rel="stylesheet" href="css/bookstore.css" type="text/css" />
7.    </h:head>
8.    <h:body>
9.        <div id="centered">
10.            <div>
11.                <ui:insert name="header">
12.                    <ui:include src="/templates/header.xhtml" />
13.                </ui:insert>
14.            </div>
15.            <div>
16.                <ui:insert name="sideBar">
17.                    <ui:include src="/templates/sideBar.xhtml" />
18.                </ui:insert>
19.            </div>
20.            <div>
21.                <ui:insert name="content">
22.                    <ui:include src="/templates/contents.xhtml" />
23.                </ui:insert>
24.            </div>
25.        </div>
26.    </h:body>
27.    </html>
- Line 3: Declares the namespace for the HTML library
- Line 4: Declares the namespace for the Facelet library
- Line 5 to 7: Show the usage of the h:head tag instead of using the markup <head/>
- Line 8: Shows the usage of the h:body tag instead of using the markup <body/>
- Lines 11 to 13: Show the usage of the u:insert tag for templating the body content of the <ui:insert> tag that is added to the view
- Line 12: Shows the usage of the ui:include tag for the inclusion of header.xhtml
- Line 17: Shows the usage of the ui:include tag for the inclusion of sideBar.xhtml
- Line 22: Shows the usage of the ui:include tag for the inclusion of contents.xhtml
Listing 6-14 illustrates the template client header.xhtml.
Listing 6-14. header.xhtml
1.    <?xml version="1.0" encoding="UTF-8"?>
2.    <html xmlns="http://www.w3.org/1999/xhtml"
3.        xmlns:h="http://java.sun.com/jsf/html"
4.        xmlns:ui="http://java.sun.com/jsf/facelets">
5.    <h:body>
6.        <ui:composition>
7.            <div class="header">
8.                <h2>
9.                <span style="margin-left: 15px; margin-top: 15px;" class="label">BOOK
10.                        <span style="color: white;">STORE</span>
11.                    </span>
12.                </h2>
13.            </div>
14.        </ui:composition>
15.    </h:body>
16.    </html>
- Line 6: The ui:composition tag indicates to the Facelets system that the enclosing children will be grafted into the UIComponent hierarchy where header.xhtml is inserted in common.xhtml.
Listing 6-15 illustrates sideBar.xhtml.
Listing 6-15. sideBar.xhtml
1.    <div class="leftbar">
2.        <ul id="menu">
3.            <li><div>
4.                    <a class="link1" href=""><span class="label"
5.                        style="margin-left: 15px;">Home</span>
6.                    </a>
7.                </div></li>
8.            <li><div>
9.            <a class="link1" href="listOfBooks.xhtml"><span
10.                style="margin-left: 15px;" class="label">All Books</span></a>
11.                </div></li>
12.            <li><div>
13.            <span class="label" style="margin-left: 15px;">Categories</span>
14.                </div>
15.                <ul>
16.                    <li><a class="label" href=""><span class="label"
17.                            style="margin-left: 30px;"></span></a></li>
18.                </ul></li>
19.            <li><div>
20.                    <span class="label" style="margin-left: 15px;">Contact Us</span>
21.                </div></li>
22.        </ul>
23.    </div>
Listing 6-15 is the same sidebar file used in Chapter 2.
Listing 6-16 illustrates the template client contents.xhtml.
Listing 6-16. contents.xhtml
1.    <?xml version="1.0" encoding="UTF-8"?>
2.    <html xmlns="http://www.w3.org/1999/xhtml"
3.        xmlns:ui="http://java.sun.com/jsf/facelets">
4.    <body>
5.        <ui:composition>
6.            <h1>Book Store Home</h1>
7.        </ui:composition>
8.    </body>
9.    </html>
- Line 5: The ui:composition tag indicates to the Facelets system that the enclosing children should be grafted into the UIComponent hierarchy at the point where contents.xhtml is inserted.
Listing 6-17 illustrates the home.xhtml file that defines content.xhtm.
Listing 6-17. home.xhtml
1.    <?xml version="1.0" encoding="UTF-8"?>
2.    <!DOCTYPE html>
3.    <html xmlns="http://www.w3.org/1999/xhtml"
4.        xmlns:h="http://java.sun.com/jsf/html"
5.        xmlns:ui="http://java.sun.com/jsf/facelets">
6.    <h:body>
7.        <ui:composition template="templates/common.xhtml">
8.            <ui:define name="content">
9.                <ui:include src="/contents.xhtml" />
10.            </ui:define>
11.        </ui:composition>
12.    </h:body>
13.    </html>
- Line 7: The ui:composition tag declares the template common.xhtml to which the enclosed content contents.xhtml should be applied using the template attribute.
You can now run this application using the URL http://localhost:8080/JSFTemplate/home.faces, as shown in Figure 6-17.
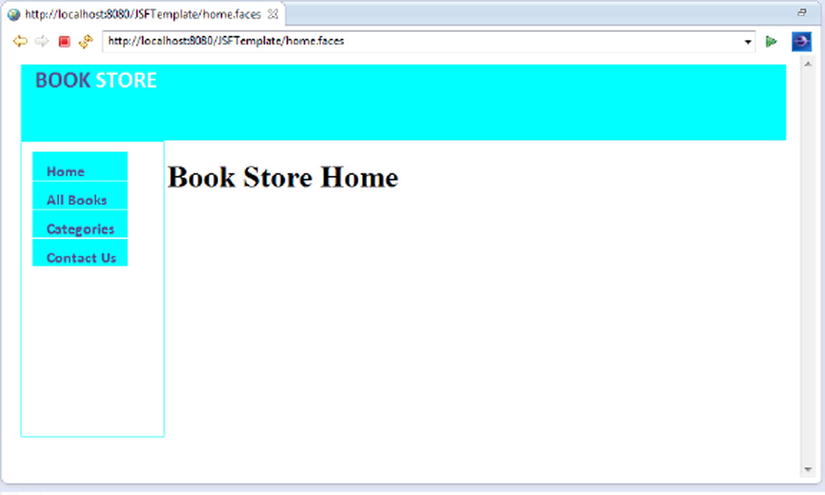
Figure 6-17. Header and sidebar using templates
Building the Bookstore Application Using JSF 2
In this section, you will develop the bookstore application using JSF. In Chapter 1 you developed the data access layer for the bookstore application and queried it via a stand-alone application developed using Java. In Chapter 5 you refactored the stand-alone application to integrate it with the Spring Framework in order to use the robust features offered by Spring’s JDBCTemplate. Then you used the Spring JDBCTemplatewith a Spring Web MVC web application. In this chapter, you will use the same Spring JDBCTemplate with a JSF-based web application to leverage the benefits of the Spring template discussed in Chapter 5. To do so, you need to integrate JSF with the Spring Framework. In the section that follows, you will learn to integrate JSF with Spring. Then you will develop the web layer of the application using JSF. You will develop this application in the following four steps:
- Integrate JSF with the Spring Framework.
- Access the database from the web layer via Spring JDBCTemplate.
- Develop templates reusing the templates developed earlier.
- Develop the user interface using UI components and JSF EL.
Figure 6-18 illustrates the directory structure of the application you are going to develop.
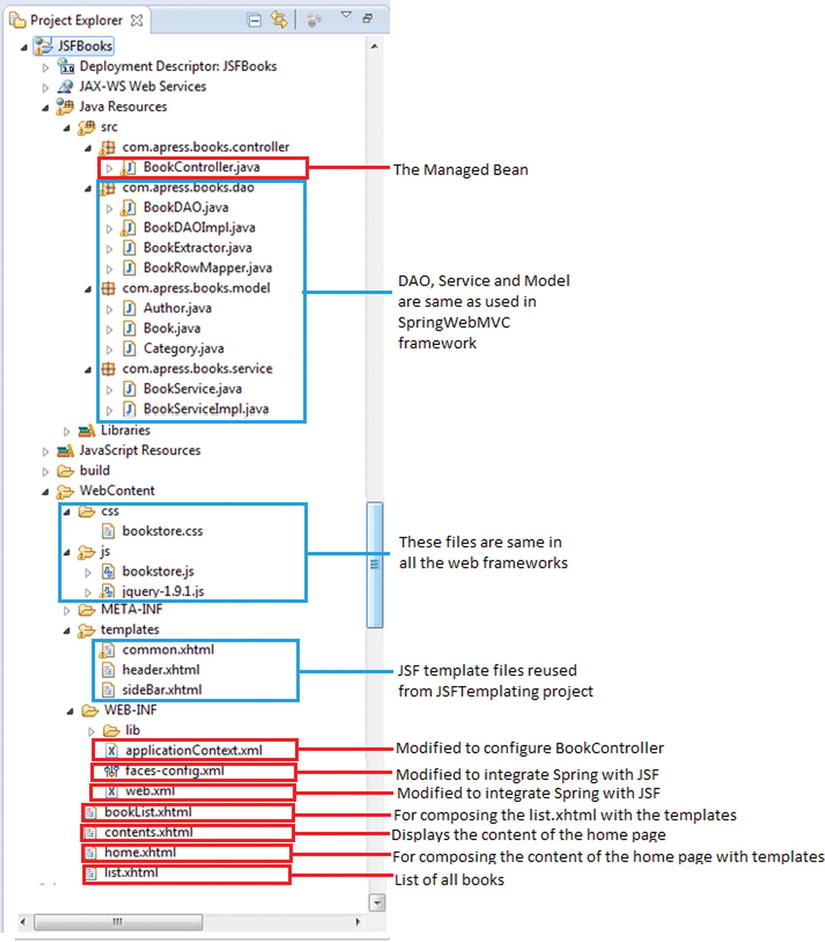
Figure 6-18. Directory structure of the bookstore web application
Integrating JSF with Spring Framework
To integrate JSF with the Spring dependency injection framework, you have to do the following:
- Add the ContextLoaderListener and RequestContextListener listeners provided by the Spring Framework in web.xml
- Add an el-resolver entry in faces-config.xml to point to the Spring class SpringBeansFacesELResolver
Listing 6-18 illustrates adding ContextLoaderListener and RequestContextListener in the web.xml file.
Listing 6-18. web.xml
1.    <?xml version="1.0" encoding="UTF-8"?>
2.    <web-app xmlns:xsi="http://www.w3.org/2001/XMLSchema-instance" xmlns="http://java.sun.com/xml/ns/javaee" xmlns:web="http://java.sun.com/xml/ns/javaee/web-app_2_5.xsd" xsi:schemaLocation="http://java.sun.com/xml/ns/javaeehttp://java.sun.com/xml/ns/javaee/web-app_3_0.xsd" metadata-complete="true" version="3.0">
3.    <display-name>JSFBooks</display-name>
4.    <servlet>
5.    <servlet-name>Faces Servlet</servlet-name>
6.    <servlet-class>javax.faces.webapp.FacesServlet</servlet-class>
7.    <load-on-startup>1</load-on-startup>
8.    </servlet>
9.    <servlet-mapping>
10.    <servlet-name>Faces Servlet</servlet-name>
11.    <url-pattern>/faces/*</url-pattern>
12.    </servlet-mapping>
13.    <servlet-mapping>
14.    <servlet-name>Faces Servlet</servlet-name>
15.    <url-pattern>*.jsf</url-pattern>
16.    </servlet-mapping>
17.    <servlet-mapping>
18.    <servlet-name>Faces Servlet</servlet-name>
19.    <url-pattern>*.faces</url-pattern>
20.    </servlet-mapping>
21.    <context-param>
22.    <description>State saving method: 'client' or 'server' (=default). See JSF Specification 2.5.2</description>
23.    <param-name>javax.faces.STATE_SAVING_METHOD</param-name>
24.    <param-value>client</param-value>
25.    </context-param>
26.    <context-param>
27.    <param-name>javax.servlet.jsp.jstl.fmt.localizationContext</param-name>
28.    <param-value>resources.application</param-value>
29.    </context-param>
30.    <listener>
31.    <listener-class>com.sun.faces.config.ConfigureListener</listener-class>
32.    </listener>
33.    <listener>
34.    <listener-class>
35.             org.springframework.web.context.ContextLoaderListener
36.    </listener-class>
37.    </listener>
38.    <listener>
39.    <listener-class>
40.             org.springframework.web.context.request.RequestContextListener
41.    </listener-class>
42.    </listener>
43.    </web-app>
- Line 33 to 37: Configures ContextLoaderListener
- Line 38 to 42: Configures RequestContextListener
SpringBeanFacesELResolver is an ELResolver implementation that delegates to Spring’s WebApplicationContext and the default resolver of the underlying JSF implementation. Listing 6-19 illustrates adding the el-resolver.
Listing 6-19. faces-config.xml
1.    <?xml version="1.0" encoding="UTF-8"?>
2.    <faces-config
3.        xmlns="http://java.sun.com/xml/ns/javaee"
4.        xmlns:xsi="http://www.w3.org/2001/XMLSchema-instance"
5.        xsi:schemaLocation="http://java.sun.com/xml/ns/javaee
http://java.sun.com/xml/ns/javaee/web-facesconfig_2_0.xsd"
6.        version="2.0">
7.    <application>
8.        <el-resolver>
9.            org.springframework.web.jsf.el.SpringBeanFacesELResolver
10.        </el-resolver>
11.        </application>
12.    </faces-config>
- Lines 7 to 11: Configures Spring EL resolver
JSF is now integrated with the Spring Framework, and you should be able to access the database via Spring JDBCTemplate.
Accessing a Database from the Web Layer via Spring JDBCTemplate
Next you will create the managed bean to access the database from the web layer. You already created the Spring JDBCTemplate in Chapter 5. The managed bean you are going to create now will use the JDBCTemplate created earlier via the BookService, which was also created in Chapter 5. In other words, we will create the managed bean to access the database via the service layer and data access layer created in Chapter 5. Listing 6-20 illustrates the BookController managed bean.
Listing 6-20. BookController.java
1.    package com.apress.books.controller;
2.
3.    import javax.faces.bean.ManagedBean;
4.    import javax.faces.bean.RequestScoped;
5.    import com.apress.books.model.Book;
6.    import com.apress.books.service.BookService;
7.    import java.util.List;
8.
9.    @ManagedBean
10.    @RequestScoped
11.    public class BookController {
12.
13.          private BookService bookService ;
14.          private List<Book> bookList;
15.
16.        public String listAllBooks() {
17.            bookList = bookService.getAllBooks();
18.                return "bookList.xhtml";
19.            }
20.
21.        public BookService getBookService() {
22.            return bookService;
23.        }
24.
25.        public void setBookService(BookService bookService) {
26.            this.bookService = bookService;
27.        }
28.
29.        public List<Book> getBookList() {
30.              return bookList;
31.        }
32.        public void setBookList(List<Book> bookList) {
33.            this.bookList = bookList;
34.        }
35.    }
- Line 17: Invokes the getAllBooks() method on bookService
- Line 18: Returns the booklist.xhtml file that is composed with the template and list.xhtml, which displays the list of books see later in Figure 6-20
Listing 6-21 illustrates the configuration metadata that is provided to the Spring IoC container. This file is the same as created in Chapter 5 with a slight modification to configure the managed bean BookController with the BookService.
Listing 6-21. applicationContext.xml
1.    <?xml version="1.0" encoding="UTF-8"?>
2.    <beans xmlns="http://www.springframework.org/schema/beans"
3.        xmlns:xsi="http://www.w3.org/2001/XMLSchema-instance" xmlns:context="http://www.springframework.org/schema/context"
4.        xmlns:aop="http://www.springframework.org/schema/aop"
5.        xsi:schemaLocation="http://www.springframework.org/schema/beans
6.            http://www.springframework.org/schema/beans/spring-beans-3.2.xsd
7.            http://www.springframework.org/schema/context
8.            http://www.springframework.org/schema/context/spring-context-3.2.xsd
9.            http://www.springframework.org/schema/aop
10.            http://www.springframework.org/schema/aop/spring-aop-3.2.xsd">
11.
12.        <!-- telling container to take care of annotations stuff -->
13.        <context:annotation-config />
14.
15.        <!-- declaring base package -->
16.        <context:component-scan base-package="com.apress.books" />
17.
18.        <bean id="bookController" class="com.apress.books.controller.BookController">
19.            <property name="bookService" ref="service"></property>
20.        </bean>
21.
22.        <bean id="dao" class="com.apress.books.dao.BookDAOImpl" >
23.        <property name="dataSource" ref="dataSourceBean">
24.            </property>
25.        </bean>
26.
27.        <bean id="service" class="com.apress.books.service.BookServiceImpl">
28.            <property name="bookDao" ref="dao">
29.            </property>
30.        </bean>
31.
32.        <bean id="dataSourceBean"
33.            class="org.springframework.jdbc.datasource.DriverManagerDataSource">
34.            <property name="driverClassName" value="com.mysql.jdbc.Driver" />
35.            <property name="url" value="jdbc:mysql://localhost:3306/books" />
36.            <property name="username" value="root" />
37.            <property name="password" value="password" />
38.        </bean>
39.    </beans>
- Lines 18 to 20: Configures bookController with bookService
You will reuse the template and the template client file developed earlier for the header and sidebar of the bookstore application. However, you need to modify sideBar.xhtml to invoke the listOfAllBooks action in the bookController bean, as illustrated in Listing 6-22.
Listing 6-22. sideBar.xhtml
1.    <?xml version="1.0" encoding="UTF-8"?>
2.    <!DOCTYPE html >
3.    <html xmlns="http://www.w3.org/1999/xhtml"
4.        xmlns:h="http://java.sun.com/jsf/html"
5.        xmlns:ui="http://java.sun.com/jsf/facelets">
6.    <h:form>
7.        <div class="leftbar">
8.            <ul id="menu">
9.                <li><div>
10.                        <a class="link1" href=""><span class="label"
11.                            style="margin-left: 15px;">Home</span>
12.                        </a>
13.                    </div></li>
14.                <li><div>
15.                <h:commandLink class="link1" action="#{bookController.listAllBooks}">
16.                    <span style="margin-left: 15px;" class="label">All Books</span>
17.                </h:commandLink>
18.                    </div></li>
19.                <li><div>
20.                    <span class="label" style="margin-left: 15px;">Categories</span>
21.                    </div>
22.                    <ul>
23.                        <li><a class="label" href=""><span class="label"
24.                        style="margin-left: 30px;"></span></a></li>
25.                    </ul></li>
26.                <li><div>
27.                    <span class="label" style="margin-left: 15px;">Contact Us</span>
28.                    </div></li>
29.            </ul>
30.        </div>
31.    </h:form>
32.
33.    </html>
- Line 6: Shows the usage of the h:form tag instead of using the markup <form>
- Line 15: Shows the usage of the h:commandlink tag that triggers the listAllBooks action on the bookController managed bean using the deferred EL
Developing the User Interface Using UI Components and JSF EL
Now you will develop the UI of the application. Figure 6-19 illustrates the home page of the application. When the user clicks All Books in the sidebar, the list of all books is displayed, as illustrated in Figure 6-20.
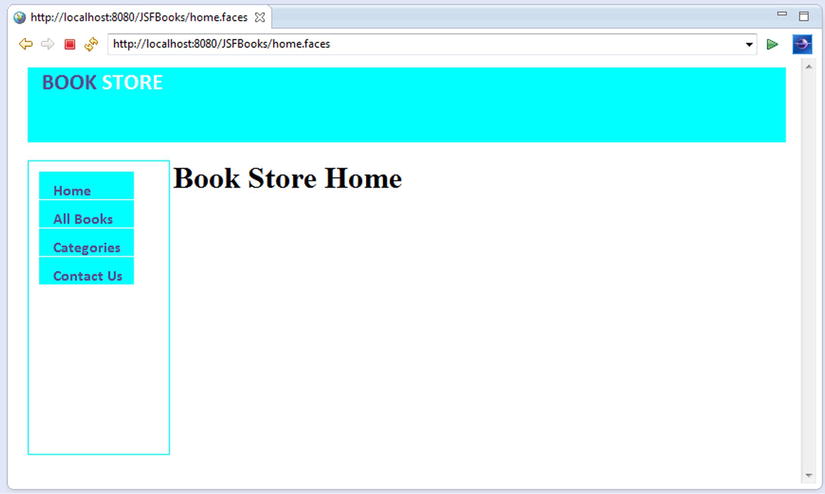
Figure 6-19. Home page of the bookstore web application
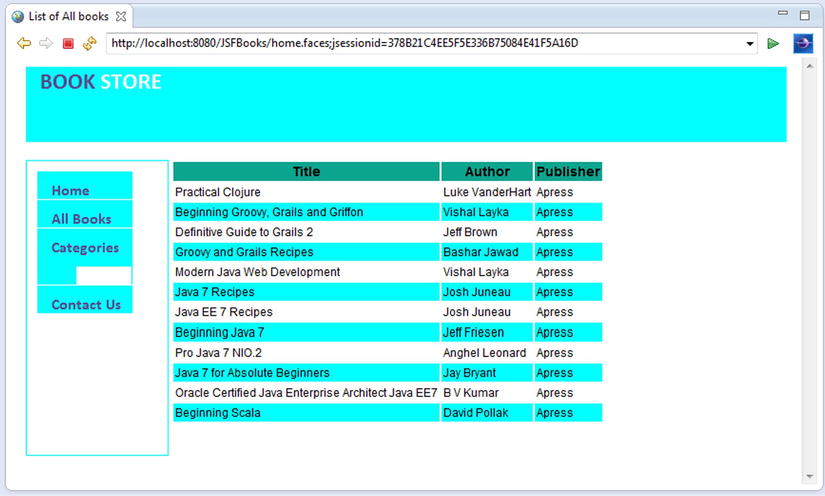
Figure 6-20. List of books
Listing 6-23 illustrates the code for Figure 6-19.
Listing 6-23. home.xhtml
1.    <?xml version="1.0" encoding="UTF-8"?>
2.    <!DOCTYPE html>
3.    <html xmlns="http://www.w3.org/1999/xhtml"
4.        xmlns:h="http://java.sun.com/jsf/html"
5.        xmlns:ui="http://java.sun.com/jsf/facelets">
6.    <h:body>
7.        <ui:composition template="templates/common.xhtml">
8.            <ui:define name="content">
9.                <ui:include src="/contents.xhtml" />
10.            </ui:define>
11.        </ui:composition>
12.    </h:body>
13.    </html>
- Line 9: The usage of the ui:include tag for the inclusion of contents.xhtml
When the user clicks All Books in the sidebar of the home page, the list of all books is displayed, as illustrated in Figure 6-20.
Listing 6-24 and Listing 6-25 illustrate the code for Figure 6-20.
Listing 6-24. bookList.html
1.    <?xml version="1.0" encoding="UTF-8"?>
2.    <!DOCTYPE html>
3.    <html xmlns="http://www.w3.org/1999/xhtml"
4.        xmlns:h="http://java.sun.com/jsf/html"
5.        xmlns:ui="http://java.sun.com/jsf/facelets">
6.    <h:body>
7.        <ui:composition template="templates/common.xhtml">
8.            <ui:define name="content">
9.                <ui:include src="/list.xhtml" />
10.            </ui:define>
11.        </ui:composition>
12.    </h:body>
13.    </html>
- Line 9: The usage of the ui:include tag for the inclusion of list.xhtml
Listing 6-25 illustrates the list.xhtml file for the list of the books displayed in Figure 6-20.
Listing 6-25. list.xhtml
1.    <?xml version="1.0" encoding="UTF-8"?>
2.    <!DOCTYPE html>
3.    <html xmlns="http://www.w3.org/1999/xhtml"
4.        xmlns:h="http://java.sun.com/jsf/html"
5.        xmlns:ui="http://java.sun.com/jsf/facelets"
6.        xmlns:f="http://java.sun.com/jsf/core">
7.    <h:head>
8.        <title>List of All books</title>
9.        <link rel="stylesheet" href="css/bookstore.css" type="text/css" />
10.        <script type="text/javascript" src="js/jquery-1.9.1.js"></script>
11.        <script src="js/bookstore.js"></script>
12.    </h:head>
13.    <h:body>
14.        <h:dataTable id="grid" value="#{bookController.bookList}" var="book">
15.            <h:column>
16.                <f:facet name="header" id="th-title">
17.                    <h:outputText value="Title" />
18.                </f:facet>
19.                <h:outputText value="#{book.bookTitle}" />
20.            </h:column>
21.            <h:column>
22.                <f:facet name="header" id="th-author">
23.                    <h:outputText value="Author" />
24.                </f:facet>
25.                <ui:repeat value="#{book.authors}" var="content">
26.                    <h:outputText value="#{content.firstName} #{content.lastName}" />
27.                </ui:repeat>
28.            </h:column>
29.            <h:column>
30.                <f:facet name="header" id="th-price">
31.                    <h:outputText value="Publisher" />
32.                </f:facet>
33.                <h:outputText value="#{book.publisherName}" />
34.            </h:column>
35.        </h:dataTable>
36.    </h:body>
37.    </html>
- Line 6: Declares the namespace for the JSF core library
- Line 14: Shows the usage of the h:dataTable tag instead of using the markup <table/>
- Line 14: Shows the deferred EL expression that uses the bookList property of the managed bean bookController
- Line 15: Shows the usage of h:column instead of using the markup <td/>
- Line 16: Shows the usage of the f:facet tag to add the facet
- Line 17: Shows the usage of h:outputText that displays the book title
Summary
JSF is a component-based MVC framework, at the heart of which is the UI component model; this model allows the development of a web application’s view from collections of standard, out-of-the-box, reusable UI components. Unlike Struts and Spring Web MVC, the JSF lifelife cycle performs mundane and recurring request-processing tasks in well-defined phases, allowing the developer to concentrate on the business logic of the web application.