
Oh, throw away the worser part of it. And live the purer with the other half.
—William Shakespeare
Java EE continues to evolve in a, sort of, benign continuum. Inspired by frameworks such as Spring, Java EE introduced features such as annotations and dependency injection to address complex tasks like transactions and database connectivity. Java EE 7, the latest edition as of this writing, further reinforces the advancements in the Java Persistence API (JPA) and JAX-RS for REST-based web services, to name just a few. Most of the complexity involved with Java web development will continue to be addressed, in many ways, by commercial or open web frameworks’ innovations.
However, the Play 2 web framework meanders off the beaten track. Play 2 is not Java EE–centric and is not constrained by Java EE. It is part of the Typesafe stack that provides an alternative to the Java EE stack. Typesafe redefines the layers of modern Java applications formerly defined by Java EE, and in this new demarcation Play constitutes the web layer.
Play is an open source web application framework, written in Scala and Java, and provides out-of-the-box support for the modern Web. Play was built for the needs of modern web and mobile applications, leveraging technologies such as REST, JSON, and Web Sockets, among others.
Play targets the JVM and focuses on enhancing developer productivity by providing features such as convention over configuration, hot code reloading, and errors in the browser. Play implements the MVC architecture by means of a route file that maps HTTP requests to controllers and view templates that represent the result. Play 2 builds upon the functional paradigm by providing native support for the Scala programming language and provides an adapted Java-specific API that formulates a highly reactive web framework.
Play 2.0 was released in 2012 in conjunction with the Typesafe stack. Play 2 was built using Scala as the core language, whereas Play 1 used the Java language and provided support for Scala by means of plug-ins. Play 2.2 was released in September 2013. Table 8-1 describes the key features of Play 2.
Table 8-1. Key Features of Play 2
Feature |
Description |
|---|---|
Asynchronous I/O |
Play 2 can service long requests asynchronously as a result of using JBoss Netty1 as its web server. |
Built-in web server |
Play 2 provides the JBoss Netty web server out of the box, but Play web applications can also be packaged as WAR files to be distributed to Java EE application servers. |
Dependency management |
Play 2 provides sbt2 for dependency management. |
Hot reloading |
In a Play 2–based application, the code in development mode is checked for updates each time a new request arrives, and any changed files are automatically recompiled; if there is any error, the error is displayed directly in the browser. |
In-memory database |
Like Grails, Play 2 supports H2 out of the box. |
Native Scala support |
Play 2 uses Scala natively but is completely interoperable with Java. |
ORM |
Play 2 provides Ebean3 as the ORM replacement of JPA to access databases. |
Stateless |
Play 2 is fully RESTful, and there is no Java EE session per connection. |
Templating |
Play 2 uses Scala for the template engine. |
Testing framework |
Play 2 provides a built-in test framework for unit testing and functional testing such as JUnit and Selenium.4 |
Web Sockets |
Play 2 implements Web Sockets out of the box to enable a bi-directional connection between a client and the server. |
A Play 2 application follows the MVC architectural pattern. In a Play 2 application, the MVC layers are defined in the app directory, each one in a separate package (see Figure 8-1).
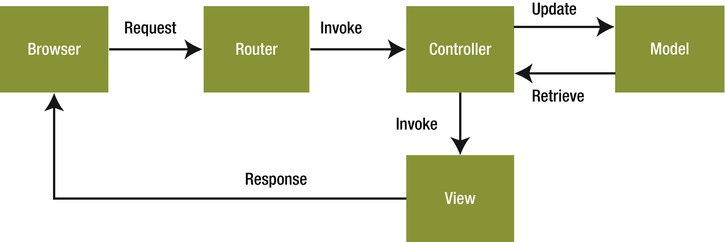
Figure 8-1. MVC in Play 2
The request flow in the MVC architecture illustrated in Figure 8-1 is as follows:
- An HTTP request is received by the router.
- The router finds the action defined in the controller to process this request.
- The controller listens for HTTP requests, extracts relevant data from the requests, and applies changes to the model.
- The controller renders a template file to generate the view.
- The result of the action method is then written as an HTTP response.
Router
The main entry point of the web application is the conf/routes file that defines the routes needed by the application. Each route consists of an HTTP method and a URI pattern associated with a call to an action method. Conf/routes is the configuration file used by the built-in component called Router that translates each incoming HTTP request to an action call.
Note The HTTP method can be any of the valid methods supported by HTTP (GET, POST, PUT, DELETE, and HEAD).
Controller
In a Java EE–based web application, a controller is a Java class that extends the servlet type. Since Play is not Java EE–centric, a controller in Play 2 is a class in Java or an object in Scala that extends the controller type (both in Java and Scala). This controller type is provided in the play.api.mvc package. A controller in Play 2 comprises a public, static method called an action. An action is basically a method that processes the request parameters and produces a result to be sent to the client. The controller responds to requests, processes them, and invokes changes on the model.
Controllers are, by default, defined in the controllers package under the source root—the app folder.
Note A controller is a type that extends the controller provided in the play.api.mvc package.
Model
The modelis the domain-specific representation of the information on which the application operates. The most commonly used object for this representation is the JavaBean. However, JavaBeans lead to plenty of boilerplate code. Play 2, like Grails, reduces this boilerplate code by generating the getters and setters for you by means of byte-code enhancement. The model objects may contain persistence artifacts such as JPA annotations, for instance, if they need to be saved into persistent storage.
Note Even if Play 2 uses Ebean for ORM, you can continue to use JPA annotations on your entities.
View
In a Java EE–based web application, the view is usually developed using JSP. That is, the view in a Java EE–based web application consists of JSP elements and template text. As Play is not Java EE–centric, the view in Play comprises the template that contains a mix of HTML and Scala code. In Play 1, the templates were based on Groovy, but starting with Play 2, the templates are based on Scala. Using Play 2 you can develop both Java- and Scala-based web applications, and the templates are the same in both of them.
Note In Play 1 the templates were based on Groovy, but starting with Play 2, the templates are based on Scala.
Getting Started with Play
To run the Play framework, you need JDK 6 or newer. You can download Play 2 from here: www.playframework.com/download. Play 2 is available in two distributions: standard and Typesafe Activator.
Download the latest stand-alone Play distribution, extract the archive to a location of your choice, and update the Path environment variable by adding/editing the Path variable in the Environment Variables dialog with the path to the Play installation, as illustrated in Figure 8-2.

Figure 8-2. Adding/editing the path variable
Now enter the following command in the command-line tool to check whether the Play environment has been correctly set up:
> play
You should see the output on the console, as illustrated in Figure 8-3, if Play is correctly installed.
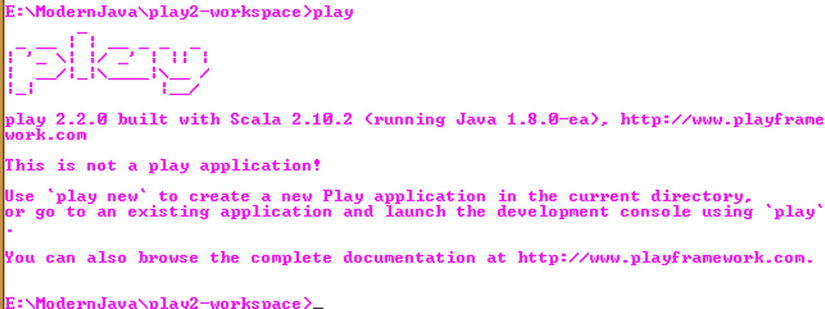
Figure 8-3. Verifying whether Play 2 is correctly installed
You can also get some help by executing the help command, as illustrated in Figure 8-4.
> play help
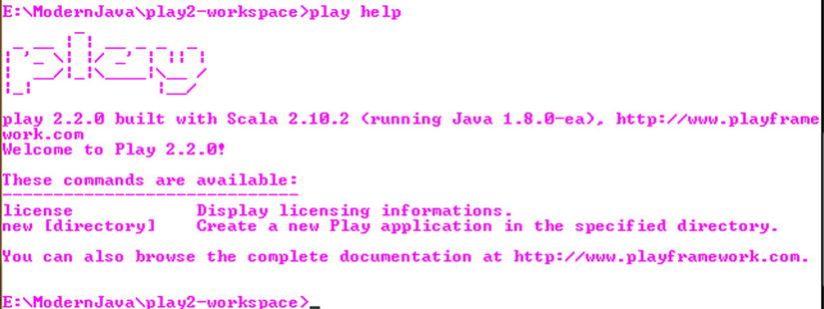
Figure 8-4. Help in Play 2
Now you can create your first Java web application with Play. Let’s Play!
Hello World Java Application with Play
To create a new application, you just have to use the play command-line tool with the parameter new followed by the name of the new application, in this case helloworld, as illustrated in Figure 8-5.
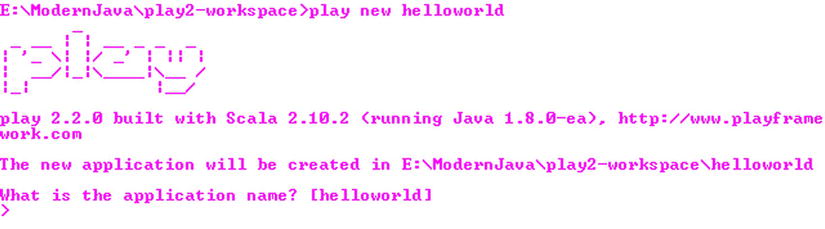
Figure 8-5. Creating the helloworld application
Play 2 will ask you to specify whether your application is a Scala or Java application, as illustrated in Figure 8-6.

Figure 8-6. Specifying whether the application is a Scala or Java application
You have to specify 2 because you want to create a Java application. Specifying 2 creates the source files and the structure of the application for the Java language, as illustrated in Figure 8-7.
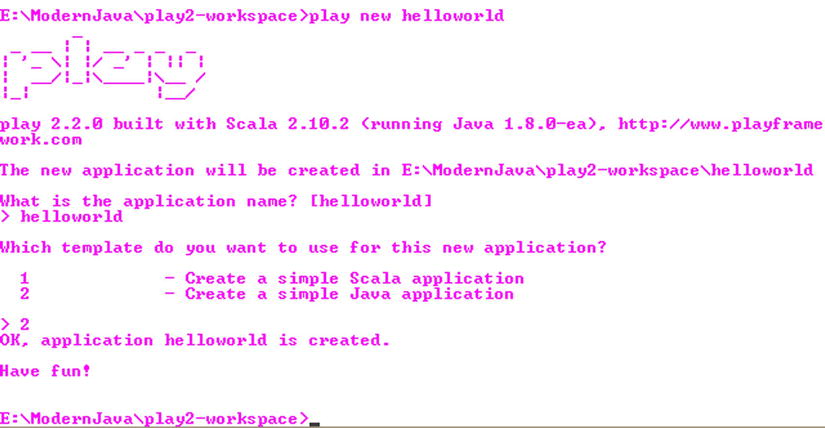
Figure 8-7. Creation of the helloworld project
You can run the application using the run command from the helloworld directory. To do this, enter the Play console, as illustrated in Figure 8-8.
> cd helloworld
>play
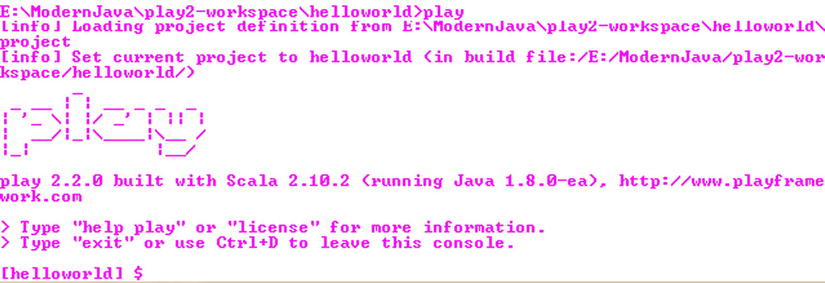
Figure 8-8. Entering the Play console
Now type run. This will start the server that will run your application.
$ run
The output on the console is shown here:
[helloworld] $ run
[info] Updating {file:/E:/ModernJava/play2-workspace/helloworld/}helloworld...
[info] Resolving org.scala-lang#scala-library;2.10.2 ...
[info] Resolving com.typesafe.play#play-java-jdbc_2.10;2.2.0 ...
  [info] Resolving com.typesafe.play#play-jdbc_2.10;2.2.0 ...
  [info] Resolving com.typesafe.play#play_2.10;2.2.0 ...
...............................................
  [info] Resolving org.fusesource.jansi#jansi;1.4 ...
[info] Done updating.
--- (Running the application from SBT, auto-reloading is enabled) ---
[info] play - Listening for HTTP on /0:0:0:0:0:0:0:0:9000
(Server started, use Ctrl+D to stop and go back to the console...)
As you can see, the console says that it has started the application, and an HTTP server is listening for HTTP requests on the port 9000. You can now send a request to this server by going to the URL http://localhost:9000/. Upon requesting the server, a welcome screen is displayed, as illustrated in Figure 8-9.

Figure 8-9. Default welcome page of the Play 2 framework
Figure 8-9 illustrates the default Play 2 welcome page. The default welcome page of the application is a great source of information for a beginner, and it is recommended that you read it.
The run command creates the structure of the application inside the helloworld directory. The structure is illustrated in Figure 8-10.

Figure 8-10. The directory structure of the helloworld application
Each folder in Figure 8-10 is described here:
- app: This is the root of all the server-side source files such as Java and Scala source code, templates, and compiled assets’ sources. At creation, only two subfolders will be created: controllers and views for the controller and view components, respectively, of the MVC architectural pattern. You can add the directory app/models for the model component of the MVC. There is also an optional directory called app/assets for compiled assets such as LESS5 sources and CoffeeScript6 sources.
- conf: The conf directory contains the application’s configuration files meant to configure the application itself, external services, and so on. There are two main configuration files:
application.conf: The main configuration file for the application, which contains standard configuration parameters
routes: The routes definition file
- project: The project folder is meant to contain all of the necessary files to configure the Scala build tool SBT.7
- public: This directory contains three standard subdirectories for images, CSS style sheets, and JavaScript files.
Note Resources stored in the public directory are static assets that will be served directly by the web server.
- target: The target directory contains everything generated by the build system such as the following:
classes: This contains all the compiled classes (from both Java and Scala sources).
classes_managed: This contains only the classes that are managed by the framework (such as the classes generated by the router or the template system).
resource_managed: This contains generated resources, typically compiled assets such as LESS CSS and CoffeeScript compilation results.
src_managed: This contains generated sources, such as the Scala sources generated by the template system.
- test: This last folder will contain all the test files along with some samples provided by the framework.
Now that you have seen the directory structure of the application, you will learn how the default welcome page is displayed when you test the URL: http://localhost:9000.
Each row in the conf/routes file is a route that defines how to access server components using HTTP. If you see the generated routes file in the conf/routes file, you will see this first route:
GET / controllers.Application.index()
This route is composed of three parts:
- GET: This is the first part in the route (row) that contains the HTTP method used in the request.
- /: This is the second part in the route that contains a relative path.
- controllers.Application.index(): This is the third part in the route that contains the action to be invoked.
These three parts in the route inform Play 2 that when the web server receives a GET request for the / path, it must call controllers.Application.index(), which calls the index method in the Application class that resides in the controllers package.
Now you will see what the controllers.Application.index method looks like. For that, you need to open the app/controllers/Application.java source file. This file is illustrated in Listing 8-1.
Listing 8-1. Application Controller
 1.    package controllers;
 2.
 3.    import play.*;
 4.    import play.mvc.*;
 5.
 6.    import views.html.*;
 7.
 8.    public class Application extends Controller {
 9.
10.      public static Result index() {
11.        return ok(index.render("Your new application is ready."));
12.      }
13.
14.    }
- Line 8: The Application controller class extends play.mvc.Controller.
- Line 10: The public static index() action returns a Result. All action methods return a Result. The Result represents the HTTP response to be sent back to the browser.
- Line 11: Here, the action returns a 200 OK response with an HTML response body. The HTML content is provided by a template. An action always returns an HTTP response, which is represented in Play 2 by the Result type. The Result type must be a valid HTTP response, so it must include a valid HTTP status code. OK sets it to 200.The render() method references a template file in Play 2.
The template is defined in the app/views/index.scala.html source file. This file is illustrated in Listing 8-2.
Listing 8-2. index.scala.html
1.    @(message: String)
2.
3.    @main("Welcome to Play") {
4.
5.        @play20.welcome(message, style = "Java")
6.
7.    }
- Line 1: The Scala statement starts with the special @ character. The first line defines the function signature. Here it takes a single String parameter. A template is like a function, and thus it needs parameters, which are declared at the top of the template file.
- Line 3: This line invokes a function named main with one string argument.
- Lines 3 to 7: These lines comprise the main function block.
- Line 5: Line 5 uses a function called welcome, provided by Play 2. This function renders the default welcome HTML page, which is in the file named main.scala.html also located in apps/views folder.
- Line 5: The welcome function has an extra parameter style that informs the template that this is a Java-based application, and then this style parameter is used by the welcome template to show links to documentation.
Configuring Eclipse for Java
Play 2 provides you with the possibility to use the Eclipse IDE. For this you need to ask Play 2 to generate the Eclipse project configuration. You can do this by invoking Eclipse in the Play console, as illustrated in Figure 8-11.

Figure 8-11. Generating the project for Eclipse
Now you can launch Eclipse, as illustrated in Figure 8-11, and import the project into it, as illustrated in Figure 8-12.

Figure 8-12. Selecting a workspace
For importing the project, select File ![]() Import, select General
Import, select General ![]() Existing Projects into Workspace, and click Next, as illustrated in Figure 8-13.
Existing Projects into Workspace, and click Next, as illustrated in Figure 8-13.
Figure 8-13. Importing the project
Now browse your filesystem, select the project folder helloworld, click OK, and then click Finish, as illustrated in Figure 8-14.

Figure 8-14. Selecting the root directory
All the files necessary to configure an Eclipse project are generated. You saw how to create a project and import it into your development environment. Now you will modify the application. In Application.java, change the content of the response in the index action, as illustrated in Listing 8-3.
Listing 8-3. Modifying the Index Action
public static Result index() {
  return ok("Hello world");
}
The index action will now respond with “Hello world,” as illustrated in Figure 8-15.
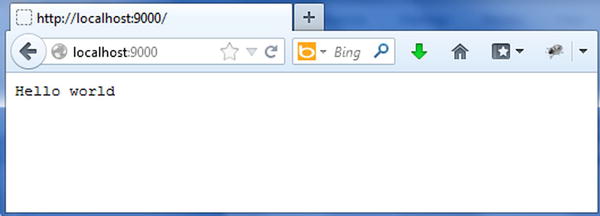
Figure 8-15. “Hello world”
Play 2 provides some sample applications in the samples folder in play-2.2.0samplesjava. You can run the helloworld application, as illustrated in Figure 8-16.
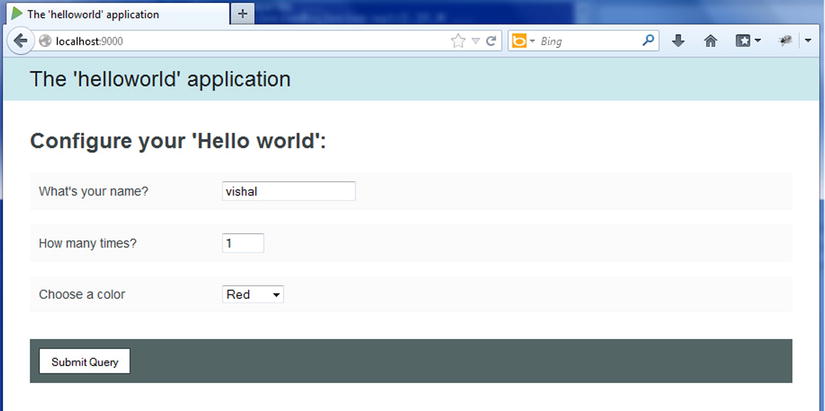
Figure 8-16. The sample helloworld application provided by Play 2
When you click Submit Query, the user’s name is displayed based on the selection, as illustrated in Figure 8-17.
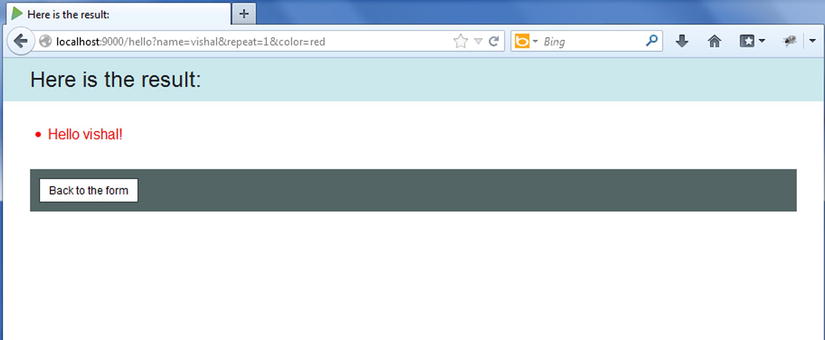
Figure 8-17. Running the sample helloworld application
You can go through the code on your own and improve the application.
Helloworld Scala Application with Play 2
As mentioned earlier, Play 2 allows you to create both Java- and Scala-based web applications. The procedure for generating a Scala-based application is the same as generating the Java application. You can create a helloworld-scala application as illustrated in Figure 8-18.
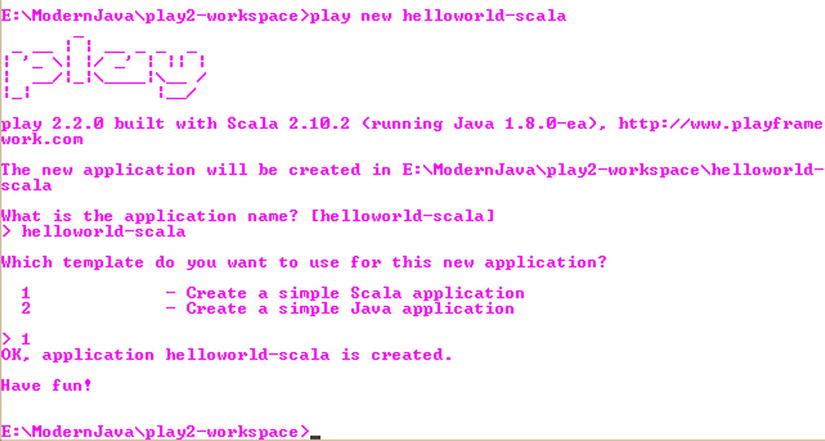
Figure 8-18. Creating the helloworld-scala application
Now you can run the helloworld-scala project using the run command from the Play console, as illustrated in Figure 8-19.
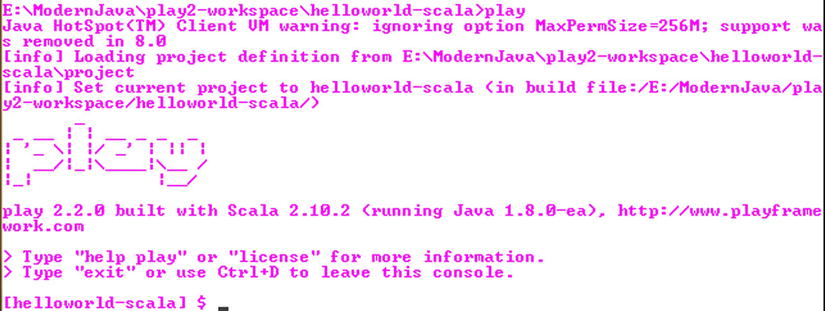
Figure 8-19. Play console for helloworld-scala application
Now you will look at the controller generated by Play 2 for helloworld-scala (see Listing 8-4). You can find the controller in helloworld-scalaappcontrollers.
Listing 8-4. Application Controller in Scala
 1.    package controllers
 2.
 3.    import play.api._
 4.    import play.api.mvc._
 5.
 6.    object Application extends Controller {
 7.
 8.      def index = Action {
 9.        Ok(views.html.index("Your new application is ready."))
10.      }
11.
12.    }
- Line 6: As you can see on line 6, in Java controller is a class, but in Scala the controller is an object.
- Line 8: As you can see on line 8, in Java action is a static method, but in Scala an action is a function (an object’s method).
- Line 9: The return type and keyword are missing if you compare this to the Java controller.
- Line 9: Scala uses a structure called Action, which is a block of code executor.
Now that you have seen the controller in Scala, which differs from a Java controller syntactically, it is time to see the template in helloworld-scala (see Listing 8-5), which you can find in helloworld-scalaappviews.
Listing 8-5. Template in helloworld-scala
1.    @(message: String)
2.
3.    @main("Welcome to Play") {
4.
5.        @play20.welcome(message)
6.
7.    }
As you can notice, the template in helloworld and helloworld-scala are the same except for line 5. The Scala version is not initializing the style argument because its default value is Scala.
You can use the Scala IDE for Scala-based applications. The Scala IDE is an Eclipse plug-in, and you can install this plug-in by selecting Help ![]() Install New Software. In the “Work with” field, enter the path for the plug-in (http://scala-ide.org/download/current.html), as shown in Figure 8-20. You can also find detailed instructions for configuring Eclipse for Scala at http://scala-ide.org/documentation.html.
Install New Software. In the “Work with” field, enter the path for the plug-in (http://scala-ide.org/download/current.html), as shown in Figure 8-20. You can also find detailed instructions for configuring Eclipse for Scala at http://scala-ide.org/documentation.html.
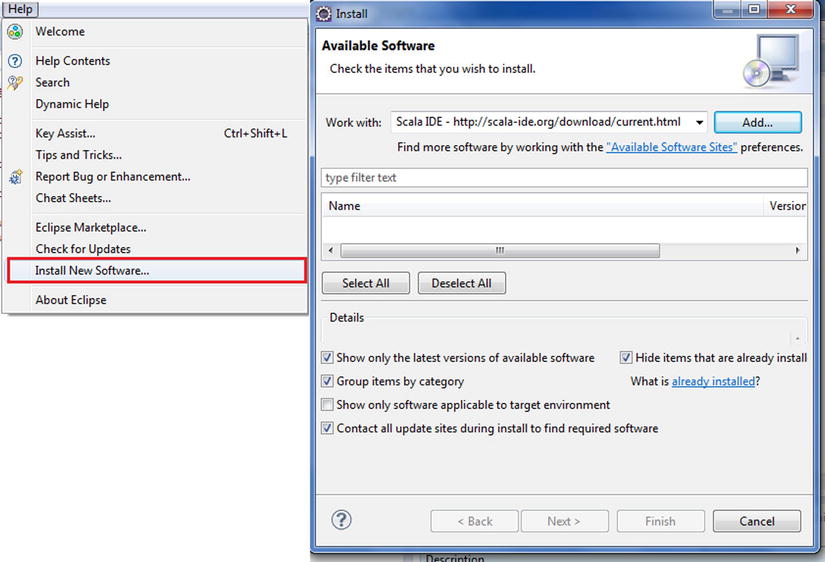
Figure 8-20. Installing the Eclipse plug-in for the Scala IDE
To import the project, you can just repeat the same steps you performed earlier when generating the project configuration for Eclipse in the helloworld Java application.
Now you can modify the index action in the application controller to display “Hello world,” as shown in Listing 8-6.
Listing 8-6. Modifying the Index Action to Display “Hello world”
def index = Action {
    Ok("Hello world")
  }
A Basic CRUD Play 2 Java Application
In this section, you will learn to write a simple CRUD application that allows you to create, view, edit, and delete books. For these operations, you need actions and URLs to invoke these actions. The code for this application is available in a downloadable archive on the Apress web site.
Defining the Routes
The first step is to define routes for these operations in the conf/routes file, as illustrated in Listing 8-7.
Listing 8-7. Edit the Conf/Routes File
1.    # Home page
2.    GET     /                    controllers.Application.index()
3.
4.    # Books
5.    GET     /books               controllers.Application.books()
6.    POST    /books               controllers.Application.newBook()
7.    POST    /books/:id/delete    controllers.Application.deleteBook(id: Long)
- Line 5: In line 5 you create a route to list all books.
- Line 6: In line 6 you create a route to handle book creation.
- Line 7: In line 7 you create a route to handle deletion. The route to handle book deletion defines a variable argument ID in the URL path. This value is then passed to the deleteBook action.
Now if you refresh your browser, you will see that Play 2 cannot compile your routes file, as illustrated in Figure 8-21.
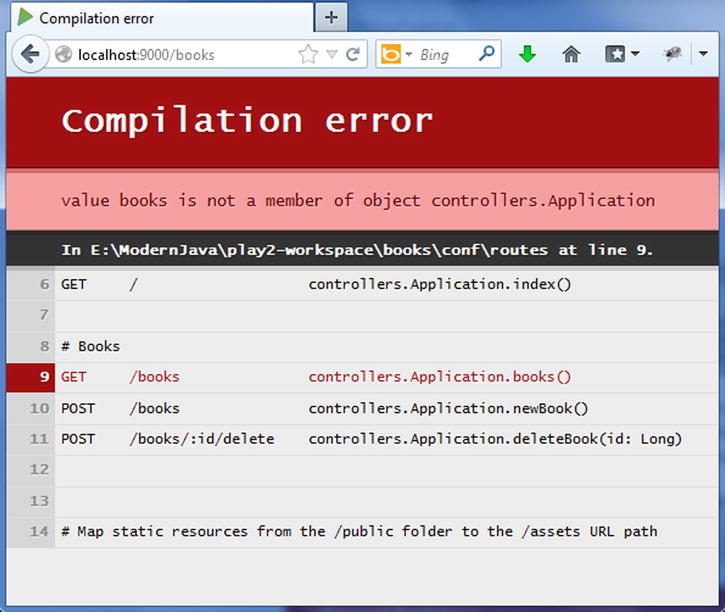
Figure 8-21. Routes file compilation error
Play cannot compile your routes file because it references actions that don’t exist. The next step is to add these actions to the Application.java file.
Creating the Controller and Actions
In this section, you will create the actions, as illustrated in Listing 8-8.
Listing 8-8. Application Controller in the Books Application
 1.    public class Application extends Controller {
 2.
 3.      public static Result index() {
 4.        return ok(index.render("Your new application is ready."));
 5.      }
 6.
 7.      public static Result books() {
 8.        return TODO;
 9.      }
10.
11.      public static Result newBook() {
12.        return TODO;
13.      }
14.
15.      public static Result deleteBook(Long id) {
16.        return TODO;
17.      }
18.
19.    }
- Lines 7, 11, and 15: These lines show the actions that were specified in the routes file in Listing 8-7.
- Lines 8, 12, and 16: A built-in result TODO is used that returns “Not implemented” response 503. This result tells Play 2 that the action implementations will be provided later. When you access the application via http://localhost:9000/books, you see the result displayed in Figure 8-22.
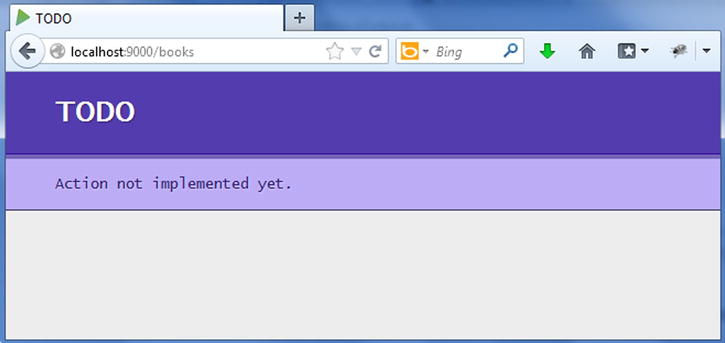
Figure 8-22. Built-in TODO result in Play 2
Creating the Model
The next step is to define the model Book that can be stored in a relational database. For this, create a class in the app/models/Book.java file, as illustrated in the Listing 8-9.
Listing 8-9. Book.java
 1.    package models;
 2.    import java.util.*;
 3.    public class Book {
 4.      public Long id;
 5.      public String label;
 6.      public static List<Book> all() {
 7.        return new ArrayList<Book>();
 8.      }
 9.      public static void create(Book book) {
10.      }
11.      public static void delete(Long id) {
12.      }
13.    }
- Lines 6 to 12: You create static methods to manage CRUD operations on Book. Later you will implement these operations to store the books in a relational database.
The Form and the View Template
A Form object encapsulates an HTML form definition, including validation constraints. To create a form for the Book class, you need to add the following to your application controller:
static Form<Book> bookForm = Form.form(Book.class);
The previous code is used to define a play.data.Form that wraps an existing class. The type of bookForm is Form<Book>.
You can add a constraint to the Book type using JSR-303 annotations. Listing 8-10 illustrates how to make the label field required.
Listing 8-10. Adding the Validation Constraint
package models;

import java.util.*;

import play.data.validation.Constraints.*;

public class Book {

  public Long id;

  @Required
  public String label;

  ...
Now you need to modify the view template to display the screen for creating the book and listing all the books.
Templates are compiled as standard Scala functions. If you create a views/Application/index.scala.html template file, Scala will generate a views.html.Application.index class that has a render() method. Listing 8-11 shows a simple template.
Listing 8-11. Simple Template
@(books: List[Book])
 <ul>
@for(book <- books) {
  <li>@book.getTitle()</li>
}
</ul>
You can then call this from any Java code like you would normally call a method on a class.
Content html = views.html.Application.index.render(books);
Listing 8-12 illustrates the code for the index.scala.html template that you will find in the app/views folder.
Listing 8-12. index.scala.html
 1.    @(books: List[Book], bookForm: Form[Book])
 2.
 3.    @import helper._
 4.
 5.    @main("books") {
 6.
 7.    <h1>@books.size() book(s)</h1>
8.
 9.    <ul>
10.            @for(book <- books) {
11.    <li>
12.                    @book.label
13.
14.                    @form(routes.Application.deleteBook(book.id)) {
15.    <input type="submit" value="Delete">
16.                    }
17.    </li>
18.            }
19.    </ul>
20.
21.    <h2>Add a new book</h2>
22.
23.        @form(routes.Application.newBook()) {
24.
25.            @inputText(bookForm("label"))
26.
27.    <input type="submit" value="Create">
28.
29.        }
30.
31.    }
In Listing 8-12, the template takes two parameters. @content is a parameter that represents valid HTML to be written in the body of the document. The type of content is Html, which is the Scala structure that can be written as HTML when invoked by the template. The imported helper._ provides the form creation helpers—that is, the form function that creates the HTML <form> with filled action and method attributes, and the inputText function that creates the HTML input given as a form field.
Note The play.data package contains several helpers to handle HTTP form data submission and validation.
Now you can implement the books() action, as illustrated in Listing 8-13.
Listing 8-13. Implementing the Books Action
public static Result books() {
    return ok(
    views.html.index.render(Book.all(), bookForm)
  );
}
The books() action renders a 200 OK result filled with the HTML, which is rendered by the index.scala.html template called with the books list and the bookForm form.
You can now try to access http://localhost:9000/books in your browser (see Figure 8-23).
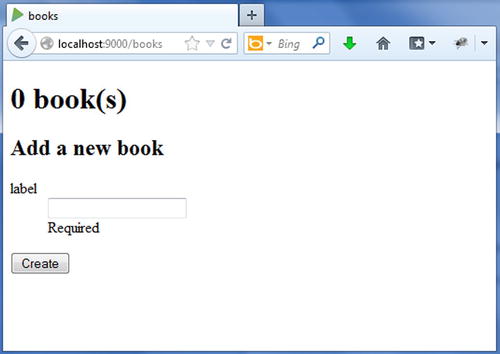
Figure 8-23. Displaying the book creation form
If you submit the book creation form, you will still get the TODO page. You need to implement the newBook() action to be able to create the book. Listing 8-14 illustrates the implementation of the newBook() action.
Listing 8-14. Implementation of the newBook( ) Action
 1.    public static Result newBook() {
 2.        Form<Book> filledForm = bookForm.bindFromRequest();
 3.      if(filledForm.hasErrors()) {
 4.        return badRequest(
 5.          views.html.index.render(Book.all(), filledForm)
 6.        );
 7.      } else {
 8.        Book.create(filledForm.get());
 9.        return redirect(routes.Application.books());
10.      }
11.    }
Play 2 supports an object-relational mapping (ORM), Ebean, out of the box to fill the gap between the domain model and the relational database, as illustrated in Figure 8-24. The other popular options that offer ORM for Java are Hibernate and the Java Persistence API, which is standardized by Oracle.
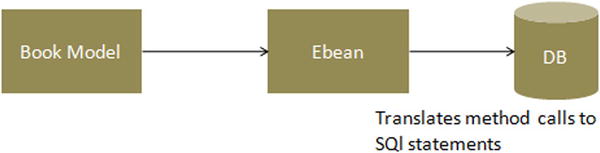
Figure 8-24. Using Ebean to query the database
Like any other ORM, Ebean aims to facilitate the usage of a model when dealing with relational databases by implementing finders based on the model’s properties. You will use H2, a lightweight DBMS that comes bundled with Play 2. Play’s configuration contains default settings for using H2 and Ebean, but they’re commented out. So, open the file conf/application.conf in your application’s directory, and find and uncomment the following lines to enable the database in your application:
db.default.driver=org.h2.Driver
db.default.url="jdbc:h2:mem:play"
You will use Ebean to query the database. So, you’ll have to enable it in the application.conf file as well:
ebean.default="models.*"
This will create an Ebean server connected to the default data source, managing all entities found in the models package.
Now it’s time to transform your Book class to a valid Ebean entity. You can do this by making the Book class extend the play.db.ebean.Model superclass to have access to Play’s built-in Ebean helper, as illustrated in Listing 8-15.
Listing 8-15. Transforming the Book Class to a Valid Ebean Entity
 1.    package models;
 2.
 3.    import java.util.*;
 4.    import play.db.ebean.*;
 5.    import play.data.validation.Constraints.*;
 6.
 7.    import javax.persistence.*;
 8.
 9.    @Entity
10.    public class Book extends Model {
11.      @Id
12.      public Long id;
13.      @Required
14.      public String label;
15.
16.    public static Finder<Long,Book> find = new Finder(
17.        Long.class, Book.class
18.      );
19.
20.
21.    public static List<Book> all() {
22.      return find.all();
23.    }
24.
25.    public static void create(Book book) {
26.      book.save();
27.    }
28.    public static void update(Long id, Book book) {
29.        book.update(id);
30.    }
31.
32.    public static void delete(Long id) {
33.      find.ref(id).delete();
34.    }
35.
36.
37.    }
- Line 13: Line 13 adds the persistence annotation.
- Lines 16 to 18: These lines create a finder helper called find to initiate queries.
- Lines 21 to 34: These lines implement the CRUD operations. For instance, when you call the create() action, Ebean translates the save() method call into one or more SQL INSERT statements that store a new record in a database table using SQL.
Now when you test the URL http://localhost:9000/, you will see the page shown in Figure 8-25.
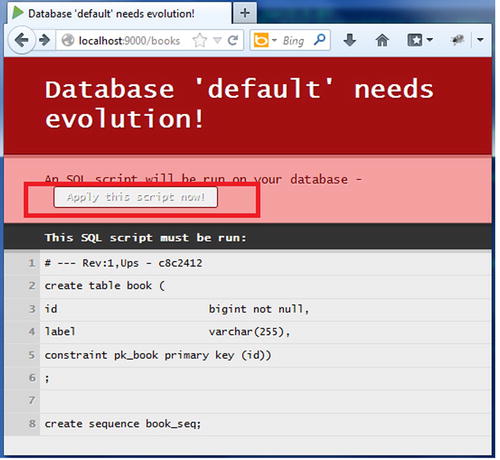
Figure 8-25. Applying a script on the default database
When you defined the database connection to connect to the H2 database, it did not automatically create the schema, in other words, the tables and column definitions. To create the schema, Play 2 generates a SQL script and demands to run it: “Apply this script now.” Once you run this script by clicking the “Apply this script now” button, you can test the URL http://localhost:9000/books and the new book, as illustrated in Figure 8-26.
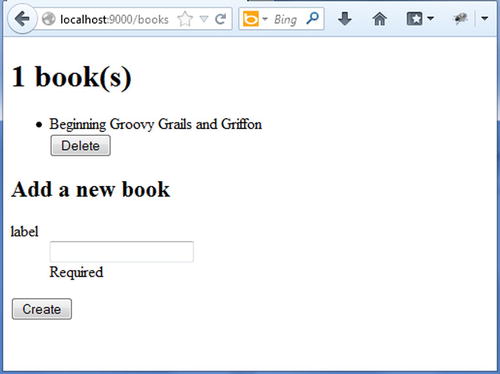
Figure 8-26. Adding a book
Now that you can create books, you need to be able to delete them. For this you need to implement the deleteBook() action, as illustrated in Listing 8-16.
Listing 8-16. Implementing the Delete Action
1.    public static Result deleteBook(Long id) {
2.      Book.delete(id);
3.      return redirect(routes.Application.books());
4.    }
This concludes the chapter and this book. One chapter is not enough to cover all the features of the Play 2 framework (or any framework, for that matter). Meanwhile, frameworks and the web architecture are evolving at a rapid pace toward real-time processing, integrating more concurrent real-time data, so web frameworks need to support a full asynchronous HTTP programming model and need to use the event model through Web Sockets. Play 2 provides an asynchronous HTTP API instead of the standard Servlet API, thus moving away from standard JEE conventions. Play 2.0 employs the Actor-based model to handle highly concurrent systems through Akka. Akka is the best implementation of Actor-based models available for both Java and Scala. Play 2.0 provides native Akka support making it possible to write highly-distributed systems.
The goals of this book were to show you that the wave the Java language ushered into Web development in late ‘90s was only a beginning of the Typesafe era that is being transcended today and that the popularity that Java has enjoyed should be accredited to the Java Virtual Machine. It is quite a machine.
Summary
In this chapter, you took a high-level look at the Play 2 framework. You developed a helloworld web application for both Java and Scala, and you learned the basics that are common to all the Play 2 web applications: Java and Scala controllers, actions, and even a bit of views. In addition, you examined the differences between Java and Scala controllers. You saw the best features provided by Play 2, such as compilation on the fly and errors shown on the browser. Then you developed a simple Java-based CRUD web application.