Chapter 2: Touring the LLVM Source
The LLVM mono repository contains all the projects under the llvm-project root directory. All projects follow a common source layout. To use LLVM effectively, it is good to know what is available and where to find it. In this chapter, you will learn about the following:
- The contents of the LLVM mono repository, covering the most important top-level projects
- The layout of an LLVM project, showing the common source layout used by all projects
- How to create your own projects using LLVM libraries, covering all the ways you can use LLVM in your own projects
- How to target a different CPU architecture, showing the steps required to cross-compile to another system
Technical requirements
The code files for the chapter are available at https://github.com/PacktPublishing/Learn-LLVM-12/tree/master/Chapter02/tinylang
You can find the code in action videos at https://bit.ly/3nllhED
Contents of the LLVM mono repository
In Chapter 1, Installing LLVM, you cloned the LLVM mono repository. This repository contains all LLVM top-level projects. They can be grouped as follows:
- LLVM core libraries and additions
- Compilers and tools
- Runtime libraries
In the next sections, we will take a closer look at these groups.
LLVM core libraries and additions
The LLVM core libraries are in the llvm directory. This project provides a set of libraries with optimizers and code generation for well-known CPUs. It also provides tools based on these libraries. The LLVM static compiler llc takes a file written in LLVM intermediate representation (IR) as input and compiles it into either bitcode, assembler output, or a binary object file. Tools such as llvm-objdump and llvm-dwarfdump let you inspect object files, and those such as llvm-ar let you create an archive file from a set of object files. It also includes tools that help with the development of LLVM itself. For example, the bugpoint tool helps to find a minimal test case for a crash inside LLVM. llvm-mc is the machine code playground: this tool assembles and disassembles machine instructions and also outputs the encoding, which is a great help when adding new instructions.
The LLVM core libraries are written in C++. Additionally, a C interface and bindings for Go, Ocaml, and Python are provided.
The Polly project, located in the polly directory, adds another set of optimizations to LLVM. It is based on a mathematical representation called the polyhedral model. With this approach, complex optimizations such as loops optimized for cache locality are possible.
The MLIR project aims to provide a multi-level intermediate representation for LLVM. The LLVM IR is already at a low level, and certain information from the source language is lost during IR generation in the compiler. The idea of MLIR is to make the LLVM IR extensible and capture this information in a domain-specific representation. You will find the source in the mlir directory.
Compilers and tools
A complete C/C++/Objective-C/Object-C++ compiler named clang (http://clang.llvm.org/) is part of the LLVM project. The source is located in the clang directory. It provides a set of libraries for lexing, parsing, semantic analysis, and generation of LLVM IR from C, C++, Objective-C, and Objective-C++ source files. The small tool clang is the compiler driver, based on these libraries. Another useful tool is clang-format, which can format C/C++ source files and source fragments according to rules provided by the user.
Clang aims to be compatible with GCC, the GNU C/C++ compiler, and CL, the Microsoft C/C++ compiler.
Additional tools for C/C++ are provided by the clang-tools-extra project in the directory of the same name. Most notable here is clang-tidy which is a Lint style checker for C/C++. clang-tidy uses the clang libraries to parse the source code and checks the source with static analysis. The tool can catch more potential errors than the compiler, at the expense of more runtime.
Llgo is a compiler for the Go programming languages, located in the llgo directory. It is written in Go and uses the Go bindings from the LLVM core libraries to interface with LLVM. Llgo aims to be compatible with the reference compiler (https://golang.org/) but currently, the only supported target is 64-bit x86 Linux. The project seems unmaintained and may be removed in the future.
The object files created by a compiler must be linked together with runtime libraries to form an executable. This is the job of lld (http://lld.llvm.org/), the LLVM linker that is located in the lld directory. The linker supports the ELF, COFF, Mach-O, and WebAssembly formats.
No compiler toolset is complete without a debugger! The LLVM debugger is called lldb (http://lldb.llvm.org/) and is located in the directory of the same name. The interface is similar to GDB, the GNU debugger, and the tool supports C, C++, and Objective-C out of the box. The debugger is extensible so support for other programming languages can be added easily.
Runtime libraries
In addition to a compiler, runtime libraries are required for complete programming language support. All the listed projects are located in the top-level directory in a directory of the same name:
- The compiler-rt project provides programming language-independent support libraries. It includes generic functions, such as a 64-bit division for 32-bit i386, various sanitizers, the fuzzing library, and the profiling library.
- The libunwind library provides helper functions for stack unwinding based on the DWARF standard. This is usually used for implementing exception handling of languages such as C++. The library is written in C and the functions are not tied to a specific exception handling model.
- The libcxxabi library implements C++ exception handling on top of libunwind and provides the standard C++ functions for it.
- Finally, libcxx is an implementation of the C++ standard library, including iostreams and STL. In addition, the pstl project provides a parallel version of the STL algorithm.
- libclc is the runtime library for OpenCL. OpenCL is a standard for heterogeneous parallel computing and helps with moving computational tasks to graphics cards.
- libc aims to provide a complete C library. This project is still in its early stages.
- Support for the OpenMP API is provided by the openmp project. OpenMP helps with multithreaded programming and can, for instance, parallelize loops based on annotations in the source.
Even though this is a long list of projects, the good news is that all projects are structured similarly. We look at the general directory layout in the next section.
Layout of an LLVM project
All LLVM projects follow the same idea of directory layout. To understand the idea, let's compare LLVM with GCC, the GNU Compiler Collection. GCC has provided mature compilers for decades for almost every system you can imagine. But, except for the compilers, there are no tools that take advantage of the code. The reason is that it is not designed for reuse. This is different with LLVM.
Every functionality has a clearly defined API and is put in a library of its own. The clang project has (among others) a library to lex a C/C++ source file into a token stream. The parser library turns this token stream into an abstract syntax tree (also backed by a library). Semantic analysis, code generation, and even the compiler driver are provided as a library. The well-known clang tool is only a small application linked against these libraries.
The advantage is obvious: when you want to build a tool that requires the abstract syntax tree (AST) of a C++ file, then you can reuse the functionality from these libraries to construct the AST. Semantic analysis and code generation are not required and you do not link against these libraries. This principle is followed by all LLVM projects, including the core libraries!
Each project has a similar organization. Because CMake is used for build file generation, each project has a CMakeLists.txt file that describes the building of the projects. If additional CMake modules or support files are required, then they are stored in the cmake subdirectory, with modules placed in cmake/modules.
Libraries and tools are mostly written in C++. Source files are placed under the lib directory and header files under the include directory. Because a project typically consists of several libraries, there are directories for each library in the lib directory. If necessary, this repeats. For example, inside the llvm/lib directory is the Target directory, which holds the code for the target-specific lowering. Besides some source files, there are again subdirectories for each target that are again compiled into libraries. Each of these directories has a CMakeLists.txt file that describes how to build the library and which subdirectories also contain source.
The include directory has an additional level. To make the names of the include files unique, the path name includes the project name, which is the first subdirectory under include. Only in this folder is the structure from the lib directory repeated.
The source of applications is inside the tools and utils directories. In the utils directory are internal applications that are used during compilation or testing. They are usually not part of a user installation. The tools directory contains applications for the end user. In both directories, each application has its own subdirectory. As with the lib directory, each subdirectory that contains source has a CMakeLists.txt file.
Correct code generation is a must for a compiler. This can only be achieved with a good test suite. The unittest directory contains unit tests that use the Google Test framework. This is mainly used for single functions and isolated functionality that can't be tested otherwise. In the test directory are the LIT tests. These tests use the llvm-lit utility to execute tests. llvm-lit scans a file for shell commands and executes them. The file contains the source code used as input for the test, for example, LLVM IR. Embedded in the file are commands to compile it, executed by llvm-lit. The output of this step is then verified, often with the help of the FileCheck utility. This utility reads check statements from one file and matches them against another file. The LIT tests themselves are in subdirectories under the test directory, loosely following the structure of the lib directory.
Documentation (usually as reStructuredText) is placed in the docs directory. If a project provides examples, they are in the examples directory.
Depending on the needs of the project, there can be other directories too. Most notably, some projects that provide runtime libraries place the source code in a src directory and use the lib directory for library export definitions. The compiler-rt and libclc projects contain architecture-dependent code. This is always placed in a subdirectory named after the target architecture (for example, i386 or ptx).
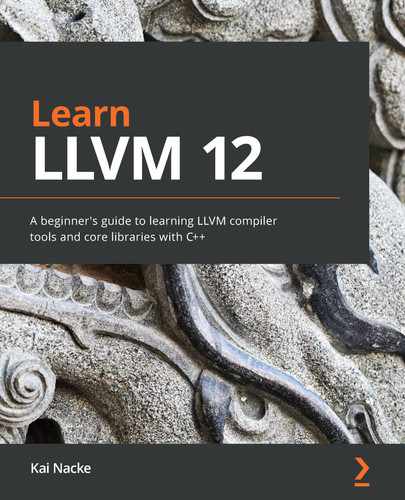
In summary, the general layout of a project that provides a sample library and has a driver tool looks like this:
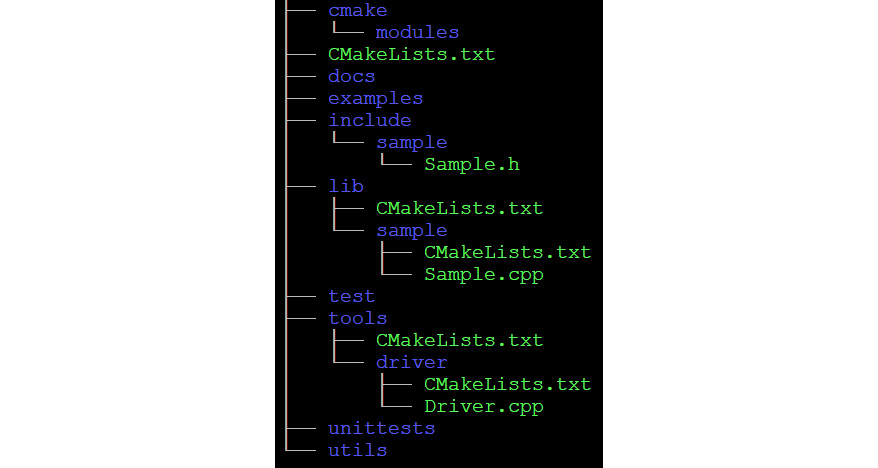
Figure 2.1 – General project directory layout
Our own project will follow this organization, too.
Creating your own project using LLVM libraries
Based on the information in the previous section, you can now create your own project using LLVM libraries. The following sections introduce a small language called Tiny. The project will be called tinylang. Here the structure for such a project is defined. Even though the tool in this section is only a Hello, world application, its structure has all the parts required for a real-world compiler.
Creating the directory structure
The first question is if the tinylang project should be built together with LLVM (like clang), or if it should be a standalone project that just uses the LLVM libraries. In the former case, it is also necessary to decide where to create the project.
Let's first assume that tinylang should be built together with LLVM. There are different options for where to place the project. The first solution is to create a subdirectory for the project inside the llvm-projects directory. All projects in this directory are picked up and built as part of building LLVM. Before the side-by-side project layout was created, this the standard way to build, for example, clang.
A second option is to place the tinylang project in the top-level directory. Because it is not an official LLVM project, the CMake script does not know about it. When running cmake, you need to specify –DLLVM_ENABLE_PROJECTS=tinylang to include the project in the build.
And the third option is to place the project directory somewhere else, outside the llvm-project directory. Of course, you need to tell CMake about this location. If the location is /src/tinylang, for example, then you need to specify –DLLVM_ENABLE_PROJECTS=tinylang –DLLVM_EXTERNAL_TINYLANG_SOURCE_DIR=/src/tinylang.
If you want to build the project as a standalone project, then it needs to find the LLVM libraries. This is done in the CMakeLists.txt file, which is discussed later in this section.
After learning about the possible options, which one is the best? Making your project part of the LLVM source tree is a bit inflexible because of the size. As long as you don't aim to add your project to the list of top-level projects, I recommend using a separate directory. You can maintain your project on GitHub or similar services without worrying about how to sync with the LLVM project. And as shown previously, you can still build it together with the other LLVM projects.
Let's create a project with a very simple library and application. The first step is to create the directory layout. Choose a location that's convenient for you. In the following steps, I assume it is in the same directory in which you cloned the llvm-project directory. Create the following directories with mkdir (Unix) or md (Windows):
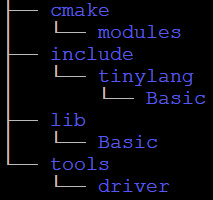
Figure 2.2 – Required directories for the project
Next, we will place the build description and source files in these directories.
Adding the CMake files
You should recognize the basic structure from the last section. Inside the tinylang directory, create a file called CMakeLists.txt with the following steps:
- The file starts by calling cmake_minimum_required() to declare the minimal required version of CMake. It is the same version as in Chapter 1, Installing LLVM:
Cmake_minimum_required(VERSION 3.13.4)
- The next statement is if(). If the condition is true, then the project is built standalone, and some additional setup is required. The condition uses two variables, CMAKE_SOURCE_DIR and CMAKE_CURRENT_SOURCE_DIR. The CMAKE_SOURCE_DIR variable is the top-level source directory that is given on the cmake command line. As we saw in the discussion about the directory layout, each directory with source files has a CMakeLists.txt file. The directory of the CMakeLists.txt file that CMake currently processes is recorded in the CMAKE_CURRENT_SOURCE_DIR variable. If both variables have the same string value, then the project is built standalone. Otherwise, CMAKE_SOURCE_DIR would be the llvm directory:
if(CMAKE_SOURCE_DIR STREQUAL CMAKE_CURRENT_SOURCE_DIR)
The standalone setup is straightforward. Each CMake project needs a name. Here, we set it to Tinylang:
project(Tinylang)
- The LLVM package is searched and the found LLVM directory is added to the CMake module path:
find_package(LLVM REQUIRED HINTS "${LLVM_CMAKE_PATH}")
list(APPEND CMAKE_MODULE_PATH ${LLVM_DIR})
- Then, three additional CMake modules provided by LLVM are included. The first is only needed when Visual Studio is used as the build compiler and sets the correct runtime library to link again. The other two modules add the macros used by LLVM and configure the build based on the provided options:
include(ChooseMSVCCRT)
include(AddLLVM)
include(HandleLLVMOptions)
- Next, the path of the header files from LLVM is added to the include search path. Two directories are added. The include directory from the build directory is added because auto-generated files are saved here. The other include directory is the one inside the source directory:
include_directories("${LLVM_BINARY_DIR}/include" "${LLVM_INCLUDE_DIR}")
- With link_directories(), the path of the LLVM libraries is added for the linker:
link_directories("${LLVM_LIBRARY_DIR}")
- As a last step, a flag is set to denote that the project is built standalone:
set(TINYLANG_BUILT_STANDALONE 1)
endif()
- Now follows the common setup. The cmake/modules directory is added to the CMake modules search path. This allows us to later add our own CMake modules:
list(APPEND CMAKE_MODULE_PATH "${CMAKE_CURRENT_SOURCE_DIR}/cmake/modules")
- Next, we check whether the user is performing an out-of-tree build. Like LLVM, we require that the user uses a separate directory for building the project:
if(CMAKE_SOURCE_DIR STREQUAL CMAKE_BINARY_DIR AND NOT MSVC_IDE)
message(FATAL_ERROR "In-source builds are not allowed.")
endif()
- The version number of tinylang is written to a generated file with the configure_file()command. The version number is taken from the TINYLANG_VERSION_STRING variable. The configure_file() command reads an input file, replaces CMake variables with their current value, and writes an output file. Please note that the input file is read from the source directory and is written to the build directory:
set(TINYLANG_VERSION_STRING "0.1")
configure_file(${CMAKE_CURRENT_SOURCE_DIR}/include/tinylang/Basic/Version.inc.in
${CMAKE_CURRENT_BINARY_DIR}/include/tinylang/Basic/Version.inc)
- Next, another CMake module is included. The AddTinylang module has some helper functionality:
include(AddTinylang)
- There follows another include_directories() statement. This adds our own include directories to the beginning of the search path. As in the standalone build, two directories are added:
include_directories(BEFORE
${CMAKE_CURRENT_BINARY_DIR}/include
${CMAKE_CURRENT_SOURCE_DIR}/include
)
- At the end of the file, the lib and the tools directories are declared as further directories in which CMake finds the CMakeLists.txt file. This is the basic mechanism to connect the directories. This sample application only has source files below the lib and the tools directories, so nothing else is needed. More complex projects will add more directories, for example, for the unit tests:
add_subdirectory(lib)
add_subdirectory(tools)
This is the main description for your project.
The AddTinylang.cmake helper module is placed in the cmake/modules directory. It has the following content:
macro(add_tinylang_subdirectory name)
add_llvm_subdirectory(TINYLANG TOOL ${name})
endmacro()
macro(add_tinylang_library name)
if(BUILD_SHARED_LIBS)
set(LIBTYPE SHARED)
else()
set(LIBTYPE STATIC)
endif()
llvm_add_library(${name} ${LIBTYPE} ${ARGN})
if(TARGET ${name})
target_link_libraries(${name} INTERFACE
${LLVM_COMMON_LIBS})
install(TARGETS ${name}
COMPONENT ${name}
LIBRARY DESTINATION lib${LLVM_LIBDIR_SUFFIX}
ARCHIVE DESTINATION lib${LLVM_LIBDIR_SUFFIX}
RUNTIME DESTINATION bin)
else()
add_custom_target(${name})
endif()
endmacro()
macro(add_tinylang_executable name)
add_llvm_executable(${name} ${ARGN} )
endmacro()
macro(add_tinylang_tool name)
add_tinylang_executable(${name} ${ARGN})
install(TARGETS ${name}
RUNTIME DESTINATION bin
COMPONENT ${name})
endmacro()
With inclusion of the module, the add_tinylang_subdirectory(), add_tinylang_library(), add_tinylang_executable(), and add_tinylang_tool() functions are available for use. Basically, these are wrappers around the equivalent functions provided by LLVM (in the AddLLVM module). add_tinylang_subdirectory() adds a new source directory for inclusion in the build. Additionally, a new CMake option is added. With this option, the user can control whether the content of the directory should be compiled or not. With add_tinylang_library(), a library is defined that is also installed. add_tinylang_executable() defines an executable and add_tinylang_tool() defines an executable that is also installed.
Inside the lib directory, a CMakeLists.txt file is needed even if there is no source. It must include the source directories of this project's libraries. Open your favorite text editor and save the following content in the file:
add_subdirectory(Basic)
A large project would create several libraries, and the source would be placed in subdirectories of lib. Each of these directories would have to be added in the CMakeLists.txt file. Our small project has only one library called Basic, so only one line is needed.
The Basic library has only one source file, Version.cpp. The CMakeLists.txt file in this directory is again simple:
add_tinylang_library(tinylangBasic
Version.cpp
)
A new library called tinylangBasic is defined, and the compiled Version.cpp is added to this library. An LLVM option controls whether this is a shared or static library. By default, a static library is created.
The same steps repeat in the tools directory. The CMakeLists.txt file in this folder is almost as simple as in the lib directory:
create_subdirectory_options(TINYLANG TOOL)
add_tinylang_subdirectory(driver)
First, a CMake option is defined that controls whether the content of this directory is compiled. Then the only subdirectory, driver, is added, this time with a function from our own module. Again, this allows us to control if this directory is included in compilation or not.
The driver directory contains the source of the application, Driver.cpp. The CMakeLists.txt file in this directory has all the steps to compile and link this application:
set(LLVM_LINK_COMPONENTS
Support
)
add_tinylang_tool(tinylang
Driver.cpp
)
target_link_libraries(tinylang
PRIVATE
tinylangBasic
)
First, the LLVM_LINK_COMPONENTS variable is set to the list of LLVM components that we need to link our tool against. An LLVM component is a set of one or more libraries. Obviously, this depends on the implemented functionality of the tools. Here, we need only the Support component.
With add_tinylang_tool() a new installable application is defined. The name is tinylang and the only source file is Driver.cpp. To link against our own libraries, we have to specify them with target_link_libraries(). Here, only tinylangBasic is needed.
Now the files required for the CMake system are in place. Next, we will add the source files.
Adding the C++ source files
Let's start in the include/tinylang/Basic directory. First, create the Version.inc.in template file, which holds the configured version number:
#define TINYLANG_VERSION_STRING "@TINYLANG_VERSION_STRING@"
The @ symbols around TINYLANG_VERSION_STRING denote that this is a CMake variable that should be replaced with their content.
The Version.h header file only declares a function to retrieve the version string:
#ifndef TINYLANG_BASIC_VERSION_H
#define TINYLANG_BASIC_VERSION_H
#include "tinylang/Basic/Version.inc"
#include <string>
namespace tinylang {
std::string getTinylangVersion();
}
#endif
The implementation for this function is in the lib/Basic/Version.cpp file. It's similarly simple:
#include "tinylang/Basic/Version.h"
std::string tinylang::getTinylangVersion() {
return TINYLANG_VERSION_STRING;
}
And finally, in the tools/driver/Driver.cpp file there is the application source:
#include "llvm/Support/InitLLVM.h"
#include "llvm/Support/raw_ostream.h"
#include "tinylang/Basic/Version.h"
int main(int argc_, const char **argv_) {
llvm::InitLLVM X(argc_, argv_);
llvm::outs() << "Hello, I am Tinylang " << tinylang::getTinylangVersion()
<< " ";
}
Despite being only a friendly tool, the source uses typical LLVM functionality. The llvm::InitLLVM() call does some basic initialization. On Windows, the arguments are converted to Unicode for the uniform treatment of command-line parsing. And in the (hopefully unlikely) case that the application crashes, a pretty print stack trace handler is installed. It outputs the call hierarchy, beginning with the function inside which the crash happened. To see the real function names instead of hex addresses, the debug symbols must be present.
LLVM does not use the iostream classes of the C++ standard library. It comes with its own implementation. llvm::outs() is the output stream and is used here to send a friendly message to the user.
Compiling the tinylang application
Now all files for the first application are in place, the application can be compiled. To recap, you should have the following directories and files:
Figure 2.3 – All directories and files of the tinylang project
As discussed previously, there are several ways to build tinylang. Here is how to build tinylang as a part of LLVM:
- Change into the build directory with this:
$ cd build
- Then, run CMake as follows:
$ cmake -G Ninja -DCMAKE_BUILD_TYPE=Release
-DLLVM_EXTERNAL_PROJECTS=tinylang
-DLLVM_EXTERNAL_TINYLANG_SOURCE_DIR=../tinylang
-DCMAKE_INSTALL_PREFIX=../llvm-12
../llvm-project/llvm
With this command, CMake generates build files for Ninja (-G Ninja). The build type is set to Release, thus producing optimized binaries (-DCMAKE_BUILD_TYPE=Release). Tinylang is built as an external project alongside LLVM (-DLLVM_EXTERNAL_PROJECTS=tinylang) and the source is found in a directory parallel to the build directory (-DLLVM_EXTERNAL_TINYLANG_SOURCE_DIR=../tinylang). A target directory for the build binaries is also given (-DCMAKE_INSTALL_PREFIX=../llvm-12). As the last parameter, the path of the LLVM project directory is specified (../llvm-project/llvm).
- Now, build and install everything:
$ ninja
$ ninja install
- After building and installing, the../llvm-12 directory contains the LLVM and the tinylang binaries. Please check that you can run the application:
$ ../llvm-12/bin/tinylang
- You should see the friendly message. Please also check that the Basic library was installed:
$ ls ../llvm-12/lib/libtinylang*
This will show that there is a libtinylangBasic.a file.
Building together with LLVM is useful when you closely follow LLVM development, and you want to be aware of API changes as soon as possible. In Chapter 1, Installing LLVM, we checked out a specific version of LLVM. Therefore, we see no changes to LLVM sources.
In this scenario, it makes sense to build LLVM once and compile tinylang as a standalone project using the compiled version of LLVM. Here is how to do it:
- Start again with entering the build directory:
$ cd build
This time, CMake is used only to build LLVM:
$ cmake -G Ninja -DCMAKE_BUILD_TYPE=Release
-DCMAKE_INSTALL_PREFIX=../llvm-12
../llvm-project/llvm
- Compare this with the preceding CMake command: the parameters referring to tinylang are missing; everything else is identical.
- Build and install LLVM with Ninja:
$ ninja
$ ninja install
- Now you have an LLVM installation in the llvm-12 directory. Next, the tinylang project will be built. As it is a standalone build, a new build directory is required. Leave the LLVM build directory like so:
$ cd ..
- Now create a new build-tinylang directory. On Unix, you use the following command:
$ mkdir build-tinylang
And on Windows, you would use this command:
$ md build-tinylang
- Enter the new directory with the following command on either operating system:
$ cd build-tinylang
- Now run CMake to create the build files for tinylang. The only peculiarity is how LLVM is discovered, because CMake does not know the location where we installed LLVM. The olution is to specify the path to the LLVMConfig.cmake file from LLVM with the LLVM_DIR variable. The command is as follows:
$ cmake -G Ninja -DCMAKE_BUILD_TYPE=Release
-DLLVM_DIR=../llvm-12/lib/cmake/llvm
-DCMAKE_INSTALL_PREFIX=../tinylang ../tinylang/
- The installation directory is now separate, too. As usual, build and install with the following:
$ ninja
$ ninja install
- After the commands are finished, you should run the../tinylang/bin/tinylang application to check that the application works.
An alternate way to include LLVM
If you do not want to use CMake for your project, then you need to find out where the include files and libraries are, which libraries to link against, which build mode was used, and much more. This information is provided by the llvm-config tool, which is in the bin directory of an LLVM installation. Assuming that this directory is included in your shell search path, you run $ llvm-config to see all options.
For example, to get the LLVM libraries to link against the support component (which is used in the preceding example), you run this:
$ llvm-config –libs support
The output is a line with the library names including the link option for the compiler, for example, -lLLVMSupport –lLLVMDemangle. Obviously, this tool can be easily integrated with your build system of choice.
With the project layout shown in this section, you have a structure that scales for large projects such as compilers. The next section lays another foundation: how to cross-compile for a different target architecture.
Targeting a different CPU architecture
Today, many small computers such as the Raspberry Pi are in use and have only limited resources. Running a compiler on such a computer is often not possible or takes too much runtime. Hence, a common requirement for a compiler is to generate code for a different CPU architecture. The whole process of creating an executable is called cross-compiling. In the previous section, you created a small example application based on the LLVM libraries. Now we will take this application and compile it for a different target.
With cross-compiling, there are two systems involved: the compiler runs on the host system and produces code for the target system. To denote the systems, the so-called triple is used. This is a configuration string that usually consists of the CPU architecture, the vendor, and the operating system. More information about the environment is often added. For example, the triple x86_64-pc-win32 is used for a Windows system running on a 64-bit X86 CPU. The CPU architecture is x86_64, pc is a generic vendor, and win32 is the operating system. The parts are connected by a hyphen. A Linux system running on an ARMv8 CPU uses aarch64-unknown-linux-gnu as the triple. aarch64 is the CPU architecture. The operating system is linux, running a gnu environment. There is no real vendor for a Linux-based system, so this part is unknown. Parts that are not known or unimportant for a specific purpose are often omitted: the triple aarch64-linux-gnu describes the same Linux system.
Let's assume your development machine runs Linux on an X86 64-bit CPU and you want to cross-compile to an ARMv8 CPU system running Linux. The host triple is x86_64-linux-gnu and the target triple is aarch64-linux-gnu. Different systems have different characteristics. Your application must be written in a portable fashion, otherwise you will be surprised by failures. Common pitfalls are as follows:
- Endianness: The order in which multi-byte values are stored in memory can be different.
- Pointer size: The size of a pointer varies with the CPU architecture (usually 16, 32, or 64 bit). The C type int may not be large enough to hold a pointer.
- Type differences: Data types are often closely related to the hardware. The type long double can use 64 bit (ARM), 80 bit (X86), or 128 bit (ARMv8). PowerPC systems may use double-double arithmetic for long double, which gives more precision by using a combination of two 64-bit double values.
If you do not pay attention to these points, then your application can act surprisingly or crash on the target platform even if it runs perfectly on your host system. The LLVM libraries are tested on different platforms and also contain portable solutions to the mentioned issues.
For cross-compiling, you need the following tools:
- A compiler that generates code for the target
- A linker capable of generating binaries for the target
- Header files and libraries for the target
Ubuntu and Debian distributions have packages that support cross-compiling. In the following setup, we take advantage of this. The gcc and g++ compilers, the ld linker, and the libraries are available as precompiled binaries producing ARMv8 code and executables. To install all these packages, type the following:
$ sudo apt install gcc-8-aarch64-linux-gnu
g++-8-aarch64-linux-gnu binutils-aarch64-linux-gnu
libstdc++-8-dev-arm64-cross
The new files are installed under the /usr/aarch64-linux-gnu. directory This directory is the (logical) root directory of the target system. It contains the usual bin, lib, and include directories. The cross-compilers (aarch64-linux-gnu-gcc-8 and aarch64-linux-gnu-g++-8) know about this directory.
Cross-compiling on other systems
If your distribution does not come with the required toolchain, then you can build it from source. The gcc and g++ compilers must be configured to produce code for the target system and the binutils tools need to handle files for the target system. Moreover, the C and the C++ library need to be compiled with this toolchain. The steps vary with the used operating systems and host and target architecture. On the web, you can find instructions if you search for gcc cross-compile <architecture>.
With this preparation, you are almost ready to cross-compile the sample application (including the LLVM libraries) except for one little detail. LLVM uses the tablegen tool during the build. During cross-compilation, everything is compiled for the target architecture, including this tool. You can use llvm-tblgen from the build of Chapter 1, Installing LLVM, or you can compile only this tool. Assuming you are in the directory that contains the clone of the GitHub repository, type this:
$ mkdir build-host
$ cd build-host
$ cmake -G Ninja
-DLLVM_TARGETS_TO_BUILD="X86"
-DLLVM_ENABLE_ASSERTIONS=ON
-DCMAKE_BUILD_TYPE=Release
../llvm-project/llvm
$ ninja llvm-tblgen
$ cd ..
These steps should be familiar by now. A build directory is created and entered. The CMake command creates LLVM build files for the X86 target only. To save space and time, a release build is done but assertions are enabled to catch possible errors. Only the llvm-tblgen tool is compiled with Ninja.
With the llvm-tblgen tool at hand, you can now start the cross-compilation. The CMake command line is very long so you may want to store the command in a script file. The difference from previous builds is that more information must be provided:
$ mkdir build-target
$ cd build-target
$ cmake -G Ninja
-DCMAKE_CROSSCOMPILING=True
-DLLVM_TABLEGEN=../build-host/bin/llvm-tblgen
-DLLVM_DEFAULT_TARGET_TRIPLE=aarch64-linux-gnu
-DLLVM_TARGET_ARCH=AArch64
-DLLVM_TARGETS_TO_BUILD=AArch64
-DLLVM_ENABLE_ASSERTIONS=ON
-DLLVM_EXTERNAL_PROJECTS=tinylang
-DLLVM_EXTERNAL_TINYLANG_SOURCE_DIR=../tinylang
-DCMAKE_INSTALL_PREFIX=../target-tinylang
-DCMAKE_BUILD_TYPE=Release
-DCMAKE_C_COMPILER=aarch64-linux-gnu-gcc-8
-DCMAKE_CXX_COMPILER=aarch64-linux-gnu-g++-8
../llvm-project/llvm
$ ninja
Again, you create a build directory and enter it. Some of the CMake parameters have not been used before and need some explanation:
- CMAKE_CROSSCOMPILING set to ON tells CMake that we are cross-compiling.
- LLVM_TABLEGEN specifies the path to the llvm-tblgen tool to use. This is the one from the previous build.
- LLVM_DEFAULT_TARGET_TRIPLE is the triple of the target architecture.
- LLVM_TARGET_ARCH is used for just-in-time (JIT) code generation. It defaults to the architecture of the host. For cross-compiling, this must be set to the target architecture.
- LLVM_TARGETS_TO_BUILD is the list of target(s) for which LLVM should include code generators. The list should at least include the target architecture.
- CMAKE_C_COMPILER and CMAKE_CXX_COMPILER specify the C and C++ compilers used for the build. The binaries of the cross-compilers are prefixed with the target triple and are not found automatically by CMake.
With the other parameters, a release build with assertions enabled is requested and our tinylang application is built as part of LLVM (as shown in the previous section). After the compilation process is finished, you can check with the file command that you have really created a binary for ARMv8. Run $ file bin/tinylang and check that the output says that it is an ELF 64-bit object for the ARM aarch64 architecture.
Cross-compiling with clang
As LLVM generates code for different architectures, it seems obvious to use clang to cross-compile. The obstacle here is that LLVM does not provide all required parts; for example, the C library is missing. Because of this, you have to use a mix of LLVM and GNU tools, and as a result you need to tell CMake even more about the environment you are using. As a minimum, you need to specify the following options for clang and clang++: --target=<target-triple> (enables code generation for a different target), --sysroot=<path> (path to the root directory for the target; see previous), I (search path for header files), and –L (search path for libraries). During the CMake run, a small application is compiled and CMake complains if something is wrong with your setup. This step is sufficient to check if you have a working environment. Common problems include picking the wrong header files, link failures due to different library names, and the wrong search path.
Cross-compiling is surprisingly complex. With the instructions from this section, you will be able to cross-compile your application for a target architecture of your choice.
Summary
In this chapter, you learned about the projects that are part of the LLVM repository and the common layout used. You replicated this structure for your own small application, laying the foundation for more complex applications. As the supreme discipline of compiler construction, you also learned how to cross-compile your application for another target architecture.
In the next chapter, the sample language tinylang will be outlined. You will learn about the tasks a compiler has to do and where LLVM library support is available.