
You are now into the home stretch of this book. If you have kept up with me thus far, you should have set up push notifications for both iOS and Android builds in the last chapter. In this chapter, I will show you how to run UI tests and view the results on actual physical devices in the cloud!
Are you excited yet? You should be because this chapter is not just about UI testing; it is about saving you money! If you are single developer creating an app or an enterprise with a team of developers and testers, after designing, developing, and distributing your app, every developer or team will reach the last phase of the DevOps cycle: testing.
Nevertheless, I do want to make one point clear before jumping into this chapter. I am not going to sugar-coat the challenges lying ahead for you. This chapter by far is the most difficult chapter in this entire book. Be prepared to configure a lot of settings—and try and fail multiple times. To be honest, I did not keep count, but I think I may have tried and failed close to 100 times before I got the UI tests to work successfully for the first time! Don’t worry. We will get through this chapter together. Be mentally prepared for multiple trials and mistakes, but hopefully, my repeated trials and mistakes with UI testing will save you from several hours of trying the wrong things.
How to configure projects for Xamarin.UITest
How to set up device sets in App Center
How to configure the CLI command in the post-build script
How to use App Center variables
How to set up post-build scripts to run in App Center
How to save the access token into an environment variable
How to get the UITest command template
How to configure the iOS UITest command to test in App Center
How to configure the Android UITest command to test in App Center
How to run UI tests asynchronously in App Center
How to use REPL to make writing UI tests easier
Why Choose App Center for UI Testing?
Door #1: Test on simulators. Publish it to the app stores, and hope that it works on every configuration out there.
Door #2: Buy the most common or popular devices on the market currently and test on those devices before publishing. If it works on the best devices, hope that it works on older devices.
Door #3: Pick a cloud provider like App Center that maintains almost every possible phone on the market and stays current and relevant with upcoming phones and operating system releases. Even though a cloud provider will charge you a monthly fee, it will save you money in the long run because you do not have to keep buying phones. And you can be confident these UI tests are run on actual physical devices and not just simulators.
It should be fairly obvious what door should be the least risky and least expensive for you, but I will break down the logic for you. If you pick door #1, you cannot know with 100% certainty if your app will behave as expected on every phone and every phone factor. If you risk it and your app misbehaves, you risk the chance that one errant UI design like a button too small for pressing or a panel not showing will give your users a bad experience. Bad experience means bad reviews and fewer downloads. Bad reviews can be a death sentence for a mobile app. Door #1 is a foolish choice.
Door #2 is viable but not a wise choice either because it is expensive to own and manage multiple physical phones. In order to develop the app I wrote for this book, I personally own two iPhones, an Android and an iPad Mini. Clearly, I could not possibly purchase every device, especially Android devices, which is why I had to rely on App Center to test on most flavors of Android on the market now. And do not forget you will rack up costs because phone devices go obsolete quickly because manufacturers release new phones into the market constantly.
Pick and choose phones across years, operating systems, or physical form factors and organize them into device sets.
See your test runs on clear and beautiful dashboards.
See actual screenshots of your app running on physical devices in the cloud.
View test results and logs to understand where and why your app failed on a device.
Before you dive in to the actual configuration and UI testing, let’s get a couple of important concepts out of the way.
Pricing
Let’s get the bad news out of the way first. Nothing is free forever! Microsoft wants to give you a taste of how App Center UI testing works. You get unlimited free tests on a single concurrency for the first 30 days, meaning you can run UI tests on one device at a time, so go wild with as many UI tests as you want during this time. Hopefully, if you follow my instructions in this chapter, you can shave off a significant number of repeated attempts to get it working right, thus giving you more of the trial period to write your own UI tests.
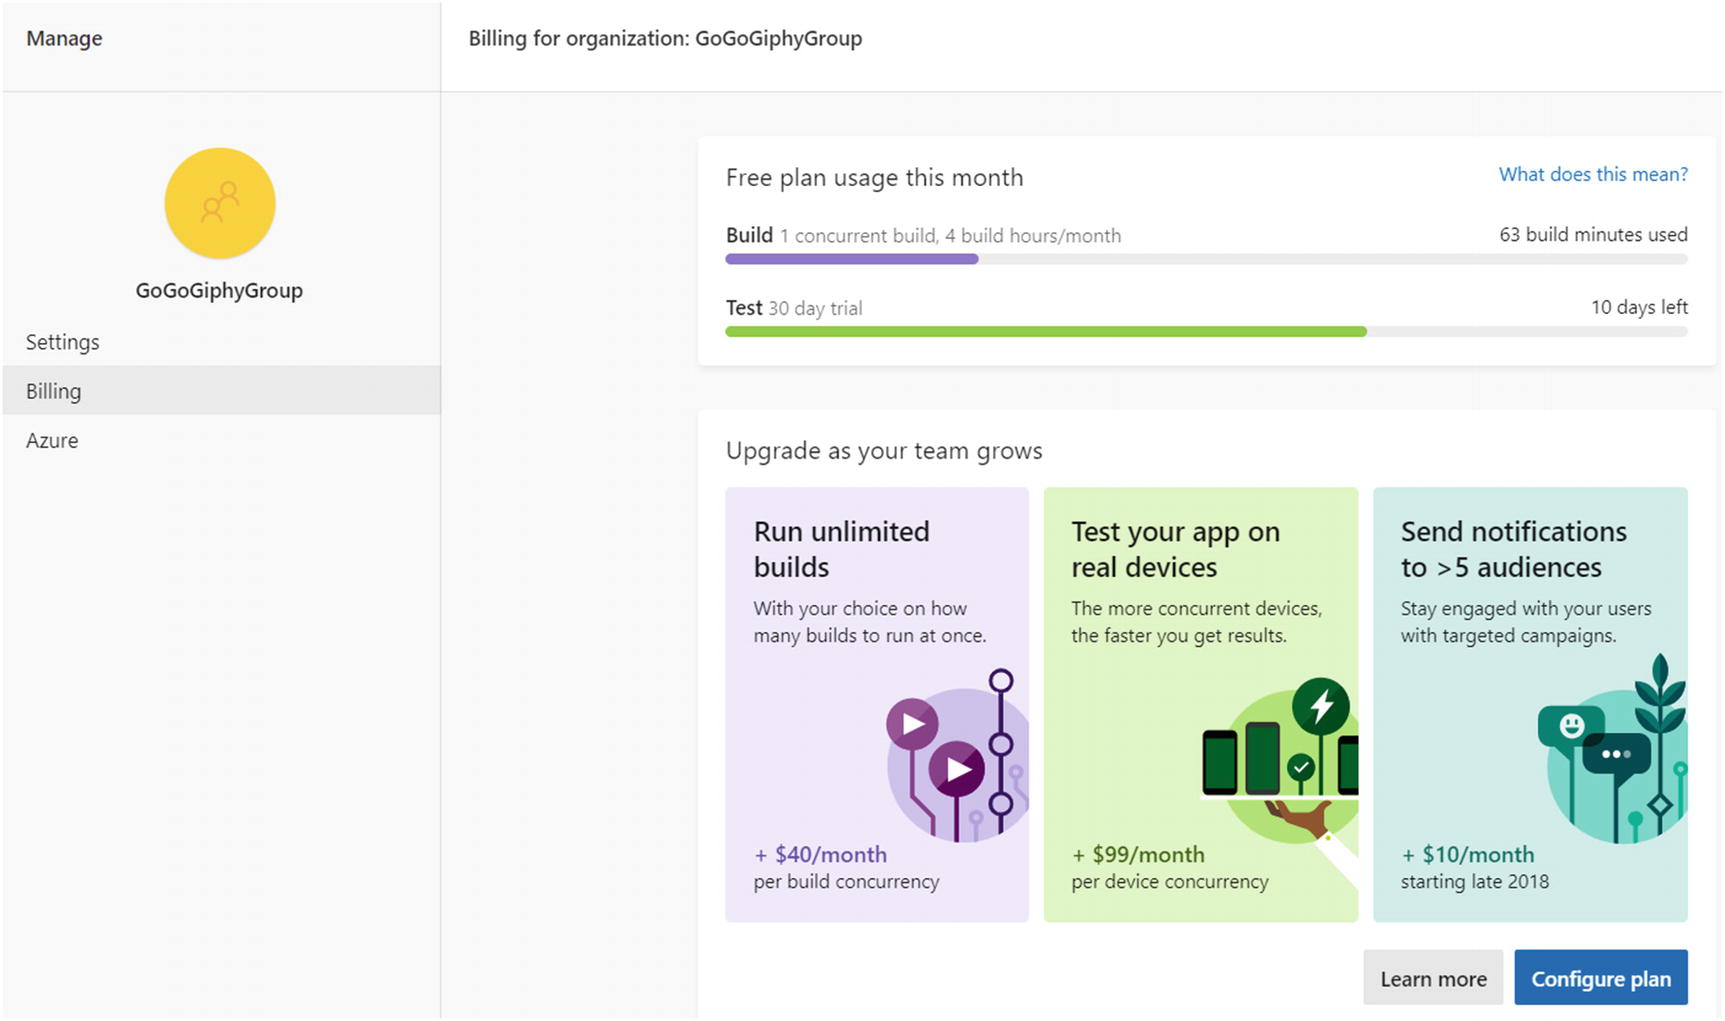
Billing and pricing information
You can click the Learn more button, which will take you to the Pricing site. Please read through the FAQs before committing to any of the subscription plans because they do provide useful information.
10 X (3 + 3) = 60 minutes
Microsoft will not bill you based on time spent downloading your app, taking screenshots, or generating test reports. Billed time is actual time spent running your test suites.
You can visit the sites below to learn more about pricing. These pages have more information on how Microsoft bills you if you want to use concurrent builds.
Migration
Several important events occurred in 2018. If you were a Xamarin mobile developer before 2018, you may have used Xamarin’s important services and applications as part of your DevOps pipeline, such as Xamarin Test Cloud and the Xamarin Test Recorder. After Microsoft’s acquisition of Xamarin, the company slowly integrated Test Cloud into App Center so now it longer exists on its own. It is all part of the App Center ecosystem of services. In fact, if any of your former apps hit https://testcloud.xamarin.com/ , you will get redirected to the App Center site. This migration includes all calls to the Test Cloud CLI because those calls will now get rerouted to the App Center CLI. And this migration includes migration of all existing data in Test Cloud into App Center.
On a sad note, Microsoft discontinued development and support for Xamarin Test Recorder, including the Visual Studio extension on Windows. If you remember what this extension was about, it watched and recorded all your actions on the app so you could paste them as actions for your UI tests. This app made the process of creating UI tests effortless. As one of the most loved tools among Xamarin developers, it is also one of the most missed. App Center does provide another tool called Repl, which I will cover later in this chapter. Honestly, if you ask me, it does not do justice to Test Recorder because Test Recorder was easier to use since it offered a GUI. But don’t get me wrong. The Repl tool is handy tool in its own right because you can still do most of the operations of Test Recorder, just through a console interface.
You can read more about Microsoft’s events and important notices about their migration from older frameworks to App Center at https://docs.microsoft.com/en-us/appcenter/migration/test-cloud/ .
Configuring Projects for Xamarin.UITest
As mentioned at the start, this book is not about teaching you how to write a Xamarin app. Similarly, this chapter is not about teaching you how to write UI tests. You should have a basic understanding of UI testing coming into this chapter.
Appium
Espresso
Calabash (future deprecation)
Xamarin.UITest
XCUITest
Please visit https://docs.microsoft.com/en-us/appcenter/test-cloud/preparing-for-upload/ to learn more about each framework.
Testing on every framework gets redundant and is out of scope for this chapter, so I will show you how to write, integrate, and run UI tests using the Xamarin UITest framework.
Furthermore, if you are coming from another mobile development background like React Native, Cordova, or Unity, even though this book is about App Center using Xamarin Forms, I will show you the steps to run UI tests using the App Center CLI. Developers from other platforms should get value from this chapter because the CLI commands are identical on every platform.
Since you have been following along using the sample app from my GitHub repository, refer to the GoGoGiphy.UITest project in the Visual Studio solution. This project has multiple sample UI tests and some tests that you will run in App Center.
Installing the Necessary NuGet Packages
Right-click the project and select Manage NuGet Packages.
Go to Browse and search for Xamarin.UITest. Install the package.
Return to Browse, search for NUnit, and install version 2.6.4, since at the time of this writing, version 2.6.4 is the latest version of NUnit that is compatible with Xamarin.UITest. If you install a later version of NUnit, your UI tests in later sections will fail because Xamarin.UITest will ask for this version. In the future, the Xamarin team may update Xamarin.UITest to reference a later version of NUnit.
Return to Browse, search for NUnitTestAdapter, and install the latest version.
Your NuGet packages and their versions should be similar to Figure 6-2.

NuGet packages
Setting Up Android
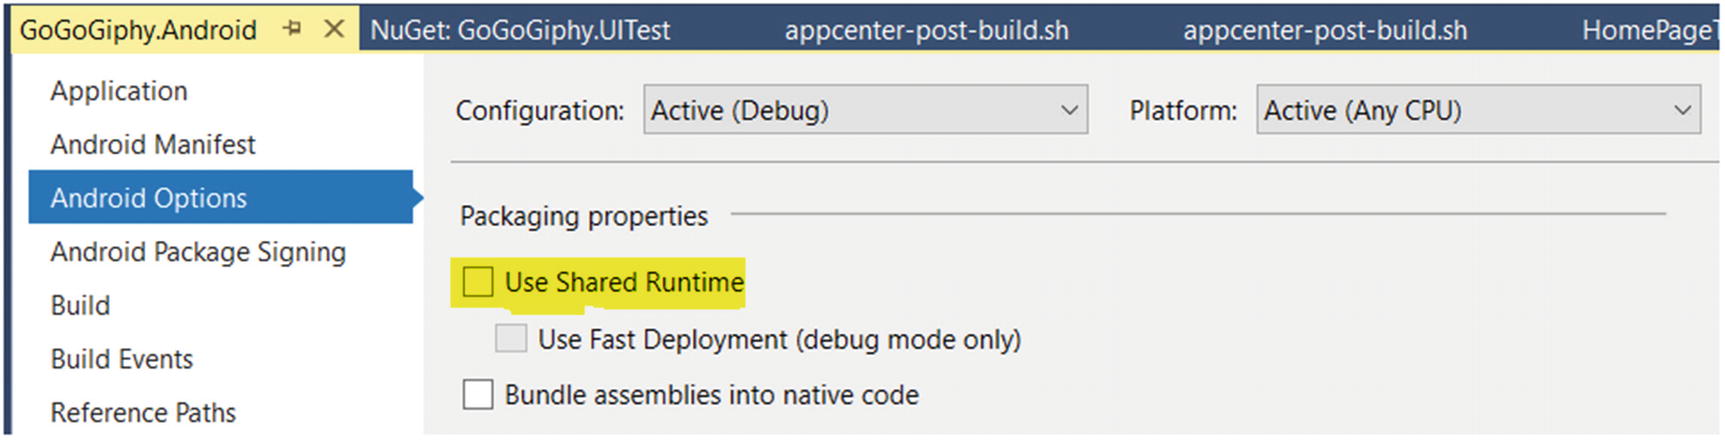
You need to disable the Use Shared Runtime setting in Android before running tests. What is this setting? This setting and its child setting, Use Fast Deployment, help manage and optimize the application size when deploying a Debug version of the app. A Debug version of the app deploys two large packages, Shared Runtime and Shared Platform, to the physical device. This setting allows you to deploy the Shared Runtime package once and every subsequent Debug version of the app reuses the package. In summary, it speeds up your deployment. You can find more information about this setting at https://docs.microsoft.com/en-us/xamarin/android/deploy-test/app-package-size .
But if this setting is enabled when the code is committed before running the Android build in App Center, it will prevent any UI tests from running. Therefore, you need to disable it before running any Android builds.
Right-click the Android project.
Go to Properties.
Go to the Android Options tab.
Unselect the Use Shared Runtime option, as shown in Figure 6-3.
Disabling the Use Shared Runtime option in Android properties
You can find more information about this setting at https://docs.microsoft.com/en-us/appcenter/test-cloud/preparing-for-upload/uitest .
Setting Up iOS
Setting up your iOS project is a little more involved than with Android. The first step is to download and install the Xamarin Test Cloud NuGet package. The Test Cloud agent runs an HTTP server that exposes the iOS user interface so you can interact with it from your UI tests.
Right-click the iOS project and select Manage NuGet Packages.
Go to Browse, search for Xamarin.TestCloud.Agent, and install the latest version.
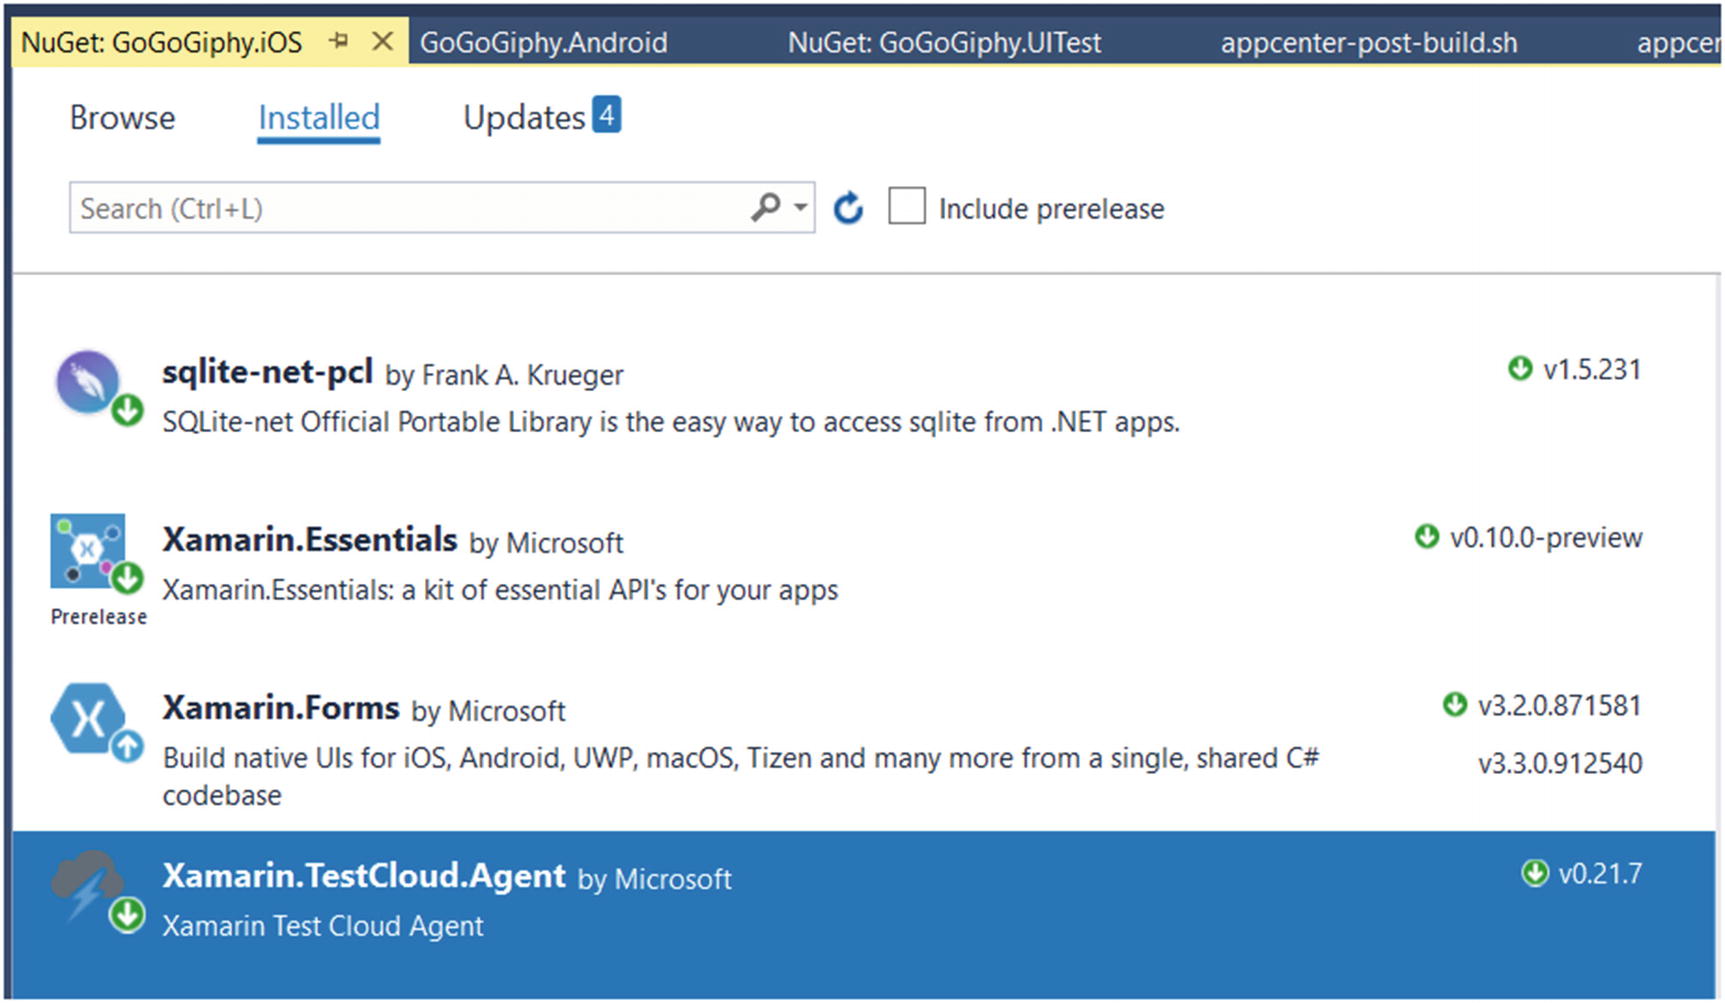
Xamarin.TestCloud.Agent NuGet package
The second step is to add a new conditional compilation symbol named ENABLE_TEST_CLOUD in the Build properties for the iOS project. This symbol instructs the iOS project to look for this additional symbol during the build when it creates the .IPA artifact according to the active build configuration. You will launch the Test Cloud Agent in the next section. You want to encapsulate this launching code within a condition so it only launches the agent for a debug build and not a release build.
Right-click iOS project.
Go to Properties.
Go to Build tab.
Add ENABLE_TEST_CLOUD to the end of the text in the compilation symbols textbox, as shown in Figure 6-5.
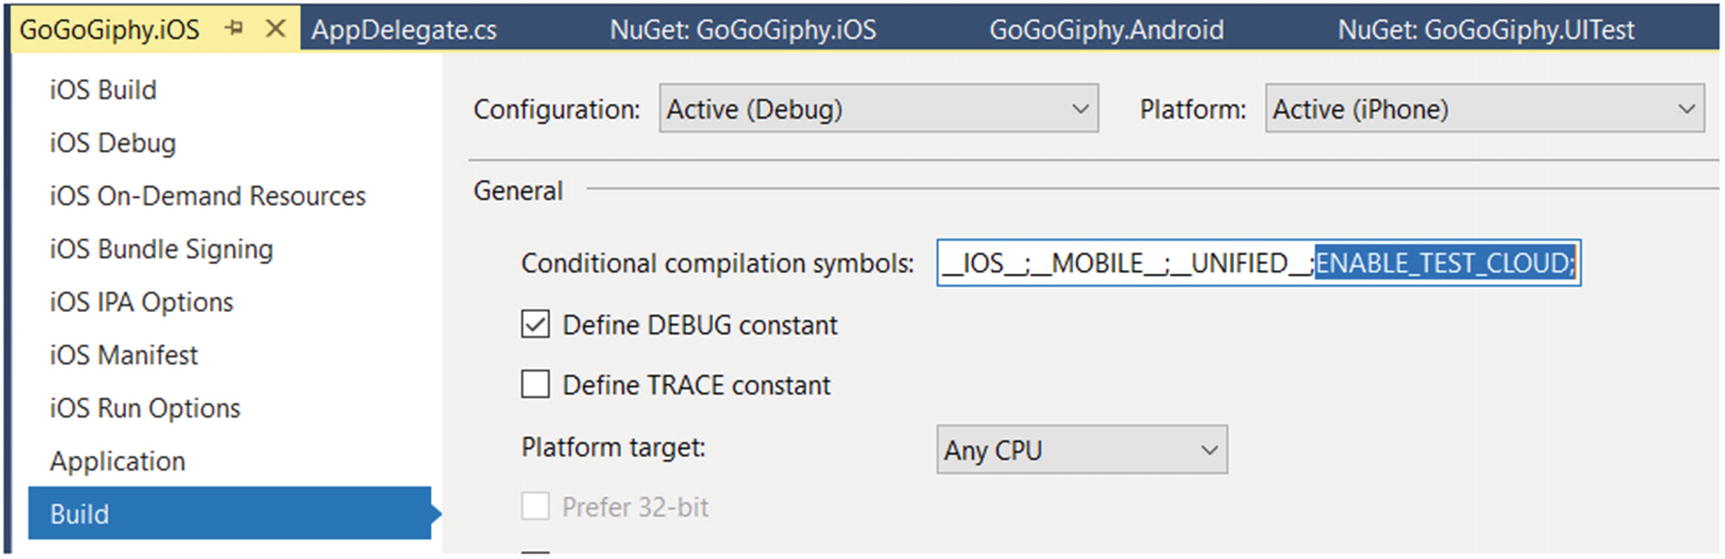
Adding the ENABLE_TEST_CLOUD conditional compilation symbol
The conditional compilation symbol ensures that the Test Cloud Agent only launches for Debug builds. The Test Cloud Agent only works on apps that are signed with a development provisioning profile. When running a UI test on your iOS app in App Center, the service will use one of their preexisting development provisioning profiles to sign your app before running. The above #if statement ensures that the Test Cloud Agent will launch when an App Center provisioning profile is used to sign your app before running a UI test.
Note
Remember that you cannot execute and run UI tests locally on Windows using the iOS Simulator. But you can run them locally on a Mac. From a Windows machine, you need to upload your UI tests to App Center to run your iOS tests. The best workflow tip is to run your Android tests locally on Windows against the Android simulator, upload your tests, run both Android and iOS builds in App Center, and verify that your iOS tests run as expected. The UI tests themselves will be identical for both platforms. The only difference is the attributes you apply to each UI test function to differentiate between the platforms. You will see this attribute later.
Installing the App Center CLI Locally
This section is not a mandatory section to run your UI tests. It is optional because you will run your UI tests using build scripts in App Center servers later in this chapter, but the commands are the same CLI commands described in this section. However, your UI tests will not work locally against App Center because the UI test commands use path references on the server and not your local system.
But this section is important because the CLI gives you the ability to query and execute multiple actions in App Center from a terminal window and not logging into the website. If you ever want to automate App Center from a PowerShell script or a .NET application, CLI is the answer. At the time of this writing, not all services that you can perform on the website are supported on the CLI, but the App Center team is adding more and more commands to the CLI all the time, which is part of the reason why I devote a small section to this topic.
You can read more about the CLI documentation and its commands at https://github.com/Microsoft/appcenter-cli and https://docs.microsoft.com/en-us/appcenter/cli/index .
Verify you have Node.js 8+ installed from Chapter 1. Remember to install Version 8.0 or higher. If not, please download and install the latest version from https://nodejs.org/en/ .
After installing NodeJS, use the following command to install the AppCenter CLI locally:
npm install -g appcenter-cli
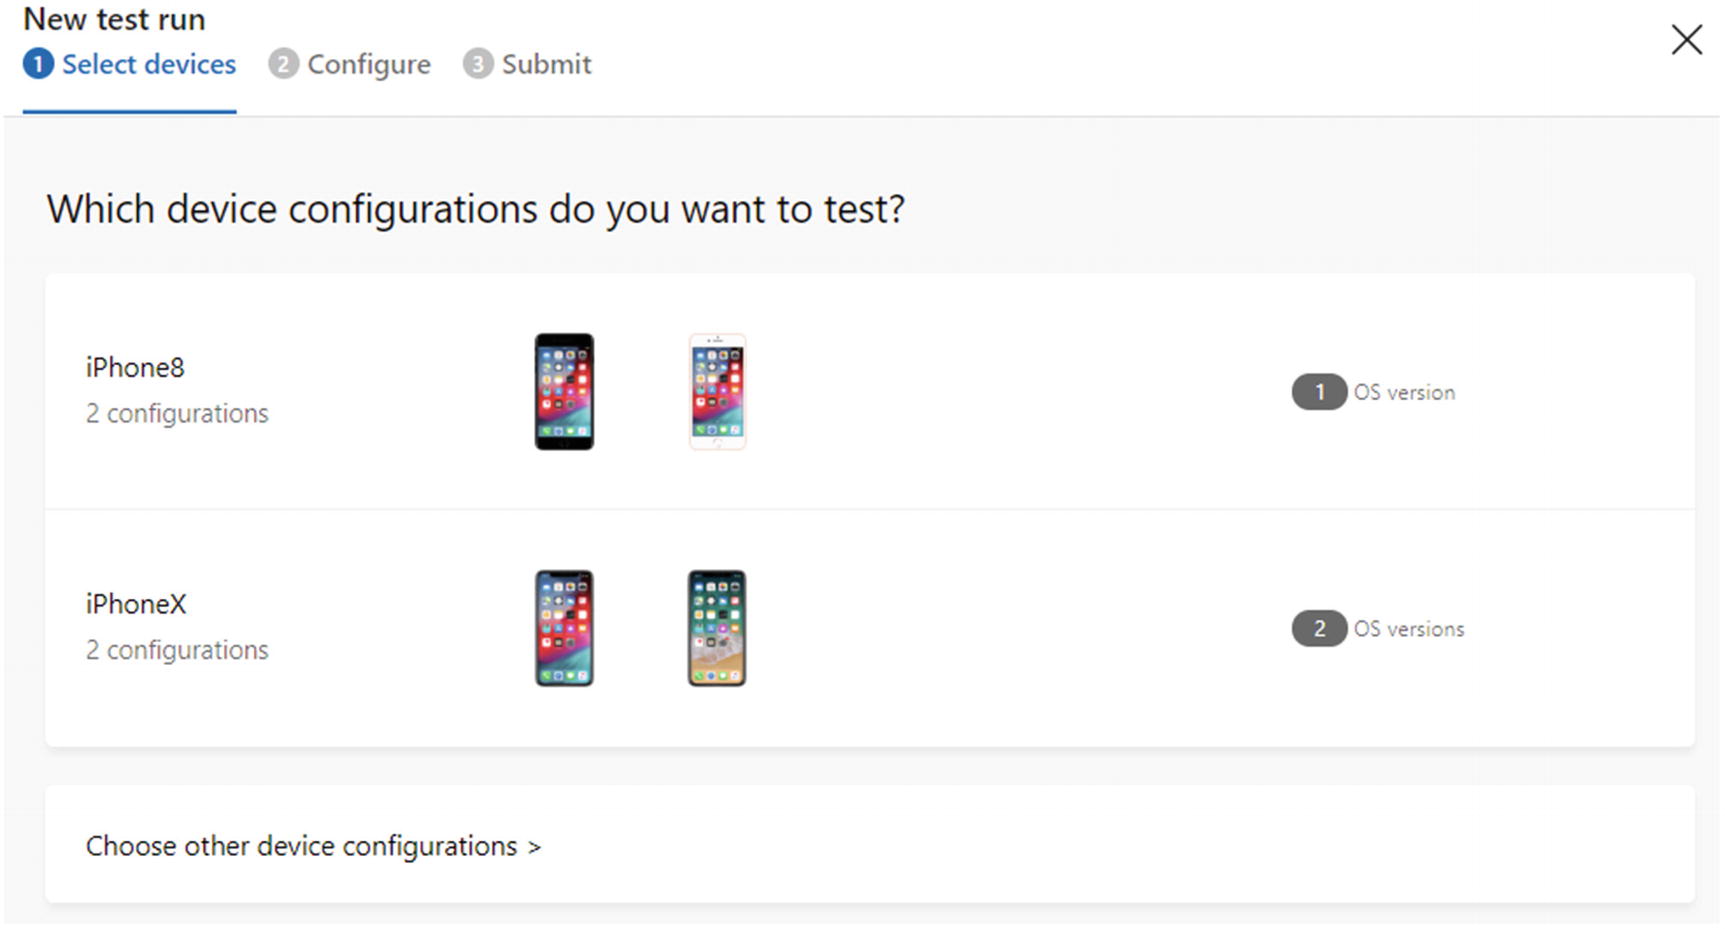
Setting Up Device Sets in App Center
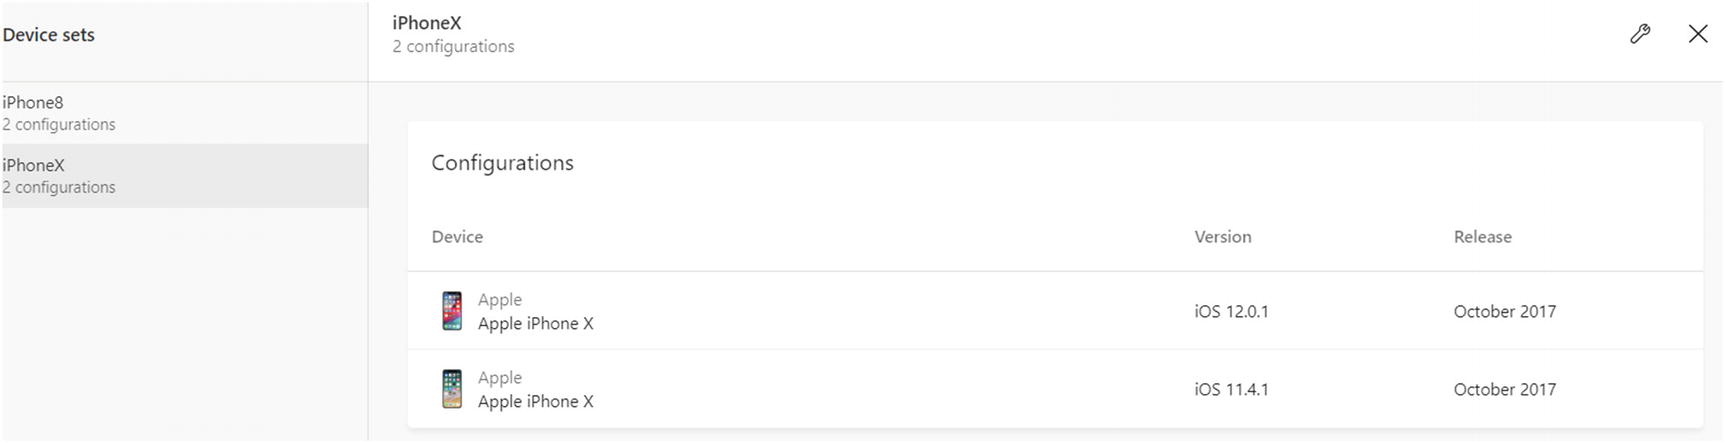
App Center lets you set up your own device sets where you can organize what devices your tests will run on. For example, one device set may be called Tier 1 and it may contain the most recently released phones on the market. A device set called iPhoneX may include all the iPhone X devices and the separate iOS versions. Remember to name them something descriptive. At the time of this writing, iPhone X was the biggest cat in the jungle in the Apple family of phone products.

Test device sets

New device set

Selecting devices in a device set
New device set for iOS
In Figure 6-9, you can see another device set for iPhone 8 devices. I will leave it to you set one up for yourself.
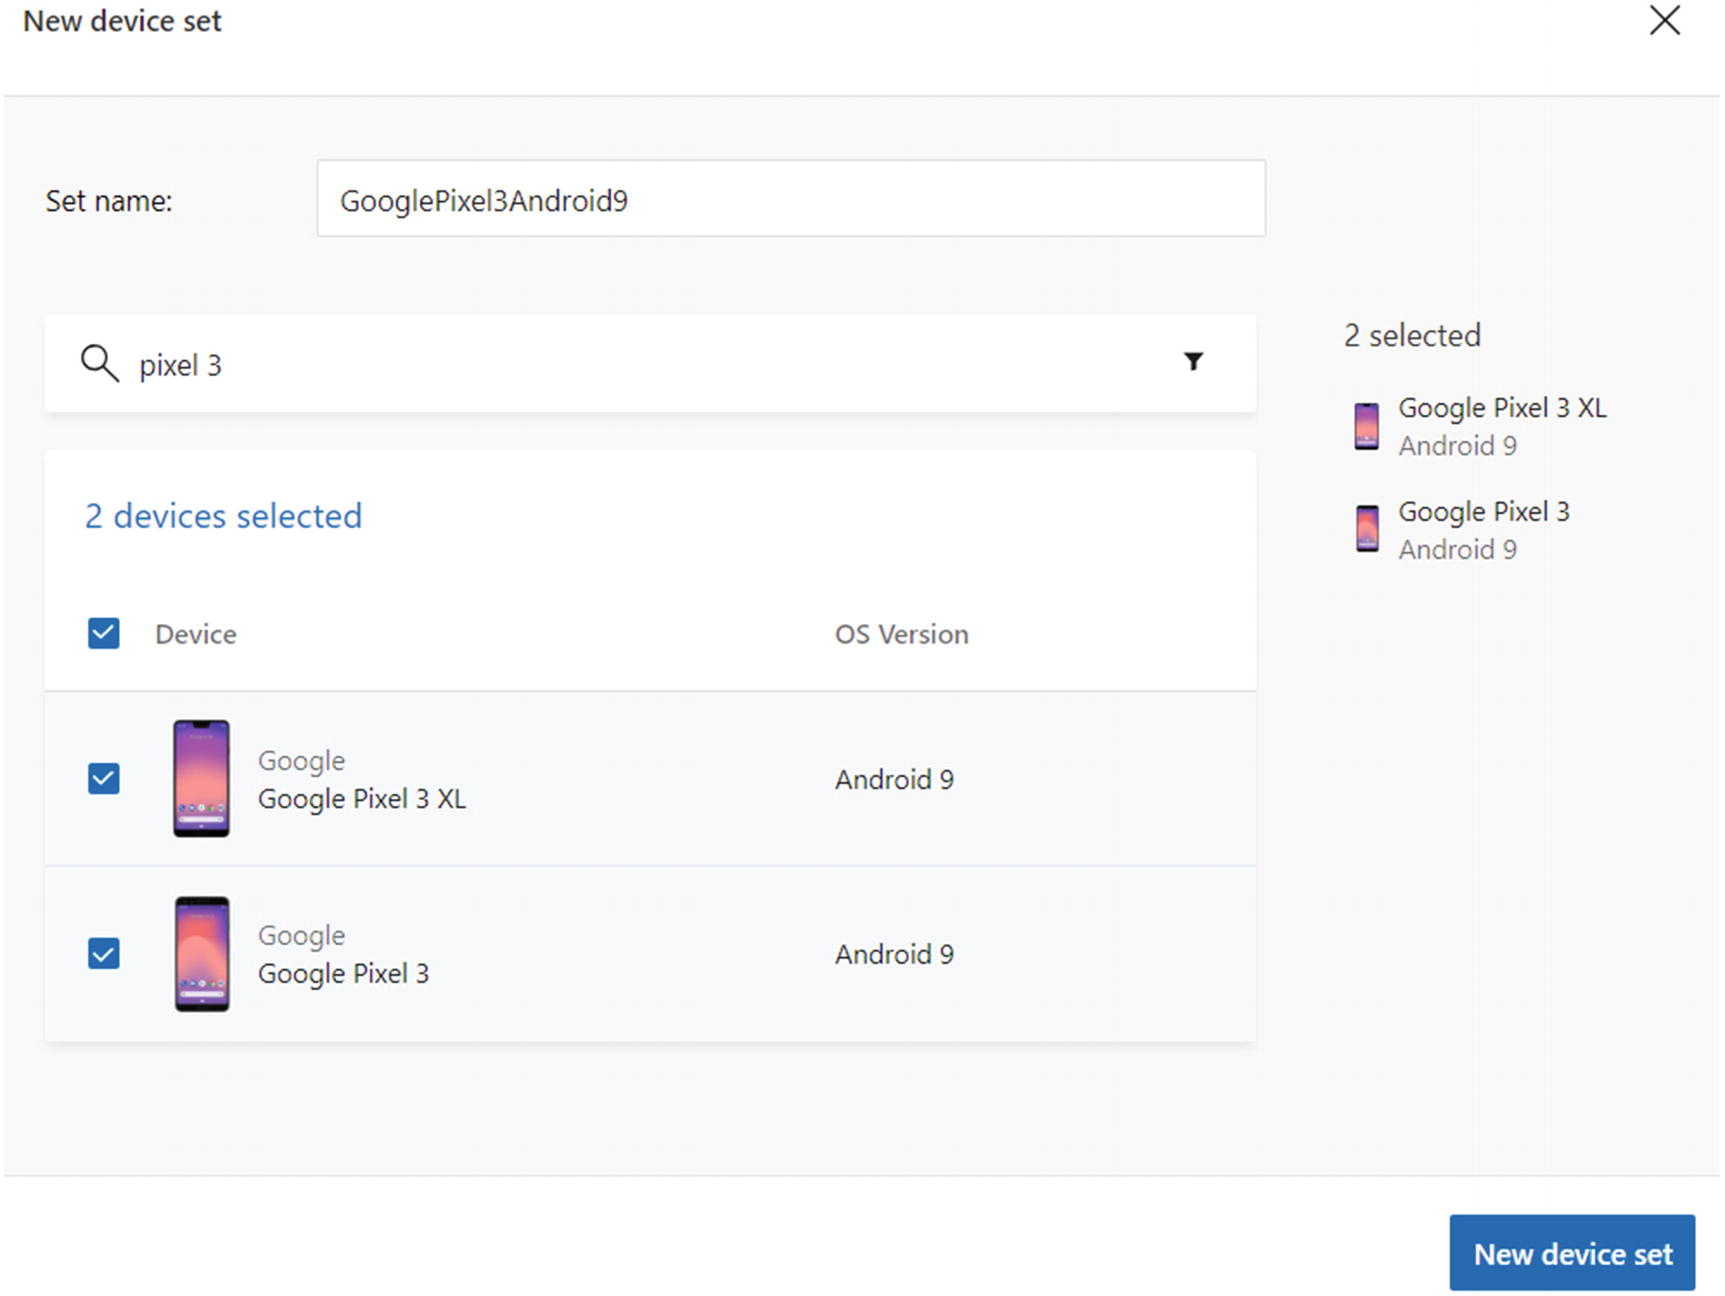
Selecting Android devices

New device set for Android
You can see the complete list of supported physical devices at https://docs.microsoft.com/en-us/appcenter/test-cloud/devices .
About App Center Variables
As mentioned, the App Center CLI commands will run within Bash scripts on the App Center server. The commands will be included in the post-build script because you want the UI tests to run after the projects have been built.
APPCENTER_SOURCE_DIRECTORY: | Location of the source code on the build machine |
|---|---|
APPCENTER_OUTPUT_DIRECTORY: | Location where the build results are stored |
App Center provides more system variables that you can read about at https://docs.microsoft.com/en-us/appcenter/build/custom/scripts/#app-center-variables .
Setting Up Post-Build Scripts
Post-clone: This script runs after the code repository is cloned but before the build runs
Pre-build: This script runs before the build starts but after dependencies like NuGet packages are installed
Post-build: This script runs after the build finishes and the artifacts are copied to the output folder
You can find more information about build scripts at https://docs.microsoft.com/en-us/appcenter/build/custom/scripts/ .
Microsoft also maintains a public GitHub repository offering helpful examples of build scripts at https://github.com/Microsoft/appcenter-build-scripts-examples .
For the purpose of UI testing, you will set up two post-build scripts, one for iOS and one for Android. You will return later to these scripts and enter your commands to run in App Center, recommit, and repeat. Trust me. You will find yourself testing these commands repeatedly to see the output in App Center.
Keep in mind that the commands in these scripts are written in the Bash language. Don’t worry if you do not know Bash because the commands that you will use in this chapter are simple and easy to follow.
Open the Start sub-folder in your Git folder. Open the solution file in Visual Studio. In the Solution Explorer, you will find two files replicated in two places, one in the root location and the second in the Android project. The first file is called appcenter-post-clone.rename for the Post-Clone script and the second file is named appcenter-post-build.rename for the Post-Build script. Later in this chapter, you will rename the file extension to “.sh” so App Center can recognize the Bash script.
Add Caption

Post-build script for iOS

Post-build script for Android
Note
Verify that the filename is exactly appcenter-post-build.sh. Otherwise, the App Center build will not detect the file.
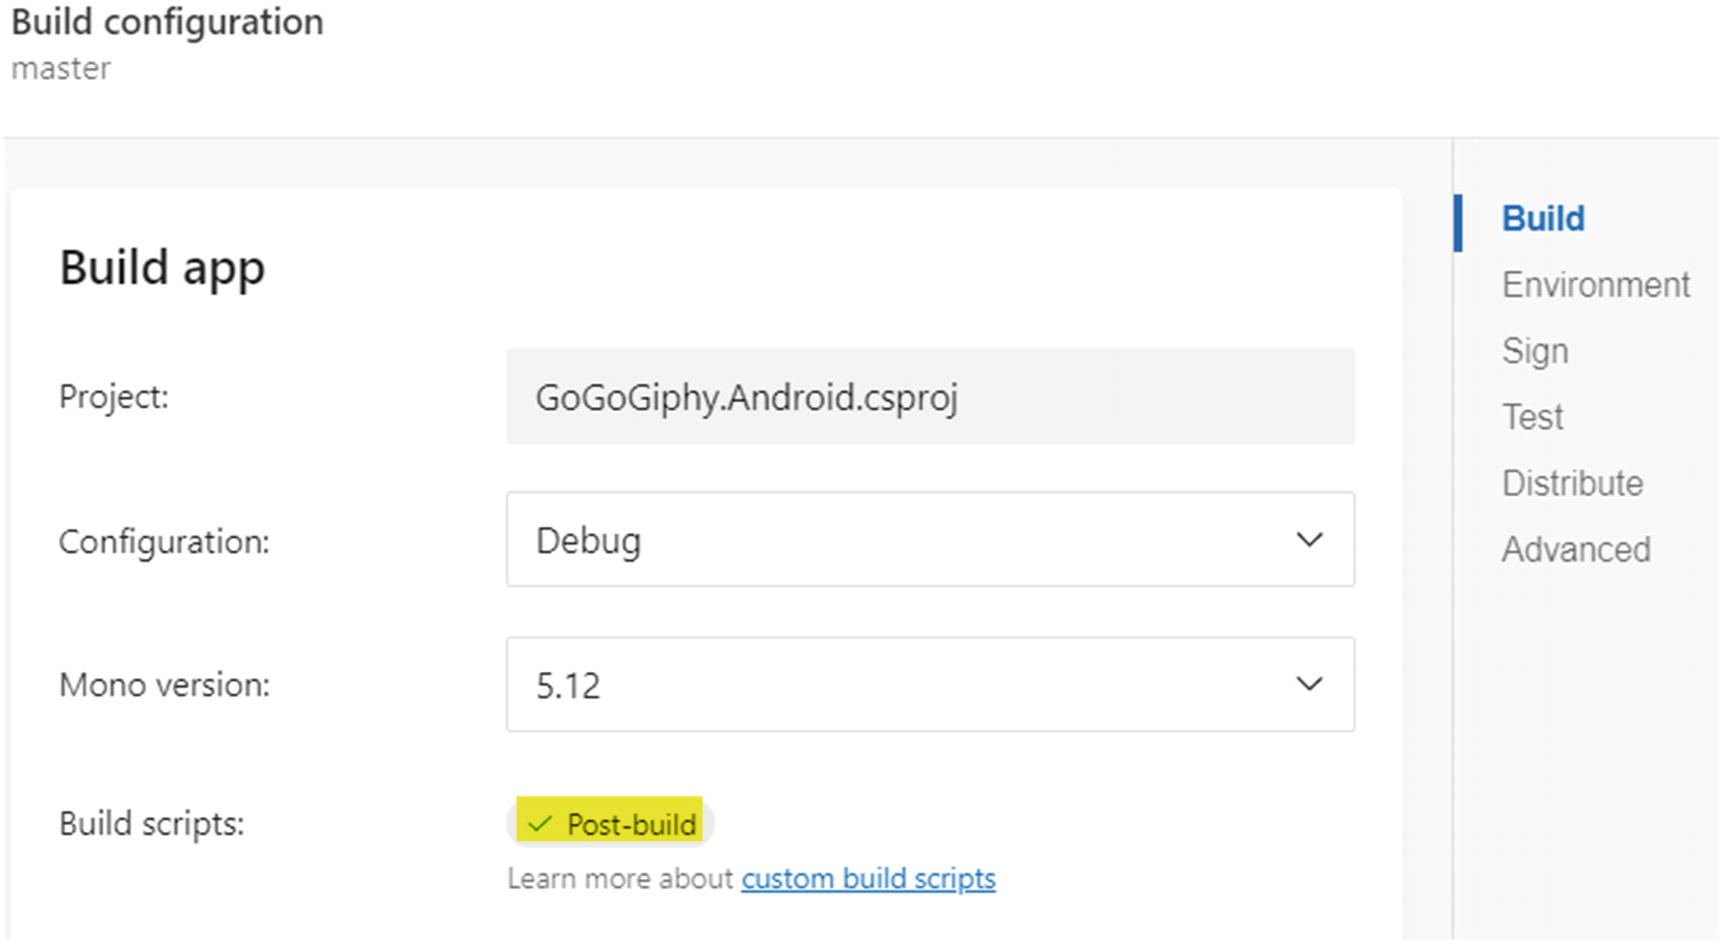
Android build definition showing the post-build label
Note
After App Center detects the build script, save both the Android and iOS build definitions. If you simply run the build without saving, the build will not include the script as part of the build.

Downloading the logs
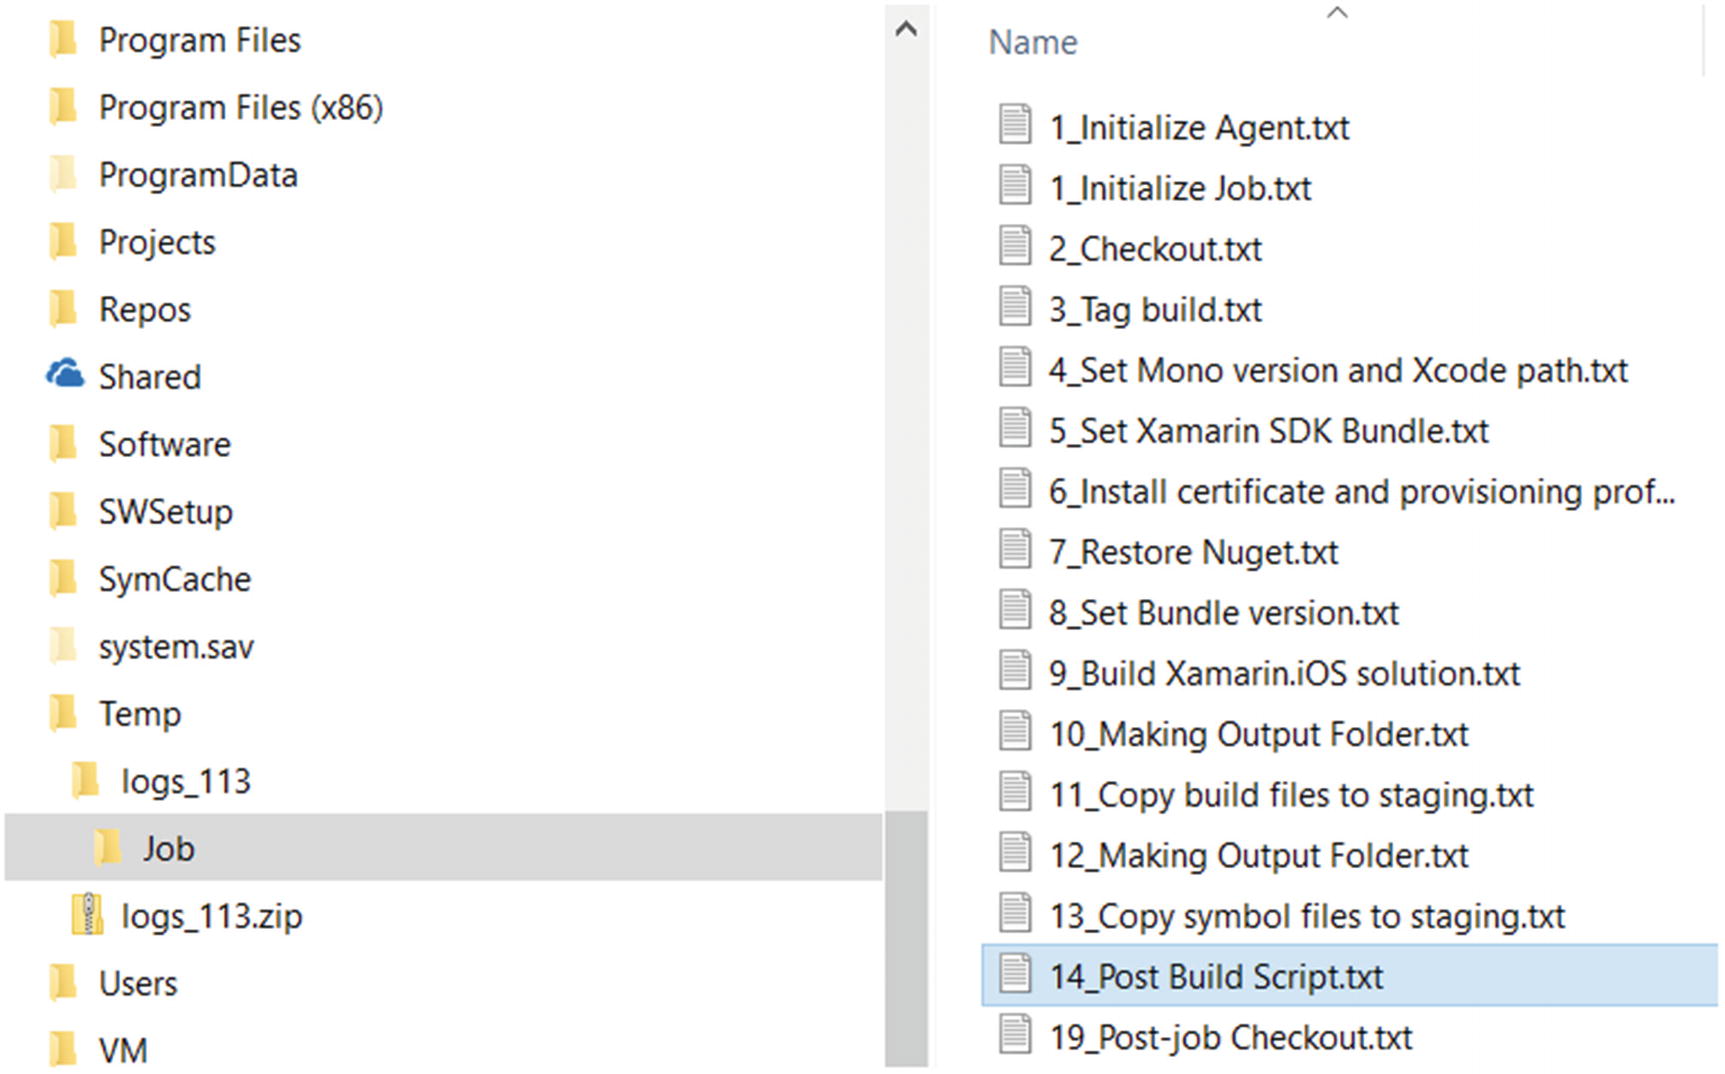
The Post Build Script.txt log file
Saving the Access Token into an Environment Variable
Since every call to the UITest command will require a login from App Center for security purposes, you need to authenticate yourself with App Center first to prove that you are an authorized user of the service. As a result, you need to automate this step by saving the access token as an environment variable and passing in the access token when invoking the UITest command.
I covered the steps of saving the access token back in Chapter 4. If you forgot the steps or if you forgot to save the value of the token, please revisit the chapter again.
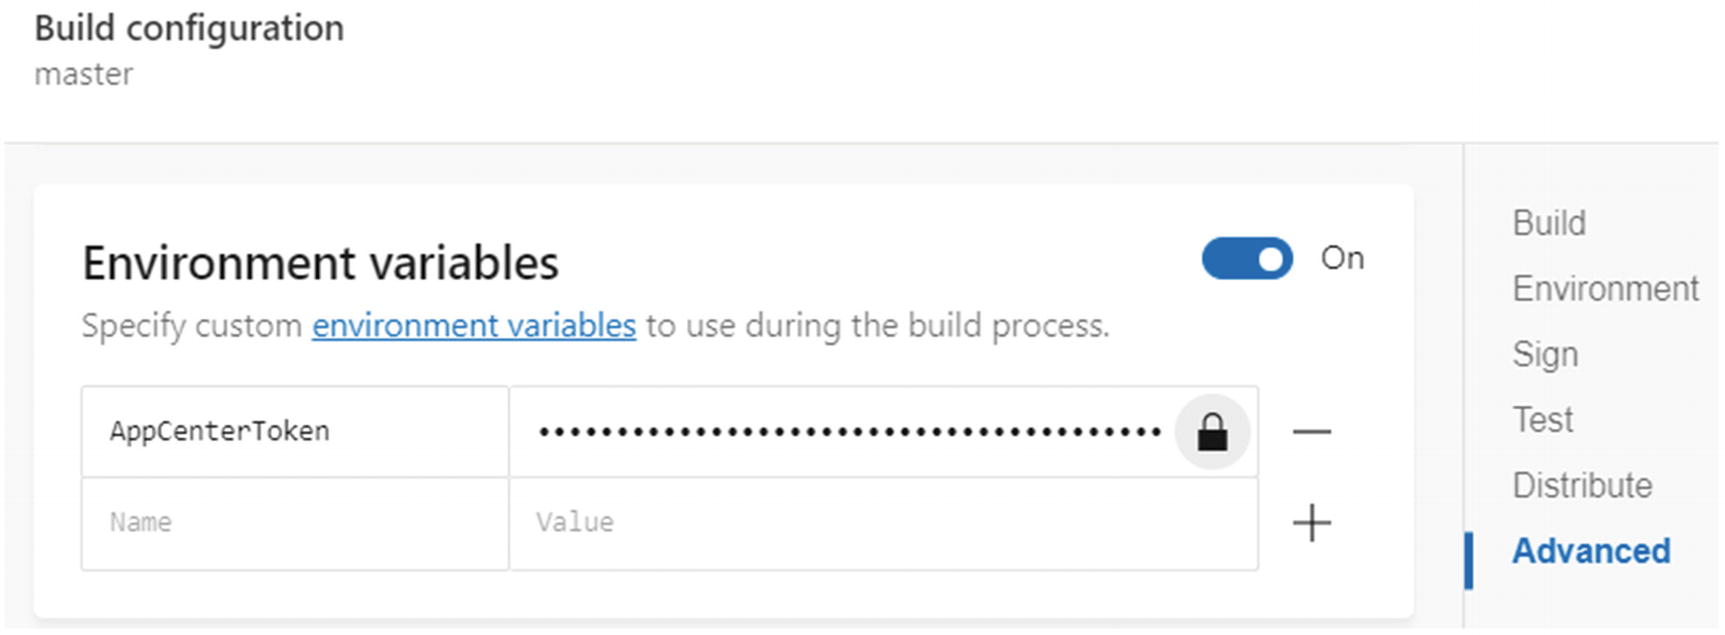
Saving the token as an environment variable
Open either the Android or the iOS build definition.
Toggle the Environment variables section to On.
Give the variable a name like AppCenterToken.
Paste the value of the token.
Click the lock icon to redact the value because you do not want other members of your team to see this value when they open the build definition.
Click Save.
Repeat the above steps for the other build definition, iOS or Android.
You can always click the environment variables link in App Center, shown in Figure 6-17, to learn more about them.
Note the use of the $ before the name of the variable.
Testing on a Real Device
I know, I know. You want to get UI testing already. But you have one last topic to get out of the way so you know what it is about and how it is different from UI testing. App Center gives you the option of launching your app on various devices just to verify it launches successfully.
Keep in mind a couple of things about this step. First, it will not run your post-build script and has nothing to do with running UI tests in App Center. Second, it will add about 10 minutes to your normal build time. This step is helpful when you build an app for the first time and you want to know quickly if it launches on various preconfigured devices.

Testing on a real device
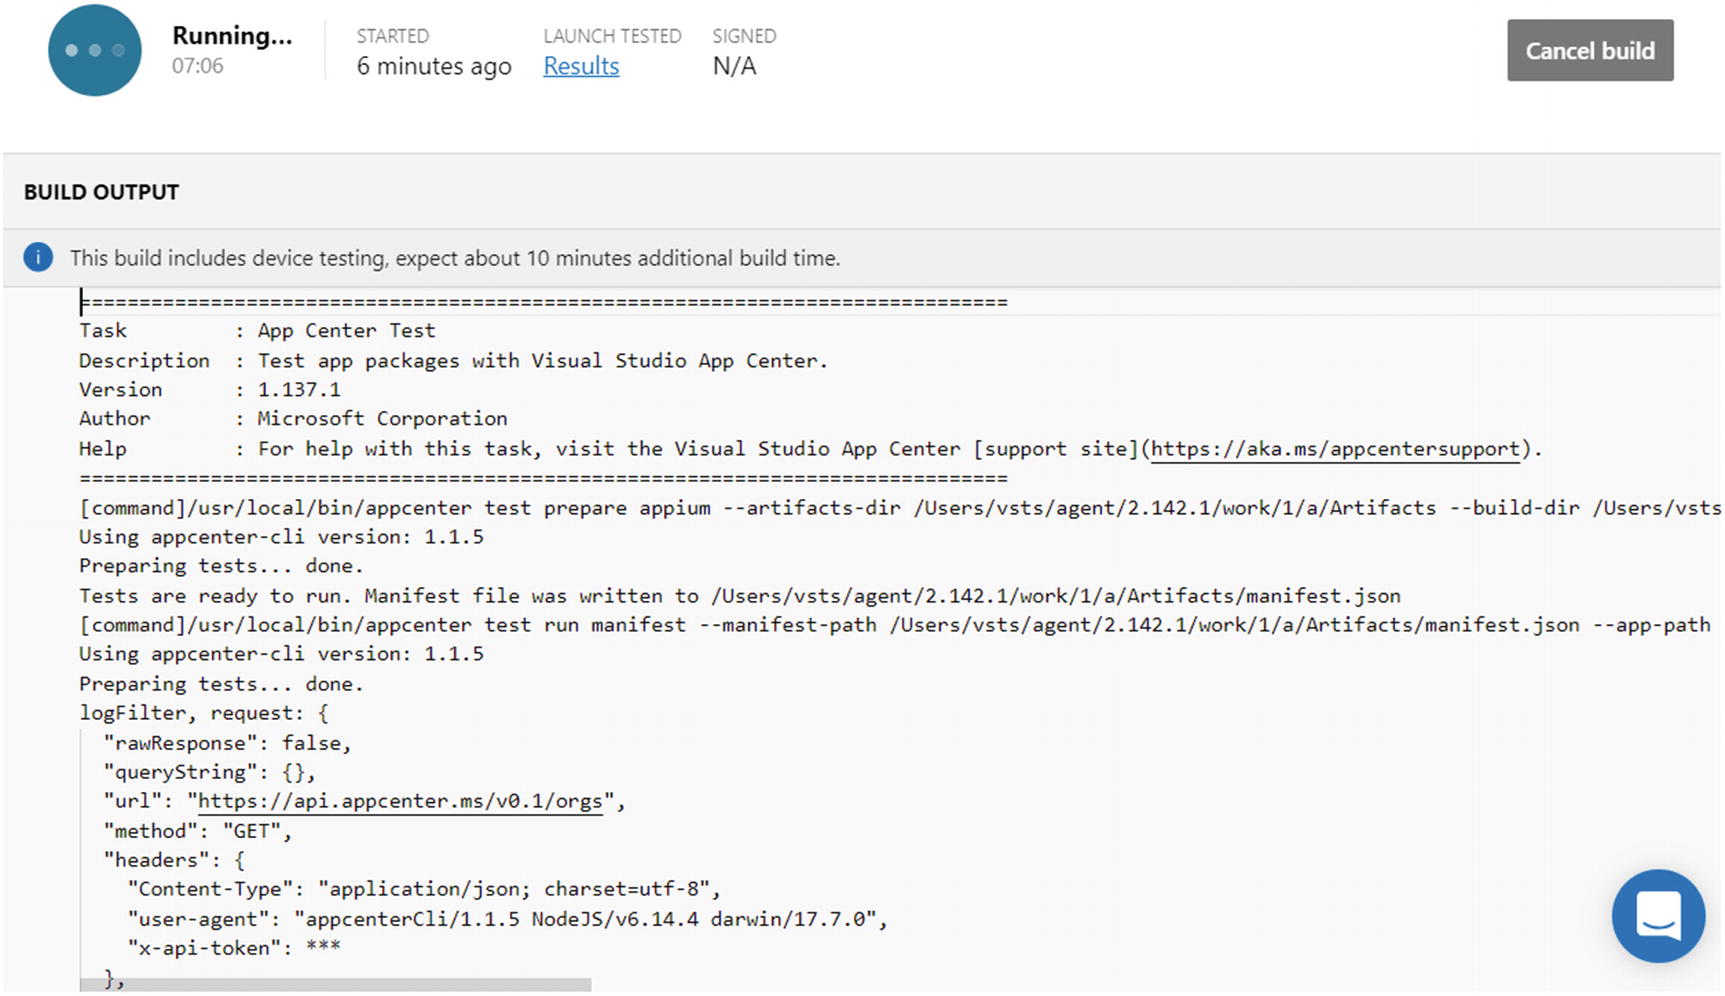
Test run in build output
Notice that your build output will show links to your test run. You can navigate to these links or go to Test Runs in App Center to view the test runs. But I will show you later in more detail the layout of the Test Runs section.
If only running UI tests were as easy as toggling an option and clicking a button, this chapter would just be a few pages long! Maybe the App Center team will make UI testing easier for developers in the future.
Getting the UITest Command Template
You are finally here: your first step in a long list of steps to get UI tests up and running! Be prepared because the journey is only beginning. In order to make the journey easier, you will let App Center do most of the work for you by using the UITest command template and then returning to the command template by adding new parameters and modifying the parameters App Center provides for you. In this way, you will make fewer mistakes with syntax errors or misspellings.
Test runs

Start testing your app
Selecting the existing device configuration or selecting new devices

Configuring a test run
The third and final page shows a lot of relevant and useful information. First, it shows you instructions on how to install NodeJS and the App Center CLI. You completed both steps in a prior section, so you can skip them. Let’s focus on the section called Running tests. You are interested in the template for running your UI tests at the bottom of this page.

The UITest command template
Let’s break down the command template and understand the purpose of each of the command arguments before moving ahead to customize the command.
The coming sections will focus more specifically on the --app-path and --build-dir arguments because those are the arguments that will require the most trial-and-error attention while the other arguments can be left to their default values. In addition, you will need to supply the CLI with more arguments because the above template will not work as it currently exists. I will explain soon.
Configuring the iOS UITest Command
Let’s begin by modifying the appcenter-post-build.sh.rename file for iOS first. Rename the existing file extension from .rename to .sh. If you created the Bash script on your own, locate the file next to the solution file. Open the bash script in either Visual Studio or your favorite text editor.
You need to remember a couple of important points to help you customize the command template. First, every file path will reference paths in the App Center server environment and not your local machine. Second, you will make use of the App Center variables that I presented in a prior section because they will allow you to reference key locations in the App Center server.
Determining the --app-path Value
This argument is the location of the iOS .ipa file. The APPCENTER_OUTPUT_DIRECTORY will contain the .ipa file itself. Instead of taking my word at face value, I will help you prove it to yourself.
Verify that the appcenter-post-build.sh file is saved and committed into the repository.
Verify that the iOS build definition detects the post-build script.
Click the Save & Build option.
Click the Download button and select the Download logs option.
Save and extract the zip file.
Go to the extracted subfolder called Job.
Locate and open the Post Build Script.txt file.
Search for APPCENTER_OUTPUT_DIRECTORY.
Verify that the next line shows GoGoGiphy.iOS.ipa as the only file content since this file is the only build output.
Finally, change the --app-path argument to the following:
This command parameter instructs the CLI to look in the output directory for the .ipa file.
Determining --build-dir Value
This argument supplies the location to the output or the assemblies of the Xamarin.UITest project containing your UI tests. In your local machine, this value is the location to your GoGoGiphy.UITest/bin/Debug folder. You need to determine the same location on the App Center server.
Return to your extracted zip file containing the latest build logs.
Open the Post Build Script.txt file in the Log folder.
Search for APPCENTER_SOURCE_DIRECTORY. The lines below the current line will show the contents recursively on a folder-by-folder basis. It will list the parent folder first and its contents. It will then move on to show the contents of each child folder.
- Verify that the contents of the parent folder are similar to the following contents. The first line is what was written to the log file from the bash command. The following lines show the contents of the parent folder. This parent folder is the location of APPCENTER_SOURCE_DIRECTORY.
- APPCENTER_SOURCE_DIRECTORY contents
GoGoGiphy
GoGoGiphy.sln
appcenter-post-build.sh
packages
Scroll down until you see the path to the first GoGoGiphy folder. The path except for GoGoGiphy is the location of APPCENTER_SOURCE_DIRECTORY as highlighted:
/Users/vsts/agent/2.141.1/work/1/s/GoGoGiphy
Copy the value of the APPCENTER_SOURCE_DIRECTORY location:
/Users/vsts/agent/2.141.1/work/1/s/
Scroll down the log file until you see the following line:
/Users/vsts/agent/2.141.1/work/1/s/GoGoGiphy/GoGoGiphy.UITest/bin/DebugVerify that you see the GoGoGiphy.UITest.dll as one of the files within the Debug folder. This assembly contains your UI tests. You need to supply this location.
Finally, append the path to the GoGoGiphy.UITest/bin/Debug folder to the APPCENTER_SOURCE_DIRECTORY path, which will be your -build-dir argument:
--build-dir $APPCENTER_SOURCE_DIRECTORY/GoGoGiphy/GoGoGiphy.UITest/bin/Debug
Determining the --uitest-tools-dir Value
This argument is missing in the original command template. Why do you need this? If you are not convinced, you can enter the CLI with the values that you have ascertained up until now into the post-build script, commit to the repository, run the build, and see what happens. It will throw an error asking you to provide the location of test-cloud.exe.
What is test-cloud.exe? Remember that Xamarin Test Cloud used to be the official product that ran UI tests. Microsoft acquired Xamarin, but this is the same application that runs your UI tests with the supplied CLI command and arguments. Microsoft retained the original name of the product.
As a result, App Center asks you to provide the location of test-cloud.exe on the server. Personally, at the time of this writing, I think App Center can do a better job of integrating the location of the test-cloud application for you since it is a critical component of running any UI tests. It should at least include the --uitest-tools-dir as part of the command template. I only learned about this from App Center Support. Hopefully, you can forego this step in the future. But for now you still need to configure this command argument.
Go to your extracted log files from the zip file.
Open the same Post Build Script.txt file.
Search for xamarin.uitest contents. This is the ls command that you entered earlier in the post-build script. You want to view the contents of all the subfolders and their files.
Browse through the list of subfolders that are displayed. They should be in version format. Each of these subfolders contains the same but a different version of the test-cloud.exe application. You want the latest version. At the time of this writing, the latest version is 2.2.6. It will sort them as earliest to latest version from top to bottom in the output.
Copy and search for the latest version number, in this case, 2.2.6.
Scroll down until you see the test-cloud.exe application. The path should be similar to the following. Copy this path:
/Users/vsts/.nuget/packages/xamarin.uitest/2.2.6/lib/tools
Integrate the above path into the --uitest-tools-dir argument:
--uitest-tools-dir /Users/vsts/.nuget/packages/xamarin.uitest/2.2.6/lib/tools
At the time of this writing, App Center does not support a wildcard pattern where you can always use the latest version of the application. Therefore, you will need to supply the version number in the path explicitly.
Logging In Automatically to Run UI Tests
App Center wants you to log in first before running the command. You already saved the access token as an environment variable in the section titled “How to Save the Access Token.” If you forgot or if you skipped the section, please revisit it since it is a prerequisite to this section.
If you changed the name of your environment variable to another name, use your own name preceded by the $. The $ character is needed when referencing from the Bash script.
Final iOS UITest Command
If you completed all of the above steps, you should be close to the finish line! Do not get discouraged if it does not work the first time. Some things may have changed in App Center since the time of this writing. I summarized all the steps that I performed after getting my UI tests to run.
Full CLI Command
Open the appcenter-post-build.sh file (adjacent to the solution file). Remember that this file is the post-build script used for the iOS build definition.
Paste the above command to the end of the file. You can comment out the other commands with a # character. Personally, I leave earlier commands commented out because you may need them later.
Save the file and commit it to your repository.
Run the build if it is set to manual build.
Wait for the build to reach the end, at which point it will execute the post-build script.
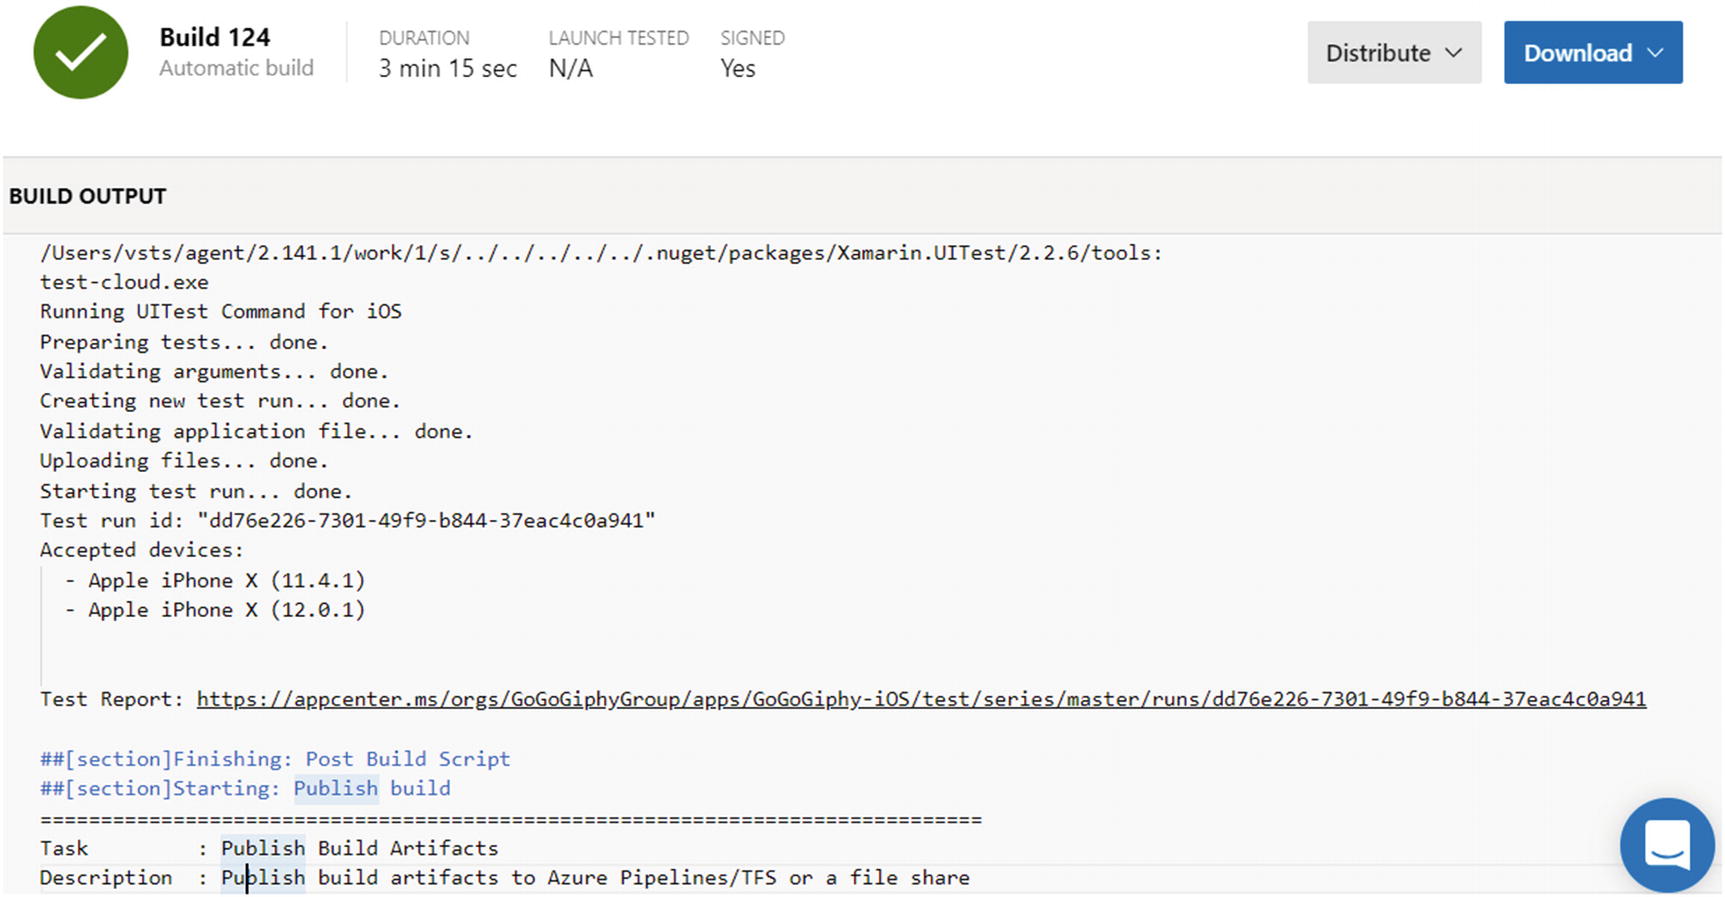
- If you configured the command correctly, you will see the start of your UI tests, similar to Figure 6-25.
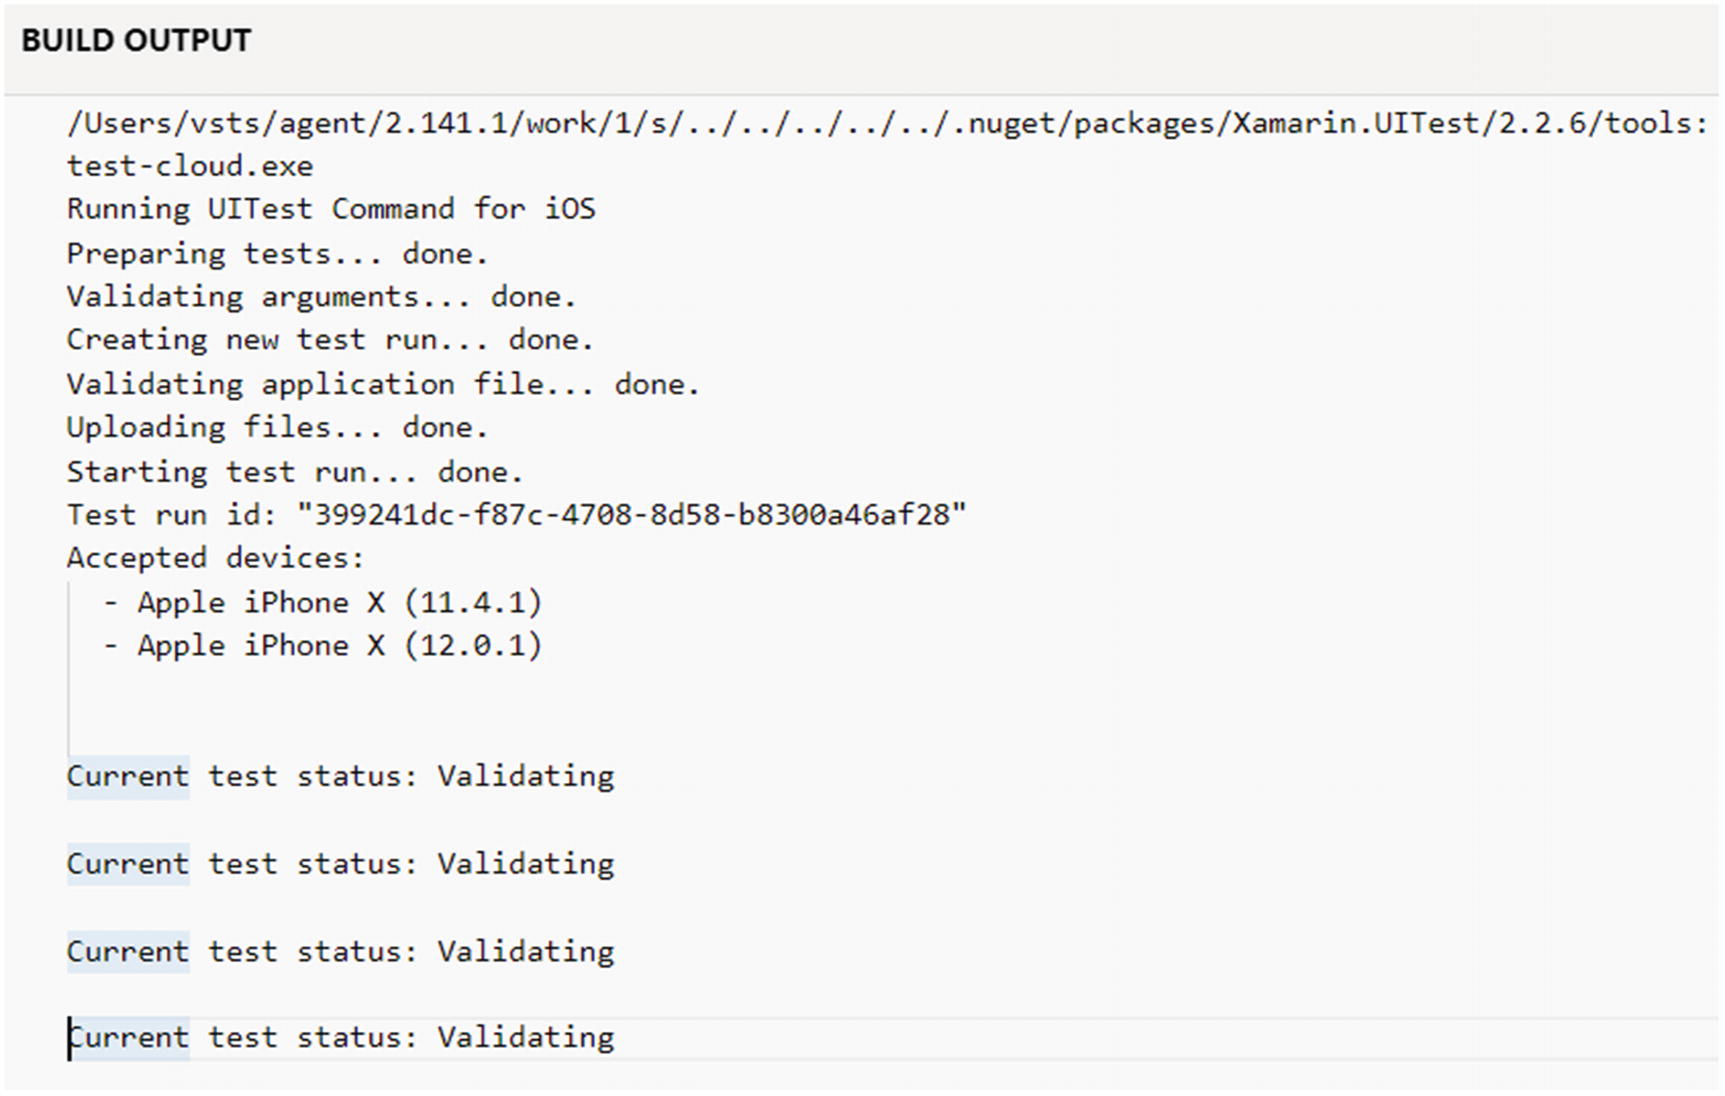 Figure 6-25
Build output showing the test run starting
Remain patient because this step will take a long time. You will see the Current test status message repeat. This is normal because App Center runs the UI test on a physical device in your device set. App Center continues pinging this physical device to get the status of the UI test on a regular interval, hence the repeated output.
Eventually, you will see the UI test finish, as shown in Figure 6-26.
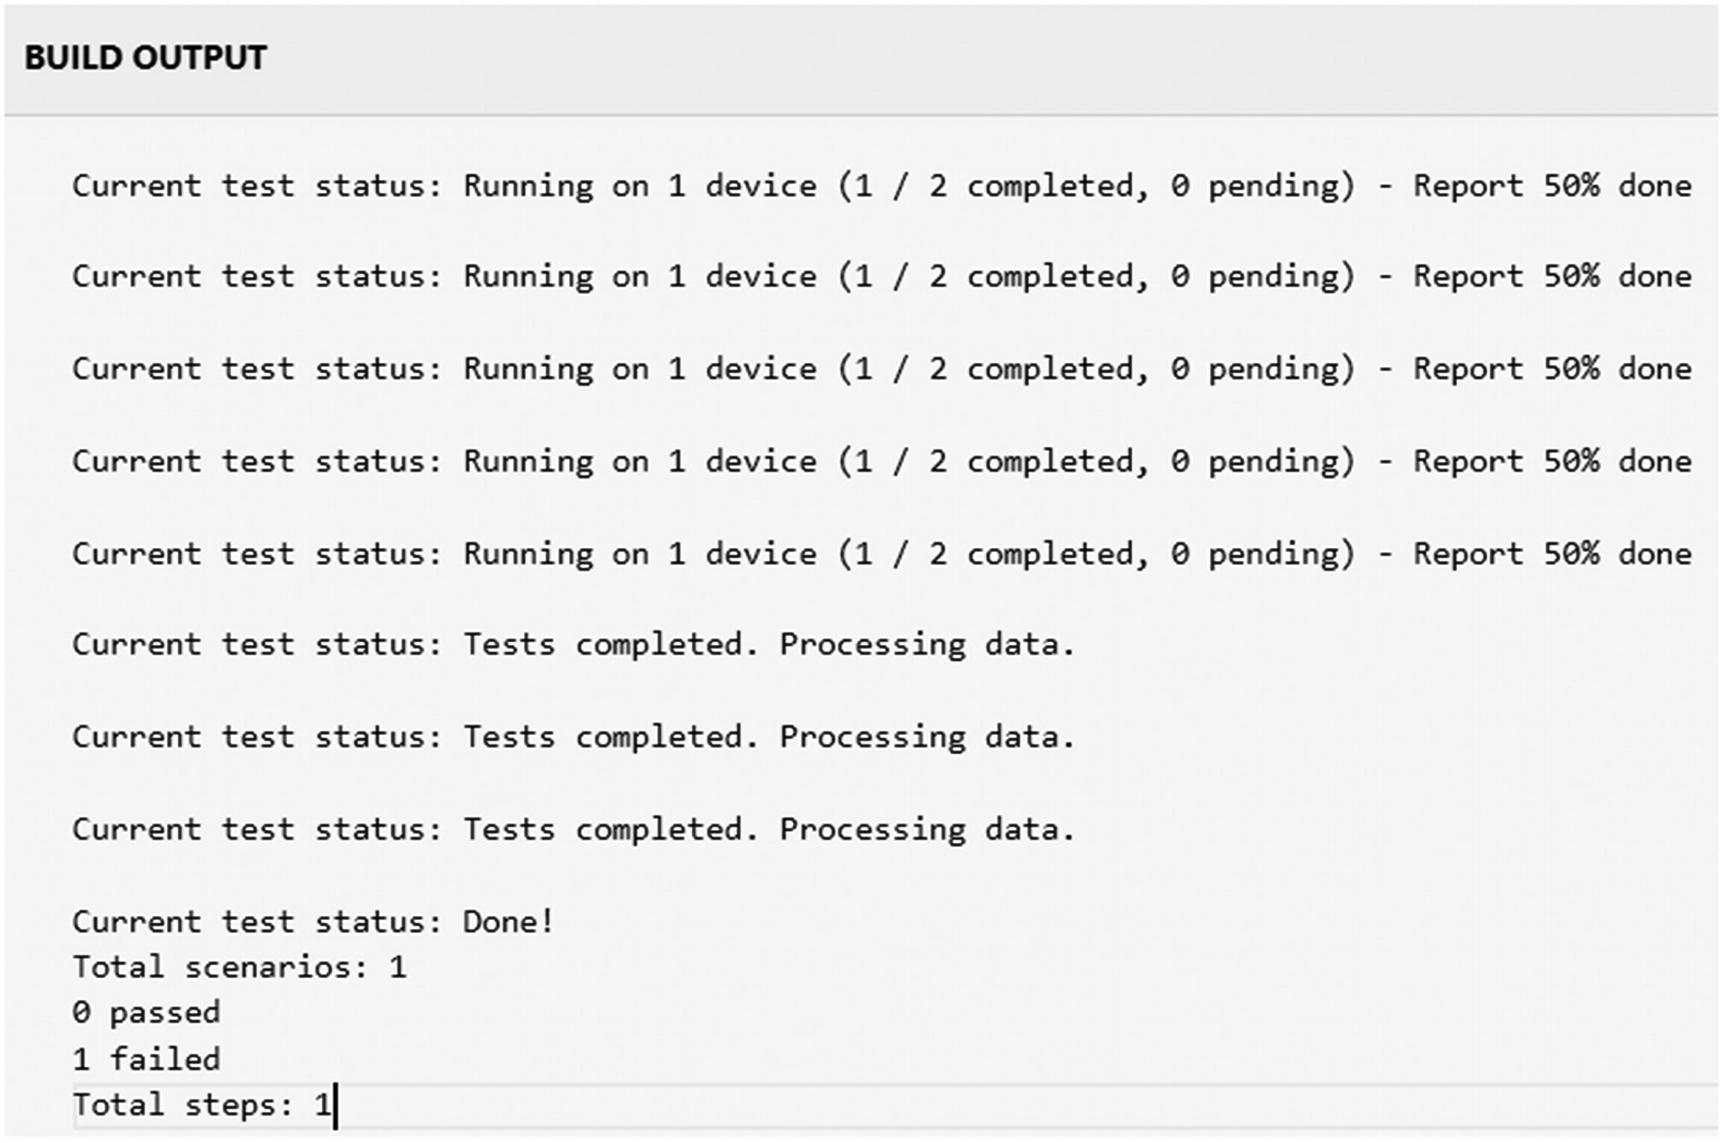
Build output showing completed UI tests
Notice above how the output shows how many scenarios ran, how many passed, and how many failed. In this test run, my UI test failed. This test run failed because one test function is set up deliberately to fail. I will show you how to fix this test function written with Xamarin.UITest in a later section.
Viewing Test Run Results

Test runs
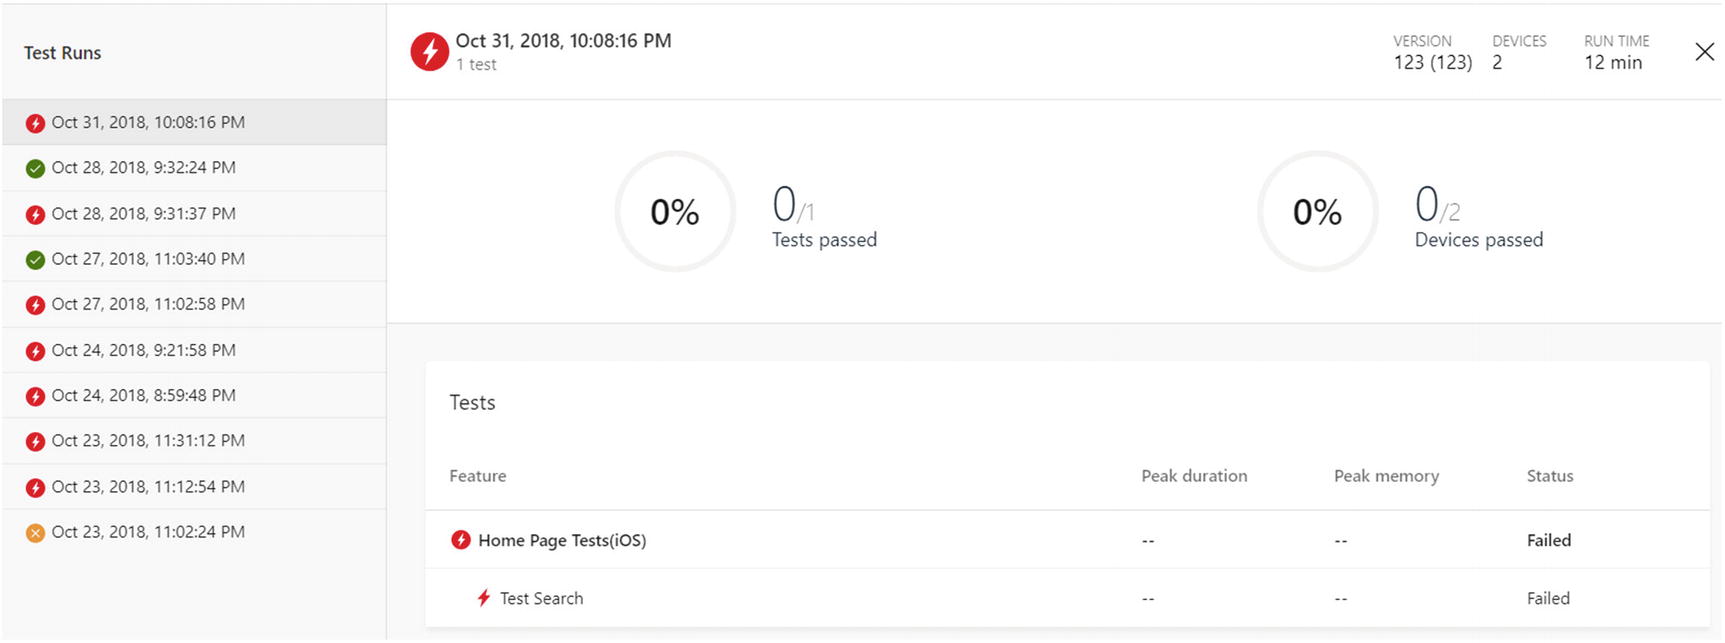
Home page tests

UI test called Test Search showing app screenshots
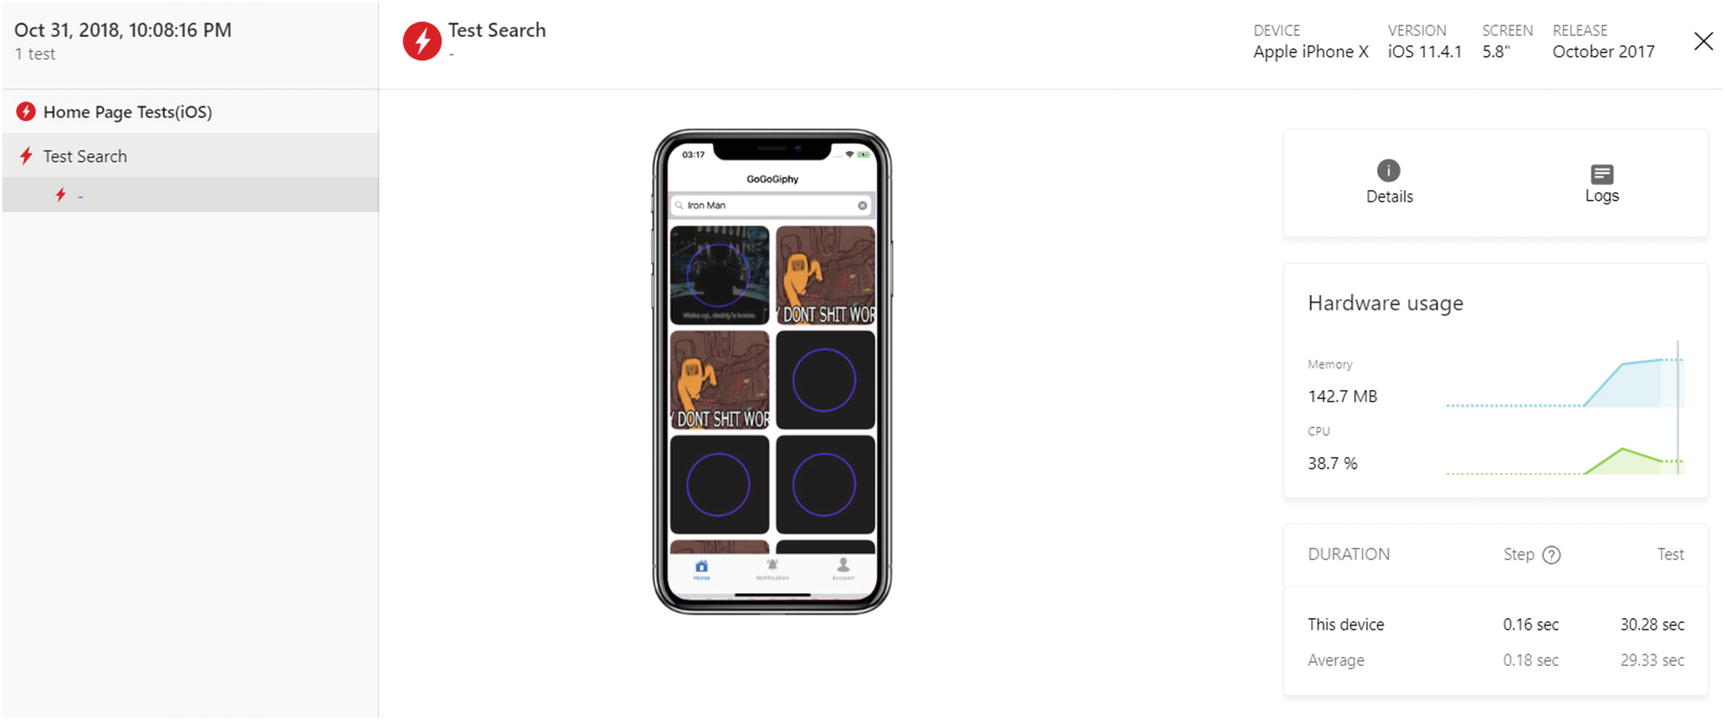
Test search

Device configuration
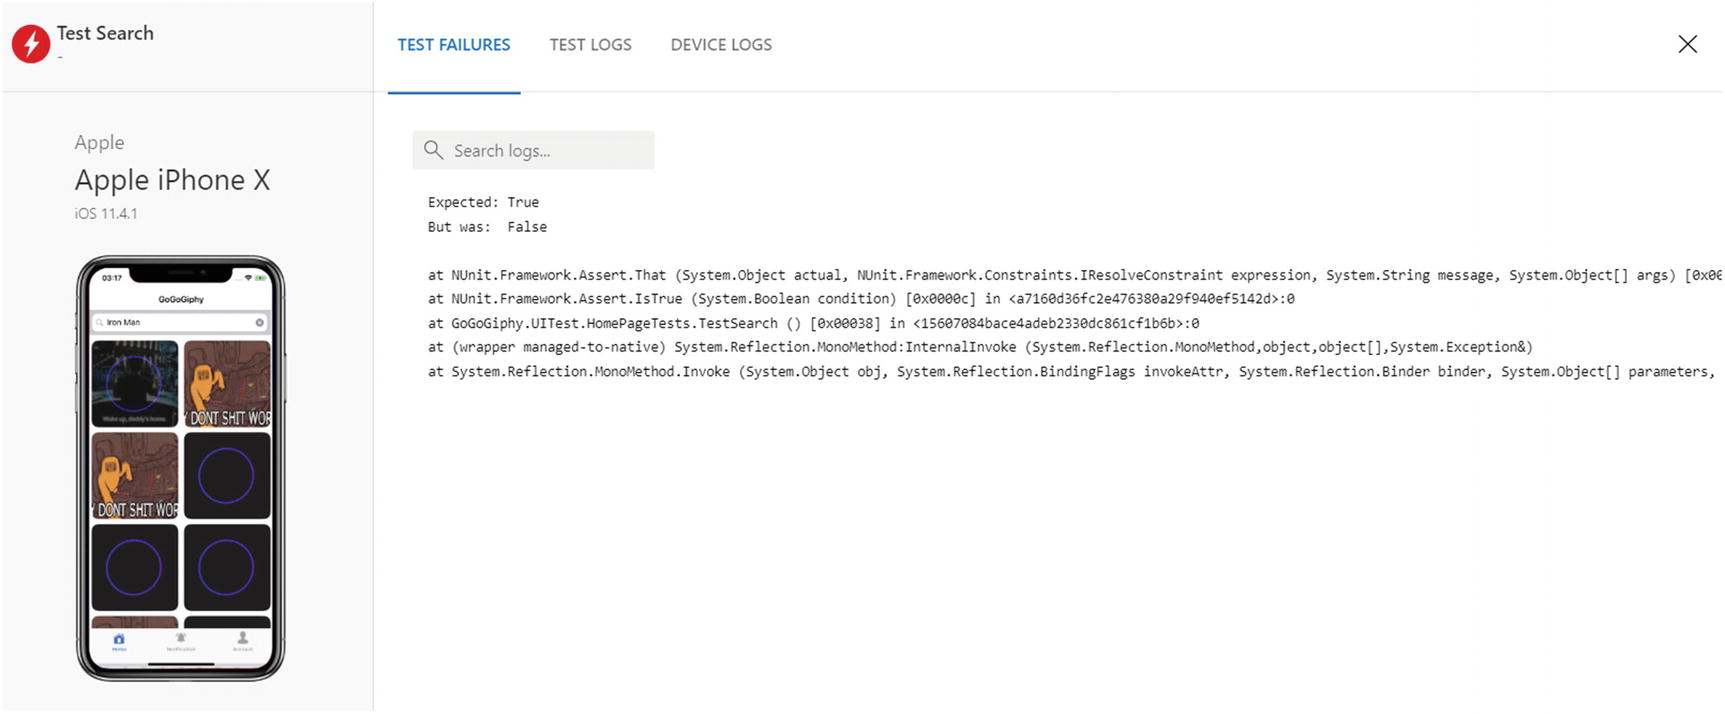
Test failures
The first section, Test Failures, will show the UI test that ran and what failed. In this example, the Assert command expected a True value but got a False value instead.

Test logs
Notice how the device shows the timestamp, the action that was taken, and the reason for the failure. In this simple example, I entered Iron Man in the search bar, instructed the UITest to press Enter, and instructed the test to search for any image marked with CachedImage from the results. It failed because it didn’t find any matching results.
If you do not own an iPhone X device yourself, you have just tested your first UI test on an iPhone X in the cloud! Now you can say you have tested a UI test officially in the cloud!
Configuring the Android UITest Command
Thankfully, you are most of the way through your journey in configuring the CLI command for Android because you can reuse most of the command parameters from iOS. Keep the other argument values the same. I will show only the argument values that you need to change and the one command you need to add.
Determining the --app-path Value
For the iOS command, you determine the --app-path value by finding that the .ipa is located in the APPCENTER_OUTPUT_DIRECTORY folder. The same is true for Android except the name of the file is different, obviously.
Post-Build Script
If you already ran the build, your zip file containing the log files should contain a Post Build Script.txt file too. If your zip file does not contain this text file, just save and run the build once. Click Download Logs as before. Extract the zip file and open the Post Build Script.txt.
At this point, search for APPCENTER_OUTPUT_DIRECTORY. Immediately below this line, you will find the name of the Android .apk file to supply to the CLI command.
Running the MS Build Command
Why would the assembly directory not exist for Android all of a sudden? Remember when you inspected the output of the ls command in the Post Build Script.txt? If you search for APPCENTER_SOURCE_DIRECTORY, it will reveal the contents of all the subfolders in the source directory, including the Bin folders where the build artifacts of each project are created. Then search for GoGoGiphy.UITest in the same file. Look through the subfolders. You will see that the Bin/Debug folder is missing.
Why would the Bin folder not exist? This clue will lead you to uncover how the build definition is originally set up. For iOS, the build definition points to the solution file, meaning that all the projects referenced in the solution are compiled. For Android, only the Android project is referenced, meaning only the Android project is built and not the GoGoGiphy.UITest.
As a result, you need a way to build the GoGoGiphy.UITest project prior to running the UITest CLI command. Therefore, you need to invoke the msbuild application and pass in the path to the .csproj file for the UITest project.
The first part of this command is the path to the msbuild executable. If you work with AppCenter support, they can provide you with this path too.
The second part of this command is the argument for the msbuild command. For brevity’s sake, I saved you the steps in figuring out how to get the path to the .csproj file for the UITest project. But if you are interested in knowing how to find this path, follow the same steps you performed earlier to inspect the output of the ls command for the APPCENTER_SOURCE_DIRECTORY folder. Scroll through the subfolders and their contents and eventually you will find the location of the .csproj file.
Final Android UITest Command
Add Caption
Similar to how you tested the post-build script, feel free to change a few things in the above command, which may be different in your setup. My device set is called GooglePixel3Android9; change it to your own device set name. If you labeled your test series to another name, change the name as well.
Open the appcenter-post-build.sh file next to the Android .csproj file.
Paste the above msbuild command before the ls commands. You need to paste it before these commands so you can verify that the Bin/Debug folder is created when the project is built.
Paste the UITest command after the ls commands. You can comment out the ls commands with the # character if you are confident that the UITest command will work. I would leave it uncommented if I were you for troubleshooting purposes.
Save and commit the file into the repository.
Run the build.

Build output showing Android UI test run
Notice how the output is similar to the iOS output. The only difference here is the accepted devices where the UI tests are run, in this case, Google Pixel 3 and Pixel 3 XL.
Viewing Test Run Results

Test runs
Notice how the same UI test succeeded for both Android devices but failed for iOS. This difference reveals the power of App Center because you have just proven that the same test can yield different results in different devices. If you attempted to reproduce the same result on physical devices, you would need to purchase at least two separate devices, one for iOS and one for Android, to notice that your app behaves differently. Now imagine how much money you can save with App Center!
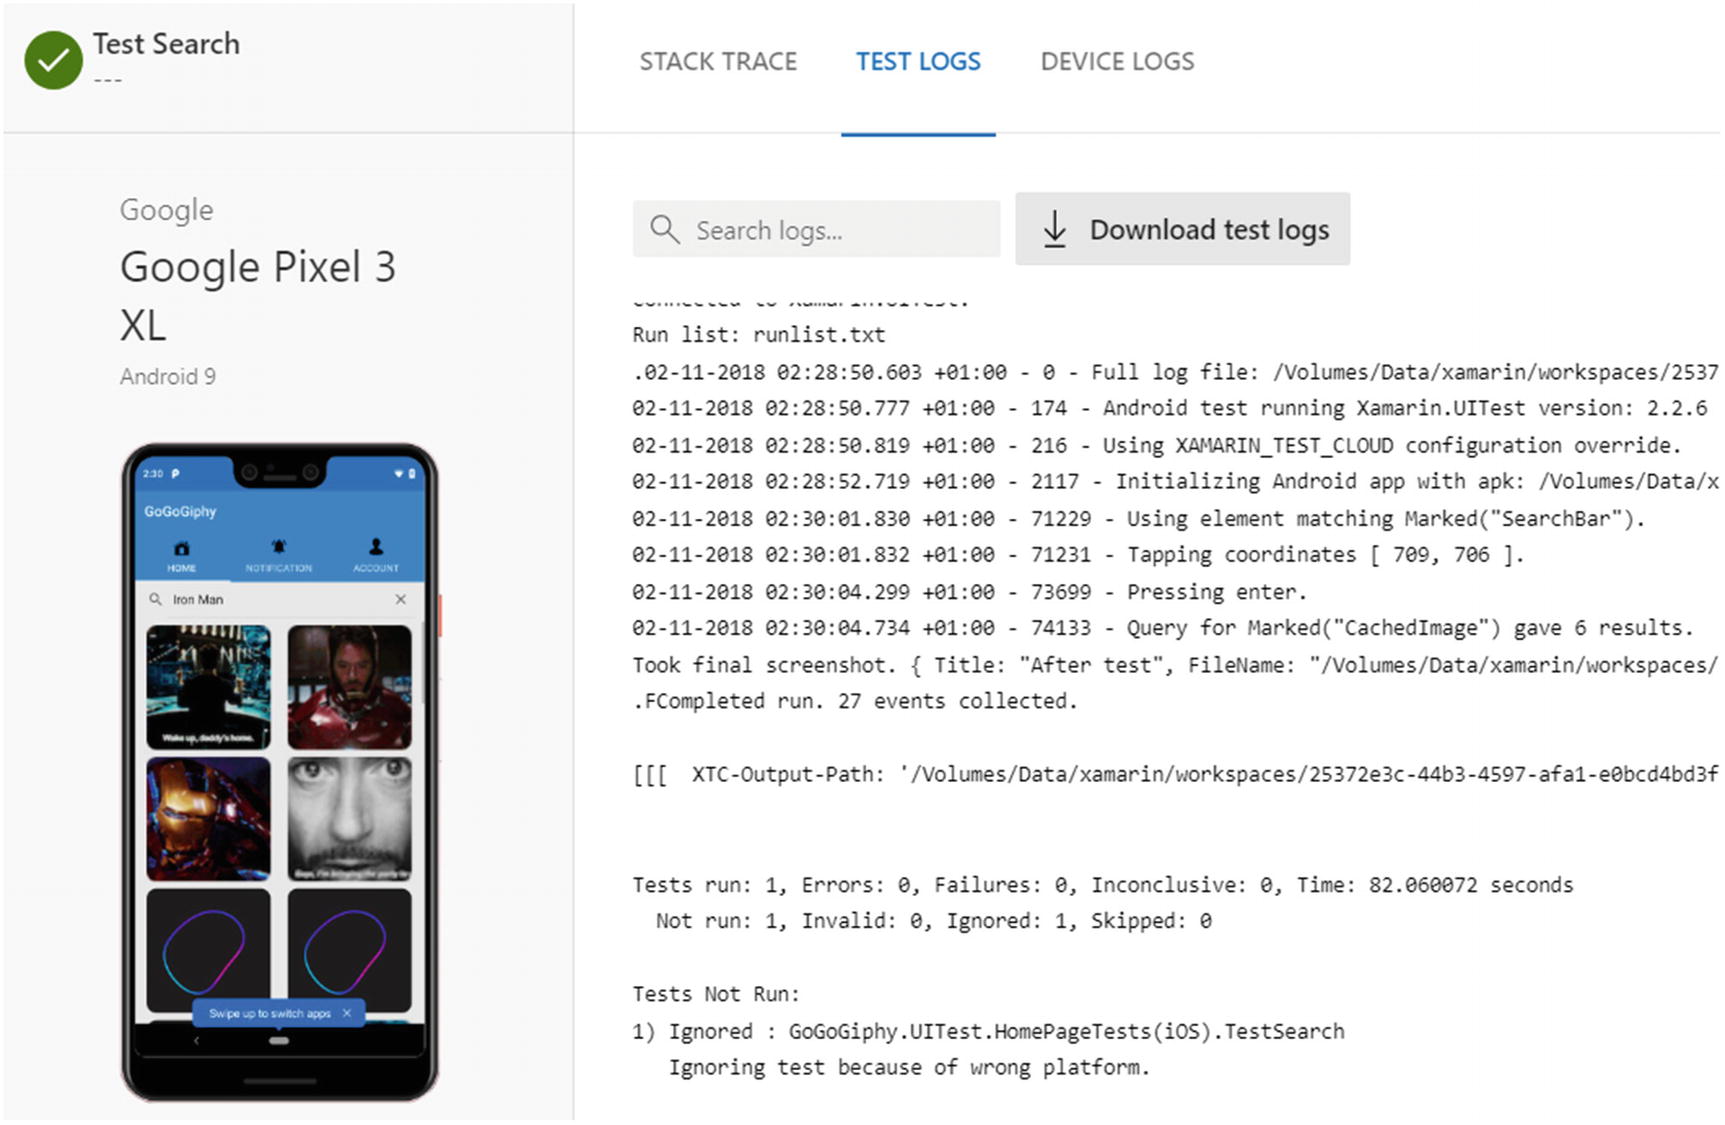
Test logs
Notice how the UITest detects six objects with the CachedImage identifier, which is why the test succeeds.
Whew! If you got this far and got both your iOS and Android test runs to execute successfully, congratulate yourself on a spectacular job! Now you hold the crown of officially running UI tests on both iOS and Android in the cloud!
Running UI Tests Asynchronously
One thing you may notice while running your UI tests is that your builds now take a long time to run. You may want to start your build and simply want to see your build finish and trigger the test run instead of waiting for the test runs to finish while holding up the build.
Add Caption
Build Output showing asynchronous test run
Notice a couple of important details in Figure 6-37. First, it runs your UI tests the same as before. Second, it provides a link to the Test Report that you can follow to view the results of the test run, which is the same webpage I showed you before. Third, the build actually succeeds and finishes a lot sooner than before.
Now your build success is not dependent on the results of your test run. It is a matter of developer preference whether the build should be dependent on the results of the test run. Just keep in mind the trade-off. If the build depends on the test run result, your build will take longer. If you want your builds to finish sooner, your builds will succeed regardless of the outcome of your test run, even a failed test run.
Using REPL (Read-Eval-Print-Loop)
If you remember, the same UI test succeeded for Android devices but not for iOS devices. This difference in results showed you the power of testing in App Center without having to purchase physical devices to run the same tests.
But why did iPhone devices give a different result in the first place? The answer is simple. Return to the solution in Visual Studio. Open HomePage.xaml. Collapse the content. You can press Control+M and Control+L to toggle the expansion and collapsing of all XAML elements. Scroll down the XAML page until you reach a control called PullToRefreshLayoutControl and the grid below it. Notice how the IsVisible bindable property on this control is bound to IsTrendingImagesPanelVisible. This property in the ViewModel collapses the grid and expands the PullToRefreshLayoutControl after the user presses Enter on the search bar. On Android, this set of actions completes in time before reaching the Assert statement in the UI test. On iOS, this set of actions do not complete in time, which is why the Assert statement returns false and the UI test fails.
How can you fix this? First, I will show you a handy little console tool that the App Center team has provided for you. It is called REPL and it stands for Read-Eval-Print-Loop. If you have experience using the C# Interactive tool or the PowerShell Interactive tool within Visual Studio, you know what REPL is about. It allows you to test or read the commands, evaluate them, and print out the results in real time, hence the name REPL. Once you have tested your commands, you can then copy the commands over into your application. Now App Center provides you with this handy tool to make writing UI tests easier by giving you the ability to test out UI test commands, evaluate your commands on your app in the simulator, and print out the results.
You can find more information about the important commands at https://docs.microsoft.com/en-us/appcenter/test-cloud/uitest/working-with-repl .
Using app.Repl()
Here are the steps for diagnosing, troubleshooting, and fixing this UI test. Open HomePageTests.cs in the UITest project. As mentioned, TestSearchBroken() is the intentionally failing UI test function. The working example called TestSearchWorking() is below it.
Feel free to create another UI test function or modify TestSearchBroken(). But I want to show you how to diagnose the broken example to arrive at the final working result in TestSearchWorking().
Add Caption
The call to app.Repl() opens the terminal window for the Repl console application and allows you to experiment and play with various UI commands. It will evaluate the console commands and display the results to the user.
Rebuild the UITest project.
Go to Test Explorer and verify the tests appear.
Go to Tools ➤ Android ➤ Android Device Manager.
Launch one of your preconfigured Android simulators. Wait for it to finish launching.
Return to Test Explorer. Expand HomePageTests for Android.
Add the following command either to TestSearchBroken() or to your own UI test function:
app.Repl();
Right-click TestSearchBroken and either run selected tests or debug selected tests. If you select debug, you can insert breakpoints and step through you UI test functions.
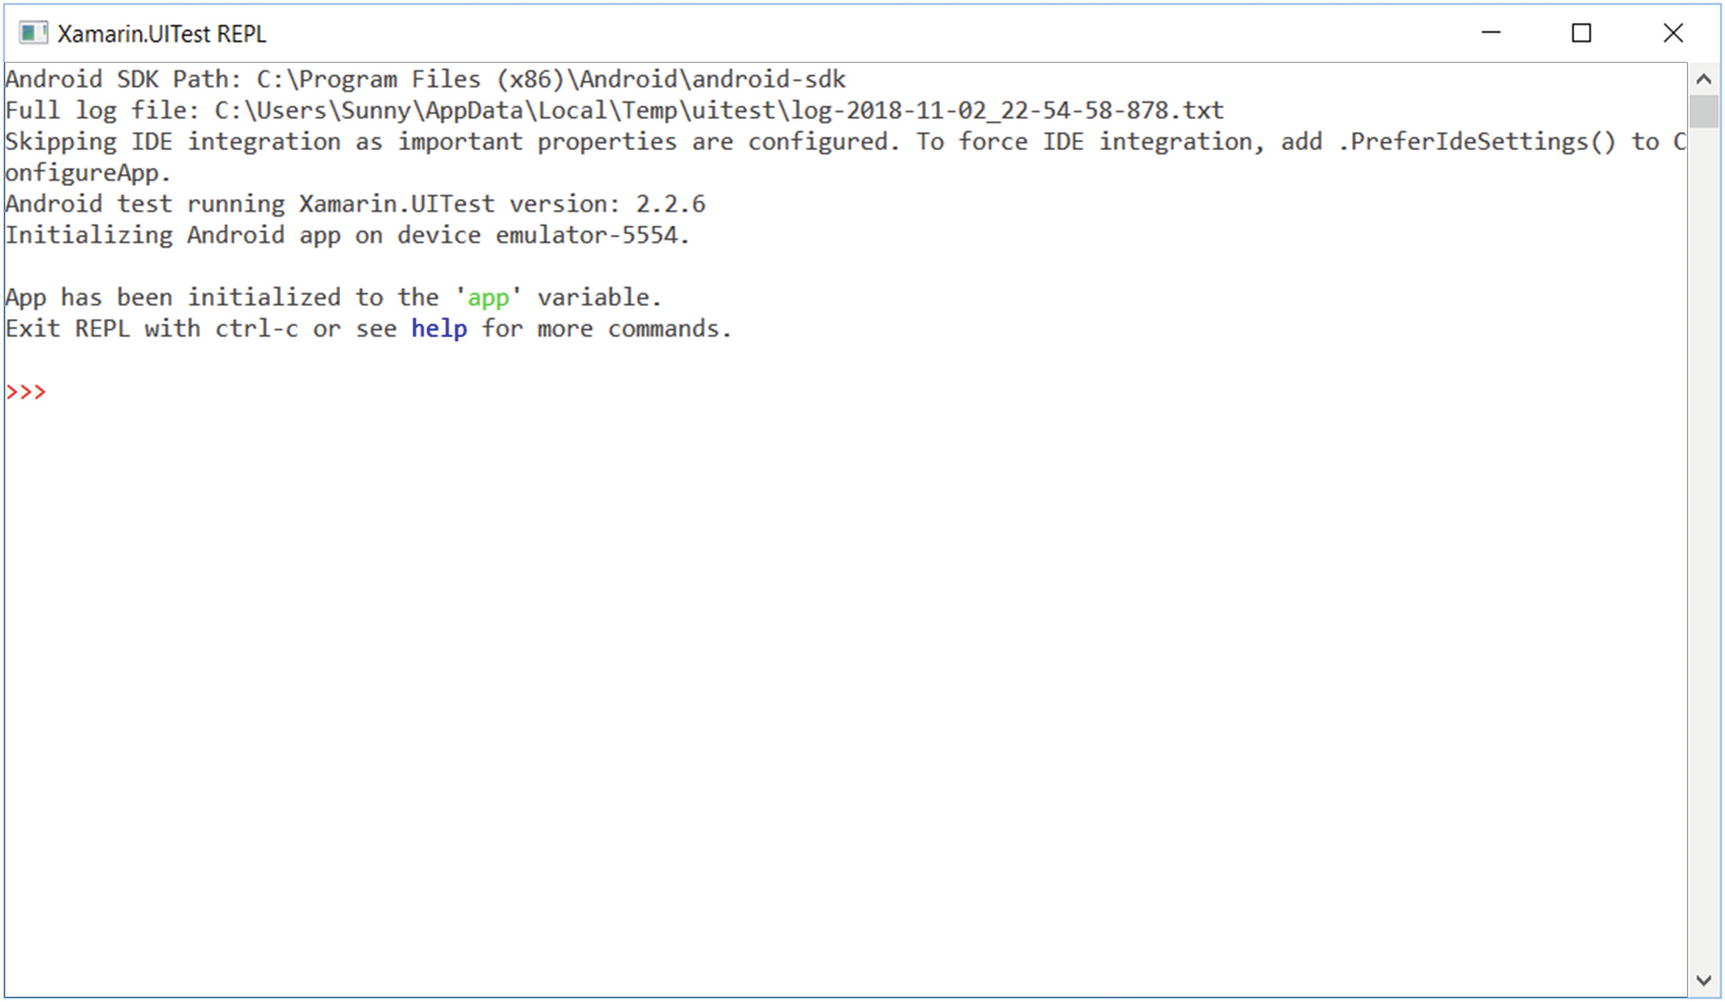
Xamarin.UITest REPL console window
Using the Tree Command
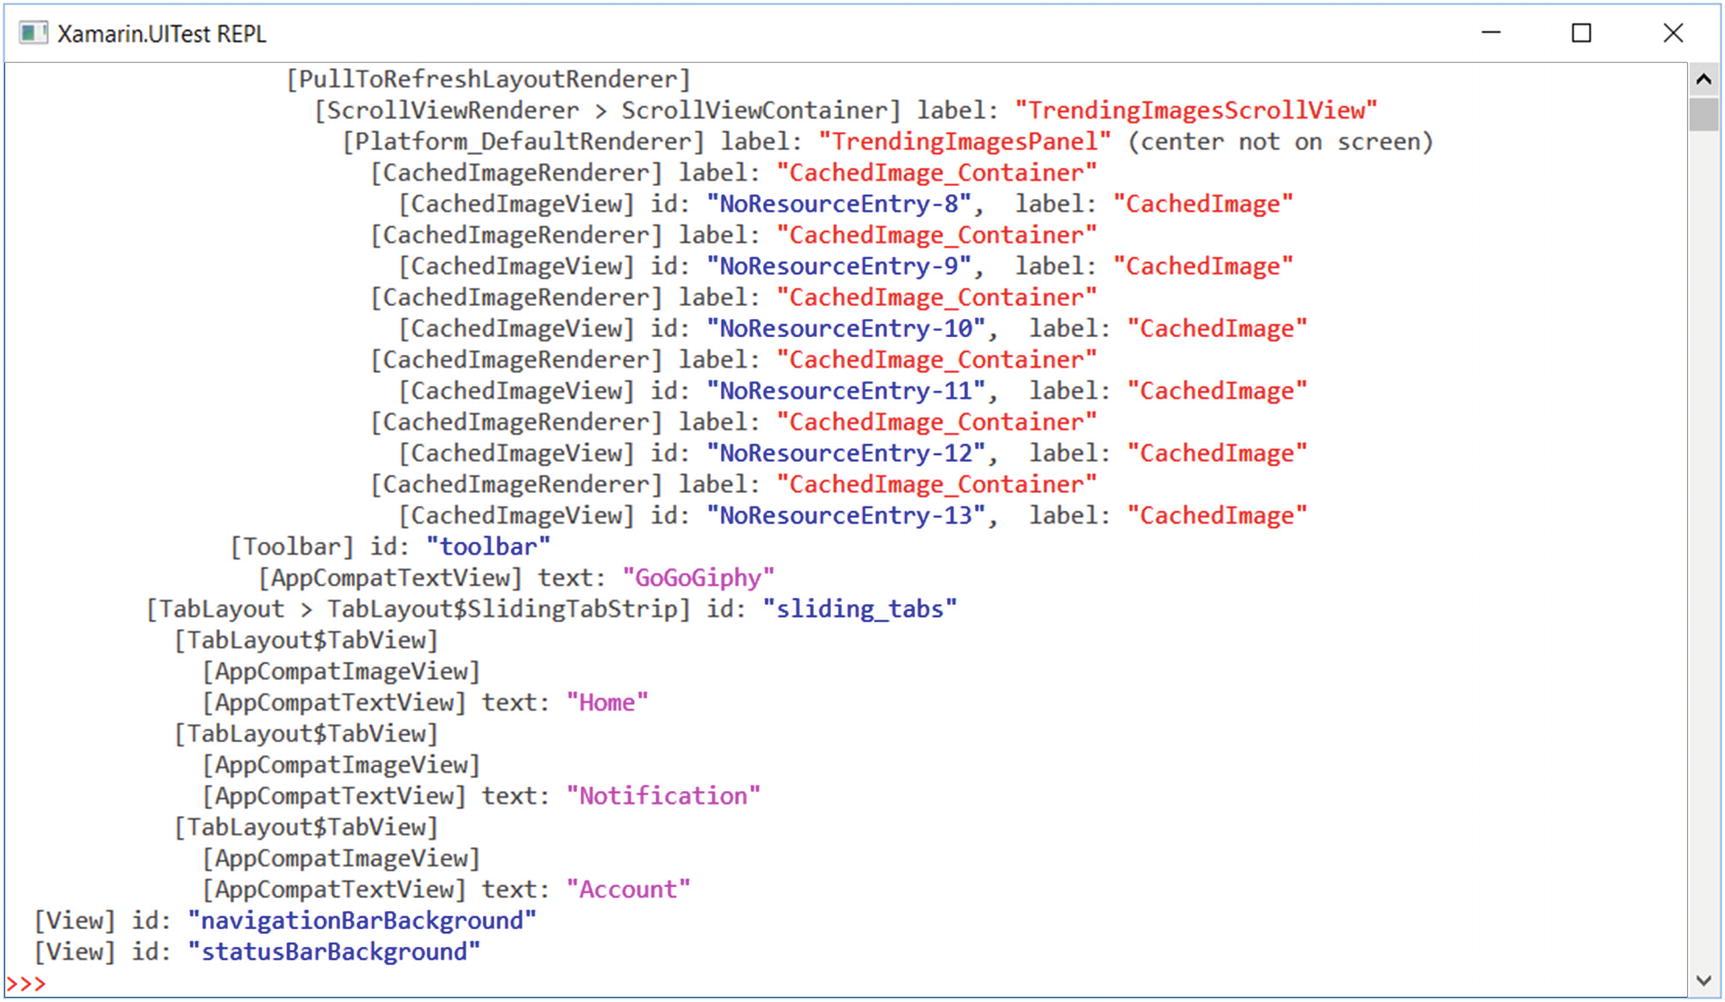
Output of the tree command
Using app.Flash(..)
At the end of the flashing, the terminal window will display all the controls that match your command.
At this point, your app should have searched for Iron Man, pressed Enter, and showed all the results for Iron Man. This evidently works great in Android. But you need to account for the delay on iOS now.
Using app.WaitForElement(..)
Copying Commands into the Clipboard
Now how do you copy all the values you typed up until now? The Repl() application provides the copy command to copy all the commands you typed into the terminal window up until now into the clipboard. I know it does not replace Xamarin Test Recorder, which Microsoft took away from us, but it is the next best thing.
Go ahead and delete the Flash command since it is not relevant for your UI test.
Final UI Test Commands
You are going to perform one final modification to your command before committing these commands as your final test.
Save your changes to HomePageTests.cs. Commit and push your changes to the remote repository.

Test Search result
Summary
Configured projects for Xamarin.UITest
Set up device sets in App Center
Set up build scripts and configured UITest commands
Learned about App Center variables
Configured UITest commands for iOS and Android
Learned about and used REPL to fix a broken UITest function
Created your mobile builds and linked with your code repository
Created developer certificates and provisioning profiles
Configured your builds for distribution
Handled crashes in your app
Reported events and analytics from your app
Sent push notifications on iOS and Android
Handled push notifications on both platforms
Sent custom data with notifications
Set up your build scripts
Ran UI tests for both platforms using the CLI
This is your accomplishment! Of course, if you jumped around from chapter to chapter instead of going sequentially or if some of the topics are a little hazy, feel free to revisit any chapter and repeat the material.
I structured the topics in this book to be valuable not just to Xamarin Forms developers but developers from other platforms. Most of the topics are platform-agnostic. Xamarin Forms was a nice fit for me given my background with this platform. Also, Xamarin Forms is the most popular cross-platform framework at the time of this writing, but it could have been done just as easily with React Native, Cordova, or Unity.
If you have any outstanding questions, feel free to contact me at my LinkedIn profile at www.linkedin.com/in/sunnymukherjee/ and I will be happy to answer your questions.
I would like to conclude this chapter and this book with a big thank you to you, the reader, for buying this book. I hope the material in this book has shed light on the next evolution of mobile DevOps using App Center. And I hope this book helps you and your team incorporate App Center into your existing DevOps pipeline.
Congratulations, thank you, and good luck in your journey ahead with App Center!