
![]()
Moving Sprites
You now know how to make sprites, but how do you make them move? That’s what this chapter is all about. We’re going to take a close look at all the code you have to write to start making your sprites move around the stage. You’ll learn about
- Making a game loop
- Using velocity properties
- Modularizing your animation code by using game states
- Making a sprite move by using the keyboard
- Containing a sprite’s movement inside the canvas
- Applying physics to a sprite’s movement
At the end of this chapter, you’ll be well prepared to apply these techniques to all kinds of interactive games and applications, so let’s get started!
Create a Game Loop
The first thing you must do to make sprites move is to create a game loop. A game loop is just a function that is called, repeatedly, 60 times per second.
![]() Note “Times per second” is more properly referred to as “frames per second,” or fps. Each frame is a single unit of movement. You can think of a frame as one page from a hand-drawn animation flip-book. If you flip through the pages (frames!) quickly, your brain is tricked into thinking that many still images are actually one moving image. (This illusion is called persistence of vision.)
Note “Times per second” is more properly referred to as “frames per second,” or fps. Each frame is a single unit of movement. You can think of a frame as one page from a hand-drawn animation flip-book. If you flip through the pages (frames!) quickly, your brain is tricked into thinking that many still images are actually one moving image. (This illusion is called persistence of vision.)
Any code that you put inside the game loop will also be updated to 60 frames per second. You can make a game loop by using a special JavaScript function called requestAnimationFrame. requestAnimationFrame tells the browser to update any function you specify at a rate that matches the refresh rate of the computer monitor or device screen that your game or application is running on. The result is that your sprites will move with the smoothest possible animation that your system is capable of producing.
Let’s look at some code that shows you how to use requestAnimationFrame to make a sprite called pixie move from the left side of the canvas to the right side. Figure 2-1 shows what this code produces.
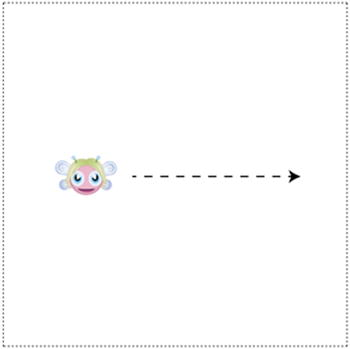
Figure 2-1. Making a sprite move from left to right
function gameLoop(){

  //Loop this function 60 times per second
  requestAnimationFrame(gameLoop);

  //Move the sprite 1 pixel per frame
  pixie.x += 1;

  //Render the stage
  renderer.render(stage);
}

//Call the `gameLoop` function once to get it started
gameLoop();
How does this code work? You can see that the name of this function is gameLoop. The gameLoop function calls requestAnimationFrame and provides itself as an argument.
requestAnimationFrame(gameLoop);
This is what makes the function run in a continuous loop, at approximately 60 times per second.
To make the sprite move, all you have to do is add a value to the sprite’s position. Adding a value of one to the sprite’s x position each time the loop is updated will make the sprite move to the right at a rate of one pixel per frame.
pixie.x += 1;
This is what makes the sprite gradually move from left to right. If you want to make the sprite move faster, use a bigger number, such as 3 or 5. If you want the sprite to move in the opposite direction (from right to left), use a negative number, such as -1 or -4. If you want the sprite to move down, add a positive number to the sprite’s y property. If you want it to move up, add a negative number to the sprite’s y property.
But, don’t forget your last step: make sure you render the stage:
renderer.render(stage);
If you don’t render the stage, you won’t see anything!
And that’s really all there is to it! Just change any sprite property by small increments inside the loop, and it will animate over time. Here’s the complete JavaScript code that loads the image, creates the sprite, and makes it move.
//Create a Pixi stage and renderer
let stage = new Container(),
  renderer = autoDetectRenderer(512, 512);
document.body.appendChild(renderer.view);

//Set the canvas’s border style and background color
renderer.view.style.border = "1px dashed black";
renderer.backgroundColor = "0xFFFFFF";

//load an image and run the `setup` function when it’s done
loader
  .add("images/pixie96x48.png")
  .load(setup);

//Define any variables that are used in more than one function
let pixie;

function setup() {

  //Create the `pixie` sprite
  pixie = new Sprite(resources["images/pixie96x48.png"].texture);

  //Center the sprite vertically on the stage
  pixie.y = renderer.view.height / 2 - pixie.height / 2;

  //Add the sprite to the stage
  stage.addChild(pixie);

  //Start the game loop
  gameLoop();
}

function gameLoop(){

  //Loop this function 60 times per second
  requestAnimationFrame(gameLoop);

  //Move the sprite 1 pixel per frame
  pixie.x += 1;

  //Render the stage
  renderer.render(stage);
}
![]() Note Notice that the pixie sprite variable has to be defined outside the setup and gameLoop functions, so that you can access it inside both of them.
Note Notice that the pixie sprite variable has to be defined outside the setup and gameLoop functions, so that you can access it inside both of them.
You can animate a sprite’s scale, rotation, or width and height—whatever! You’ll see many more examples of how to animate sprites ahead.
Using Velocity Properties
To give you more flexibility, it’s a good idea to control a sprite’s movement speed, using two velocity properties: vx and vy. vx is used to set the sprite’s speed and direction on the x axis (horizontally). vy is used to set the sprite’s speed and direction on the y axis (vertically). Instead of changing a sprite’s x and y values directly, first update the velocity variables, and then assign those velocity values to the sprite. This is an extra bit of modularity that you’ll need for interactive game animation.
The first step is to create vx and vy properties on your sprite and give them an initial value.
pixie.vx = 0;
pixie.vy = 0;
Setting vx and vy to 0 means that the sprite isn’t moving.
Next, inside the game loop, update vx and vy with the velocity that you want the sprite to move at. Then assign those values to the sprite’s x and y properties.
pixie.vx = 1;
pixie.vy = 1;

pixie.x += pixie.vx;
pixie.y += pixie.vy;
This will make the sprite move down and to the right at one pixel each frame. Here are the new setup and gameLoop functions that use this new code to produce the effect you can see in Figure 2-2.
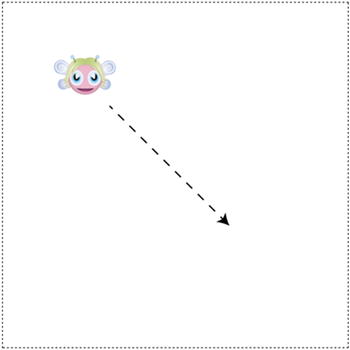
Figure 2-2. Making a sprite move down and to the right
function setup() {

  //Create the `pixie` sprite
  pixie = new Sprite(resources["images/pixie96x48.png"].texture);

  //Position the sprite at the top left corner
  pixie.x = 0;
  pixie.y = 0;

  //Initialize the sprites’s velocity variables
  pixie.vx = 0;
  pixie.vy = 0;

  //Add the sprite to the stage
  stage.addChild(pixie);

  //Start the game loop
  gameLoop();
}

function gameLoop(){

  //Loop this function 60 times per second
  requestAnimationFrame(gameLoop);

  //Update the sprite’s velocity
  pixie.vx = 1;
  pixie.vy = 1;

  //Apply the velocity values to the sprite’s position to make it move
  pixie.x += pixie.vx;
  pixie.y += pixie.vy;

  //Render the stage
  renderer.render(stage);
}
When you run this code, the pixie sprite will move down and to the right at one pixel per frame. To make the sprite move at different speeds and in different directions, just change the values of the vx and vy variables in the same way you changed the x and y values in the previous example.
You’ll see ahead how modularizing a sprite’s velocity with vx and vy velocity properties helps with keyboard and mouse pointer control systems for games, as well as making it easier to implement physics.
Game States
As a matter of style, and to help modularize your code, I recommend structuring your game loop like this:
//Set the game’s current state to `play`:
let state = play;

function gameLoop() {

  //Loop this function at 60 frames per second
  requestAnimationFrame(gameLoop);

  //Update the current game state:
  state();

  //Render the stage to see the animation
  renderer.render(stage);
}

function play() {

  //Move the sprite 1 pixel to the right each frame
  anySprite.x += 1;
}
```
(The variable anySprite in this sample code could be the name of any sprite in your program.)
You can see that the gameLoop is calling a function called state 60 times per second. What is the state function? It’s been assigned to another function called play, with this code:
let state = play;
That means that state just points to play. And that means all the code in the play function will also run at 60 times per second whenever state is called inside the gameLoop, like this:
state();
Yes, I know, this is a bit of a head-swirler! But don’t let it scare you, and spend a minute or two walking through in your mind how those functions are connected. Figure 2-3 illustrates visually how all this code fits together.
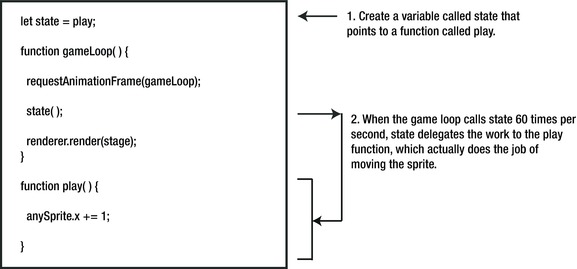
Figure 2-3. Using states to help modularize your code
As you’ll see ahead, structuring your game loop like this will make it much, much easier to do things such as switching game scenes and levels. It means that you can completely change what your game or application is doing by simply pointing the state variable to any other function that contains the next bit of code you want to run.
state = anyOtherFunction;
You can do this at any point in your code when you want your application’s behavior to change. Because the game loop is just calling the same state variable, the behavior will change automatically when you point state to a different function. You can use functions from the same JS file, load them with a <script> tag, or import them with ES6 modules (or any other module system, such as CommonJS or AMD). In fact, this simple bit of code architecture is the key to scaling your games and applications in a modular and manageable way.
Here’s how the code from the previous example can be re-factored to this new model:
//Define any variables that are used in more than one function
let pixie;

//Set the game’s current state to `play`:
let state = play;

function setup() {

  //Create the `pixie` sprite
  pixie = new Sprite.(resources["images/pixie96x48.png"].texture);

  //Position the sprite at the top left corner
  pixie.x = 0;
  pixie.y = 0;

  //Initialize the sprites’s velocity variables
  pixie.vx = 0;
  pixie.vy = 0;

  //Add the sprite to the stage
  stage.addChild(pixie);

  //Start the game loop
  gameLoop();
}

function gameLoop(){

  //Loop this function 60 times per second
  requestAnimationFrame(gameLoop);

  //Update the current game state
  state();

  //Render the stage
  renderer.render(stage);
}

function play() {

  //Update the sprite’s velocity
  pixie.vx = 1;
  pixie.vy = 1;

  //Apply the velocity values to the sprite’s position to make it move
  pixie.x += pixie.vx;
  pixie.y += pixie.vy;
}
Now that we’ve got a solid model for animating sprites, let’s add a few more features: keyboard control, physics, and limiting the area of movement.
![]() Note This basic game loop will be all you need for most games or applications. But, for a more full-featured game loop, including fine control over the frame rate, consider using a helper library called Smoothie: github.com/kittykatattack/smoothie.
Note This basic game loop will be all you need for most games or applications. But, for a more full-featured game loop, including fine control over the frame rate, consider using a helper library called Smoothie: github.com/kittykatattack/smoothie.
Keyboard Movement
With just a little more work, you can build a simple system to control a sprite, using the keyboard. To simplify your code, I suggest that you use this custom function, called keyboard, that listens for and captures keyboard events. It’s really just a convenient wrapper function for HTML keyup and keydown events, so that you can keep your application code clutter-free and easier to write and read. Here’s the complete keyboard function. (You’ll also find it at its code repository at github.com/kittykatattack/keyboard.)
function keyboard(keyCode) {
  let key = {};
  key.code = keyCode;
  key.isDown = false;
  key.isUp = true;
  key.press = undefined;
  key.release = undefined;

  //The `downHandler`
  key.downHandler = event => {
    if (event.keyCode === key.code) {
      if (key.isUp && key.press) key.press();
      key.isDown = true;
      key.isUp = false;
    }
    event.preventDefault();
  };

  //The `upHandler`
  key.upHandler = event => {
    if (event.keyCode === key.code) {
      if (key.isDown && key.release) key.release();
      key.isDown = false;
      key.isUp = true;
    }
    event.preventDefault();
  };

  //Attach event listeners
  window.addEventListener(
    "keydown", key.downHandler.bind(key), false
  );
  window.addEventListener(
    "keyup", key.upHandler.bind(key), false
  );

  //Return the `key` object
  return key;
}
The keyboard function is easy to use. Create a new keyboard object, like this:
let keyObject = keyboard(asciiKeyCodeNumber);
Its one argument is the ASCII key code number of the keyboard key that you want to listen for. A web search will turn up many lists for all the codes on your computer’s keyboard, but the following are the four we’ll be using in this chapter:
- left arrow: 37
- up arrow: 38
- right arrow: 39
- down arrow: 40
Then assign press and release methods to the keyboard object, like this:
keyObject.press = () => {
  //key object pressed
};
keyObject.release = () => {
  //key object released
};
Keyboard objects also have isDown and isUp Boolean properties that you can use to check the state of each key. Have a look at the keyboardMovement.html file in this chapter’s source code folder to see how you can use this keyboard function to control a sprite, using your keyboard’s arrow keys. Run it and use the left, up, down, and right arrow keys to move the sprite around the canvas, as shown in Figure 2-4.
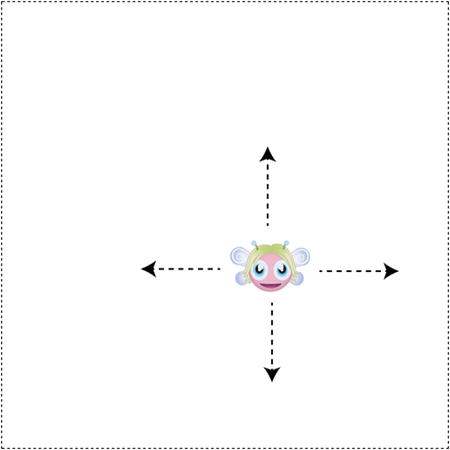
Figure 2-4. Controlling a sprite with the keyboard
Here’s the complete code that uses the keyboard function to create this effect:
//Create a Pixi stage and renderer
let stage = new Container(),
  renderer = autoDetectRenderer(512, 512);
document.body.appendChild(renderer.view);

//Set the canvas’s border style and background color
renderer.view.style.border = "1px dashed black";
renderer.backgroundColor = "0xFFFFFF";

//load an image and run the `setup` function when it’s done
loader
  .add("images/pixie96x48.png")
  .load(setup);

//Define any variables that are used in more than one function
let pixie, state;

function setup() {

  //Create the `pixie` sprite
  pixie = new Sprite(resources["images/pixie96x48.png"].texture);

  //Center the sprite
  pixie.x = renderer.view.width / 2 - pixie.width / 2;
  pixie.y = renderer.view.height / 2 - pixie.height / 2;

  //Initialize the sprites’s velocity variables
  pixie.vx = 0;
  pixie.vy = 0;

  //Add the sprite to the stage
  stage.addChild(pixie);

  //Capture the keyboard arrow keys
  var left = keyboard(37),
      up = keyboard(38),
      right = keyboard(39),
      down = keyboard(40);

  //Left arrow key `press` method
  left.press = () => {

    //Change the sprite’s velocity when the key is pressed
    pixie.vx = -5;
    pixie.vy = 0;
  };

  //Left arrow key `release` method
  left.release = () => {

    //If the left arrow has been released, and the right arrow isn’t down,
    //and the pixie isn’t moving vertically, stop the sprite from moving
    //by setting its velocity to zero
    if (!right.isDown && pixie.vy === 0) {
      pixie.vx = 0;
    }
  };

  //Up
  up.press = () => {
    pixie.vy = -5;
    pixie.vx = 0;
  };
  up.release = () => {
    if (!down.isDown && pixie.vx === 0) {
      pixie.vy = 0;
    }
  };

  //Right
  right.press = () => {
    pixie.vx = 5;
    pixie.vy = 0;
  };
  right.release = () => {
    if (!left.isDown && pixie.vy === 0) {
      pixie.vx = 0;
    }
  };

  //Down
  down.press = () => {
    pixie.vy = 5;
    pixie.vx = 0;
  };
  down.release = () => {
    if (!up.isDown && pixie.vx === 0) {
      pixie.vy = 0;
    }
  };

  //Set the game’s current state to `play`
  state = play;

  //Start the game loop
  gameLoop();
}

function gameLoop(){

  //Loop this function 60 times per second
  requestAnimationFrame(gameLoop);

  //Update the current game state
  state();

  //Render the stage
  renderer.render(stage);
}

function play() {

  //Apply the velocity values to the sprite’s position to make it move
  pixie.x += pixie.vx;
  pixie.y += pixie.vy;
}
This code works by first assigning variables to the four keyboard arrow keys:
var left = keyboard(37),
    up = keyboard(38),
    right = keyboard(39),
    down = keyboard(40);
The press and release methods for each of those four keys are then programmed. For example, if the user presses the left arrow key, the sprite’s horizontal velocity (vx) is set to -5, to make it move left. Its vertical velocity is set to 0, to prevent up or down movement.
left.press = () => {
  pixie.vx = -5;
  pixie.vy = 0;
};
If the user releases the left arrow key, the sprite’s horizontal velocity should be set to 0. But that should only occur if the right arrow key isn’t being pressed, and the sprite isn’t moving up or down. Here’s the code that does all this:
left.release = () => {
  if (!right.isDown && pixie.vy === 0) {
    pixie.vx = 0;
  }
};
But none of these keys actually makes the sprite move! They just set the correct velocity. The sprite won’t move until the play function (which runs in the game loop) updates the sprite’s x and y position with these velocity values, like this:
function play() {
  pixie.x += pixie.vx;
  pixie.y += pixie.vy;
}
This is what actually makes the sprite move!
Now that you know the basics of making a sprite move, let’s make the effect more interesting, by adding some simple physics.
![]() Note In Chapter 7, you’ll learn how to add mouse and touch interactivity.
Note In Chapter 7, you’ll learn how to add mouse and touch interactivity.
Adding Acceleration and Friction
Acceleration is a physics effect that makes a sprite gradually speed up. Friction is an effect that makes the sprite gradually slow down. You can apply acceleration and friction to your keyboard-controlled sprite, so that when you press a key, the sprite gradually speeds up, and when you release a key, it gradually slows down.
The first step is to add acceleration and friction properties to the sprite object. Each axis (x and y) requires its own acceleration and friction property.
pixie.accelerationX = 0;
pixie.accelerationY = 0;
pixie.frictionX = 1;
pixie.frictionY = 1;
You also need a number that represents the speed at which the sprite should accelerate and a number that represents the amount of drag that will slow the sprite down.
pixie.speed = 0.2;
pixie.drag = 0.98;
The speed value is going to be used to set the acceleration, and the drag value is going to be used to set the friction.
The next step is to configure the press and release methods, so that they set the correct acceleration and friction on the sprite. If the user presses the left key, for example, you want to set accelerationX to the negative value of speed (to make the sprite move left). And you want to set friction to 1, which essentially means “don’t apply friction while the sprite is accelerating.”
left.press = () => {
  pixie.accelerationX = -pixie.speed;
  pixie.frictionX = 1;
};
![]() Note Why set friction to 1? As you’ll soon see, the frictionX and frictionY values are multipliers. Any value multiplied by 1 means that the value will be unchanged. For example: 1 times 5 equals 5, right? So a friction value of 1 means “no friction.”
Note Why set friction to 1? As you’ll soon see, the frictionX and frictionY values are multipliers. Any value multiplied by 1 means that the value will be unchanged. For example: 1 times 5 equals 5, right? So a friction value of 1 means “no friction.”
If the user releases the left key, and the right key isn’t currently being pressed, set the acceleration to 0 to stop the sprite from moving and add drag to the friction.
left.release = () => {
  if (!right.isDown) {
    pixie.accelerationX = 0;
    pixie.frictionX = pixie.drag;
  }
};
You need to apply this same format to the three remaining keys, as follows:
//Up
up.press = () => {
  pixie.accelerationY = -pixie.speed;
  pixie.frictionY = 1;
};
up.release = () => {
  if (!down.isDown) {
    pixie.accelerationY = 0;
    pixie.frictionY = pixie.drag;
  }
};

//Right
right.press = () => {
  pixie.accelerationX = pixie.speed;
  pixie.frictionX = 1;
};
right.release = () => {
  if (!left.isDown) {
    pixie.accelerationX = 0;
    pixie.frictionX = pixie.drag;
  }
};

//Down
down.press = () => {
  pixie.accelerationY = pixie.speed;
  pixie.frictionY = 1;
};
down.release = () => {
  if (!up.isDown) {
    pixie.accelerationY = 0;
    pixie.frictionY = pixie.drag;
  }
};
As the last step, you have to use acceleration and friction to make the sprite move inside the looping play function. Add the acceleration to the velocity, multiply the velocity by the friction, and then, finally, make the sprite move, by adding the velocity to the sprite’s position.
function play() {

  //Apply acceleration by adding the acceleration to the sprite’s velocity
  pixie.vx += pixie.accelerationX;
  pixie.vy += pixie.accelerationY;

  //Apply friction by multiplying sprite’s velocity by the friction
  pixie.vx *= pixie.frictionX;
  pixie.vy *= pixie.frictionY;

  //Apply the velocity to the sprite’s position to make it move
  pixie.x += pixie.vx;
  pixie.y += pixie.vy;
}
Run the physics.html file in the chapter’s source code files for a fun interactive example of this code in action. Use the arrow keys to fly the pixie sprite all around the stage, as shown in Figure 2-5. She’ll accelerate and decelerate smoothly in all directions.
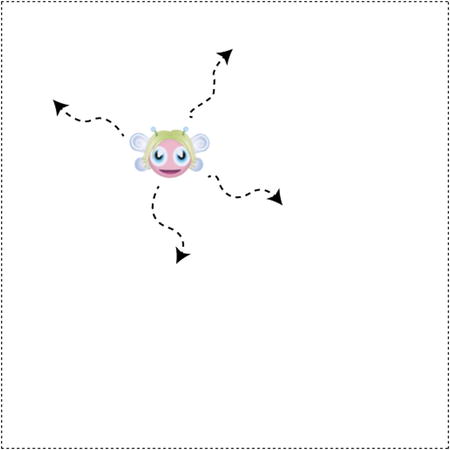
Figure 2-5. Smooth movement in all directions with acceleration and friction
The pixie sprite can now fly freely around the canvas, but let’s make it a bit more interesting, by adding another important physics property.
Adding Gravity
Gravity is a constant downward force on an object. You can add it to a sprite by applying a constant positive value to the sprite’s vertical velocity, like this:
pixie.vy += 0.1;
You have to add this line of code to the play function, along with the other bits of code that help calculate the sprite’s velocity. Here’s how you could add it to our current example:
function play() {

  //Acceleration and friction
  pixie.vx += pixie.accelerationX;
  pixie.vy += pixie.accelerationY;
  pixie.vx *= pixie.frictionX;
  pixie.vy *= pixie.frictionY;

  //Gravity
  pixie.vy += 0.1;

  //Move the sprite
  pixie.x += pixie.vx;
  pixie.y += pixie.vy;
}
If you add this code and run the sample file again, you’ll discover that you must keep pressing the up key to prevent being pulled down by gravity, as illustrated in Figure 2-6.
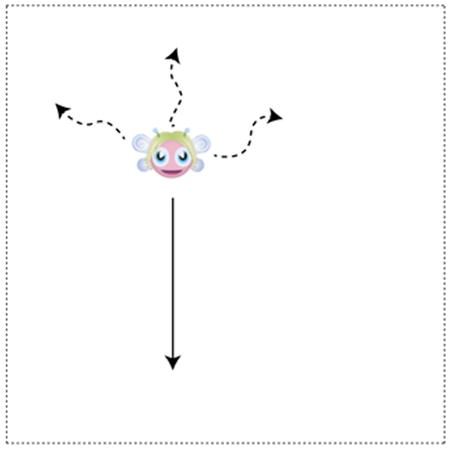
Figure 2-6. Using gravity to pull the sprite down
By experimenting with different gravity and accelerationY values, you’ll be able to fine-tune this effect for an engaging player experience.
![]() Note This is as much as you need to now to get started using physics with games. For a totally comprehensive exploration of game physics for 2D action games, see this book’s companion, Advanced Game Design with HTML5 and JavaScript (Apress, 2015).
Note This is as much as you need to now to get started using physics with games. For a totally comprehensive exploration of game physics for 2D action games, see this book’s companion, Advanced Game Design with HTML5 and JavaScript (Apress, 2015).
Containing Movement Inside a Fixed Area
So far, we can make our pixie sprite fly around the canvas, but we have no way of keeping her inside the canvas boundaries. We can fix that by using a special custom function called contain. Before you see the code that makes contain work, let’s find out how to use it. The contain function takes two arguments: a sprite and an object literal with x, y, width, and height properties. Here’s how we could apply it to our pixie sprite:
contain(pixie, {x: 0, y: 0, width: 512, height: 512});
This code will contain the sprite’s position inside the 512 by 512 pixel area defined by the object literal. The contain function also returns a value that gives you useful information about the collision. For example, here’s how you could contain the sprite inside the canvas area and access the collision value:
let collision = contain(
  pixie,
  {
    x: 0,
    y: 0,
    width: renderer.view.width,
    height: renderer.view.height
  }
);
If the sprite bumps into any of the containing object’s boundaries, the collision value will tell you which side the sprite bumped into: "left", "top", "right", or "bottom". Here’s how you could use that collision value to find out which boundary the sprite hit.
if(collision) {
  if collision.has("left") console.log("The sprite hit the left");
  if collision.has("top") console.log("The sprite hit the top");
  if collision.has("right") console.log("The sprite hit the right");
  if collision.has("bottom") console.log("The sprite hit the bottom");
}
If the sprite doesn’t hit a boundary, the value of collision will be undefined.
To see the contain function in action, run the containingMovement.html example file in this chapter’s source code. Use the arrow keys to fly the pixie sprite around, and watch her bounce against the sides of the canvas when she hits them. Figure 2-7 illustrates what you’ll see.
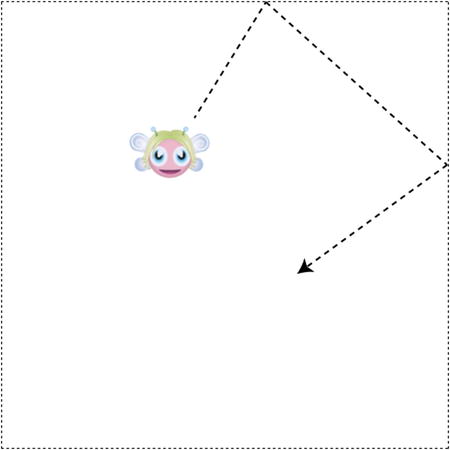
Figure 2-7. Bouncing the sprite against the sides of the canvas
Here’s the new code from the play function that uses contain to achieve this effect:
function play() {

  //Apply physics to the sprite’s position
  pixie.vx += pixie.accelerationX;
  pixie.vy += pixie.accelerationY;
  pixie.vx *= pixie.frictionX;
  pixie.vy *= pixie.frictionY;
  pixie.x += pixie.vx;
  pixie.y += pixie.vy;

  //Use the `contain` function to keep the sprite inside the canvas

  let collision = contain(
    pixie,                           //The sprite you want to contain
    {                                //An object that defines the area
      x: 0,                          //`x` position
      y: 0,                          //`y` position
      width: renderer.view.width,    //`width`
      height: renderer.view.height   //`height`
    }
  );

  //Check for a collision. If the value of `collision` isn’t
  //`undefined` then you know the sprite hit a boundary

  if (collision) {

    //Reverse the sprite’s `vx` value if it hits the left or right
    if (collision.has("left") || collision.has("right")){
      pixie.vx = -pixie.vx;
    }

    //Reverse the sprite’s `vy` value if it hits the top or bottom
    if (collision.has("top") || collision.has("bottom")){
      pixie.vy = -pixie.vy;
    }
  }
}
The contain function automatically keeps the sprite contained in the area defined by the object literal. The bounce effect is achieved by the last two lines of the preceding code. If the sprite hits the left or right boundary, its vx velocity is reversed. If it hits the top or bottom boundary, its vy velocity is reversed.
 pixie.vx = -pixie.vx;
 pixie.vy = -pixie.vy;
That’s what makes the sprite bounce.
But where do those values, "left", "top", "right", and "bottom" come from, and what does collision.has mean? Let’s find out by taking a quick look at JavaScript sets, and then how they’re used in the custom contain function.
Using ES6 Sets
The collision value that was returned by the contain function in the previous example is actually a JavaScript ES6 Set object. A set is similar to an array, but with a few interesting little tweaks. Before we take a look at how the contain function works, let’s find out what an ES6 Set object is and how to use it. Following is a quick-start guide to using ES6 sets.
You can create a set like this:
let things = new Set();
Set objects are like arrays, and you can populate them with data, like this:
let things = new Set(["left", "top", "right", "bottom"]);
One of the biggest differences between sets and arrays is that sets can only contain one instance of any value. This is a really good thing and why sets can be really handy for situations in which you don’t need or want duplicate values. For example, in an array, you could have the value "left" two or three times. But in a set, you can only have one "left". If you try to add a second or third "left", nothing happens.
You can add a new item to a set with the add method, as follows:
things.add("anotherThing");
You can remove an item with the delete method.
things.delete("right");
You can completely empty a set of all its items by using the clear method.
things.clear();
If you want to find out whether a set contains a value, use the has method.
if (things.has("left")) {/* Then do this... */}
Using has is a much faster operation than checking whether items exist in an array using indexOf. Sets are optimized for these kinds of look-ups; it’s their super-power!
You can also initialize a set with any pre-existing array.
let things = new Set(anyArray);
That will give you a set that uses the values in the preexisting array, but if there are any duplicate values in the array, they’ll be removed from the set. Remember: Sets can only contain unique values.
If you want to find out how many elements are in a set, use the size property.
things.size;
And if you want to loop through all the elements in an set, use the forEach method.
things.forEach(element => console.log(element));
This will loop through and display all the elements in a set.
![]() Note ES6 also has a highly memory-efficient version of sets called WeakSet. WeakSets let the garbage collector immediately re-use the memory space of any elements in the set that were deleted, even if those elements reference other objects being used somewhere else in your code. This is a great feature, because it can prevent possible memory leaks. The trade-off is that WeakSet only supports the add, has, and delete methods. If that’s not a problem, it is preferable to use WeakSet instead of Set anywhere in your code.
Note ES6 also has a highly memory-efficient version of sets called WeakSet. WeakSets let the garbage collector immediately re-use the memory space of any elements in the set that were deleted, even if those elements reference other objects being used somewhere else in your code. This is a great feature, because it can prevent possible memory leaks. The trade-off is that WeakSet only supports the add, has, and delete methods. If that’s not a problem, it is preferable to use WeakSet instead of Set anywhere in your code.
Why should you use sets instead arrays or object literals? If you only want or need no more than one kind of value in the set, or want to prevent duplicate values from being added, use a set. If you want a high-performance look-up of values using the has method, use a set. If you want to be certain of preventing memory leaks, use a WeakSet. If you want more features and more flexibility, use arrays or object literals. Arrays and object literals are cool. We love them, and they’re not going anywhere!
OK, got it? Now that you know all about ES6 sets, let’s find out how a set was used to create the custom contain function we used in the previous example.
The contain Function
The contain function has two parameters: the sprite and the container object that defines the x, y, width, and height values of the containment areas. The code checks to see if the sprite’s x and y position has crossed any of those boundaries. If it has, the sprite is moved back to those boundary limits. A set called collision is used to track which boundary side the collision occurred on: "left", "top", "right", or "bottom". The collision set is returned by the function. If the sprite didn’t touch any of the boundaries, collision is set to undefined, to indicate that there was no collision. Here’s the complete contain function that does all this:
function contain(sprite, container) {

  //Create a `Set` called `collision` to keep track of the
  //boundaries with which the sprite is colliding
  var collision = new Set();

  //Left
  //If the sprite’s x position is less than the container’s x position,
  //move it back inside the container and add "left" to the collision Set
  if (sprite.x < container.x) {
    sprite.x = container.x;
    collision.add("left");
  }

  //Top
  if (sprite.y < container.y) {
    sprite.y = container.y;
    collision.add("top");
  }

  //Right
  if (sprite.x + sprite.width > container.width) {
    sprite.x = container.width - sprite.width;
    collision.add("right");
  }

  //Bottom
  if (sprite.y + sprite.height > container.height) {
    sprite.y = container.height - sprite.height;
    collision.add("bottom");
  }

  //If there were no collisions, set `collision` to `undefined`
  if (collision.size === 0) collision = undefined;

  //Return the `collision` value
  return collision;
}
Keeping sprites contained inside a boundary is a very common task in games and interactive applications, and you’ll see many more examples of how the contain function is used later in this book. (You’ll find the contain function in this chapter’s source code or its code repository: github.com/kittykatattack/contain.)
Summary
You’ve now got all the basic skills you need to make sprites move. You’ve learned how to update a sprite’s position inside a game loop, how to use velocity variables, and how to apply useful physics properties such as acceleration, friction, and gravity. You also learned how to structure a modular application, by using a state variable to control the program flow. You’ll see how useful this will be a little later in this book when our applications become a bit more sophisticated. I’ve also covered the basics of interactive animation, by using a keyboard controller to move a sprite, and that will prepare you for Chapter 8, which takes a closer look at interactive animation using mouse and touch events. But we’re not done with animation yet—far from it! In Chapter 5, you’ll learn all about keyframe animation, and in Chapter 6, you’ll learn how to create transitions and use tweening effects.
So far in this book, we’ve looked at how to make sprites using images, but Pixi lets you make sprites just as easily using lines and shapes. Let’s find out how, in the next chapter!