
Take a look in the Xcode Developer Tools folder and you will see quite a collection of programs, most of which we haven't covered. And indeed from talking with other Mac developers it seems that many of these hardly get used at all. Some, such as the OpenGL graphics audio tools, are specialist utilities that are of interest mainly to developers working in these areas. Others, like USB Prober, IORegistryExplorer, Syncrospector, and iSync Plug-in Maker are advanced utilities aimed at developers who are writing software to communicate or synchronize with external hardware. Those utilities are unlikely to be of interest to you as a learning developer and I won't be covering them here. Still others are what I call Cinderella utilities: high-quality, useful programs that somehow don't get the exposure that they deserve.
In this chapter you'll be looking at a grab bag of Cinderella utilities that, although often overlooked, provide really useful support for any developer creating software for Mac OS X or iPhone. There is no common theme to these—apart from being useful, that is—and so, in no particular order, here are my favorite support tools.
The icon is arguably the first thing your users will see of your product. It's also going to be sitting there in your user's Dock (at least while it's running) alongside your other applications. It ought to look good, bearing in mind the company it will be keeping. Some application icons are things of photorealistic beauty, but the best icons are more than just that. A good icon also carries the brand for the application. Interestingly, an icon doesn't necessarily have to pictorially illustrate what the application is for—actually, some of the best-known applications have quite abstract icons. Figure 13-1 shows some instantly recognizable and memorable application icons: I don't need to tell you which applications they are, do I?

So it makes good sense for you to devote some effort to making an attractive and memorable icon for your application. Inevitably you need to bring some graphic-design expertise into your work here—if you don't have that expertise, talk to someone who does.
Adding an icon to your application involves creating a special type of resource file called an icns file. The easiest way to create one of these is using Icon Composer. You import images into Icon Composer and then generate the icns file. Finally you add the icns file as a resource to your Xcode project.
Let's add an icon to the Daily Journal application.
You also need to have access to a good graphics package to create the basic image for your icon, and Apple doesn't supply one of those for free in the Xcode Tools (hey, what did you expect?). There are many great tools to choose from, including free tools such as the GIMP. I use Photoshop because I know my way around it. I'll just go through the process briefly here: obviously the detailed processes for image manipulation will vary from one image-editing application to another, so I won't go into unnecessary detail.
I started with a stock image—a photorealistic image of an open book with a pen. I made this image big enough to look good at 512 × 512 pixels, as this is the largest icon size used in Mac OS X. I used the various lasso tools to cut out the image from the background, and then added a drop shadow and some text. I shaped the text so that it followed—more or less—the curve of the page. This gave me the image shown in Figure 13-2.

Notice that I kept a layer with the original untouched image file. This is prudence born of experience—it's always a good idea to leave the original and work on a copy, because you will make mistakes! Notice also that I have a layer that just provides a white background for the image. Since the icon will have transparency and shape, you can use a background layer here to make sure that you have properly cut out the original background and that the drop shadow works OK. Try a few different background colors.
Having saved the Photoshop image, I exported it as a transparent Portable Network Graphics (PNG) file. This is a good format for bringing in to Icon Composer.
If you want to follow along with this next section, you can use your own PNG file or the one provided in the download for this Chapter (it's called DJIcon.png).
Start up Icon Composer (it's in /Developer/Applications/Utilities/). The program window shows a set of image wells representing different sizes, ranging from 16 pixels square to 512 pixels square.
Now find the 512 × 512 pixel PNG icon image file and drag it over the largest image well. You should see something like Figure 13-3.

The good news is that if you have provided a 512 × 512-pixel icon you probably won't need to supply any of the others. The display system in Mac OS X will handle the resizing to give you the other icon sizes. You can see the effect in the Preview panel, which lets you see how your icon will look at different sizes.
However, because the icon is being resized programmatically it won't always look right. Smaller sizes particularly can look blurred and lose edge definition. If your icon looks ugly or indistinct at different sizes, you can provide a refined image at the appropriate size and drop it into the corresponding image well. The most common case is for the 16-pixel icon.
Icon Composer has two other panels: Masks and Preview. Check out the Masks panel first, in Figure 13-4.

You may be wondering why you need a mask—what is it for? In the old days of small, simple, rectangular icons there was no need for them. Masks are used where the edges of images need to be displayed in a more refined fashion, particularly in terms of shapes and aliasing. Take the icon we are creating here: an open book with a drop shadow. Ideally we would want the icon's outline to follow the outline shape of the book itself so that the background shows through correctly when the icon is seen against a colored or image-based background (see Figure 13-5). Additionally, the icon has a drop shadow. This has a soft edge blending out to the background, so we need a way to manage that in the display of the icon. Those two needs are satisfied by having a mask. It can be very difficult to create precise masks manually, so it's great to know that Icon Composer just does this automatically for you (if you really want to, you can create your own mask image and drag it into this pane, but in my experience Icon Composer does a great job).

As mentioned previously, the Preview pane allows you to see the icon at a range of sizes and against different backgrounds. You can also see how your icon will look in the Dock (View
You can create the icon resource file now. Choose File
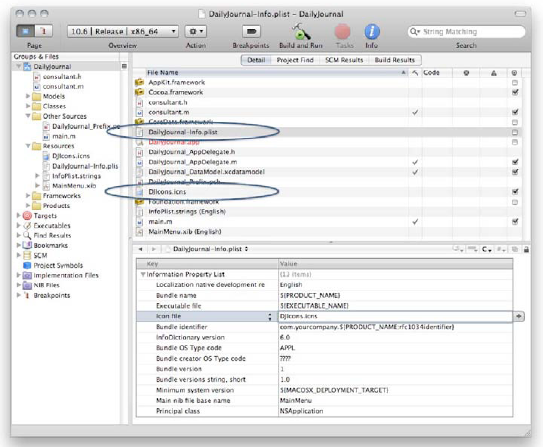
Now open up the DailyJournal project. Drag the DJIcons.icns file that you just created into the Resources folder. In the drop-down dialog window that appears, check the box Copy items into destination group's folder and click the Add button. Next, choose the DailyJournal-Info.plist file in the Detail pane. In the editing pane, look for the Icon file item and enter the name of the new file (see Figure 13-6). As usual with Xcode, there is another way to set the icon file. You can bring up the Get Info window (right-click the DailyJournal target and choose Get Info). Then choose the Properties tab and enter the icon file name in the Icon File field.
Now Build (

And that's it; you're done. It looks good, doesn't it? Using Icon Composer makes it easy for you to create professional-quality icons for your applications.
It's easy to overlook Pixie as a lightweight and not very useful utility—on the face of it, it simply provides a magnified view of the display. Actually, though, it is a remarkably useful tool, and I use it in most of my projects. Here is a quick tour (I have to admit that there is no tour other than a quick tour for Pixie—even the help-file content is only two lines long!).
Start up Pixie (/Developer/Applications/Graphics Tools), and you see the magnified view of your current mouse location (see Figure 13-8; in this figure the mouse pointer is over the three Manage... buttons in the Journal Entry window):

If that were all Pixie did, it would be a little dull. However, there is more to it: you can change the size of the inspection window and set the magnification (Use the Magnify menu, or
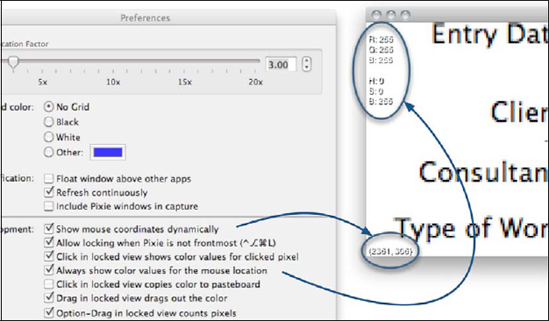
I find this view useful for various purposes. By checking the options labeled Show mouse coordinates dynamically and Always show color values for the mouse location you can see continuously updated values for the location and color of the mouse pointer. The typeface used for displaying these values is sadly not very readable, but the close-up in Figure 13-9 shows where to find them.
If you want to know the precise size of an object, you can use Pixie to select an area and count the pixels bound by the selection. When you need to know the color of an object in a window, you can copy the color under the mouse pointer to the clipboard (Pixie calls this the "pasteboard") and it will be stored there in the form [NSColor colorWithCalibratedRed:0.400000 green:0.647059 blue:0.015686 alpha:1.0], which you can use directly within Xcode. To do this, select the checkbox entitled Click in locked view copies color to pasteboard, then lock Pixie's viewport so it contains the colors you are interested in. Finally, click on a colored pixel in the viewport. You can now paste the color string in your editor. Or you can drag a color into a system color well for use in other applications. In each case you would simply select the relevant option in the Preferences window.
One or two options don't work as well as they might. The grid, though potentially very useful for alignment purposes, seems to come and go in slightly unpredictable ways. The option to show Pixie in the capture is most strange: by default Pixie's own window is invisible to itself, so when you mouse over it you actually see the underlying window as if Pixie were not there. If you check the option to show the Pixie window, then Pixie also captures its own window. This can lead to some interestingly bizarre recursive capture effects, which can be briefly engaging, but frankly there is no obvious application for this option.
Well, that about wraps it up for Pixie. Small but well formed, a sadly neglected but very useful utility.
Here is the scenario: I had a copy of the DailyJournal project stored on the network. I took a copy off to my desktop and did some work on it but forgot to copy it back. The next day I connected my notebook to the network and took a copy of that project to work on it. I added an icon to the desktop copy, and an installation package document to the notebook copy, and made changes to the same class code file in both.
Oops. I now have three copies of the same project, completely out of sync. Oh, and I had neglected to read Chapter 11 of this book and so none of these folders was under Subversion source-code management. What a mess. I could work painstakingly through each folder to figure out the differences, but that's what computers are for, isn't it? Let's see what FileMerge can do to help.
The first thing to do, in the interest of safety, was to copy all three folders somewhere where I could work on them. For clarity I gave the three project folders different names: Network copy, Desktop copy, and Notebook copy.
Next I started up FileMerge. This utility starts up with a small interface window: its default operation is to compare two files or folders, so that is what you see. However, if you expand the window a little vertically, it pops open to show some additional options that suit what we want to do here; see Figure 13-10.
Note
FileMerge is a bit of an oddity from a usability perspective. This "popping open" behavior, for example: why didn't the developer use a disclosure arrow, or More/Less buttons, either of which would be more Mac-like? FileMerge also uses a drop-down list to launch a new window where you would normally expect just to make a choice between options in the same window. To me this breaks the cardinal usability rule of not surprising your user. We'll be returning to the topic of usability in a lot more detail in the next chapter.
FileMerge allows you to compare the contents of two child folders against a common original folder (called an ancestor). I entered the location of the Network copy as the ancestor, and the Notebook and Desktop copies as respectively the Left and Right derived versions. The use of "Left" and "Right" as descriptions here is quite arbitrary, by the way (another usability flaw): they are flags that identify the two versions that you want to compare. These also identify the two panels in the comparison view, which you will see a little later.
The final thing to consider was what to do once I had figured out where the most relevant files belonged. FileMerge has the option of a merge folder that holds the correct version of each file as the result of the compare operation. I created a new folder called Fixed copy. The final FileMerge setup looked like Figure 13-10:

OK, ready to go. I clicked the Compare button. After a short pause I saw the result (see Figure 13-11).

This report carries a lot of information. Files and folders shown grayed-out are identical. Those shown in normal text indicate a difference between the left and right versions (I could safely ignore any differences in build, since that folder's contents are rebuilt at compile time anyway). Those shown in italics indicate a file added or removed. Selecting any entry shows a brief message in the status area (at the bottom of the window) describing the change or difference. If there are a lot of files and folders, you can use the Exclude checkboxes to narrow down the list displayed.
OK, the file consultant.m shows some significant differences, so I decided to take a closer look. I selected that entry and then chose Comparison from the View dropdown menu (here's that bit of poor usability). The file-comparison window that appears shows the left and right files with the differences highlighted (see Figure 13-12).

The highlighting in this window shows not only the differences but also how they compare to their ancestor file. Looking down the file contents, the first difference is a comment added to each file. These comments (differences 1 and 2) don't actually conflict with each other, and FileMerge simply indicates where the content departs from the ancestor.
The next difference (3) is highlighted in gray. The arrow pointing to the left indicates that the left file has changed with respect to the ancestor file. The final difference is highlighted in red to show a conflict. This means that both copies of the file have had the same line of code changed from the version in the ancestor file.
In each case you can choose which version is valid for the final merge file, and in fact you can see how the merge file will look by pulling up the splitter handle near the bottom of the window.
I chose to keep the left-hand version of difference 1 and difference 2 (this means that I effectively delete the comment from the right-hand version. I decided to unwind the change made in the left-hand copy revealed in difference 3 and to choose the right-hand version in difference 4.
Warning
When you are choosing actions you might think (at least, I did) that choosing the Neither option in the Actions drop-down list would result in the file reverting to the ancestor copy. Sadly, it doesn't. It literally chooses neither the left nor the right version, and you end up with no code at all for this line in the merge file! Use this action with caution.
The final step here was to save the merge file (File
For the other files there were no conflicts, simply files added to one side or another or changed on one side or the other. In each case, the thing to do was to select the file and choose the appropriate action from the Merge drop-down list. Where a file had been added to one copy but not the other I chose the copy with the added file. Where a file was on both copies and had changed on one copy but there were no conflicts, I chose the changed copy. In each case the message at the bottom of the FileMerge window showed which copy was which, and FileMerge duly put the appropriate file into the Fixed copy folder. In the case of the grayed-out folders I simply chose the left file (it could have been either since they are identical) and I left the build folder alone (I chose the Merge action Remove) since it would get rebuilt by Xcode.
There remained one slight complication: the xcodeproj project/folder. When I looked at that I noticed that there were quite a number of issues. I had .pbxuser and .perspective3 files for the user accounts on both computers and a single project.pbxproj file. I could choose Remove for the .pbxuser and .perspectivev3 files since these are regenerated when needed. Looking at the .pbxproj file it was clear that the main changes were due to the addition of DJIcons to the right (desktop) copy. That fit well with what I knew I had done, so I reckoned it was safe to use the right copy of this file.
At the end of this process I had a new Fixed copy folder that held the files containing the correct versions. I opened the project and checked that all was well.
FileMerge is a sophisticated and capable utility, if a little quirky in usability terms. If you need an effective method to manage the business of comparing and merging the contents of folders and text files, it's there waiting for you.
In a sense you have already encountered the Property List Editor. When you choose a Plist file in the Detail pane in the Xcode Workspace you will see an editor that shows a structured view of your plist file. In fact, this file is an XML file and can also be read into a text editor like TextEdit. (However, I prefer a more sophisticated editor like TextMate for its color-coding. I also like the code-folding feature that allows you to collapse and hide parts of the plist structure that you don't want to look at. You can get a trial copy of TextMate from http://macromates.com/.) Figure 13-13 shows the DailyJournal-Info.plist file in both the Xcode view and in TextMate.

Both views have their advantages (I am a great fan of plain-text views—it's harder to hide problems in plain text!). Actually, the standalone Property List Editor offers few real advantages to the Xcode developer over simply using the editing panel in Xcode Workspace. However, it has one feature that you may find useful—the ability to open binary .plist files. For reasons that seem to have to do with performance, Apple chose back in version 10.2 of Mac OS X to start generating .plist XML files in a binary format. Anyway, if you were to look at the plist file for a program such as TextEdit, you would find that it looks like Figure 13-14 in TextMate:

That's not much use if you like a hierarchical view, or even a plain-English view. That's where Property List Editor is useful. Having read in a binary file such as this one, you can save it in normal text-based XML format (use the File
The last utility you'll be looking at in this chapter is the Help Indexer. But you'll be learning a bit more than that: this section is about building an HTML-based help system for your application, and the Help Indexer is part of that process.
Have you ever reached for the Help menu in an application, only to see the terse message "Help isn't available for [insert name of application here]"? Personally, I find it a tad unfriendly. While Mac software has an inbuilt advantage when it comes to usability (as you will see in the next chapter) it does no harm to include some helpful hints for your user about how to get the best out of your killer application.
The collection of help pages for your application is really just a collection of web pages, in XHTML format. You can create your help system using any tool you like to make a local collection of static XHTML pages. These can include text, images, and even multimedia resources. There are great resources available in the Developer Documentation: search for "Apple Help Programming" for a good entry point. For this section I am going to focus on enhancing the DailyJournal application by adding a set of help pages with text and images and making them available through the Apple Help mechanism.
You can use any tool to create your pages. I use RapidWeaver, which is a great application for quickly putting together professional-looking websites. You could just as easily use Coda, BBEdit, TextMate, iWeb, or any of a host of similar tools.
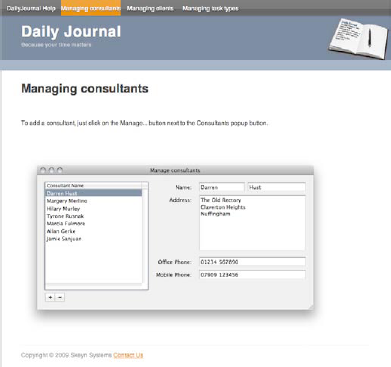
As always, there is some planning and setting up to do. First, here is the page layout that I decided on: there is a welcome page that describes how to create a new journal entry, and a simple menu leading to three further pages dealing with the three secondary windows (see Figure 13-15):
Obviously you need to add some help content—text, images, and so on—to these web pages. Good writing for web pages is a discipline in and of itself, and a detailed description is way beyond the scope of this book. However, there are a few points to bear in mind when writing help web pages:
Keep the pages short unless a long description is really necessary.
Put the salient points near the top of the page—many people never venture below "the fold" on a web page.
Use diagrams only where they add to the message, and keep them small.
Make the page title as meaningful as possible—this is the text that will show up in a help search later on. You can use the meta-description tag to provide a more verbose description that will show up as a tooltip and as the second line in any search results (see Listing 13-1 and Figure 13-20).
The next thing you need to do is add some meta tags to the <head> element of the welcome page: these help to identify that page to the Help Indexer and Xcode as the entry point for help. See Listing 13-1—much of the <head> element has been omitted for clarity, indicated by [...].
Example 13-1. Meta Tags in Index.html
<!DOCTYPE html PUBLIC "-//W3C//DTD XHTML 1.0 Strict//EN"
"http://www.w3.org/TR/xhtml1/DTD/xhtml1-strict.dtd">
<html xmlns="http://www.w3.org/1999/xhtml">
    <head>
[...]
        <meta name="AppleTitle" content="DailyJournal Help" />
        <meta name="AppleIcon"
content="DailyJournal/DailyJournalIcon16.png" />
        <meta name="description"
content="Online help for the Consultant's Daily Journal application" />
[...]
</head>
[...]
The AppTitle meta tag is used, as you will see shortly, to identify the entry point into our help pages. The 16-pixel PNG image will be used in the Help menu—of course, there has to be an image file at this location. The description tag provides text that will appear as a tooltip when doing help searches. For this reason you should add meta name="description" tags to each of the HTML files in the collection of help web pages.
Once you have created and configured the welcome page and other pages, it's time to run the Help Indexer. To do this, start up the program in /Developer/Applications/Utilities/. The interface is very simple, asking for a help folder location. The folder in this case is the folder that contains the index.html and other files (see Figure 13-16):

The Help Indexer acts in much the same way as a search spider on a conventional web page: it reads the textual content of each web help page and follows any links that it finds to other pages. It uses the meta AppleTitle tag to identify the home page out of the collection of web help pages. All of this information is then packaged up into the index that is used by the help search function and stored in this folder with the name DailyJournal.helpindex. The application's Search Help function is able to read this index and point to the relevant location in the help page collection.
The next step is to add this complete folder to the DailyJournal project. Open the project in Xcode, select the Resources item in the Groups & Files list, right-click, and choose Add

This should give you a project window like the one in Figure 13-18. The final step is to edit the DailyJournal-Info.plist file so that it links to the help folder and the welcome file. Choose the .plist file in the Detail pane so that you have the content in the code editor window. Next, right-click on the Information Property List title and choose Add Row from the contextual menu. This adds a blank row to the .plist file and pops up a menu of available .plist keys. Choose Help Book directory name and add the value DailyJournal (as that was the name of the folder containing help content). Add another row with the key Help Book Identifier, and set the value of this to DailyJournal Help. Note that this is the same as the value that you put into the meta tag for AppleTitle in the help welcome page (look back to Listing 13-1).

Let's review Figure 13-18. The Resources item now has the help folder (DailyJournal) and this is also configured in the DailyJournal-Info.plist file as a directory named Help Book. The help index has been generated and is also embedded in the project. The welcome page, index.html, has meta tags with content that mirrors the identifier in the .plist file.
Now, to test our work. If you are following along with the downloaded project, start up DailyJournal. Choose Help

Check that you can navigate between the different pages using the top menu. Now, try a search. Type the word client into the search box and press Return. You will see a set of results. For each result the page title is shown, and beneath that is the text that was entered as the meta description tag. This also appears as a tooltip if you hover over the result. Click any result to see the page. See Figure 13-20.

As a final step, let's add a Help button to one of the user interface windows and link it to our new help pages.
We'll start with the code. The first thing to do is to create an IBAction declaration and implementation. You'll need this to connect the Help button when we create it. Listing 13-2 has the declaration (you will need to add the code in bold).
Notice that we are importing Carbon libraries here (the Apple Help functions are held in Carbon.framework), so the next thing to do is to add this framework to the project. In summary, you do a right-click on Other Frameworks in the Groups & Files list, then choose Add
Example 13-2. DailyJournal_AppDelegate.h
#import <Cocoa/Cocoa.h>#import <Carbon/Carbon.h>@interface DailyJournal_AppDelegate : NSObject { NSWindow *window; NSPersistentStoreCoordinator *persistentStoreCoordinator; NSManagedObjectModel *managedObjectModel; NSManagedObjectContext *managedObjectContext; } @property (nonatomic, retain) IBOutlet NSWindow *window; @property (nonatomic, retain, readonly) NSPersistentStoreCoordinator *persistentStoreCoordinator; @property (nonatomic, retain, readonly) NSManagedObjectModel *managedObjectModel; @property (nonatomic, retain, readonly) NSManagedObjectContext *managedObjectContext; - (IBAction)saveAction:sender;OSStatus MyGotoHelpPage (CFStringRefpagePath, CFStringRef anchorName); - (IBAction) loadHelpForJournalEntry:(id)sender; @end
The implementation of the action in DailyJournal_AppDelegate.m calls a local function called MyGotoHelpPage (I took this directly from the Developer Documentation). This function in turn calls the help function AHGotoPage.
Note
The relevant help page with the example code is actually quite hard to find, so here is how to get to it. Search for AHGotoHelpPage (note the lowercase to; It's easy to get this wrong, particularly as GoTo seems correct on the face of it!) and in the results list look for a Full Text result entitled Opening your Help Book in Help Viewer. Select that item. Now, in the table of contents open Opening Your Help Book in Help Viewer and then click on Loading a Help Book Page.
Our IBAction passes in the name of the HTML page that we want to load. That's it (there are other options available—check the Developer Documentation as suggested previously). The function and action are shown in Listing 13-3, with the new code in bold (most of the rest of the class code has been omitted for clarity, indicated by [...]).
Example 13-3. New Code in DailyJournal_AppDelegate.m
[...]
/**
 Implementation of MyGotoHelpPage
 Taken from Apple Developer Documentation
 */

OSStatus MyGotoHelpPage (CFStringRef pagePath, CFStringRef anchorName) {
    CFBundleRef myApplicationBundle = NULL;
    CFStringRef myBookName = NULL;
    OSStatus err = noErr;
     myApplicationBundle = CFBundleGetMainBundle();
    if (myApplicationBundle == NULL) {
        err = fnfErr;
        goto bail;
    }
    myBookName = CFBundleGetValueForInfoDictionaryKey(
        myApplicationBundle,
        CFSTR("CFBundleHelpBookName"));
    if (myBookName == NULL) {
        err = fnfErr;
        goto bail;
    }
    if (CFGetTypeID(myBookName) != CFStringGetTypeID()) {
        err = paramErr;
    }
    if (err == noErr) err = AHGotoPage (myBookName, pagePath, anchorName);
bail:
    return err;
}

/**
 Action calling the MyGotoHelp function with the correct help page
 */

- (IBAction) loadHelpForJournalEntry:(id)sender {
    MyGotoHelpPage(CFSTR("index.html"), NULL);
}
[...]
Now move to Interface Builder and open the Journal Entries window. Add a help button (the small circular button with a question-mark image). Position it next to the Add/Remove buttons below the Journal Entries list. We're just going to point this button at the welcome page in the help pages. Right-click on the new button, drag to the DailyJournal_AppDelegate controller, and choose the action loadHelpForJournalEntry:. Once again I am not going to spell this out—you are way past that! Save the NIB and return to Xcode, Build and Run. You should see the new button in your main window. Click on this, and you should see the help window (see Figure 13-21).

If you wanted to extend this idea to add other help buttons pointing at different help pages, the simplest way would be to have a number of loadHelpFor... methods, but that approach would be inelegant and begging for refactoring. Another approach would be to change the loadHelpForJournalEntry: method into a general-purpose loadHelpForTopic: method, and check within the method for the sender in order to determine which help page to load. I'm not going to give you the line-by-line detail of how to do this, but have a look at the TemperatureConverterAppDelegate class in the TemperatureConverter project (first introduced in Chapter 6 but revisited several times since). In the convertTemperature: method you can check which NSTextField supplied the starting temperature, and that determines which calculation the method then runs. You could use this approach, with some adaptation, to determine which of a variety of help buttons was clicked and thus which help page needs to be loaded.
Well, I hope you enjoyed that trip off the beaten track, and I hope you are sold on some of these lesser-used utilities and tools. I think they generously repay the modest effort that you put in to learn them.
In a sense, you'll be staying on the back roads in the next chapter, when we take a look at usability and accessibility—two hugely important topics but ones that rarely get an outing in Mac developer books. In the next chapter, you'll learn how you might make your application more usable in general or more usable by users with impairments. I hope you'll stick with me, and turn the page to Chapter 14.