
Now that we’ve discussed the UITableView and UINavigationController (as well as their
associated classes and views) and built an iPhone application using them,
you’ve actually come a long way toward being able to write applications on
your own. With these classes under your belt, you have the tools to attack a
large slice of the problem space that iPhone applications normally
address.
In this chapter, we’ll look at some of the other view controllers and classes that will be useful when building your applications: simple two-screen views (utility applications), single-screen tabbed views (tab bar applications), a view controller that takes over the whole screen until dismissed (modal view controller), and a view controller for selecting video and images (image picker view controller).
Utility applications perform simple tasks: they have a one-page main view and another window that is brought into view with a flip animation. The Stocks and Weather applications that ship with the iPhone and iPod touch are examples of applications that use this pattern. Both are optimized for simple tasks that require the absolute minimum of user interaction. Such applications are usually designed to display a simple list in the main view, with preferences and option settings on the flip view. You access the flip view by clicking a small i icon from the main view.
The Xcode Utility Application template implements the main view and gives the user access to a flipside view. It is one of the most extensive templates in Xcode and it implements a fully working utility application, which is fortunate as the documentation Apple provides regarding this type of application is otherwise somewhat lacking in details.
Open Xcode and start a new project. Click Application under the iPhone OS group, and then select Utility Application from the New Project window as the template (see Figure 6-1). Click Choose, and name the project “BatteryMonitor” when requested.
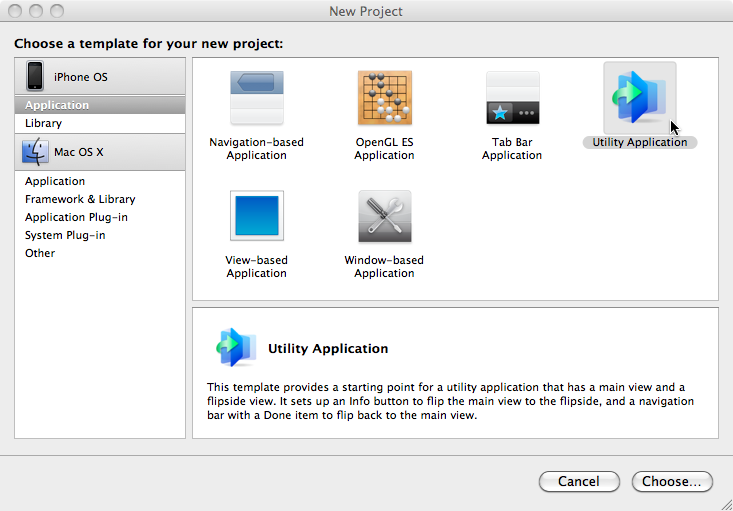
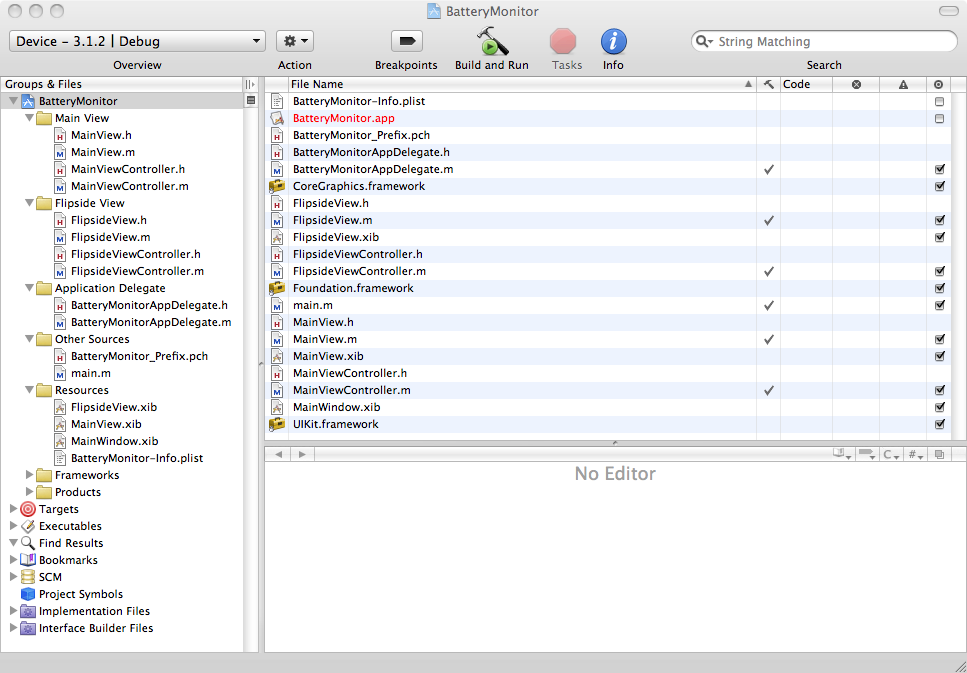
Figure 6-2 shows the Project window in Xcode and lists the files the template generates. The names of the classes the template generates are meant to hint strongly at what each of them does, but if not, Xcode has conveniently put the relevant classes into groups. Since the template implements all the logic necessary to control the application’s interface, we only need to implement our own UI and some basic logic to control it.
Click Build and Run to compile and run the application. You’ll find that it’s a fully working utility application, although with blank main and flipside views.
The somewhat descriptive name of the application has
probably revealed its purpose already. We’re going to implement a
simple battery monitoring application, and to do so I’m going to
introduce you to the UIDevice class.
This is a singleton class that provides
information relating to your hardware device. From it you can obtain
information about your device such as its unique ID, assigned name,
device model, and operating system name and version. More importantly,
you can also use the class to detect changes in the device’s
characteristics such as physical orientation, and register for
notifications about when these characteristics change.
Note
A singleton class is restricted in some manner such that only one instance of the class can be created. This design pattern can be used to coordinate actions or information across your application. Although some argue that because use of singleton classes introduces global state into your application, and is therefore almost by definition a bad thing, I think that when it is used correctly the pattern can simplify your architecture considerably.
Information—and notifications—about the device battery state weren’t introduced until the 3.0 update of the SDK. Even now the implementation is somewhat coarse-grained (notifications regarding charge level changes occur in only 5% increments).
Warning
The UIDevice class has several limitations, and some developers have
resorted to the underlying IOKit framework to obtain more information
about the device (e.g., better precision to your battery
measurements). However, while Apple marked the IOKit as a public
framework, no documentation or header files are associated with
it.
If you use this framework and try to publish your application on the App Store, it is possible that Apple will reject it for using a private framework despite its apparent public status. In the official documentation, IOKit is described as “Contain[ing] interfaces used by the device. Do not include this framework directly.”
First we’re going to build our interface. Double-click on the MainView.xib file (located in the Resources group in the Groups & Files pane) to open it in Interface Builder. You’ll see that the default view that Xcode generated already has the Info button to switch between the main and flipside views. Not only is it there, but it’s connected to the template code, so it’s already working.
The UI will consist of just three UILabel elements, so drag and drop three
labels from the Library (⌘-Shift-L, then choose Cocoa Touch→Inputs & Values) onto the Main View
window, and position them roughly as shown in Figure 6-3.
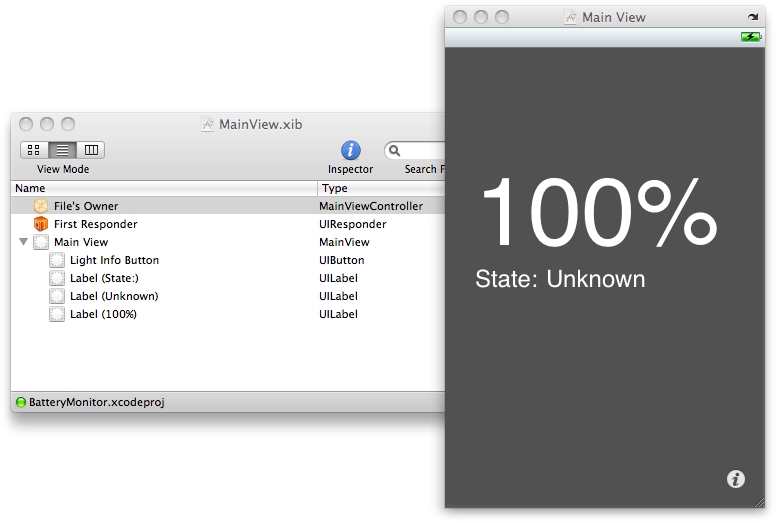
You can use the Attributes Inspector (⌘-1) to change the font size and color as I have done with my view. We’ll be setting the text of the labels from inside our code, but for now I’ve added placeholder text (“100%”, “State:”, and “Unknown”) using the Attributes tab so that I can position the labels more neatly and get a better idea of how my UI will look.
That’s all we’re going to do to the main view. Save the file and
return to Xcode. Open the FlipsideView.xib file. You’ll see
that this time the default view that Xcode generates already has a
navigation bar and a Done button present and connected to the template
code. You need to add a label (UILabel) and switch (UISwitch) to this interface, as shown in
Figure 6-4.
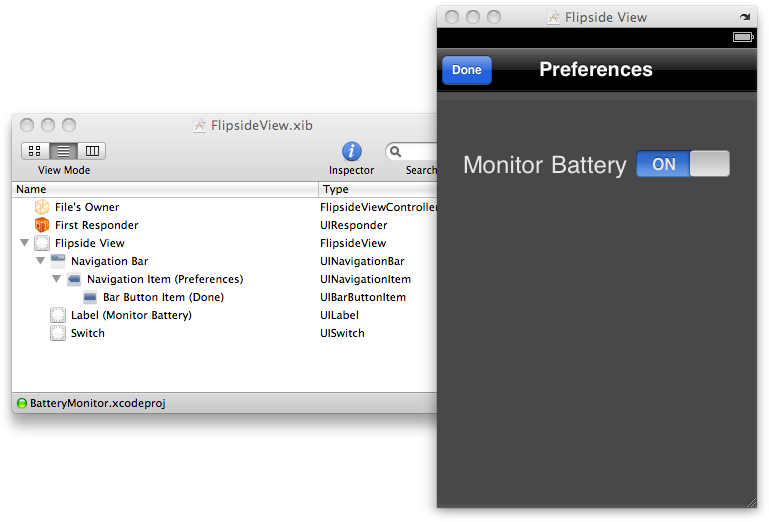
Drag and drop the two elements from the Library window (⌘-Shift-L, then choose Cocoa Touch→Inputs & Values) into the Flipside View window and position them as shown in Figure 6-4. Set the text of the label to “Monitor Battery”, and using the Attributes pane of the Inspector window set the label text color to white. The default black text won’t show up well against the dark gray background of the view. That’s all that’s needed. Save the file in Interface Builder, and open the BatteryMonitorAppDelegate.h file in Xcode (it’s in the Application Delegate folder in the Groups & Files pane).
In the interface, we need to add a Boolean variable that stores the flag that indicates
whether the app is currently monitoring the battery state. Add the
following inside the @interface
declaration:
BOOL monitorBattery;
We also need to make this a property. Add the following next to the existing @property declarations (but before the
@end):
@property (nonatomic) BOOL monitorBattery;
This means that in the
BatteryMonitorAppDelegate.m implementation file,
we also need to synthesize the property to create the accessor
methods. Open that file and add the following next to the existing
@synthesize statements:
@synthesize monitorBattery;
By default, we’re going to make it so that the application
starts with battery monitoring turned off, so in the applicationDidFinishLaunching: method we
must set the flag to NO. Add the
following to the top of the method:
self.monitorBattery = NO;
-
Note that we access the variable by using the accessor method generated by the
@synthesizestatement. It’s important to realize that accessing the instance variable directly usingmonitorBatteryand accessing the property via a call toself.monitorBattery:are completely different in Objective-C since you are sending a message when you invoke the property, rather than directly accessing the variable.
Next, open the FlipSideViewController.h interface file (you can find it in the Flipside View folder in the Groups & Files pane) and add the lines shown in bold:
@class BatteryMonitorAppDelegate;IBOutlet UISwitch *toggleSwitch;
}
-
This is a forward declaration of the
BatteryMonitorAppDelegateclass, which allows you to refer to it elsewhere in this file.-
We’re going to be using the switch (
UISwitch) we added to the NIB file to toggle battery monitoring on and off. Because we’re storing the state of that switch in the application delegate, we need this variable so that we can refer to the application delegate.-
Finally, we need to add a
UISwitchvariable and mark it as anIBOutletfor Interface Builder.
In the FlipSideViewController.m
implementation file, you first need to import the application delegate
header file (using the @class
forward declaration in the interface file does not remove the need to
#import this header file). See
Chapter 4 for details on the #import statement. Add the following line to
the top of FlipSideViewController.m:
#import "BatteryMonitorAppDelegate.h"
Next, make the changes shown in bold to the viewDidLoad: method:
- (void)viewDidLoad {
    [super viewDidLoad];
    self.view.backgroundColor = [UIColor viewFlipsideBackgroundColor];
    self.title = @"Preferences";

    appDelegate = (BatteryMonitorAppDelegate *)
      [[UIApplication sharedApplication] delegate];
    toggleSwitch.on = appDelegate.monitorBattery;
}Now modify the done: method to save
the status of the toggle switch back to the application delegate when you close the
flipside view:
- (IBAction)done {
    appDelegate.monitorBattery = toggleSwitch.on;
    [self.delegate flipsideViewControllerDidFinish:self];
}
Finally, add the following code to the dealloc: method (this releases the toggleSwitch variable):
- (void)dealloc {
    [toggleSwitch release];
    [super dealloc];
}
The modifications we need to make to the main view controller are a bit more extensive than those we’ve made thus far. Open the MainViewController.h interface file in Xcode and make the changes shown in bold. You can find this file in the Main View folder of the Groups & Files pane.
#import "FlipsideViewController.h" @class BatteryMonitorAppDelegate;- (NSString *)batteryLevel;
- (NSString *)batteryState:(UIDeviceBatteryState )batteryState;
@end
-
This is a forward declaration of the
BatteryMonitorAppDelegateclass, which allows you to refer to it elsewhere in this file.-
This is a reference to the application delegate.
-
Here, we’ve added an
IBOutletfor each of the two labels in the main view that we’re going to be updating: one for the battery charge level and the other for the current charging state.-
This method will be called when we receive a notification that there has been a change in the state of the battery.
-
This is a convenience method to wrap the call to
UIDeviceto query the current battery level and return anNSStringthat we can use for the text of one of theUILabels.-
This is another convenience method to convert a
UIDeviceBatteryStateinto anNSStringthat we can use for the text of one of the otherUILabels.
Save the interface file, and then open the MainViewController.m implementation file in Xcode. We declared a reference to the application delegate in the interface file, so now we need to import the relevant header file. Add this line at the top:
#import "BatteryMonitorAppDelegate.h"
We also need to grab a reference to the application delegate in
the viewDidLoad: method.
Uncomment the method (remove the lines that consist solely of /* and */
immediately before and after the method) and add the lines shown in
bold:
- (void)viewDidLoad {
    [super viewDidLoad];
    appDelegate = (BatteryMonitorAppDelegate *)
      [[UIApplication sharedApplication] delegate];

}
Next, we need to implement the viewWillAppear:
method. At this point, you may be wondering what the difference is
between this method and the previous viewDidLoad: method. The answer is that
they’re called at different times: viewWillAppear: will be called each time the
view becomes visible, while viewDidLoad: is called only when the view is
first loaded. Because the changes we make to the preferences (on the
flip side) affect the main view, we need to use viewWillAppear:, which is triggered each
time we flip back from the preferences view to the main view. Add the
following to MainViewController.m:
- (void)viewWillAppear:(BOOL)animated {
    UIDevice *device = [UIDevice currentDevice];
    device.batteryMonitoringEnabled = appDelegate.monitorBattery;

    if (device.batteryMonitoringEnabled) {
        [[NSNotificationCenter defaultCenter] addObserver:self
           selector:@selector(batteryChanged:)
           name:@"UIDeviceBatteryLevelDidChangeNotification" object:nil];

        [[NSNotificationCenter defaultCenter] addObserver:self
           selector:@selector(batteryChanged:)
           name:@"UIDeviceBatteryStateDidChangeNotification" object:nil];
    } else {

        [[NSNotificationCenter defaultCenter] removeObserver:self
          name:@"UIDeviceBatteryLevelDidChangeNotification" object:nil];
        [[NSNotificationCenter defaultCenter] removeObserver:self
          name:@"UIDeviceBatteryStateDidChangeNotification" object:nil];
    }
    levelLabel.text = [self batteryLevel];
    stateLabel.text = [self batteryState:device.batteryState];

    [super viewWillAppear:animated];

}-
This sets the current battery monitoring state in the singleton
UIDeviceobject to correspond to our current battery monitoring state, as determined by the switch on the flipside view.-
If battery monitoring is enabled, we’re going to add our object as an observer to receive notifications when either the battery level or the battery state changes. If either of these events occurs, the
batteryChanged:method will be called.-
If battery monitoring is disabled, we’re going to remove the object as an observer for these notifications.
-
In either case, we’ll populate the text of our two
UILabels using the convenience methods (batteryState:andbatteryLevel:, which we’ll define shortly).
Since the object may be registered as an observer when we
deallocate this view, we also need to make sure we remove ourselves as
an observer of any notifications in the dealloc: method. Add the lines shown in bold
to the dealloc: method:
- (void)dealloc {
    [[NSNotificationCenter defaultCenter] removeObserver:self];
    [levelLabel release];
    [stateLabel release];
    [super dealloc];
}
We also need to implement the batteryChanged: method; this method is
called when our application is notified of a change in battery state.
Here, all we’re doing is updating the text of our two labels when we
receive a notification of a change. Add the following to
MainViewController.m:
- (void)batteryChanged:(NSNotification *)note {
    UIDevice *device = [UIDevice currentDevice];
    levelLabel.text = [self batteryLevel];
    stateLabel.text = [self batteryState:device.batteryState];
}
Finally, we need to implement those convenience methods. Add the following to MainViewController.m:
- (NSString *)batteryLevel {
UIDevice *device = [UIDevice currentDevice];
NSString *levelString = nil;
float level = device.batteryLevel;
if ( level == -1 ) {
levelString = @"---%";
} else {
int percent = (int) (level * 100);
levelString = [NSString stringWithFormat:@"%i%%", percent];
}
return levelString;
}
- (NSString *)batteryState:(UIDeviceBatteryState )batteryState {
NSString *state = nil;
switch (batteryState) {
case UIDeviceBatteryStateUnknown:
state = @"Unknown";
break;
case UIDeviceBatteryStateUnplugged:
state = @"Unplugged";
break;
case UIDeviceBatteryStateCharging:
state = @"Charging";
break;
case UIDeviceBatteryStateFull:
state = @"Full";
break;
default:
state = @"Undefined";
break;
}
return state;
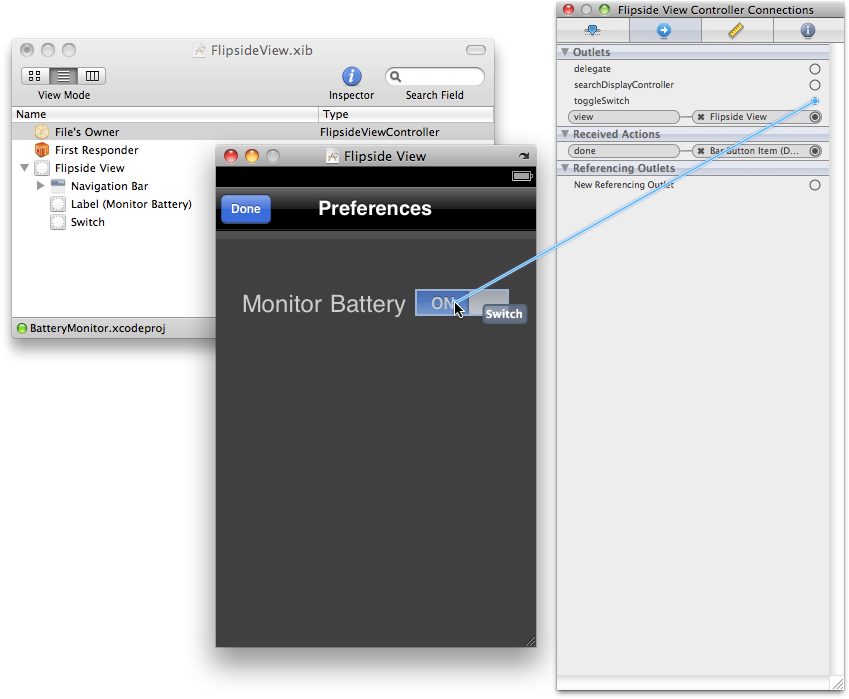
}We’re done in Xcode; let’s go back into Interface Builder to make all the necessary connections. Locate FlipsideView.xib under Resources in the Groups & Files pane and double-click it to open it in Xcode.
In the FlipsideView.xib file we need to
make only one connection: between the toggleSwitch outlet and the UISwitch. To make the connection, click File’s Owner in the
FlipsideView.xib window, and then drag the
toggleSwitch outlet from the
Connections Inspector (⌘-2) to the switch, as shown in Figure 6-5.
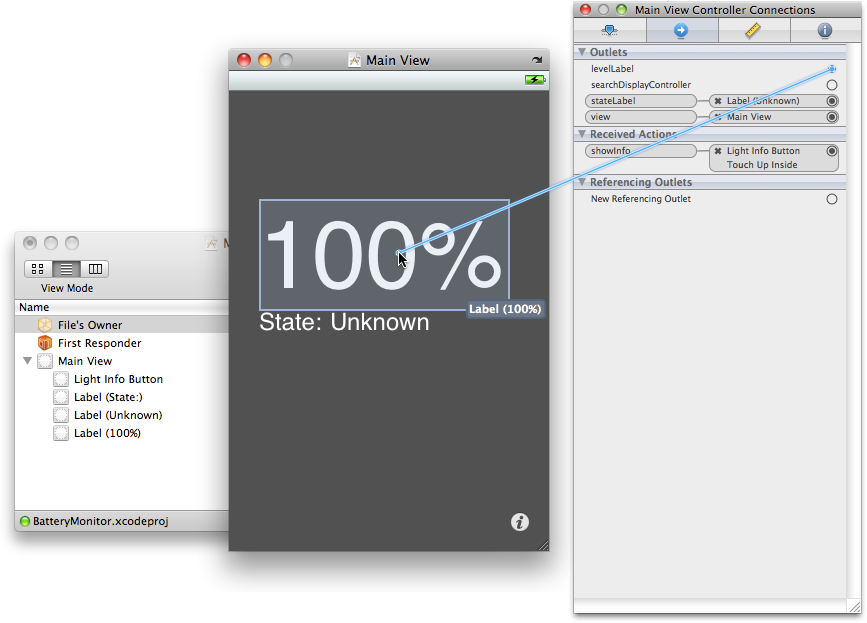
Save the FlipsideView.xib file and open the
MainView.xib file. This time we need to make two
connections. Just as you did in FlipsideView.xib,
select File’s Owner and use the Connections Inspector to make
connections between the levelLabel
and stateLabel outlets and their
corresponding UILabel in the main
view, as shown in Figure 6-6.
At this point, we’re done. We’ve implemented everything we need
to in code, and we’ve linked all of our outlets to our interface.
Unfortunately, since this application makes use of the UIDevice battery monitoring API, and iPhone
Simulator doesn’t have a battery, we’re going to have to test it
directly on the device. We covered deploying applications onto your
iPhone or iPod touch at the end of Chapter 3.
To deploy the application onto your device, you need to edit the Bundle Identifier inside the BatteryMonitor-Info.plist file to something appropriate, and you need to set the Code Signing Identity associated with the project in the Project Info window (although in most cases Xcode will select an appropriate signing identity automatically, if you have more than one developer profile installed this isn’t guaranteed). For more information, see Putting the Application on Your iPhone in Chapter 3. Once this is done, change the Active SDK in the overview window to “iPhone Device” and click Build and Run. Xcode should compile and deploy the application onto your iPhone.
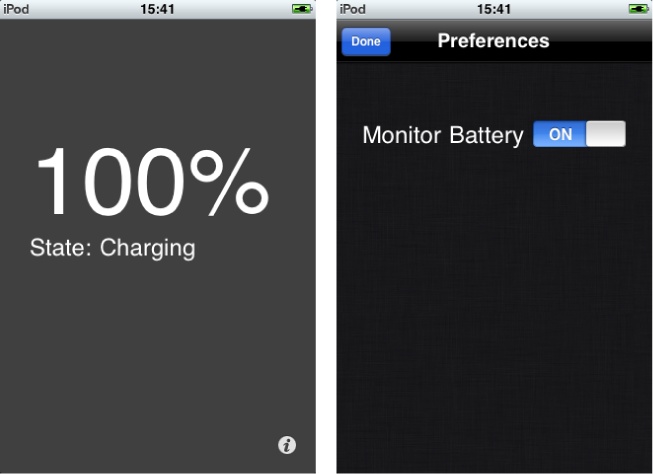
Click the Info button in the bottom-lefthand corner to switch to the flip side and enable battery monitoring in the preferences pane. Click the Done button and return to the main view. Both the battery level and the state should have changed. While the battery level only changes every 5%, you can get some immediate feedback by plugging and unplugging your device from your Mac. The state should change from “Full” or “Charging” (see Figure 6-7) to “Unplugged”.
If you need to provide a number of different views on the same data set, or separately present a number of different tasks relating to your application, Apple recommends using a tab bar application. Both the iTunes and the App Store applications that ship with the iPhone and iPod touch are examples of applications that use this pattern.
To create a tab bar application, open Xcode and start a new project. Select Tab Bar Application from the New Project window as the template and name it “TabExample” when requested.
Unlike some of the other application templates provided by Apple, there are actually several different approaches you can take to building a tab bar application: loading a tab’s view from a secondary NIB, managing the tab’s view entirely from a view controller, or using a hybrid of these two approaches.
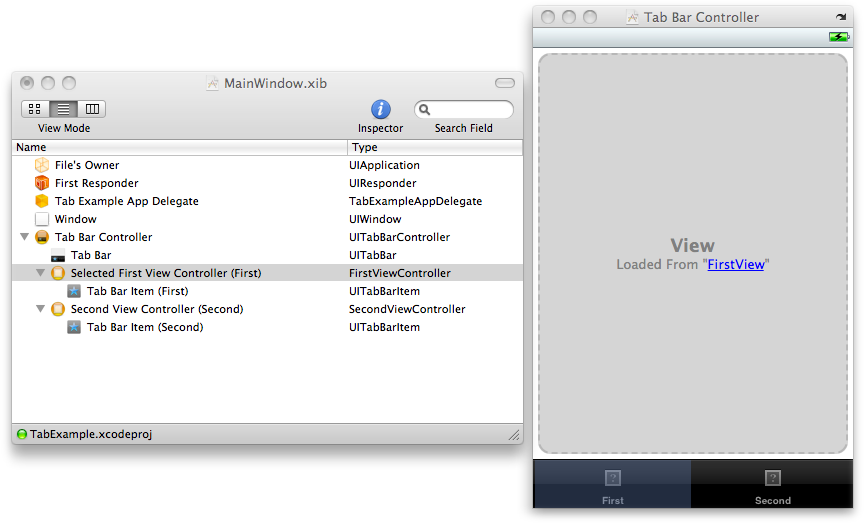
The default template provides a tab bar application with two tab items, but the way the view is managed for each of these items is very different. Double-click MainWindow.xib (it’s in the Resources group) to open it in Interface Builder. Next, make sure MainWindow.xib is the foremost window and switch to List Mode (⌘-Option-2), then fully expand Tab Bar Controller by Option-clicking the disclosure triangle to its left.
In Figure 6-8 you can see that under the Tab Bar Controller entry is the tab bar itself, and then two view controllers, each with a tab bar item.
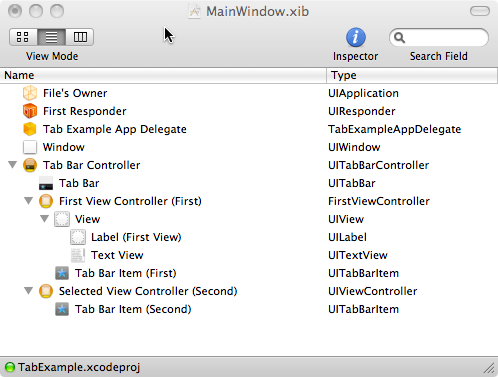
Notice that the “Selected View Controller (Second)” view controller
has type UIViewController. Select it
and open the Attributes Inspector window (⌘-1) and you’ll also see that it
loads its view from the SecondView.xib file that Xcode
generated when you created the new project.
However, the “First View Controller (First)” entry is of type
FirstViewController
rather than UIViewController. The view
here is managed slightly differently. It has no linked NIB file, and the
custom view controller manages its own view.
The template generated by Apple therefore illustrates two very different ways to manage views inside a tab bar application. However, I recommend that you use neither of these two. Instead, I usually approach view management in a slightly different manner: by using a custom view controller class to manage the view, but storing the view outside the MainWindow.xib in a separate NIB file.
Let’s refactor the current template to reflect my prejudices. Don’t worry if you think one of the other approaches sounds better; you should learn enough while refactoring the template to manage your views in either of the other two ways.
In Xcode, create a new View NIB called
FirstView.xib. Then back in Interface Builder
(MainWindow.xib, not the newly created NIB) click
on the UIView managed by “First
View Controller (First)” and press the Backspace key to delete it.
This will also delete its children (a label and text view).
Next, click on “First View Controller (First)” and navigate to the Attributes Inspector (⌘-1). Using the NIB Name drop down, select your newly created FirstView NIB from the list of NIB files in the project.
Note
To add a new View XIB to the project, right-click or Ctrl-click on the Resources group in the lefthand pane in Xcode and select Add→New File. When the New File window opens select User Interface from under iPhone OS, then choose View XIB and click Next. Enter the name for the new NIB and then click Finish.
Now open the FirstView.xib file and click
File’s Owner in the main window. Then, using the Identity Inspector
(⌘-4), change the Class identity of File’s Owner from NSObject to UIViewController. Next, use the Connections
Inspector (⌘-2) to connect the view outlet to the view in
FirstView.xib.
Save both of the NIB files and return to Xcode.
We also need to create a custom view controller for the second
tab view. Go back into Xcode and right-click or Ctrl-click on the
Classes group and select Add→New File.
When the File window opens select a UIViewController subclass from the Cocoa
Touch Class panel, but unlike earlier examples in this book, uncheck
the “With XIB for user interface” box (we already have a
SecondView.xib file in the project). Click Next.
When asked, name the new view controller
“SecondViewController.m”.
Go back to MainWindow.xib in Interface
Builder and click on the “Second View Controller (Second)” entry. In
the Identity Inspector (⌘-4) change the Class identity from UIViewController to SecondViewController.
You don’t need to connect the view outlet as you did for the
FirstView.xib file because Xcode created the
second tab bar item with its outlets connected correctly by
default.
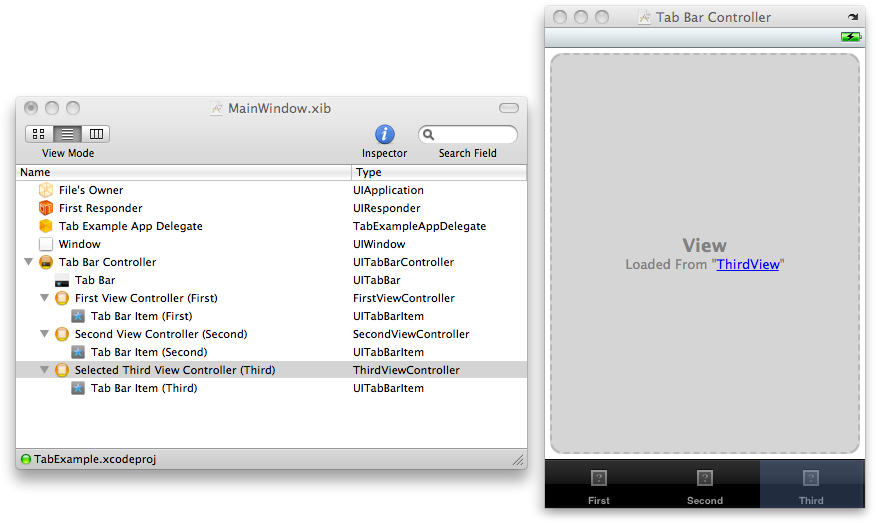
After doing this refactoring, you should end up with a MainWindow.xib file that looks a lot like that shown in Figure 6-9. Make sure you save the NIB file after finishing the refactoring.
Let’s add another tab bar item so that you can see how to create
one from scratch. With MainWindow.xib open in Interface
Builder, drag and drop a new tab bar item (not a tab bar) from the
Library window (under Cocoa Touch→Windows, Views, & Bars) onto the tab bar
controller in the MainWindow.xib window. Click the disclosure triangle
next to the new tab bar item, and you’ll notice that it generates
another view controller with an associated tab bar item. The new view
controller is similar to “Second View Controller (Second)” before
refactoring, with a type of UIViewController. If you check the Attributes
tab of the Inspector window, however, you’ll notice that the new
controller currently has no view associated with it in Interface
Builder, as shown in Figure 6-10.
We now need to add a view controller to manage this tab. Go back
into Xcode and right-click or Ctrl-click on the Classes group and select
Add→New File again. When the File window
opens, select a UIViewController
subclass from the Cocoa Touch Class panel; this time check the “With XIB
for user interface” box, as you need Xcode to generate a NIB. When
asked, name the new view controller “ThirdViewController.m”.
Note
For neatness, you may want to drag the ThirdViewController.xib file from the Classes group to the Resources group. You may also want to rename the ThirdViewController.xib file to ThirdView.xib to keep your naming conventions consistent throughout the application.
After doing this, edit MainWindow.xib in
Interface Builder by changing the type of the newly created “View
Controller (Item)” from UIViewController to ThirdViewController in
the Identity tab of the Inspector window, and then set the NIB name to
ThirdView in the Attributes Inspector
(⌘-1).
You should explore some of the standard tab bar items that Apple provides; for example, expand the newly added third view controller’s disclosure triangle in the MainWindow.xib window. Next, select the tab bar item underneath it and open the Attributes Inspector (⌘-1). Try selecting something other than Custom for its identifier and see what happens.
This example assumes you use the Custom identifier, so make sure you set it back to Custom when you’re done exploring.
After selecting Custom, you should change the name of the item from “Item” to “Third”. Although currently our tab bar item doesn’t have an image, we could associate one with (each of) our tabs using the Image drop down in the Attributes tab. Just drag and drop the image you want to use into the project in the same way you added the images for the City Guide application in Chapter 5. To look like Apple’s icons, your images cannot be larger than 32×32 pixels in size and they must have a transparent background. I’ve found that PNG images between 20 and 30 pixels work well as tab bar icons.
Finally, edit the three NIB files—FirstView.xib, SecondView.xib, and ThirdView.xib—and add a large (in 144 pt font) label saying “1”, “2”, and “3” to each respective view. This way you can confirm that the correct one is being activated. SecondView.xib will have some labels on it that were placed there when Xcode generated the project from its template; you can delete these labels.
Make sure you save all the NIB files. Then, click Build and Run to compile, deploy, and run the application in iPhone Simulator, as shown in Figure 6-11.
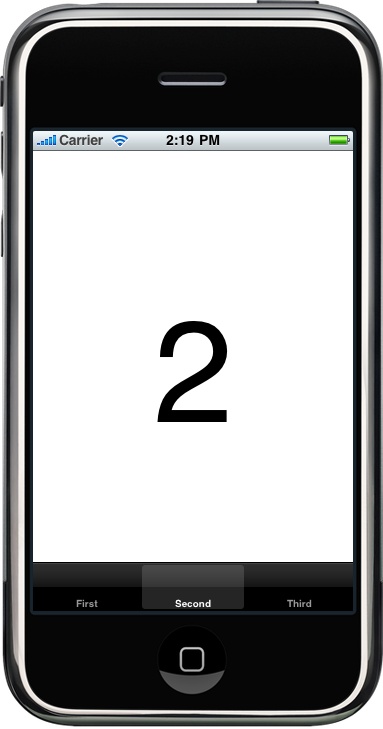
Figure 6-11. The tab bar application running in the simulator with SecondView selected as the active tab
Despite the fact that we haven’t written a single line of code in this section, you should now have a working, if rather basic, tab bar application.
Although I haven’t walked you through the process of building a full-blown application, you should have begun to see the commonalities and familiar patterns emerging in this application. Our application has an application delegate along with three custom view controllers managing each view. This is a very similar arrangement to both the table view application we wrote in Chapter 5 and the utility application we wrote earlier in this chapter.
At this point, you may want to try building your own application on top of the infrastructure we have created so far. Start with something simple where changing something in one view affects the contents of another view. Don’t worry; take your time, and I’ll be here when you get back.
So far in this chapter we’ve looked at two of Apple’s
application templates. However, in this section we’re going to focus
once again on an individual view controller—or rather, a way to
present a view controller to the user. After table
views and the UINavigationController
it’s probably one of the most heavily used ways to present data: it’s the
modal view controller.
You’ll have seen a modal controller in action many times when using your iPhone. A view slides in from the bottom of the screen and is usually dismissed with a Done button at the top of the screen. When dismissed, it slides back down the screen, disappearing at the bottom.
In the main controller we would generally have a button or other UI element; tapping this would trigger an event linked to the following method in the view controller, which would bring up the modal view:
-(void)openNewController:(id)sender {
    OtherController *other = [[OtherController alloc] init];
    [self presentModalViewController:other animated:YES];
    [other release];
}-
We instantiate the view controller that manages the view we wish to display.
-
We present the view managed by the view controller. Note that presenting a view controller modally will explicitly retain it, hence the need for the release in the next line.
-
We release the view controller. Once it is dismissed, the retain count (see The alloc, retain, copy, and release Cycle in Chapter 4) will drop to zero.
In the modal view itself, we would implement a button or some other way to close the view, which would call this method in the view controller:
-(void)doneWithController:(id)sender {
    [self dismissModalViewControllerAnimated:YES];
}
This dismisses the current modal view.
The best way to explain the modal view is to show it in action. For that we’re going to go back to the City Guide application we built in Chapter 5. We’re going to make some fairly extensive changes to it, so you should make a copy of the project first and work with the copy while you make your modifications. In this section, I’ll show you how to take your code apart and put it back together again in an organized fashion. This occurs a lot when writing applications, especially for clients who have a tendency to change their mind about what they want out of the application in the first place.
Open the Finder and navigate to the location where you saved the CityGuide project; see Figure 6-12.
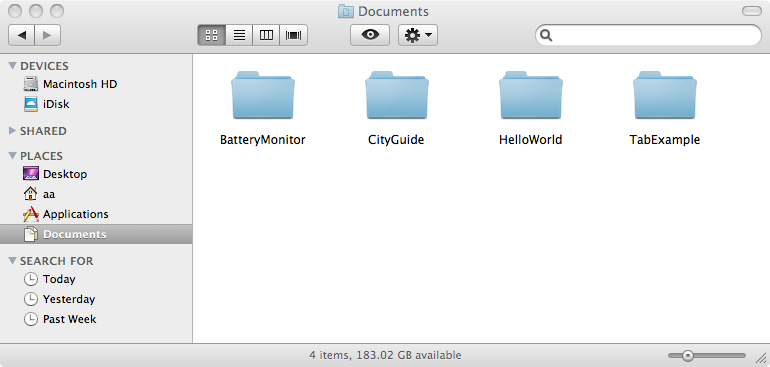
Right-click or Ctrl-click on the folder containing the project
files and select Duplicate. A folder called CityGuide
copy will be created containing a duplicate of our project.
You should probably rename it to something more sensible. I suggest
CityGuide2. Now open the new version of the project
in Xcode and select Project→Rename from
the Xcode menu bar. Enter CityGuide2 when
prompted and click on the Rename button to rename the project.
In Chapter 5, we built an application that lets users both add and delete city entries in our table view. Adding the functionality to delete table view cells was fairly simple; the complicated part was adding the ability to add cities. So, let’s take a step back and look at another way to implement that functionality.
First we’re going to go into the RootController implementation and back out of
the changes that allowed users to edit the table view. We’re going to
replace the Edit button and the associated implementation with an Add
button, reusing the AddCityController
code and associated view, but presenting the Add City view modally
instead of using the navigation controller.
You may wonder about deleting lots of perfectly good code, but refactoring functionality like this is a fairly common task when you change your mind about how you want to present information to the user, or if the requirements driving the project change. This is good practice for you.
Note
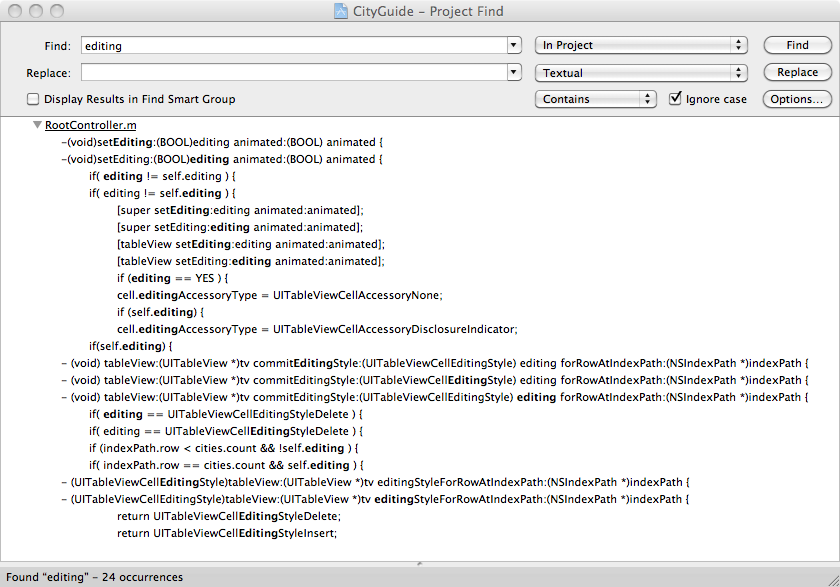
If you want to do a global find (and replace) over the entire project for a word or phrase you can do so from the Edit menu. Selecting Edit→Find→Find in Project will bring up the Project Find window.
To remove functionality like this, first you need to figure out what needs to be removed. If you don’t know the author of the original application this can sometimes be difficult. Do a project-wide search for “editing”, as shown in Figure 6-13. If you do that you’ll see that the only mention of “editing” is in the RootController.m file. The changes we’ll need to make are actually fairly tightly constrained inside a single class. We’ll have to make some minor changes elsewhere in the project. Limiting the scope of necessary changes when refactoring code in this way is one of the main benefits of writing code in an object-oriented manner.
Open the RootController.m file in Xcode. Begin the refactoring by deleting the following methods in their entirety:
setEditing:animated:tableView:commitEditingStyle:forRowAtIndexPath:tableView:editingStyleForRowAtIndexPath:
Note
Remember that the methods as they appear in the file have
longer, more complicated names.
For example, setEditing:animated:
is (void)setEditing:(BOOL)editing
animated:(BOOL) animated.
Next, do the following:
In the
viewDidLoad:method, remove the line that adds theself.editButtonItemto the navigation bar.In the
tableView:cellForRowAtIndexPath:method, remove the section enclosed in theif( self.editing ) { ... }conditional statement, and theelse { ... }statement that adds the “Add New City...” cell. Additionally, you should remove the line that sets theeditingAccessoryTypeinside the conditional statement.Similarly, remove the
if(
          self.editing ) { ... }
conditional statement in thetableView:numberOfRowsInSection:method.Finally, in the
tableView:didSelectRowAtIndexPath:method remove the&& !self.editingexpression from the firstifblock. Remove the secondifblock (which deals with what happens if we are editing) in its entirety.
We’re done. If you do a global find in the project for “editing” you should now come up blank, and the class should appear as shown here:
#import "RootController.h"
#import "CityGuideDelegate.h"
#import "City.h"
#import "CityController.h"
#import "AddCityController.h"

@implementation RootController

@synthesize tableView;

#pragma mark UIViewController Methods

- (void)didReceiveMemoryWarning {
    [super didReceiveMemoryWarning];
}

- (void)viewDidLoad {
    self.title = @"City Guide";
    CityGuideDelegate *delegate =
     (CityGuideDelegate *)[[UIApplication sharedApplication] delegate];
    cities = delegate.cities;
}

- (void)dealloc {
    [tableView release];
    [cities release];
    [super dealloc];
}

#pragma mark UITableViewDataSource Methods

- (UITableViewCell *)tableView:(UITableView *)tv
   cellForRowAtIndexPath:(NSIndexPath *)indexPath
{
    UITableViewCell *cell =
     [tv dequeueReusableCellWithIdentifier:@"cell"];
    if( nil == cell ) {
        cell = [[[UITableViewCell alloc]
         initWithFrame:CGRectZero reuseIdentifier:@"cell"] autorelease];
    }

    if (indexPath.row < cities.count ) {
        City *thisCity = [cities objectAtIndex:indexPath.row];
        cell.textLabel.text = thisCity.cityName;
        cell.textLabel.textColor = [UIColor blackColor];
     }
    return cell;
}

- (NSInteger)tableView:(UITableView *)tv
  numberOfRowsInSection:(NSInteger)section
{
    NSInteger count = cities.count;
    return count;
}

#pragma mark UITableViewDelegate Methods

- (void)tableView:(UITableView *)tv
  didSelectRowAtIndexPath:(NSIndexPath *)indexPath
{
    CityGuideDelegate *delegate =
     (CityGuideDelegate *)[[UIApplication sharedApplication] delegate];

    if (indexPath.row < cities.count ) {
        CityController *city =
          [[CityController alloc] initWithIndexPath:indexPath];
        [delegate.navController pushViewController:city animated:YES];
        [city release];
    }
    [tv deselectRowAtIndexPath:indexPath animated:YES];
}

@end
Since you’ve now made fairly extensive changes to the view controller, you should test it to see if things are still working. Click the Build and Run button on the Xcode toolbar, and if all is well you should see something very similar to Figure 6-14. Tapping on one of the city names should take you to its city page as before.
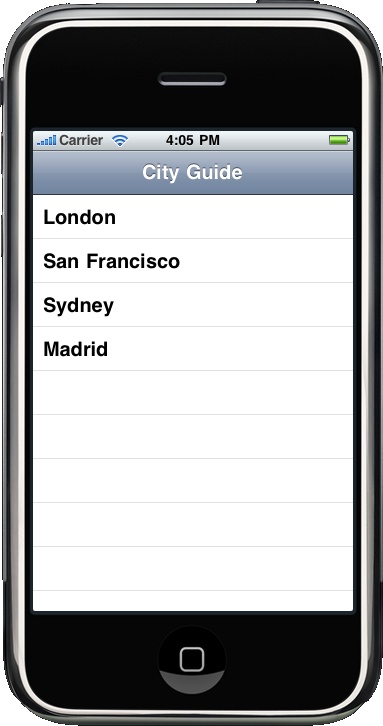
Figure 6-14. The stripped-down City Guide application, looking a lot like it did in Figure 5-16 in Chapter 5
We’ve deleted a lot of code, so let’s write some more. In the
viewDidLoad: method we need to
replace the Edit button that we deleted with an Add button.
Let’s add a button of style UIBarButtonSystemItemAdd and set things up so
that when it is clicked it will call the addCity: method in this class. Add the
following code to the viewDidLoad:
method:
self.navigationItem.rightBarButtonItem = [[UIBarButtonItem alloc]
  initWithBarButtonSystemItem:UIBarButtonSystemItemAdd target:self
  action:@selector(addCity:)];
Since there isn’t an addCity:
method right now, we need to declare it in the
RootController.h interface file. Open that file,
and add this line after the @interface {
...} declaration but before the @end directive:
- (void)addCity:(id)sender;
Now add the implementation to the RootController.m file:
- (void)addCity:(id)sender {
    AddCityController *addCity = [[AddCityController alloc] init];
    [self presentModalViewController:addCity animated:YES];
    [addCity release];
}
This looks almost identical to the snippet of code I showed you at
the beginning of this section, but the modal view we’re going to display
is the one managed by our AddCityController class.
Now we need to make a couple of small changes to our AddCityController class. Open the
AddCityController.h interface file in Xcode and
declare the saveCity: method as an
IBAction. Add this line after the
@interface { ... } statement but
before the @end directive:
- (IBAction)saveCity:(id)sender;
Open the implementation file
(AddCityController.m), and remove the last line
(where we pop the view controller off the navigation controller) and
replace it with a line dismissing the modal view controller. You’ll also
change the return value of the saveCity: method from void to IBAction here just as you did in the interface
file:
- (IBAction)saveCity:(id)sender {
    CityGuideDelegate *delegate =
      (CityGuideDelegate *)[[UIApplication sharedApplication] delegate];
    NSMutableArray *cities = delegate.cities;

    UITextField *nameEntry = (UITextField *)[nameCell viewWithTag:777];
    UITextView *descriptionEntry =
                       (UITextView *)[descriptionCell viewWithTag:777];

    if ( nameEntry.text.length > 0 ) {
        City *newCity = [[City alloc] init];
        newCity.cityName = nameEntry.text;
        newCity.cityDescription = descriptionEntry.text;
        [cities addObject:newCity];

        RootController *viewController = delegate.viewController;
        [viewController.tableView reloadData];
    }
    [self dismissModalViewControllerAnimated:YES];

}
We’re pretty much there at this point; however, before we finish
with our changes here we also need to go up to the viewDidLoad: method and delete the lines where
we add the Save button to the view (it’s a single statement beginning
with self.navigationItem.rightBarButtonItem that
spans multiple lines).
Make sure you save the changes you made to the AddCityController class, and open the
AddCityController.xib file inside Interface
Builder.
First, drag and drop into the view a navigation bar (UINavigationBar) from
the Library window (select Cocoa Touch→Windows, Views & Bars). Position it at the
top of the view, and resize the table view so that it fits in the
remaining space. While you’re there, change the title of the navigation
bar from “title” to “Add New City”.
Next, drag and drop a bar button item (UIBarButtonItem) onto
the navigation bar and position it to the left of the title. In the
Attributes Inspector (⌘-1) change the Identifier from Custom to Done.
You’ll see that this changes both the text and the style of the
button.
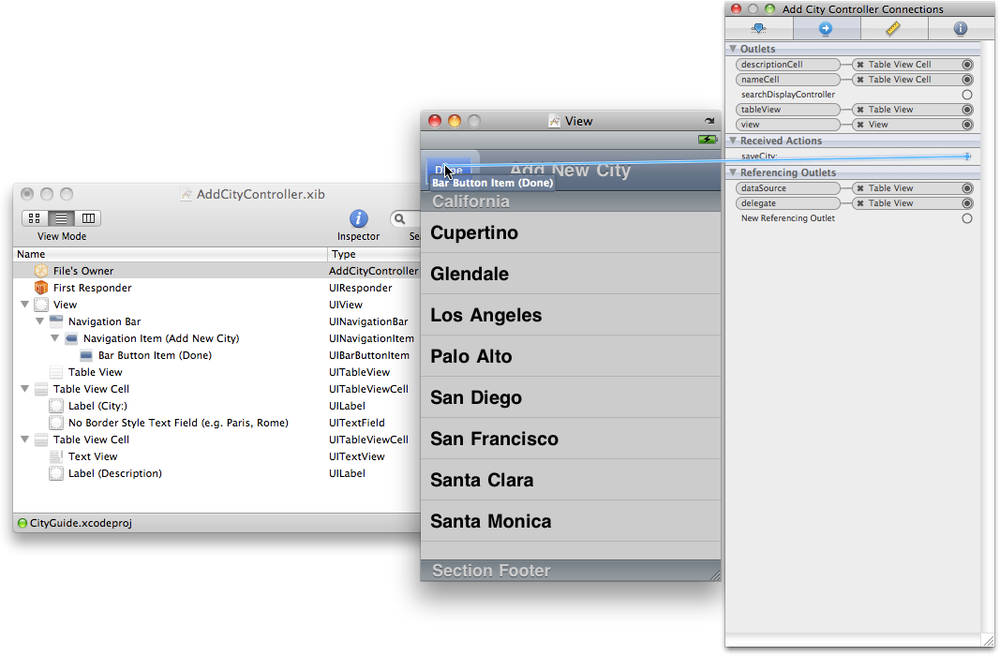
Finally, click on File’s Owner in the AddCityController.xib window
and switch to the Connections Inspector (⌘-2). Connect the saveCity: received action to the Done button,
as I’ve done in Figure 6-15. Save your changes
to the NIB file, as we’ve now finished refactoring our City Guide
application.
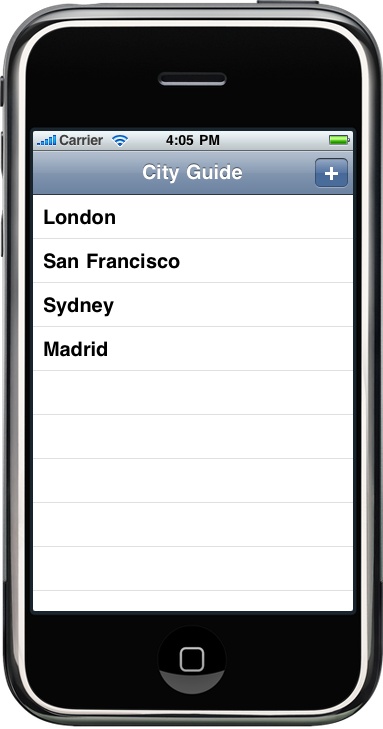
Click Build and Run on the Xcode toolbar to compile and start the application in iPhone Simulator. When the application starts you should see something like Figure 6-16. Clicking the Add button in the navigation bar should bring up our “Add City” view; when it does, enter some information and click Done. You should see your test city appear in the main table view.
Well done. We’ve just taken the City Guide application apart, put it back together again, and made it work slightly differently. But what if you disliked the way we implemented the ability to add cities in the first version of the application, preferring this approach, but you still want to retain the ability to delete cities? You could still implement things so that a left-to-right swipe brought up the Delete button for the row; for instance, Apple’s Mail application that ships with the iPhone and iPod touch takes this approach. Just adding the following method back into RootController.m will reimplement this functionality:
- (void) tableView:(UITableView *)tv
  commitEditingStyle:(UITableViewCellEditingStyle) editing
   forRowAtIndexPath:(NSIndexPath *)indexPath {
    if( editing == UITableViewCellEditingStyleDelete ) {
        [cities removeObjectAtIndex:indexPath.row];
        [tv deleteRowsAtIndexPaths:[NSArray arrayWithObject:indexPath]
          withRowAnimation:UITableViewRowAnimationLeft];
    }
}
As I promised in Chapter 5, I’m going to talk about the image picker view controller. This view controller manages Apple-supplied interfaces for choosing images and movies, and on supported devices it takes new images or movies with the camera. As this class handles all of the required interaction with the user, it is very simple to use. All you need to do is tell it to start, and then dismiss it after the user selects an image or movie.
In this section, we’ll continue to build on our City Guide
application. Either of the two versions of the application we now have
will do, as all of the changes we’re going to make will be confined to
the AddCityController class. In the
preceding section, we made only relatively minor changes in this class
that won’t affect our additions here.
However, if you want to follow along, I’m going to return to our original version and work on that. As we did in the preceding section, you should work on a copy of the project, so right-click or Ctrl-click on the folder containing the project files and select Duplicate. A folder called CityGuide copy will be created containing a duplicate of our project. You should probably rename the folder to something more sensible. I suggest CityGuide3, and renaming the project by selecting Project→Rename from the Xcode menu bar.
The first thing we need to do is build an interface to allow the user to trigger the image picker. If you remember from Chapter 5, our “Add City” view was built out of two custom table view cells. The easiest way to add this ability is to add another table view cell.
Open the AddCityController.xib file in
Interface Builder. Drag and drop a table view cell (UITableViewCell) from the Library window into
the AddCityController.xib window. We need to resize
this cell so that it can hold a small thumbnail of our selected image,
so go to the Size Inspector (⌘-3) and change its height from the default
44 pixels to H = 83 pixels. At this point, we also need to resize the
super-size table view cell for entering the description to account for
this new cell. So, click on the description cell and go to the Size tab
of the Inspector window and change the height from H = 362 to H = 279
pixels.
Go back to the new cell and grab a label (UILabel) from the Library window and drop it
onto the Table View Cell window (if the window is not open already,
double-click on the new cell in the
AddCityController.xib window to open it). In the
Attributes Inspector (⌘-1) change the label’s text to “Add a picture:”
and then switch to the Size tab and position the label at X = 10 and Y =
28 with W = 126 and H = 21 pixels.
Next, grab an image view (UIImageView) from the
Library window and drop it onto the cell, then position it at X = 186
and Y = 7 and resize it to be W = 83 and H = 63 using the Size tab of
the Inspector window. In the Attributes tab, set the Tag attribute to
777 (this lets us easily refer to this subview from our code) and set
the view mode to Aspect Fill.
Finally, drop a round rect button (UIButton) onto the cell, and in the Attributes
tab change its type from Rounded Rect to Add Contact. The button should
now appear as a blue circle enclosing a plus sign. Position it to the
right of the UIImageView, at X = 274
and Y = 25.
After doing this, you should have something that looks a lot like Figure 6-17. Set the cell selection type to None in the Attributes tab, make sure you’ve saved your changes to the NIB, and then open the AddCityController.h and AddCityController.m files in Xcode.
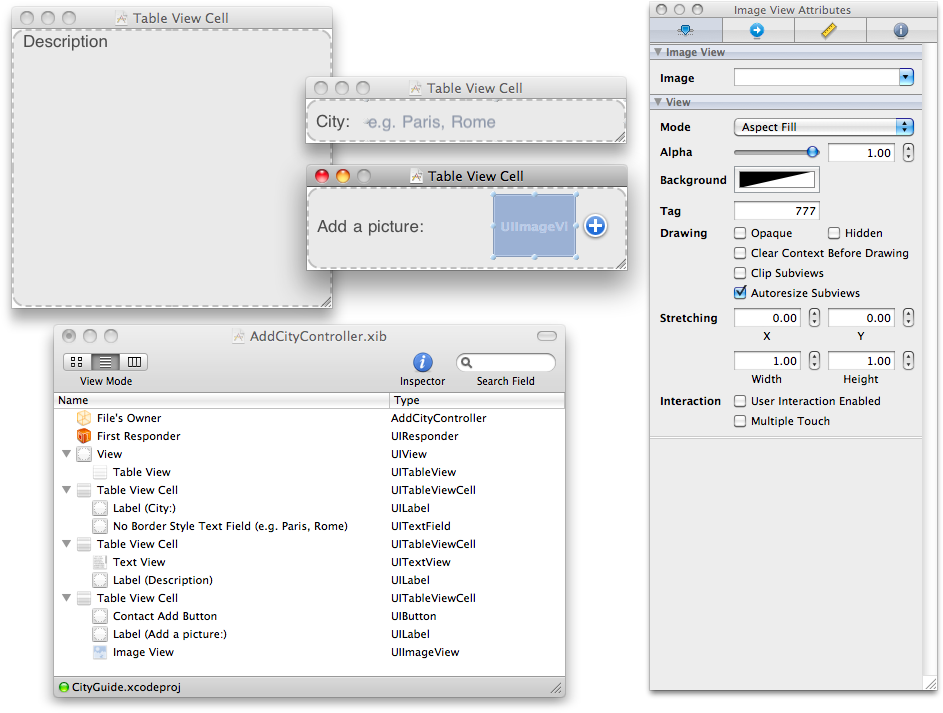
Figure 6-17. The Add Picture table view cell in Interface Builder with the UIImageView tagged as view 777 so that we can access its subview from code more easily
In the AddCityController.h interface file,
the first thing we need to do is add an IBOutlet to allow us to connect our code
to the new table view cell inside Interface Builder. We must also add an
instance variable of type UIImage
called cityPicture, which we’ll use
to hold the image passed back to us from the image picker, along with an
addPicture:
method that we’ll connect to the UIButton in the cell, allowing us to start the
image picker. Add the lines shown in bold to the file:
#import <UIKit/UIKit.h>

@interface AddCityController : UIViewController
  <UITableViewDataSource, UITableViewDelegate> {
    IBOutlet UITableView *tableView;
    IBOutlet UITableViewCell *nameCell;
    IBOutlet UITableViewCell *pictureCell;
    IBOutlet UITableViewCell *descriptionCell;

    UIImage *cityPicture;
}

- (void)saveCity:(id)sender;
- (IBAction)addPicture:(id)sender;

@end
Before implementing the code to go with this interface, we need to
quickly go back into Interface Builder and make those two connections.
Open the AddCityController.xib file and click on
File’s Owner, then use the Connections Inspector (⌘-2) to connect the
pictureCell outlet to your new
UITableViewCell. Next, click on the
addPicture: received action and connect it to the
UIButton in your table view cell; see
Figure 6-18. When you
release the mouse button you’ll be presented with a pop-up menu of
possible events the button can generate (just like the Hello World
example back in Chapter 3). We want just
a simple button click, so select the Touch Up Inside event.
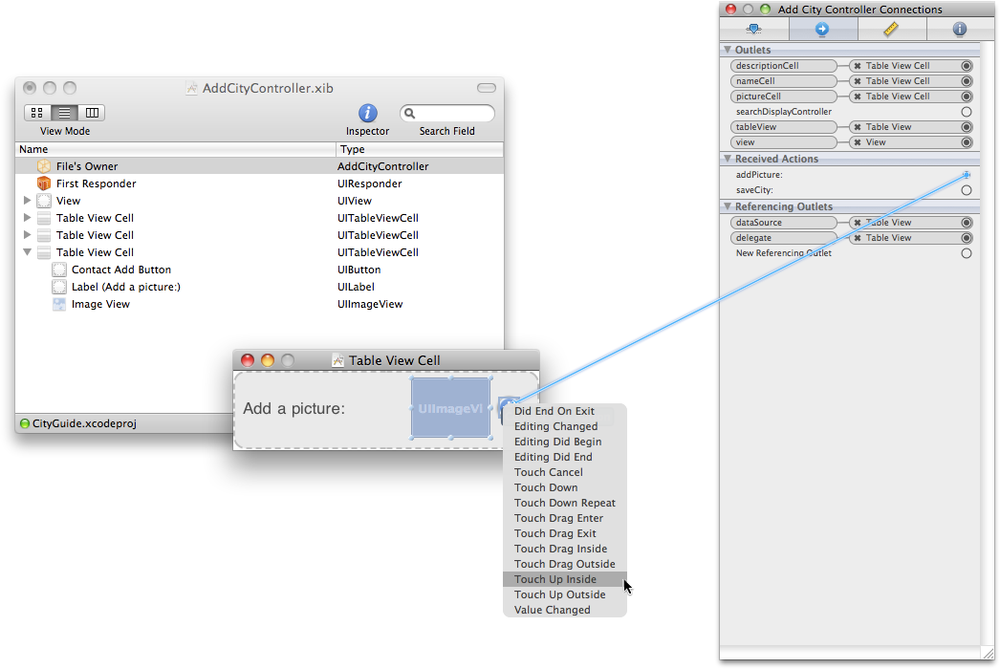
Figure 6-18. Connecting the addCity: received action to the UIButton in our new UITableViewCell to allow it to trigger the image picker
We now need to save this file, and then go back into Xcode to
finish our implementation. In the
AddCityController.m implementation file, first we
have to provide a default image for the UIImage in the cell (otherwise, it will appear
blank). We can do this inside the viewDidLoad: method by adding this line
(you’ll need an image called QuestionMark.jpg for
this to work; see Capturing the City Data in Chapter 5 for information on using this
image in your project):
cityPicture = [UIImage imageNamed:@"QuestionMark.jpg"];
We also have to make some changes to the table view delegate and
data source methods (in the AddCityController.m
implementation file) to take account of the new cell. First we need to
change the number of rows returned by the tableView:numberOfRowsInSection: method from
two to three. Make the change shown in bold:
 - (NSInteger)tableView:(UITableView *)tv
     numberOfRowsInSection:(NSInteger)section
{
    return 3;
}
Now we need to modify the tableView:cellForRowAtIndexPath: method to
return the extra cell in the correct position in our table view. Make
the changes shown in bold:
- (UITableViewCell *)tableView:(UITableView *)tv
    cellForRowAtIndexPath:(NSIndexPath *)indexPath {
    UITableViewCell *cell = nil;
    if( indexPath.row == 0 ) {
        cell = nameCell;
    } else if ( indexPath.row == 1 ) {
        UIImageView *pictureView = (UIImageView *)[pictureCell viewWithTag:777];
        pictureView.image = cityPicture;
        cell = pictureCell;
    } else {
        cell = descriptionCell;
    }
    return cell;

}-
In the first row of the table view, we return a
nameCell, configured to allow the user to enter the city name.-
In the second row of the table view, we return the cell we just added. We first populate the
UIImageViewwith the image held by thecityPicturevariable that we initialized in theviewDidLoad:method earlier.-
Finally, we return the table view cell that we set up to allow the user to enter a description for the city.
We also need to change the tableView:heightForRowAtIndexPath: method to
take account of the new cell. Make
the changes shown in bold:
- (CGFloat)tableView:(UITableView *)tv
    heightForRowAtIndexPath:(NSIndexPath *)indexPath
{
    CGFloat height;
    if( indexPath.row == 0 ) {
        height = 44;
    } else     if( indexPath.row == 1 ) {
        height = 83;
    } else {
        height = 279;
    }
    return height;

}
We also need to remember to release the pictureCell variables in the dealloc: method. We don’t have to release the
cityPicture variable because it will
be part of the autorelease pool. Add the following to the
dealloc: method:
[pictureCell release];
Finally, we need to add a placeholder implementation (after the
instance methods pragma mark) for our addPicture: method, which we’ll fill in
later:
- (IBAction)addPicture:(id)sender {
NSLog(@"addPicture: called.");
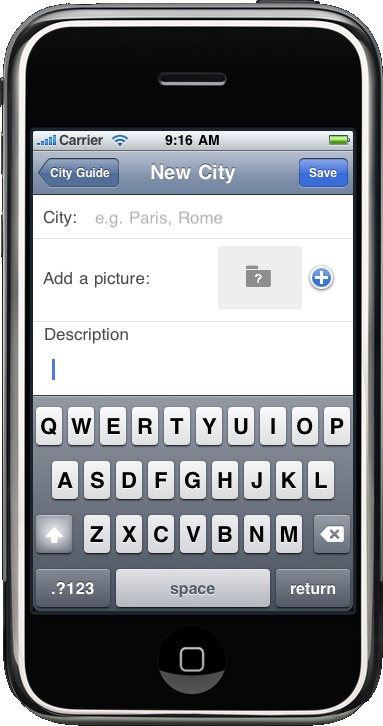
}We’re done, at least for now. Click Build and Run in the Xcode toolbar to compile and run the application in iPhone Simulator. Once the application has started, tap the Edit button in the navigation bar and click Add New City (if you chose to modify the second version of the guide, click the Add button). Figure 6-19 shows the new view.
Now we have an interface to trigger the image picker for us, so
let’s implement the code to do that. First we need to add a UIImagePickerController
variable to the AddCityController.h interface file,
along with a UIImage variable to hold
the image returned by the image picker. We also need to declare the
class to be a delegate. Make the changes shown in bold:
@interface AddCityController : UIViewController <UITableViewDataSource, UITableViewDelegate, UIImagePickerControllerDelegate, UINavigationControllerDelegate> {
In the AddCityController.m implementation
file, we need to modify the viewDidLoad: method to initialize our UIImagePickerController. Make the changes
shown in bold:
- (void)viewDidLoad {
    self.title = @"New City";
    self.navigationItem.rightBarButtonItem = [[UIBarButtonItem alloc]
      initWithBarButtonSystemItem:UIBarButtonSystemItemSave
      target:self action:@selector(saveCity:)];
    cityPicture = [UIImage imageNamed:@"QuestionMark.jpg"];

    pickerController = [[UIImagePickerController alloc] init];
    pickerController.allowsImageEditing = NO;
    pickerController.delegate = self;
    pickerController.sourceType =
      UIImagePickerControllerSourceTypeSavedPhotosAlbum;
}-
We allocate and initialize the
UIImagePickerController(this means we’re responsible for it and we must release it inside ourdealloc:method).-
When using the image picker, the user may be allowed to edit the selected image before it is passed to our code. This disables that option here.
-
We set the delegate class to be this class.
-
Finally, we select the image source. There are three:
UIImagePickerControllerSourceTypeCamera,UIImagePickerControllerSourceTypePhotoLibrary, andUIImagePickerControllerSourceTypeSavedPhotosAlbum. Each presents different views to the user, allowing him to take an image with the camera, pick it from the image library, or choose something from his photo album.
We also need to implement the addPicture: method, the method called when we
tap the button in our interface. This method simply starts the image
picker interface, presenting it as a modal view controller. Replace the
placeholder addPicture: method you
added to the AddCityController.m file as part of
the instance methods pragma section with the following:
- (IBAction)addPicture:(id)sender {
    [self presentModalViewController:pickerController animated:YES];
}
Next, we need to implement the delegate method that will tell our
code the user has finished with the picker interface, the imagePickerController:didFinishPickingMediaWithInfo:
method. Add the following to AddCityController.m
inside the UIImagePickerController
method’s pragma section:
- (void)imagePickerController:(UIImagePickerController *)picker
    didFinishPickingMediaWithInfo:(NSDictionary *)info
{
    [self dismissModalViewControllerAnimated:YES];
    cityPicture = [info objectForKey:@"UIImagePickerControllerOriginalImage"];

    UIImageView *pictureView = (UIImageView *)[pictureCell viewWithTag:777];
    pictureView.image = cityPicture;
    [tableView reloadData];

}-
We dismiss the image picker interface.
-
We grab the
UIImageselected by the user from theNSDictionaryreturned by the image picker and set thecityPicturevariable.-
We grab a reference to the thumbnail
UIImageView, populate it with the chosen image, and reload the table view so that the displayed image is updated.
Finally, in the saveCity:
method, we need to add a line just before we add the newCity to the cities array. Add the line shown in
bold:
newCity.cityPicture = nil;
newCity.cityPicture = cityPicture;
[cities addObject:newCity];
This will take our new picture and serialize it into the data model for our application.
It’s time to test our application. Make sure you’ve saved your changes and click Build and Run.
Note
If you test the application in iPhone Simulator, you’ll notice that there are no images in the Saved Photos folder. There is a way around this problem. In the simulator, tap the Safari icon and drag and drop a picture from your computer (you can drag it from the Finder or iPhoto) into the browser. You’ll notice that the URL bar displays the file path to the image. Click and hold down the cursor over the image and a dialog will appear allowing you to save the image to the Saved Photos folder.
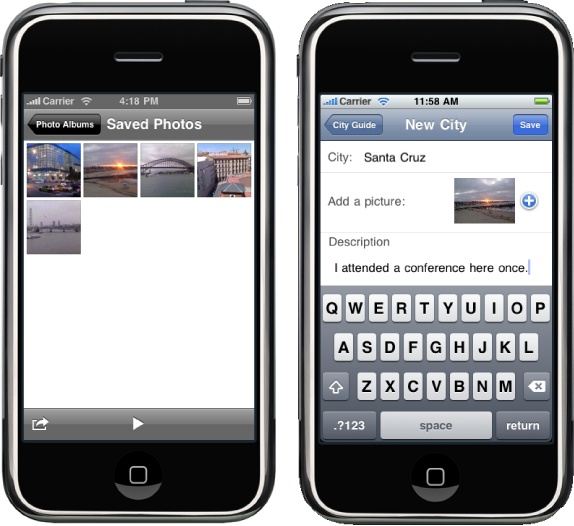
Once the application has started, tap the Edit button in the navigation bar and go to the New City view. Tapping the blue button will open the image picker, as shown in Figure 6-20, and allow you to select an image. Once you’ve done this, the image picker will be dismissed and you’ll return to the New City interface.
Is everything working? Not exactly; depending on how you tested the interface you may have noticed the problem. Currently, if you enter text in the City field and then click on the “Add a picture” button before clicking on the Description field, the text in the City field will be lost when you return from the image picker. However, if you enter text in the City field and then enter text in (or just click on) the Description field, the text will still be there when you return from the image picker. Any text entered in the Description field will remain in any case.
This is actually quite a subtle bug and is a result of the
different ways in which a UITextField
and UITextView interact as first
responders. We’re going to talk about the responder
chain in Chapter 8 when we deal with
data handling in more detail. However, to explain this without getting
into too much detail, the first responder is the object in the
application that is the current recipient of any UI events (such as a
touch). The UIWindow class sends
events to the registered first responder, giving it the first chance to
handle the event. If it fails to do so, the event will be passed to the
next object.
By default, the UITextField
doesn’t commit any changes to its text until it is no longer the first
responder, which is where the problem comes from. While we could change
this behavior through the UITextFieldDelegate protocol, there is a
simpler fix. Add the lines shown in bold to the addPicture: method:
- (IBAction)addPicture:(id)sender {
    UITextField *nameEntry = (UITextField *)[nameCell viewWithTag:777];
    [nameEntry resignFirstResponder];

    [self presentModalViewController:pickerController animated:YES];
}
With this change, we force the UITextField to resign as first responder
before we open the image picker. This means that when the image picker
is dismissed, the text we entered before opening it will remain when we
are done.
Save your changes, and click on the Build and Run button in the Xcode toolbar. When the application starts up, return to the New City view and confirm that this simple change fixes the bug.
We’re done with the City Guide application for a while. However, we’ll be back in Chapter 8, where I’ll fix the last remaining problem with the application and talk about data storage. (Until then, cities you add will not be saved when you exit the application, so don’t enter all your favorite cities just yet.)