
Chapter 8. Process Handling
The Unix operating system built its reputation on a small number of concepts, all of which are simple yet powerful. We’ve seen most of them by now: standard input/output, pipes, text-filtering utilities, the tree-structured filesystem, and so on. Unix also gained notoriety as the first small-computer[99] operating system to give each user control over more than one process. We call this capability user-controlled multitasking.
If Unix is the only operating system that you’re familiar with, you might be surprised to learn that several other major operating systems have been sadly lacking in this area. For example, Microsoft’s MS-DOS, for IBM PC compatibles, has no multitasking at all, let alone user-controlled multitasking. IBM’s own VM/CMS system for large mainframes handles multiple users but gives them only one process each. Compaq’s OpenVMS has user-controlled multitasking, but it is limited and difficult to use. The latest generation of small-computer operating systems, such as Apple’s Macintosh OS X (which is BSD-based) and Microsoft’s Windows (Windows 95 and later), finally include user-controlled multitasking at the operating system level.
But if you’ve gotten this far in this book, you probably don’t think
that multitasking is a big deal.
You’re probably used to the idea
of running a process in the background by putting an ampersand (&) at the end
of the command line.
You have also seen the idea of a shell subprocess in Chapter 4, when we showed how shell scripts run.
In this chapter, we cover most of the Korn shell’s features that relate to multitasking and process handling in general. We say “most” because some of these features are, like the file descriptors we saw in Chapter 7, of interest only to low-level systems programmers.
We start out by looking at certain important primitives for identifying processes and for controlling them during login sessions and within shell scripts. Then we move out to a higher-level perspective, looking at ways to get processes to communicate with each other. The Korn shell’s coroutine facility is the most sophisticated interprocess communication scheme that we’ll examine; we also look in more detail at concepts we’ve already seen, like pipes and shell subprocesses.
Don’t worry about getting bogged down in low-level technical details about Unix. We provide only the technical information that is necessary to explain higher-level features, plus a few other tidbits designed to pique your curiosity. If you are interested in finding out more about these areas, refer to your Unix Programmer’s Manual or a book on Unix internals that pertains to your version of Unix.
We strongly recommend that you try out the examples in this chapter. The behavior of code that involves multiple processes is not as easy to understand on paper as most of the other examples in this book.
Process IDs and Job Numbers
Unix gives all processes numbers, called process IDs, when they
are created.
You will notice that, when you run a command in the background
by appending & to it, the shell responds with a line that looks like
this:
$ fred &
[1]     2349
In this example, 2349 is the process ID for the fred process.
The [1] is a job number assigned by the shell (not the
operating system).
What’s the difference? Job numbers refer to
background processes that are currently running under your shell,
while process IDs refer to all processes currently running on the
entire system, for all users. The term job basically refers to a
command line that was invoked from your login shell.
If you start up additional background jobs while the first one is still running, the shell numbers them 2, 3, etc. For example:
$bob &[2] 2367 $dave | george &[3] 2382
Clearly, 1, 2, and 3 are easier to remember than 2349, 2367, and 2382!
The shell includes job numbers in messages it prints when a background job completes, like this:
[1] + Done fred &
We’ll explain what the plus sign means soon. If the job exits with nonzero status (see Chapter 5), the shell includes the exit status in parentheses:
[1] + Done(1) fred &
The shell prints other types of messages when certain abnormal things happen to background jobs; we’ll see these later in this chapter.
Job Control
Why should you care about process IDs or job numbers? Actually, you could probably get along fine in your Unix life without ever referring to process IDs (unless you use a windowing workstation — as we’ll see soon). Job numbers are more important, however: you can use them with the shell commands for job control.
You already know the most obvious way to control a job:
you can create one in the background with &.
Once a job is running in the background, you can let it run to
completion, bring it into the foreground, or send
it a message called a signal.
Foreground and Background
The built-in command fg brings a background job into the
foreground.
Normally this means that the job has control of your terminal
or window and therefore is able to accept your input. In other
words,
the job begins to act as if you typed its command without the
&.
If you have only one background job running, you can use
fg without arguments, and the shell brings that
job into the foreground. But if you have several jobs running in the
background, the shell picks the one that you put into the background
most recently. If you want a different job put into the foreground,
you need to use the job’s command name, preceded by a percent sign
(%), or you can use its job number, also preceded
by %, or its process ID without a percent sign.
If you don’t remember which jobs are running, you can use the
jobs command to list them.
A few examples should make this clearer. Let’s say you created three background jobs as above. If you type jobs, you see this:
[1]   Running                  fred &
[2] - Running                  bob &
[3] + Running                  dave | george &
jobs has a few interesting options.
Besides the job status, jobs -l also
lists process group IDs:
[1]   2349      Running                  fred &
[2] - 2367      Running                  bob &
[3] + 2382      Running                  dave | george &
How does all this work? Every time you run a job, the process(es) in the job are put into a new process group. Each process in a process group, besides its unique process ID number, also has a process group ID. The process group ID is the same as the process ID of the process group leader, which is one of the processes invoked as part of the job. (The last one in the pipeline, in fact.) The numbers that the shell prints are actually the process group IDs. (Note that for job 3, there are two processes, but only one number.)
Now, your terminal device, be it a real serial port or a pseudo-terminal such as you get in a windowing system or telnet session, also has a process group ID number. Processes whose process group ID matches that of the terminal “own” the terminal, in the sense that they are allowed to read input from it. In brief, job control works by setting the process group of the terminal to be the same as the process group of the current job. (There are lots more technical details, including the idea of a “session” introduced by POSIX, but those details aren’t necessary for understanding the day-to-day use of job control.)
The -p option tells jobs to list only process group IDs:
$ jobs -p
2349
2367
2382
This could be useful with command substitution; see Task 8-1 later in this chapter. Finally, the -n option lists only those jobs whose status has changed since the shell last reported it — whether with a jobs command or otherwise.
If you type fg without an argument,
the shell puts dave | george
in the foreground, because it was put in the background most recently.
But if you type fg %bob (or fg %2),
bob will go in the foreground.
You can also refer to the job most recently put in the background
by %+. Similarly, %- refers to the background
job invoked next-most recently (bob
in this case). That explains the plus and minus signs in the above:
the plus sign shows the most recently invoked job; the minus
sign shows the next most recently invoked job.[100]
If more than one background job has the same command, then
%
command will disambiguate by choosing the most recently
invoked
job (as you’d expect). If this isn’t what you want, you need to use
the job number instead of the command name.
However, if the commands
have different arguments, you can use %?
string
instead of %
command.
%?
string refers to the
job whose command contains the string.
For example, assume you
started these background jobs:
$bob pete &[1] 189 $bob ralph &[2] 190 $
Then you can use %?pete
and %?ralph to refer to each of
them, although actually %?pe and %?ra
are sufficient to disambiguate.
Table 8-1 lists all of the ways to refer to background jobs. We have found that, given how infrequently people use job control commands, job numbers or command names are sufficient, and the other ways are superfluous.
| Reference | Background job |
N
| Process ID N |
-
N
| Process group ID N |
%
N
| Job number N |
%
string
| Job whose command begins with string |
%?
string
| Job whose command contains string |
%+, %%
| Most recently invoked background job |
%-
| Second most recently invoked background job |
Suspending a Job
Just as you can put background jobs into the foreground with fg, you can also put a foreground job into the background. This involves suspending the job, so that the shell regains control of your terminal.
To suspend a job, type CTRL-Z[101] while it is running. This is analogous to typing CTRL-C (or whatever your interrupt key is), except that you can resume the job after you have stopped it. When you type CTRL-Z, the shell responds with a message like this:
[1] + Stopped command
Then it gives you your prompt back.
It also puts the suspended job at the top of the job list, as indicated
by the + sign.
To resume a suspended job so that it continues to run in the foreground, just type fg. If, for some reason, you put other jobs in the background after you typed CTRL-Z, use fg with a job name or number. For example:
fred is running ...CTRL-Z[1] + Stopped fred $bob &[2] bob & $fg %fredfred resumes in the foreground ...
The ability to suspend jobs and resume them in the foreground comes in very handy when you only have a single connection to your system,[102] and you are using a text editor like vi on a file that needs to be processed. For example, if you are editing an HTML file for your web server, you can do the following:
$vi myfile.htmlEdit the file ...CTRL-Z[1] + Stopped vi myfile.html $lynx myfile.htmlPreview results with a text-only browser You see that you made a mistake $fgvi comes back up in the same place in your file
Programmers often use the same technique when debugging source code.
You will probably also find it useful to suspend a job and resume it in the background instead of the foreground. You may start a command in the foreground (i.e., normally) and find that it takes much longer than you expected — for example, a grep, sort, or database query. You need the command to finish, but you would also like control of your terminal back so that you can do other work. If you type CTRL-Z followed by bg, you move the job to the background.[103]
Disowning a Job
Normally, when you log out, the shell sends the HUP signal (see the next section) to any background jobs. If you’ve started a long-running job in the background and want it to complete no matter what, you should indicate this to the shell using the disown command with one or more job ID numbers as arguments. With no arguments, all background jobs are disowned.
Signals
We said earlier that typing CTRL-Z to suspend a job is similar to typing CTRL-C to stop a job, except that you can resume the job later. They are actually similar in a deeper way: both are particular cases of the act of sending a signal to a process.
A signal is a message that one process sends to another when some abnormal event takes place or when it wants the other process to do something. Most often, a process sends a signal to a subprocess it created. You’re undoubtedly already comfortable with the idea that one process can communicate with another through an I/O pipeline; think of a signal as another way for processes to communicate with each other. (In fact, any textbook on operating systems will tell you that both are examples of the general concept of interprocess communication, or IPC.)[104]
Depending on the version of Unix, there are two or three dozen
types of signals, including a few that can be used for whatever purpose
a programmer wishes. Signals have numbers (from 1 to the number of
signals the system supports) and names; we’ll use the latter. You can get
a list of all the signals on your system
by typing kill -l. Bear in mind, when you write shell code
involving signals, that signal names are more portable to other
versions of Unix than signal numbers.
Control-Key Signals
When you type CTRL-C, you tell the shell to send the INT (for “interrupt”) signal to the current job; CTRL-Z sends TSTP (for “terminal stop”). You can also send the current job a QUIT signal by typing CTRL- (control-backslash); this is sort of like a “stronger” version of CTRL-C.[105] You would normally use CTRL- when (and only when) CTRL-C doesn’t work.
As we’ll see soon, there is also a “panic” signal called KILL that you can send to a process when even CTRL- doesn’t work. But it isn’t attached to any control key, which means that you can’t use it to stop the currently running process. INT, TSTP, and QUIT are the only signals you can use with control keys (although some systems have additional control-key signals).
You can customize the control keys used to send signals with options
of the stty(1) command. These vary from system to system — consult
your man page for the command — but the usual syntax is
stty
signame char.
signame is a name for the signal
that, unfortunately, is often not the same as the names we use
here.
Table 1-7 in Chapter 1
lists stty names for signals and tty-driver actions
found on all modern versions of Unix. char is the control character,
which you can give in the same notation we use. For example,
to set your INT key to CTRL-X on most systems, use:
stty intr ^X
Now that we’ve told you how to do this, we should add that we don’t recommend it. Changing your signal keys could lead to trouble if someone else has to stop a runaway process on your machine.
Most of the other signals are used by the operating system to advise processes of error conditions, like a bad machine code instruction, bad memory address, division by zero, or other events such as input being available on a file descriptor or a timer (“alarm” in Unix terminology) going off. The remaining signals are used for esoteric error conditions that are of interest only to low-level systems programmers; newer versions of Unix have more and more arcane signal types.
kill
You can use the built-in shell command kill to send a signal to any process you’ve created — not just the currently running job. kill takes as argument the process ID, job number, or command name of the process to which you want to send the signal. By default, kill sends the TERM (“terminate”) signal, which usually has the same effect as the INT signal that you send with CTRL-C. But you can specify a different signal by using the -s option and the signal name, or the -n option and a signal number.
kill is so named because of the nature of the default TERM signal, but there is another reason, which has to do with the way Unix handles signals in general. The full details are too complex to go into here, but the following explanation should suffice.
Most signals cause a process that receives them to roll over and die; therefore, if you send any one of these signals, you “kill” the process that receives it. However, programs can be set up to “trap” specific signals and take some other action. For example, a text editor would do well to save the file being edited before terminating when it receives a signal such as INT, TERM, or QUIT. Determining what to do when various signals come in is part of the fun of Unix systems programming.
Here is an example of kill. Say you have a fred process in the background, with process ID 480 and job number 1, that needs to be stopped. You would start with this command:
kill %1
If you were successful, you would see a message like this:
[1] + Terminated fred &
If you don’t see this, then the TERM signal failed to terminate the job. The next step would be to try QUIT:
kill -s QUIT %1
If that worked, you would see this message:
[1] + Quit(coredump) fred &
The shell indicates the signal that killed the program (“Quit”) and the fact that it produced a core file. When a program exits normally, the exit status it returns to the shell is a value between 0 and 255. When a program dies from having been sent a signal, it exits, not with a status value of its own choosing, but rather with the status 256+N, where N is the number of the signal it received. (With ksh88 and most other shells, normal exit statuses are between 0 and 127, and the “death by signal” exit status is 128+N. Caveat emptor.)
If even QUIT doesn’t work, the last-ditch method would be to use KILL:
kill -s KILL %1
(Notice how this has the flavor of “yelling” at the runaway process.) This produces the message:
[1] + Killed fred &
It is impossible for a process to trap a KILL signal — the operating system should terminate the process immediately and unconditionally. If it doesn’t, then either your process is in one of the “funny states” that we’ll see later in this chapter, or (far less likely) there’s a bug in your version of Unix.
On job-control systems, there is an additional uncatchable signal: STOP.
This is like TSTP, in that it suspends the targeted job. But unlike
TSTP, it cannot be caught or ignored. It is a more drastic signal
than TSTP, but less so than QUIT or TERM, since a stopped job may still
be continued with fg or bg.
The Korn shell provides the predefined alias stop='kill -s STOP'
to make stopping jobs easier.
Task 8-1 is another example of how to use the kill command.
The solution to this task is simple, relying on jobs -p:
function killalljobs {
    kill "$@" $(jobs -p)
}
You may be tempted to use the KILL signal immediately, instead of trying TERM (the default) and QUIT first. Don’t do this. TERM and QUIT are designed to give a process the chance to clean up before exiting, whereas KILL will stop the process, wherever it may be in its computation. Use KILL only as a last resort.
You can use the kill command with any process you create, not just jobs in the background of your current shell. For example, if you use a windowing system, then you may have several terminal windows, each of which runs its own shell. If one shell is running a process that you want to stop, you can kill it from another window — but you can’t refer to it with a job number because it’s running under a different shell. You must instead use its process ID.
ps
This is probably the only situation in which a casual user would need to know the ID of a process. The command ps(1) gives you this information; however, it can give you lots of extra information that you must wade through as well.
ps is a complex command. It takes many options, some of which differ from one version of Unix to another. To add to the confusion, you may need different options on different Unix versions to get the same information! We will use options available on the two major types of Unix systems, those derived from System V (such as most of the versions for Intel x86 PCs, as well as Solaris, IBM’s AIX and Hewlett-Packard’s HP-UX) and BSD (Compaq’s Ultrix, SunOS 4.x, and also GNU/Linux). If you aren’t sure which kind of Unix version you have, try the System V options first.
You can invoke ps in its simplest form without any options. In this case, it prints a line of information about the current login shell and any processes running under it (i.e., background jobs). For example, if you invoked three background jobs, as we saw earlier in the chapter, ps on System V-derived versions of Unix would produce output that looks something like this:
   PID TTY      TIME COMD
   146 pts/10   0:03 ksh
  2349 pts/10   0:03 fred
  2367 pts/10   0:17 bob
  2387 pts/10   0:06 george
  2389 pts/10   0:09 dave
  2390 pts/10   0:00 ps
The output on BSD-derived systems looks like this:
   PID TT STAT  TIME COMMAND
   146 10 S     0:03 /bin/ksh -i
  2349 10 R     0:03 fred
  2367 10 D     0:17 bob
  2387 10 S     0:06 george
  2389 10 R     0:09 dave
  2390 10 R     0:00 ps
(You can ignore the STAT column.) This is a bit like the jobs command. PID is the process ID; TTY (or TT) is the terminal (or pseudo-terminal, if you are using a windowing system) the process was invoked from; TIME is the amount of processor time (not real or “wall clock” time) the process has used so far; COMD (or COMMAND) is the command. Notice that the BSD version includes the command’s arguments, if any; also notice that the first line reports on the parent shell process, and in the last line, ps reports on itself.
ps without arguments lists all processes started from the current terminal or pseudo-terminal. But since ps is not a shell command, it doesn’t correlate process IDs with the shell’s job numbers. It also doesn’t help you find the ID of the runaway process in another shell window.
To get this information, use ps -a (for “all”); this lists information on a different set of processes, depending on your Unix version.
System V
Instead of listing all of those that were started under a specific terminal, ps -a on System V-derived systems lists all processes associated with any terminal that aren’t group leaders. For our purposes, a “group leader” is the parent shell of a terminal or window. Therefore, if you are using a windowing system, ps -a lists all jobs started in all windows (by all users), but not their parent shells.
Assume that, in the above example, you have only one terminal or window. Then ps -a prints the same output as plain ps except for the first line, since that’s the parent shell. This doesn’t seem to be very useful.
But consider what happens when you have multiple windows open. Let’s say you have three windows, all running terminal emulators like xterm for the X Window System. You start background jobs fred, dave, and bob in windows with pseudo-terminal numbers 1, 2, and 3, respectively. This situation is shown in Figure 8-1.

Assume you are in the uppermost window. If you type ps, you see
something like this:
   PID TTY      TIME COMD
   146 pts/1    0:03 ksh
  2349 pts/1    0:03 fred
  2390 pts/1    0:00 ps
But if you type ps -a, you see this:
   PID TTY      TIME COMD
  2349 pts/1    0:03 fred
  2367 pts/2    0:17 bob
  2389 pts/3    0:09 dave
  2390 pts/1    0:00 ps
Now you should see how ps -a can help you track down a runaway
process. If it’s dave, you can type kill 2389.
If that doesn’t work, try kill -s QUIT 2389, or in the worst case,
kill -s KILL 2389.
BSD
On BSD-derived systems,[107] ps -a lists all jobs that were started on any terminal; in other words, it’s a bit like concatenating the the results of plain ps for every user on the system. Given the above scenario, ps -a will show you all processes that the System V version shows, plus the group leaders (parent shells).
Unfortunately, ps -a (on any version of Unix) will not report processes that are in certain pathological conditions where they “forget” things like what shell invoked them and what terminal they belong to. Such processes have colorful names (zombies, orphans) that are actually used in Unix technical literature, not just informally by professional systems programmers. If you have a serious runaway process problem, it’s possible that the process has entered one of these states.
Let’s not worry about why or how a process gets this way.
All you need to understand is that the process doesn’t show up when
you type ps -a.
You need another option to ps to see it:
on System V, it’s ps -e (“everything”), whereas on BSD, it’s
ps -ax.
These options tell ps to list processes that either weren’t started from terminals or “forgot” what terminal they were started from. The former category includes lots of processes that you probably didn’t even know existed: these include basic processes that run the system and so-called daemons (pronounced “demons”) that handle system services like mail, printing, network file systems, etc.
In fact, the output of ps -e or ps -ax is an excellent source of education about Unix system internals, if you’re curious about them. Run the command on your system and, for each line of the listing that looks interesting, invoke man on the process name or look it up in the Unix Programmer’s Manual for your system.
User shells and processes are listed at the very bottom of
ps -e or ps -ax output;
this is where you should look for runaway processes. Notice
that many processes in the listing have ? instead of
a terminal. Either these aren’t supposed to have one (such as the
basic daemons) or they’re runaways.
Therefore it’s likely that if ps -a doesn’t find a process
you’re trying to kill, ps -e (or ps -ax)
will list it with ? in the TTY (or TT) column. You can determine
which process you want by looking at the COMD (or COMMAND) column.
kill: The Full Story
The kill command is really misnamed. It should have been called sendsignal or something similar, since it sends signals to processes. (The name in fact derives from the kill(2) system call, which the kill command uses to send signals, and which is similarly misnamed.)
As we saw earlier, kill -l gives you the full list of available signal names on your system. The behavior of the built-in version of kill has been considerably rationalized in ksh93. The options and what they do are summarized in Table 8-2.
| Option | Meaning |
kill
job ... |
Send the TERM signal to each named job. This is the normal usage. |
kill -l
|
List the names of all supported signals. |
kill -l
signal ... |
When signal is a number, print its name. If it’s a name, print its number. If signal is a number greater than 256, it’s treated as an exit status. The shell subtracts 256 and prints the corresponding signal. |
kill -s
signal-name job ... |
Send the signal named by signal-name to each given job. |
kill -n
signal-number job ... |
Send the numeric signal given by the signal-number to each given job. |
kill -
signal job ... |
Send the signal specified by signal to each given job. signal may be either a number or a signal name. This form is considered to be obsolete; it is provided for compatibility with ksh88 and the external kill(1) command. |
One place to take advantage of kill’s ability to turn a number into a name is in issuing diagnostics. When a job dies due to a signal, the exit status is 256 plus the signal number. Thus, you might use code like this to produce a meaningful diagnostic from within a script:
es=$?        # save exit status
if ((es >= 256)); then
    print job received signal $(kill -l $((es - 256)) )
fi
trap
We’ve been discussing how signals affect the casual user; now let’s talk a bit about how shell programmers can use them. We won’t go into too much depth about this, because it’s really the domain of systems programmers.
We mentioned earlier that programs in general can be set up to “trap” specific signals and process them in their own way. The trap built-in command lets you do this from within a shell script. trap is most important for “bullet-proofing” large shell programs so that they react appropriately to abnormal events — just as programs in any language should guard against invalid input. It’s also important for certain systems programming tasks, as we’ll see in the next chapter.
trap cmd sig1 sig2 ...
That is, when any of sig1, sig2, etc., are received, run cmd, then resume execution. After cmd finishes, the script resumes execution just after the command that was interrupted.[108]
Of course, cmd can be a script or
function. The sigs can be specified by name or by number. You can also invoke trap without arguments, in which case
the shell prints a list of any traps that have been set, using
symbolic names for the signals.
If you use trap -p, the shell prints the trap settings in
a way that can be saved and reread later by a different invocation of the shell.
The shell scans the text of cmd twice.
The first time is while it is preparing to run the trap command;
all the substitutions as outlined in Chapter 7 are performed
before executing the trap command.
The second time is when the shell actually executes the trap.
For this reason, it is best to use single quotes around the cmd
in the text of the shell program.
When the shell executes the trap’s command, $? is always
the exit status of the last command
run before the trap started. This is important for diagnostics.
Here’s a simple example that shows how trap works. Suppose we have a shell script called loop with this code:
while true; do
    sleep 60
done
This just pauses for 60 seconds (the sleep(1) command) and repeats indefinitely. true is a “do-nothing” command whose exit status is always 0. For efficiency, it is built-in to the shell. (The false command is a similar “do-nothing” command whose exit status is always 1. It is also built-in to the shell.) As it happens, sleep is also built-in to the shell. Try typing in this script. Invoke it, let it run for a little while, then type CTRL-C (assuming that is your interrupt key). It should stop, and you should get your shell prompt back.
Now insert the following line at the beginning of the script:
trap 'print "You hit control-C!"' INT
Invoke the script again. Now hit CTRL-C. The odds are overwhelming
that you are interrupting the sleep command (as opposed to
true). You should see the message
“You hit control-C!”, and the script will not stop running;
instead, the sleep command will abort, and
it will loop around and start another sleep.
Hit CTRL- to get it to stop.
Type rm core to get rid of the resulting core dump file.
Next, run the script in the background by typing loop &.
Type kill %loop (i.e., send it the TERM signal);
the script will terminate. Add TERM
to the trap command, so that it looks like this:
trap 'print "You hit control-C!"' INT TERM
Now repeat the process: run it in the background and
type kill %loop.
As before, you will see the message and the process will keep
running. Type kill -KILL %loop to stop it.
Notice that the message isn’t really appropriate when you use kill. We’ll change the script so it prints a better message in the kill case:
trap 'print "You hit control-C!"' INT
trap 'print "You tried to kill me!"' TERM

while true; do
    sleep 60
done
Now try it both ways: in the foreground with CTRL-C and in the background with kill. You’ll see different messages.
Traps and Functions
The relationship between traps and shell functions is straightforward,
but it has certain nuances that are worth discussing. The most
important thing to understand is that Korn shell functions
(those created using the function keyword;
see Chapter 4) have their own
local traps; these aren’t known outside of the function.
Old-style POSIX functions (those created using the
name
() syntax)
share traps with the parent script.
Let’s start with function-style functions,
where traps are local.
In particular,
the surrounding script doesn’t know about them. Consider this code:
function settrap {
    trap 'print "You hit control-C!"' INT
}

settrap
while true; do
    sleep 60
done
If you invoke this script and hit your interrupt key, it just exits. The trap on INT in the function is known only inside that function. On the other hand:
function loop {
    trap 'print "How dare you!"' INT
    while true; do
        sleep 60
    done
}

trap 'print "You hit control-C!"' INT
loop
When you run this script and hit your interrupt key, it prints “How dare you!” But how about this:
function loop {
    while true; do
        sleep 60
    done
}

trap 'print "You hit control-C!"' INT
loop
print 'exiting ...'
This time the looping code is within a function, and the trap is set in the surrounding script. If you hit your interrupt key, it prints the message and then prints “exiting...” It does not repeat the loop as above.
Why? Remember that when the signal comes in, the shell aborts the current command, which in this case is a call to a function. The entire function aborts, and execution resumes at the next statement after the function call.
The advantage of traps that are local to functions is that they allow you to control a function’s behavior separately from the surrounding code.
Yet you may want to define global traps inside functions. There is a rather kludgy way to do this; it depends on a feature that we introduce in Chapter 9, which we call a “fake signal.” Here is a way to set trapcode as a global trap for signal SIG inside a function:
trap "trap trapcode SIG" EXIT
This sets up the command trap
trapcode SIG to run
right after the function exits, at which time the surrounding
shell script is in scope (i.e., is “in charge”). When that command
runs, trapcode is set up to handle the SIG signal.
For example, you may want to reset the trap on the signal you just received, like this:
function trap_handler {
    trap "trap second_handler INT" EXIT
    print 'Interrupt: one more to abort.'
}

function second_handler {
    print 'Aborted.'
    exit
}

trap trap_handler INT
This code acts like the Unix mail utility: when you are typing in a message, you must press your interrupt key twice to abort the process.
There is a less kludgy way to this, taking advantage of the fact that POSIX-style functions share traps with the parent script:
# POSIX style function, trap is global
trap_handler () {
    trap second_handler INT
    print 'Interrupt: one more to abort.'
}

function second_handler {
    print 'Aborted.'
    exit
}

trap trap_handler INT

while true ; do
    sleep 60
done
If you type this in and run it, you get the same results as in the previous example, without the extra trickery of using the fake EXIT signal.
Speaking of mail, in Task 8-2 we’ll show a more practical example of traps.
The basic idea is to use cat to create the message in a temporary file and then hand the file’s name off to a program that actually sends the message to its destination. The code to create the file is very simple:
msgfile=/tmp/msg$$
cat > $msgfile
Since cat without an argument reads from the standard input, this just waits for the user to type a message and end it with the end-of-file character CTRL-D.
Process ID Variables and Temporary Files
The only thing new about this is $$ in the filename expression.
This is a special shell variable whose value is the process ID
of the current shell.
To see how $$ works,
type ps and note the process ID of your shell process (ksh).
Then type print "$$";
the shell responds with that
same number. Now type ksh to
start a shell subprocess, and when you get a prompt, repeat the process.
You should see a different number, probably slightly higher than
the last one.
You can examine the parent-child relationship in more detail by
using the PPID (parent process ID) variable.
ksh sets this to the process ID of the parent process.
Each time you start a new instance of ksh, if you
type print $PPID you should see a number that is the
same as the $$ of the earlier shell.
A related built-in shell variable is ! (i.e., its value is
$!), which contains the process ID of the most recently
invoked background job. To see how this works, invoke any job
in the background and note the process ID printed by the shell
next to [1]. Then type
print "$!"; you should see the same number.
To return to our mail example:
since all processes on the system must
have unique process IDs, $$ is excellent for constructing names
of temporary files. We saw an example of this in Chapter 7,
when discussing command-line evaluation steps, and there are also
examples in Chapter 9.[109]
The directory /tmp is conventionally used for temporary files. Files in this directory are usually erased whenever the computer is rebooted.
Nevertheless, a program should clean up such files before it exits,
to avoid taking up unnecessary disk space. We could do this in
our code very easily by adding the line
rm $msgfile after the code that actually sends the message.
But what if the program receives a signal during execution?
For example, what if a user changes his or her mind about sending
the message and hits CTRL-C to stop the process? We would need to
clean up before exiting. We’ll emulate the actual Unix mail
system by saving the message being written in a file called
dead.letter in the current directory.
We can do this by using trap with
a command string that includes an exit command:
trap 'mv $msgfile dead.letter; exit' INT TERM
msgfile=/tmp/msg$$
cat > $msgfile
# send the contents of $msgfile to the specified mail address ...
rm $msgfile
When the script receives an INT or TERM signal, it saves
the temp file and then exits. Note that the command string
isn’t evaluated until it needs to be run, so $msgfile
will contain the correct value; that’s why we surround the string
in single quotes.
But what if the script receives a signal before msgfile is
created — unlikely though that may be? Then mv will try to
rename a file that doesn’t exist. To fix this, we need to
test for the existence of the
file $msgfile before trying to save it. The code for this is
a bit unwieldy to put in a single command string, so we’ll use a
function instead:
function cleanup {
    if [[ -e $msgfile ]]; then
        mv $msgfile dead.letter
    fi
    exit
}

trap cleanup INT TERM

msgfile=/tmp/msg$$
cat > $msgfile
# send the contents of $msgfile to the specified mail address ...
rm $msgfile
Ignoring Signals
Sometimes a signal comes in that you don’t want to do anything about.
If you give the null string (""
or '') as the command argument to
trap, the shell effectively ignores that signal.
The classic
example of a signal you may want to ignore is HUP (hangup),
the signal all of your background processes receive when
you log out.
(If your line actually drops, Unix sends the HUP signal to the
shell. The shell forwards the signal to all your background
processes, or sends it on its own initiative if you logout normally.)
HUP has the usual default behavior: it kills the process that receives it. But there are bound to be times when you don’t want a background job to terminate when you log out. For example, you may start a long compile or text formatting job; you want to log out and come back later when you expect the job to be finished. Under normal circumstances, your background job terminates when you log out. But if you run it in a shell environment where the HUP signal is ignored, the job finishes.
To do this, you could write a simple function that looks like this:
function ignorehup {
    trap "" HUP
    eval "$@"
}
We write this as a function instead of a script for reasons that will become clearer when we look in detail at subshells at the end of this chapter.
Actually, there is a Unix command called nohup that does precisely this. The start function from the last chapter could include nohup:
function start {
    eval nohup "$@" > logfile 2>&1 &
}
This prevents HUP from terminating your command and saves its standard and error output in a file. Actually, the following is just as good:
function start {
    nohup "$@" > logfile 2>&1 &
}
If you understand why eval is essentially redundant when you use nohup in this case, then you have a firm grasp on the material in Chapter 7.
Resetting Traps
Another “special case” of the trap command occurs when you give
a dash (-) as the command argument. This resets the action taken when
the signal is received to the default, which usually is
termination of the process.
As an example of this, let’s return to Task 8-2, our mail program. After the user has finished sending the message, the temporary file is erased. At that point, since there is no longer any need to “clean up,” we can reset the signal trap to its default state. The code for this, apart from function definitions, is:
trap cleanup INT TERM

msgfile=/tmp/msg$$
cat > $msgfile
# send the contents of $msgfile to the specified mail address ...
rm $msgfile

trap - INT TERM
The last line of this code resets the handlers for the INT and TERM signals.
At this point you may be thinking that one could get seriously carried away with signal handling in a shell script. It is true that industrial strength programs devote considerable amounts of code to dealing with signals. But these programs are almost always large enough so that the signal-handling code is a tiny fraction of the whole thing. For example, you can bet that the real Unix mail system is pretty darn bullet-proof.
However, you will probably never write a shell script that is complex enough, and that needs to be robust enough, to merit lots of signal handling. You may write a prototype for a program as large as mail in shell code, but prototypes by definition do not need to be bullet-proofed.
Therefore, you shouldn’t worry about putting signal-handling code in every 20-line shell script you write. Our advice is to determine if there are any situations in which a signal could cause your program to do something seriously bad and add code to deal with those contingencies. What is “seriously bad”? Well, with respect to the above examples, we’d say that the case where HUP causes your job to terminate on logout is seriously bad, while the temporary file situation in our mail program is not.
The Korn shell has several new options to trap (with respect to the same command in most Bourne shells) that make it useful as an aid for debugging shell scripts. We cover them in Chapter 9.
Coroutines
We’ve spent the last several pages on almost microscopic details of process behavior. Rather than continue our descent into the murky depths, we’ll revert to a higher-level view of processes.
Earlier in this chapter, we covered ways of controlling multiple simultaneous jobs within an interactive login session; now we consider multiple process control within shell programs. When two (or more) processes are explicitly programmed to run simultaneously and possibly communicate with each other, we call them coroutines.
This is actually nothing new: a pipeline is an example of coroutines. The shell’s pipeline construct encapsulates a fairly sophisticated set of rules about how processes interact with each other. If we take a closer look at these rules, we’ll be better able to understand other ways of handling coroutines — most of which turn out to be simpler than pipelines.
When you invoke a simple pipeline, say ls | more, the shell
invokes a series of Unix primitive operations, a.k.a. system calls.
In effect, the shell tells Unix to do the following things;
in case you’re interested, we include in parentheses
the actual system call used at each step:
You can probably imagine how the above steps change when the pipeline involves more than two processes.
Now let’s make things simpler. We’ll see how to get multiple processes to run at the same time if the processes do not need to communicate. For example, we want the processes dave and bob to run as coroutines, without communication, in a shell script. Both should run to completion before the script exits. Our initial solution would be this:
dave &
bob
Assume for the moment that bob is the last command in the script. The above works — but only if dave finishes first. If dave is still running when the script finishes, it becomes an orphan, i.e., it enters one of the “funny states” we mentioned earlier in this chapter. Never mind the details of orphanhood; just believe that you don’t want this to happen, and if it does, you may need to use the “runaway process” method of stopping it, discussed earlier in this chapter. (For example, consider the case where dave goes on a resource binge, slowing your system way down — it’s much harder to stop it if the parent script has already exited.)
wait
There is a way of making sure the script doesn’t finish before dave does: the built-in command wait. Without arguments, wait simply waits until all background jobs have finished. So to make sure the above code behaves properly, we would add wait, like this:
dave &
bob
wait
Here, if bob finishes first, the parent shell waits for dave to finish before finishing itself.
If your script has more than one background job and you need to wait for specific ones to finish, you can give wait the same type of job argument (with a percent sign) as you would use with kill, fg, or bg.
However, you will probably find that wait without arguments suffices for all coroutines you will ever program. Situations in which you would need to wait for specific background jobs are quite complex and beyond the scope of this book.
Advantages and Disadvantages of Coroutines
In fact, you may be wondering why you would ever need to program coroutines that don’t communicate with each other. For example, why not just run bob after dave in the usual way? What advantage is there in running the two jobs simultaneously?
If you are running on a computer with one processor (CPU), there is a performance advantage — but only if you have the bgnice option turned off (see Chapter 3), and even then only in certain situations.
Roughly speaking, you can characterize a process in terms of how it uses system resources in three ways: whether it is CPU intensive (e.g., does lots of number crunching), I/O intensive (does a lot of reading or writing to the disk), or interactive (requires user intervention).
We already know from Chapter 1 that it makes no sense to run an interactive job in the background. But apart from that, the more two or more processes differ in these three criteria, the better it is to run them simultaneously. For example, a number-crunching statistical calculation would do well when running at the same time as a long, I/O-intensive database query.
On the other hand, if two processes use resources in similar ways, it may even be less efficient to run them at the same time as it would be to run them sequentially. Why? Basically, because under such circumstances, the operating system often has to “time-slice” the resource(s) in contention.
For example, if both processes are disk hogs, the operating system may enter a mode where it constantly switches control of the disk back and forth between the two competing processes; the system ends up spending at least as much time doing the switching as it does on the processes themselves. This phenomenon is known as thrashing; at its most severe, it can cause a system to come to a virtual standstill. Thrashing is a common problem; system administrators and operating system designers both spend lots of time trying to minimize it.
Parallelization
But if you have a computer with multiple CPUs[110] you should be less concerned about thrashing. Furthermore, coroutines can provide dramatic increases in speed on this type of machine, which is often called a parallel computer; analogously, breaking up a process into coroutines is sometimes called parallelizing the job.
Normally, when you start a background job on a multiple-CPU machine, the computer assigns it to the next available processor. This means that the two jobs are actually — not just metaphorically — running at the same time.
In this case, the running time of the coroutines is essentially equal to that of the longest-running job plus a bit of overhead, instead of the sum of the run times of all processes (although if the CPUs all share a common disk drive, the possibility of I/O-related thrashing still exists). In the best case — all jobs having the same run time and no I/O contention — you get a speedup factor equal to the number of CPUs.
Parallelizing a program is often not easy; there are several subtle issues involved and there’s plenty of room for error. Nevertheless, it’s worthwhile to know how to parallelize a shell script whether or not you have a parallel machine, especially since such machines are becoming more and more common, even on the desktop.
We’ll show how to do this by means of Task 8-3, a simple task whose solution is amenable to parallelization.
If you have multiple CPUs, there is potential for considerable speedup by compiling multiple source files in parallel. Each file is independent of the next, and thus creating multiple object files simultaneously gets more work done, faster.
The changes are relatively straightforward: fire off the compilation pipeline into the background, and then add a wait statement before doing the final link step:
# initialize option-related variables
do_link=true
debug=""
link_libs=""
clib="-lc"
exefile=""

# initialize pipeline components
compile=" | ccom"
assemble=" | as"
optimize=""

# process command-line options
while getopts "cgl:[lib]o:[outfile]O files ..." opt; do
    case $opt in
        c )    do_link=false ;;
        g )    debug="-g" ;;
        l )    link_libs+=" -l $OPTARG" ;;
        o )    exefile="-o $OPTARG" ;;
        O )    optimize=" | optimize" ;;
    esac
done
shift $(($OPTIND - 1))

# process the input files
for filename in "$@"; do
    case $filename in
        *.c )
            objname=${filename%.c}.o ;;
        *.s )
            objname=${filename%.s}.o
            compile="" ;;
        *.o )
            objname=$filename  # just link it directly with the rest
            compile=""
            assemble="" ;;
        *   )
        print "error: $filename is not a source or object file."
        exit 1 ;;
    esac

    # run a pipeline for each input file; parallelize by backgrounding
    eval cat $filename $compile $assemble $optimize > $objname &
    objfiles+=" $objname"
    compile=" | ccom"
    assemble=" | as"
done

wait    # wait for all compiles to finish before linking
if [[ $do_link == true ]]; then
    ld $exefile $objfiles $link_libs $clib
fi
This is a straightforward example of parallelization, with the only “gotcha” being to make sure that all the compilations are done before doing the final link step. Indeed, many versions of make have a “run this many jobs in parallel” flag, precisely to obtain the speedup from simultaneous compilation of independent files.
But all of life is not so simple; sometimes just firing more jobs off into the background won’t do the trick. For example, consider multiple changes to the same database: the database software (or something, somewhere) has to ensure that two different processes aren’t trying to update the same record at the same time.
Things get even more involved when working at a lower level, with multiple threads of control within a single process (something not visible at the shell level, thankfully). Such problems, known as concurrency control issues, become much more difficult as the complexity of the application increases. Complex concurrent programs often have much more code for handling the special cases than for the actual job the program is supposed to do!
Therefore it shouldn’t surprise you that much research has been and is being done on parallelization, the ultimate goal being to devise a tool that parallelizes code automatically. (Such tools do exist; they usually work in the confines of some narrow subset of the problem.) Even if you don’t have access to a multiple-CPU machine, parallelizing a shell script is an interesting exercise that should acquaint you with some of the issues that surround coroutines.
Coroutines with Two-Way Pipes
Now that we have seen how to program coroutines that don’t communicate with each other, we’ll build on that foundation and discuss how to get them to communicate — in a more sophisticated way than with a pipeline. The Korn shell has a set of features that allow programmers to set up two-way communication between coroutines. These features aren’t included in most Bourne shells.
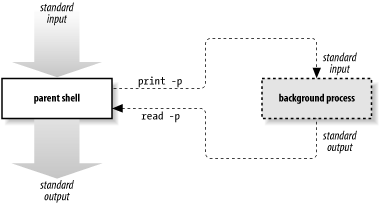
If you start a background process by appending |& to a command
instead of &, the Korn shell sets up a special two-way
pipeline between the parent shell and the new background process.
read -p in the parent shell reads a line of the background
process’ standard output; similarly, print -p in the parent shell
feeds into the standard input of the background process.
Figure 8-2 shows how this works.
This scheme has some intriguing possibilities. Notice the following things: first, the parent shell communicates with the background process independently of its own standard input and output. Second, the background process need not have any idea that a shell script is communicating with it in this manner. This means that the background process can be almost any preexisting program that uses its standard input and output in normal ways.[111]
Task 8-4 is a task that shows a simple example.
The objective here is to write the program without reimplementing the calculation engine that dc already has — in other words, to write a program that translates algebraic notation to RPN and passes the translated line to dc to do the actual calculation. (The utility bc(1) actually provides similar functionality.)
We’ll assume that the function alg2rpn, which does the translation, already exists: given a line of algebraic notation as argument, it prints the RPN equivalent on the standard output. If we have this, then the calculator program (which we’ll call adc) is very simple:
dc |&

while read line'?adc> '; do
    print -p "$(alg2rpn $line)"
    read -p answer
    print "    = $answer"
done
The first line of this code starts dc as a coroutine with a
two-way pipe. Then the while loop prompts the user for a line
and reads it until the user types CTRL-D for end-of-input.
The loop body converts the line to RPN, passes it to dc through
the pipe, reads dc’s answer, and prints it after an equal sign.
For example:
$adcadc>2 + 3= 5 adc>(7 * 8) + 54= 110 adc>^D$
Actually — as you may have noticed — it’s not entirely necessary to have a two-way pipe with dc. You could do it with a standard pipe and let dc do its own output, like this:
{ while read line'?adc> '; do
      print "$(alg2rpn $line)"
  done
} | dc
The only difference from the above is the lack of equal sign before each answer is printed.
But what if you wanted to make a fancy graphical user interface
(GUI), like the xcalc program that comes with many X Window System
installations? Then, clearly, dc’s own output would not be
satisfactory, and you would need full control of your own standard
output in the parent process. The user interface would have to capture
dc’s output and display it in the window properly.
The two-way pipe is an excellent solution to this problem: just imagine
that, instead of
print " = $answer",
there is a call to a
routine that displays the answer in the “readout”
section of the calculator window.
All of this suggests that the two-way pipe scheme is great for writing shell scripts that interpose a software layer between the user (or some other program) and an existing program that uses standard input and output. In particular, it’s great for writing new interfaces to old, standard Unix programs that expect line-at-a-time, character-based user input and output. The new interfaces could be GUIs, or they could be network interface programs that talk to users over links to remote machines. In other words, the Korn shell’s two-way pipe construct is designed to help develop very up-to-date software!
Two-Way Pipes Versus Standard Pipes
Before we leave the subject of coroutines, we’ll complete the circle by
showing how the two-way pipe construct compares to regular pipelines. As you may have been able to figure out by now, it is possible to
program a standard pipeline by using |& with
print -p.
This has the advantage of reserving the parent shell’s standard output for other use. The disadvantage is that the child process’ standard output is directed to the two-way pipe: if the parent process doesn’t read it with read -p, it’s effectively lost.
Shell Subprocesses and Subshells
Coroutines clearly represent the most complex relationship between processes that the Korn shell defines. To conclude this chapter, we will look at a much simpler type of interprocess relationship: that of a shell subprocess with its parent shell. We saw in Chapter 3 that whenever you run a shell script, you actually invoke another copy of the shell that is a subprocess of the main, or parent, shell process. Now let’s look at them in more detail.
Shell Subprocess Inheritance
The most important things you need to know about shell subprocesses are what characteristics they get, or inherit, from their parents. These are as follows:
The current directory
Environment variables
Standard input, output, and error plus any other open file descriptors
Any characteristics defined in the environment file (see Chapter 3). Note that only interactive shells execute the environment file
Signals that are ignored
The first three characteristics are inherited by all subprocesses, while the last two are unique to shell subprocesses. Just as important are the things that a shell subprocess does not inherit from its parent:
Shell variables, except environment variables and those defined in the environment file
Handling of signals that are not ignored
We covered some of this earlier (in Chapter 3), but these points are common sources of confusion, so they bear repeating.
Subshells
A special kind of shell subprocess is the subshell. The subshell is started within the same script (or function) as the parent. You do this in a manner very similar to the code blocks we saw in the last chapter. Just surround some shell code with parentheses (instead of curly braces), and that code runs in a subshell.
For example, here is the calculator program, from above, with a subshell instead of a code block:
( while read line'?adc> '; do
      print "$(alg2rpn $line)"
  done
) | dc
The code inside the parentheses runs as a separate process.[112] This is usually less efficient than a code block. The differences in functionality between subshells and code blocks are very few; they primarily pertain to issues of scope, i.e., the domains in which definitions of things like shell variables and signal traps are known. First, code inside a subshell obeys the above rules of shell subprocess inheritance, except that it knows about variables defined in the surrounding shell; in contrast, think of blocks as code units that inherit everything from the outer shell. Second, variables and traps defined inside a code block are known to the shell code after the block, whereas those defined in a subshell are not.
For example, consider this code:
{
    fred=bob
    trap 'print "You hit CTRL-C!"' INT
}
while true; do
    print "$fred is $fred"
    sleep 60
done
If you run this code, you will see the message $fred is bob every
60 seconds, and if you type CTRL-C, you will see the message, You hit CTRL-C!.
You will need to type CTRL- to stop it (don’t forget to
remove the core file). Now let’s change it to a subshell:
(
    fred=bob
    trap 'print "You hit CTRL-C!"' INT
)
while true; do
    print "$fred is $fred"
    sleep 60
done
If you run this, you will see the message $fred is; the outer shell
doesn’t know about the subshell’s definition of fred and therefore
thinks it’s null. Furthermore, the outer shell doesn’t know about
the subshell’s trap of the INT signal, so if you hit CTRL-C, the script
terminates.
If a language supports code nesting, definitions inside a nested unit should have a scope limited to that nested unit. In other words, subshells give you better control than code blocks over the scope of variables and signal traps. Therefore we feel that you should use subshells instead of code blocks if they are to contain variable definitions or signal traps — unless efficiency is a concern.
This has been a long chapter, and it has covered a lot of territory. Here are some exercises that should help you make sure you have a firm grasp on the material. The last exercise is especially difficult for those without backgrounds in compilers, parsing theory, or formal language theory.
Write a function called pinfo that combines the jobs and ps commands by printing a list of jobs with their job numbers, corresponding process IDs, running times, and full commands. Extra credit: describe why this has to be a function and not a script.
Take the latest version of our C compiler shell script — or some other non-trivial shell script — and “bullet-proof” it with signal traps.
Redo the findterms program in the last chapter using a subshell instead of a code block.
The following doesn’t have that much to do with the material in this chapter per se, but it is a classic programming exercise, and it will give you some good practice if you do it:
Write the function alg2rpn used in adc. Here’s how to do this: arithmetic expressions in algebraic notation have the form expr op expr, where each expr is either a number or another expression (perhaps in parentheses), and op is +, -, x, /, or
%(remainder). In RPN, expressions have the form expr expr op. For example: the algebraic expression2+3is2 3 +in RPN; the RPN equivalent of(2+3) x (9-5)is2 3 + 9 5 - x. The main advantage of RPN is that it obviates the need for parentheses and operator precedence rules (e.g., the rule that x is evaluated before +). The dc program accepts standard RPN, but each expression should have “p” appended to it: this tells dc to print its result, e.g., the first example above should be given to dc as2 3 + p.You need to write a routine that converts algebraic notation to RPN. This should be (or include) a function that calls itself (known as a recursive function) whenever it encounters a subexpression. It is especially important that this function keep track of where it is in the input string and how much of the string it eats up during its processing. (Hint: make use of the pattern matching operators discussed in Chapter 4 to ease the task of parsing input strings.)
To make your life easier, don’t worry about operator precedence for now; just convert to RPN from left to right. e.g., treat
3+4x5as(3+4)x5and3x4+5as(3x4)+5. This makes it possible for you to convert the input string on the fly, i.e., without having to read in the whole thing before doing any processing.Enhance your solution to the previous exercise so that it supports operator precedence in the usual order: x, /, % (remainder) +, -. e.g., treat
3+4x5as3+(4x5)and3x4+5as(3x4)+5.
[99] The PDP-11 systems on which Unix first became popular were considered small for the time.
[100]
This is analogous to ~+ and ~- as references to the
current and previous directory; see the footnote
in Chapter 7. Also: %%
is a synonym for %+.
[101] This assumes that the CTRL-Z key is set up as your suspend key; just as with CTRL-C and interrupts, this is conventional but by no means required.
[102] Such as when you’re dialed in from home to your office, or connected to a remote system over the Internet via telnet or ssh.
[103] Be warned, however, that not all commands are “well-behaved” when you do this. Be especially careful with commands that run over a network on a remote machine; you may end up “confusing” the remote program.
[104] Pipes and signals were the only IPC mechanisms in early versions of Unix. More modern versions have additional mechanisms, such as sockets, named pipes, and shared memory. Named pipes are accessible to shell programmers through the mkfifo(1) command, which is beyond the scope of this book.
[105] CTRL- can also cause the running program to leave a file called core in the program’s current directory. This file contains an image of the process to which you sent the signal; a programmer could use it to help debug the program that was running. The file’s name is a (very) old-fashioned term for a computer’s memory. Other signals leave these “core dumps” as well; you should feel free to delete them unless a systems programmer tells you otherwise.
[106] To test your understanding of how the shell works, answer this question: why can’t this be done as a separate script?
[107] ps on GNU/Linux systems acts like the BSD version.
[108] This is what usually happens. Sometimes the command currently running aborts (sleep acts like this, as we’ll see soon); other times it finishes running. Further details are beyond the scope of this book.
[109]
In practice, temporary filenames based just on $$
can lead to insecure systems. If you have the mktemp(1)
program on your system, you should use it in your applications to generate
unique names for your temporary files.
[110] Multiprocessor systems were once to be found only as large-scale servers kept in special climate-controlled machine rooms. Today, multiprocessor desktop systems are available and becoming increasingly common, although systems with more than around 4 CPUs still tend to be mostly in machine rooms.
[111] Note that sort(1) doesn’t quite fit here. sort has to read all its input before it can generate any output. You can still use sort in a coprocess, but you’d have to close the file descriptor used to write to the coprocess first. The way to do this is to move the coprocess’s input file descriptor to a numbered file descriptor and then close it. Both of these involve the exec command, which is covered in the next chapter.
[112]
For performance reasons, the Korn shell tries very hard to avoid
actually creating a separate process to run code in parentheses and
inside $(...). But the
results should always be the same as if the code
ran in a separate process.