
CHAPTER 4
SIDE VIEW AND PERSPECTIVE
Side View Techniques and Strategies
Side view poses are challenging because they often have less information, such as anatomy and details, than other views. Because there is less information available, it becomes more difficult to communicate the pose or get a clear read. A side view can often feel flat and uninteresting.
To help me draw side views and get a clear read, I use a combination of techniques and strategies.

TECHNIQUE 1: STACKING LAYERS
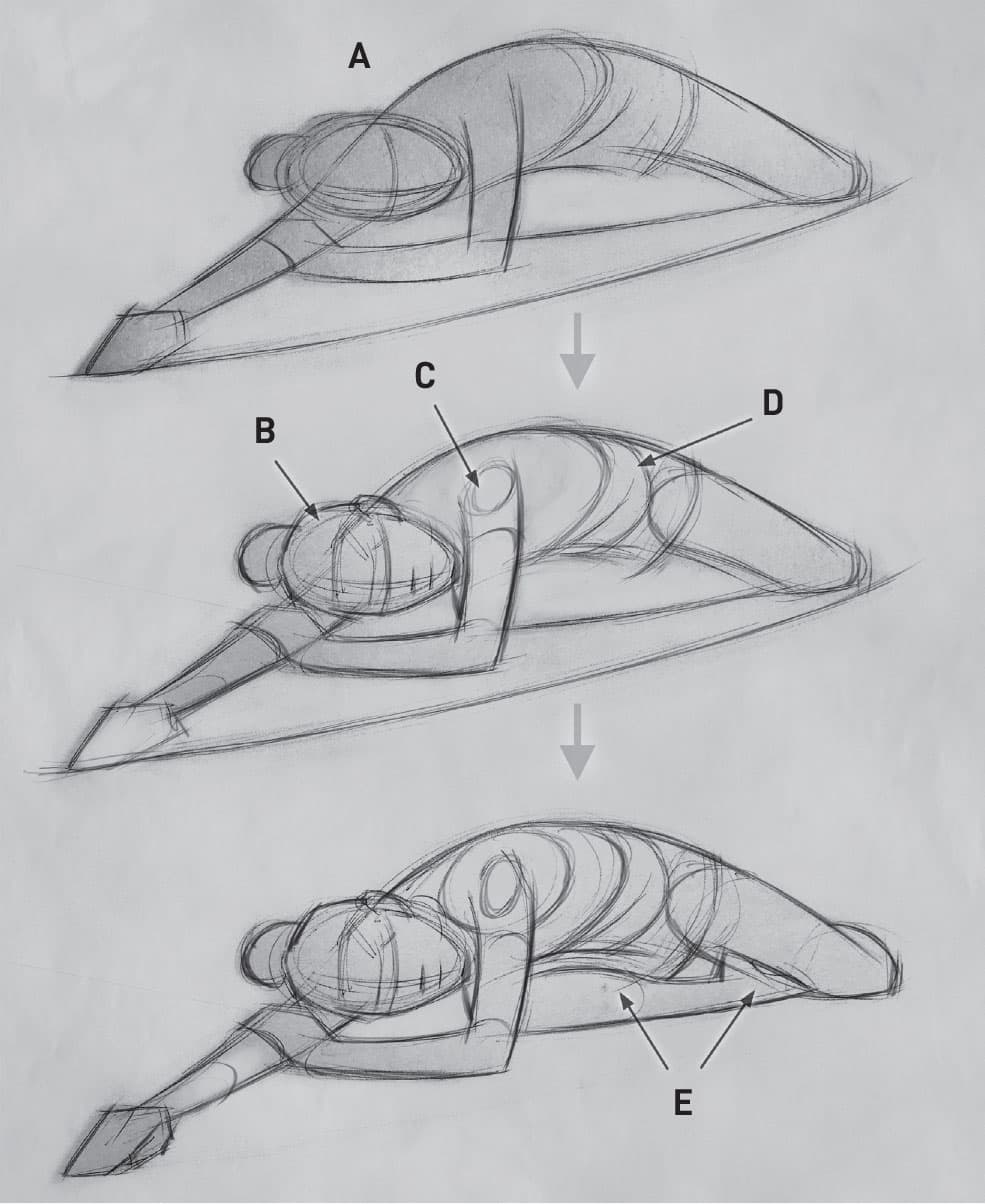
A side view pose is a series of layers of anatomy and forms. Each layer gives us an opportunity to create overlaps, which help suggest depth. The layers of anatomy are:
A. The rib cage and pelvis.
B. The deep muscles, which include the abdominals, latissimus dorsi (lat) muscles, and trapezius.
C. The scapula and the pectoralis (pecs), or chest muscles. Females would also have breasts as the top layer of the chest.
D. The limbs, which also have their own layers of form that can be used to create more overlaps.

When I draw, I construct my forms and anatomy with the layers in mind.
1. Block in the shape of the rib cage and pelvis, and also define the pinch in the back.
2. Refine the rib cage shape and describe the gesture of the limbs.
3. Block in the abdominals, lat muscles, and then the scapula and chest muscles.
4. Construct the limbs with cylinders, compound shapes, and cross sections.
5. Emphasize any overlapping forms to help suggest depth.

TECHNIQUE 2: OVERLAPS
The layers of anatomy and form naturally overlap. When forms overlap they create depth. In my drawing, I consciously emphasize overlaps. One way is by using “T” intersections, which are T-shaped accents anytime two forms intersect. The more overlaps you create, the more depth you will suggest. Whenever possible, you can invent overlaps if you really want to push the feeling of depth.

TECHNIQUE 3: VALUES AND TONES
For longer poses, you can also use shading to create depth and overlaps. In terms of value, dark objects will recede and light areas will come forward. In the above example, when I fill the shadow shape with a tone and create a two-value, light-and-dark pattern, the forms in shadow recede and the forms in light come forward (A). To create more depth in the shadow, you can add dark accents, such as pinching forms in the torso (B), the armpit, and where the right leg makes contact and overlaps the left leg (C). When you add halftones and start to model the form, you can create a three-value system with lights and highlights. Because the highlights are the brightest part of the figure, they appear to come forward and make the halftones recede. This can be seen in the shoulder muscle, as the highlight makes the shoulder muscle come forward and appear to be in front of the arm and torso underneath (D). This is also seen in the left hip and leg, as the highlight makes the form come forward and the halftones and shadows recede (E).


Example 1: Side View, Bending Forward, Female
Observation Notes
The first thing I look for are the layers of anatomy (see opposite). The rib cage is hidden but the iliac crest of the pelvis is clearly visible (A). In the upper back, the seventh cervical point is clearly seen (B). This bony landmark helps me visualize the shoulder and the top of the rib cage. The next layer is the muscles. Here the lat muscle in the back is very obvious (C). The side of the lower stomach sits directly above the iliac crest (D). The large hip muscles, especially the gluteus medius, are above the pelvis and upper leg and can be an opportunity to make an overlap (E).
The next layer is the scapula and muscles surrounding it (F). The final layer is the arm itself, especially the shoulder muscle (G), which is on top of the upper arm. In this pose, the breasts and head are behind the arm and create a lot of opportunities for overlaps (H).

Part 1: The Lay-in
Start by defining the torso and limbs as 2-D shapes, especially the shapes of the rib cage, pelvis, and abdomen. Lightly lay in the gesture of the arm and legs, which will help you make a mental game plan for the areas of overlap.
The second layer to add is the muscles. In the upper body, indicate the lat muscle (A) and then block in the muscles around the scapula (B). Also indicate the shoulder muscle (C). At the hips, block in the iliac crest (D), which will create a layer between the torso and the upper leg.

Refine the shoulder muscle shape (E). Block-in the forearm with an oval shape, separating and blocking in the elbow joint (F). Block-in the hair shape (G) to create more overlap opportunities. Refine the feet and ankle joint (H).
To complete the lay-in, refine the shape of the arm, especially where it overlaps the leg (I). Indicate details at the abdomen (J). Indicate the facial features (K). Add background shapes and details like the folds of the fabric (L).

Part 2: Establishing Values
Massing in the shadow shapes creates a two-value pattern, which starts to make the forms in shadow recede and the forms in light come forward (A). To establish three values, start adding halftones at the legs and lower body (B), leaving the light areas around the side of the hip and the lower abdomen (C). Add tones to the upper body, especially at the back muscles (D), leaving a highlight area at the top of the shoulder, neck, breast, and forearm (E).

Part 3: Modeling Form and Highlights
To make the gluteus medius muscle come forward, first darken the core shadow and the shadow area around it (F). Darken the halftones on the light side of the core shadow to help create a highlight. In the light areas, add a subtle light tone, which creates a highlight on the hip (G).
Darken the shadow areas around the shoulder, especially the core shadow of the shoulder muscle (H). Use the core shadow of the muscles and tendons around the scapulae muscles to invent a subtle overlap (I). Add subtle light tones to the shoulder muscles to create a highlight (J). Darken and soften the breast to it make recede farther behind the arm (K).

Part 4: Accents and Finishing Touches
The last marks are dark accents and finishing touches. For example, there are “T” intersection accents where the front of the arm overlaps the knee and calf (L) and where the back of the arm overlaps the bottom of the thigh (M). Erase a highlight at the hips and upper leg (N) to make these forms come forward and also to create another layer of anatomy. If there is time remaining, add detail to the hand (O) to help the entire arm come forward from the leg.
How to Draw the Figure in Perspective
Drawing the forms of the figure in perspective is challenging. A pose with extreme foreshortening can be very intimidating and frustrating, especially for anyone new to figure drawing. In my drawing classes and workshops, how to draw in the figure in perspective is one of the most requested topics.
Perspective drawing is a complex science, and an expertise on the subject is not necessary to start drawing the figure from life. In this chapter, I share some ways I apply perspective to the figure, as well as tips and techniques. First we must understand the fundamental concept of position.
DEFINING POSITION AND EYE LEVEL
“Position” refers to where a form is in 3-D space and how it occupies that space. Position is defined by the direction the form is moving relative to the viewer’s eye level and vantage point. In general, a form is either moving toward or away from the viewer.
Eye level is an imaginary horizontal line that is level with the center of your eyes. Forms can be above, at, or below eye level.
The figure is capable of an infinite range of movement. In figure drawing, however, there are only six positions that require perspective. These positions are:

1. Toward and up (above eye level)
2. Toward, horizontally (at eye level)
3. Toward and down (below eye level)
4. Away and up (above eye level)
5. Away, horizontally (at eye level)
6. Away and down (below eye level)
PERSPECTIVE DRAWING TOOLS
To draw the figure and its forms in any position and suggest perspective, I use a series of drawing tools and techniques that are based on form drawing, which is drawing with 3-D shapes like cylinders, cubes, and cones, to simplify the complex forms of the figure.
Tool 1: Box Forms
To see and communicate eye level, visualize the figure as geometric 3-D forms, especially box-like forms, and look for their sides, also known as “planes.” If you see undersides of forms, the form is above your eye level. If you see the top of the form, the form is below your eye level.
In this pose, the arms and head are above eye level, so their undersides are clearly seen (A). The underside of the chest and rib cage (B) can also be seen. As forms below go below eye level, you can see their top planes. Here, the top plane of the lower abdomen (C), along with the thigh and foot (D), are easily identified.

Tool 2: Cross Sections
A cross section is an imaginary cut or section of a form. For example, cylinder forms are elliptical in shape and the curved outer edge of the ellipse communicates the position. Determining which cross section I use depends on which of the six positions I want to communicate.
To help see the direction of a form, visualize the forms as cylinders. In this example, the torso is moving upward and toward the viewer. This means the cross sections will curve down (A) because the form is above eye level. The model’s left arm is also moving toward the viewer, but downward and below eye level, so the cross sections will curve up (B). The model’s left leg is moving toward the viewer, but mostly at a horizontal plane, almost parallel to eye level. This means the cross sections will curve outward to the left (C). The model’s right leg is moving downward, below eye level and slightly away. This means the cross sections will curve down (D). Similarly, the model’s right arm is moving away from the viewer and slightly down, which means the cross sections will also curve down (E). When you draw the figure, you can use cross sections to help communicate the many positions of a form and suggest perspective.

Tool 3: Overlapping Forms
As in a side view, take advantage of the naturally overlapping forms of the body. For example, if the model is bending forward, the head will overlap the shoulders, the shoulders will overlap the chest, the chest will overlap the stomach, and so on. When I draw foreshortened poses, I take advantage of as many overlaps as possible, and I even exaggerate. I will also invent overlaps, if needed, to help me get a better read.
In this pose, there are many overlaps available to use to suggest perspective. In the torso alone, the three sections of the rib cage, abdomen, and hips clearly overlap each other (A). The breasts add another layer of overlap (B). The head clearly overlaps the neck (C), but the hair can also be used to create overlaps (D). To draw foreshortened poses like this, use or emphasize as many overlaps as you can. How many more overlaps can you see?

Tool 4: Tapering Forms
Tapering forms suggest perspective, especially forms that are moving away from the viewer. The more dramatic the perspective in the pose, the more I exaggerate the taper.


EXAMPLE 1: LOW ANGLE, UP-VIEW
A low-angle pose such as this is common in life drawing because the model is often on a stage. In this example, the model is sitting on a high stool and leaning away.
Observation Notes
Because an up-view is more challenging to draw, I take extra time to observe the pose, look at what the forms are doing, and think of what perspective drawing tools are available to me. The first thing I notice in this pose is the dramatic action and movement. Since the model is leaning back, the body and its forms are moving away from me in an upward, curved motion (A). To draw this, I know I will use tapering forms as much as possible, especially when drawing the torso and the head (B). The second thing I look for in an up-view are the underplanes, which are the undersides of any forms. The most noticeable underplanes in this pose are in the head, breasts, abdomen, and left leg (C).

Part 1: Gesture and Shape
This pose has a very clear stretch and action (D). Begin the drawing with the gesture and an outer shape that looks like a triangle or tapering cone (E). This is how you will draw the sections and forms. Next indicate the head and define the shape of the torso, separating its sections. Loosely block in the gesture of the limbs. Block in the legs as two overlapping shapes (F).

Part 2: Construction, Part 1
Block in the shape of the breasts and draw them in a way that describes the curve of a cylinder (A). This creates a cross section that helps define the position. Start to construct the legs with cylinders and ovals. This adds thickness, volume, and cross sections that you can use to define the position (B).

Part 3: Construction, Part 2
Continue to add construction to the arms (C). Indicate the features, using the underplanes of the eye sockets, nose, and upper lip to emphasize the low-angle view (D). Complete the lay-in by refining the contour of the torso and legs (E).

Part 4: Overlaps, Accents, and Tone
These next steps help the drawing communicate perspective and a low-angle view. First reinforce overlaps by adding dark accents at “T” intersections: the overlaps to the legs, the hip, and the many layers of form around the armpit, breasts, and shoulders. Also accent and define the overlaps of the clavicle, neck, and jaw, which pushes the head back and behind the chest and torso (F).
With the time remaining, you can add tones and edge variation. Because this pose is an up-view, use tone mostly on the overlapping areas, which are occlusion shadows, and especially on the underplanes (G).

EXAMPLE 2: HIGH-ANGLE RECLINING
Reclining and seated poses are common for longer poses, and they usually come at the end of a life drawing session. If the head and upper body of the model are coming toward you (or away), then the perspective will be a challenge. These poses take much more thought and care to get a good read with natural-looking proportions.

Observation Notes
The first thing I see in this pose are the tapering forms. The torso and lower body as a whole are foreshortened, and the forms are naturally tapering (A). The tapering cylinder of the right arm also suggests perspective (B). The second tool you can use in this pose is overlaps. For a pose with this much perspective, use as many overlaps as you can. Here the overlapping layers are clear. The head and right arm are clearly in front of the torso (C). The left arm and shoulder are on top of the torso (D). The sections of the torso have clear overlaps (E). The legs are also another layer you can use (F).

Part 1: Gesture and Shape
The action line in this pose runs along the torso and extends all the way from the fingertips through the body to the left knee (G). Relate the hand to the knee to create movement and help with the proportion (H). Draw the gesture of the head shape and pinch side of the torso (I). Next block in the shape of the legs by following the gesture of their contour (J). Use tapering lines to block in the gesture and shape of the arms (K). Simplify the hands into triangular shapes (L).

Part 2: Construction, Part 1
The gesture drawing gives you a lot of movement and a good 2-D shape to work with (A), but to communicate the perspective you need to add construction to the figure.
Start construction by indicating the features and adding some details to the head (B). Next add cross sections to the arms to add volume and define their position (C). For the torso, separate the sections (D). Construct the legs with cross sections, and also block in the foot (E).
Part 3: Construction, Part 2
To complete the lay-in, add anatomy and details to communicate perspective. Start by adding anatomy to the shoulder (F) and then the forearm and hand (G). In the torso, add the shape of the breasts and then folds and overlaps in the abdomen (H). Add sockets and details to the facial features to help communicate the head’s position (I), and also add detail to the foot (J).

Part 4: Overlaps and Accents
For foreshortened poses like these, emphasize and exaggerate any overlaps. Start with the overlaps in the abdomen and the right leg and calf (K). Next emphasize the arm overlapping the torso and leg (L). Also add dark accents where the head and hand overlap the extended arm (M). To create more depth, exaggerate the overlaps in the contour, especially where the abdomen connects with the hip and the hip connects with the leg (N). At this point, you have completed the lay-in as a line drawing. The last tool you can use to create more perspective and depth is shading.

Part 5: Shading
If you have time remaining, add medium dark tones in the overlapping areas, especially around the abdomen, chest, and right leg. Next add tone at the left sides of the forms, the top of the left shoulder, and the front of the face (O).
Darkening the cast shadows adds contrast and helps ground the figure (P). To add even more volume and depth, you can also add highlights where the forms are facing the light source (Q).

*Note: These steps don’t have to be followed in this exact order. It’s okay to add dark accents before the highlights. Or, if you add “T” intersections before shading, that’s okay too. The important thing is not the order of the marks, but that the marks add to the drawing and help communicate the read.