
What if the low-level specification for your device driver demands that, between the execution of func_a() and func_b(), there should be a 50-millisecond delay? Furthermore, depending on your circumstances, the delay should work when you're running in either process or interrupt contexts. What if, in another part of the driver, you require a monitoring function of some sort to be executed asynchronously and periodically (say, every second)? Or do you need to have a thread (or several threads) silently performing work in the background but within the kernel?
These are very common requirements in all kinds of software, including our corner of the universe – Linux kernel module (and driver) development! In this chapter, you will learn how to set up, understand, and use delays while running in kernel space, as well as how to work with kernel timers, kernel threads, and workqueues.
In this chapter, you will learn how to optimally perform these tasks. In a nutshell, we will cover the following topics:
- Delaying for a given time in the kernel
- Setting up and using kernel timers
- Creating and working with kernel threads
- Using kernel workqueues
Let's get started!
Technical requirements
I assume that you have gone through the Preface section To get the most out of this book and have appropriately prepared a guest VM running Ubuntu 18.04 LTS (or a later stable release) and installed all the required packages. If not, I highly recommend you do this first. To get the most out of this book, I strongly recommend you first set up the workspace environment, including cloning this book's GitHub repository for the code, and work on it in a hands-on fashion. The repository can be found here: https://github.com/PacktPublishing/Linux-Kernel-Programming-Part-2.
Delaying for a given time in the kernel
Often, your kernel or driver code will need to wait for a given time before moving on to the next instruction. This can be achieved within the Linux kernel space via a set of delay APIs. Right from the outset, a key point to understand is that you can enforce a delay in two broad ways:
- Delay via non-blocking or atomic APIs that will never cause a sleep process to occur (in other words, it will never schedule out)
- Delay via blocking APIs that cause the current process context to sleep (in other words, by scheduling out)
(As we covered in detail in the companion guide Linux Kernel Programming, our chapters on CPU scheduling Chapter 10, The CPU Scheduler – Part 1, and Chapter 11, The CPU Scheduler – Part 2), putting a process context to sleep internally implies that the kernel's core schedule() function is invoked at some point, ultimately causing a context switch to occur. This leads up to a really important point (one we've mentioned previously!): you must never, ever invoke schedule() while running in an atomic or interrupt context of any sort.
Often, as is our case here with inserting delays, you have to figure out what context the code where you intend to insert a delay is running in. We covered this in the companion guide Linux Kernel Programming - Chapter 6, Kernel Internals Essentials – Processes and Threads, in the Determining the context section; please refer back to it if you're unclear. (We went into even more detail on this in Chapter 4, Handling Hardware Interrupts.)
Next, think about this carefully: if you are indeed in an atomic (or interrupt) context, is there really a need to delay? The whole point of an atomic or interrupt context is that the execution within it is limited to an as-brief-as-possible duration; it is strongly recommended that you design it in this way. This implies that you don't insert delays into atomic code unless you can't avoid doing so.
- Use the first type: These are the non-blocking or atomic APIs that will never cause a sleep to occur. You should use this when your code is in an atomic (or interrupt) context and you really do require a non-blocking delay with a short duration; but how short is that? As a rule of thumb, use these APIs for non-blocking atomic delays that are 1 millisecond or less. Even if you need to delay for longer than a millisecond in an atomic context – say, within the code of an interrupt handler (but why delay in an interrupt!?) – use these *delay() APIs (the * character implies a wildcard; here, as you will see, it implies the ndelay(), delay(), and mdelay() routines).
- Use the second type: These are the blocking APIs that cause the current process context to sleep. You should use this when your code is in a process (or task) context, for delays that are blocking in nature and of a longer duration; in effect, for delays over a millisecond. These kernel APIs follow the form *sleep(). (Again, without going into too much detail, think about this: if you are in a process context but within the critical section of a spinlock, it's an atomic context – if you must incorporate a delay, then you must use the *delay() APIs! We'll cover spinlocks and much more in the last two chapters of this book.)
Now, let's look at these kernel APIs and see how they're used. We'll begin by looking at *delay() atomic APIs.
Understanding how to use the *delay() atomic APIs
Without further ado, let's take a look at a table that quickly summarizes the available (to us module authors) non-blocking or atomic *delay() kernel APIs; they're meant to be used in any kind of atomic or interrupt context where you cannot block or sleep (or invoke schedule()):
| API | Comment |
| ndelay(ns); | Delay for ns nanoseconds. |
| udelay(us); | Delay for us microseconds. |
| mdelay(ms); | Delay for ms milliseconds. |
There are a few points to note regarding these APIs, their internal implementation, and their usage:
- Always include the <linux/delay.h> header when using these macros/APIs.
- You are expected to call an appropriate routine based on the time you must delay for; for example, if you need to perform an atomic non-blocking delay of, say, 30 milliseconds, you should call mdelay(30) and not udelay(30*1000). The kernel code mentions this very point: linux/delay.h – "Using udelay() for intervals greater than a few milliseconds can risk overflow for high loops_per_jiffy (high bogomips) machines ...".
- The internal implementation of these APIs, like many on Linux, is nuanced: there is a higher-level abstracted implementation for these functions (or macros, as the case may be) in the <linux/delay.h> header; there is often a low-level arch-specific implementation within an arch-specific header (<asm-<arch>/delay.h> or <asm-generic/delay.h>; where arch, of course, means CPU) that will automatically override the high-level version at call time (the linker will ensure this).
- In the current implementation, these APIs ultimately boil down to wrappers over udelay(); this function itself boils down to a tight assembly loop that performs what's called "busy looping"! (for x86, the code can be found in arch/x86/lib/delay.c:__const_udelay()). Without going into the gory details, early in the boot process, the kernel calibrates a couple of values: the so-called bogomips – bogus MIPS – and loops per jiffy (lpj) values. Essentially, the kernel figures out, on that particular system, how many times a loop must be iterated over in order for 1 timer tick or a jiffy to elapse. This value is known as the system's bogomips value and can be seen in the kernel log. For example, on my Core-i7 laptop, it's as follows:
Calibrating delay loop (skipped), value calculated using timer frequency.. 5199.98 BogoMIPS (lpj=10399968)
- For delays over MAX_UDELAY_MS (set to 5 ms), the kernel will internally call the udelay() function in a loop.
Remember the *delay() APIs must be used when you require a delay in any type of atomic context, such as an interrupt handler (top or bottom half), as they guarantee that no sleep – and thus no call to schedule() – ever occurs. A reminder (we mentioned this point in Chapter 4, Handling Hardware Interrupts): might_sleep() is used as a debug aid; the kernel (and drivers) internally uses the might_sleep() macro in places in the code base where the code runs in the process context; that is, where it can sleep. Now, if might_sleep() is ever invoked within an atomic context, that's just plain wrong – a noisy printk stack trace is then emitted, thus helping you catch these issues early and fix them. You can use these *delay() APIs in the process context as well.
Now, let's look at the second type of delay APIs available – the blocking type.
Understanding how to use the *sleep() blocking APIs
Let's look at another table that quickly summarizes the available (to us module authors) blocking *sleep*() kernel APIs; these are only meant to be used in the process context when it's safe to sleep; that is, where the invocation of schedule() is not a problem. In other words, the delay is implemented by the process context actually going to sleep for the duration of the delay and is then woke up when it's done:
| API | Internally "backed by" | Comment |
| usleep_range(umin, umax); | hrtimers (high-resolution timers) | Sleep for between umin and umax microseconds. Use where the wakeup time is flexible. This is the recommended API to use. |
| msleep(ms); | jiffies/legacy_timers | Sleep for ms milliseconds. Typically meant for a sleep with a duration of 10 ms or more. |
| msleep_interruptible(ms); | jiffies/legacy_timers | An interruptible variant of msleep(ms);. |
| ssleep(s); | jiffies/legacy_timers | Sleep for s seconds. This is meant for sleeps > 1 s (wrapper over msleep()). |
There's a few points to note regarding these APIs, their internal implementation, and their usage:
- Ensure you include the <linux/delay.h> header when using these macros/APIs.
- All these *sleep() APIs are internally implemented in such a manner that they cause the current process context to sleep (that is, by internally invoking schedule()); thus, of course, they must only ever be invoked in the process context when it's "safe to sleep". Again, just because your code is in the process context does not necessarily mean it's safe to sleep; for example, the critical section of a spinlock is atomic; thus, you must not invoke the aforementioned *sleep() APIs there!
- We mentioned that usleep_range() is the preferred/recommended API to use when you want a short sleep – but why? This will become clearer in the Let's try it – how long do delays and sleeps really take? section.
As you are aware, sleeps on Linux can be of two types: interruptible and uninterruptible. The latter means that no signal task can "disturb" the sleep. So, when you invoke msleep(ms);,i t puts the current process context to sleep for ms by internally invoking the following:
__set_current_state(TASK_UNINTERRUPTIBLE);
return schedule_timeout(timeout);
The schedule_timeout() routine works by setting up a kernel timer (our next topic!) that will expire in the desired time, then immediately putting the process to sleep by calling schedule()! (For the curious, have a peek at its code here: kernel/time/timer.c:schedule_timeout().) The msleep_interruptible() implementation is very similar, except that it calls __set_current_state(TASK_INTERRUPTIBLE);. As a design heuristic, follow the UNIX paradigm of provide mechanism, not policy; this way, calling msleep_interruptible() might be a good idea in situations where, if the userspace app aborts the work (by the user pressing ^C perhaps), the kernel or driver obediently releases the task: its process context is awoken, it runs the appropriate signal handler, and life continues. In situations where it's important that the kernel space is not disturbed by user-generated signals, use the msleep() variant.
Again, as a rule of thumb, use the following APIs, depending on the duration of the delay:
- For delays of over 10 milliseconds: msleep() or msleep_interruptible()
- For delays of over 1 second: ssleep()
As you might expect, ssleep() is a simple wrapper over msleep(); and becomes msleep(seconds * 1000);.
One simple way to implement the (approximate) equivalent of the user space sleep(3) API can be seen in our convenient.h header; at heart, it employs the schedule_timeout() API:
#ifdef __KERNEL__
void delay_sec(long);
/*------------ delay_sec --------------------------------------------------
 * Delays execution for @val seconds.
 * If @val is -1, we sleep forever!
 * MUST be called from process context.
 * (We deliberately do not inline this function; this way, we can see it's
 * entry within a kernel stack call trace).
 */
void delay_sec(long val)
{
    asm (""); // force the compiler to not inline it!
    if (in_task()) {
        set_current_state(TASK_INTERRUPTIBLE);
        if (-1 == val)
            schedule_timeout(MAX_SCHEDULE_TIMEOUT);
        else
            schedule_timeout(val * HZ);
    }
}
#endif /* #ifdef __KERNEL__ */
Now that you've learned how to delay (yes, smile please), let's move on and learn a useful skill: timestamping kernel code. This allows you to quickly calculate how long a particular piece of code takes to execute.
Taking timestamps within kernel code
It's important to be able to take an accurate timestamp as kernels open employ this facility. For example, the dmesg(1) utility shows the time since the system booted in seconds.microseconds format; Ftrace traces typically show the time a function takes to execute. When in user mode, we often employ the gettimeofday(2) system call to take a timestamp. Within the kernel, several interfaces exist; commonly, the ktime_get_*() family of routines is employed for the purpose of obtaining accurate timestamps. For our purposes, the following routine is useful:
u64 ktime_get_real_ns(void);
This routine internally queries the wall (clock) time via the ktime_get_real() API and then converts the result into a nanosecond quantity. We won't bother with the internal details here. Also, several variants of this API are available; for example, ktime_get_real_fast_ns(), ktime_get_real_ts64(), and so on. The former is both fast and NMI-safe.
Now that you know how to get a timestamp, you can calculate how long some code takes to execute to a good degree of accuracy, with nanosecond resolution no less! You can use the following pseudocode to achieve this:
#include <linux/ktime.h>
t1 = ktime_get_real_ns();
foo();
bar();
t2 = ktime_get_real_ns();
time_taken_ns = (t2 -> t1);
Here, the time taken for the (fictional) foo() and bar() functions to execute is calculated, and the result – in nanoseconds – is available in the time_taken_ns variable. The <linux/ktime.h> kernel header itself includes the <linux/timekeeping.h> header, which is where the ktime_get_*() family of routines is defined.
The code example in the next section will help us employ this kind of approach.
Let's try it – how long do delays and sleeps really take?
By now, you know how to use the *delay() and *sleep() APIs to construct delays and sleeps (non-blocking and blocking, respectively). Hang on, though – we haven't really tried it out in a kernel module. Not only that, are the delays and sleeps as accurate as we have been led to believe? Let's, as usual, be empirical (this is important!) and not make any assumptions. Let's actually try it out for ourselves!
The demo kernel module we'll be looking at in this subsection performs two kinds of delays, in order:
- First, it employs the *delay() routines (which you learned about in the Understanding how to use the *delay() atomic APIs section) to implement atomic non-blocking delays of 10 ns, 10 us, and 10 ms.
- Next, it employs the *sleep() routines (which you learned about in the Understanding how to use the *sleep() blocking APIs section) to implement blocking delays of 10 us, 10 ms, and 1 second.
We call the code for this like so:
DILLY_DALLY("udelay() for 10,000 ns", udelay(10));
Here, DILLY_DALLY() is a custom macro. Its implementation is as follows:
// ch5/delays_sleeps/delays_sleeps.c
/*
 * DILLY_DALLY() macro:
 * Runs the code @run_this while measuring the time it takes; prints the string
 * @code_str to the kernel log along with the actual time taken (in ns, us
 * and ms).
 * Macro inspired from the book 'Linux Device Drivers Cookbook', PacktPub.
 */
#define DILLY_DALLY(code_str, run_this) do {
    u64 t1, t2;
    t1 = ktime_get_real_ns();
    run_this;
    t2 = ktime_get_real_ns();
    pr_info(code_str "-> actual: %11llu ns = %7llu us = %4llu ms
",
        (t2-t1), (t2-t1)/1000, (t2-t1)/1000000);
} while(0)
Here, we have implemented the time delta calculation trivially; a good implementation will involve checking that the value of t2 is greater than t1, that no overflow occurs, and so on.
We invoke it, for various delays and sleeps, within our kernel module's init function, like this:
    [ ... ]
    /* Atomic busy-loops, no sleep! */
    pr_info("
1. *delay() functions (atomic, in a delay loop):
");
    DILLY_DALLY("ndelay() for         10 ns", ndelay(10));
    /* udelay() is the preferred interface */
    DILLY_DALLY("udelay() for     10,000 ns", udelay(10));
    DILLY_DALLY("mdelay() for 10,000,000 ns", mdelay(10));

    /* Non-atomic blocking APIs; causes schedule() to be invoked */
    pr_info("
2. *sleep() functions (process ctx, sleeps/schedule()'s out):
");
    /* usleep_range(): HRT-based, 'flexible'; for approx range [10us - 20ms] */
    DILLY_DALLY("usleep_range(10,10) for 10,000 ns", usleep_range(10, 10));
    /* msleep(): jiffies/legacy-based; for longer sleeps (> 10ms) */
    DILLY_DALLY("msleep(10) for      10,000,000 ns", msleep(10));
    DILLY_DALLY("msleep_interruptible(10)         ", msleep_interruptible(10));
    /* ssleep() is a wrapper over msleep(): = msleep(ms*1000); */
    DILLY_DALLY("ssleep(1)                        ", ssleep(1));
Here's some sample output when the kernel module is run on our trusty x86_64 Ubuntu VM:

Carefully study the preceding output; it's peculiar that both the udelay(10) and mdelay(10) routines seem to complete their execution before the desired delay period has expired (in our sample output, in 9 us and 9 ms, respectively)! How come? The reality is that the *delay() routines tend to finish earlier. This fact is documented within the kernel source. Let's take a look at the relevant portion of code here (it's self-explanatory):
// include/linux/delay.h
/*
 [ ... ]
 * Delay routines, using a pre-computed "loops_per_jiffy" value.
 *
 * Please note that ndelay(), udelay() and mdelay() may return early for
 * several reasons:
 * 1. computed loops_per_jiffy too low (due to the time taken to
 * execute the timer interrupt.)
 * 2. cache behavior affecting the time it takes to execute the
 * loop function.
 * 3. CPU clock rate changes.
 *
 * Please see this thread:
 * http://lists.openwall.net/linux-kernel/2011/01/09/56
The *sleep() routines have the reverse characteristic; they pretty much always tend to sleep for longer than asked. Again, these are expected issues in a non-real-time OS such as standard Linux.
You can mitigate these issues in a few ways:
- On standard Linux, in user mode, do the following:
- First of all, it's best to use the High-Resolution Timer (HRT) interfaces for high accuracy. This, again, is code that's been merged from the RTL project into mainstream Linux (way back in 2006). It supports timers that require a resolution of less than a single jiffy (which, as you know, is tightly coupled to the timer "tick", the kernel CONFIG_HZ value); for example, with the HZ value being 100, a jiffy is 1000/100 = 10 ms; with HZ being 250, a jiffy is 4 ms, and so on.
- Once you've done this, why not employ the soft RT scheduling features of Linux? Here, you can specify a scheduling policy of SCHED_FIFO or SCHED_RR and a high priority for your user mode thread (the range is 1 to 99; we covered these details in the companion guide Linux Kernel Programming - Chapter 10, The CPU Scheduler – Part 1).
- The kernel developers have taken the trouble to clearly document some excellent recommendations for when you're using these delay and sleep APIs within the kernel. It's really important that you browse through this document within the official kernel documentation: https://www.kernel.org/doc/Documentation/timers/timers-howto.rst.
- Configure and build the Linux OS as an RTOS; this will significantly reduce scheduling "jitter" (we covered this topic in detail in the companion guide Linux Kernel Programming - Chapter 11, The CPU Scheduler – Part 2, in the Converting mainline Linux into an RTOS section).
Interestingly, using our "better" Makefile's checkpatch target can be a real boon. Let's take a look at what it (the kernel's checkpatch Perl script) has caught (first ensure you're in the correct source directory):
$ cd <...>/ch5/delays_sleeps
$ make checkpatch
make clean
[ ... ]
--- cleaning ---
[ ... ]
--- kernel code style check with checkpatch.pl ---

/lib/modules/5.4.0-58-generic/build/scripts/checkpatch.pl --no-tree -f --max-line-length=95 *.[ch]
[ ... ]
WARNING: usleep_range should not use min == max args; see Documentation/timers/timers-howto.rst
#63: FILE: delays_sleeps.c:63:
+ DILLY_DALLY("XXXXXXXXXXXXXXXXXXXXXXXXXXXXXXXXX", usleep_range(10, 10));

total: 0 errors, 2 warnings, 79 lines checked
[ ... ]
That's really good! Ensure that you use the targets in our "better" Makefile (we covered this in detail in the companion guide Linux Kernel Programming - Chapter 5, Writing Your First Kernel Module LKMs – Part 2, in the A "better" Makefile template for your kernel modules section).
With that, we've finished looking at kernel delays and sleeping within the kernel. With this as a base, you shall now learn how to set up and use kernel timers, kernel threads, and workqueues in the remaining sections of this chapter.
The "sed" drivers – to demo kernel timers, kthreads, and workqueues
To make this chapter more interesting and hands-on, we shall begin evolving a miscellaneous class character "driver" called a simple encrypt decrypt – or sed for short – driver (not to be confused with the well-known sed(1) utility). No, you won't get a grand prize for guessing that it provides some kind of – very simplistic – text encryption/decryption support.
The point here is that we shall imagine that in the specification for this driver, one clause demands that the work (practically speaking, the encryption/decryption functionality) is carried out within a given time interval – in effect, within a given deadline. In order to check this, we shall design our driver so that it has a kernel timer that will expire in the given time interval; the driver will check that the functionality does indeed complete within this time constraint!
We shall evolve a series of sed drivers and their user space counterparts (apps):
- The first driver – the sed1 driver and user mode app (ch5/sed1) – will perform what we just described: the demo user mode app will employ ioctl system calls to interface with the driver and get the encrypt/decrypt message functionality going. The driver will focus on a kernel timer that we will set up to expire by the given deadline. If it does expire, we deem the operation to have failed; if not, the timer is canceled and the operation is a success.
- The second version, sed2 (ch5/sed2), will do the same as sed1, except that the actual encrypt/decrypt message functionality here will be carried out in the context of a separately created kernel thread! This changes the design of the project.
- The third version, sed3 (ch5/sed3), will again do the same as sed1 and sed2, except that this time the actual encrypt/decrypt message functionality will be carried out by a kernel workqueue!
Now that you have learned how to perform delays (both atomic and blocking) and capture timestamps, let's learn how to set up and use kernel timers.
Setting up and using kernel timers
A timer provides software with a means of being asynchronously notified when a designated amount of time has passed. All kinds of software, both in user and kernel space, require timers; this commonly includes network protocol implementations, block layer code, device drivers, and various kernel subsystems. This timer provides a means of asynchronous notification, thus allowing the driver to execute work in parallel with the running timer. An important question that arises is, how will I know when the timer expires? In user space apps, typically, the kernel sends a signal to the relevant process (the signal is typically SIGALRM).
In kernel space, it's a bit nuanced. As you will know from our discussion on top and bottom halves for hardware interrupts (see Chapter 4, Handling Hardware Interrupts, the Understanding and using top and bottom halves section), after the timer interrupt's top half (or ISR) completes, the kernel will ensure it runs the timer interrupt bottom half or timer softirq (as we showed in the table in Chapter 4, Handling Hardware Interrupts section Available softirqs and what they are for). This is a very high priority softirq called TIMER_SOFTIRQ. This softirq is what consumes expired timers! In effect – and this is very important to understand – your timer's "callback" function – the function that will run when the timer expires – is run by the timer softirq and thus runs in atomic (interrupt) context. Thus, it's limited in what it can and cannot do (again, this was explained in detail in Chapter 4, Handling Hardware Interrupts).
In the following section, you will learn how to set up and use a kernel timer.
Using kernel timers
In order to use a kernel timer, you must follow a few steps. Here's what to do in a nutshell (we'll discuss this in more detail afterward):
- Initialize the timer metadata structure (struct timer_list) with the timer_setup() macro. The key items that get initialized here are as follows:
- The time to expire by (that value that jiffies should reach for the timer to expire)
- The function to invoke when the timer expires – in effect, the timer "callback" function
- Write the code for your timer callback routine.
- When appropriate, "arm" the timer – that is, have it start – by invoking the add_timer() (or mod_timer()) function.
- When the timer times out (expires), the OS will automatically invoke your timer's callback function (the one you set up in step 2); remember, it will be running in the timer softirq or an atomic or interrupt context.
- (Optional) Timers are not cyclic, they are one-time by default. To have your timer run again, you will have to invoke the mod_timer() API; this is how you can set up an interval timer – one that times out at a given fixed time interval. If you don't perform this step, your timer will be a one-shot timer - it will count down and expire exactly once.
- When you are done, delete the timer with del_timer[_sync](); this can also be used to cancel the timeout. It returns a value denoting whether a pending timer has been deactivated or not; that is, it returns 1 for an active timer or 0 for an inactive timer being canceled.
The timer_list data structure is the one that's relevant to our work here; within it, the relevant members (the module/driver authors) are shown:
// include/linux/timer.h
struct timer_list {[ ... ]
    unsigned long expires;
    void (*function)(struct timer_list *);
    u32 flags;
[ ...] };
Use the timer_setup() macro to initialize it:
timer_setup(timer, callback, flags);
The parameters of timer_setup() are as follows:
- @timer: The pointer to the timer_list data structure (this should be allocated memory first; also, prefixing the formal parameter name with an @ is a common convention).
- @callback: The pointer to the callback function. This is the function that the OS invokes (in the softirq context) when the timer expires. Its signature is void (*function)(struct timer_list *);. The parameter you receive in the callback function is the pointer to the timer_list data structure. So, how can we pass and access some arbitrary data within our timer callback? We'll answer this question shortly.
- @flags: These are the timer flags. We typically pass this as 0 (implying no special behavior). The flags you can specify are TIMER_DEFERRABLE, TIMER_PINNED, and TIMER_IRQSAFE. Let's look at both in the kernel source code:
// include/linux/timer.h
/**
 * @TIMER_DEFERRABLE: A deferrable timer will work normally when the
 * system is busy, but will not cause a CPU to come out of idle just
 * to service it; instead, the timer will be serviced when the CPU
 * eventually wakes up with a subsequent non-deferrable timer.
  [ ... ]
 * @TIMER_PINNED: A pinned timer will not be affected by any timer
 * placement heuristics (like, NOHZ) and will always expire on the CPU
 * on which the timer was enqueued.
Using the TIMER_DEFERRABLE flag is useful when power consumption must be watched (such as on a battery-backed device). The third flag, TIMER_IRQSAFE, is special-purpose only; avoid using it.
Next, use the add_timer() API to arm, or start, the timer. Once called, the timer is "live" and starts counting down:
void add_timer(struct timer_list *timer);
Its parameter is the pointer to the timer_list structure that you just initialized (via the timer_setup() macro).
Our simple kernel timer module – code view 1
Without further ado, let's dive into the code of a simple kernel timer, written using the Loadable Kernel Module (LKM) framework (this can be found at ch5/timer_simple). As with most drivers, we keep a context or private data structure containing the information required while running; here, we call it st_ctx. We instantiate it as the ctx variable. We also specify the time to expire (as 420 ms) in a global named exp_ms:
// ch5/timer_simple/timer_simple.c
#include <linux/timer.h>
[ ... ]
static struct st_ctx {
    struct timer_list tmr;
    int data;
} ctx;
static unsigned long exp_ms = 420;
Now, let's check out the first portion of our init code:
static int __init timer_simple_init(void)
{
    ctx.data = INITIAL_VALUE;

    /* Initialize our kernel timer */
    ctx.tmr.expires = jiffies + msecs_to_jiffies(exp_ms);
    ctx.tmr.flags = 0;
    timer_setup(&ctx.tmr, ding, 0);
This is pretty straightforward. First, we initialize the ctx data structure, setting a data member to the value 3. The one key point here is that the timer_list structure is within our ctx structure, so we must initialize it. Now, setting the timer callback function (the function parameter) and the flags parameter values is simple; what about setting the time to expire? You must set the timer_list.expires member to the value that the jiffies variable (macro, actually) in the kernel must reach; at that point, the timer will expire! So, we prime it to have the timer expire 420 milliseconds in the future by adding the current value of jiffies to the jiffies value that the 420 ms elapsed time will take, like this:
ctx.tmr.expires = jiffies + msecs_to_jiffies(exp_ms);
The msecs_to_jiffies() convenience routine helps us out here as it converts the millisecond value that's passed to jiffies. Adding this result to the current value of jiffies will give us the value that jiffies will be in the future, in 420 ms from now, which is when we want our kernel timer to expire.
The next portion of the init code is as follows:
    pr_info("timer set to expire in %ld ms
", exp_ms);
    add_timer(&ctx.tmr); /* Arm it; let's get going! */
    return 0;     /* success */
}
As we can see, by invoking the add_timer() API, we have armed (start) our kernel timer. It's now live and counting down... in (approximately) 420 ms, it will expire. (Why approximately? As you saw in the Let's try it – how long do delays and sleeps really take? section, delay and sleep APIs aren't all that precise. In fact, a suggested exercise for you to work on later is to test the accuracy of the timeout; you can find this in the Questions/kernel_timer_check section. Also, in a sample solution for this exercise, we will show how using the time_after() macro is a good idea; it performs a validity check to ensure that the second timestamp is actually later than the first. Similar macros can be found in include/linux/jiffies.h; see the comment preceding this line: include/linux/jiffies.h:#define time_after(a,b)).
Our simple kernel timer module – code view 2
add_timer() started our kernel timer. As you just saw, it will soon expire. Internally, as we mentioned earlier, the kernel's timer softirq will run our timer's callback function. In the preceding section, we initialized the callback function to the ding() function (ha, onomatopoeia – a word that suggests the sound it describes – in action!) via the timer_setup() API. Hence, this code will run when the timer expires:
static void ding(struct timer_list *timer)
{
    struct st_ctx *priv = from_timer(priv, timer, tmr);
    /* from_timer() is in fact a wrapper around the well known
     * container_of() macro! This allows us to retrieve access to our
     * 'parent' driver context structure */
    pr_debug("timed out... data=%d
", priv->data--);
    PRINT_CTX();

    /* until countdown done, fire it again! */
    if (priv->data)
        mod_timer(&priv->tmr, jiffies + msecs_to_jiffies(exp_ms));
}
There are a few things to keep in mind regarding this function:
- The timer callback handler code (ding() here) runs in atomic (interrupt, softirq) context; thus, you aren't allowed to invoke any perform any blocking APIs, memory allocation other than with the GFP_ATOMIC flag, or any kind of data transfer between kernel and user space (we covered this in detail in the previous chapter in the Interrupt context guidelines – what to do and what not to do section).
- The callback function receives, as a parameter, the pointer to the timer_list structure. Since we have (very deliberately) kept struct timer_list within our context or private data structure, we can usefully employ the from_timer() macro to retrieve the pointer to our private structure; that is, struct st_ctx). The first line of code shown previous does this. How does this work? Let's look at its implementation:
 // include/linux/timer.h
 #define from_timer(var, callback_timer, timer_fieldname)
           container_of(callback_timer, typeof(*var), timer_fieldname)
It's really a wrapper over the container_of() macro!
- We then print and decrement our data value.
- We then issue our PRINT_CTX() macro (recall that it's defined in our convenient.h header file). It will show that we're running in softirq context.
- Next, as long as our data member is positive, we force another timeout (of the same period) by invoking the mod_timer() API:
int mod_timer(struct timer_list *timer, unsigned long expires);
As you can see, with mod_timer(), when the timer triggers again is completely up to you; it's considered an efficient way of updating a timer's expiry date. By using mod_timer(), you can even arm an inactive timer (the job that add_timer() does); in this case, the return value is 0, else it's 1 (implying that we've modified an existing active timer).
Our simple kernel timer module – running it
Now, let's test our kernel timer module. On our x86_64 Ubuntu VM, we will use our lkm convenience script to load up the kernel module. The following screenshot shows a partial view of this and the kernel log:

Study the dmesg (kernel log) output shown here. Since we've set the initial value of our private structure's data member to 3, the kernel timer expires three times (just as our logic demands). Check out the timestamps in the left-most column; you can see that the second timer expiry occurred at 4234.289334 (sec.us) and the third at 4234.737346; a quick subtraction reveals that the time difference is 448,012 microseconds; that is, about 448 milliseconds. This is reasonable since we asked for a 420 ms timeout (its a bit over that; the overheads of the printks do matter as well).
The PRINT_CTX() macro's output is revealing as well; let's look at the second one shown in the preceding screenshot:
[ 4234.290177] timer_simple:ding(): 001) [swapper/1]:0 | ..s1 /* ding() */
This shows that (as explained in detail in Chapter 4, Handling Hardware Interrupts) the code ran on CPU 1 (the 001)) in softirq context (s in ..s1). Furthermore, the process context that got interrupted – by the timer interrupt and softirq – is the swapper/1 kernel thread; this is the CPU idle thread running on CPU 1 when it's idle. This makes sense and is quite typical on an idle or lightly loaded system. The system (or at least CPU 1) was idle when the timer interrupt was initiated and a subsequent softirq came along and ran our timer callback.
sed1 – implementing timeouts with our demo sed1 driver
In this section, we'll write a bit of a more interesting driver (the code's for this can be found at ch5/sed1/sed1_driver). We'll design it so that it encrypts and/or decrypts a given message (very trivially, of course). The basic idea is that a user mode app (this can be found in ch5/userapp_sed) serves as its user interface. When run, it opens our misc character driver's device file (/dev/sed1_drv) and issues an ioctl(2) system call upon it.
The ioctl() call passes a data structure that encapsulates the data being passed, its length, the operation (or transform) to perform upon it, and a timed_out field (to figure out if it failed due to it missing its deadline). The valid ops are as follows:
- Encrypt: XF_ENCRYPT
- Decrypt: XF_DECRYPT
Due to lack of space, we don't intend to show the code in great detail here – after all, having read so much of this book, you're now in a good position to browse and try and understand the code on your own! Nevertheless, certain key details relevant to this section will be shown.
Let's take a look at its overall design:
- Our sed1 driver (ch5/sed1/sed1_driver/sed1_drv.c) is really a pseudo driver, in the sense that it doesn't operate on any peripheral hardware controller or chip but on memory; nevertheless, it's a full-fledged misc class character device driver.
- It registers itself as a misc device; in the process, a device node is auto-created by the kernel (here, we will call it /dev/sed1_drv).
- We arrange for it to have a driver "context" structure (struct stMyCtx) containing key members that it uses throughout; one of them is a struct timer_list structure for a kernel timer, which we initialize in the init code path (with the timer_setup() API).
- A user space app (ch5/sed1/userapp_sed/userapp_sed1.c) opens the device file of our sed1 driver (it's passed as a parameter to it, along with the message to encrypt). It invokes an ioctl(2) system call – the command being to encrypt – and the arg parameter, which is a pointer to a duly populated structure containing all the required information (including the message payload to encrypt). Let's take a look at it in brief:
kd->data_xform = XF_ENCRYPT;
ioctl(fd, IOCTL_LLKD_SED_IOC_ENCRYPT_MSG, kd);
- Our sed1 driver's ioctl method takes over. After performing validity checks, it copies the metadata structure (via the usual copy_from_user()) and fires off our process_it() function, which then invokes our encrypt_decrypt_payload() routine.
- encrypt_decrypt_payload() is the key routine here. It does the following:
- Starts our kernel timer (with the mod_timer() API), setting it to expire in TIMER_EXPIRE_MS milliseconds from now (here, we've set TIMER_EXPIRE_MS to 1).
- Grabs a timestamp, t1 = ktime_get_real_ns();.
- Kicks off the actual work – it's either an encrypt or decrypt operation (we've kept it very simplistic: a mere XOR operation followed by an increment for each byte of the payload; the reverse for decryption).
- As soon as the work's complete, do two things: grab a second timestamp, t2 = ktime_get_real_ns();, and cancel the kernel timer (with the del_timer() API).
- Show the time taken to complete (via our SHOW_DELTA() macro).
- The user space app then sleeps for 1 second (to gather itself) and runs the ioctl decryption, resulting in our driver decrypting the message.
- Finally, it terminates.
The following is the relevant code from the sed1 driver:
// ch5/sed1/sed1_driver/sed1_drv.c
[ ... ]
static void encrypt_decrypt_payload(int work, struct sed_ds *kd, struct sed_ds *kdret)
{
        int i;
        ktime_t t1, t2;   // a s64 qty
        struct stMyCtx *priv = gpriv;
        [ ... ]
        /* Start - the timer; set it to expire in TIMER_EXPIRE_MS ms */
        mod_timer(&priv->timr, jiffies + msecs_to_jiffies(TIMER_EXPIRE_MS));
        t1 = ktime_get_real_ns();

        // perform the actual processing on the payload
        memcpy(kdret, kd, sizeof(struct sed_ds));
        if (work == WORK_IS_ENCRYPT) {
                for (i = 0; i < kd->len; i++) {
                        kdret->data[i] ^= CRYPT_OFFSET;
                        kdret->data[i] += CRYPT_OFFSET;
                }
        } else if (work == WORK_IS_DECRYPT) {
                for (i = 0; i < kd->len; i++) {
                        kdret->data[i] -= CRYPT_OFFSET;
                        kdret->data[i] ^= CRYPT_OFFSET;
                }
        }
        kdret->len = kd->len;
        // work done!
        [ ... // code to miss the deadline here! (explained below) ... ]
        t2 = ktime_get_real_ns();

        // work done, cancel the timeout
        if (del_timer(&priv->timr) == 0)
                pr_debug("cancelled the timer while it's inactive! (deadline missed?)
");
        else
                pr_debug("processing complete, timeout cancelled
");
        SHOW_DELTA(t2, t1);
}
That's pretty much it! To get a feel for how it works, let's see it in action. First, we must insert our kernel driver (LKM):
$ sudo insmod ./sed1_drv.ko
$ dmesg
[29519.684832] misc sed1_drv: LLKD sed1_drv misc driver (major # 10) registered, minor# = 55,
               dev node is /dev/sed1_drv
[29519.689403] sed1_drv:sed1_drv_init(): init done (make_it_fail is off)
[29519.690358] misc sed1_drv: loaded.
$
The following screenshot shows a sample run of it encrypting and decrypting (here, we deliberately run the Address Sanitizer (ASan) debug version of this app; it might just reveal bugs, so why not!):

Everything went well here.
Let's take a look at the code of our kernel timer's callback function. Here, in our simple sed1 driver, we merely have it do the following:
- Atomically set an integer in our private structure, timed_out, to a value of 1, indicating failure. As we copy the data structure back to our user mode app (over ioctl()), this allows it to easily detect the failure and report/log it (the details on using atomic operators and much more will be covered in the last two chapters of this book).
- Emit a printk to the kernel log (at the KERN_NOTICE level), indicating that we timed out.
- Invoke our PRINT_CTX() macro to show the context details.
The code for our kernel timer's callback function is as follows:
static void timesup(struct timer_list *timer)
{
    struct stMyCtx *priv = from_timer(priv, timer, timr);

    atomic_set(&priv->timed_out, 1);
    pr_notice("*** Timer expired! ***
");
    PRINT_CTX();
}
Can we see this code – the timesup() timer expiry function – run? We arrange to do just this next.
Deliberately missing the bus
The part I left out earlier is an interesting wrinkle: just before the second timestamp is taken, we insert a bit of code to deliberately miss the sacrosanct deadline! How? It's really very simple:
static void encrypt_decrypt_payload(int work, struct sed_ds *kd, struct sed_ds *kdret)
{
    [ ... ]
    // work done!
    if (make_it_fail == 1)
        msleep(TIMER_EXPIRE_MS + 1);
    t2 = ktime_get_real_ns();
make_it_fail is a module parameter that is set to 0 by default; thus, only if you want to live dangerously (yes, a bit exaggerated!) should you pass it as 1. Let's try it out and see our kernel timer expire. The user mode app will detect this and report the failure as well:

This time, the deadline is exceeded before the timer is canceled, thus causing it to expire and fire. Its timesup() callback function then runs (highlighted in the preceding screenshot). I highly recommend that you take the time to read the code of the driver and user mode app in detail and try it out on your own.
Additional information on timers can be found within the proc filesystem; among the relevant (pseudo) files is /proc/[pid]/timers (per-process POSIX timers) and the /proc/timer_list pseudofile (this contains information about all pending high-resolution timers, as well as all clock event sources. Note that the /proc/timer_stats pseudo-file disappeared after kernel version 4.10). You can find out more information about them on the man page about proc(5) at https://man7.org/linux/man-pages/man5/proc.5.html.
In the next section, you will learn how to create and use kernel threads to your benefit. Read on!
Creating and working with kernel threads
A thread is an execution path; it's purely concerned with executing a given function. That function is its life and scope; once it returns from that function, it's dead. In user space, a thread is an execution path within a process; processes can be single or multi-threaded. Kernel threads are very similar to user mode threads in many respects. In kernel space, a thread is also an execution path, except that it runs within the kernel VAS, with kernel privilege. This means that kernels are also multi-threaded. A quick look at the output of ps(1) (run with the Berkeley Software Distribution (BSD) style aux option switches) shows us the kernel threads – they're the ones whose names are enclosed in square brackets:
$ ps aux
USER         PID %CPU %MEM    VSZ   RSS TTY        STAT START   TIME COMMAND
root           1  0.0  0.5 167464 11548 ?          Ss   06:20   0:00 /sbin/init splash 3
root           2  0.0  0.0      0     0 ?          S    06:20   0:00 [kthreadd]
root           3  0.0  0.0      0     0 ?          I<   06:20   0:00 [rcu_gp]
root           4  0.0  0.0      0     0 ?          I<   06:20   0:00 [rcu_par_gp]
root           6  0.0  0.0      0     0 ?          I<   06:20   0:00 [kworker/0:0H-kblockd]
root           9  0.0  0.0      0     0 ?          I<   06:20   0:00 [mm_percpu_wq]
root          10  0.0  0.0      0     0 ?          S    06:20   0:00 [ksoftirqd/0]
root          11  0.0  0.0      0     0 ?          I    06:20   0:05 [rcu_sched]
root          12  0.0  0.0      0     0 ?          S    06:20   0:00 [migration/0]
[ ... ]
root          18  0.0  0.0      0     0 ?          S    06:20   0:00 [ksoftirqd/1]
[ ... ]
The majority of the kernel threads have been created for a definite purpose; often, they're created at system startup and run forever (in an infinite loop). They put themselves into a sleep state, and, when some work is required to be done, wake up, perform it, and go right back to sleep. A good example is that of the ksoftirqd/n kernel thread(s) (there's typically one per CPU core; that's what the n signifies – it's the core number); when the softirq load gets too heavy, they're woken up by the kernel to help consume the pending softirqs and thus help out (we discussed this in Chapter 4, Handling Hardware Interrupts, in the Employing the ksoftirqd kernel threads section; in the preceding ps output, you can see them on a dual-core VM; they have PID 10 and 18). Similarly, the kernel also employs "kworker" worker threads, which are dynamic – they come and go as work is required (a quick ps aux | grep kworker should reveal several of them).
Let's take a look at a few characteristics of kernel threads:
- They always execute in kernel VAS, in kernel mode with kernel privilege.
- They always run in process context (refer to the companion guide Linux Kernel Programming - Chapter 6, Kernel Internals Essentials – Processes and Threads, the Understanding process and interrupt contexts section) and they have a task structure (and thus a PID and all other typical thread attributes, though their credentials always are set to 0, implying root access).
- They compete for the CPU resource with other threads (including user mode threads) via the CPU scheduler; kernel threads (often abbreviated as kthreads) do get a slight bump in priority.
- Since they run purely in kernel VAS, they're blind to user VAS; thus, their current->mm value is always NULL (indeed, it's a quick way to identify a kthread).
- All kernel threads descend from the kernel thread named kthreadd, which has a PID of 2. This is created by the kernel (technically, the first swapper/0 kthread with a PID of 0) during early boot; you can verify this by doing pstree -t -p 2 (look up the man page on pstree(1) for usage details).
- They have naming conventions. kthreads are named differently, though some conventions are followed. Often, the name ends in /n; this signifies that it's a per-CPU kernel thread. The number specifies the CPU core it's been affined to run upon (we covered CPU affinity in the companion guide Linux Kernel Programming - Chapter 11, The CPU Scheduler – Part 2, in the Understanding, querying, and setting the CPU affinity mask section). Furthermore, kernel threads are used for specific purposes and their name reflects that; for example, irq/%d-%s (where %d is the PID and %s is the name) is a threaded interrupt handler (covered in Chapter 4, Handling Hardware Interrupts). You can learn how to find out the kthread name and about many practical uses of kthreads (and how to tune them to reduce jitter) by reading the kernel documentation, Reducing OS jitter due to per-cpu kthreads, at https://www.kernel.org/doc/Documentation/kernel-per-CPU-kthreads.txt.
The bit we're interested in is that the kernel modules and device drivers often need to run a certain code path in the background, in parallel with other work that it and the kernel routinely performs. Let's say you need to block upon an asynchronous event that's occurring, or need to, upon some event, execute a user mode process from within the kernel, which is time-consuming. The kernel thread is just the ticket here; thus, we shall focus on how you, as a module author, can create and manage kernel threads.
Great; with that, let's learn how to create and work with a kernel thread.
A simple demo – creating a kernel thread
The primary API for creating kernel threads (that's exposed to us module/driver authors) is kthread_create(); it's a macro that invokes the kthread_create_on_node() API. The fact is, calling kthread_create() alone isn't sufficient to have your kernel thread do anything useful; this is because, while this macro does create the kernel thread, you need to make it a candidate for the scheduler by setting it's stated to running and waking it up. This can be done with the wake_up_process() API (once successful, it's enqueued onto a CPU runqueue, which makes it schedulable so that it runs in the near future). The good news is that the kthread_run() helper macro can be used to invoke both kthread_create() and wake_up_process() in one go. Let's take a look at its implementation in the kernel:
// include/linux/kthread.h
/**
 * kthread_run - create and wake a thread.
 * @threadfn: the function to run until signal_pending(current).
 * @data: data ptr for @threadfn.
 * @namefmt: printf-style name for the thread.
 *
 * Description: Convenient wrapper for kthread_create() followed by
 * wake_up_process(). Returns the kthread or ERR_PTR(-ENOMEM).
 */
#define kthread_run(threadfn, data, namefmt, ...)
({
    struct task_struct *__k
        = kthread_create(threadfn, data, namefmt, ## __VA_ARGS__);
    if (!IS_ERR(__k))
        wake_up_process(__k);
    __k;
})
The comments in the preceding code snippet make the parameters and return value of kthread_run() clear.
To demonstrate how to create and use a kernel thread, we will write a kernel module called kthread_simple. The following is the relevant code of its init method:
// ch5/kthread_simple/kthread_simple.c
static int kthread_simple_init(void)
{   [ ... ]
    gkthrd_ts = kthread_run(simple_kthread, NULL, "llkd/%s", KTHREAD_NAME);
    if (IS_ERR(gkthrd_ts)) {
        ret = PTR_ERR(gkthrd_ts); // it's usually -ENOMEM
        pr_err("kthread creation failed (%d)
", ret);
        return ret;
    }
    get_task_struct(gkthrd_ts); // inc refcnt, marking the task struct as in use
    [ ... ]
The first parameter to kthread_run() is the new kthread's lifeblood – its function! Here, we don't intend to pass any data to our newborn kthread, which is why the second parameter is NULL. The remaining parameters are the printf-style format string specifying its name. Once successful, it returns the pointer to the new kthread's task structure (we covered the task structures in some detail in the companion guide Linux Kernel Programming - Chapter 6, Kernel Internals Essentials – Processes and Threads, in the Understanding and accessing the kernel task structure section). Now, the get_task_struct() inline function is important – it increments the reference count of the task structure passed to it. This marks the task as being in use (later, in the cleanup code, we will issue the kthread_stop() helper routine; it will perform the converse operation, thus decrementing (and ultimately freeing up) the task structure's reference count).
Now, let's look at our kernel thread itself (we'll only show the relevant code snippets):
static int simple_kthread(void *arg)
{
    PRINT_CTX();
    if (!current->mm)
        pr_info("mm field NULL, we are a kernel thread!
");
The moment kthread_run() succeeds in creating the kernel thread, it will begin running its code in parallel with the rest of the system: it's now a schedulable thread! Our PRINT_CTX() macro reveals that it runs in process context and is indeed a kernel thread. (We have mimicked the tradition of enclosing its name in square brackets to show just this. The check to verify that the current mm pointer is NULL confirms the same.) You can see the output in Figure 5.5. All the code in your kernel thread routine is going to be running in the process context; hence, you can perform blocking operations (unlike with interrupt context).
Next, by default, the kernel thread runs with root ownership and all signals are masked. However, as a simple test case, we can turn on a couple of signals via the allow_signal() helper routine. After that, we simply loop (we'll get to the kthread_should_stop() routine shortly); in the loop body, we put ourselves to sleep by setting our task's state to TASK_INTERRUPTIBLE (implying that the sleep can be interrupted by signals) and invoking schedule():
    allow_signal(SIGINT);
    allow_signal(SIGQUIT);

    while (!kthread_should_stop()) {
        pr_info("FYI, I, kernel thread PID %d, am going to sleep now...
",
            current->pid);
        set_current_state(TASK_INTERRUPTIBLE);
        schedule(); // yield the processor, go to sleep...
        /* Aaaaaand we're back! Here, it's typically due to either the
         * SIGINT or SIGQUIT signal hitting us! */
        if (signal_pending(current))
            break;
    }
Thus, only when we're awoken– which will happen when you send the kernel thread either the SIGINT or SIGQUIT signal – will we resume execution. When this occurs, we break out of the loop (notice how we first verify that this is indeed the case with the signal_pending() helper routine!). Now, our kthread resumes execution outside the loop, only to (deliberately, and quite dramatically) die:
    set_current_state(TASK_RUNNING);
    pr_info("FYI, I, kernel thread PID %d, have been rudely awoken; I shall"
            " now exit... Good day Sir!
", current->pid);
    return 0;
}
The cleanup code of the kernel module is as follows:
static void kthread_simple_exit(void)
{
    kthread_stop(gkthrd_ts);   /* waits for our kthread to terminate;
                                * it also internally invokes
                                * the put_task_struct() to decrement task's
                                * reference count
                                */
    pr_info("kthread stopped, and LKM removed.
");
}
Here, within the cleanup code path, you're expected to call kthread_stop(), which performs the necessary cleanup. Internally, it actually waits for the kthread to die (via the wait_for_completion() routine). So, if you call the rmmod without having killed the kthread by sending it the SIGINT or SIGQUIT signal, the rmmod process will appear to hang here; it's (the rmmod process, that is) waiting (well, kthread_stop() is really the one waiting) for the kthread to die! This is why, if the kthread hasn't been signaled yet, this could cause a problem.
There should be a better way to deal with stopping a kernel thread than sending it signals from user space. Indeed there is: the correct way is to employ the kthread_should_stop() routine as the (inverse) condition of the while loop it runs, so this is exactly what we'll do! In the preceding code, we have the following:
while (!kthread_should_stop()) {
The kthread_should_stop() routine returns a Boolean value that's true if the kthread should stop (terminate) now! Calling kthread_stop() in the cleanup code path will cause kthread_should_stop() to return true, thus causing our kthread to break out of the while loop and terminate via a simple return 0;. This value (0) is passed back to kthread_stop(). Due to this, the kernel module is successfully unloaded, even if no signal is ever sent to our kernel thread. We will leave testing this case as a simple exercise for you!
Note that the return value of kthread_stop() can be useful: it's an integer and the result of the thread function that ran – in effect, it states whether your kthread succeeded (0 returned) in its work or not. It will be the value -EINTR if your kthread was never woken up.
Running the kthread_simple kernel thread demo
Now, let's try it out (ch5/kthread_simple)! We can perform module insertion via insmod(8); the module gets inserted into the kernel as planned. The kernel log shown in the following screenshot, as well as a quick ps, proves that our brand new kernel thread has indeed been created. Also, as you can see from the code (ch5/kthread_simple/kthread_simple.c), our kthread puts itself to sleep (by setting its state to TASK_INTERRUPTIBLE and then calling schedule()):

Quickly running ps(1) grep for our kernel thread by name shows that our kthread is alive and well (and asleep):
$ ps -e |grep kt_simple
 11372   ?        00:00:00 llkd/kt_simple
$
Let's shake things up a bit and send the SIGQUIT signal to our kthread. This has it wake up (since we've set its signal mask to allow the SIGINT and SIGQUIT signals), set its state to TASK_RUNNING, and then, well, simply exit. We then use rmmod(8) to remove the kernel module, as shown in the following screenshot:

Now that you have understood how to create and work with kernel threads, let's move on and design and implement the second version of our sed driver.
The sed2 driver – design and implementation
In this section (as mentioned in the The "sed" drivers – to demo kernel timers, kthreads, and workqueues section), we will write the next evolution of the sed1 driver, called sed2.
sed2 – the design
Our sed v2 (sed2; code: ch5/sed2/) mini-project is very similar to our sed1 project. The key difference is that this time, we'll carry out the "work" via a kernel thread created by the driver for just this purpose. The key differences between this version and the previous one are as follows:
- There's just one global shared memory buffer for holding the metadata, along with the payload; that is, the message to encrypt/decrypt. This is the struct sed_ds->shmem member within our driver context structure, struct stMyCtx.
- The work of encryption/decryption is now performed within a kernel thread (that this driver spawns); we keep the kernel thread asleep. Only when work arises does the driver wake up the kthread and have it consume (execute) the work.
- We now run the kernel timer within the kthread's context and show if it expires prematurely (indicating that the deadline wasn't met).
- A quick test reveals that eliminating the several pr_debug() printks within the kernel thread's critical section goes a long way toward reducing the time taken to complete the work! (You can always change the Makefile's EXTRA_CFLAGS variable to undefine the DEBUG symbol if you wish to eliminate this overhead (by using EXTRA_CFLAGS += -UDEBUG)!). Hence, here, the deadline is longer (10 ms).
So, in a nutshell, the whole idea here is to primarily demonstrate using a custom kernel thread, along with a kernel timer, to timeout an operation. A key point to understand that changes the overall design (especially the way that the user space app interacts with our sed2 driver) is that since we're running the work in the context of a kernel thread, it's not the same context as that of the process that ioctl() is issued to. Due to this, it's very important to realize the following things:
- You cannot simply transfer data from the kernel thread's process context to the user space process – they're completely different (they run in different virtual address spaces: the user mode process has its own complete VAS and PID, and so on; the kernel thread literally lives within the kernel VAS with its own PID and kernel mode stack). Due to this, using the copy_{from|to}_user() (and similar) routine is out of question for communicating from the kthread to the user mode app.
- The potential for dangerous races is significant; the kernel thread runs asynchronously with respect to the user process context; thus, we can end up creating concurrency-related bugs if we're not careful. This is the entire reason for the last two chapters of this book, where we'll cover kernel synchronization, locking (and related) concepts, and technologies. For now, bear with us – we keep things as simple as possible by using some simple polling tricks in place of proper synchronization.
We have four operations inside our sed2 project:
- Encrypt the message (this also gets the message from user space into the driver; thus, this has to be done first).
- Decrypt the message.
- Retrieve the message (sent from the driver to the user space app).
- Destroy the message (in effect, it's reset – the memory and metadata are wiped clean within the driver).
It's important to realize that due to the potential for races, we cannot simply transfer data directly from the kthread to the user space app. Due to this, we must do the following:
- We must carry out the retrieve and destroy operations in the process context of the user space process by issuing the ioctl() system calls.
- We must carry out the encrypt and decrypt operations in the process context of our kernel thread, asynchronously with respect to the user space app (we run it within a kernel thread, not because we have to but because we want to; this is, after all, the point of this topic!).
This design can be summarized by a simple ASCII-art diagram:

Right, let's now check out the relevant code implementation for sed2.
sed2 driver – code implementation
In terms of code, the ioctl() method's code within the sed2 driver for the encrypt operation is as follows (for clarity, we won't show all the error checking code here; we will show only the most relevant parts). You can find the full code at ch5/sed2/:
// ch5/sed2/sed2_driver/sed2_drv.c
[ ... ]
#if LINUX_VERSION_CODE >= KERNEL_VERSION(2, 6, 36)
static long ioctl_miscdrv(struct file *filp, unsigned int cmd, unsigned long arg)
#else
static int ioctl_miscdrv(struct inode *ino, struct file *filp, unsigned int cmd, unsigned long arg)
#endif
{
    struct stMyCtx *priv = gpriv;

[ ... ]
switch (cmd) {
    case IOCTL_LLKD_SED_IOC_ENCRYPT_MSG: /* kthread: encrypts the msg passed in */
        [ ... ]
        if (atomic_read(&priv->msg_state) == XF_ENCRYPT) { // already encrypted?
            pr_notice("encrypt op: message is currently encrypted; aborting op...
");
            return -EBADRQC; /* 'Invalid request code' */
        }
        if (copy_from_user(priv->kdata, (struct sed_ds *)arg, sizeof(struct sed_ds))) {
         [ ... ]

        POLL_ON_WORK_DONE(1);
        /* Wake up our kernel thread and have it encrypt the message ! */
        if (!wake_up_process(priv->kthrd_work))
            pr_warn("worker kthread already running when awoken?
");
        [ ... ]
The driver, after performing several validity checks in its ioctl() method, gets down to work: for the encryption operation, we check if the current payload is already encrypted (obviously, we have a state member within our context structure that is updated to hold this information; that is, priv->msg_state). If everything is fine, it copies in the message (along with the required metadata in struct sed_ds) from the user space app. Then, it wakes up our kernel thread (via the wake_up_process() API; the parameter is the pointer to its task structure, which is the return value from the kthread_create() API). This causes the kernel thread to resume execution!
The following code within our init method creates the kernel thread:
static int __init sed2_drv_init(void)
{
    [ ... ]
    gpriv->kthrd_work = kthread_create(worker_kthread, NULL, "%s/%s", DRVNAME, KTHREAD_NAME);
    if (IS_ERR(gpriv->kthrd_work)) {
        ret = PTR_ERR(gpriv->kthrd_work); // it's usually -ENOMEM
        dev_err(dev, "kthread creation failed (%d)
", ret);
        return ret;
    }
    get_task_struct(gpriv->kthrd_work); // inc refcnt, marking the task struct as in use
    pr_info("worker kthread created... (PID %d)
", task_pid_nr(gpriv->kthrd_work));
    [ ... ]
After this, the timer is initialized (via the timer_setup() API). The (truncated) code of our worker thread looks as follows:
static int worker_kthread(void *arg)
{
    struct stMyCtx *priv = gpriv;

    while (!kthread_should_stop()) {
        /* Start - the timer; set it to expire in TIMER_EXPIRE_MS ms */
        if (mod_timer(&priv->timr, jiffies + msecs_to_jiffies(TIMER_EXPIRE_MS)))
            pr_alert("timer already active?
");
        priv->t1 = ktime_get_real_ns();

        /*--------------- Critical section begins --------------------------*/
        atomic_set(&priv->work_done, 0);
        switch (priv->kdata->data_xform) {
        [ ... ]
        case XF_ENCRYPT:
            pr_debug("data transform type: XF_ENCRYPT
");
            encrypt_decrypt_payload(WORK_IS_ENCRYPT, priv->kdata);
            atomic_set(&priv->msg_state, XF_ENCRYPT);
            break;
        case XF_DECRYPT:
            pr_debug("data transform type: XF_DECRYPT
");
            encrypt_decrypt_payload(WORK_IS_DECRYPT, priv->kdata);
            atomic_set(&priv->msg_state, XF_DECRYPT);
            break;
        [ ... ]
        priv->t2 = ktime_get_real_ns();
        // work done, cancel the timeout
        if (del_timer(&priv->timr) == 0)
        [ ... ]
Here, you can see the timer being started (mod_timer()), the actual encrypt/decrypt functions being invoked as required, the timestamps being captured, and then the kernel timer being canceled. This is what happened in sed1 except that, this time (sed2), the work happens in the context of our kernel thread! The kernel thread function then makes itself go to sleep while yielding the processor by (as was covered in the companion guide Linux Kernel Programming - Chapter 10, The CPU Scheduler – Part 1, and Chapter 11, The CPU Scheduler – Part 2) setting the task state to a sleep state (TASK_INTERRUPTIBLE) and invoking schedule().
Hang on a minute – within the ioctl() method, did you notice the call to the POLL_ON_WORK_DONE(1); macro just before the kernel thread was woken up? Take a look at the following code:
        [ ... ]
         POLL_ON_WORK_DONE(1);
        /* Wake up our kernel thread
         * and have it encrypt the message !
         */
        if (!wake_up_process(priv->kthrd_work))
            pr_warn("worker kthread already running when awoken?
");
        /*
         * Now, our kernel thread is doing the 'work';
         * it will either be done, or it will miss it's
         * deadline and fail. Attempting to lookup the payload
         * or do anything more here would be a
         * mistake, a race! Why? We're currently running in
         * the ioctl() process context; the kernel thread runs
         * in it's own process context! (If we must look it up,
         * then we really require a (mutex) lock; we shall
         * discuss locking in detail in the book's last two chapters.
         */
        break;
The poll is used to circumvent a possible race: what if one (user mode) thread invokes ioctl() to, say, encrypt a given message, and simultaneously on another CPU core, another user mode thread invokes ioctl() to, say, decrypt a given message? This will cause concurrency issues! Again, the last two chapters of this book are devoted to understanding and handling these; but here and now, what can we do? Let's implement a poor man's synchronization solution: polling.
This is not ideal but will have to do. We'll make use of the fact that the driver sets an atomic variable in the driver's context structure, named work_done, to 1 when the work is done; its value is 0 otherwise. We poll for this within this macro:
/*
 * Is our kthread performing any ongoing work right now? poll...
 * Not ideal (but we'll live with it); ideally, use a lock (we cover locking in
 * this book's last two chapters)
 */
#define POLL_ON_WORK_DONE(sleep_ms) do {
        while (atomic_read(&priv->work_done) == 0)
            msleep_interruptible(sleep_ms);
} while (0)
To keep this code somewhat palatable, we aren't hogging the processor; if the work isn't done (yet), we sleep for a millisecond (via the msleep_interruptible() API) and try again.
So far, we've covered the relevant code for the encrypt and decrypt functionality of sed2 (both of which run in our worker kthread's context). Now, let's look at the remaining two pieces of functionality – retrieving and destroying messages. These are carried out in the original user space process context – the process (or thread) that issues the ioctl() system calls. Here's the relevant code for them:
// ch5/sed2/sed2_driver/sed2_drv.c : ioctl() method
[ ... ]
case IOCTL_LLKD_SED_IOC_RETRIEVE_MSG: /* ioctl: retrieves the encrypted msg */
        if (atomic_read(&priv->timed_out) == 1) {
            pr_debug("the encrypt op had timed out! returning -ETIMEDOUT
");
            return -ETIMEDOUT;
        }
        if (copy_to_user((struct sed_ds *)arg, (struct sed_ds *)priv->kdata, sizeof(struct sed_ds))) {
           //  [ ... error handling ... ]
        break;
    case IOCTL_LLKD_SED_IOC_DESTROY_MSG: /* ioctl: destroys the msg */
        pr_debug("In ioctl 'destroy' cmd option
");
        memset(priv->kdata, 0, sizeof(struct sed_ds));
        atomic_set(&priv->msg_state, 0);
        atomic_set(&priv->work_done, 1);
        atomic_set(&priv->timed_out, 0);
        priv->t1 = priv->t2 = 0;
        break;
[ ... ]
Now that you've seen the (relevant) sed2 code, let's try it out!
sed2 – trying it out
Let's take a look at a sample run of our sed2 mini project over a couple of screenshots; ensure that you look at them carefully:

So, we have encrypted a message, but how do we view it? Simple: we use the menu! Select option 2 to retrieve the (encrypted) message (it will be displayed for your leisurely perusal), option 3 to decrypt it, option 2 once more to view it, and option 5 to see the kernel log – quite useful! Some of these options are shown in the following screenshot:
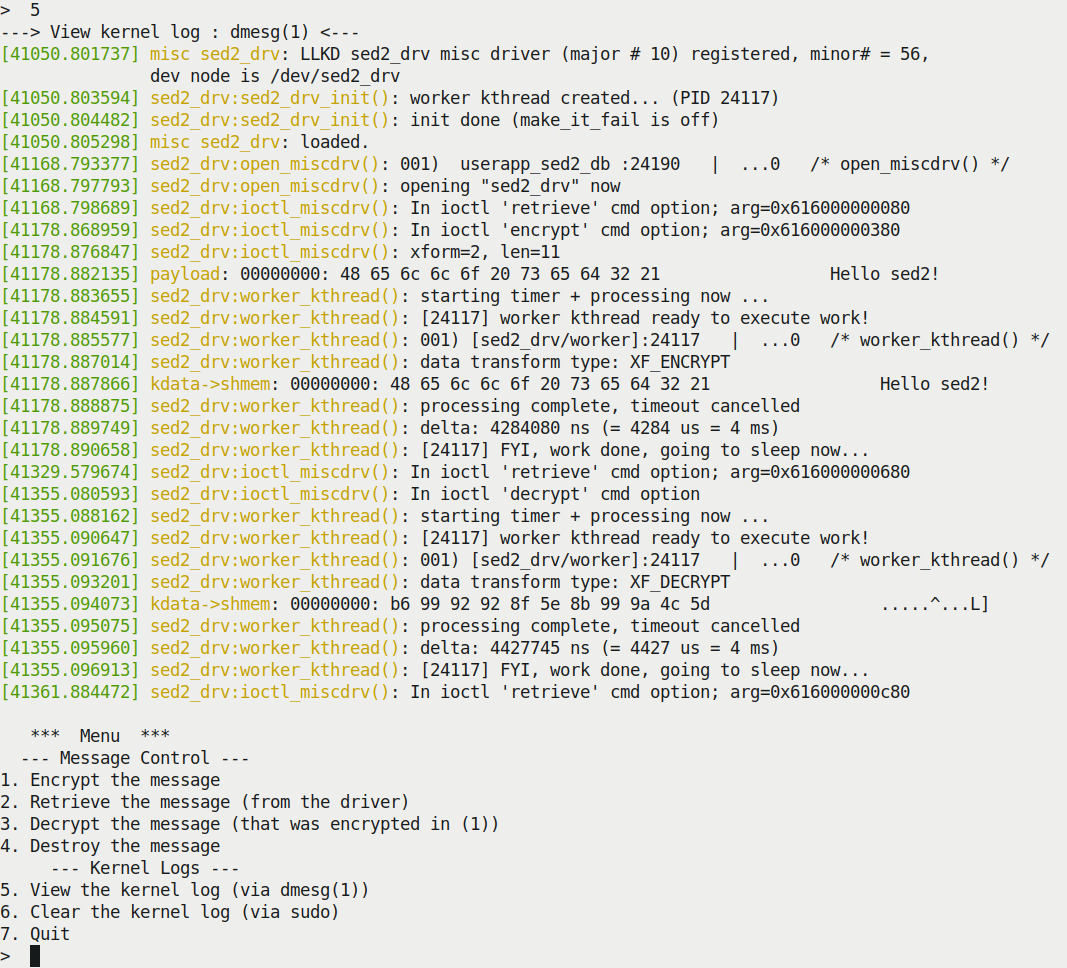
As shown in the kernel log, our user mode app (userapp_sed2_dbg_asan) has opened the device and issued the retrieve operation, followed by the encrypt operation a few seconds later (the timestamps in the bottom-left corner of the preceding screenshot help you figure this out). Then, the driver wakes up the kernel thread; you can see its printk output, as well as the output of PRINT_CTX(), here:
[41178.885577] sed2_drv:worker_kthread(): 001) [sed2_drv/worker]:24117 | ...0 /* worker_kthread() */
The encrypt operation then completes (successfully and within the deadline; the timer is canceled):
[41178.888875] sed2_drv:worker_kthread(): processing complete, timeout cancelled
Similarly, other operations are carried out. We shall refrain from showing the user space app's code here since it's a simple user mode "C" program. This time (unusually), it's an interactive app with a simple menu (as shown in the screenshots); do check it out. I'll leave it to you to read and understand the sed2 code in detail and try it out for yourself.
Querying and setting the scheduling policy/priority of a kernel thread
In closing, how can you query and/or change the scheduling policy and (real-time) priority of a kernel thread? The kernel provides APIs for this (the sched_setscheduler_nocheck() API is often used within the kernel). As a practical example, the kernel will require kernel threads for the purpose of servicing interrupts – the threaded interrupt model, which we covered in Chapter 4, Handling Hardware Interrupts, in the Internally implementing the threaded interrupt section).
It creates these threads (via kthread_create()) and changes their scheduling policy and real-time priority via the sched_setscheduler_nocheck() API. We won't explicitly cover their usage here as we covered this in the companion guide Linux Kernel Programming - Chapter 11, The CPU Scheduler – Part 2. It's interesting: the sched_setscheduler_nocheck() API is just a simple wrapper over the underlying _sched_setscheduler() routine. Why? The _sched_setscheduler() API isn't exported at all and is thus unavailable to module authors; the sched_setscheduler_nocheck() wrapper is exported via the EXPORT_SYMBOL_GPL() macro (implying that only GPL licensed code can actually make use of it!).
Though this book only covers kernel programming, I've mentioned this here as it's a really powerful thing: in effect, the user space app designer/developer has the ability to create and deploy application threads perfectly suited to their purpose: real-time threads at differing scheduling policies, real-time priorities between 1 and 99, non-RT threads (with the base nice value of 0), and so on. Indiscriminately creating kernel threads is frowned upon, and the reason is clear – every additional kernel thread adds overhead, both in terms of memory and CPU cycles. When you're in the design phase, pause and think: do you really require one or more kernel threads? Or is there a better way of doing things? Workqueues are often exactly that – a better way!
Now, let's look at workqueues!
Using kernel workqueues
A workqueue is an abstraction layer over the creation and management of kernel worker threads. They help solve a crucial problem: directly working with kernel threads, especially when several are involved, is not only difficult but can quite easily result in dangerous bugs such as races (and thus the potential for deadlock), as well as poor thread management, resulting in efficiency losses. Workqueues are bottom-half mechanisms that are employed within the Linux kernel (along with tasklets and softirqs).
The modern workqueue implementation in the Linux kernel – called the concurrency managed work queue (cmwq) – is really a pretty elaborate framework, with various strategies for dynamically and efficiently provisioning kernel threads based on specific requirements.
The key characteristics of the workqueue are as follows:
- The workqueue task(s) (callbacks) always execute in a preemptible process context. This is obvious once you realize that they are executed by kernel (worker) threads, which run in a preemptible process context.
- By default, all interrupts are enabled and no locks are taken.
- The aforementioned points imply that you can do lengthy, blocking, I/O-bound work within your workqueue function(s) (this is diametrically opposite to an atomic context such as a hardirq, tasklet, or softirq!).
- Just as you learned about kernel threads, transferring data to and from user space (via the typical copy_[to|from]_user() and similar routines) is not possible; this is because your workqueue handler (function) executes within its own process context – that of a kernel thread. As we know, kernel threads have no user mapping.
- The kernel workqueue framework maintains worker pools. These are literally several kernel worker threads organized in differing ways according to their needs. The kernel handles all the complexity of managing them, as well as concurrency concerns. The following screenshot shows several workqueue kernel worker threads (this was taken on my x86_64 Ubuntu 20.04 guest VM):

As we mentioned in the Creating and working with kernel threads section, one way to figure out the kthread's name and learn about the many practical uses of kthreads (and how to tune them to reduce jitter) is by reading the relevant kernel documentation; that is, Reducing OS jitter due to per-cpu kthreads (https://www.kernel.org/doc/Documentation/kernel-per-CPU-kthreads.txt).
It's important to understand that the kernel has an always-ready default workqueue available for use; it's known as the kernel-global workqueue or system workqueue. To avoid stressing the system, it's highly recommended that you use it. We shall use the kernel-global workqueue, enque our work task(s) on it, and have it consume our work.
You can even use and create other kinds of workqueues! The kernel provides the elaborate cmwq framework, along with a set of APIs, to help you create specific types of workqueues. We'll look at this in more detail in the next section.
The bare minimum workqueue internals
We don't go into too much depth about the internals of the workqueue here; in fact, we will merely scratch the surface (as we mentioned previously, our purpose here is to only focus on using the kernel-global workqueue).
It's always recommended that you use the default kernel-global (system) workqueue to consume your asynchronous background work. If this is deemed to be insufficient, don't worry – certain interfaces are exposed that let you create your workqueues. (Keep in mind that doing so will increase stress on the system!) To allocate a new workqueue instance, you can use the alloc_workqueue() API; this is the primary API that's used for creating (allocating) workqueues (via the modern cmwq framework):
include/linux/workqueue.h
struct workqueue_struct *alloc_workqueue(const char *fmt, unsigned int flags, int max_active, ...);
Note that it's exported via EXPORT_SYMBOL_GPL(), which means it's only available to modules and drivers that use the GPL license. fmt (and the parameters following max_active) specifies how to name the workqueue threads in the pool. The flags parameter specifies a bitmask of special behavioral values or other characteristics, such as the following:
- Use the WQ_MEM_RECLAIM flag when the workqueue needs forward progress guarantees under memory pressure.
- Use the WQ_HIGHPRI flag when work items are to be serviced by a worker pool of kthreads at an elevated priority level.
- Use the WQ_SYSFS flag to make some of the workqueue details visible to user space via sysfs (practically, look under /sys/devices/virtual/workqueue/).
- Similarly, there are several other flags. Take a look at the official kernel documentation for more details (https://www.kernel.org/doc/Documentation/core-api/workqueue.rst; it provides some interesting coverage on reducing "jitter" due to workqueue execution within the kernel).
The max_active parameter is used to specify the maximum number of kernel threads per CPU that can be assigned to a work item.
Broadly speaking, there are two types of workqueues:
- Single-threaded (ST) workqueues or ordered workqueues: Here, only one thread can be active at any given point in time across the system. They can be created with alloc_ordered_workqueue() (it's really just a wrapper over alloc_workqueue() specifying the ordered flags with max_active set to exactly 1).
- Multi-threaded (MT) workqueues: This is the default option. The exact flags specify the behavior; max_active specifies the maximum number of worker kernel threads the work item can possibly have per CPU.
All workqueues can be created via the alloc_workqueue() API. The code for creating them is as follows:
// kernel/workqueue.c
int __init workqueue_init_early(void)
{
[ ... ]
system_wq = alloc_workqueue("events", 0, 0);
system_highpri_wq = alloc_workqueue("events_highpri", WQ_HIGHPRI, 0);
system_long_wq = alloc_workqueue("events_long", 0, 0);
system_unbound_wq = alloc_workqueue("events_unbound", WQ_UNBOUND, WQ_UNBOUND_MAX_ACTIVE);
system_freezable_wq = alloc_workqueue("events_freezable", WQ_FREEZABLE, 0);
system_power_efficient_wq = alloc_workqueue("events_power_efficient", WQ_POWER_EFFICIENT, 0);
system_freezable_power_efficient_wq = alloc_workqueue("events_freezable_power_efficient",
WQ_FREEZABLE | WQ_POWER_EFFICIENT, 0);
[ ... ]
This happens early in the boot process (literally in the early init kernel code path). The first is highlighted in bold; this is the kernel-global workqueue or the system workqueue being created. Its worker pool is named events. (The name of the kernel threads that belong to this pool follow this naming convention and have the word events in their name; see Figure 5.10 again. The same happens with kthreads belonging to other worker pools.)
The underlying framework has evolved a great deal; an earlier legacy workqueue framework (prior to 2010) used to use the create_workqueue() and friends APIs; however, these are now considered deprecated. The modern concurrency managed workqueue (cmwq) framework (around 2010 onward) is, interestingly, backward compatible with the old one. The following table summarizes the mapping of the older workqueue APIs to the modern cmwq ones:
| Legacy (old and deprecated) workqueue API | Modern (cmwq) workqueue API |
| create_workqueue(name) | alloc_workqueue(name,WQ_MEM_RECLAIM, 1) |
| create_singlethread_workqueue(name) | alloc_ordered_workqueue(name, WQ_MEM_RECLAIM) |
| create_freezable_workqueue(name) | alloc_workqueue(name, WQ_FREEZABLE | WQ_UNBOUND | WQ_MEM_RECLAIM, 1) |
The following diagram summarizes (in a simple, conceptual manner) the kernel workqueue subsystem:

The kernel's workqueue framework dynamically maintains these worker pools (of kernel threads); some, such as the events workqueue (corresponding to the kernel-global workqueue) are general-purpose, while others are created and maintained for a specific purpose (in terms of the names given to their kernel threads, such as block I/O, kworker*blockd, memory control, kworker*mm_percpu_wq, device-specific ones such as tpm, tpm_dev_wq, CPU frequency governor drivers, devfreq_wq, and so on).
Note that the kernel workqueue subsystem maintains all these workqueues (and their associated worker pools of kernel threads) automatically, elegantly, and efficiently.
So, how do you actually make use of the workqueue? The next section will show you how to use the kernel-global workqueue. This will be followed by a demo kernel module that clearly demonstrates its usage.
Using the kernel-global workqueue
In this section, we shall learn how exactly to use the kernel-global (also known as the system or events workqueue, which is the default) workqueue. This typically involves initializing the workqueue with your work task, having it consume your work, and finally, performing cleanup.
Initializing the kernel-global workqueue for your task – INIT_WORK()
Enqueuing work onto this workqueue is actually very easy: use the INIT_WORK() macro! This macro takes two parameters:
#include <linux/workqueue.h>
INIT_WORK(struct work_struct *_work, work_func_t _func);
The work_struct structure is the workhorse structure for work queues (from the module/driver author's point of view, at least); you are to allocate memory to it and pass the pointer as the first parameter. The second parameter to INIT_WORK() is a pointer to the workqueue callback function – the function that will be consumed by the worker thread(s) of the workqueue! work_func_t is a typedef that specifies the signature for this function, which is void (*work_func_t)(struct work_struct *work).
Having your work task execute – schedule_work()
Calling INIT_WORK() registers the specified work structure and function with the in-house default kernel-global workqueue. But it doesn't execute it – yet! You have to tell it when to execute your "work" by calling the schedule_work() API at the appropriate moment:
bool schedule_work(struct work_struct *work);
Clearly, the parameter to schedule_work() is the pointer to the work_struct structure (which you initialized earlier via the INIT_WORK() macro). It returns a Boolean (quoting directly from the source): %false if @work was already on the kernel-global workqueue and %true otherwise True. In effect, schedule_work() checks if the function that was specified (via the work structure) is already on the kernel-global workqueue; if not, it enqueues it there; if it already was there, it leaves it alone in the same position (it doesn't add one more instance). It then marks the work item for execution. This typically happens as soon as the underlying kernel thread(s) corresponding to the workqueue get scheduled, thus giving you a chance to run your work.
Note that you can call schedule_work() in an atomic context! The call is non-blocking; it merely schedules the work item to be consumed at a later, deferred (and safe) point in time, when it will run in process context.
Variations of scheduling your work task
There are a few variations of the schedule_work() API we just described, all of which are available via the schedule[_delayed]_work[_on]() APIs. Let's briefly enumerate them. First, let's look at the schedule_delayed_work() inline function, whose signature is as follows:
bool schedule_delayed_work(struct delayed_work *dwork, unsigned long delay);
Use this routine when you want to delay the execution of the workqueue handler function by a specified amount of time; the second parameter, delay, is the number of jiffies you want to wait for. Now, we know that the jiffies variable increments by HZ jiffies per second; thus, to have your work task delayed by n seconds, specify n * jiffies. Similarly, you could always pass the msecs_to_jiffies(n) value as the second parameter to have it execute n milliseconds from now.
Next, notice that the first parameter to schedule_delayed_work() is different; it's a delayed_work structure, which itself contains the now-familiar work_struct structure as a member, along with other housekeeping members (a kernel timer, a pointer to the workqueue structure, and a CPU number). To initialize it, just allocate memory to it and then make use of the INIT_DELAYED_WORK() macro (the syntax remains identical to INIT_WORK()); it will take care of all initialization.
Another slight variation on the theme is the schedule[_delayed]_work_on() routine; on in the name allows you to specify which CPU core your work task will be scheduled upon when it executes. Here's the signature of the schedule_delayed_work_on() inline function:
bool schedule_delayed_work_on(int cpu, struct delayed_work *dwork, unsigned long delay);
The first parameter specifies the CPU core to execute the work task upon, while the remaining two parameters are identical to the schedule_delayed_work() routine's parameters. (You can employ the schedule_delayed_work() routine to schedule your task – immediately – on a given CPU core).
Cleaning up – canceling or flushing your work task
At some point, you will want to ensure that your work task(s) have actually completed execution. You may wish to do this before destroying your workqueue (assuming it's a custom created one and not the kernel-global one) or, more likely, when using the kernel-global workqueue in the cleanup method of your LKM or driver. The typical API to use here is cancel_[delayed_]work[_sync](). Its variations and signatures are as follows:
bool cancel_work_sync(struct work_struct *work);
bool cancel_delayed_work(struct delayed_work *dwork);
bool cancel_delayed_work_sync(struct delayed_work *dwork);
It's quite simple, really: use cancel_work_sync() once you have used the INIT_WORK() and schedule_work() routines; use the latter two when you've delayed your work task. Notice that two of the routines are suffixed with _sync; this implies that the cancellation is synchronous – the kernel will wait until your work tasks have completed execution before these functions return! This is usually what we want. These routines return a boolean: True if there was work pending and False otherwise.
The kernel workqueue subsystem also provides a few flush_*() routines (including flush_scheduled_work(), flush_workqueue(), and flush_[delayed_]work()). The kernel documentation (https://www.kernel.org/doc/html/latest/core-api/workqueue.html) clearly warns us that these routines are not the easiest to use as you can easily cause deadlock issues with them. It's recommended that you use the aforementioned cancel_[delayed_]work[_sync]() APIs instead.
A quick summary of the workflow
When using the kernel-global workqueue, a simple pattern (workflow) emerges:
- Initialize the work task.
- At the appropriate point in time, schedule it to execute (perhaps with a delay and/or on a particular CPU core).
- Clean up. Typically, in the kernel module (or driver's) cleanup code path, cancel it. (Preferably, do this with synchronization so that any pending work tasks are completed first. Here, we will stick to employing the recommended cancel*work*() routines, avoiding the flush_*() ones).
Let's summarize this using a table:
| Using the kernel-global workqueue | Regular work task | Delayed work task | Execute work task on given CPU |
| 1. Initialization | INIT_WORK() | INIT_DELAYED_WORK() | < either immediate or delayed's fine > |
| 2. Schedule work task to execute | schedule_work() | schedule_delayed_work() | schedule_delayed_work_on() |
| 3. Cancel (or flush) it; foo_sync() to ensure it's complete | cancel_work_sync() | cancel_delayed_work_sync() | < either immediate or delayed's fine > |
In the next few sections, we'll write a simple kernel module using the kernel-default workqueue in order to execute a work task.
Our simple work queue kernel module – code view
Let's get hands-on with a work queue! In the following sections, we will write a simple demo kernel module (ch5/workq_simple) that demonstrates using the kernel-default workqueue to execute a work task. It's actually built upon our earlier LKM, which we used to demonstrate kernel timers (ch5/timer_simple). Let's check it out code-wise (as usual, we won't show the full code here, only the most relevant portions). We'll begin by looking at its private context data structure and init method:
static struct st_ctx {
    struct work_struct work;
    struct timer_list tmr;
    int data;
} ctx;
[ ... ]
static int __init workq_simple_init(void)
{
    ctx.data = INITIAL_VALUE;
    /* Initialize our work queue */
    INIT_WORK(&ctx.work, work_func);
    /* Initialize our kernel timer */
    ctx.tmr.expires = jiffies + msecs_to_jiffies(exp_ms);
    ctx.tmr.flags = 0;
    timer_setup(&ctx.tmr, ding, 0);
    add_timer(&ctx.tmr); /* Arm it; let's get going! */
    return 0;
}
A key point to ponder: how will we manage to pass along some useful data items to our work function? The work_struct structure only has an atomic long integer that's used for internal purposes. A good (and very typical!) trick is to have your work_struct structure embedded within your driver's context structure; then, within the work task callback function, use the container_of() macro to gain access to the parent context data structure! This is a strategy that's often employed. (The container_of() is a powerful macro, but not really easy to decipher! We've provided a couple of useful links for this in the Further reading section.) So, in the preceding code, we have our driver's context structure embed a struct work_struct within it. You can see the initialization of our work task within the INIT_WORK() macro.
Once the timer's been armed (add_timer() does the trick here), it will expire in approximately 420 milliseconds and the timer callback function will run in the timer softirq context (this is very much an atomic context):
static void ding(struct timer_list *timer)
{
    struct st_ctx *priv = from_timer(priv, timer, tmr);
    pr_debug("timed out... data=%d
", priv->data--);
    PRINT_CTX();

    /* until countdown done, fire it again! */
    if (priv->data)
        mod_timer(&priv->tmr, jiffies + msecs_to_jiffies(exp_ms));
    /* Now 'schedule' our work queue function to run */
    if (!schedule_work(&priv->work))
        pr_notice("our work's already on the kernel-global workqueue!
");
}
After decrementing the data variable, it sets up the timer to fire again (in 420 ms, via mod_timer()), after which, via the schedule_work() API, it schedules our work queue callback to run! The kernel will recognize that the work queue function must now be executed (consumed) as soon as is viable. But hang on – the work queue callback must and will run only in the process context, via a global kernel worker thread – the so-called events thread(s). Thus, only once we're out of this softirq context and (one of) the "events" kernel worker threads is on a CPU runqueue and actually runs will our work queue callback function be invoked.
Relax – it will happen soon enough... the whole point of using workqueues is that not only is the thread management completely taken care of by the kernel, but the function runs in the process context, where it's then possible to perform lengthy blocking or I/O operations.
Again, how soon is soon? Let's attempt to measure this: we take a timestamp (via the usual ktime_get_real_ns() inline function) immediately after schedule_work() as the first line of code in the work queue function. Our trusty SHOW_DELTA() macro shows the difference in time. As expected, it's small, typically within a few hundredths of a microsecond's range (of course, this depends on several factors, including the hardware platform, kernel version, and so on). A highly loaded system would result in it taking longer to context switch to the events kernel thread(s), which could cause a delay in your work queue's functionality executing. You will see it in a sample run within a screenshot capture (Figure 5.12) in the following section.
The following code is of our work task function. This is where we employ the container_of() macro to gain access to our module's context structure:
/* work_func() - our workqueue callback function! */
static void work_func(struct work_struct *work)
{
    struct st_ctx *priv = container_of(work, struct st_ctx, work);

    t2 = ktime_get_real_ns();
    pr_info("In our workq function: data=%d
", priv->data);
    PRINT_CTX();
    SHOW_DELTA(t2, t1);
}
Furthermore, our PRINT_CTX() macro's output conclusively shows that this function runs in the process context.
In the next section, we will run our kernel module.
Our simple work queue kernel module – running it
Let's take it for a spin! Take a look at the following screenshot:

Let's take a look at this code in more detail:
- Via our lkm helper script, we build and then insmod(8) the kernel module; that is, workq_simple.ko.
- The kernel log is displayed via dmesg(1):
- Here, the workqueue and kernel timer are initialized and armed within the init method.
- The timer expires (in approximately 420 ms); you can see its printks (showing timed out... and the value of our data variable).
- It invokes the schedule_work() API, causing our workqueue function to run.
- As highlighted in the preceding screenshot, our work queue function, work_func(), indeed runs; it displays the data variable's current value, proving that it correctly gained access to our "context" or private data structure.
Note that we used our PRINT_CTX() macro in this LKM (it's within our convenient.h header) to reveal something interesting:
-
- When it runs in the context of the timer callback function, its status bits contain the s character (the third character within the four-character field – .Ns1 or similar), showing that it's running in softirq (an interrupt, atomic) context.
- When it runs in the context of the work queue callback function, its status bit's third character will never contain the s character; it will always be a ., proving that the workqueue always executes in the process context!
Next, the SHOW_DELTA() macro calculates and spits out the time difference between the workqueue being scheduled and actually executing. As you can see (here, at least, on our lightly loaded x86_64 guest VM), it's in the range of a few hundred microseconds.
Why not look up the actual kernel worker thread that was used to consume our work queue? A simple ps(1) on the PID is all that's required here. In this particular case, it happens to be one of the kernel's per CPU core generic workqueue consumer threads – a kernel worker (kworker/...) thread:
$ ps -el | grep -w 55200
 1 I     0   55200       2  0  80  0 -    0 -    ?       00:00:02 kworker/1:0-mm_percpu_wq
 $
Of course, the kernel code base is littered with workqueue usage (especially many device drivers). Please use cscope(1) to find and browse through instances of such code.
The sed3 mini project – a very brief look
Let's conclude this chapter by taking a very brief look at the evolution of our sed2 project to sed3. This mini-project is identical to sed2 except that it's simpler! The (en/de)crypt work is now carried out by our work task (function) via the kernel's workqueue functionality or bottom-half mechanism. We use a workqueue – the default kernel-global workqueue – to get the work done instead of manually creating and managing kthreads (as we did in sed2)!
The following screenshot shows us accessing the kernel log of a sample run; in the run, we had the user mode app encrypt, then decrypt, and then retrieve the message for viewing. We've highlighted the interesting bit here – the execution of our work task via the kernel-global workqueue's worker threads – in the two red rectangles:

By the way, the user mode app is identical to the one we used in sed2. The preceding screenshot shows (via our trusty PRINT_CTX() macro) the actual kernel worker threads that the kernel-global workqueue employed to run our encrypt and decrypt work; in this particular case, it's [kworker/1:0] PID 9812 for the encrypt work and [kworker/0:2] PID 9791 for the decrypt work. Note how they both run in the process context. We shall leave it to you to browse through the code of sed3 (ch5/sed3).
This brings this section to a close. Here, you learned how the kernel workqueue infrastructure is indeed a blessing for module/driver authors as it helps you add a powerful abstraction layer over the underlying details regarding kernel threads, their creation, and intricate management and manipulation. It makes it very easy for you to perform work in the kernel – especially by employing the pre-existing kernel-global (default) workqueue – without having to worry about the gory details.
Summary
Well done! We covered a lot of ground in this chapter. First, you learned how to create delays in kernel space, both the atomic and the blocking types (via the *delay() and *sleep() routines, respectively). Next, you learned how to set up and use kernel timers within your LKM (or driver) – a very common and required task. Directly creating and working with kernel threads can be a heady (and even difficult) experience, which is why you learned the basics of doing so. After that, you looked at the kernel workqueue subsystem, which solves complexity (and concurrency) issues. You learned what it is and how to practically make use of the kernel-global (default) workqueue to make your work task(s) execute when required.
The series of three sed (simple encrypt decrypt) demo drivers we designed and implemented showed you a bit of a more sophisticated use case for these interesting technologies: sed1 with the timeout implementation, sed2 adding to the kernel thread to perform work, and sed3 using the kernel-global workqueue to have work consumed when required.
Please take some time to work on the following Questions/exercises for this chapter and browse through the Further reading resources. When you're done, I suggest that you take a well-deserved break and jump back in. We're almost there: the final two chapters cover a really key topic – kernel synchronization!
Questions
- Spot the bug(s) in the following pseudocode:
static my_chip_tasklet(void)
{
    // ... process data
    if (!copy_to_user(to, from, count)) {
        pr_warn("..."); [...]
    }
}
static irqreturn_t chip_hardisr(int irq, void *data)
{
    // ack irq
    // << ... fetch data into kfifo ... >>
    // << ... call func_a(), delay, then call func_b() >>
    func_a();
    usleep(100); // 100 us delay required here! see datasheet pg ...
    func_b();
    tasklet_schedule(...);
    return IRQ_HANDLED;
}
my_chip_probe(...)
{
    // ...
    request_irq(CHIP_IRQ, chip_hardisr, ...);
    // ...
    tasklet_init(...);
}
- timer_simple_check: Enhance the timer_simple kernel module so that it checks the amount of time that elapsed between setting up a timeout and it actually being serviced.
- kclock: Write a kernel module that sets up a kernel timer so that it times out every second. Then, use this to print the timestamp to the kernel log to get, in effect, a simple "clock app" in the kernel.
- mutlitime: Develop a kernel module that takes the number of seconds to issue a timer callback in as a parameter. Have it default to zero (implying no timer and thus a validity error). Here's how it should work: if the number that's passed is 3, it should create three kernel timers; the first one will expire in 3 seconds, the second in 2 seconds, and the last in 1 second. In other words, if the number passed is "n", it should create "n" kernel timers; the first one will expire in "n" seconds, the second in "n-1" seconds, the third in "n-2" seconds, and so on until the count hits zero.
- Build and run the sed[123] mini-projects provided in this chapter and verify (by looking at the kernel logs) that they work the way they should.
- workq_simple2: The ch5/workq_simple LKM we provided sets up and "consumes" one work item (function) via the kernel-global workqueue; enhance it so that it sets up and executes two "work" tasks. Verify that it works correctly.
- workq_delayed: Build upon the previous assignment (workq_simple2) to execute two work tasks, plus one more task (from the init code path). This one (the third one) should be delayed; the amount of time to delay by should be passed as a module parameter named work_delay_ms (in milliseconds; the default should be 500 ms).
[Tip: Be careful when using container_of() within the delayed work task callback function; you'll have to specify the third parameter as a work member of struct delayed_work; check out a solution we've provided].
Further reading
- Kernel documentation: Delays, sleep mechanisms: https://www.kernel.org/doc/Documentation/timers/timers-howto.tx
- Kernel Timer Systems: https://elinux.org/Kernel_Timer_Systems#Timer_information
- Workqueues:
- This is a very good presentation: Async execution with workqueues, Bhaktipriya Shridhar: https://events.static.linuxfound.org/sites/events/files/slides/Async%20execution%20with%20wqs.pdf
- Kernel documentation: Concurrency Managed Workqueue (cmwq): https://www.kernel.org/doc/html/latest/core-api/workqueue.html#concurrency-managed-workqueue-cmwq
- The container_of() macro explained:
- The Magical container_of() Macro, November 2012: https://radek.io/2012/11/10/magical-container_of-macro/
- Understanding of container_of macro in Linux kernel: https://embetronicx.com/tutorials/linux/c-programming/understanding-of-container_of-macro-in-linux-kernel/