CHAPTER 4
BASICS & PANTRY STAPLES
It’s normal to feel overwhelmed when you’re starting a low-sugar lifestyle, and you might have a lot of questions about it. What can you eat, and what’s off-limits? Which ingredients should you choose? How do you prepare low-sugar food that’s both nutritious and delicious?
Well, this chapter is here to help. It’s full of low-sugar recipes for the staples you’ll be using again and again, so that you’ll always have healthy ingredients on hand, and won’t have to reach for sugar-laden processed stuff in a pinch. (Plus, the homemade versions taste better.)
So, whether you’re looking for sugar-free ketchup (a guaranteed kid-pleaser!), easy-to-make mayo, guilt-free jams and marmalades, or fluffy, sliceable starch-free bread, you’re sure to find inspiration in the pages that follow.
LOW-SUGAR SWEET AND SOUR SAUCE
Commercial sweet and sour sauce easily contains more than 30 percent sugar, but this flavorful, homemade version has ten times less! Better yet, this exceptionally simple and seriously good condiment is ready in no time: Just mix all the ingredients together and heat until thick. Use it as a wok sauce for Asian-style dishes, in the Easy Breakfast Burrito, or serve it as a condiment with chicken or vegetable dishes. It also makes a great dip for starch-free crackers and raw vegetables.
INGREDIENTS
2/3 cup (160 ml) water
1/2 cup (65 g) powdered erythritol
3 tablespoons (45 ml) rice vinegar
3 tablespoons (48 g) unsweetened tomato paste
11/2 tablespoons (25 ml) naturally fermented gluten-free soy sauce, such as tamari
15 drops liquid stevia, or to taste
1/4 teaspoon unrefined sea salt or Himalayan salt, or to taste
1/2 teaspoon xanthan gum
Yield: about 13/4 cups (410 ml)
Place the water, erythritol, vinegar, tomato paste, soy sauce, stevia, and salt in a small saucepan and whisk well. Sprinkle in the xanthan while constantly whisking. Place the saucepan over a high heat, constantly mixing. When the mixture starts to thicken—and before it begins to boil—remove it from the heat. Let cool to room temperature before refrigerating. Store in an airtight container in the fridge. The sauce tastes best the following day, after the flavors have had time to combine. Use within two weeks.
TIP: If you don’t have rice vinegar, use raw apple cider vinegar or another mild-tasting vinegar instead.

◁ FIVE-INGREDIENT SUGAR-FREE KETCHUP
This is every parent’s dream: super-healthy, sugar-free ketchup! Made with an erythritol-based brown sugar substitute that is almost noncaloric, it’s a healthy condiment that’s delicious for dipping low-carb rutabaga or turnip fries, or the Easy Broccoli “Tater Tots”. Remember that placing the ketchup mixture over a higher heat causes it to thicken faster—but it does splatter easily, so take care and keep a lid handy while cooking.
INGREDIENTS
2 cups (450 g) unsweetened tomato sauce
1/4 cup (40 g) erythritol-based brown sugar substitute
2 tablespoons (28 ml) raw apple cider vinegar
1/8 teaspoon Ceylon cinnamon
Pinch of cayenne pepper
Yield: about 2 cups (450 g)
Place all the ingredients in a medium saucepan over a high heat and bring to a boil. Reduce the heat to medium and boil, uncovered, until the ketchup has reached the desired consistency (about 30 minutes), stirring every 5 minutes. As the ketchup thickens, it may splatter, so be careful. If so, reduce the heat and cover the saucepan with a lid until the splattering stops. Let cool to room temperature before refrigerating. Store in an airtight container in the fridge, and use within one week.
NO-SUGAR TERIYAKI SAUCE
Traditional Japanese teriyaki sauce is sweet and tangy, but commercial versions often contain a huge amount of sugar, which can be responsible for as much one-third of their total calorie count. This guilt-free version, however, has no added sugar. Instead, it gets its sweetness from an erythritol-based brown sugar substitute, which is almost calorie-free. It’s easy to adjust the level of sweetness to your taste.
INGREDIENTS
1/2 cup (120 ml) naturally fermented gluten-free soy sauce, such as tamari
1/3 cup (53 g) erythritol-based brown sugar substitute
1/4 cup (60 ml) dry sherry
1/4 cup (60 ml) rice vinegar
1 teaspoon ground ginger
1/4 teaspoon garlic powder
Yield: about 1 cup (240 ml)
Place all ingredients in a small saucepan and bring to a boil over a high heat, mixing constantly. Once boiling, remove from the heat and let cool to room temperature. Use it just like traditional teriyaki sauce—to make teriyaki chicken, for example, or the Terrific Teriyaki Pork Sandwich.
TIP: If you want to use fresh ingredients, replace the garlic powder with 1 minced garlic clove and replace the ground ginger with 1 tablespoon (8 g) of grated ginger root.
NOTE: If you prefer a thicker sauce, sprinkle 1/2 teaspoon xanthan gum or glucomannan into the mixture before heating. Whisk carefully when adding the thickener to prevent lumps.
FOOLPROOF ONE-MINUTE MAYO
Think it’s hard to make homemade mayonnaise? Think again. This is the quickest, easiest way to prepare mayonnaise, ever, and it’s healthy as well because it calls for light olive oil instead of unhealthy, omega-6-filled canola or sunflower oil. (Light olive oil is more neutral-tasting than extra-virgin, which might be too strong for mayonnaise.) This simple mayo is used in lots of recipes in this book, so be sure to keep a batch on hand. (Note that this recipe contains raw egg.)
INGREDIENTS
1 very fresh egg
2 teaspoons unsweetened mustard (such as Dijon)
1/8 teaspoon ground white pepper
1/4 teaspoon unrefined sea salt or Himalayan salt, or to taste
2 teaspoons raw apple cider vinegar
3/4 cup (180 ml) extra-light olive oil
Yield: about 1 cup (225 g)
1. Place the egg, mustard, white pepper, salt, and vinegar into a deep, narrow blending jar. Then insert an immersion blender into the jar so that it reaches the bottom.
2. Now pour in the olive oil. Don't lift the immersion blender or turn it on yet: Let it stand in the bottom of the jar, covering the egg and the other ingredients.
3. Start blending on the highest speed. Blend until the oil is completely incorporated and the mayonnaise is smooth. (You can lift the blender very slowly at the end of the process to make sure all the oil is incorporated.) This phase shouldn’t take longer than a minute. Store the finished mayonnaise in the fridge for up to two days.
NOTE: You can also prepare the mayonnaise in the traditional way by adding the oil little by little to the rest of the ingredients, beating vigorously all the time with a whisk or electric mixer.
FANTASTIC FRENCH DRESSING
Here’s another classic low-carb dressing that combines great taste and good fats. And its sharp yet sophisticated flavor is a perfect match for the Greek Salad with Chicken and Strawberries, or similarly fruity-yet-savory salads. If you prefer your dressing on the sweet side, add a couple of drops of liquid stevia to the mix.
INGREDIENTS
1 tablespoon (15 ml) freshly squeezed lemon juice
1/3 cup (80 ml) extra-virgin olive oil
1/4 teaspoon mustard powder
1 garlic clove, crushed
Pinch unrefined sea salt or Himalayan salt
Yield: about 6 tablespoons (95 ml)
1. Place all the ingredients in a small jar with a tight-fitting lid. Close the lid tightly and shake vigorously until the mixture is smooth. For best results, let the flavors mingle for a few hours before serving.
2. Store in the fridge and bring to room temperature 30 minutes before use. Shake well before serving.

◁ QUICK RASPBERRY VINAIGRETTE
This flavorful, easy-to-make vinaigrette adds a dash of elegance to just about any salad, and it’s also a delicious way to add extra vitamins and healthy fats to your diet—minus the nasty sugar and its harmful effects, of course. Use a high-speed blender to break up the gritty seeds and to achieve a smooth, rich result. Feel free to experiment with other berries here, too, such as strawberries and blueberries.
INGREDIENTS
1/4 cup (25 g) fresh raspberries, or thawed frozen raspberries
2 tablespoons (28 ml) raw apple cider vinegar
6 tablespoons (90 ml) extra-virgin olive oil
5 drops liquid stevia, or to taste
1/4 teaspoon unrefined sea salt or Himalayan salt, or to taste
Yield: about 2/3 cup (160 ml)
Simply place all the ingredients in a high-speed blender and blend until smooth. Serve immediately, or store in an airtight container in the fridge and bring to room temperature 30 minutes before use. Shake well before serving.
NOTE: To make this recipe even simpler, make a batch of the Easy Sugar-Free Strawberry Jam recipe ahead of time, replacing the strawberries with raspberries. Then, to make this vinaigrette, just replace the raspberries and stevia with 2 tablespoons (30 g) of the jam.
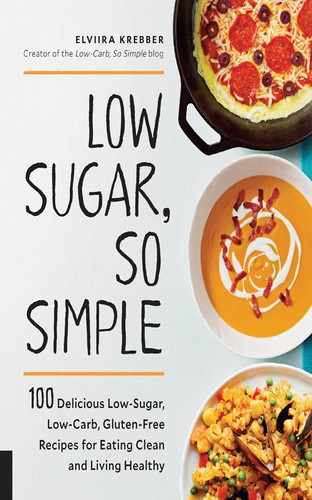
◁ SIMPLE AND SUCCULENT SATAY SAUCE
Full of richness and exotic flavor, this Thai-style satay sauce is ready in mere minutes. Enjoy it warm with chicken, fish, or vegetable dishes, and don’t forget to add chopped salted peanuts before serving: They enhance the flavor and texture even more. If you prefer a thicker sauce, increase the amount of peanut butter; if you prefer a thinner sauce, increase the coconut milk.
INGREDIENTS
1 cup (240 ml) coconut milk
2/3 cup (160 g) crunchy unsweetened peanut butter
11/2 tablespoons (23 g) sugar-free Thai red curry paste
1 to 2 tablespoons (15 to 28 ml) fish sauce
10 drops liquid stevia, or to taste
1/4 cup (30 g) chopped salted peanuts, to serve
Yield: about 2 cups (480 ml)
Combine all the ingredients in a small saucepan and place over high heat, stirring constantly. When the mixture is hot and smooth, remove it from the heat. Let cool slightly and serve warm, sprinkled with chopped peanuts.
TIP: For a fruitier-tasting sauce, replace the stevia with 2 tablespoons (30 g) of Five-Ingredient Sugar-Free Ketchup.
FIVE-INGREDIENT SUGAR-FREE CHOCOLATE HAZELNUT SPREAD
Commercial chocolate hazelnut spreads contain both a good deal of sugar and processed vegetable oils, which are infamous for their inflammation-inflicting omega-6 content. But this healthy, homemade option uses only natural sweeteners and real butter, which is far heart healthier. Smear it on a slice of Easy Fluffy Bread for a quick, light breakfast or snack.
INGREDIENTS
3/4 cup (85 g) crushed toasted hazelnuts
1/4 cup (2 ounces or 60 g) unsalted grass-fed butter, softened
1 tablespoon (7 g) unsweetened dark cocoa powder
3 tablespoons (24 g) powdered erythritol or other preferred sweetener, or to taste
2 tablespoons (28 ml) extra-light olive oil
1/2 teaspoon vanilla extract (optional)
Yield: about 3/4 cup (195 g)
Combine all the ingredients in a high-speed blender and blend until a smooth paste is formed. Add more sweetener if needed, then blend well again. Store in an airtight container in the fridge and bring to room temperature 30 minutes before use. Use within one week.
THREE-INGREDIENT SUGAR-FREE CARAMEL GLAZE
Great news: It’s possible to make a healthy, sugar-free caramel glaze with just three natural ingredients. Sound too good to be true? Well, it’s not! In fact, you can make caramel using just two ingredients—heavy cream and erythritol—but the salted butter enhances its flavor and produces a perfectly glossy sauce. And the longer you cook it, the thicker your sauce will be. Try topping your favorite low-sugar desserts with this luscious treat.
INGREDIENTS
11/2 cups (350 ml) heavy cream
3 tablespoons (30 g) erythritol-based brown sugar substitute
1 tablespoon (14 g) salted grass-fed butter
Yield: about 1 cup (240 ml)
1. Place the heavy cream and the sweetener in a medium saucepan and bring to a boil over a medium-high heat, stirring constantly. Reduce the heat to medium, then simmer uncovered until thick, about 15 minutes, stirring all the time. You’ll know the sauce is ready when you can see the bottom of the saucepan as you whisk it. Be sure to watch the mixture constantly during cooking; it can boil over in seconds. Reduce the heat if the mixture is about to spill.
2. When the caramel is thick, remove from the heat. Add the butter and mix well, until the butter is melted and is completely incorporated into the mixture.
3. Cover and let it cool down. Use as glaze or sauce immediately, or store in the fridge in an airtight container and consume within three days.
TIP: Be extremely careful with the boiling cream, as it boils over very easily. Using a larger saucepan helps prevent this, and also allows you to use a higher heat, which, in turn, reduces cooking time.

◁ LOW-SUGAR ORANGE MARMALADE
Traditional orange marmalade is terribly high in sugar—but now you can enjoy all that fresh, succulent flavor without sugar and its harmful effects. Plus, this marmalade has a smooth texture, which makes it easily spreadable (and more kid-friendly). Discarding the white pith of the orange before cooking guarantees a perfectly fruity marmalade without a hint of bitterness, and long, slow cooking ensures naturally deep, sweet flavors.
INGREDIENTS
2 oranges
1 cup (240 ml) plus 1/4 cup (60 ml) water divided
1 cup (130 g) powdered erythritol
40 drops orange-flavored stevia
2 teaspoons gelatin powder
2 drops 100 percent orange essential oil
Yield: about 21/2 cups (750 g)
1. Wash the oranges and pat them dry. Finely grate the peel from 1 orange and place it in a medium saucepan. (Be sure to grate the orange part of the peel only and leave out the white pith: it’s very bitter.)
2. Peel both oranges. Discard the peels and seeds and use only the flesh. Remove as much of the white pith as possible. Chop the flesh into 1/2-inch (1.3 cm) chunks. Add these to the saucepan, along with 1 cup (240 ml) of the water, the powdered erythritol, and the orange stevia. Mix well and bring to a boil over a high heat. Once boiling, reduce the heat to low. Cover, and let the mixture simmer for 3 hours.
3. When the mixture has simmered for close to 3 hours, pour the remaining 1/4 cup (60 ml) water into a small cup. Sprinkle the gelatin powder on top. Let the gelatin soak and thicken for 5 minutes, then add it to the hot orange mixture and mix well until completely dissolved. Add the orange essential oil and mix again. Pour the hot marmalade into sterilized glass jars or a ceramic container. Let cool to room temperature, then refrigerate overnight. The marmalade will set in the fridge. Store in the fridge and consume within two weeks.

◁ EASY SUGAR-FREE STRAWBERRY JAM
You won’t believe how easy it is to make homemade sugar-free strawberry jam. And you can tailor it to your taste, too: Cooking the mixture for less time yields a chunkier jam, while longer cooking results in a smoother texture and a sweeter flavor. Use this summery jam to dress up your breakfast yogurt or to accompany a sugar-free cheesecake, or slather it on a slice of starch-free peanut butter bread to make a healthy PB&J sandwich.
INGREDIENTS
1 pound (450 g) fresh strawberries, or thawed frozen strawberries
1/4 cup (32 g) powdered erythritol
40 drops liquid vanilla stevia, or to taste
2 pinches xanthan gum
Yield: about 11/2 cups (350 g)
1. Combine the strawberries, erythritol, and vanilla stevia in a large saucepan. Place over a high heat, stirring constantly (and scraping the bottom of the saucepan as you stir). When the mixture begins to steam, reduce the heat to low. Cook for 15 to 20 minutes, or until the mixture has reached the desired consistency. (Feel free to leave it as chunky as you like.) Mix constantly during cooking, crushing and breaking the strawberries with the back and sides of the mixing spoon.
2. Sprinkle in the xanthan gum little by little on top of the mixture, stirring all the time. (If you like, you can sift in the xanthan gum through a tea strainer to prevent lumps.) Continue mixing and let the jam simmer for 2 to 3 minutes before removing from the heat. Cover with a lid and let the jam cool completely. Store it in an airtight container in the fridge and consume within one week. You can also freeze the jam for up to two months, or preserve it for longer in sterilized glass jars.
HOMEMADE SUGAR-FREE MAPLE SYRUP
There’s no need to skimp on this delicious condiment: You can happily drown your starch-free pancakes and waffles in it without worrying about the harmful sugar load that’s part and parcel of traditional maple syrup. And it tastes, looks, and feels just like the real thing! I use Frontier Natural Products maple flavor for this recipe, so if you use another type of maple flavor, be sure to adjust the amount accordingly.
INGREDIENTS
11/2 cups (350 ml) water
3/4 cup (120 g) erythritol-based brown sugar substitute
1/2 teaspoon glucomannan
1 teaspoon sugar-free maple flavoring, or to taste
Yield: about 2 cups (475 ml)
1. Combine the water and the sweetener in a small saucepan and bring to a rolling boil over high heat. Mix a couple of times while heating.
2. Remove the saucepan from the heat and, very carefully, sprinkle in the glucomannan while whisking vigorously to prevent lumps. Add the maple flavoring and mix well again. Adjust the taste by adding more sweetener or maple flavoring, if necessary. Let cool to room temperature. The syrup will thicken during cooling. Pour the syrup into a glass bottle and store in the fridge for up to two weeks.
TIP: Glucomannan is the best thickener to use here because it produces the smoothest, most neutral-tasting result.
NOTE: This “maple syrup” is intentionally less sweet than regular maple syrup, to help wean you off the unnaturally sweet taste. However, if you’d like to make it sweeter, use 1 cup (240 ml) erythritol-based brown sugar substitute.

◁ EASY FLUFFY BREAD
In 2012, I posted my first fluffy bread recipe on my blog. Since then, I’ve made several improvements to the recipe, this one being the latest—and absolute best!—version. Its texture is fabulously light and fluffy, but it holds together extremely well, so slice it as thinly as you like.
INGREDIENTS
1/4 cup (30 g) unflavored egg white protein powder
1/4 cup (20 g) unflavored grass-fed whey protein powder
1 tablespoon (9 g) psyllium husk powder
2 teaspoons baking powder
4 eggs, separated
1/2 cup (120 g) unsweetened cashew butter
1/2 cup (120 ml) unsweetened almond milk
1 teaspoon unrefined sea salt (optional)
5 drops liquid stevia, or to taste (optional)
Yield: 1 loaf
1. Preheat the oven to 350°F (175°C). Combine the egg white protein, whey protein, psyllium husk powder, and baking powder in a small bowl. Mix well to break up any lumps.
2. In a separate bowl, beat the egg whites until stiff peaks form.
3. Combine the cashew butter and egg yolks in a large bowl and beat until well combined. Then add the almond milk and salt and stevia, if using, and beat again. Add the dry ingredients to the wet, and mix well. Fold in the egg whites and mix gently with a rubber spatula until smooth. Pour the mixture into a 9 × 5-inch (23 × 13 cm) silicone loaf pan.
4. Bake in the preheated oven for 45 minutes, or until a toothpick inserted in the center of the loaf comes out clean. Remove from the pan, let cool completely, and serve.
TIP: For even lower sugar content, replace the cashew butter with macadamia nut butter.
LOW-SUGAR CINNAMON RAISIN BREAD
Raisins are relatively high in natural sugars—but this delicious Cinnamon Raisin Bread isn’t. What’s the secret? Chopping the raisins into tiny pieces, which yields plenty of flavor with minimal sugar. And if you add extra cinnamon and sweetener, you’ll be able to reduce the quantity of raisins even further.
INGREDIENTS
3/4 cup (90 g) coconut flour
1/3 cup (45 g) finely chopped raisins
1/4 cup (20 g) vanilla-flavored grass-fed whey protein powder
3 tablespoons (27 g) psyllium husk powder
2 teaspoons baking powder
2 teaspoons Ceylon cinnamon
1/4 teaspoon unrefined sea salt or Himalayan salt
6 eggs
1 cup (240 ml) unsweetened almond milk
25 drops liquid stevia
Yield: 1 loaf
1. Preheat the oven to 350°F (175°C). Place all the dry ingredients in a medium bowl. Mix well, making sure there are no lumps.
2. Place the eggs, almond milk, and stevia in another medium bowl and whisk well. Add the dry ingredients to the wet, then mix with an electric mixer until smooth. Transfer the batter to a 9 × 5-inch (23 × 13 cm) silicone loaf pan. Use a rubber spatula to form it into a loaf shape. Bake for 60 minutes, or until a toothpick inserted in the center of the loaf comes out dry. Remove from the pan, let cool completely, and serve.
TIP: For variation, add 1/4 cup (75 g) Low-Sugar Orange Marmalade to the wet ingredients.
PERFECT FIVE-INGREDIENT PEANUT BUTTER BREAD
If you love peanut butter bread—and who doesn’t?—but don't want your blood sugar to skyrocket, then this sugar-free version is the answer to your prayers. And it takes just five ingredients to make this starch-free, gluten-free treat. Just be sure to bake it in a silicone loaf pan to prevent the dough from sticking.
INGREDIENTS
1/2 cup (45 g) vanilla-flavored grass-fed whey protein
2 teaspoons baking powder
1/2 cup (120 g) unsweetened smooth peanut butter
4 eggs
1/4 cup (32 g) powdered erythritol
Pinch unrefined sea salt or Himalayan salt, if the peanut butter is not salted (optional)
Yield: 1 loaf
1. Preheat the oven to 300°F (150°C). Place the whey protein and the baking powder in a small bowl and mix well. Set aside.
2. Place the rest of the ingredients—peanut butter, eggs, sweetener, and salt, if using—in a large bowl and beat with an electric mixer until smooth, fluffy, and bubbly, about 5 minutes. Add the whey protein mixture to the peanut butter mixture and beat again until smooth and well combined.
3. Pour the batter into a 9 × 5-inch (23 × 13 cm) silicone loaf pan and bake for 40 minutes, or until a knife inserted near the center comes out clean. Remove from the pan, let cool, and slice. Serve with Easy Sugar-Free Strawberry Jam.
NOTE: To make a PB&J loaf, add 1/2 cup (120 g) Easy Sugar-Free Strawberry Jam to the batter after pouring it into the loaf pan. Use a fork to make big swirls in the batter with the jam, then bake according to the instructions above.
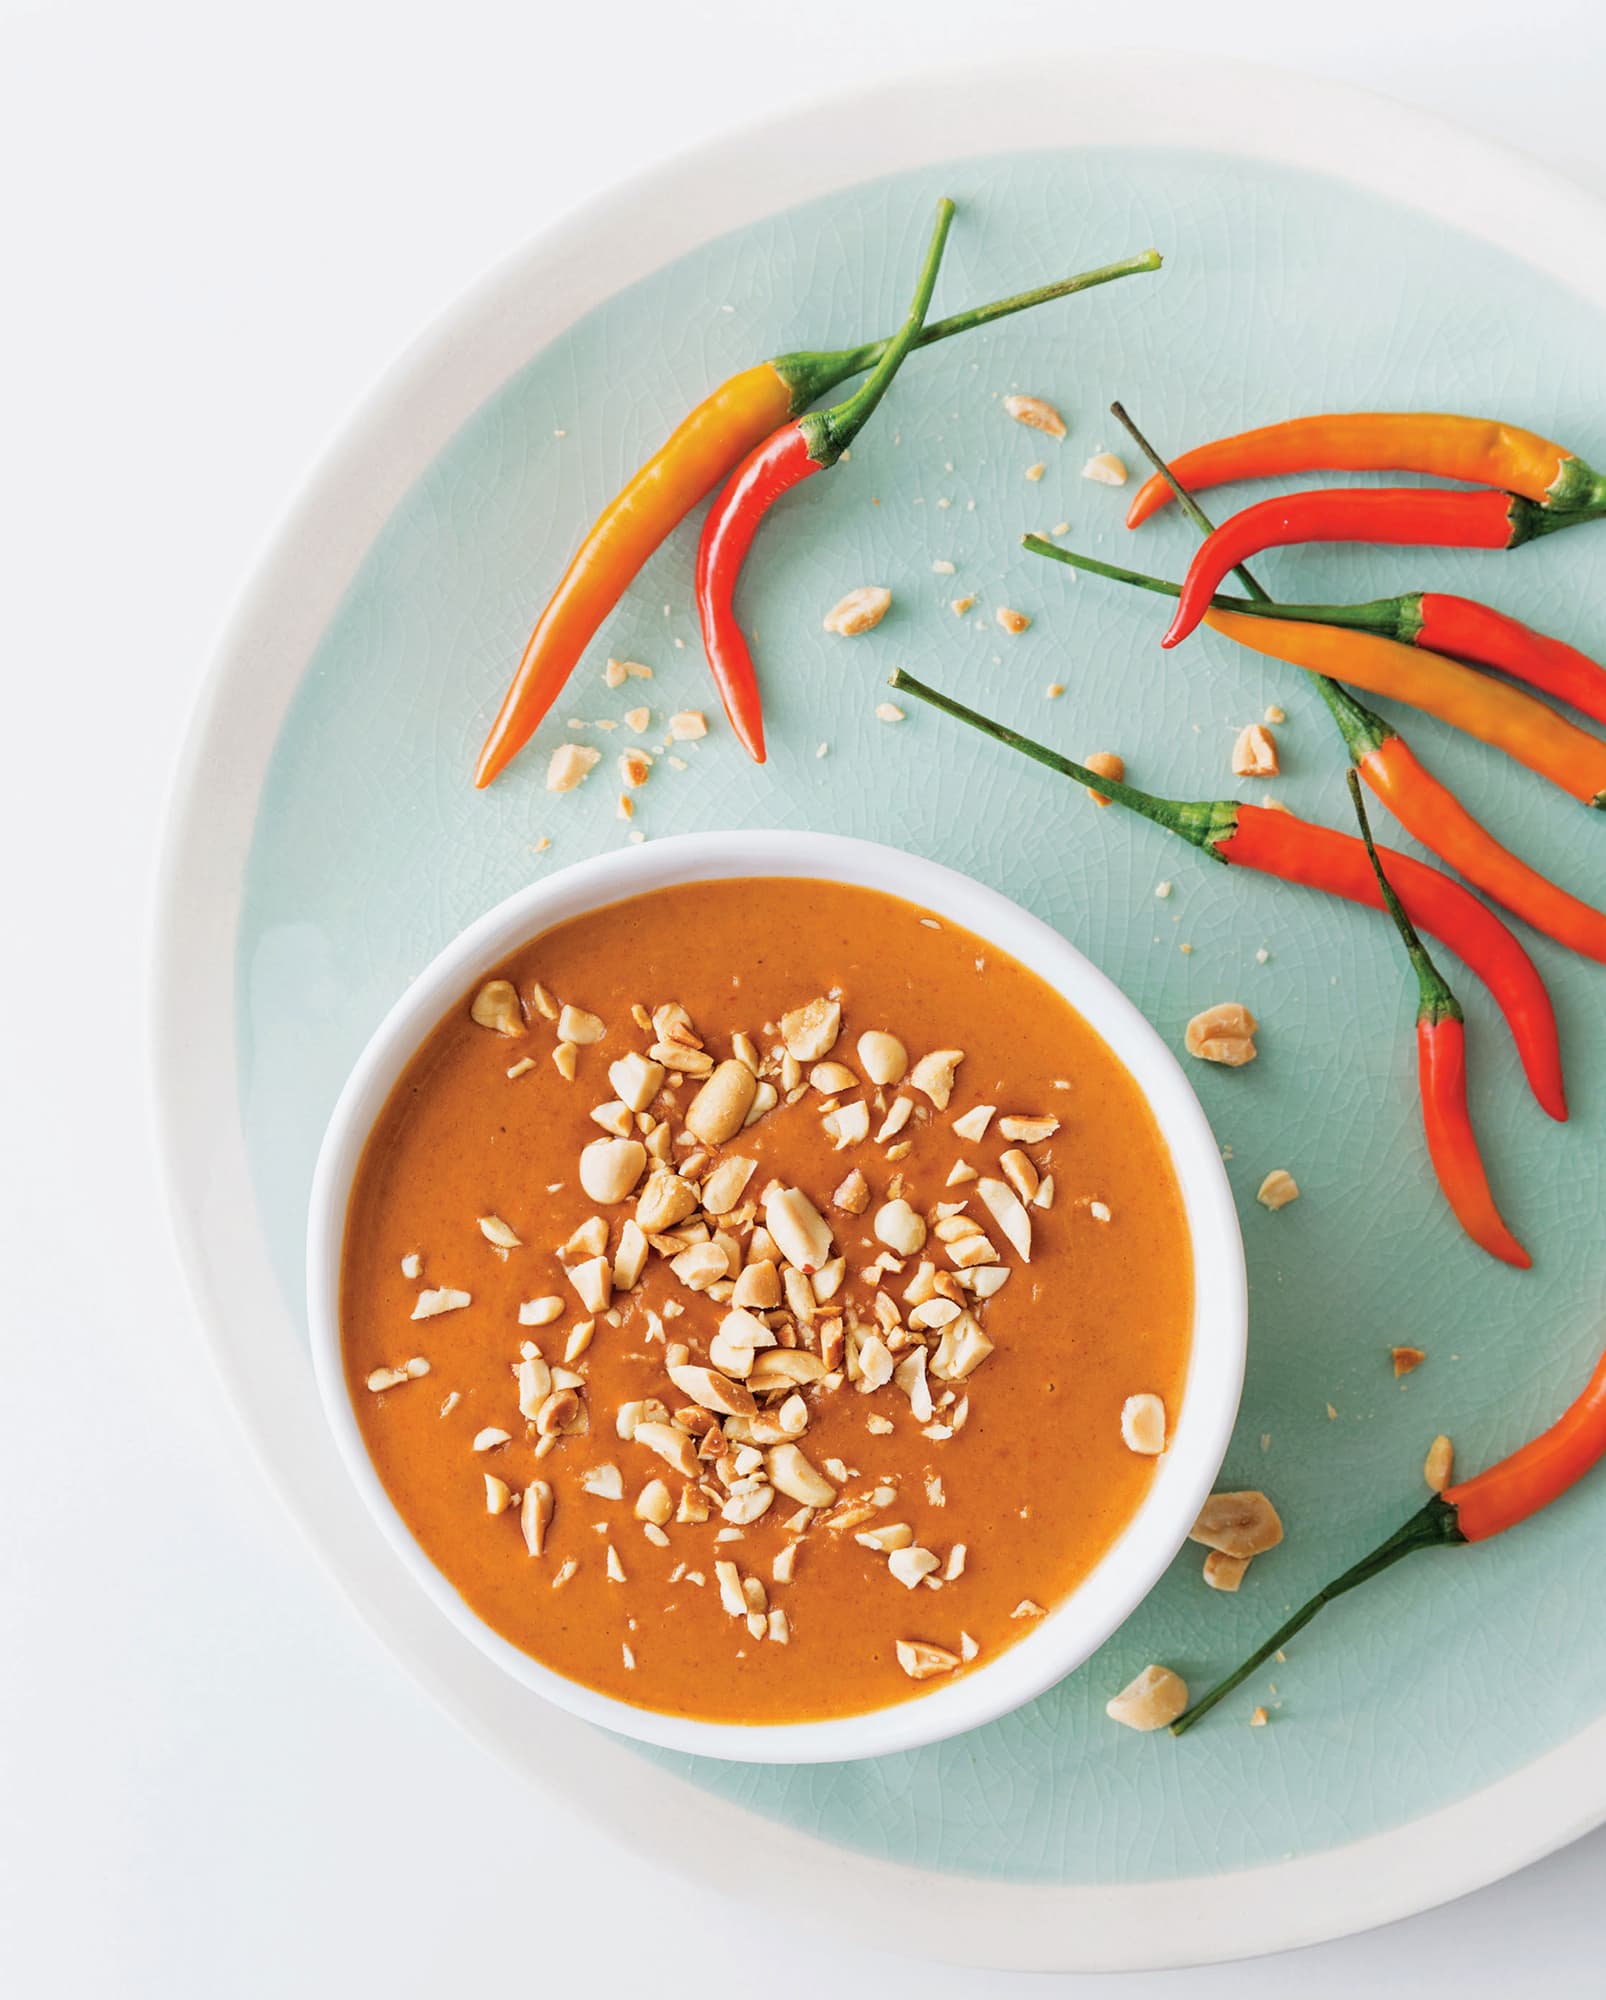
◁ TWO-MINUTE MILE-HIGH ENGLISH MUFFIN IN A MUG
A few basic ingredients and a couple of minutes are all you need to whip up a low-sugar English muffin that’s the perfect vehicle for just about any kind of topping, such as salad, meat, eggs, cheese, or veggies. Or, for an elegant-yet-filling weekend treat, try filling it with lox, cream cheese, dill, and red onion. You won’t even miss the bagel!
INGREDIENTS
Softened butter (for greasing the mug)
1/4 cup (30 g) almond flour
1 teaspoon psyllium husk powder
1/4 teaspoon aluminum-free baking powder
1 pinch unrefined sea salt or Himalayan salt, or to taste
1 egg
1 tablespoon (15 ml) soda water (or any sparkling water)
Yield: 1 serving
1. Grease a microwave-safe cup with softened butter. (The higher and narrower the cup, the better the muffin will rise.)
2. Combine the almond flour, psyllium husk powder, baking powder, and salt in a small bowl, taking care to break up any lumps. Add the egg and mix well with a spoon. Add the carbonated water and mix well again. Spoon the batter into the greased cup, then microwave on high for 2 minutes. (Check the muffin after 1 minute and adjust the total cooking time according to your microwave oven.)
3. Remove the muffin from the cup, let cool slightly, slice, and enjoy warm with your favorite toppings, or toast it, if you like.
SUGAR-FREE, STARCH-FREE PIE CRUST
Traditional pie crust is filled with starch—mainly wheat flour—which means it’s hardly a healthy choice. Never fear, though: It’s not difficult to make a thin, flaky starch-free pastry that’s perfect for sweet and savory pies alike. If you’re using this crust to make a sweet pie, add 2 tablespoons (16 g) of powdered erythritol to the dry ingredients, or a couple of drops liquid stevia to the wet ingredients.
INGREDIENTS
1/2 cup (60 g) almond flour
1/4 cup (30 g) coconut flour
2 tablespoons (18 g) psyllium husk powder
1 teaspoon aluminum-free baking powder
Pinch unrefined sea salt or Himalayan salt
3 eggs
2 tablespoons (30 ml) light olive oil
Yield: 1 pie crust
1. Preheat the oven to 350°F (175°C). Place the dry ingredients in a small bowl and mix them well to break up any lumps.
2. Place the eggs and olive oil into a medium bowl. Gradually add the dry ingredients, whisking constantly to prevent lumps. (The dough will be very sturdy, and will thicken almost immediately after adding the dry ingredients.) Press the dough evenly into the bottom and sides of a 10-inch (25 cm) pie pan. Prick the dough all over with a fork to prevent blistering, and prebake the crust for 15 minutes before adding the filling of your choice.
VEGAN SUGAR-FREE, STARCH-FREE PIE CRUST
If you’re vegan, you know that creating low-carb desserts can be a bit of an extra challenge. But here’s some good news: You don’t need egg to make a perfect pie crust. And this recipe is proof. Like its nonvegan counterpart (opposite page), it calls for just a few simple ingredients, and it can be used to make sweet and savory pies that are sure to impress your guests.
INGREDIENTS
2 cups (230 g) almond flour
2 tablespoons (18 g) psyllium husk powder
1/2 teaspoon unrefined sea salt or Himalayan salt, or to taste
1 teaspoon aluminum-free baking powder
1/3 cup (80 ml) extra-light olive oil
1/4 cup (60 ml) water
Yield: 1 pie crust
Preheat the oven to 350°F (175°C). Place the almond flour, psyllium husk powder, salt, and baking powder in a small bowl. Mix well to break up any lumps. Add the olive oil and water. Use clean hands to mix and knead until a stiff dough forms. Press the dough evenly into the bottom and the sides of a 10-inch (25 cm) pie pan. Prick the dough all over with a fork to prevent blistering. Prebake the crust for 10 minutes before adding the filling of your choice.
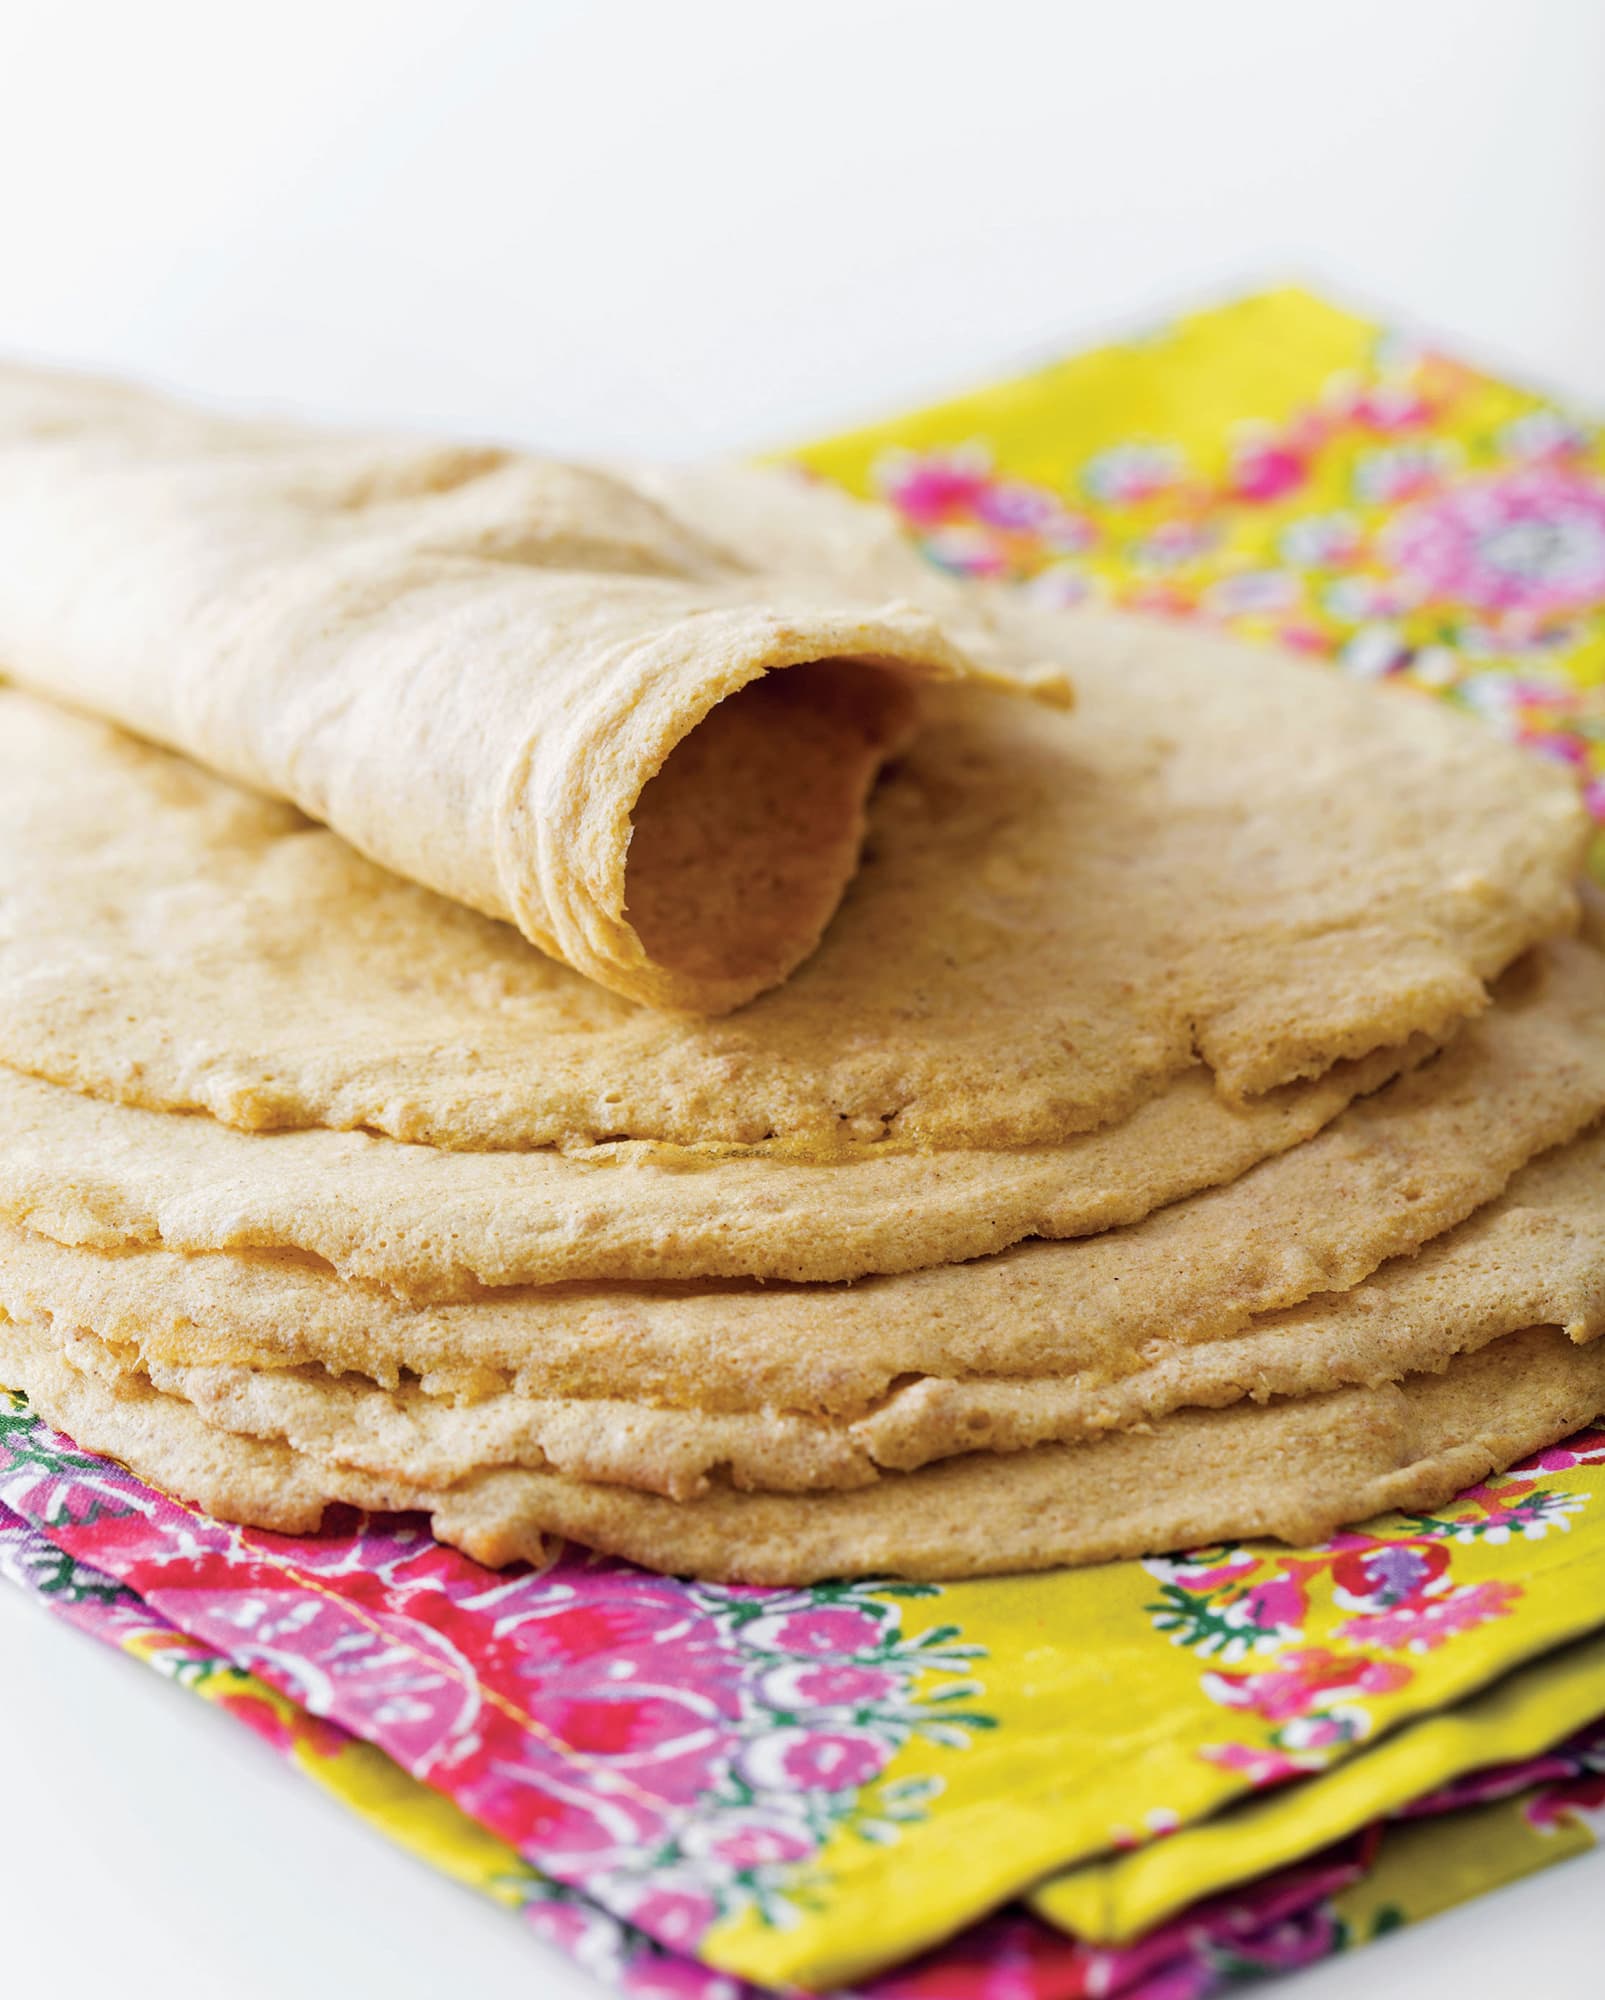
◁ SINGLE-SERVE TORTILLA
Is there anything quite as handy and versatile as a tortilla? It can become a burrito, a quesadilla, or a lunchtime wrap—and when it’s baked, it’s the perfect foundation for a plate of nachos (see the variation, above right). And this starch-free version is a cinch to make. Because it has a neutral taste, it’s perfect for desserts and sweet snacks, too.
INGREDIENTS
2 teaspoons coconut flour
1 teaspoon psyllium husk powder
Pinch unrefined sea salt or Himalayan salt
1 egg
2 teaspoons unsweetened almond milk
1. Combine the coconut flour, psyllium husk powder, and salt in a small bowl and mix well until combined. Add the egg and the almond milk and stir with a spoon until smooth.
2. Pour the mixture onto an 8-inch (20 cm) microwave-safe plate. Tilt the plate to thinly spread the batter as evenly as possible. Heat on high for 1 minute and 45 seconds, or until done. Adjust the time according to your microwave oven, but don't overbake: The tortilla will be dry if baked too long. Use a spatula or cheese slicer to remove the tortilla from the plate. Let cool and serve.
TIP: You can use almond flour instead of coconut flour, if you like. Just omit the coconut flour and add 2 tablespoons (15 g) of almond flour to the dry ingredients and then follow the recipe directions.
VARIATION: To make nachos: Add 1 teaspoon extra-light olive oil to the batter and omit the almond milk. Bake the tortilla for 3 minutes, turning it over after each minute. Let cool completely. Once cooled, the tortilla will be crispy and easy to break into pieces.
NOTE: For extra flavor and variety, add 1/2 teaspoon dried herbs or 1 teaspoon dried tomato powder to the dry ingredients.
SUPER-HEALTHY WAFFLES (OR PANCAKES)
While waffles are often thought of as breakfast food in the United States, in Europe they are eaten at every meal. You can top waffles with berries for breakfast, cream cheese and mixed greens for lunch, and hearty stews for a comforting dinner. With jam and whipped cream they are a very popular dessert. Waffles and pancakes make great substitutes to traditional high-carb options such as bread, croissants, and noodles; thus, they serve as a great basic recipe in your low-sugar cooking repertoire.
INGREDIENTS
1/2 cup (60 g) coconut flour
1/4 cup (20 g) vanilla-flavored grass-fed whey protein
1 tablespoon (7 g) milled chia seeds
2 teaspoons aluminum-free baking powder
Pinch unrefined sea salt or Himalayan salt
6 eggs
1/2 cup (120 ml) unsweetened almond milk
20 drops vanilla stevia
Yield: 6 to 8 pancakes
1. Place the dry ingredients in a small bowl and mix well. Place the eggs, almond milk, and stevia in a medium bowl and whisk until smooth. Gradually add the dry ingredients to the wet, stirring constantly. When completely combined, let the mixture stand for 10 minutes to thicken.
2. Use the batter to make waffles in your waffle maker according to the manufacturer's instructions. (Use butter for greasing the waffle maker.) To make pancakes, fry pancakes in a small skillet on medium-low heat in an ample amount of butter. Store leftover pancakes or waffles in an airtight container in the fridge and consume within one day.
TIP: For dairy-free waffles or pancakes, replace the whey protein with rice protein, and use butter-flavored coconut oil or light olive oil for frying.