
OBJECTIVES
This chapter covers the following Microsoft-specified objectives for the “Creating User Services” section of Exam 70-315, “Developing and Implementing Web Applications with Microsoft Visual C# .NET and Microsoft Visual Studio .NET”:
Implement navigation for the user interface.
Manage the view state.
Manage data during postback events.
Use session state to manage data across pages.
The underlying protocol for communication between the Web browser and Web server is Hypertext Transfer Protocol (HTTP). Because of the stateless nature of the HTTP, Web applications are stateless. Traditionally, this has been one of the major challenges for developing rich and interactive Web applications.
ASP.NET provides several features that help you easily maintain the state of a page across a page postback or between page navigations. This exam objective requires you to know the various ways in which you can manage state using ASP.NET. In addition to this, you should also know the various ways in which you can navigate from one page to another in a Web application.
Use and edit intrinsic objects. Intrinsic objects include response, request, session, server, and application.
Retrieve values from the properties of intrinsic objects.
Set values on the properties of intrinsic objects.
Use intrinsic objects to perform operations.
ASP.NET provides several classes such as
HttpResponse,HttpRequest,HttpSessionState,HttpServerUtility, andHttpApplicationStatethat give you methods and properties for accessing the underlying Web application's framework. You can easily access the objects of these classes for the current HTTP request using the properties of thePageclass such asResponse,Request,Session,Server, andApplication. This exam objective requires you to know about various important properties and methods of these objects.
OUTLINE
STUDY STRATEGIES
Experiment with different techniques for state management. You should understand their differences, advantages, and disadvantages so that you know which technique to use in a given scenario.
Use new features of ASP.NET such as view state and smart navigation that enhance the user experience for a Web page.
Use
Response.Redirect(),Server.Transfer(), andServer.Execute()methods in your programs and understand their differences. Be prepared to choose an appropriate navigation method for a given scenario.Know how to access and use various intrinsic objects from your Web form. Use various properties and methods of these objects to understand how they can help you in various Web development tasks.
Development of Web applications is a different game compared to developing Windows applications. One of the major challenges that a Web developer faces while developing a Web application is the disconnected nature of Web application. Traditionally, programmers had to write a lot of additional code to maintain state between page postback and navigation. ASP.NET provides a better model of programming by incorporating the tasks related to state management as part of the programming framework itself so that developers spend less time in plumbing work and more on developing the actual business logic.
In this chapter, I'll present various state management features provided by ASP.NET. I'll discuss both client-side techniques as well as server-side techniques for state management.
I'll also discuss the ASP.NET intrinsic objects that are available to you via the Page class. You'll see how these objects can help you fulfill various common Web development requirements.
Finally, I'll use the intrinsic objects to demonstrate various methods you can use to navigate from one page to another. I'll also compare various navigation techniques so that you can choose the appropriate technique for a given scenario.
Implement navigation for the user interface: Manage data during postback events.
Web applications have a distributed execution model. When a user interacts with a Web form, the browser might respond to some of the user actions by executing client-side scripts while some other actions that require server resources must be sent to the Web server for processing. When server-side processing is involved, a typical interactive user session with a Web form consists of the following steps:
User requests a Web form from the Web server.
Web Server responds back with the requested Web form.
User enters the data and submits the form to the Web server.
Web Server processes the form and sends the result back to the user.
Step 3 is also referred to as a page postback, whereas steps 3 and 4 are collectively referred to as a roundtrip. A roundtrip involves making a complete trip over the network to the Web server and getting the response back.
The Web applications use HTTP to establish communication between the Web browser and the Web server. HTTP is disconnected in nature, which means that the life cycle of a Web page is just a single roundtrip. Every time a Web server responds to a page request, it freshly creates the resources required to create the page, sends the page to the requesting client and destroys the page resources from the server. Between two page requests, Web server and the clients are disconnected with each other, and values of page variables and controls are not preserved across the page requests.
This model of execution allows a Web server to support a large number of clients because each client request occupies the server resources only for a short duration. However, the disconnected nature of HTTP provides a major challenge to the Web developers to implement the following functionality in their applications:
Maintain values of controls and variables across page postbacks.
Distinguish the initial request of a page from the page postback.
Provide smart navigation features similar to that of desktop applications.
ASP.NET provides solutions to these problems built right in to its framework. As an ASP.NET developer, you only need to write a minimum amount of code to achieve these functionalities in your application. From my discussion about server controls in Chapter 2, “Controls,” you already know that ASP.NET provides a set of server controls that automatically retain their value across page postbacks. You'll learn how ASP.NET actually retains the state for server controls later in this chapter in a section titled “State Management.” For now, I'll talk about two properties of the Page class—IsPostBack and SmartNavigation—that provide the other two functionalities from the previous list.
The IsPostBack property of the Page class returns true when a page is being loaded in response to a client postback. If the page is being requested for the first time, the value of the IsPostBack property is false.
A typical case in which you would like to make use of this distinction is when you do not want the server to execute some costly initialization operations for each page postback. Instead, you would like the initializations to be performed only with the first request to the page.
Step by Step 3.1 helps you understand roundtrip and postback operations and demonstrates the use of the IsPostBack property.
STEP BY STEP
Procedure 3.1. 3.1 Using the IsPostBack Property
Create a new Visual C# ASP.NET Web application project. Name the project
315C03.Add a new Web form to the project. Name the Web form
StepByStep3_1.aspx. Change thepageLayoutproperty of theDOCUMENTelement toFlowLayout.Add a
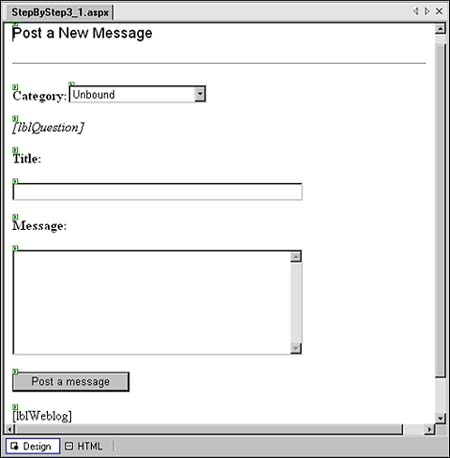
DropDownListWeb server control (ddlCategories) to the form. Set itsAutoPostBacktotrueandTabIndexto1(see Figure 3.1).Add a
Labelcontrol (lblQuestion) to the Web form.Add a
TextBoxcontrol (txtTitle) and set itsAutoPostBacktotrueandTabIndexto2. Add anotherTextBox(txtMessage) and set itsTabIndexto3andTextModetoMultiLine(see Figure 3.1).Add a
Buttoncontrol (btnPost) and set itsTexttoPost a message. Place aLabelcontrol (lblWeblog) at the end of the form as shown in Figure 3.1.Switch to the code view of the Web form and add the following code to the
Page_Load()event handler:private void Page_Load( object sender, System.EventArgs e) { if (!Page.IsPostBack) { // If page is requested for the first time ddlCategories.Items.Add("Web development"); ddlCategories.Items.Add( "Programming Languages"); ddlCategories.Items.Add("Certifications"); } else { // On postback, change the case of // the textbox's text txtTitle.Text = txtTitle.Text.ToUpper(); } // Set the text of the label control // on each page load lblQuestion.Text = "What do you want to write about " + ddlCategories.SelectedItem.Text + " today?"; }Attach the following event handler to the
Clickevent of the Post button:private void btnPost_Click( object sender, System.EventArgs e) { // Format the data entered by the user and // append it to the existing contents of lblWeblog lblWeblog.Text = "<b>" + ddlCategories.SelectedItem.Text + " :: " + txtTitle.Text + "</b> (" + DateTime.Now.ToString() + ")<hr>" + txtMessage.Text + "<p>" + lblWeblog.Text + "</p>"; }Set
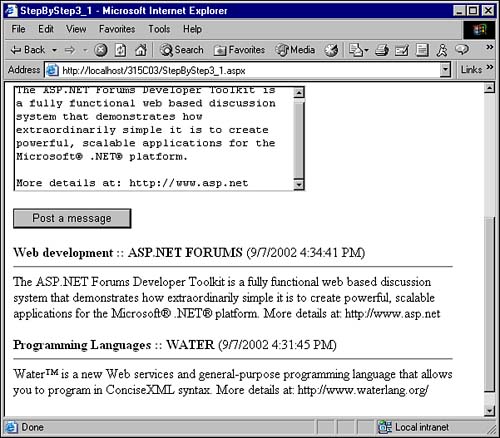
StepByStep3_1.aspxas the start page in the project.Run the project. Use the Tab key to navigate between various fields and publish a few entries to the Weblog as shown in Figure 3.2.
In Step by Step 3.1, I am using the event handler for the Load event of the Page class to check if the page is loaded by a postback operation. If that is the case, I skip executing the code for adding items to the drop-down list.
You also note that the navigation between controls is not smooth. When the form returns after a postback, it does not remember the active control. However, you have a solution to this problem with the help of the SmartNavigation property.
ASP.NET has a feature called smart navigation that can greatly enhance the user experience of a Web page for users of Internet Explorer 5.0 or higher browsers. The following list summarizes the enhancements provided by smart navigation:
Persists element focus between postbacks—. When a postback occurs, the active control on the Web page loses its focus. Anyone using a keyboard for navigation will have to press the Tab key several times to return to their original position of data entry. However, when smart navigation is enabled, the information about the active control is persisted between postbacks to the server.
Persists scroll position between postbacks—. When a postback occurs, the browser loses the record of the scroll position of the page. This can be especially annoying in the case of large data entry forms because after postback, the form will be positioned at the beginning and user has to scroll down to find her last data entry position. However, when smart navigation is enabled, the information about the scroll position persists between postbacks to the server.
Eliminates page flash caused by page postback—. When users navigate from one page to another, the old page is destroyed and the new one is created on a blank screen. Depending on the user's video card and display setting, this operation can cause a small flash to occur. This flash is especially noticeable during page postback operations in which the visual contents of the page do not change significantly between the two page requests. When smart navigation is enabled, ASP.NET uses a technique called double buffering to eliminate this flash.
Prevents each postback from being saved in the browser history—. Normally, every postback to an ASP.NET page causes an entry to be created in the browser's history. This defeats the purpose of the browser's back button because instead of going back to the previous page, users are taken to the previous state of the current page. Smart navigation prevents this from happening by saving only the latest state of the current page in the browser's history.
Smart navigation is specified by the SmartNavigation property of the Page class. The default value of this property is false, which disables smart navigation for the Web form.
WARNING
Smart Navigation. Smart navigation is only supported in Internet Explorer 5.0 or later browsers. Therefore, when you are targeting an application for a generic browser, this feature won't be very helpful.
In most cases, you should not set the SmartNavigation property directly in the code. Instead, you should use the SmartNavigation attribute of the Page directive. Using the SmartNavigation attribute of the Page directive automatically generates the correct code for setting the SmartNavigation property of the Page class, when the Web form is compiled to create a Page derived class.
Step by Step 3.2 enhances the Web form created in Step by Step 3.1 to use the smart navigation feature.
In a corporate scenario in which you are sure about the browsers used by the users, you might want to turn on smart navigation for the complete Web application instead of individual files. In that case, you can make the following changes to the web.config file:
ASP.NET provides intrinsic objects to enable low-level access to the Web application framework. With the help of these intrinsic objects, you can work directly with the underlying HTTP streams, server, session, and application objects. The intrinsic objects can be accessed in a Web form through the properties of the Page class. Table 3.1 lists the important intrinsic objects and the properties of the Page class to which they are mapped.
Table 3.1. Intrinsic Objects and Their Mappings to the Page Class Properties
Intrinsic Object | Property of the |
|---|---|
|
|
|
|
|
|
|
|
|
|
I'll discuss the HttpRequest, HttpResponse, and HttpServerUtility objects in the following section. The other two objects, HttpApplicationState and HttpSessionState, are discussed later in this chapter in the section “State Management.”
The HttpRequest object . represents the incoming request from the client to the Web server. The request from the client can come in two ways—GET or POST. GET attaches the data with the URL, whereas POST embeds the data within the HTTP request body.
The requested page and its details are encapsulated in an HttpRequest object. The HttpRequest intrinsic object can be accessed by the Request property of the Page class. Tables 3.2 and 3.3 list the properties and methods of the HttpRequest class, respectively. Because the HttpRequest class provides information about the request sent by the client, all the properties are read-only except the Filter property.
NOTE
CurrentExecutionFilePath. This property of the HttpRequest class returns the file path of the currently executing page. When using the server-side redirection methods such as Server.Execute() and Server.Transfer(), the FilePath property returns the path to the original page, whereas CurrentExecutionFilePath returns the path to the currently executing page.
Table 3.2. Properties of the HttpRequest Class
Property | Description |
|---|---|
| Specifies the MIME types that the client browser accepts. |
| Represents the application's virtual application root path on the server. |
| Provides access to the capabilities and characteristics of the requesting browser. |
| Represents the certificate, if any, sent by the client for secure communications. |
| Represents the character encoding (such as |
| Specifies the length in bytes of the request. |
| Specifies the MIME type of the incoming request. |
| Represents the cookies collection that is sent by the client to the server. |
| Specifies the virtual path of the current executing page on the Web server. |
| Specifies the virtual path of the file on the Web server. |
| Represents the file collection that is posted by the client to the Web server. |
| Represents a stream that is applied as a filter on the incoming request. |
|
| Specifies the contents of a form posted to the server. |
| Represents the HTTP headers passed in with the incoming request. |
| Represents the method of the HTTP request (for example, |
| Represents the stream that contains the incoming HTTP request body. |
| Indicates whether the client has been authenticated to the Web site. |
| Indicates whether the client connection is over a secure HTTPS connection. |
| Represents the form, query string, cookies, and server variables collection of the current request. |
| Specifies the virtual path of the current request, along with additional path information. |
| Specifies the additional path information of the current request. |
| Specifies the physical file system path of the application's root directory. |
| Specifies the physical file system path of the current request on the Web server. |
| Represents the query string collection sent by the client to the Web server through the URL. |
| Specifies the URL portion of the current request, excluding the domain information. |
| Represents the type of request ( |
| |
| Represents the total number of bytes posted to the server in the current request. |
| Specifies information about the current URL request. |
| Specifies the URL of the client's previous request that linked to the current URL request. |
| Represents the browser being used by the client. |
| Represents the IP address of the requesting client's machine. |
| Represents the Domain Name System (DNS) name of the requesting client's machine. |
|
Table 3.3. Methods of the HttpRequest Class
Step by Step 3.3 displays some of the path-related properties of the HttpRequest object and calls the MapPath() method to get the physical file system path for a specified virtual path. It also displays the header information sent by the client to the server when the StepByStep3_3.aspx page is requested from the server.
STEP BY STEP
Procedure 3.3. 3.3 Using the HttpRequest Intrinsic Object
Add a new Web form to the project. Name the Web form
StepByStep3_3.aspx. Change thepageLayoutproperty of theDOCUMENTelement toFlowLayout.Add a Label control (
lblInfo) to the Web form.Switch to the code view of the form. Add the following
usingdirective at the top of the code-behind file:using System.Text; using System.Collections.Specialized;
Add the following code to the
Page_Load()event handler:private void Page_Load( object sender, System.EventArgs e) { StringBuilder sbInfo = new StringBuilder(); // Display some of the path related properties // of the HttpRequest object sbInfo.Append("The Url of the ASPX page: " + Request.Url + "<br>"); sbInfo.Append("The Virtual File Path: " + Request.FilePath + "<br>"); sbInfo.Append("The Physical File Path: " + Request.PhysicalPath + "<br>"); sbInfo.Append("The Application Path: " + Request.ApplicationPath + "<br>"); sbInfo.Append("The Physical Application Path: " + Request.PhysicalApplicationPath + "<br>"); // Display the request header sbInfo.Append("Request Header:"); sbInfo.Append("<br>"); NameValueCollection nvcHeaders = Request.Headers; String[] astrKeys = nvcHeaders.AllKeys; // Iterate through all header keys // and display their values foreach (String strKey in astrKeys) { sbInfo.Append(strKey + ": " + nvcHeaders[strKey].ToString()); sbInfo.Append("<br>"); } // Call MapPath() method to find the physical path // of StepByStep3_2.aspx sbInfo.Append( "The physical path of StepByStep3_2.aspx: "); sbInfo.Append( Request.MapPath("StepByStep3_2.aspx")); lblInfo.Text = sbInfo.ToString(); }Set
StepByStep3_3.aspxas the start page in the project.Run the project. You should see the Web form displaying the properties for the current request, as shown in Figure 3.3.

Some properties of the HttpRequest object—such as Form, QueryString, Headers, and so on—return a NameValueCollection containing a collection of key-value pairs of their contents. Step by Step 3.3 shows how to iterate through this collection by iterating through the keys of the Headers collection and displaying the key and value of each header sent by the client.
The HttpResponse object represents the response sent back to the client from the Web server. It contains properties and methods that provide direct access to the response stream and allow you to set its behavior and operations. The Response property of the Page class provides access to the HttpResponse object. Tables 3.4 and 3.5 list the properties and methods of the HttpResponse class, respectively.
Table 3.4. Properties of the HttpResponse Class
NOTE
Caching Policy. The properties CacheControl, Expires, and ExpiresAbsolute are provided for backward compatibility. You should instead use the HttpCachePolicy object's methods to set the caching policy. This object is returned by the Cache property. Setting caching policy is discussed in Chapter 15, “Configuring a Web Application.”
Table 3.5. Methods of the HttpResponse Class
Step by Step 3.4 shows the use of HttpResponse object methods and properties to create a response that displays the File Download dialog box and allows the user to download a text file from the Web server to the client's machine.
STEP BY STEP
Procedure 3.4. 3.4 Using the HttpResponse Intrinsic Object
Add a new Web form to the project. Name the Web form
StepByStep3_4.aspx. Change thepageLayoutproperty of theDOCUMENTelement toFlowLayout.Add a text file to the project that contains some data that needs to be downloaded. Name it
Summary.txt.Add a
LinkButtoncontrol (lbtnDownload) to the Web form with its Text property set to Download Summary.txt.Double-click the
lbtnDownloadcontrol and add the following code to theClickevent handler:private void lbtnDownload_Click(object sender, System.EventArgs e) { // Append a Header to the response to force a // Download of Summary.txt as an attachment Response.AppendHeader("Content-Disposition", "Attachment;FileName=" + "Summary.txt"); // Set the Content type to text/plain // As the download file is a TXT file Response.ContentType = "text/plain"; // Write the file to the Response Response.WriteFile("Summary.txt"); // Stop further execution of the page Response.End(); }Set
StepByStep3_4.aspxas the start page in the project.Run the project. Click the link button. You should see a File Download dialog box, as shown in Figure 3.4. After the download, open the file to verify that the file has been successfully downloaded.

The HttpServerUtility object contains utility methods and properties to work with the Web server. It contains methods to enable HTML/URL encoding and decoding, execute or transfer to an ASPX page, create COM components, and so on. The Server property of the Page class provides access to the HttpServerUtility object. Tables 3.6 and 3.7 list the properties and methods of the HttpServerUtility class, respectively.
Table 3.6. Properties of the HttpServerUtility Class
Property | Description |
|---|---|
| Returns the name of the server that hosts the Web application. |
| Indicates the number of seconds that are allowed to elapse when processing the request before a timeout error is sent to the client. |
Table 3.7. Methods of the HttpServerUtility Class
Method | Description |
|---|---|
| Clears the last exception from memory. This method is discussed in Chapter 4, “Error Handling for the User Interface.” |
| Creates a COM object on the server. This method is discussed in Chapter 10, “Working with Legacy Code.” |
| Creates a COM object on the server identified by a specified class identifier (CLSID). |
| Executes an ASPX page within the current requested page. |
| Returns the last exception that occurred on the Web server. This method is discussed in Chapter 4. |
| Decodes a string that has been previously encoded to eliminate invalid HTML characters. |
| Encodes a string converting any characters that are illegal in HTML for transmission over HTTP. |
| Returns the physical path for a specified virtual path on a Web server. |
| Allows the transfer of ASPX page execution from the current page to another ASPX page on the same Web server. |
|
| Decodes a string that has been previously encoded to eliminate invalid characters for transmission over HTTP in a URL. |
| Encodes a string converting any characters that are illegal in URL for HTTP transmission. |
| Encodes the path portion of the URL string for safe transmission over HTTP. |
STEP BY STEP
Procedure 3.5. 3.5 Using the HttpServerUtility Intrinsic Object
Add a new Web form to the project. Name the Web form
StepByStep3_5.aspx. Change thepageLayoutproperty ofDOCUMENTelement toFlowLayout.Add the following code to the
Page_Load()event handler:private void Page_Load( object sender, System.EventArgs e) { // Write to the response // using the Server.HtmlEncode() method // so that the browser does not parse // the text into HTML elements Response.Write(Server.HtmlEncode( "To include a title in the title bar, " + "enclose your chosen title between the " + "pairs of the <title>...</title> element " + "in the HTML <head> element. ")); Response.Write(Server.HtmlEncode( "For example, <title> " + "Using the HtmlEncode() method </title>.")); }Set
StepByStep3_5.aspxas the Start page in the project.Run the project. You should see that the browser does not parse the HTML
<title>elements written to the response, as shown in Figure 3.5, because of the use of theHtmlEncode()method of theHttpServerUtilityclass.

I will discuss various other methods of the HttpServerUtility object throughout the course of this book.
GUIDED PRACTICE EXERCISE 3.1
Several Web sites collect statistics about the browsers, operating system, and other settings on their users' computers. This data helps the Web sites customize their contents to target a large number of users. A common requirement for Web applications is to find out the browser versions of their users and then serve them files that are optimized for that particular browser version.
In this exercise, you are required to create a Web form that displays the following information about the client browser: the browser name, version, platform of the client's computer, the CLR version installed, JavaScript support, ECMA version, MS DOM version, and the W3C XML DOM version supported by the browser.
You can use the Request.Browser property to get access to the HttpBrowserCapabilities object that provides various properties that contain information on the capabilities of the client's browser.
How would you create a Web form that allows the Web page to get information about the browser?
You should try working through this problem on your own first. If you are stuck, or if you'd like to see one possible solution, follow these steps:
Open the project
315C03. Add a new Web formGuidedPracticeExercise3_1.aspxto the project. Change thepageLayoutproperty ofDOCUMENTelement toFlowLayout.Add a Label control (
lblInfo) to the Web form.Switch to the code view of the form. Add the following
usingdirective at the top of the code-behind file:using System.Text;
Add the following code to the
Page_Load()event handler:private void Page_Load( object sender, System.EventArgs e) { StringBuilder sbText = new StringBuilder(); // Get the reference to the // HttpBrowserCapabilities object HttpBrowserCapabilities browser = Request.Browser; // Display the properties of the // HttpBrowserCapabilities Class sbText.AppendFormat("Browser : " + browser.Browser + "<br>"); sbText.AppendFormat("Browser Version: " + browser.Version + "<br>"); sbText.AppendFormat("Client's Platform: " + browser.Platform + "<br>"); sbText.AppendFormat(".NET CLR Version: " + browser.ClrVersion + "<br>"); sbText.AppendFormat("ECMA Script Version: " + browser.EcmaScriptVersion + "<br>"); sbText.AppendFormat("JavaScript Support: " + browser.JavaScript + "<br>"); sbText.AppendFormat( "Microsoft HTML Document Object Model Version: " + browser.MSDomVersion + "<br>"); sbText.AppendFormat( "World Wide Web (W3C) XML Document " + " Object Model Version: " + browser.W3CDomVersion + "<br>"); lblInfo.Text=sbText.ToString(); }Set
GuidedPracticeExercise3_1.aspxas the start page in the project.Run the project. You should see the Web form displaying the properties of the browser as shown in Figure 3.6.

If you have difficulty following this exercise, review the section “The HttpRequest Object” earlier in this chapter and perform Step by Step 3.3. Also, look at the .NET Framework documentation for the System.Web.HttpBrowserCapabilities class. After doing this review, try this exercise again.
An ASP.NET application is made up of the Web forms, assemblies, and other files stored within a virtual Web directory marked as an IIS application.
When ASP.NET receives a request for a resource in an ASP.NET application, it instantiates an HttpApplication object. The HttpApplication object then takes over the processing of incoming request. An HttpApplication object can only handle one request at a time. To process multiple simultaneous requests, ASP.NET needs to create multiple HttpApplication objects.
For the sake of optimization, instead of destroying the HttpApplication object, ASP.NET maintains a pool of HttpApplication objects. When a new HTTP request arrives, ASP.NET reuses one of the objects from this pool rather than creating a new HttpApplication object from scratch.
The HttpApplication class defines the methods, properties, and events common to all application objects within an ASP.NET application. If you want to customize the behavior of an HttpApplication object, you can derive a class from the HttpApplication class and override the event handlers of the base class for various application level events. An easy way to do this is by using the global.asax file.
ASP.NET provides an easy way to customize your applications by using the global.asax file. This optional file resides in the root directory of an ASP.NET application. The global.asax file defines a class named Global that derives from the HttpApplication class. When ASP.NET notices that the global.asax file is present for an application, rather than using the implicitly created HttpApplication object, ASP.NET creates instances of the class defined in the global.asax file to handle requests for your application.
Visual Studio .NET automatically creates a global.asax file when you create an ASP.NET Web application project. As with Web forms, Visual Studio .NET creates a code-behind version of the global.asax file. When you make any changes to the code-behind file for global.asax, you must precompile the file before the server can detect those changes. However, it is also possible to create a single file implementation of the global.asax file. In that case, instead of being precompiled, the global.asax file will be dynamically compiled at runtime by ASP.NET.
The global.asax file is an appropriate place to handle events that are not specific to a Web form, but rather apply to an application as a whole. I'll call these events global events and classify them in two categories—Application and session level events and Per-Request events.
Application and session level events are fired to signal the start and end of the application or a user session. These events can be handled using the predefined event handlers in the global.asax file shown in Table 3.8.
Table 3.8. Application and Session Level Event Handlers in the global.asax File
The event handlers shown in Table 3.9 are invoked for each individual page request processed by the HttpApplication object.
Table 3.9. Per-Request Event Handlers
Event Handler | Purpose |
|---|---|
| Called at the beginning of each request. |
| Called when a security module has established the identity of the user. |
| Called when a security module has verified user authorization. |
| Called to resolve the current request by providing content from a cache. |
| Called to associate the current request with the session state. |
| Called when ASP.NET begins executing a page. |
| Called when ASP.NET finishes executing a page. |
| Called to save the current state data. |
| Called to update a cache with the responses. |
| Called at the end of each request. |
As you can see from Table 3.9, you have complete control over how a request is processed. You can write code in any of these event handlers to modify the default behavior of ASP.NET. Step by Step 3.6 uses the Application_BeginRequest() and Application_EndRequest() methods to determine the time it took for each request to process and append this information with every response.
STEP BY STEP
Procedure 3.6. 3.6 Handling Global Events Using the global.asax File
Open the
global.asaxfile from the Solution Explorer. Click on the Click Here to Switch to Code View hyperlink to switch to code view.Add the following code to the
Application_BeginRequest()event handler:protected void Application_BeginRequest(Object sender, EventArgs e) { // Store the begin time of the // request in the HttpContext object this.Context.Items.Add("BeginTime", DateTime.Now); }Add the following code to the
Application_EndRequest()event handler:protected void Application_EndRequest(Object sender, EventArgs e) { // Get the begin time from the HttpContext object DateTime dtBeginTime = (DateTime) this.Context.Items["BeginTime"]; // Calculate the time span between // the start and end of request TimeSpan tsProcessingTime = DateTime.Now-dtBeginTime; // Display the processing time taken // by the response this.Context.Response.Output.Write("<hr>"); this.Context.Response.Output.Write( "{0} took {1} milliseconds to execute.", this.Request.Url, tsProcessingTime.TotalMilliseconds); }Run the project. You should see that the page shows a message at the bottom indicating the processing time of the request, as shown in Figure 3.7.

In Step by Step 3.6, the Context object is used to store the begin time. The Context object exposes a key-value collection via the Items property in which you can add values that will be available for the life of the current request. The Context object gives access to the current HTTP request and response.
The modification of the global.asax file in Step by Step 3.6 will affect all other Web forms in the Web application 315C03. If at a later stage, you would like to disable the output generated by the global events, just comment the corresponding lines in the global.asax file.
Implement navigation for the user interface.
Manage the view state.
Use session state to manage data across pages.
The value of the variables and controls collectively make up the state of a Web page. State management is the process of maintaining state for a Web page across roundtrips.
State management is ubiquitous with desktop-based applications, and programmers need not even care about it while developing these applications. However, because of the disconnected nature of the HTTP, state management is a big issue for Web applications.
ASP.NET provides several techniques for preserving state information across page postbacks. I'll broadly categorize these techniques as either client-side or server-side, depending on where the resources are consumed for state management.
Client-side techniques use the HTML code and the capabilities of the Web browser to store state-related information. ASP.NET supports the following techniques for storing state information at the client side:
Query strings
Cookies
View State
Query strings are used to maintain state by appending the state information to a page's URL. The state data is separated from the actual URL with a question mark (?). The data attached to the URL is usually a set of key-value pairs, where each key-value pair is separated by an ampersand (&). For example, look at this URL that embeds two key-value pairs, name and city:
Because of its simplicity, query strings are widely used for passing a small amount of information to Web pages. However, query strings suffer the following limitations:
Most browsers restrict the length of the query string; this reduces the amount of data that you can embed in a URL.
Query strings do not provide any support for structured data types.
The information stored in a query string is not secure because it is directly visible to users in the browser's address field.
Reading information from query string in an ASP.NET program is easy using the QueryString property of the current HttpRequest object. QueryString returns a NameValueCollection object representing the key-value pairs stored in the query string. Step by Step 3.7 shows you how query strings can be used for client-side state management.
STEP BY STEP
Procedure 3.7. 3.7 Using Query Strings in a Web Application
Add a new Web form to the project. Name the Web form
StepByStep3_7.aspx. Change thepageLayoutproperty of theDOCUMENTelement toFlowLayout.Add two
Labelcontrols, twoTextBoxcontrols (txtName,txtEmail), and aButtoncontrol (btnSubmit) on the Web form.Double-click the button control and add the following code in the
Clickevent handler:private void btnSubmit_Click(object sender, System.EventArgs e) { // Redirect to StepByStep3_7a.aspx page, // with a query string containing name and // email appended to the URL Response.Redirect("StepByStep3_7a.aspx?Name=" + txtName.Text + "&Email=" + txtEmail.Text); }Add a new Web form to the project. Name the Web form
StepByStep3_7a.aspx. Change thepageLayoutproperty of theDOCUMENTelement toFlowLayout.Add a
Labelcontrol (lblInfo) to the Web form.Add the following code in the
Page_Load()event handler:private void Page_Load( object sender, System.EventArgs e) { // If the query string collection contains Name if(Request.QueryString["Name"] != null) { // Display a message by getting Name and Email // from the query string collection lblInfo.Text = Request.QueryString["Name"] + ", thanks for registering with us! "; lblInfo.Text += "You are subscribed at " + Request.QueryString["Email"]; } }Set
StepByStep3_7.aspxas the start page in the project.Run the project. Enter a name and an email in the text boxes and click the Submit button. You should see that the button redirects the response to the
StepByStep3_7a.aspxwith the name and email address data in the query string. The new form then displays a message along with the name and email address fetched from the query string as shown in Figure 3.8.


If you observe the URL in Figure 3.8, you'll note that the name and email addresses are embedded in the URL itself. Query string is a very effective way to pass small non-sensitive pieces of information.
Cookies are small packets of information—each storing a key-value pair at the client side. These packets are associated with a specific domain and are sent along with each request to the associated Web server.
A cookie can be set to expire when a user session ends, or you can request that the browser persist the cookie on the user's computer for a specified period. Cookies are commonly used to store users' preferences and provide them with a personalized browsing experience on their subsequent visits to a Web page.
Use of cookies suffers from the following limitations:
Most browsers limit the size of information that you can store in a cookie. The typical size is 4,096 bytes with older browser versions and 8,192 bytes with the newer browser versions.
Some users configure their browsers to refuse cookies.
When you request that the browser persist a cookie on a user's computer for a specified period, the browser might override that request by using its own rules for cookie expiration.
Because cookies are stored at the client, they might be tampered with. You cannot trust data that you receive from a cookie.
You can use the Cookies property of the HttpRequest object to get an HttpCookieCollection object that represents the cookies sent by the client for the current HTTP request.
Step by Step 3.8 shows you how cookies can be used for client-side state management.
STEP BY STEP
Procedure 3.8. 3.8 Using Cookies to Maintain Client-Side State
Make a copy of the Web form
StepByStep3_1.aspxand change its name toStepByStep3_8.aspx. Open the ASPX file and the CS file and replace all occurrences ofStepByStep3_1withStepByStep3_8.Add a label control (
lblName) to the form.Switch to the code view and add the following code above the existing code in the
Page_Load()event handler:private void Page_Load( object sender, System.EventArgs e) { if(Request.Cookies["Name"] == null) { // If the Name cookie does not exist, // ask user to enter name Response.Redirect("StepByStep3_8a.aspx"); } else { // If cookie already exists, show // a personalized welcome message to the user lblName.Text="Welcome " + Request.Cookies["Name"].Value; } ... }Double-click the Post button control and add the following code in the
Clickevent handler:private void btnPost_Click( object sender, System.EventArgs e) { // Format the data entered by the user and // use the name of the user stored in a cookie // Append to it the existing contents of lblWeblog lblWeblog.Text = "<b>" + ddlCategories.SelectedItem.Text + " :: " + txtTitle.Text + ":: by " + Request.Cookies["Name"].Value + "</b> (" + DateTime.Now.ToString() + ")<hr>" + txtMessage.Text + "<p>" + lblWeblog.Text + "</p>"; }Add a new Web form to the project. Name the Web form
StepByStep3_8a.aspx. Change thepageLayoutproperty of theDOCUMENTelement toFlowLayout.Add a
Labelcontrol, aTextBoxcontrol (txtName), aButtoncontrol (btnSubmit), and aCheckBoxcontrol (cbRemember) on the Web form.Double-click the Submit button control and add the following code in the
Clickevent handler:private void btnSubmit_Click(object sender, System.EventArgs e) { // Create a cookie called Name // Set the cookie with the Text of the text box HttpCookie cName = new HttpCookie("Name"); cName.Value = txtName.Text; // Check if the checkbox remember me is checked if(cbRemember.Checked) { // Set the expiration time of the cookie // to 15 minutes from the current time cName.Expires = DateTime.Now + new TimeSpan(0,0,15,0); } // Add the cookie to the response cookies // collection to send it to the client's machine Response.Cookies.Add(cName); // Redirect the response to the message post page Response.Redirect("StepByStep3_8.aspx"); }Run the project. You should see that you have been redirected to
StepByStep3_8a.aspx. Enter a name, select the checkbox, and click the Submit button. You'll now seeStepByStep3_8.aspxwith a personalized greeting. Post a message. You should see that your name is now posted along with the title of the message, as shown in Figure 3.9.Close this browser window. Open another browser window and browse to
StepByStep3_8.aspx. Assuming that you checked the Remember Me check box in step 8, you should see the Weblog window personalized with your name.

Step by Step 3.8 demonstrates how cookies can be used to persist state across browser restarts. If you don't select the check box, cookies will just be stored in the primary memory and will be destroyed when the browser window is closed. The program also demonstrates how you can request the browser to set an expiration date and time for the cookie. Step by Step 3.8 sets the expiration time of the cookie to 15 minutes from the current time. You should note that this is just a request; browsers are free to override this with their own settings.
Hidden fields contain information that is not visible on the page but is posted to the server along with a page postback. All modern browsers support hidden fields on a Web page. However, hidden fields have some limitations as mentioned in the following list:
Although information stored in a hidden field is not visible on the page, it is still part of the page's HTML code and users can see the value of a hidden field by viewing the HTML source of the page. Hidden fields are therefore not a good choice for storing information that you would like to keep secure.
Hidden fields are part of the page HTML. If you store more information in hidden fields, it increases the size of the HTML page, making it slow for users to download.
Hidden fields only allow you to store a single value in a field. If you want to store structured values such as those in a customer record, you'll have to use several hidden fields.
ASP.NET provides an HTML server control, HtmlInputHidden, that maps to the <input type="hidden"> HTML element. Step by Step 3.9 demonstrates the use of hidden fields to maintain the number of posts on the Weblog page created in Step by Step 3.1.
STEP BY STEP
Procedure 3.9. 3.9 Using Hidden Fields to Maintain Client-Side State
Make a copy of the Web form
StepByStep3_1.aspxand change its name toStepByStep3_9.aspx. Open the ASPX file and the CS file and replace all occurrences ofStepByStep3_1withStepByStep3_9.Place a
Labelcontrol (lblPosts) and an HTML Hidden control (txtPosts) next to the Post button control on the form. Right-click on thetxtPostscontrol and set it to run as a server control. Set thevalueproperty of thetxtPostscontrol to 0.Switch to the code view and modify the
Clickevent handler of thebtnPostcontrol as follows:private void btnPost_Click(object sender, System.EventArgs e) { // Format the data entered by the user and // append it to the existing contents of lblWeblog lblWeblog.Text ="<b>" + ddlCategories.SelectedItem.Text + " :: " + txtTitle.Text + "</b> (" + DateTime.Now.ToString() + ")<hr>" + txtMessage.Text + "<p>" + lblWeblog.Text + "</p>"; // As one more post is added // Increment the value of the hidden control Int32 intPostCount = Int32.Parse(txtPosts.Value) + 1; txtPosts.Value = intPostCount.ToString(); lblPosts.Text = "Total Posts: (" + txtPosts.Value + ")"; }Set
StepByStep3_9.aspxas the start page in the project.Run the project. Make a few entries in the Weblog. You will see that with each entry in the Weblog, the total posts value is increased by 1, as shown in Figure 3.10.

Step by Step 3.9 shows a typical example in which the hidden fields can be used to maintain state information. Here, because a hidden field is an input control, its value is posted back to the Web server with each page postback. The hidden fields can be used to store page scope values between roundtrips. The HtmlInputHidden control is not available as a Web server control mainly because ASP.NET uses a similar, but more powerful, technique called view state.
View state is the mechanism that ASP.NET uses to maintain the state of controls across page postbacks. Just like hidden fields and cookies, you can also use view state to maintain state for non-control values in a page. However, it is important to note that the view state works only when a page is posted back to itself.
The following sections explain how view state works in various scenarios.
Some server controls, such as TextBox, CheckBox, and so on, post their values as part of the postback operation. These types of controls are also known as postback controls. For postback controls, ASP.NET retrieves their values one by one from the HTTP Request and copies them to the control values while creating the HTTP response. Traditionally, Web developers had to manually write this code for maintaining state for the postback controls, but now ASP.NET does this automatically.
View state does not require any additional storage either on the client side or on the server side for maintaining state for the postback controls.
In addition to the postback controls, the view state mechanism of ASP.NET also retains values for non-postback controls (that is, the controls that do not post their values as part of the postback operation, such as a Label control). You might wonder how ASP.NET manages to maintain values for a control even when the controls do not post their values. Actually, no magic is involved; ASP.NET extends the concept of hidden fields to accomplish this.
When ASP.NET executes a page, it collects the values of all non-postback controls that are modified in the code and formats them into a single, base64-encoded string. This string is then stored in a hidden field in a control named __VIEWSTATE, as in this example:
<input type="hidden" name="__VIEWSTATE" value=
"dDwtMTg3NjA4ODA2MDs7PoYLsizcOhkv2XeRfSJNPt12o1HP" />
The hidden input field is a postback control, so in the next postback of the page, the encoded string stored in the __VIEWSTATE field is also posted. At the Web server, ASP.NET decodes the view state string at page initialization and restores the controls values in the page.
Maintaining state using this technique does not require many server resources, but it definitely increases the size of the HTML file, which therefore increases the amount of time it takes to load the page.
The ViewState property of the Page class is a great place to store page-level values. View state will save these values just prior to rendering the page and will restore the values at the time of page initialization after the postback operation. This might sound like cookies or hidden fields, but a major improvement is that you are not just limited to storing simple values. You can use the ViewState to store any object as long as it is serializable.
A good practice is to expose a page-level value as a property that internally manipulates the ViewState of the page. For example,
protected int NumberOfPosts
{
    get
    {
        if(ViewState["NumberOfPosts"] == null)
        {
            return 0;
        }
        else
        {
            return Convert.ToInt32(
                ViewState["NumberOfPosts"]);
        }
    }
    set
    {
        ViewState["NumberOfPosts"] = value;
    }
}
I'll use this technique in Step by Step 3.10 to maintain the number of posts on the Weblog using the view state.
As you can see in Step by Step 3.10, view state is internally maintained as a hidden field. However, view state provides a higher degree of customizability and other security features that you'll see shortly.
By default, view state is enabled in an ASP.NET application. As you have observed in Step by Step 3.10, the size of information stored in view state can increase the size of HTML for a Web page. This is especially important when your application contains complex controls such as a DataList or DataGrid. To optimize a Web page's size, you might want to disable view state in the following cases:
When a page does not postback to itself
When there are no dynamically set control properties
When the dynamic properties are set with each request of the page
ASP.NET provides you complete flexibility to disable view state at various levels as mentioned in the following list:
At the level of a control—. If you populate the control's state on each request, you can disable view state at the control level by setting the
EnableViewStateproperty of the control tofalse:<asp:DataGrid EnableViewState="false" .../>
At the level of a page—. If the page doesn't post back to itself, you can disable view state at the page level by setting the
EnableViewStateattribute of thePagedirective tofalsein the ASPX page:<%@ Page EnableViewState="false" %>
At the level of an application—. If none of the pages in an application post back to themselves, you can disable view state at the application level by adding the following line to the
web.configfile:<Pages EnableViewState="false"/>
At the level of the machine—. In the unlikely case in which you want to disable view state for all applications running on a Web server, you can do so by adding the following statement to the
machine.configfile:
NOTE
ViewState Decoder. You can decode the contents stored in the __VIEWSTATE hidden input control using the ViewState Decoder utility written by Fritz Onion. You can download this utility from
To prevent malicious users from manipulating the view state, ASP.NET provides a way of knowing if somebody has modified the contents of the view state to fool your application. Using this technique, the view state is encoded using a hash code (using the SHA1 or MD5 algorithms) when it is sent to the browser. When the page is posted back, ASP.NET checks the encoded view state to verify that it has not been tampered with on the client. This type of check is called a machine authentication check (MAC). By default, ASP.NET has the following entry in its machine.config file:
<pages EnableViewStateMac="true" />
This enables tamper proofing for all applications running on a Web server. You can also manually enable or disable the tamper-proofing check at a page level by setting the EnableViewStateMac attribute of the Page directive to true or false in the ASPX page:
<%@ Page EnableViewStateMac="false"%>
NOTE
Secure Only When Needed. Running security algorithms puts additional overhead on your Web server and makes applications slower. Therefore, you should enable security for view state only when it is a must.
However, this scheme just makes the view state tamper proof. It does not restrict the users from determining the contents of the view state. Although the values are not directly visible as in the cases of query strings or hidden variables, determined users can readily decode the view state.
EXAM TIP
View State Security on a Web Farm. When securing the view state for applications running on a Web farm configuration, you must use the same validation key for all the machines on a Web farm. To do this, use a manually assigned key instead of the default autogenerated key with the <machineKey> setting in the machine.config file.
With only a few configuration changes, it's possible to instruct ASP.NET to encrypt the contents of view state using Triple DES symmetric algorithm (3DES), making it extremely difficult for the clients to decode the view state. This kind of encryption can be applied only at the machine level by specifying the following setting in the machine.config file:
<machineKey validation='3DES' />
Table 3.10 lists the advantages and disadvantages of the various client-side state management techniques. This table will help you make a quick decision about which client-side state management technique to choose in a given scenario.
Table 3.10. Comparing the Client-Side State Management Techniques
Technique | Advantage | Disadvantage |
|---|---|---|
QueryString | Requires no postback operation. | Most browsers limit the length of data that can include in a query string. No Security. No options for persistence. No support for storing structured values. |
Cookies | State can be persisted on user's computer. Requires no postback operation. | Some users disable cookies in their browsers. Size restriction by browser (~4 to 8KB). No support for storing structured values. No Security. |
Hidden fields | Can be used for pages that post to themselves or to other pages. | Increases HTML size. No support for storing structured values. No Security. No options for persistence. |
View State | Support for structured values. Involves less coding. | Increases HTML size. Works only when a page posts back to itself. No options for persistence. |
Unlike client-side techniques for state management, server-side techniques use server resources for storing and managing state. One of the advantages of using server-side techniques for state management is that the possibility of a user spoofing or reading the session data is eliminated, but there is a disadvantage, too: These techniques use server resources, raising scalability issues.
ASP.NET supports server-side state management at two levels—at the level of the Web application using the application state, and at the level of a user session using the session state.
An ASP.NET application creates a session for each user who sends a request to the application. ASP.NET distinctly identifies each of these sessions by sending a unique SessionID to the requesting browser. This SessionID is sent as a cookie or is embedded in the URL, depending on the application's configuration.
This mechanism of sending SessionID ensures that when the next request is sent to the server, the server can use the unique SessionID to distinctly identify the repeat visit of the user. Both user visits are considered to belong to the same session.
The capability of uniquely identifying and relating requests can be used by Web developers to store session-specific data. A common example is storing the shopping cart contents for the users as they browse through the store. This session-specific information is collectively known as the session state of a Web application.
The concepts of SessionID and session state are not unique to ASP.NET. ASP.NET's predecessor, ASP, also supported these features. However, session state in ASP was considered a flaw and many large sites wrote their own code for maintaining session state. ASP.NET comes with a new implementation of session state that removes all the old problems and provides several enhancements that are equally useful to small and very large Web sites. Table 3.11 compares these improvements.
Table 3.11. Managing the Session State
The ASP Way | The ASP.NET Way |
|---|---|
ASP maintains the state in the same process that hosts ASP. If the ASP process somehow fails, the session state is lost. | ASP.NET allows you to store session state out-of-process in a state service or database. |
|
Each ASP Web server maintains its own session state. This creates a problem in the Web farm scenario, where the user's requests can be dynamically routed to different servers in the Web farm. | Because ASP.NET can store its session state out-of-process, several computers in a Web farm can use a common computer as their session state server. |
ASP sessions do not work with browsers that don't support cookies or where the users have disabled cookies. | ASP.NET supports cookieless sessions by storing the SessionID in the URL itself by changing the application configuration. |
Moreover, session state in ASP.NET is configurable. Depending on the requirements of your Web application, you can change the way the session state is maintained in your application by just changing a few lines in an XML-based configuration file (web.config). You will learn about session state configuration in Chapter 15.
ASP.NET uses an instance of the HttpSessionState class to provide access to the session data for the user who originated the request. In an ASPX page, this object is accessible through the Session property of the Page class. This property provides access to the HttpSessionState object that stores the session state as a collection of key-value pairs, where the key is of string type while the value can be any type derived from System.Object. Tables 3.12 and 3.13 explain properties and methods of the HttpSessionState class, respectively.
Table 3.12. Properties of the HttpSessionState Class
Table 3.13. Methods of the HttpSessionState Class
Property | Description |
|---|---|
| |
| Adds a new object to the session state. |
| Removes all objects from the session state. |
| Copies the session state values to a single-dimensional array at the specified index. |
| Gets an enumerator of all session state values in the current session. |
|
| Removes an object from the session state. |
| Removes all the objects from the session state. Calls the |
| Removes an object from the session state at a particular index. |
Step by Step 3.11 demonstrates the use of session state by upgrading the cookie example that you used in Step by Step 3.8 to maintain the session state at the server side instead of maintaining state at the client side.
Step by Step 3.11 demonstrates that session state is not persistently stored like cookies. The default technique of passing SessionID is with non-persistent cookies, so this example only works if you are using a cookie-enabled browser. If you instead want to use a cookieless session, you'll have to modify the web.config file associated with this application to set the cookieless attribute to true in the <sessionState> element:
Application state is used to store data that is globally used throughout the application. The application state is stored in memory, and unlike the session state, application state can't be configured for storage on another server or a SQL database. This limits the usefulness of the application state for Web farm scenarios.
Application state can be easily accessed through the Application property of the Page class. This property provides access to the HttpApplicationState object that stores the application state as a collection of key-value pairs, where the key is a string type, and the value can be any type derived from System.Object. Tables 3.14 and 3.15 discuss properties and methods of the HttpApplicationState class, respectively.
Table 3.14. Properties of the HttpApplicationState Class
Table 3.15. Methods of the HttpApplicationState Class
Property | Description |
|---|---|
| |
| Removes all objects from the application state. |
| Gets an object from the application state by key name or index. |
| Gets a key from the application state by index. |
| Locks access to the application state object. This is used to prevent other clients from changing data stored in the application state. |
| Removes an object from the application state. |
| Removes all the objects from the application state. Calls the |
| Removes an object from the application state at a particular index. |
| Updates the value of an object stored in the application state. |
|
Step by Step 3.12 demonstrates the use of Application property to store the application-wide data.
STEP BY STEP
Procedure 3.12. 3.12 Using the Application State
Add a new Web form to the project. Name the Web form
StepByStep3_12.aspx. Change thepageLayoutproperty of theDOCUMENTelement toFlowLayout.Add a Label control (
lblInfo) to the Web form.Switch to code view and add the following code in the
Page_Load()event handler:private void Page_Load( object sender, System.EventArgs e) { // Lock the Application as the // application state value needs to be modified Application.Lock(); if(Application["HitCount"] != null) { // Increment the HitCount variable // stored in the application state Application["HitCount"] = (int) Application["HitCount"] + 1; } else { Application["HitCount"] = 1; } // Unlock the application as the changes are done Application.UnLock(); // Display the hit count of this page by // fetching the value from the HitCount key // in the application state lblInfo.Text = "This page has been accessed (" + Application["HitCount"].ToString() + ") times!"; }Set
StepByStep3_12.aspxas the start page in the project.Run the project. You should see that the page shows the number of times it has been accessed. Refresh the page, and you should see that the page access counter increments by 1 as shown in Figure 3.11.
Close this browser window. Open another browser window and browse to
StepByStep3_12.aspx. You should see that the page retains the value of the counter and increments it by 1.

Note that the technique used in Step by Step 3.12 is a volatile way to store the hit count (that is, users only see the total number of hits since the last time the application started). If you want the hit count to persist across application restarts, you should store the hit count periodically to a database.
In Step by Step 3.12, I modified the contents of application state using a pair of Application.Lock() and Application.UnLock() methods. Locking is important for keeping application state consistent when multiple users might want to modify the application object's content concurrently. While the application is locked, only the current user will be able to change the contents of the application state. This locking mechanism can severely reduce the scalability of a Web application; therefore, you should usually not store any updatable data in the application state.
NOTE
No Locking Needed for Application_Start() and Application_End(). There is no need to use the Application.Lock() and Application.Unlock() methods in the Application_Start() and Application_End() event handlers because these event handlers are only called just once during the lifetime of an application.
Later in this book in Chapter 15, you'll learn about an alternative way of maintaining global state for an application using the application data cache. In fact, the application data cache provides everything that application state offers and provides several other advanced features, such as cache expiration policy. I recommend using application state only when you are migrating ASP applications to ASP.NET and want to write minimal code. In all other cases and for all new ASP.NET applications, you should use the application data cache as your preferred choice for storing global data.
Implement navigation for the user interface.
A typical Web application is a collection of Web pages linked to each other. In Chapter 2, I discussed the HyperLink control that allows a user to navigate to a different Web page when the hyperlink is clicked. However, there is also a need to navigate to a Web page programmatically. ASP.NET provides the following methods for programmatically navigating between pages:
Response.Redirect()Server.Transfer()Server.Execute()
I'll discuss each of these methods in the following sections.
The Response.Redirect() method causes the browser to connect to the specified URL. When the Response.Redirect() method is called, it creates a response whose header contains a 302 (Object Moved) status code and the target URL. When the browser receives this response from the server, it uses the header information to generate another request to the specified URL. When using the Response.Redirect() method, the redirection happens at the client side and involves two roundtrips to the server.
Using the Response.Redirect() method is recommended in the following cases:
You want to connect to a resource on ANY Web server.
You want to connect to a non-ASPX resource (such as an HTML file).
You want to pass query string as part of the URL.
The Server.Transfer() method transfers the execution from the current ASPX page to the specified ASPX page. The path specified to the ASPX page must be on the same Web server and must not contain a query string.
When the Server.Transfer() method is called from an executing ASPX page, the current ASPX page terminates execution and control is transferred to another ASPX page. The new ASPX page still uses the response stream created by the prior ASPX page. When this transfer occurs, the URL in the browser still shows the original page because the redirection occurs on the server side and the browser remains unaware of the transfer.
When you want to transfer control to an ASPX page residing on the same Web server, you should use Server.Transfer() instead of Response.Redirect() because Server.Transfer() will avoid an unnecessary roundtrip and provide better performance and user experience.
The default use of the Server.Transfer() method passes the form data and the query string of the original page request to the page receiving the transfer. However, you can clear the form data and query string of the original page by passing a false value to the optional second argument. The second argument takes a Boolean value that indicates whether to preserve the form and query string collections.
When you set the second argument to true, you need to be aware of one thing: that the destination page contains the form and query string collections that were created by the original page. As a result, the hidden _VIEWSTATE field of the original page is also preserved in the form collection. The view state is page scoped and is valid for a particular page only. This causes the ASP.NET machine authentication check (MAC) to announce that the view state of the new page is tampered with. Therefore, when you choose to preserve the form and query string collections of the original page, you must set the EnableViewStateMac attribute of the Page directive to false for the destination page.
WARNING
Bad HTML Code. The output returned to the browser by Server.Execute() and Server.Transfer() might contain multiple <html> and <body> tags because the response stream remains the same while executing another ASPX page. Therefore, the output that results from calling these methods might contain bad HTML code.
The Server.Execute() method allows the current ASPX page to execute a specified ASPX page. The path to the specified ASPX page must be on the same Web server and must not contain a query string.
After the specified ASPX page is executed, control transfers back to the original page from which the Server.Execute() method was called. This technique of page navigation is analogous to making a method call to an ASPX page.
The called ASPX page has access to the form and query string collections of the calling page: Thus, for the reasons explained in the previous section, you need to set the EnableViewStateMac attribute of the Page directive to false on the called ASPX page.
By default, the output of the executed page is added to the current response stream. This method also has an overloaded version in which the output of the redirected page can be fetched in a TextWriter object instead of adding the output to the response stream. This helps you control where the output is placed on the original page.
STEP BY STEP
Procedure 3.13. 3.13 Using the Response.Redirect(), Server.Transfer(), and Server.Execute() Methods
Add a new Web form to the project. Name the Web form
StepByStep3_13.aspx. Change thepageLayoutproperty of theDOCUMENTelement toFlowLayout.Add three
Labelcontrols, aLiteralcontrol (litDynamic), twoTextBoxcontrols (txtRows,txtCells), and threeButtoncontrols (btnTransfer,btnExecute, andbtnRedirect) to the Web form, as shown in Figure 3.12.Add the following using directive to the form’s code:
using System.IO;Double-click the three
Buttoncontrols to add an event handler to theClickevent of each button. Add the following code in their event handlers:private void btnRedirect_Click(object sender, System.EventArgs e) { // Calling Response.Redirect by passing // Rows and Cells values as query strings Response.Redirect("StepByStep3_13a.aspx?Rows=" + txtRows.Text + "&Cells=" + txtCells.Text); } private void btnTransfer_Click(object sender, System.EventArgs e) { // Writing into Response stream Response.Write( "The following table is generated " + "by StepByStep3_13a.aspx page:"); // Calling the Server.Transfer method // with the second argument set to true // to preserve the form and query string data Server.Transfer("StepByStep3_13a.aspx", true); // Control does not come back here } private void btnExecute_Click(object sender, System.EventArgs e) { // Creating a StringWriter object StringWriter sw = new StringWriter(); // Calling the Server.Execute method by // passing a StringWriter object Server.Execute("StepByStep3_13a.aspx", sw); // Control comes back // Displaying the output in the StringWriter // object in a Literal control litDynamic.Text = sw.ToString(); }Add a new Web form to the project. Name the Web form
StepByStep3_13a.aspx. Change thepageLayoutproperty of theDOCUMENTelement toFlowLayout.Add a
Tablecontrol (tblDynamic) from the Web Forms tab of the Toolbox to the Web form.Switch to the HTML view of the
StepByStep3_13a.aspxfile and modify thePagedirective to add theEnableViewStateMac="false"attribute:<%@ Page language="c#" Codebehind="StepByStep3_13a.aspx.cs" AutoEventWireup="false" Inherits="_315C03.StepByStep3_13a" EnableViewStateMac="false" %>Switch to code view and add the following method in the class definition:
private void CreateTable(Int32 intRows, Int32 intCells)
{
    // Create a new table
    TableRow trRow;
    TableCell tcCell;

    // Iterate for the specified number of rows
    for (int intRow=1; intRow <= intRows; intRow ++)
    {
        // Create a row
        trRow = new TableRow();
        if(intRow % 2 == 0)
        {
            trRow.BackColor = Color.LightBlue;
        }
        // Iterate for the specified number of columns
        for (int intCell=1; intCell <= intCells;
             intCell++)
        {
            // Create a cell in the current row
            tcCell = new TableCell();
            tcCell.Text = "Cell (" + intRow  + ","
                + intCell + ")";
            trRow.Cells.Add(tcCell);
        }
        // Add the row to the table
        tblDynamic.Rows.Add(trRow);
    }
}
Add the following code in the
Page_Load()event handler:private void Page_Load( object sender, System.EventArgs e) { if(Request.Form["txtRows"] != null) { // If the request contains form data then the // page is called from the Server.Transfer or // Server.Execute methods from the // StepByStep3_13.aspx page. Get the Rows and // Cells values from the form collection and // Create a table. CreateTable( Int32.Parse(Request.Form["txtRows"]), Int32.Parse(Request.Form["txtCells"])); } else if(Request.QueryString["Rows"] != null) { // If the request contains query string data // that means the response is redirected from // the StepByStep3_14.aspx page. Get the Rows // and Cells value from the query string and // Create a table. Response.Write("StepByStep3_13a.aspx:"); CreateTable( Int32.Parse(Request.QueryString["Rows"]), Int32.Parse(Request.QueryString["Cells"])); } }Set
StepByStep3_13.aspxas the start page in the project.Run the project. Enter the number of rows and cells and click all three buttons one by one. When you click the Redirect button, the browser is redirected to
StepByStep3_13a.aspxby passing the Rows and Cells values as the query string data as shown in Figure 3.13. When you click the Transfer button, the browser doesn't change the page name in the location bar, but the control gets transferred to theStepByStep3_13a.aspxpage as shown in Figure 3.14. Finally, when you click the Execute button, theStepByStep3_13a.aspxpage is executed and control comes back to the calling page, where the output of theServer.Execute()method is displayed as shown in Figure 3.15.
Figure 3.13. The
Response.Redirect()method can be used to navigate to a URL that contains query strings.


In fact, it's a good idea to keep the second argument set to false when using the Server.Transfer() method. When you want to pass some values from one page to another in the current HTTP request, instead of using the form and query string collections, you should use the HttpContext object. The HttpContext object gives access to all the information about the current HTTP request. It exposes a key-value collection via the Items property in which you can add values that will be available for the life of the current request. The Page class contains a property called Context that provides access to the HttpContext object for the current request.
You can use two techniques to access the values of one page from another page in the current HTTP request using the HttpContext objects—HttpContext.Handler and HttpContext.Items. I have demonstrated these techniques in the Guided Practice Exercise 3.2 and in the Exercise 3.2, respectively.
In this chapter, you learned how to deal with the disconnected nature of Web applications using the state management techniques provided by ASP.NET. In addition to the traditional client-side state management techniques like query strings, cookies, and hidden variables, ASP.NET provides a new technique called view state. When used carefully, view state can give great benefits; however, careless use of view state can significantly increase the download size of the rendered HTML file.
You also learned about various server-side state management techniques. In particular, ASP.NET provides great improvements over the session state of ASP. Session state in ASP.NET is highly configurable. With small configuration changes, you can support Web farms and cookieless sessions.
I also discussed various ASP.NET intrinsic objects that can be accessed using the properties of the Page class, such as Request, Response, Session, Application, and Server. You experimented with several properties and methods of these objects throughout this chapter.
I also discussed the Response.Redirect(), Server.Transfer(), and Server.Execute() methods for implementing navigation from one page to another, as well as the advantages and limitations of each of these methods.
Online stores often use session state to maintain information about a user's shopping cart. This allows the site to keep track of users' selections as they explore the store rather than requiring the users to add all the items at the same time.
In this exercise, you'll use a similar technique to manage a shopping cart. To keep the emphasis on session state, you'll keep the catalog smaller than you'll generally find at most stores.
Estimated time: 20 minutes
Create a new Visual C# ASP.NET Web Application project at the location
http://localhost/315C03Exercises.Add a Web form to the project. Name it
ShoppingPage.aspx.Add three
Labelcontrols, threeTextboxcontrols (txtNK,txtCF, andtxtHA) and threeButtoncontrols (btnNK,btnCF, andbtnHA) in to the table on the Web form (see Figure 3.16).Switch to code view and add the following code to add selected items and their quantities to the session:
// Add the selected item to
// the session state
private void AddToSession(
    String strProduct, int intQty)
{
    if(Session[strProduct] != null)
    {
        // If the product already exists,
        // increase its quantity
        Session[strProduct] = (int)
          Session[strProduct] + intQty;
    }
    else
    {
        Session[strProduct] = intQty;
    }
}
Double-click the three button controls and add the following code to their Click event handlers:
private void btnNK_Click(
    object sender, System.EventArgs e)
{
    // Add the selected item
    // to the shopping cart
    AddToSession("NK", Int32.Parse(
        txtNK.Text));
    // Display shopping cart
    Server.Transfer("ShoppingCart.aspx");
}

private void btnCF_Click(
    object sender, System.EventArgs e)
{
    // Add the selected item
    // to the shopping cart
    AddToSession("CF",
        Int32.Parse(txtCF.Text));
    // Display shopping cart
    Server.Transfer("ShoppingCart.aspx");
}

private void btnHA_Click(
    object sender, System.EventArgs e)
{
    // Add the selected item
    // to the shopping cart
    AddToSession("HA",
        Int32.Parse(txtHA.Text));
    // Display shopping cart
    Server.Transfer("ShoppingCart.aspx");
}
Add a new Web form to the project. Name the Web form
ShoppingCart.aspx.Drag a Hyperlink control (
hlShopping) to the Web form. Set itsNavigateUrlproperty toShoppingPage.aspx.Switch to code view and add the following code in the
Page_Load()event handler:private void Page_Load( object sender, System.EventArgs e) { Response.Write( "The shopping cart contains" + " the following items: <br>"); // Display the contents of // the shopping cart for(int intI=0; intI < Session.Count; intI++) { switch (Session.Keys[intI]) { case "NK": Response.Write( "Nestle KitKat (" + Session[intI]+ ")" + "<br>"); break; case "CF": Response.Write( "Cadbury's Fingers (" + Session[intI]+ ")"+ "<br>"); break; case "HA": Response.Write( "Hersheys Almonds (" + Session[intI] + ")" + "<br>"); break; } } }Set
ShoppingPage.aspxas the start page in the project.Run the project. You'll see a shopping page as shown in Figure 3.16. Enter a quantity for a product and click on the Add to Cart button. You'll be taken to the shopping cart as shown in Figure 3.17. Add a few more items to the cart; you'll note that the shopping cart remembers your selections.
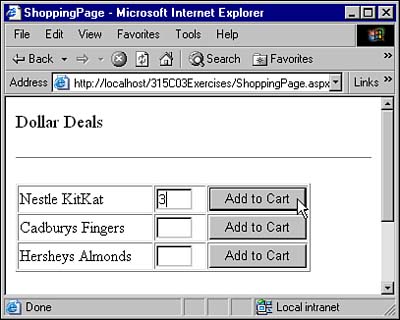

When creating a wizard-like user interface, you need to access the information entered in one page from another page in the wizard.
When you use the Server.Transfer() method to navigate from one page to another, both the pages share the same HTTP context. From the first page, you can add items to the HTTP context and then retrieve these items in the second page.
The HttpContext object gives access to all the information about the current HTTP request. It exposes a key-value collection via the Items property in which you can add values that will be available for the life of the current request.
In this exercise, I'll show you how to use the Items property of the HttpContext object to retrieve values from previous page of a wizard.
Estimated time: 20 minutes
Add a Web form to the project. Name it
Magazine1.aspx.Drag two
Labelcontrols, aTextBoxcontrol (txtCode), and aButtoncontrol (btnCode) on the Web form. (see Figure 3.18).Switch to the code view of the form. Add the following code in the class definition:
// Declaring Code property to expose
// the txtCode control's value
public String Code
{
    get
    {
        return txtCode.Text;
    }
}
Double-click the Next button control and add the following code in the
Clickevent handler:private void btnNext_Click( object sender, System.EventArgs e) { // Adding the Code to the Items // collection of the HttpContext // object for the current request Context.Items.Add("Code", txtCode.Text); // Calling the Server.Transfer method Server.Transfer("Magazine2.aspx"); }Add another Web form to the project. Name it
Magazine2.aspx.Drag three
Labelcontrols, twoTextBoxcontrols (txtNameandtxtAddress), and aButtoncontrol (btnFinish) to the Web form (see Figure 3.19).Add the following code in the
Page_Load()event handler:private void Page_Load( object sender, System.EventArgs e) { if(!IsPostBack) { // Fetch the Code value from the // HttpContext object of the // current request string strCode = Context.Items["Code"].ToString(); lblCode.Text = "Priority Code: " + strCode; } }Set
Magazine1.aspxas the start page of the project.Run the project. You will see the first page of the wizard as shown in Figure 3.18. Enter some text in the text box and click the Next button. You can see that the second page can retrieve the information entered in the first page of the wizard (see Figure 3.19).


B and D. The code for the initialization of controls should be placed inside the | |
A. When all users are using Internet Explorer versions 5.0 or later, you can set the | |
B. Options C and D do not work with each page request, so only options A and B are viable choices. Between these two choices, you should choose to write the code in the | |
A. When a user visits the site, the browser establishes a new session with the Web server. At that time, the | |
D. Because the variable is only required on a single page, you might not want to consume server resources by storing the values in session. You can instead use a client-side technique for state management, but cookies and hidden fields do not allow you to stored structured data. Therefore, the best option is to use view state. For more information, see the section “State Management” in this chapter. | |
D. Cookies can be easily accessed and used by malicious users. View state with encryption does provide a high level of encryption but is only available on the same page. In the application, you want the name and current balance to be displayed on all the pages, so the correct choice is session. Session data is stored at the server side and cannot be easily tampered with. For more information, see the section “State Management” in this chapter. | |
C. You want the information to be available across browser restarts. In this case, cookies are the right choice because they allow you to store a small amount of information on the user's computer. For more information, see the section “Client-Side Techniques for State Management” in this chapter. | |
A. When you use view state encryption in a Web farm, you must use the same validation key for all the Web servers. If the validation keys don't match, you will get an error when the user is directed to a different server in the Web farm. For more information, see the section “View State” in this chapter. | |
A, C, and E. If the pages don't postback to themselves, they are not making use of view state; in that case, it's a good idea to disable view state for the whole page. For all other pages, the controls that are not dynamically changed need not have their view state enabled. Also, the controls whose values are modified on every page load need not store their values in the view state. For more information, see the section “View State” in this chapter. | |
B. Setting the | |
B. You cannot use query strings with the | |
D. Only the | |
C. | |
B. You get an error while executing the | |
A and C. You should choose |