
In earlier versions of the Mac OS, the Finder was located in the application menu at the far-right edge of the menu bar. The Finder was the application responsible for displaying the contents of a drive or folder; when double-clicked, a window would open, displaying either an Icon or List View of the contents. Mac OS X’s Finder really isn’t that different from Mac OS 9’s Finder. It still displays the contents of drives and folders; however, the Finder is much more powerful, particularly in Jaguar.
The Finder serves as a graphical file manager, which offers three ways (or Views) to look at the files, folders, applications, and other filesystems mounted on your system. The Finder also sports a toolbar that allows you quick access to frequently used files and directories, along with a built-in Search field. More on the Finder toolbar and how to search for files later; for now, let’s look at the three Views available to the Finder: Icon, List, and the new Column View.
Note
You can quickly change the Finder’s viewpoint by using
-1 for Icon View,
-2 for List View, or
-3 for Column View.
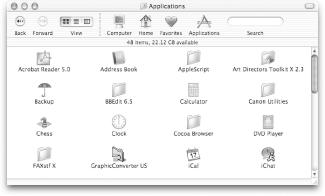
- Icon View
This shows the contents of a directory as either a file, folder, or application icon, as shown in Figure 2-2. Double-clicking on an icon will do one of three things: launch an application, open a file, or display the contents of a double-clicked folder in the Finder window.
Table 2-1 presents a list of keyboard shortcuts that can be used within the Finder’s Icon View.
- List View
A directory’s contents are displayed in a list, as shown in Figure 2-3. To display the contents of a folder, you can click on the disclosure triangle (the black triangle to the left of the folder), as illustrated in the figure.
Another way to navigate through the icons and folders in the Finder’s List View is by using the keyboard, as noted in Table 2-2.
Table 2-2. List View’s keyboard shortcuts
Key command
Description
Move down through the list of items.
Up Arrow
Move up through the list of items.
Right Arrow
Open a folder’s disclosure triangle to reveal its contents.
Left Arrow
Close a folder’s disclosure triangle to hide its contents.
Option-Right Arrow
Open a folder and any subfolders.
Option-Left Arrow
Close a folder and any subfolders.
To open all the folders in the View, select all the View’s contents (
-A) and use Option-Right Arrow (likewise, use Option-Left Arrow to close them again). To open all the folders in the View, including subfolders, add the Shift key (Shift-Option-Right Arrow to open, Shift-Option-Left Arrow to close).
- Column View
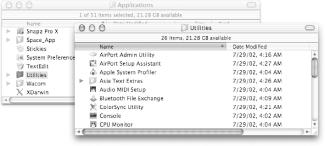
For NeXT users, the Column View will look familiar. Column View, shown in Figure 2-4, displays a directory’s contents in column form. This is similar to List View, except that when you click on an item, a new pane opens to the right and either exposes the contents of a folder or displays some information about a file, including its name, type, and file size.
Table 2-3 lists the keyboard shortcuts that can be used within the Finder’s Column View.

The Finder’s application menu has options for changing the Finder’s preferences (Finder → Preferences), and for emptying the trash (Finder → Empty Trash, or Shift-
-Delete).

Near the top of the Finder window is a toolbar (shown in Figure 2-5), which offers a quick way to access files and directories on your system and also to switch between the View modes mentioned earlier.
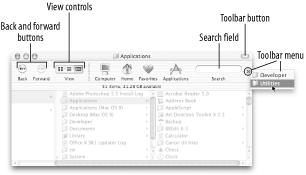
You can add a file, folder, or application to the Finder toolbar by dragging and dropping its icon to the toolbar. Application icons that get added to the toolbar will launch with a single click, just as they do in the Dock.
Located at the upper-right corner of the Finder window is a clear, elliptical button that can be used to hide the Finder’s toolbar, as shown in Figure 2-6.
If you are in Icon or List View with the toolbar hidden, the Finder window performs just like Mac OS 9’s Finder windows. Double-clicking on a folder icon will open a new window for that folder, displaying its contents. Column View will function normally.
As seen in Figure 2-5, the Finder’s toolbar sports a Search field. This is a new feature, added for Mac OS X 10.2 (Jaguar), replacing Sherlock’s old system search functionality.
To search
for a file on your system, simply type a word in the Search field and
hit Return. The search begins from the location selected in the
Finder window and traverses through the filesystem from that point.
For example, if you are in your home directory (e.g.,
~/chuck) the search looks inside all your user
directories.
Search results are displayed in a split Finder window, as shown in Figure 2-7. Note that the titlebar for the Search Results window also displays the item you searched for and the directory from which the search was conducted.
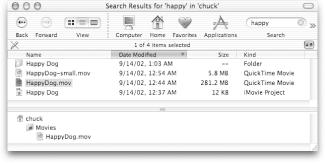
Clicking on one of the items in the search results in the upper pane displays its path in the lower pane. Double-clicking a folder opens that location in the Finder window; double-clicking an application icon launches the application; and double-clicking a file opens the file in the appropriate application (and launches that application, too, if it isn’t already active).
You can also do a more advanced search by clicking on the “Search” text label below the search field. This opens up the Find window (shown in Figure 2-8), which is also the same Find window you’ll see if you select File → Find (
-F).

Clicking on the Search button will open a window, revealing the search results.
The following are some tips for working with the Finder:
- Hide the Finder toolbar?
-B).
Click on the transparent button in the upper-right corner of the titlebar.
- Customize the Finder toolbar?
Finder → View → Customize Toolbar.
Shift-click the toolbar button.
Control-click within the toolbar and select Customize Toolbar from the context menu.
Shift-clicking on the toolbar button again closes the Customize Toolbar window and returns you to the previous Finder View.
- Only show the icons or text labels of items in the toolbar?
View → Customize Toolbar → Show; select Icons Only or Text Only from the pull-down menu.
- Speed up Finder searches?
Open the Finder’s preferences panel (Finder → Preferences). Click on the Select button at the bottom of the window; this pops open a window that lets you select the languages to use when searching a files’ contents. The fewer languages you select here, the faster your search.
- Locate a specific folder in the Finder?
-G).