
Digital Kirlian Photography
Shoot “auras” without film.
Kirlian photography records a high-voltage corona discharge around objects. Some people call this discharge an “aura” and attribute metaphysical and paranormal factors to its varying parameters. Originally, Kirlian photography was a contact print process that used film. This article illustrates another method of shooting Kirlian photographs, using a digital camera.
The technique can be traced back to the late 1700s, when Georg Christoph Lichtenberg first created “electro-photographs” in dust using static electricity and sparks. Nikola Tesla photographed corona discharges using his famous Tesla coil in the 1880s and in the early 1900s. Others followed, and in 1939, the Russian husband-wife research team, Semyon and Valentina Kirlian, began their 30-year investigation into electro-photography techniques.
In 1970, the landmark fringe book, Psychic Discoveries Behind the Iron Curtain by Sheila Ostrander and Lynn Schroeder, popularized the Kirlians’ work in the English-speaking world, and electro-photography has been known as Kirlian photography ever since.
Many claims have been made regarding Kirlian images, but most phenomena have conventional explanations. For example, changes in the “aura” of an honest individual who is lying result from the same stress-related increase in galvanic skin resistance that a polygraph lie detector measures. Changes in skin resistance can also be caused by illness, fatigue, drug or alcohol consumption, and other factors, which make these conditions observable using Kirlian photography with no paranormal “bio-plasma” explanation required. The Kirlians themselves believed that their photography could diagnose illnesses before noticeable symptoms manifested, an idea that generated interest, but was never verified by scientific investigation.
One famous Kirlian phenomenon, the “phantom leaf,” cannot be explained by known physical laws — but it may be a fake. The experiment is easy to perform: you take a Kirlian photograph of a leaf after cutting off a small portion. Phantom leaf photos from Soviet-era proponents showed the removed portion of the leaf appearing as a ghostly apparition, suggesting an ethereal “bio-plasma body” persisting where the physical leaf no longer existed. Many researchers and experimenters have been unable to replicate this effect (myself included) although it is easy to fake with a simple double exposure: take a short exposure of the entire leaf, then cut off a piece and continue the exposure.
Although I have never observed any paranormal phenomena with Kirlian photography, I like Kirlian photographs, which are unique and often beautiful. I also like exploring, so I’ve continued to look for the phantom leaf effect over the years, taking sporadic excursions back into Kirlian photography when I think of new twists to incorporate. If the phantom leaf effect exists and someone finds an exact combination of voltage, frequency, pressure, ambient humidity, exposure time, and other experimental parameters that can reproduce it consistently, it will be the starting point of a new paradigm.
FILM AND DIGITAL TECHNIQUES
The process for traditional, film-based Kirlian photography is simple. In complete darkness, place sheet film on top of a metal plate, and then an object to photograph on top of the film. If the object is inanimate, ground it. Then apply high voltage to the plate momentarily. The corona discharge between the object and high voltage plate is recorded onto the film as a contact print. Develop, and you have a Kirlian photograph of the object.
To shoot Kirlian photographs with a digital camera requires a slightly different technique that uses a transparent discharge plate instead of a metal plate. This discharge plate has a coating of tin oxide on one side that is so thin it is visually transparent, but still electrically conductive.
Place the object on one side of the plate and the camera on the other. As with the film process, connect the object to an earth ground if it’s inanimate.
With all the room lights turned off, open the camera’s shutter and apply high-voltage power to the transparent discharge plate. The camera captures the corona discharge between the object and the transparent plate.
With film Kirlians, the electrical discharge has to travel through the film’s 3 primary color dye layers and activate the silver crystals in each layer at different depths; whereas with digital, it all happens at one level on the plate. This makes Kirlian photographs with film more colorful around the edges, but less accurate than digital Kirlians.
![]() DANGER: HIGH VOLTAGE!
DANGER: HIGH VOLTAGE!
Do not attempt this project without expert assistance unless you are an adult experienced in working with extremely high-voltage power sources. This project is intended only for very experienced adults. Severe injury, death, or property damage may result from failure to use adequate safety gear and precautions.
KIRLIAN PHOTOGRAPHY WITH A DIGITAL CAMERA

Photography by John Iovine
MATERIALS
Digital camera with manual focus and a shutter capable of multi-second exposure times. It also helps to have a macro lens setting for close-ups.
High-voltage power supply You can use a Tesla coil, induction coil circuit, high-voltage flyback transformer circuit, or any other source that puts out 5,000+ volts, between 1-5 milliamps, at any frequency (or DC). Variable frequency lets you experiment. The PG13 supply I sell is great for this; see makezine.com/go/highvoltage.
Transparent discharge plate You can buy one of these, or make one out of conductive glass (tin oxide coated), clear plastic, thin copper plate, silver epoxy, and some HV wire. For sources and instructions, see makezine.com/09/kirlian.
Stand or tripod or another way of holding the camera still
Black paper or foamcore
High-voltage wire, Teflon-coated or other, sufficient for your HV power supply
READY, STEADY, SHOOT
Long exposures are required to capture the corona discharge, so you will need to keep your camera still and the object steady. I use a camera copy stand that holds my camera pointing downward, and I set up the object and plate horizontally underneath it. Once you have a steady arrangement, here’s the procedure.

Illustrations by Damien Scogin
1. A black background works best, so put down a piece of black paper or foamcore (must be nonconductive) on your work surface. If you’re shooting an inanimate object such as a leaf or coin, you need to ground it. To do this, cut a small hole in the center of the black background, and attach a length of HV wire to an earth ground (a pipe will work). Then strip the other end of the wire, run it through the hole in the background, and place the object on top, making sure it has contact with the wire. You can also use a small grounded copper plate under the background instead of a wire, so long as the object you are shooting makes contact with the plate through the hole.
2. Attach the high voltage lead from the HV power source to the discharge plate’s electrode, and place the plate on top of the object.
3. Position your camera to frame the object, and focus it manually. If you can set the camera’s f-stop, open the aperture (reduce the f-stop) as much as possible. You will usually shoot a flat object, which doesn’t require much depth of field. Set the shutter speed to 15 seconds or more.
4. Turn off all room lights. Turn on the high-voltage, and adjust its frequency to provide the brightest discharge. Hit the camera’s shutter, and keep the power going for the full duration of the exposure.
5. Evaluate your picture, adjust, and reshoot. Raise the f-stop and reduce the exposure time if the image is washed out; do the reverse if it’s too dim.
SHOOTING PEOPLE
Sooner or later you are going to want to shoot people. The best place to start is with a person’s fingertip. To avoid electric shock, make sure that the subject doesn’t touch ground. They also need to hold still, of course, and they shouldn’t put too much skin surface in contact with the discharge plate. Touching an entire hand to the discharge plate can dissipate the corona discharge so much that it won’t photograph, even with a long exposure.

![]() WARNING: When shooting people, make sure the subject doesn’t touch ground.
WARNING: When shooting people, make sure the subject doesn’t touch ground.
DIGITAL MANIPULATION
My digital camera has a maximum exposure time of 16 seconds, during which the image accumulates some digital noise — mostly gray, red, and yellow pixels of various shades sprinkled throughout the resulting photograph. I remove this in Adobe Photoshop as follows:
1. Starting with the base image of the leaf, select Image » Adjust » Brightness/Contrast, and increase the contrast.

2. Zoom picture to 500% so you can clearly see the background pixel noise. Using the Magic Wand (set to 30 tolerance), click on a noise pixel. Then go to Select » Similar. Now all the pixels with that color in the photograph will be selected.
3. Set the foreground color to black and hit the Delete key to turn all the selected noise pixels black. Repeat this process by selecting and deleting various other noise pixels, but don’t select any noise pixel that has a similar shade to the main image you are trying to enhance.
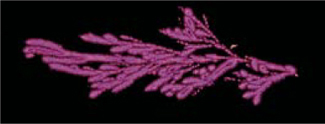
Kirlian photographs are mostly blue-violet with a little white. This is because the corona discharge in nitrogen (air is 78% nitrogen) generates light in the blue-to-ultraviolet range. You can use Image » Adjust » Color Balance in Photoshop to change your image’s color for some beautiful effects.

GOING FURTHER
Using digital cameras to capture Kirlian photographs is relatively new. Because it’s a low-light process, we can borrow techniques from the astronomers who use digital cameras, as well as astronomy software such as AstroStack (astrostack.com), which stacks multiple images of the same object to create a brighter, more detailed image.
Shooting Kirlian photographs in atmospheres with other mixes of inert gases, such as helium, neon, and carbon dioxide, will create corona discharges in different colors. Just make sure the gases are inert.
To learn more about Kirlian photography using film, refer to my book, Kirlian Photography: A Hands-On Guide (Images Publishing, 2000).
John Iovine is a science and electronics tinkerer who has published a few books and articles and owns and operates Images SI Inc. (imagesco.com). He lives in Staten Island, N.Y.
Film-Based Kirlians
The light you see during a Kirlian discharge comes from an electric field ionizing the air and parts of your Kirlian subject. The charged air gives off intense heat and ultraviolet radiation as well as visible light. Photographic emulsions interact with all of these, plus the electrostatic field itself, while digital sensors mainly just capture visible light. As a result, traditional film-based Kirlian images require shorter exposure times than digital methods, and can show the lightningfast discharge arcs in greater detail.
For example, my Kirlian photograph of the quarter on this issue’s cover took only a ¼-second exposure. With faster photo papers and films it might take even less. In addition to improving detail, such short exposures also decrease the chances of vaporizing or burning your subject. And when photographing a human being, short exposure times are less painful!
Open-film Kirlian requires a fully darkened room, tens of thousands of volts, and expensive sheet film. All of this can be daunting and, well, dangerous — or at least expensive. But you can start out and get wonderful results using black and white photo paper instead of film, and working under a darkroom safelight or red LED flashlight to help you steer clear of the power supply. Later, you can graduate to a color image, and the digital method is also worth a try! —Jasper Nance


Photograph by Jasper Nance