
PINHOLE PANORAMIC CAMERA

Photograph by Sam Murphy
PIN-O-RAMA
Lensless and low-tech, pinhole cameras have always been maker-friendly. But forget the Quaker Oats carton, and go wide with this roll-film, panorama design.
I bought a new scanner recently, and soon found myself spelunking through drawers of old photos from my many misspent years in photography. Some of the most interesting shots were the pinhole camera experiments I had done as a teenager. With ghostly outlines from multi-minute exposures, and shapes warped into boomerangs by curved film, these otherworldly images got me dreaming about pinhole cameras again.
So I headed to the workshop to build a new one. And then another, and another. I eventually made more than a dozen, and this “Pin-o-rama” design is my favorite. Unlike simpler pinholes, it uses standard 120mm roll film, which means you don’t have to open the camera and reload after each exposure, and you don’t need a darkroom to process the results — just take the rolls to a photo lab. Also, it’s built entirely from scratch, rather than hijacking the film-transport from an existing camera.
Set up: p.95 Make it: p.96 Use it: p.101
THE HOLE PICTURE
A pinhole camera is a light-tight box with a piece of film (or photo paper) on one side and a tiny hole in the other. An image forms because each point on the film can only “see” the one patch of the outside world that’s lined up with the pinhole, whether it’s light, dark, blue, red, etc. Because the pinhole does not focus light like a lens, the film can be any shape and a flexible distance from the hole, and the enclosure can be made from any lightproof material.
With construction so forgiving, pinhole tinkerers have produced a riot of camera creations, from mint tins to airplane hangars — even animal skulls and hollowed-out vegetables. Pinholes are the most hackable camera type ever devised.

Illustration by Nik Schulz
PROPER PINHOLE SIZE

TOO LARGE: The pinhole’s image comes from overlapping pinhole-sized blobs of light. A large pinhole loses all detail smaller than its own diameter.

TOO SMALL: With a too-small pinhole, light diffraction smears the image. A smaller hole also decreases brightness, requiring longer exposures.

JUST RIGHT: Calculating proper pinhole size has absorbed much scholarly brainpower. For cameras with typical focal lengths, it’s 0.2mm to 0.5mm.
SET UP.

Photography by Ross Orr
MATERIALS
[A] Scrap piece of ½" MDO plywood at least 6" square. Medium density overlay (MDO) has a smooth finish that looks nice.
[B] ½"×¾" pine strips (2) about 6" long each
[C] Aluminum sheet 0.010.02" thick (e.g. roof flashing), about 1’ square
[D] Tinsnips
[E] Sewing needle
[F] Utility knife
[G] Jigsaw or scroll saw or band saw
[H] Drill and assorted bits
[I] Drawing compass
[J] English and metric ruler or calipers
[K] Flat black spray paint
[L] Roll of 120mm film and cheap, expired film rolls for testing (2) or one old roll and a spool
[M] Light meter or camera with a built-in meter (optional)
[N] Slide projector or slide scanner
[O] Tuna can or other source of springy steel
[P] Black silicone sealant
[Q] Pop rivet tool and pop rivets (rivets not pictured)
[R] Ball-peen hammer
[S] ⅜" threaded eye bolt (or thumbscrew) with matching nuts (2) and washers (2)
[T] #10×1" bolt with assorted matching nuts and washers
[U] ¼" #20 nut
[NOT SHOWN] Epoxy or wood glue
Scrap piece of ¼" plywood at least 9" square
5/16" fender washer
¾" round-head wood screws (4) and 1½" roundhead wood screws (4)
Cereal box cardboard
Staples or tacks
Electrical tape
320-grit sandpaper
Carpenter’s square
Hacksaw
Metal file
Screwdriver any type
Block of scrap wood
MAKE IT.

BUILD YOUR PINHOLE PANORAMA CAMERA
START ≫ |
Time: A Day or Two Complexity: Medium |
1. MAKE THE BODY AND WINDER
1a. Draw a paper template for the top and bottom pieces. We’re going to cut 2 identical D-shaped pieces of plywood; the curved side is a 105° chord of a circle with radius 65mm (about 2.56"), which continues along tangent flat planes to form 2 corners that extend ¼" past the circle’s center. Download the template I used at makezine.com/09/pinhole.

1b. Use a jigsaw or band saw to cut the ½" plywood into 2 D-shaped pieces, following your template.
1c. Clamp the 2 Ds together, and sand until the cut perimeters are smooth and matching.

1d. Use the template to mark the spool centers on the top piece. Drill a ⅜" hole for the film take-up spool, which will be on the left as you face the camera’s curved back. Drill a 3/13" hole for the supply spool on the right. In the center of the bottom piece, on the underside, drill a ½" hole partway through.
1e. Epoxy a ¼" #20 nut into the partial hole in the bottom piece, to make the camera’s tripod mount.

1f. Fit the ⅜" eye bolt through the top piece with nuts and washers on each side, then measure the distance that the nut opposite the winder eyelet will stick into the camera. Find a combination of washers and nuts that fits onto the #10 bolt (for the supply reel) and matches this height.

1g. Cut both bolt ends so each protrudes ⅛" beyond the nut face. Get an empty 120mm film spool from a friendly camera lab, or untape one from a cheap, expired roll of 120mm film; this will be our take-up spool. File the ends of each bolt flat on 2 sides, so that they engage the slot of the spool.

1h. Use thread-locking compound or mash the bolt’s threads slightly to keep the nuts in place, so that the bolt assembly spins easily through the wood without loosening or tightening.
1i. Calculate the inside height of the camera by measuring the spool height and adding twice the height of the nut stacks; using this dimension will center the film vertically. Cut a scrap block of wood down to this dimension.
1j. Calculate the outside height by adding 1" (twice the plywood thickness) to the inside height, and cut 2 side rails to this length from the ½"×¾" wood. Clamp the top and bottom pieces around the scrap block, and glue on the side rails after making sure that all 4 pieces fit together evenly and are perfectly square.
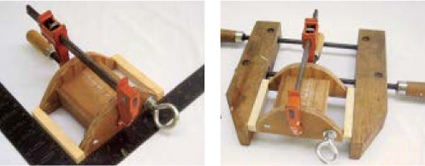
1k. After the glue has set, cut a 1"×5" strip of springy steel — I used the sidewall of a tuna-fish can. Drill ⅛" holes that exactly match the spacing of the bolts on the top, and then attach pop rivets through these holes. The rivet nubs will catch the bottoms of the film spools.
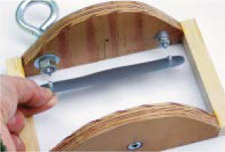
1l. Cut a small wooden block the same thickness as the nut stacks, and staple or tack the spring to it, centered. My block was ⅜"×1"×1½". Apply glue to the block and position it on the floor of the camera. Load the film and take-up spools between the spring nubs and the bolts, and slide the spring block around until the film spools are exactly vertical. Clamp, and let the glue set.

2. MAKE THE FILM GATE
2a. Cut aluminum flashing to the height of the camera body, and 8" wide. Draw a 2¼"×4¾" rectangle in the center. At each corner, draw lines that parallel the top and bottom edges, ½" in (to match the plywood thickness), and extending to the same longitudes as the sides of the rectangle. Measure the camera’s curved plywood edge, and symmetrically mark the corners of the aluminum where the edge overlaps this distance. For example, my camera back measured 7¾" around, so I marked in ⅛" from each side.

2b. Use tinsnips to cut along the 4 lines that extend in from the sides, and then cut the excess-overlap corners off of each piece, as marked. Then score the center rectangle lines with a sharp utility knife, and flex along the score lines to snap through the aluminum.
2c. Fold the 2 center flaps inward from each side, using a screwdriver shaft as a brake to form smooth, 90-degree bends. Sand any rough edges, especially around the opening in the center.
2d. Fit the gate around the back of the camera. Cut notches in the flaps so that they clear the spring strip, and carefully curl them around so they fit around the film spools.
2e. Spread a thin bead of black silicone sealant along the plywood edges, position the film gate onto the back, and tape it into position until it cures.
2f. Wrap your test film in position around the back of the gate (if it isn’t centered, add or remove washers on the film-winder bolts). Mark the edges of the film on the gate.
2g. Cut 2 straight strips of cardboard from a cereal box, to use as guide rails for the film. Glue them in place along your marks on the gate with a thin layer of silicone. The film should easily slide between these guides with a little wiggle room.

3. MAKE THE PINHOLE
3a. Cut several 17/8" squares of sheet metal; we’ll put a pinhole in each of these, and load them into a 35mm slide projector or slide scanner later to choose the best ones.
3b. For each square, use a ball-peen hammer to tap a small bump into the center of the metal.
3c. Thin the bump with #320 sandpaper. Stop sanding when light pressure with a needle telegraphs a tiny dent through the other side.

3d. Back the bump against a phone book, and lightly press the needle until a hole shows through. Sand away any raised burr, blow through the hole to remove gunk, and check the diameter.
3e. Use a slide scanner or projector to check each hole’s diameter and roundness. For our camera’s 65mm focal length, we want a pinhole diameter of 0.33mm, plus or minus 20%. Focal length divided by hole diameter yields the equivalent f-stop, and we’re aiming for about f/200.

With a scanner: Set the scanner to its highest resolution, scan the hole, and read its size by setting your image software’s units to millimeters.
With a projector: Set the projector up so that a full 35mm slide image measures 52"×35". Load the pinhole into the projector, and look for the light spot to measure about ½" in diameter.
4. MAKE THE FRONT AND SHUTTER
With long exposure times, pinhole shutters can be very low-tech — a piece of black gaffer’s tape will work fine but I like this simple “cigar cutter” design. The lip that’s formed by the inner and outer panel edges deflects any light that leaks through the sides, making it disappear before it gets a direct line to the film.
4a. Cut 2 rectangles of ¼" plywood, one to the camera front’s inside dimensions and one to its outside dimensions. Mine measured about 4"×5¾" and 3½"×5¼".
4b. Drill a 7/8" diameter hole in the exact center of the smaller (inner) piece, and cut a 1"×1½" rectangle in the center of the larger (outer) piece. If you want to use a simple piece of tape as a shutter, glue these pieces together and skip ahead to step 4e.
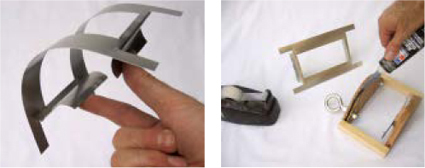
4c. Use paper and a thumbtack to make templates for a pivoting shutter and the chamber it moves within. The pivot point will sit at the right edge of the front panel (if you’re right-handed). pinhole by about 2"; this will be the shutter’s inside edge. The chamber should limit the shutter’s travel so that its hole swings between fully visible to fully tucked away. When you have shapes that work, cut the shutter out of aluminum flashing and the chamber out of cardboard.

4d. Glue the cardboard chamber to the outer panel, thumbtack the metal shutter into place at the pivot point, and position the small panel in back. Test the shutter to make sure the alignment works.

4e. Disassemble the pieces, and spray-paint black both sides of the inner panel, and the back sides of the shutter and outer panel. Reattach the shutter and glue everything back together.
4f. Center the pinhole behind the rear opening and tape it in place. Hold the panel against the camera, point the pinhole toward some light, and sight along the edges of the film gate to check for any obstructions. The plywood shouldn’t block any light from reaching the corners of the film.
4g. Drill clearance and pilot holes, and use two ¾" wood screws to attach the front panel to the side rails, in place.

5. MAKE THE BACK
5a. Cut a piece of flashing to match the height and width of the camera back, bending ½" flanges for the side rails. Drill a ½"-diameter peep sight for the frame counter, offset 1¼" left of center. Put a small square of black tape over this hole; you’ll keep it there to cover the hole whenever you aren’t winding the film.
5b. Spray-paint black the inside of the back piece you just cut, and the interior of the camera itself. But don’t paint the wooden side rails, which you’ll be gluing, or the gate where it touches the film. Mask these areas with tape before spraying.

5c. Glue down the back with a sparing amount of silicone, to avoid squeezeout into the film path. Tack and clamp the side flanges to the wood rails, and hold the back against the D’s with tape until the silicone cures.
5d. That’s it! Your camera is now ready to use.

NOTE: The finished camera shown above includes an optional viewfinder. To see the step-by-step process for making the viewfinder, please go to makezine.com/09/pinhole.
FINISH X
NOW GO USE IT »
USE IT.
JOIN THE PINHOLE PAPARAZZI
120MM FILM
Once you remove 120mm film from its foil pouch, the only thing that keeps ambient light from exposing it is the backing paper at each end of the roll, and the fact that it’s wrapped so tightly around the spool. So be careful, and don’t reload in the sun.
Choose 100- or 200-speed negative film. Anything faster makes sunny-day exposures too brief to time accurately. I recommend Fuji’s Superia color and Acros black-and-white films.
LOADING THE CAMERA
When the roll is done, you don’t rewind; instead, wind it all onto the take-up spool. The original inner spool becomes the take-up for your next roll.
1. Unscrew the front of the camera, unspool a few inches of backing paper, and use your (moistened) fingertips to fish the paper through the film gate.
2. Tape the paper onto the take-up spool, wind it one turn, and then close up the camera.
3. Wind until the “1” shows in the peep sight. You’re on a roll, and ready to shoot! (After each winding, stick the black tape back down over the hole.)
TAKING PHOTOS
With the viewfinder, you will need to move your eye around to see all the edges of the frame.
After every shot, wind to the next odd number, so you don’t accidentally double-expose. This yields 6 double-width panoramas per roll.
With 100-speed film, try 2-second exposures in sun, or 10 seconds in bright shade. At this slow shutter speed and camera height, you’ll need a tripod to keep your images sharp. In a pinch, resting the camera on a flat surface will work, too, but be careful not to jiggle the camera while exposing the film. For other light conditions, use a light meter or another camera to get exposure times. Your Pino-rama has an f-stop of about f/200. Few light meters give readings for f-stops this high, but you can take the shutter speed indicated for f/16 and multiply the time by 150. Don’t hesitate to double or triple the calculated time. Negative films are tolerant of overexposure. To time exposures without looking away from the subject, hold a watch to your ear and count ticks.

FINISHING A ROLL
After exposing shot #11 (the sixth and final shot), keep winding until the paper backing disappears from the peep sight. Open the camera in dim light, and use the adhesive band to tape the roll tight. (If you find the take-up reel has wound too loosely, add more spring pressure on the supply spool.)
Any lab or camera shop that caters to professionals can develop your 120mm negatives for about $5. The 6×12 format is nonstandard, so they should develop the negatives only, and return them uncut. Then you can scan them yourself with a flatbed film scanner. The generous negative size means that even a budget scanner will do a decent job — resolution is a non-issue given the softness of pinhole images. (Darkroom prints are possible too, using a 4×5 format enlarger.)
For pinhole photography resources and additional information go to makezine.com/09/pinhole.
PIN-O-RAMA PHOTO GALLERY
The Pin-o-rama camera design was a brainwave from early 2006. Since then, I’ve loved exploring how it transforms familiar scenes from my hometown into fresh and surprising images.

Big Boy The limitless depth of field of a pinhole lets you move as close as you want to your subject, while leaving distant details sharp — making all kinds of playful juxtapositions possible. The Pin-o-rama’s curved perspective, so obvious when manmade straight lines are in the frame, is much less noticeable when they’re absent. With this camera’s wide, cinematic framing, I like compositions where the subject is strongly off-center.

Cafe Scene This one is a sentimental favorite from my first test roll with the Pin-o-rama prototype. During the 9-minute exposure, people got up and sat down, unaware that the strange object resting on my table was taking a photograph. The clock’s minute hand also has blurred into nothingness. At the time, I had no idea what this camera’s images would look like, but after pulling the film out of my developing tank, I was delighted.

PINHOLE PORTFOLIOS
![]() See more of Ross Orr’s pinhole photographs at flickr.com/photos/vox/tags/pinorama
See more of Ross Orr’s pinhole photographs at flickr.com/photos/vox/tags/pinorama
![]() Homemade Pinhole Flickr Group: flickr.com/groups/homemadepinhole
Homemade Pinhole Flickr Group: flickr.com/groups/homemadepinhole


Liberty Plaza Tree Lights I started this 15-minute exposure just as daylight was fading from the sky — slightly self-conscious about loitering in a darkened park with my unidentifiable apparatus. I was surprised that on the negative, it’s quite noticeable that the pinpoints of light shatter into tiny ripples, from the diffraction of light waves passing through the pinhole. In the background, the taillights of cars creeping by in stop-and-go traffic add their own sparkle to the scene.
Liberty Block Darting into the street between passing cars, I set down my tripod to make this exposure of a nice old commercial block in downtown Ann Arbor, Mich. The couple waiting at the crosswalk stood motionless enough during the 3-second exposure to register on film, but another shopper walking through the scene dematerialized completely. The glint off the window was pure serendipity; pinhole photography seems to invite fun surprises and accidents.
Peaches Pinhole photos can evoke mysterious, even somber moods. But I enjoy working against that stereotype, seeking out subjects that are vibrant and colorful. Strong crossing light can provide extra punch and contrast. I also sometimes use Photoshop’s Unsharp Mask filter in an unconventional way: with a very large radius and the amount set to about 12%, to lift the “fog” from pinhole images and regain the brilliance of the original scene.
Yellow Bakery Vertical I’ve always enjoyed how the afternoon sun lights up this brightly painted neighborhood bakery. This was shot using a Kodak pro film 3 years past its expiration date; any minor color shifts are easily corrected when scanning. Historically, the biggest users of 120 film were wedding photographers and other professionals. But these shooters migrated to digital so abruptly that camera stores often have excess out-ofdate rolls for sale, at half price or lower.