Chapter 10. Objects
Object-oriented programming (OOP) is a different way to think about your programs. Although the term “object-oriented programming” may sound intimidating, there’s good news: you’ve been working with objects since Chapter 7, when you started using PImage, PFont, String, and PShape. Unlike the primitive data types boolean, int, and float, which can store only one value, an object can store many. But that’s only a part of the story. Objects are also a way to group variables with related functions. Because you already know how to work with variables and functions, objects simply combine what you’ve already learned into a more understandable package.
Objects are important, because they break up ideas into smaller building blocks. This mirrors the natural world where, for instance, organs are made of tissue, tissue is made of cells, and so on. Similarly, as your code becomes more complicated, you must think in terms of smaller structures that form more complicated ones. It’s easier to write and maintain smaller, understandable pieces of code that work together than it is to write one large piece of code that does everything at once.
Fields and Methods
A software object is a collection of related variables and functions. In the context of objects, a variable is called a field (or instance variable) and a function is called a method. Fields and methods work just like the variables and functions covered in earlier chapters, but we’ll use the new terms to emphasize that they are a part of an object. To say it another way, an object combines related data (fields) with related actions and behaviors (methods). The idea is to group together related data with related methods that act on that data.
For instance, to model a radio, think about what parameters can be adjusted and the actions that can affect those parameters:
- Fields
volume,frequency,band(FM, AM),power(on, off)- Methods
setVolume,setFrequency,setBand
Modeling a simple mechanical device is easy compared to modeling an organism like an ant or a person. It’s not possible to reduce such complex organisms to a few fields and methods, but it is possible to model enough to create an interesting simulation. The Sims video game is a clear example. This game is played by managing the daily activities of simulated people. The characters have enough personality to make a playable, addictive game, but no more. In fact, they have only five personality attributes: neat, outgoing, active, playful, and nice. With the knowledge that it’s possible to make a highly simplified model of complex organisms, we could start programming an ant with only a few fields and methods:
- Fields
type(worker, soldier),weight,length- Methods
walk,pinch,releasePheromones,eat
If you made a list of an ant’s fields and methods, you might choose to focus on different aspects of the ant to model. There’s no right way to make a model, as long as you make it appropriate for the purpose of your program’s goals.
Define a Class
Before you can create an object, you must define a class. A class is the specification for an object. Using an architectural analogy, a class is like a blueprint for a house, and the object is like the house itself. Each house made from the blueprint can have variations, and the blueprint is only the specification, not a built structure. For example, one house can be blue and the other red; one house might come with a fireplace and the other without. Likewise with objects, the class defines the data types and behaviors, but each object (house) made from a single class (blueprint) has variables (color, fireplace) that are set to different values. To use a more technical term, each object is an instance of a class and each instance has its own set of fields and methods.
Before you write a class, we recommend a little planning. Think about what fields and methods your class should have. Do a little brainstorming to imagine all the possible options and then prioritize and make your best guess about what will work. You’ll make changes during the programming process, but it’s important to have a good start.
For your fields, select clear names and decide the data type for each. The fields inside a class can be any type of data. A class can simultaneously hold many images, boolean, float, and String values, and so on. Keep in mind that one reason to make a class is to group together related data elements. For your methods, select clear names and decide the return values (if any). The methods are used to change the values of the fields and to perform actions based on the fields’ values.
For our first class, we’ll convert Example 8-9 from earlier in the book. We start by making a list of the fields from the example:
floatxfloatyintdiameterfloatspeed
The next step is to figure out what methods might be useful for the class. In looking at the draw() function from the example we’re adapting, we see two primary components. The position of the shape is updated and drawn to the screen. Let’s create two methods for our class, one for each task:
voidmove()voiddisplay()
Neither of these methods return a value, so they both have the return type void. When we next write the class based on the lists of fields and methods, we’ll follow four steps:
-
Create the block.
-
Add the fields.
-
Write a constructor (explained shortly) to assign values to the fields.
-
Add the methods.
First, we create a block:
classJitterBug{}
Notice that the keyword class is lowercase and the name JitterBug is uppercase. Naming the class with an uppercase letter isn’t required, but it is a convention (that we strongly encourage) used to denote that it’s a class. (The keyword class, however, must be lowercase because it’s a rule of the programming language.)
Second, we add the fields. When we do this, we have to decide which fields will have their values assigned through a constructor, a special method used for that purpose. As a rule of thumb, field values that you want to be different for each object are passed in through the constructor, and the other field values can be defined when they are declared. For the JitterBug class, we’ve decided that the values for x, y, and diameter will be passed in. So the fields are declared as follows:
classJitterBug{floatx;floaty;intdiameter;floatspeed=0.5;}
Third, we add the constructor. The constructor always has the same name as the class. The purpose of the constructor is to assign the initial values to the fields when an object (an instance of the class) is created (Figure 10-1). The code inside the constructor block is run once when the object is first created. As discussed earlier, we’re passing in three parameters to the constructor when the object is initialized. Each of the values passed in is assigned to a temporary variable that exists only while the code inside the constructor is run. To clarify this, we’ve added the name temp to each of these variables, but they can be named with any terms that you prefer. They are used only to assign the values to the fields that are a part of the class. Also note that the constructor never returns a value and therefore doesn’t have void or another data type before it. After adding the constructor, the class looks like this:
classJitterBug{floatx;floaty;intdiameter;floatspeed=0.5;JitterBug(floattempX,floattempY,inttempDiameter){x=tempX;y=tempY;diameter=tempDiameter;}}
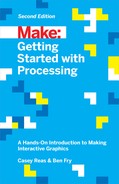
The last step is to add the methods. This part is straightforward; it’s just like writing functions, but here they are contained within the class. Also, note the code spacing. Every line within the class is indented a few spaces to show that it’s inside the block. Within the constructor and the methods, the code is spaced again to clearly show the hierarchy:
classJitterBug{floatx;floaty;intdiameter;floatspeed=2.5;JitterBug(floattempX,floattempY,inttempDiameter){x=tempX;y=tempY;diameter=tempDiameter;}voidmove(){x+=random(-speed,speed);y+=random(-speed,speed);}voiddisplay(){ellipse(x,y,diameter,diameter);}}

Figure 10-1. Passing values into the constructor to set the values for an object’s fields
Create Objects
Now that you have defined a class, to use it in a program you must define an object from that class. There are two steps to create an object:
-
Declare the object variable.
-
Create (initialize) the object with the keyword
new.
Example 10-1: Make an Object
To make your first object, we’ll start by showing how this works within a Processing sketch and then continue by explaining each part in depth:

JitterBugbug;// Declare objectvoidsetup(){size(480,120);// Create object and pass in parametersbug=newJitterBug(width/2,height/2,20);}voiddraw(){bug.move();bug.display();}classJitterBug{floatx;floaty;intdiameter;floatspeed=2.5;JitterBug(floattempX,floattempY,inttempDiameter){x=tempX;y=tempY;diameter=tempDiameter;}voidmove(){x+=random(-speed,speed);y+=random(-speed,speed);}voiddisplay(){ellipse(x,y,diameter,diameter);}}
Each class is a data type and each object is a variable. We declare object variables in a similar way to variables from primitive data types like boolean, int, and float. The object is declared by stating the data type followed by a name for the variable:
JitterBugbug;
The second step is to initialize the object with the keyword new. It makes space for the object in memory and creates the fields. The name of the constructor is written to the right of the new keyword, followed by the parameters into the constructor, if any:
JitterBugbug=newJitterBug(200.0,250.0,30);
The three numbers within the parentheses are the parameters that are passed into the JitterBug class constructor. The number of these parameters and their data types must match those of the constructor.
Example 10-2: Make Multiple Objects
In Example 10-1, we see something else new: the period (dot) that’s used to access the object’s methods inside of draw(). The dot operator is used to join the name of the object with its fields and methods. This becomes clearer in this example, where two objects are made from the same class. The jit.move() function refers to the move() method that belongs to the object named jit, and bug.move() refers to the move() method that belongs to the object named bug:

JitterBugjit;JitterBugbug;voidsetup(){size(480,120);jit=newJitterBug(width*0.33,height/2,50);bug=newJitterBug(width*0.66,height/2,10);}voiddraw(){jit.move();jit.display();bug.move();bug.display();}classJitterBug{floatx;floaty;intdiameter;floatspeed=2.5;JitterBug(floattempX,floattempY,inttempDiameter){x=tempX;y=tempY;diameter=tempDiameter;}voidmove(){x+=random(-speed,speed);y+=random(-speed,speed);}voiddisplay(){ellipse(x,y,diameter,diameter);}}
Tabs
Now that the class exists as its own module of code, any changes will modify the objects made from it. For instance, you could add a field to the JitterBug class that controls the color, or another that determines its size. These values can be passed in using the constructor or assigned using additional methods, such as setColor() or setSize(). And because it’s a self-contained unit, you can also use the JitterBug class in another sketch.
Now is a good time to learn about the tab feature of the Processing Development Environment (Figure 10-2). Tabs allow you to spread your code across more than one file. This makes longer code easier to edit and more manageable in general. A new tab is usually created for each class, which reinforces the modularity of working with classes and makes the code easy to find.
To create a new tab, click the arrow at the righthand side of the tab bar. When you select New Tab from the menu, you will be prompted to name the tab within the message window. Using this technique, modify this example’s code to try to make a new tab for the JitterBug class.
Note
Each tab shows up as a separate .pde file within the sketch’s folder.
Figure 10-2. Code can be split into different tabs to make it easier to manage
Robot 8: Objects

A software object combines methods (functions) and fields (variables) into one unit. The Robot class in this example defines all of the robot objects that will be created from it. Each Robot object has its own set of fields to store a position and the illustration that will draw to the screen. Each has methods to update the position and display the illustration.
The parameters for bot1 and bot2 in setup() define the x and y coordinates and the .svg file that will be used to depict the robot. The tempX and tempY parameters are passed into the constructor and assigned to the xpos and ypos fields. The svgName parameter is used to load the related illustration. The objects (bot1 and bot2) draw at their own location and with a different illustration because they each have unique values passed into the objects through their constructors:
Robotbot1;Robotbot2;voidsetup(){size(720,480);bot1=newRobot("robot1.svg",90,80);bot2=newRobot("robot2.svg",440,30);}voiddraw(){background(0,153,204);// Update and display first robotbot1.update();bot1.display();// Update and display second robotbot2.update();bot2.display();}classRobot{floatxpos;floatypos;floatangle;PShapebotShape;floatyoffset=0.0;// Set initial values in constructorRobot(StringsvgName,floattempX,floattempY){botShape=loadShape(svgName);xpos=tempX;ypos=tempY;angle=random(0,TWO_PI);}// Update the fieldsvoidupdate(){angle+=0.05;yoffset=sin(angle)*20;}// Draw the robot to the screenvoiddisplay(){shape(botShape,xpos,ypos+yoffset);}}