
Photography by Brad Graham
Granny’s Nightmare Chopper Bike
Chop an old ladies’ bicycle into something evil.
You know what irritates me? I drive out to the dump, pay my five bucks to get in, and the only bikes laying around are those goofy granny bikes from the late 1970s. OK — enough whining — a real chopper artist can chop any bike, even a crusty old codger cruiser.
Here’s how I hacked and welded a granny bike into something evil. Normally, I wouldn’t even bother with a bike like this because it has a lugged frame. This means that the head tube and bottom bracket are just press-fit and brazed into place, rather than welded. You can’t salvage lugged joints for most projects because they have holes where the tubing fits together, and brazing filler metal interferes with arc welding. But this project was doable as long as I kept most of the frame intact.
MATERIALS
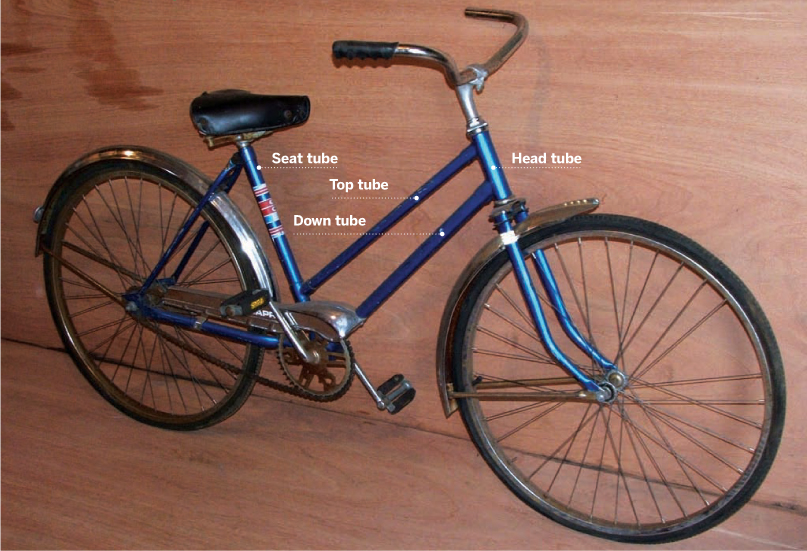
GRANNY STYLE: The more I looked at this bike, the more I thought it could make a sweet ride. Check out all that chrome, and that long, spindly frame.
Donor bike This one is a ladies’ single-speed, Canada Cycle and Motor Co., circa 1970s.
Basic AC welder with 6013 rod
Angle grinder with cut-off disc
1"-diameter thin steel conduit (8’) cut into 2 equal lengths
Matching nuts and bolts (2)
Small pieces of scrap metal
New chain wheel
Tires (2)
Paint
MAKE IT.
THE FORK
First take your donor bike completely apart. Even though my donor was older than time itself, it came apart easily. The chrome parts had only slight surface rust, which I cleaned with steel wool.
I didn’t want to change the bike so much that it lost all of its original look — the idea was to make it radical, yet show its roots. The main modification was turning the original fork into a long, chopper-style “triple tree” tubular fork. Since this was the focus of the conversion, I worked on the fork first and then made frame adjustments to match.
Fortunately, bikes from the good old days were made out of heavy, mild steel and were built to last, which makes them easier to weld to than the whippersnappers manufactured today from very thin steel or aluminum.
Using an angle grinder with a cut-off disc, amputate both legs off the original fork, right at the crown (Figure A, following page). Then cut off the dropouts, keeping them even to ensure wheel alignment, and leave some extra tube above to weld them to the new fork legs. I saved the original fork legs; with those nice curves, I knew they would add some class to the frame later.
For the new fork, start with two 4’-long, 1"-diameter, thin-walled, steel conduit tubes. The tubes must be exactly the same length, and 4’ is plenty. Much longer, and the frame would need radical manipulation in order to prevent the “instant wheelie” effect while riding over bumps.
I used the original fork crown as the base of the triple tree and welded the 2 pipes onto either side. To make a strong weld, grind semi-circular indentations into the crown where the tubes will fit in (Figure B).
Once both sides of the crown are ground out, lay the unit on a flat surface and tack-weld the new legs into place so that you can realign them later (Figure C).

Fig. A: Legs and dropouts cut from the original fork.

Fig. B: Grinding out too much of the crown would make the fork legs too close together for a front wheel, and would invite major warping in the pipe while welding.

Fig. C: New fork legs tack-welded in place on either side of the original fork crown.
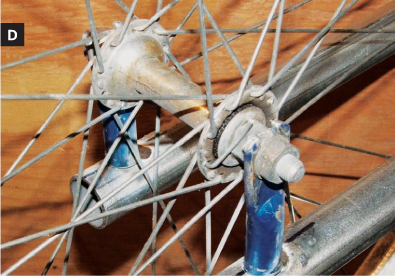
Fig. D: Welding the dropouts to the fork legs.
Next, bolt the dropouts back onto the front wheel, making sure they’re perfectly parallel. If the flat parts are not in line with the tubes, straighten them with a pair of pliers.
With your new fork laying on a flat surface next to the upright front wheel, position the dropouts so they hang down and touch the ends of the fork legs. Tack-weld the dropouts in place, then check alignment by looking at the assembly from all angles, especially lengthwise. Correct any misalignments with a small hammer, and then complete all the welds, starting with the dropouts. Keep checking the alignment as you weld.
THE FRAME
With both wheels attached (Figure D), insert the new fork back into the frame and look at the geometry. Most likely, the bike will lean back and the bottom bracket will be very high, creating a “skyscraper” style chopper. Although the bike would be rideable in this configuration, I decided to mod the frame in order to lower the bottom bracket. Since I planned to remove the top tube and convert it from a women’s frame anyway, this wasn’t a big deal.
Using the cutting wheel, cut the top tube from the frame at the thick part of the lugs at both ends. Cutting it flush with the head and seat tubes would make a mess, and you can use the thicker part of the lugs to your advantage later.
The down tube needs to be bent upward to keep the bike from leaning too far backward when you add those long forks. The amount is up to you. If you like a tall chopper, try bending the tube upward 10 or 20 degrees. If you want that low-and-lean look, you could bend the tube farther, but be careful of how close the pedals may come to the ground. When in doubt, lay all your parts down to get a visual plan in your mind before you make a radical adjustment.
To adjust the down tube, slice a thin, pie-shaped wedge out of the top of the tube and bend it up to fill the gap (Figure E). If you make your cuts even on both sides, then the tube will bend up easily in perfect alignment with the rest of the frame. After bending the tube up, weld the gap closed. After welding, the down tube will actually be stronger than it was originally.
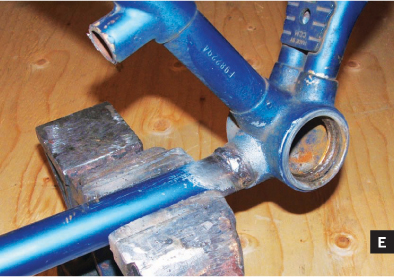
Fig. E: The frame with the top tube cut off and the down tube sliced, bent upward, and welded closed.
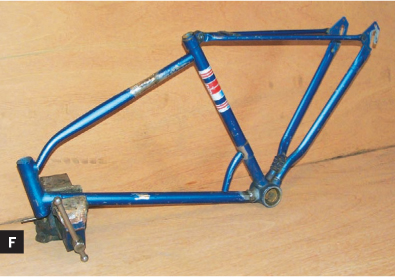
Fig. F: The new frame — all forked up!

Fig. G: Cutting the gusset pattern. A jigsaw is better for tight curves, but this method works faster and makes good use of a worn cut-off wheel.
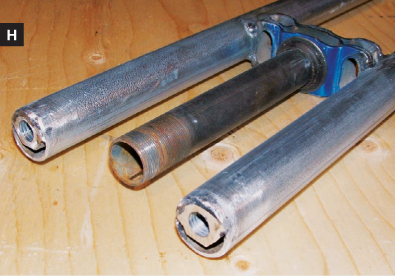
Fig. H: Nuts welded into the fork legs.
I thought it would be cool to use the original bike’s fork legs to make a nice, curved top tube, converting the frame from granny style to a diamond shape. The fork tubing is actually round tubing that’s been squished into an oblong shape, so I un-squished the fork pieces in a vise and then welded the wide ends together end-to-end to make the new top tube. To attach it to the frame, cut off the original head tube lug and weld it to the small, curved end of the new top tube. Weld the other end high up on the seat tube.
I had a bit of one fork left over, which I used to fill in the ugly gap from the leftover lug at the bottom of the seat tube. This little curve echoed the curve on the top tube, giving the frame a stylish look (Figure F) that formed the basis for the gas-tank-style gusset I added next. I had an old cardboard box containing bicycle safety brochures, which I promptly dumped into the recycling so I could salvage the box. I cut a cool-looking gusset out of the cardboard, and then traced the shape onto some scrap sheet steel. After cutting the shape out using a worn-out cut-off disc on the angle grinder (Figure G), I welded it onto the frame at the joint between the top and head tubes.
THE FORK CAP
The modded frame puts the bottom bracket about 6" lower than it was before, which works well. But don’t sit on the bike yet, dude! Without the top of the triple tree, the forks can’t take much weight.
To make the fork cap, weld two ½" nuts into the ends of each leg. Weld both nuts flush with the ends of the pipe and center them as much as you can (Figure H). Then bolt each leg to a small, oblong metal plate, which connects to the gooseneck that holds the handlebars. Cut the plates from each end of a 1½"-wide, perforated bar bracket, and grind them concave to fit against the gooseneck. Bolt the 2 plates in place, insert the gooseneck into the stem tube, and weld the plates to the gooseneck. To ensure alignment, start with a few tack welds and then check it all, being careful not to hit the fork threads with the welding rod. The 2 plates should align as if they are one single plate (Figure I).

Fig. I: Plates welded to the gooseneck. This design lets you keep the handlebars original, rather than clamping them to a single top plate somehow.
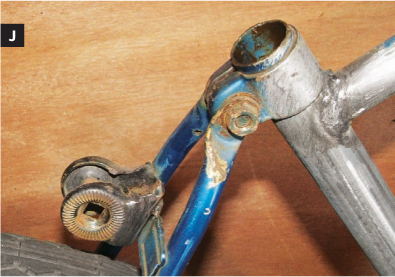
Fig. J: Seat clamp welded above the rear wheel.

Fig. K: Seat installed in its new position.
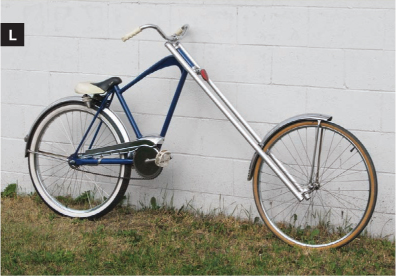
Fig. L: Dude, this isn’t your Granny’s bike anymore!
THE SEAT
With the stem tube reassembled into the head tube, the frame was finished and ready to take the weight of a rider. But following the theme, I wanted new seating that came from the original granny bike, but was butchered into something evil. So I took the original seat out of its normal position and re-mounted it behind the seat tube, putting it as close to the rear wheel as possible. To accomplish this silly feat, I welded the seat clamp to the cross-brace over the rear wheel (Figure J). The nose of the seat covered up the original seat post hole (Figure K), and this looked really good — almost planned!
WHERE IS MY BIKE, YOUNG MAN?
It was time for the first test crash. I rode around the block a few times making sure everything was good, then stripped the bike right back down and painted it the original deep blue color. I buffed up the chrome parts with some steel wool, put the bike back together (Figure L), and damn it dog, it sure looked cool! To add more wackiness to the bike, I reversed the front fender. I also replaced the front chain ring with a huge chrome unit from an exercise bike. But other than that, the fork tubes, and some fresh tires, the whole deal was made from the original granny bike. It really worked out nicely.
The bike rode well, did not rattle, and felt pretty comfortable, considering where the seat was placed. The moral of this story: when you find something in the dumpster, don’t think, “Hey, look at that scrap.” Instead think, “Dude, this thing will make a sick chop!”
Brad Graham has been creating unique home-built bikes since the 1980s. He hosts atomiczombie.com, which showcases custom bicycles, including his 2003 World Record SkyCycle.