
Chapter 5. Build processes
- Adding Groovy to Ant builds
- Using Maven with Groovy
- Groovy Grapes and @Grab
- The future: Gradle
Building source code is almost always a pain point in development organizations. An ideal build process is automated end-to-end, including compilation, running tests, generating reports, and producing any required artifacts. The process needs to be fast enough that it can be done frequently, especially given modern agile approaches, and yet flexible enough to adapt to the exigencies of individual teams.
In the Java world two primary approaches to automated builds have emerged over time. Both are open source projects from Apache. The first is Ant (http://ant.apache.org), which uses a library of tasks configured in XML backed by Java classes. The other is Maven (http://maven.apache.org), which offers a rich array of options and promises to make the entire process simple, but uses a highly opinionated API that requires a degree of mastery to use effectively.
To start I want to address the goals of any build process, and then see how the various tools attempt to meet them.
5.1. The build challenge
A software build combines several features that individually seem like they ought to be easy but in practice become complicated. To build your code you must
- Download any necessary dependencies.
- Compile the source code with the dependencies properly resolved, handling any cross-language issues that may arise.
- Run the unit, integration, and/or functional tests.
- Produce the desired artifacts, whatever they may be.
Optionally, other tasks might include checking code out of source code control, generating documentation, and even deploying the results into production.
Some companies still do their builds inside integrated development environments (IDEs). Although this is not in itself a bad thing, it often leads to long-term problems. Sooner or later such companies wind up with a special computer that no one is allowed to touch, even though the original owner left or transferred to another division long ago, because it’s the only system where the build still works.
Current thinking is that the source code control system should manage all aspects of a build, from the required scripts to the JAR dependencies. That way you can always be sure the build is correct and self-sufficient, which avoids the whole “at least it works on my machine” problem.
In fact, the recent trend in development processes is toward continuous delivery, where a single command performs the whole sequence from build to deployment in one motion.[1]
1 See Jez Humble and Dave Farley’s book Continuous Delivery (Addison Wesley, 2010) for details. (Available through its companion website, http://continuousdelivery.com/.)
There are two primary build tools in the Java world: Ant and Maven. Ant is older and is gradually being replaced, but it is still common in the industry and is the foundation of everything that came afterward. Maven is used extensively in the Java industry but tends to trigger strong feelings in developers.
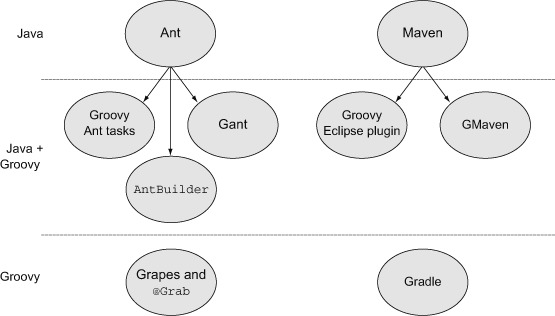
A guide to the technologies covered in this chapter is shown in figure 5.1. I’ll start with the Apache Ant project in the next section.
Figure 5.1. Guide to technologies in this chapter. Java approaches are based on Ant or Maven. Groovy supplies Ant tasks for compilation and executing scripts. Gant is used by Grails but will eventually be replaced by Gradle. The AntBuilder class is useful and built into Gradle. There are two separate plugins available for Maven builds. Groovy Grapes make it easy to deliver code (normally scripts) to a client without compiling it first. Ultimately, though, the future belongs to Gradle.
5.2. The Java approach, part 1: Ant
Apache Ant is a Java-based build tool, based on the older “make” technology but without many of its difficulties. The name Ant represents either “another neat tool” or a tool that lifts far more than its own weight, depending on whom you ask. Ant build files are written in XML, so they are inherently cross-platform, and because Java classes implement the XML tasks, a single API suffices for all operating systems.
That’s the good news. The (somewhat) bad news is that Ant is an extremely low-level API, so many build files consist of lots of twisty little tasks, all alike.[2]
2 Yes, an Adventure (or Zork) reference. I just mean they’re small, they’re many, and they’re easy to get lost in.
Let me start with a “Hello, World” example in the next listing, based on a sample from the Ant tutorial provided by Apache at the Ant website.
Listing 5.1. build.xml: A simple Ant build file for a “Hello, World” Java application
<project name="HelloWorld" basedir="." default="main">

    <property name="src.dir"     value="src"/>
    <property name="build.dir"   value="build"/>
    <property name="classes.dir" value="${build.dir}/classes"/>
    <property name="jar.dir"     value="${build.dir}/jar"/>
    <property name="main-class"  value="mjg.HelloWorld"/>

    <target name="clean">
        <delete dir="${build.dir}"/>
    </target>

    <target name="compile">
        <mkdir dir="${classes.dir}"/>
        <javac srcdir="${src.dir}" destdir="${classes.dir}"
            includeantruntime="false"/>
    </target>

    <target name="jar" depends="compile">
        <mkdir dir="${jar.dir}"/>
        <jar destfile="${jar.dir}/${ant.project.name}.jar"

            basedir="${classes.dir}">
            <manifest>
                <attribute name="Main-Class" value="${main-class}"/>
            </manifest>
        </jar>
    </target>

    <target name="run" depends="jar">
        <java jar="${jar.dir}/${ant.project.name}.jar" fork="true"/>
    </target>

    <target name="clean-build" depends="clean,jar"/>

    <target name="main" depends="clean,run"/>

</project>
By default, this file is called build.xml and resides in the root directory of the project. The root element of the project file is called <project>, which is given a name, a base directory, and the name of a default task to run if none is supplied on the command line.
At the top of the file a series of properties are set, including the locations of various directories. Note that one property can refer to another by using the ${...} syntax.
A series of <task> elements (clean, compile, jar, run, clean-compile, and main) are defined to represent individual actions during the build process. Some tasks depend on others, which is expressed using the depends attribute of the <task> element.
All the defined tasks ultimately delegate to a library of predefined Ant tasks. Here those tasks include file-based tasks like mkdir and delete, and Java-related tasks like javac, jar, and java.
Executing this build without arguments means typing ant at the command line, which will execute the default main task. Because main depends on clean and run it will execute those tasks first, which will execute their own individual dependencies, and so on. The result looks like the following listing.
Listing 5.2. Execution of the default task in the “Hello, World” Ant build
Buildfile: /.../build.xml
clean:
   [delete] Deleting directory /.../build
compile:
    [mkdir] Created dir: /.../build/classes
    [javac] Compiling 1 source file to /.../build/classes
jar:
    [mkdir] Created dir: /.../build/jar
      [jar] Building jar: /.../build/jar/HelloWorld.jar
run:
     [java] Hello, World!
main:
BUILD SUCCESSFUL
Total time: 1 second
Each task outputs its own name, followed by the included built-in Ant tasks indented underneath. The build completed successfully, though that can be misleading. The BUILD SUCCESSFUL statement at the end means that Ant finished all the tasks. The individual tasks may or may not have worked.
The tasks chosen here are typical, but there is no standard. Each organization (and even each developer) is free to choose their own. Reusing tasks between different builds also requires an import statement (or copy-and-paste reuse), plus some effort to make sure the tasks are not tied to a particular project structure.
Again, the benefit here is that this is all completely portable. The Ant build should work just as well on Mac OS X as it does on Windows or Linux. The downside is that this is a trivial Hello World application and the build file is already over 35 lines long. Once you add in the junit and junitreport tasks, to say nothing of customizing the classpath with third-party libraries, the size of this file will grow quickly. A more extensive build file, including the JUnit 4 libraries and a test case, can be found in the chapter source code.
Rather than do that here, however, let me show you how to introduce Groovy into this system.
5.3. Making Ant Groovy
Ant is not as common in Java builds as it used to be, but switching build tools is a major decision for most organizations and not to be undertaken lightly. If you’re working with a large installed base of Ant builds, then Groovy can still contribute.
Four approaches are available:
- Groovy scripting code can be added directly to an Ant build file.
- Groovy scripts and classes can be compiled and executed in Ant builds using special Ant tasks for that purpose.
- The Groovy standard library contains a special class called groovy.util.AntBuilder that can replace the XML build file with Groovy scripting code that does the same thing.
- There’s a Groovy DSL available, called Gant, which provides an alternative to AntBuilder.
AntBuilder
Even if you don’t use Ant, the AntBuilder class is worth knowing about because it’s embedded in other build tools, like Gant and Gradle.
The following subsections will tackle each of these Groovy and Ant topics in turn.
5.3.1. The <groovy> Ant task
Ant has two hooks that allow you to add Groovy to a standard build file. The <groovy> and <groovyc> tasks use the Groovy libraries to execute Groovy scripts and compile Groovy source files, respectively.
Starting first with <groovy>, defining the associated task in an Ant build lets you write Groovy code directly into the build file. The following listing shows a trivial example.
Listing 5.3. A trivial Ant build that executes Groovy code in a task
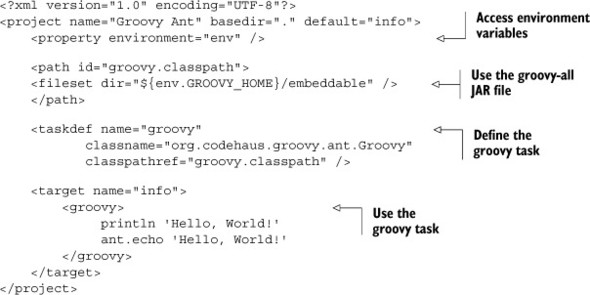
The environment property allows the build to access system properties in the operating system. Here the env variable is used to access the current value of GROOVY_HOME, the installation directory for Groovy. The <path> element assigns the groovy-all JAR file (found in the embeddable directory) to the groovy.classpath ID.
The <taskdef> element then defines the groovy task as a reference to the org.codehaus.groovy.ant.Groovy class, which is resolved in the groovy-all JAR file. Once the groovy task has been defined it can be used to execute arbitrary Groovy code. A straight print of “Hello, World!” is executed, and then the Ant echo task is also called.
It’s therefore easy enough to add Groovy code to an existing Ant build file, which can be useful if looping or conditional logic is needed in the build. It’s notoriously difficult to “program” in XML, and technologies that tend that direction (like Ant and XSLT) often result in awkward, complex build files. Adding Groovy scripting code might help the build file without modifying the underlying source code.
5.3.2. The <groovyc> Ant task
Say you follow the advice in this book and decide to add Groovy modules to your implementation code. If you’re still going to build with Ant you’ll need a compilation task, similar to <javac>, for Groovy. That task is <groovyc>.
The basic <groovyc> task definition is simple enough:
<taskdef name="groovyc"
    classname="org.codehaus.groovy.ant.Groovyc"
    classpathref="groovy.classpath"/>
The name of the task is <groovyc>, and it’s backed by the Groovyc class in the org.codehaus.groovy.ant package. This class is part of the Groovy Ant JARs referenced in the earlier build file.
The result of this task definition is that you can compile Groovy classes with <groovyc> while you compile Java classes with <javac>. This enforced separation of code bases can lead to difficulties, however, if there are cross dependencies. For example, a Groovy class may implement a Java interface and reference a Java class, which in turn uses a Groovy class, and so on.
A good way to resolve these issues is to use the joint-compilation approach. Ant lets you embed the <javac> task inside the <groovyc> task. The nested tag approach results in a <groovyc> task that looks like this:
<groovyc srcdir="${src.dir}" destdir="${classes.dir}"
   classpathref="classpath">
    <javac source="1.5" target="1.5" />
</groovyc>
The nested <javac> task doesn’t imply the Java compiler is running. As a child of the <groovyc> task it lets the Groovy joint compiler do all the work.
The source directory, destination directory, and classpath variables defined in the <groovyc> task are passed down to the nested <javac> task. The joint-compilation approach means that Groovy will compile the Groovy sources and create stubs for them, then call the Java compiler to do the same for the Java sources, and resume the compilation process with the Groovy compiler. The result is that you can mix Java and Groovy sources without a problem.
Therefore, to extend the Ant build file presented section 5.2 to include Groovy files, make the additions and changes shown in the next listing.
Listing 5.4. Extending the “Hello, World” build to mix Java and Groovy sources
    <path id="groovy.classpath">
       <fileset dir="${env.GROOVY_HOME}/embeddable" />
    </path>

    <path id="classpath">
        <fileset dir="${lib.dir}" includes="**/*.jar" />
    </path>

    <taskdef name="groovyc"
        classname="org.codehaus.groovy.ant.Groovyc"
        classpathref="groovy.classpath" />
...
    <target name="compile">
        <mkdir dir="${classes.dir}" />
           <groovyc srcdir="${src.dir}" destdir="${classes.dir}"
               classpathref="classpath">
               <javac source="1.5" target="1.5" />
           </groovyc>
       </target>
The rest is the same as before.
If you’re committed to Ant builds using XML, that’s all there is to it. If, however, you’re willing to switch your build language to Groovy, there are a couple of other alternatives. The next two subsections use Groovy for the build language but are still fundamentally based on Ant.
5.3.3. Writing your build in Groovy with AntBuilder
The standard Groovy library includes a class called groovy.util.AntBuilder. To use it you need to add the Java-based Ant JAR library files to your classpath, but once you do, AntBuilder lets you replace the XML syntax with Groovy.
Any task defined by Ant can be used through the AntBuilder class. For example, the following listing shows a simple script that makes a copy of its own source, verifies that it worked, and then deletes the copy.
Listing 5.5. antbuilder.groovy, which copies itself
def ant = new AntBuilder()
String dir = 'src/main/groovy'

assert !(new File("$dir/antbuildercopy.groovy").exists())

ant.echo 'about to copy the source code'
ant.copy file:"$dir/antbuilder.groovy",
    tofile:"$dir/antbuildercopy.groovy"

assert (new File("$dir/antbuildercopy.groovy").exists())

ant.echo 'deleting the copied file'
ant.delete file:"$dir/antbuildercopy.groovy"
Builder code and regular Groovy code are freely intermixed in this example. The Ant tasks used here are echo, copy, and delete, but it would be easy enough to use others like javac, junitreport, or even optional Ant tasks like mail. As long as the required Ant libraries are in the classpath, each will work.
There’s actually a simplification available. The with syntax is available as a part of Groovy’s metaprogramming capabilities. It can simplify the previous listing down to that shown in the next listing.
Listing 5.6. Simplifying the build script using the with method
ant.with {
    echo 'about to copy the source code'
    copy file:"$dir/antbuilder.groovy",
        tofile:"$dir/antbuildercopy.groovy"
    echo 'deleting the copied file'
    delete file:"$dir/antbuildercopy.groovy"
}
The with method invokes the contained methods on the Ant builder.
AntBuilder can be used to script entire build files. It’s useful for creating a build file quickly, especially if you already know the corresponding Ant tasks well. Because AntBuilder is part of the standard Groovy library it can be used wherever you need to do build-related tasks. Even better, Gradle build files include an instance of AntBuilder, making the migration path from Ant to Gradle much simpler.
A more interesting example is given in the next listing, which is a port of the original Ant build shown in listing 5.1.
Listing 5.7. A Groovy AntBuilder script port of the build.xml file from listing 5.1

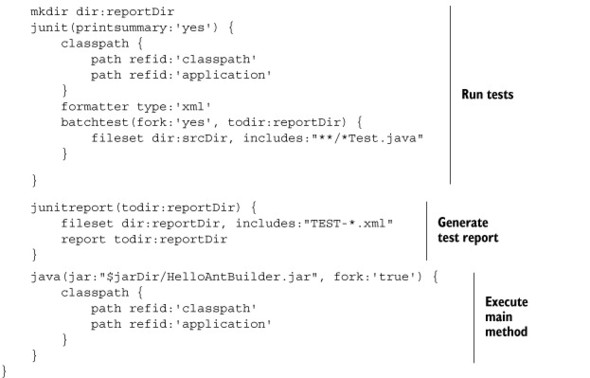
You execute this script with the groovy command. Inside the with block, all methods like mkdir, javac, and junit are passed to the builder instance. Formally this means that the delegate property for the with block is the AntBuilder instance. Because this is a Groovy script you could add any code you wish to do other processing. It’s notoriously awkward do arrange loops and conditionals inside XML files, for instance, but here that would be easy.
For all of its simplicity, though, AntBuilder is still just Ant under the hood. Groovy wouldn’t be Groovy if there wasn’t a domain-specific language (DSL) alternative. The best of breed is Gradle, which is discussed later in this chapter. There’s another approach, however, which you may encounter in practice. For completeness the next subsection contains a brief discussion of Groovy Ant, known as Gant.
5.3.4. Custom build scripts with Gant
Although the future of build files in Groovy belongs to Gradle, Gant still occupies one special niche in the Groovy ecosystem. As of this writing, the latest version of the Grails framework (2.3)[3] still implements its build scripts in Gant.[4] If you need to create a custom build script for a Grails application, Gant is still useful. If you’re not planning to do that, you can comfortably skip this subsection.
3 Grails is discussed in chapter 8 on databases and chapter 10 on web development. The home page for Grails is http://grails.org.
4 Gant will continue to be included in Grails through at least version 2.3.
Gant Use Case
Grails commands are implemented as Gant scripts, so if you need to customize a Grails command or create a new one, Gant is the tool of choice.
The Gant scripts in Grails are also an excellent choice of sample code. To keep this section simple I’ll review parts of an existing Grails Gant script, called Clean.groovy. The script can be found in the scripts directory under the root of the Grails distribution. As with all Grails Gant scripts, it’s invoked using the script name in lowercase, substituting dashes for camel case; so for the Clean script the command would be grails clean, and for the CreateDomainObject script the command is grails create-domain-object.
Here’s the Clean script in its entirety (minus the copyright statement):
includeTargets << grailsScript("_GrailsClean")
setDefaultTarget("cleanAll")
The grailsScript command loads a different Gant script, called _GrailsClean. By convention (and Grails is all about conventions), scripts that begin with an underscore are internal scripts that can’t be executed from the command line. The first line thus loads a series of tasks, and the second line makes the cleanAll task the default.
Turning now to the _GrailsClean script, let me highlight a couple of small sections from it:
includeTargets << grailsScript("_GrailsEvents")

target (cleanAll: "Cleans a Grails project") {
    clean()
    cleanTestReports()
    grailsConsole.updateStatus "Application cleaned."
}

target (clean: "Implementation of clean") {
    depends(cleanCompiledSources, cleanWarFile)
}
The resemblance to Ant is not accidental. Gant scripts contain targets, and targets can be invoked as though they were method calls. Here the target defined with the name cleanAll invokes two other tasks (clean and cleanTestReports) and then invokes the updateStatus method on the predefined grailsConsole object.
The clean task uses the depends method (again analogous to the same functionality in Ant) to make sure that the cleanCompiledSources and cleanWarFile tasks are invoked when the clean task is invoked. Here’s a snippet from the cleanCompiledSources task:
target (cleanCompiledSources: "Cleans compiled Java and Groovy sources") {
    def webInf = "${basedir}/web-app/WEB-INF"
    ant.delete(dir:"${webInf}/classes")
    ant.delete(file:webXmlFile.absolutePath, failonerror:false)
    ant.delete(dir:"${projectWorkDir}/gspcompile", failonerror:false)
The task goes on to delete many more items, delegating to an internal AntBuilder object in each case. The cleanWarFile task shows how you can mix in Groovy logic code inside a script:
target (cleanWarFile: "Cleans the deployable .war file") {
    if (buildConfig.grails.project.war.file) {
        warName = buildConfig.grails.project.war.file
    }
    else {
        def fileName = grailsAppName
        def version = metadata.'app.version'
        if (version) {
            fileName += "-$version"
        }
        warName = "${basedir}/${fileName}.war"
    }
    ant.delete(file:warName, failonerror:false)
}
This is straightforward Groovy code that simply defines some variables and sets their properties based on the current configuration, and then invokes the delete method on the ant object.
That’s enough Gant for this book.[5]
5 Additional information on Gant can be found at the Groovy website. There’s also a decent tutorial in the book Grails in Action (Manning, 2009), by Peter Ledbrook and Glen Smith. Finally, the Grails user guide has a section on creating Gant scripts specifically for Grails.
5.3.5. Ant summary
That also concludes the discussion of Ant and Ant-based approaches, both in Java and Groovy. The “Lessons learned” sidebar shows the details.
- If you have an existing Ant build, you can add <groovyc> and <groovy> tasks to it.
- Gant is only used by Grails, and not for very much longer.
- AntBuilder is rare by itself but is built into and useful in Gradle
It’s time now to examine the other major build tool in the Java world: Maven.
When it was released Ant was a major improvement over previous build processes. Still, it has major issues that complicate life, especially in larger builds. Here’s a brief list of complexities associated with using Ant. This is not intended to be a criticism of Ant, but rather to highlight the issues that lead to the next-generation tools.
Ant builds are based on XML, and XML is not a scripting language. Builds inevitably need to be customized and usually vary depending on whether the project is in development, test, or production mode. Ant allows you to set properties, but properties aren’t variables. It’s especially difficult to do complex branching logic in an XML file.
Ant says nothing about dependency management. It assumes you have all the required libraries available and that you can build a file set to hold them and use that as your classpath. The Ivy project (also from Apache) fills that gap, and the combination of Ant and Ivy is much more common now than Ant alone.
XML was designed to be processed by programs, not people. Reading a short XML file isn’t hard. Reading a long, involved one is, and even the trivial build file presented in this section is over 50 lines long when a few basic tasks are included.
The built-in Ant tasks are very low level. As a result, Ant build files quickly grow long and complex and involve a lot of repetition.
For all these reasons and others Ant was ripe for a higher-level replacement. That role was filled by the Maven project, which is either a blessing or a curse depending on your experiences with it.
5.4. The Java approach, part 2: Maven
I’m going to confess up front that Maven is hard to talk about rationally. Its best features (establishing a conventional project layout, managing dependencies, providing a rich plugin architecture) are also considered some of its worst features (difficult to work outside its conventions, hard to manage transitive dependencies, the whole “download the internet” problem). I can honestly say I’ve never encountered a technology that’s both common in the industry and yet loathed with the white-hot intensity of a thousand suns.[6] Bring up Maven in a group of developers, and someone will refuse to discuss “the M word.” Yet, at the same time, somebody else will quietly say that they can make it do anything and don’t understand what all the fuss is about.
6 Except possibly for every Microsoft technology ever.
My own experience isn’t so black-and-white. I find that if a project was designed using Maven from the beginning, it tends to work well with the system. It’s also hard to use that system without Maven. On the other hand, adding Maven to a system that wasn’t started with it can be quite painful. In addition, friends have also assured me that once a system gets above a certain size, the whole process becomes an unmanageable mess.
Perhaps the best way to stay above the fray is to say that Maven has a highly opinionated API. To be successful you have to do things the Maven way. Plus, like Ant, you’re coding your build in XML, which is never easy. The multi-project build capabilities are awkward, too.[7]
7 Admittedly that doesn’t sound terribly “above the fray,” but at least I’m trying.
I will note that the standard Maven project layout (shown in figure 5.2) has become common throughout the industry. Also, people may complain about Maven’s approach to dependency management, but I haven’t seen anything dramatically better. Gradle (the proposed replacement, discussed later in this chapter) uses Maven repositories and Ivy dependency management and suffers from the same “download the internet” problem. Dependency management is just hard, no matter how you approach it.
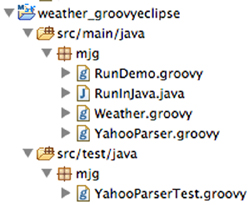
Figure 5.2. Standard Maven project structure used for the application in this section. Compiled sources are in src/main/java, and tests reside in src/test/java.
Returning (at last) to the core theme of this book, the goal of this section is to show you how to incorporate Groovy into Maven builds. There are two ways to do that. I’ll start with the Groovy-Eclipse plugin and then build the same application using the GMaven project.
5.4.1. The Groovy-Eclipse plugin for Maven
The Groovy-Eclipse compiler plugin (http://mng.bz/2rHY) is a standard compiler plugin for Maven. It emerged from the effort to build a good Eclipse plugin for Groovy that worked with combined Groovy and Java projects. The Maven plugin is a way to take advantage of that effort, whether you plan to use the Eclipse IDE or not.
To demonstrate its use I’ll build a small project that accesses the Yahoo! Weather web service and reports on the current conditions. This is easy enough to do in Java but becomes particularly simple in Groovy.
The Yahoo! Weather web service (http://developer.yahoo.com/weather/) provides weather information in the form of an RSS feed. The web service is accessed from a URL of the form
http://weather.yahooapis.com/forecastrss
The URL has two parameters, one required and one optional. The required parameter is w, a so-called WOEID (Where On Earth ID), that Yahoo uses to identify a location. The other parameter is u, which is used to specify the temperature units in Fahrenheit (f, the default) or Celsius (c). For unknown reasons, there’s no way to programmatically look up a WOEID. Instead Yahoo! directs you to its own weather page and suggests you search for your city.
A simple HTTP GET request to the proper URL returns an XML response in RSS form. A sample is included on Yahoo!’s web page.
Suppose I decided to build a simple application to retrieve the current weather conditions based on this service. Maven recommends that you specify a particular artifact to begin the project, so I’ll start with the classic maven-archetype-quickstart:
> mvn archetype:generate –DgroupId=mjg –DartifactId=weather
    –DarchetypeArtifactId=maven-archetype-quickstart
    -Dversion=1.0-SNAPSHOT –Dpackage=mjg
Maven archetypes
The Groovy-Eclipse plugin uses regular Java archetypes and adds Groovy functionality. The GMaven approach in the next section includes a basic archetype to get started.
This generates a Java project with the standard layout, meaning the source code directory is src/main/java and the testing directory is src/test/java. The quick start archetype includes a trivial App.java and AppTest.java in those directories, respectively. The generator also adds a standard Maven POM file in the root directory, whose only dependency is on JUnit, as shown in the next listing.
Listing 5.8. The Maven pom.xml file for a standard Java project
<project xmlns="http://maven.apache.org/POM/4.0.0"
  xmlns:xsi="http://www.w3.org/2001/XMLSchema-instance"
  xsi:schemaLocation="http://maven.apache.org/POM/4.0.0
                      http://maven.apache.org/maven-v4_0_0.xsd">
  <modelVersion>4.0.0</modelVersion>
  <groupId>mjg</groupId>
  <artifactId>weather</artifactId>
  <packaging>jar</packaging>
  <version>1.0-SNAPSHOT</version>
  <name>weather</name>
  <url>http://maven.apache.org</url>
  <dependencies>
    <dependency>
      <groupId>junit</groupId>
      <artifactId>junit</artifactId>
      <version>4.10</version>
      <scope>test</scope>
    </dependency>
  </dependencies>
</project>
The only change I’ve made so far from the standard is to upgrade the JUnit dependency to 4.10 from 3.8.1.
To do the actual work I need a class to send the request to Yahoo and parse the response, and a POJO to hold the resulting weather information. Starting with the POJO, for a given city, region, and country I want to store the condition, temperature, wind chill, and humidity. The web service returns a lot more information than this, but this will suffice to get started.
POJOs are simple containers for data, so the constructors, getter and setter methods, and any necessary overrides are mostly clutter. I can therefore simplify my life if I use a POGO instead, as shown in the following listing.
Listing 5.9. Weather.groovy, a POGO to hold weather results from the web service
package mjg

class Weather {
    String city
    String region
    String country
    String condition
    String temp

    String chill
    String humidity

    String toString() {
        """
        Weather for $city, $region, $country:
        Condition  : $condition
        Temperature: $temp
        Wind Chill : $chill
        Humidity   : $humidity
        """
    }
}
The toString method is a way to produce formatted output. Groovy’s multiline string makes it particularly easy.
The other class I need is a parser for the web service. Because all I need is a GET request I can use the parse method in the XmlSlurper class as usual and drill down the resulting DOM tree to get the results I want. That’s pretty simple, too, as shown in the following listing.
Listing 5.10. YahooParser.groovy, which accesses and parses the weather service
package mjg

class YahooParser {
    final static String BASE = 'http://weather.yahooapis.com/forecastrss?'

    Weather getWeather(String woeid) {
        def root = new XmlSlurper().parse(BASE + "w=$woeid")
        Weather w = new Weather(
            city:root.channel.location.@city,
            region:root.channel.location.@region,
            country:root.channel.location.@country,
            condition:root.channel.item.condition.@text,
            temp:root.channel.item.condition.@temp,
            chill:root.channel.wind.@chill,
            humidity:root.channel.atmosphere.@humidity
        )
    }
}
Given a WOEID, the service builds the URL and accesses the web service, parses the resulting RSS, and returns an instance of the Weather class with all the relevant fields populated.
To complete the program I need a driver, which I can write as a Groovy script. That’s a one-liner, unless I want to allow the client to specify a WOEID on the command line:
def woeid = args.size() ? args[0] : '2367105'
println new YahooParser().getWeather(woeid)
The default WOEID in the script is for Boston, MA, and it’s stored in RunDemo.groovy. In order to demonstrate the differences when both Java and Groovy sources are present together, I also added a Java class to access the web service in the file RunInJava.java:
public class RunInJava {
    public static void main(String[] args) {
        String woeid = "2367105";
        if (args.length > 0) woeid = args[0];
        YahooParser yp = new YahooParser();
        System.out.println(yp.getWeather(woeid));
    }
}
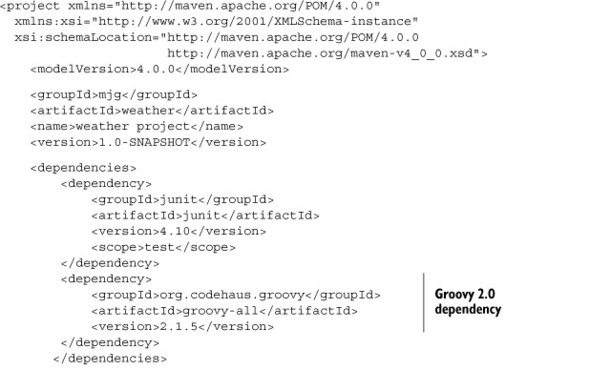
Now comes the interesting part: how do I get Maven to handle all the Groovy code? The Groovy-Eclipse plugin requires two additions to the POM file. First I need to add Groovy as a dependency:
<dependencies>
...
    <dependency>
        <groupId>org.codehaus.groovy</groupId>
        <artifactId>groovy-all</artifactId>
        <version>2.1.5</version>
    </dependency>
  </dependencies>
Next I need to add the Groovy-Eclipse plugin in a build section below the dependencies:
<build>
   <plugins>
        <plugin>
            <artifactId>maven-compiler-plugin</artifactId>
            <version>2.3.2</version>
            <configuration>
                <compilerId>groovy-eclipse-compiler</compilerId>
            </configuration>
            <dependencies>
                <dependency>
                    <groupId>org.codehaus.groovy</groupId>
                    <artifactId>groovy-eclipse-compiler</artifactId>
                    <version>2.7.0-01</version>
                </dependency>
            </dependencies>
        </plugin>
    </plugins>
</build>
With both of these additions Maven will compile and use Groovy code appropriately, except for one rather strange oddity. Normally I would add my Groovy classes to src/main/groovy and any Groovy tests to src/test/groovy. According to the plugin documentation, I can do that only if (1) there’s at least one Java class in src/main/java or (2) I add a lot more XML to specify the additional source directories.
Source directories
For the Groovy-Eclipse plugin, put Java and Groovy sources in the src/main/java and src/test/java directories by default.
I put my Groovy files in src/main/java and src/test/java. Now I can build the project using
mvn clean install
I can even execute the project using the exec:java (!) task, both using the default WOEID and with a supplied command-line argument:
> mvn exec:java -Dexec.mainClass=mjg.RunDemo
...
        Weather for Boston, MA, United States:
        Condition  : Cloudy
        Temperature: 58
        Wind Chill : 58
        Humidity   : 84
I can supply a command-line argument using –Dexec.args:
> mvn exec:java -Dexec.mainClass=mjg.RunDemo -Dexec.args='44418'
...
        Weather for London, , United Kingdom:
        Condition  : Cloudy
        Temperature: 54
        Wind Chill : 54
        Humidity   : 82
A guiding principle in this book is that Java is good at tools, libraries, and (existing) infrastructure, and that Groovy is good at everything else. It’s hard to imagine a better demonstration of that than the current example. The entire application was written in Groovy, at a code savings on the order of 10 to 1. The infrastructure treated the code as though it was all Java, and I was even able to use the Java exec task to execute the Groovy script to drive the application.
The Groovy-Eclipse compiler plugin is a funded project, because it’s used inside the IDEs provided by SpringSource (a division of VMware).[8] The quality of the plugin, especially for cross-compilation, is therefore quite high. Just because it has the name “Eclipse” wired into it, there’s no reason not to use it in a Maven project. There’s no implication that the plugin is exclusive to the IDE. You can use it anywhere, as I did with the Maven project in this section.
8 Now part of Pivotal, which is owned by VMware, which is owned by EMC...
The other way to add Groovy to a project built with Maven is to use the GMaven project, discussed in the next section.
5.4.2. The GMaven project
GMaven is an alternative approach for adding Groovy into Maven projects. It works with combined Java and Groovy sources by generating stubs for the Groovy files as part of the build sequence.
To help users get started, the project provides a Maven archetype called gmaven-archetype-basic. To use the archetype, execute the following at the command line:
> mvn archetype:generate –DgroupId=mjg –DartifactId=weather
    –DarchetypeArtifactId=gmaven-archetype-basic
    -Dversion=1.0-SNAPSHOT –Dpackage=mjg
This again produces a project in standard Maven structure, in which the sources are in src/main/groovy and the tests are in src/test/groovy. The plugin expects both Java and Groovy sources to reside in those directories.
The generated POM is shown in the following listing, with some modifications discussed in the listing.
Listing 5.11. The Maven pom.xml file produced by the GMaven project
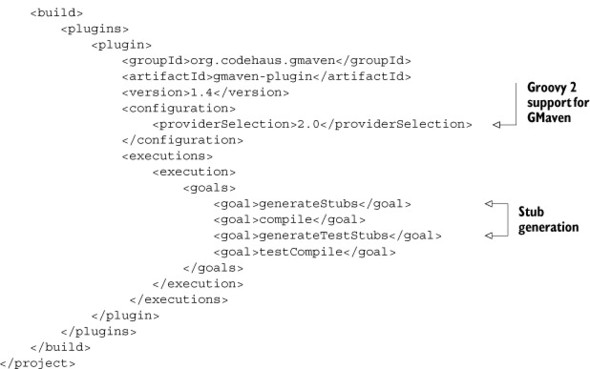
The POM needs a Groovy dependency. It doesn’t have to be global, but it was just as easy to add it that way here. The provider was adjusted to 2.1.5 in order to use Groovy version 2.
Building the system is done with a standard Maven install:
> mvn clean install
During the build process, Java stubs are generated for each Groovy file. The stubs themselves are quite minimal; they’re only used to resolve the inter-language dependencies rather than execution. As an example, here’s a portion of the stub generated for the Weather class, whose Groovy implementation was shown in the previous section.
Listing 5.12. Part of the Java stub generated from Weather.groovy
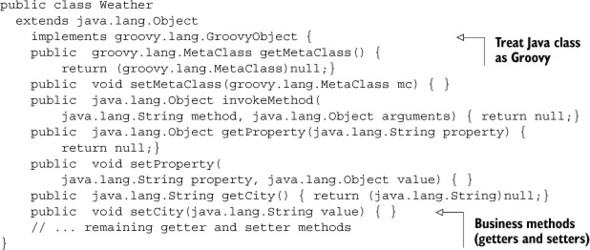
Any Java class can be treated as though it was Groovy source by implementing the GroovyObject interface, as the stub does here. The first five methods in the stub provide no-op implementations for all the methods in that interface. The rest of the stub consists of empty implementations for the remaining methods, which in this case are the getters and setters and the toString method.
The stub generated for the RunDemo class is slightly different, in an interesting way. The Groovy implementation is just a couple lines of scripting code. As noted in the demonstration in chapter 3 where I executed a compiled Groovy script from the java command, every Groovy script is ultimately converted to a class by the compiler, and the corresponding RunDemo.java stub illustrates this:
public class RunDemo extends groovy.lang.Script {
  public RunDemo() {}
  public RunDemo(groovy.lang.Binding context) {}
  public static  void main(java.lang.String... args) { }
  public  java.lang.Object run() { return null;}
}
The class extends groovy.lang.Script, has a default constructor and a constructor that takes a groovy.lang.Binding, a standard Java main method, and a run method. All Groovy scripts look like this to the JVM. Running the script is like executing the main method, which delegates to the run operation here.
As before, to run the program using the Maven you call the exec:java task with the right arguments. In this case that means the main class is either RunDemo or RunInJava:
> mvn exec:java -Dexec.mainClass=mjg.RunDemo

> mvn exec:java -Dexec.mainClass=mjg.RunInJava
Either way, the result is the same as in the previous section.
The GMaven project has been quiet recently, but it’s still alive. As demonstrated, the archetype works and the stub generation allows the plugin to delegate compilation to the standard Maven tools.
- There are two separate ways to add Groovy to Maven builds, each with benefits and drawbacks: the “Groovy Eclipse” plugin and GMaven.
- If at all possible, consider moving to Gradle.
5.4.3. Maven summary
There are two ways to add Groovy dependencies to a Maven project: the Groovy-Eclipse plugin and the GMaven project. My advice (which may change as the projects evolve) is
1. For an already existing Maven build, add the Groovy-Eclipse plugin. It works, and a company that has a significant interest in the success of Groovy financially supports development of the plugin itself. The fact that the name includes the word Eclipse is irrelevant.
2. For new projects either plugin will work, but the existence of a Maven archetype makes it particularly easy to get started with GMaven.
3. It’s quite interesting that both plugins expect Java and Groovy sources to reside together. There’s a significant integration lesson there somewhere.
Moving now from hybrid approaches to purely Groovy solutions, I’ll address first the short and sweet Grapes approach before moving to the real destination: Gradle.
5.5. Grapes and @Grab
The Grape mechanism allows you to declare library dependencies directly inside a Groovy script. This is useful when you need to deliver a script to a client that doesn’t already have the required dependencies but is willing to download them as part of the build process.
The overall API is called Grape (Groovy Adaptable/Advanced Packaging Engine) and starts with the groovy.lang.Grab annotation. It uses an Ivy resolver to identify and download dependencies. Its primary use case is on scripts, so that they can be delivered to a client without any setup requirements other than having Groovy installed. At runtime Groovy will download and install any declared libraries and their transitive dependencies as part of the execution process.
Grape Use Case
Grape allows you to deliver a simple script that can be executed by a client without any setup necessary other than installing Groovy, making it particularly convenient for testers or QA people.
To demonstrate the Grape system, let me choose the Math library from the Apache Commons project (http://commons.apache.org/math/). Specifically, I want to work with the complex numbers package. The package includes a class called Complex, which represents complex numbers. Although the class is interesting in itself, it also makes for a nice demonstration of Groovy’s metaprogramming capabilities.
In Maven syntax the library has a group ID of org.apache.commons, an artifact ID of commons-math3, and a version of 3.0. Therefore, the format of the @Grab annotation is as shown in the following script:
import org.apache.commons.math3.complex.*

@Grab('org.apache.commons:commons-math3:3.0')
Complex first = new Complex(1.0, 3.0);
Complex second = new Complex(2.0, 5.0);
The @Grab annotation downloads both the given library and its dependencies. The syntax uses Maven structure, using colons to connect the group ID, the artifact ID, and the version number. Alternatively, you can specify the sections individually:
@Grab(group='org.apache.commons', module='commons-math3', version='3.0')
The behavior is equivalent in either case.
There isn’t much more to Grapes than this. In order to show an interesting example that requires an external Java library, let me present a simple case of Groovy metaprogramming. There’s nothing about it that requires Grapes in particular, but it shows how a small amount of metaprogramming can make a Java library class groovier. Using Grapes in the script allows me to send it to a client without compiling it or providing the library dependencies. The Grape annotations will handle the rest.
The Complex class represents a complex number, which combines real and imaginary parts. The class contains a two-argument constructor, as shown, that takes the real and imaginary parts as parameters. Many methods are defined on the class, so that it generalizes basic numerical computations to the complex domain.
Recall that in Groovy every operator delegates to a method call. Interestingly enough, the Complex class already has a method called multiply for computing the product of two complex numbers. Because the * operator in Groovy uses the multiply method, that operator can be used immediately:
assert first.multiply(second) == first * second
Again, this is a Java class. Fortunately, the developers of the class chose to include a method called multiply, so Groovy can use the * operator with complex numbers.
What about all the other mathematical operations? Most don’t line up as cleanly. For example, the class uses add instead of plus and subtract instead of minus. It’s easy to connect them, however, by adding the appropriate methods to the metaclass associated with Complex when viewed through Groovy.
As a reminder, every class accessed through Groovy contains a metaclass, and the metaclass is an Expando. This means that methods and properties can be added to the metaclass as desired, and the resulting members will be part of any instantiated object. Here’s how to add several mathematical operations to Complex:
Complex.metaClass.plus = { Complex c -> delegate.add c }
Complex.metaClass.minus = { Complex c -> delegate.subtract c }
Complex.metaClass.div = { Complex c -> delegate.divide c }
Complex.metaClass.power = { Complex c -> delegate.pow c }
Complex.metaClass.negative = { delegate.negate() }
That takes care of the +, -, /, **, and negation operators, respectively. In each case, the relevant method is defined on the metaclass by setting it equal to a closure. The associated closure takes a Complex argument (in the case of binary operators) and invokes the desired existing method on the closure’s delegate, passing along the argument.
Closure Delegates
Every closure has a delegate property. By default the delegate points to the object that the closure was invoked on.
After adding those methods to the metaclass, the operators can be used in the Groovy script:
assert new Complex(3.0, 8.0) == first + second
assert new Complex(1.0, 2.0) == second - first
assert new Complex(0.5862068965517241, 0.03448275862068969) ==
    first / second
assert new Complex(-0.007563724861696302, 0.01786136835085382) ==
    first ** second
assert new Complex(-1.0, -3.0) == -first
To complete this part of the story I want to demonstrate the famous equation known as Euler’s identity,[9] which is expressed as
9 Leonhard Euler (1707 – 1783) was one of the most brilliant mathematicians of all time. His work spanned virtually every field of math and science, and his collected works filled between 60 and 80 quarto volumes. The transcendental number e is named after him.
eiπ=–1
This equation connects the imaginary numbers (i) and the transcendental numbers (e and π) to the negative numbers (–1). Euler found this expression so profound he had it inscribed on his tombstone.
The java.lang.Math class contains constants Math.E and Math.PI, and the Complex class has the constant Complex.I. To make the formula look better I’ll use static imports for all of them.
One final addition is necessary to make this work. Math.E in Java is of type double, and I want to raise it to a Complex power. The easiest way to do that is to convert the double to an instance of the Complex class and then use the pow method in the Complex class. Returning to Groovy metaprogramming, I need a power method (which corresponds to the ** operator) on Double that takes a Complex argument:
Double.metaClass.power = { Complex c -> (new Complex(delegate,0)).pow(c) }
With all that machinery in place the resulting code is a bit anticlimactic, but that’s a good thing:
Complex result = E ** (I * PI)
assert result.real == -1
assert result.imaginary < 1.0e-15
As usual in Groovy, accessing the real or imaginary property is equivalent to calling the getReal or getImaginary method, respectively. The expression does generate a real part of –1, but the imaginary part isn’t exactly zero due to the round-off error associated with Java doubles. On my machine it evaluates to a number less than the bound shown, which is certainly close enough.
There are a few additional annotations available in the Grapes system. One is @GrabConfig, used in the next example when loading a database driver. The following script uses the groovy.sql.Sql class to generate an H2 database and add some data to it:
import groovy.sql.Sql

@GrabConfig(systemClassLoader=true)
@Grab(group='com.h2database', module='h2', version='1.2.140')
Sql sql = Sql.newInstance(url:'jdbc:h2:mem:',driver:'org.h2.Driver')
The annotations provide the driver, so the Sql class can be used normally.
Because a member of a class can only have a single instance of a particular annotation, the @Grapes annotation is used to combine multiple @Grab annotations. The next listing computes complex values and stores them in a database table.
Listing 5.13. Using Apache Commons Math and a database driver together
@GrabConfig(systemClassLoader=true)
@Grapes([
    @Grab('org.apache.commons:commons-math3:3.0'),
    @Grab(group='com.h2database', module='h2', version='1.2.140')
])

import static java.lang.Math.*
import org.apache.commons.math3.complex.Complex
import org.apache.commons.math3.complex.ComplexUtils
import groovy.sql.Sql

Sql sql = Sql.newInstance(url:'jdbc:h2:mem:',driver:'org.h2.Driver')

sql.execute '''
    create table coordinates (
        id bigint generated by default as identity,
        angle double not null,
        x double not null,
        y double not null,
        primary key (id)
    )
'''

int n = 20
def delta = 2*PI/n
(0..<n).each { num ->
    Complex c = ComplexUtils.polar2Complex(1, num*delta)
    sql.execute """
    insert into coordinates(id,angle,x,y)
        values(null, ${i*delta}, $c.real, $c.imaginary)
    """
}

sql.rows('select * from coordinates').each { row ->
    println "$row.id, $row.angle, $row.x, $row.y"
}
The script creates a table to hold x and y coordinates at 20 points along a circle. The ComplexUtils.polar2Complex method takes a radius (here using one for simplicity) and an angle (in radians) along the circle and generates a complex number, which is then stored in the database.
The Grapes system is simple and effective, but limited in practice. The additions work in a script, but for a larger system it’s more common to use a full-scale build tool, like Gradle, which is the subject of the next section.
5.6. The Gradle build system
Gradle is proposed as a next-generation build solution. Gradle combines the flexibility of Groovy builds with a powerful domain-specific language (DSL) that configures a rich set of classes.
As with virtually all Groovy projects of any significant size, Gradle is written in both Java and Groovy. Gradle is essentially a DSL for builds.[10] It defines a language of syntax and semantics that allows you to write a build file quickly and easily.
10 Mandatory DSL jokes: “JavaScript is a DSL for finding browser bugs”; “Java is a DSL for generating stack traces”; “Maven is a DSL for downloading the internet.”
Gradle doesn’t come with an installer. Instead you just download a ZIP file, set the GRADLE_HOME environment variable to wherever you unzip it, and add the $GRADLE_ HOME/bin directory to your path, and you’re ready to go. In fact, you don’t even need to install Groovy first, because Gradle comes with its own version of Groovy.
One of the dirty little secrets of Groovy is that the major versions are not always binary compatible. Code compiled with one version doesn’t necessarily work with any other.
This means that projects in the Groovy ecosystem have a choice. They can either be compiled with different versions of Groovy and make the Groovy version number part of their own version, or they can bundle in a particular version of Groovy.
The Spock framework (discussed in chapter 6) takes the former approach. Spock versions are in the form 0.7-groovy-2.0, meaning Spock version 0.7 compiled with Groovy version 2.0.
The Grails and Gradle projects take the other approach. Grails 1.3.9, for example, includes a copy of Groovy 1.7.8, Grails 2.0.3 includes Groovy 1.8.6, and Grails 2.2.1 includes Groovy 2.0.8. To see the Groovy version included in your Gradle distribution, run the gradle –v command.
For Grails, the bundled Groovy version locks you into that version for the entire application. For Gradle, however, the bundled Groovy version is used only to execute the build script itself. You’re free to use any version of Groovy in your own projects, and Gradle will correctly build them.
When you run the gradle –v command, in addition to showing the Gradle and Groovy versions, Gradle also reports the included versions of Ant and Ivy, as well as the JVM and OS.
Gradle builds range from extremely simple to quite powerful. I’ll start with the simplest possible example and build from there.
5.6.1. Basic Gradle builds
Gradle is a plugin-based architecture. Most Gradle tutorials start by defining what a task is and showing how to call one. Rather than do that here, let me instead show you a minimal build file and go from there.
Here’s the smallest possible Gradle build for a Java project, in a file called build.gradle:
apply plugin:'java'
The apply syntax indicates that the build is using the Java plugin. When you run the build command using this file, Gradle executes tasks in several stages, as shown:
:compileJava UP-TO-DATE
:processResources UP-TO-DATE
:classes UP-TO-DATE
:jar
:assemble
:compileTestJava UP-TO-DATE
:processTestResources UP-TO-DATE
:testClasses UP-TO-DATE
:test
:check
:build

BUILD SUCCESSFUL
Each word after the colon is a Gradle task. Gradle constructs a Directed Acyclic Graph (DAG) out of the specified tasks, paying attention to their dependencies, and then executes them in order. This minimal project has no source code, so the compile tasks are up to date without running at all. In fact, the only task that does anything is the jar task, which creates a JAR file in the build/libs directory.
If you’re doing any testing your project will need to include the JUnit dependency. Consider a simple project that uses standard Maven structure, so that any Java classes are contained in src/main/java, and any tests are in src/test/java. The next listing shows a POJO called Greeting with a single String property called message.
Listing 5.14. A Greeting POJO to demonstrate a Gradle build
public class Greeting {
    private String message = "Hello, World!";

    public String getMessage() {
        return message;
    }

    public void setMessage(String message) {
        this.message = message;
    }
}
The following listing is a JUnit test called GreetingTest, which checks the getter and setter.
Listing 5.15. A JUnit test for the Greeting POJO
import static org.junit.Assert.*;
import org.junit.Test;

public class GreetingTests {
    private Greeting greeting = new Greeting();

    @Test
    public void testGetGreeting() {
        assertEquals("Hello, World!", greeting.getMessage());
    }

    @Test
    public void testSetGreeting() {
        greeting.setMessage("What up?");
        assertEquals("What up?", greeting.getMessage());
    }
}
The next listing shows a Gradle build file with a JUnit dependency during the testing phase. It’s still a “Hello, World” example, but it does introduce some essential concepts.
Listing 5.16. A build.gradle file for the POJO application with testing
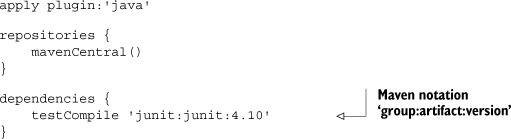
The terms repositories and dependencies are part of the Gradle DSL. Any required libraries are listed in the dependencies block. There are several legal forms for listing dependencies. The one used here is a string separated by colons. Using Maven syntax is not an accident, as shown in the repositories section. Many different types of repositories can be used, but here the standard Maven central repository is declared.
Executing the build this time runs the same series of tasks, but now any tests are executed and a JUnit report in HTML form is produced in the build/reports/tests directory.
That demonstrated that a Gradle build can be applied to a Java project with no Groovy dependencies. To show that the same process works on mixed Java/Groovy projects, I’ll add a Groovy test case, called GroovyGreetingTests, in the src/test/groovy directory. The test case is shown in the next listing.
Listing 5.17. A Groovy test for the POJO, making this a mixed Java/Groovy project
import static org.junit.Assert.*
import org.junit.Test

class GroovyGreetingTests {
    Greeting greeting = new Greeting()

    @Test
    void testGetMessage(){
        assert 'Hello, World!' == greeting.message
    }

    @Test
    void testSetMessage() {
        greeting.message = 'Yo, dude'
        assert 'Yo, dude' == greeting.message
    }
}
The new build.gradle file requires a Groovy dependency. Prior to Gradle version 1.6 the name of the dependency was “groovy”. Now the preferred notation is to declare the Groovy dependency as a standard compile-time requirement. The complete build.gradle file is shown in the following listing.
Listing 5.18. A build.gradle file for a mixed Java/Groovy project
apply plugin:'groovy'

repositories {
    mavenCentral()
}

dependencies {
    compile 'org.codehaus.groovy:groovy-all:2.1.5'
    testCompile 'junit:junit:4.10'
}
The other change to the build file is that the Java plugin has been replaced by the Groovy plugin, which includes the Java tasks already. The new plugin adds a couple of tasks to the build, as shown here:
:compileJava
:compileGroovy UP-TO-DATE
:processResources UP-TO-DATE
:classes
:jar
:assemble
:compileTestJava
:compileTestGroovy
:processTestResources UP-TO-DATE
:testClasses
:test
:check
:build

BUILD SUCCESSFUL
Both the compileGroovy and compileTestGroovy tasks are new, but everything else proceeds normally. The classes are compiled, the tests run, and the HTML test report is produced.
That’s the basic structure of a Gradle build file when dealing with Java, Groovy, or mixed Java/Groovy projects. Similar files are shown throughout this book. To illustrate some interesting Gradle features I’ll now consider several use cases that often come up in practice.
5.6.2. Interesting configurations
Gradle builds are used throughout this book. I’ll bring up lots of different options when discussing specific examples in context, but here I can discuss a few interesting ideas.
Custom source sets
First, one of the running themes in this book is that separating Groovy source code from Java source code is rather artificial. What if you wanted to use the same source folder for both, as an Eclipse project might do? Here’s an easy customized project layout to do so:
sourceSets {
          main {
              java { srcDirs = [] }
              groovy { srcDir 'src' }
          }
          test {
              java { srcDirs = [] }
              groovy { srcDir 'src' }
          }
      }
Source sets are collections of source code in a Gradle build. Here, by assigning the srcDirs property of both the src/main/java and src/test/java folders to an empty list, the Java compiler won’t run at all. Instead, the Groovy compiler is used for all classes in the src directory, which will presumably hold both Java and Groovy classes.
Copying JARs
Another useful tactic is to make a local copy of the dependent libraries. The following task does that:
task collectJars(type: Copy) {
    into "$buildDir/output/lib"
    from configurations.testRuntime
}
The collectJars task is a kind of Copy task—one of the built-in task types in Gradle. Running collectJars copies the JAR files in the runtime classpath into the output/lib folder in the build directory. Spock uses this task to make a complete distribution.
Inputs and outputs
Another neat capability of Gradle is that it can skip tasks that aren’t necessary. It does this by creating hashes of files and directories and checking whether or not they have changed. The following listing shows an example taken from the samples[11] that come with Gradle.
11 See the userguide/tasks/incrementalBuild/inputsAndOutputs directory in the download distribution. Gradle comes with a huge number of very simple samples like this one.
Listing 5.19. Inputs/outputs example from the incrementalBuilds Gradle sample
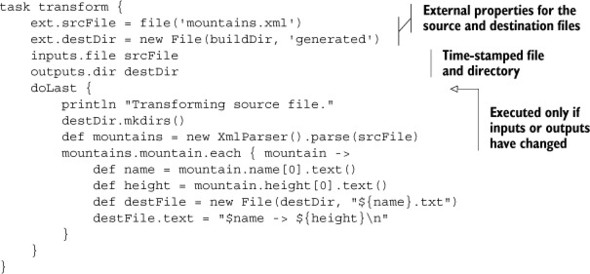
The srcFile and destDir properties of the script are assigned to the ext map, which puts them in the project but avoids any potential conflict with existing Project properties. The inputs and outputs properties can be assigned to either files or directories (in other words, the word file is interpreted as a java.io.File). If both properties are the same as during the previous run, the code inside the doLast block is skipped.
Ant integration
One of the nice features of Gradle is that it includes an instance of groovy.ant.AntBuilder as part of the build. That means that anything that can be done with Ant can be handled inside a Gradle build. That has a couple of consequences. First, if you already have an Ant build file, you can invoke its tasks inside a Gradle build. You can even make the Gradle tasks dependent on the Ant tasks.
Consider this example, from the Gradle samples.[12] The Ant build file is build.xml, and it contains a single task called hello:
12 See userguide/ant/dependsOnAntTarget in the distribution.
<project>
    <target name="hello">
        <echo>Hello, from Ant</echo>
    </target>
</project>
The Gradle build is in the file build.gradle:
ant.importBuild 'build.xml'

task intro(dependsOn: hello) << {
    println 'Hello, from Gradle'
}
The intro task depends on the hello task from the Ant build, which is imported using the ant variable (an instance of AntBuilder). Running gradle intro executes both tasks:
:hello
[ant:echo] Hello, from Ant
:intro
Hello, from Gradle

BUILD SUCCESSFUL
The Wrapper task
Finally, a client can execute a Gradle build even if they don’t have Gradle installed. Gradle comes with a special Wrapper task, which has a version property:
task wrapper(type: Wrapper) {
    gradleVersion = '1.6'
}
Running this task generates scripts for both Windows and Unix, called gradlew.bat and gradlew, respectively, along with a minimal Gradle JAR distribution. When executed the wrappers first download and install a local copy of Gradle and then execute the build.
Gradle is a very powerful system, and a thorough investigation is well beyond the scope of this book.[13] Hopefully this section will provide you with enough of an introduction to get you started.
13 The book Gradle in Action (Manning, 2013) by Benjamin Muschko is both well written and thorough. I highly recommend it.
- @Grab is helpful for Groovy scripts.
- Gradle uses Groovy build files to configure your build but downloads the internet like Maven.
- Gradle does not have artifacts like Maven, but people are working on ways to create standard builds for various goals.
- In addition to the discussion in this chapter, every project in this book includes a Gradle build highlighting a variety of capabilities.
5.7. Summary
This chapter looked at build tools useful for both Groovy and Java projects. Ant is very common but low level. Groovy provides both a raw groovy task and a groovyc compiler task, which can be useful in combined projects.
Maven is a higher-level tool, but it can be difficult to customize. In this chapter I presented both the GMaven project as a way to add Groovy to Maven and the Groovy-Eclipse plugin approach, which tends to be more robust for cross-compilation issues.
Groovy includes an @Grab annotation with its so-called Grapes capability, which can be used to add dependencies directly to a Groovy script. It’s powerful, but it’s restricted to Groovy builds.
Finally, I presented the Gradle build tool. This chapter included a basic discussion of Gradle and mentioned several more advanced capabilities. Gradle is used throughout this book to demonstrate interesting mechanisms in each chapter.