
Chapter 6. Testing Groovy and Java projects
- Using GroovyTestCase and its subclasses
- Testing scripts as well as classes
- The MockFor and StubFor classes in the Groovy library
- The Spock testing framework
The rise of automated testing is one of the most significant software development productivity improvements in the past 20 years. Automated tests, running as part of your build process, are very easy to set up, catch problems right away, and give you the freedom to refactor your code without worrying that you’re breaking something unrelated.
Testing is the cornerstone of many of the “agile” development processes, from more modern techniques like SCRUM to Kanban back to the original Extreme Programming (XP) movement. There are two other benefits of automated testing, however, that aren’t nearly as publicized:
1. Tests are executable documentation.
Any major open source project is a communal effort by some of the best developers in the world, many of whom are working on their own time. They’re highly motivated to write code, not documentation. The result is that the documentation quality tends to be inferior to the code quality, if it’s even up to date in the first place.
My own experience is that the better the developer, the more he or she cares about testing. The best developers write complete tests, and these tests run all the time as part of a continuous integration system. If a test breaks, the system notifies the project committers right away. As a result, the tests are excellent examples of how the developers intend the system to be used.
Whenever you work with a major open source project, download the source. You may or may not look at the details, but the tests are invaluable.
2. Tests aren’t part of production code.
This isn’t as big a deal from a developer point of view, but it’s a huge issue for managers. One of the reasons companies are reluctant to adopt new languages is that they aren’t sure how well they work in a production environment. Production code often involves complex approval processes and performance assessments that can be extremely conservative.
If you would like to try Groovy in your system, testing is one easy way to do it. Groovy has many testing capabilities built into the language, all of which work with both Groovy and Java code. Best of all from a management point of view, at runtime Groovy’s just another JAR file.
This chapter reviews the Groovy APIs and libraries that make testing easier. First I’ll review how Java developers normally test applications, focusing on the JUnit library. Then I’ll show how Groovy enhances that process through its GroovyTestCase extension. Next I’ll show how to test scripts written in Groovy, using subclasses of GroovyTestCase. From there I’ll discuss testing classes in isolation using mocks and stubs. This involves the built-in mock and stub capabilities in Groovy, both through the Expando class and through Groovy’s MockFor and StubFor classes. Finally I’ll show you a glimpse of the future in the form of the powerful Spock framework, a pure Groovy library that simplifies testing for both Java and Groovy projects.
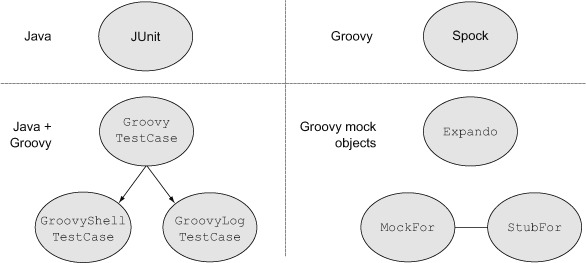
Figure 6.1 is a guide to the technologies discussed in this chapter.
Figure 6.1. Java tests in this chapter are from JUnit. The standard Groovy library includes a subclass of JUnit’s TestCase called GroovyTestCase, and its subclasses are useful as well. The Spock framework is a very popular alternative testing API that includes a JUnit test runner. Groovy makes it easy to create mock objects through library classes like Expando, MockFor, and StubFor.
6.1. Working with JUnit
The agile development community created JUnit (http://junit.org) as a great tool for automating tests. While other Java testing tools exist, JUnit has been so influential that nearly every Java developer I encounter has either used it or heard of it. JUnit’s success has spawned an entire family of comparable tools for other languages (known collectively as “xUnit”). JUnit is simple, easy to use, and ubiquitous in the Java world. As I’ll show in this chapter, the available Groovy tools also are easy to use and easy to learn, and some of them are based directly on JUnit.[1]
1 Now known more commonly as “agile” development, because most Fortune 500 companies don’t want to be associated with “extreme” anything.
JUnit is an open source project created by two of the founders of Extreme Programming,1 Erich Gamma and Kent Beck. The JUnit library can be downloaded from the home site (http://junit.org), but it’s built into most of the common IDEs, including Eclipse, NetBeans, and IntelliJ IDEA. It also can be retrieved from the Maven central repository, using a POM dependency of the form
<dependency>
    <groupId>junit</groupId>
    <artifactId>junit</artifactId>
    <version>4.10</version>
</dependency>
As an alternative, JUnit version 4.5 and above enables the artifact ID junit-dep instead, which does not include the so-called Hamcrest matchers (http://code.google.com/p/hamcrest/) that simplify the syntax in certain cases. Like most cool projects, the source code for JUnit now resides at GitHub, at https://github.com/junit-team/junit.
Most of the Gradle build files in this book (especially for the projects in this chapter) include JUnit as a “test-compile” dependency. That means classes in the API (like org.junit.TestCase and org.junit.Assert) are only available for test classes.
When writing JUnit tests in Groovy, you have two options. You can write a JUnit test with annotations as usual, but implement it in Groovy, or you can extend the GroovyTestCase class. The only difference is that GroovyTestCase adds a few additional methods to the TestCase class from JUnit.
Because this book is all about integration, I’d like to examine the following cases:
- Use a standard Groovy JUnit test to check a Java implementation.
- Use a standard Java JUnit test to check a Groovy implementation.
- Write a Groovy test that extends GroovyTestCase to see what additions it provides.
In each case I need something to test. Because I plan to mix the languages, one way I’ve found that makes that easier is to declare my methods in a Java interface and then implement it in both languages. That’s actually a pretty general rule.
Groovy implements Java
Groovy classes can implement Java interfaces as easily as Java classes can.
The next listing shows a Java interface, called UtilityMethods, containing three method declarations.
Listing 6.1. A Java interface with three methods
public interface UtilityMethods {
    int[] getPositives(int... values);
    boolean isPrime(int x);
    boolean isPalindrome(String s);
}
In true test-driven development (TDD) I would now write the tests, watch them fail, and then write the correct implementations. Because the subject of this chapter is the tests rather than the implementations, let me present the implementations first.[2]
2 I try to use TDD, but more often I use GDD, which stands for Guilt-Driven Development. If I write code and it’s not tested, I feel guilty and write a test for it.
The following listing is the Java implementation of the UtilityMethods interface.
Listing 6.2. The Java implementation of the UtilityMethods interface
import java.util.ArrayList;
import java.util.List;

public class JavaUtilityMethods implements UtilityMethods {

    public int[] getPositives(int... values) {
        List<Integer> results = new ArrayList<Integer>();
        for (Integer i : values) {
            if (i > 0) results.add(i);
        }
        int[] answer = new int[results.size()];
        for (int i = 0; i < results.size(); i++) {
            answer[i] = results.get(i);
        }

        return answer;
    }

    public boolean isPrime(int x) {
        if (x < 0) throw new IllegalArgumentException("argument must be > 0");
        if (x == 2) return true;
        for (int i = 2; i < Math.sqrt(x) + 1; i++) {
            if (x % i == 0) return false;
        }
        return true;
    }

    public boolean isPalindrome(String s) {
        StringBuilder sb = new StringBuilder();
        for (char c : s.toCharArray()) {
            if (Character.isLetter(c)) {
                sb.append(c);
            }
        }
        String forward = sb.toString().toLowerCase();
        String backward = sb.reverse().toString().toLowerCase();
        return forward.equals(backward);
    }
}
The implementations will not be surprising to anyone with a Java background. The Groovy implementation, shown in the next listing, is somewhat shorter.
Listing 6.3. The Groovy implementation of the UtilityMethods interface

There is, in fact, a subtle bug in the implementation of the isPrime method. The tests will detect it and give me a chance to explain the trap.
In the next subsection I’ll use Java to test the Groovy implementation and fix the bug. Then I’ll use Groovy to test the Java implementation, and finally I’ll write the test as a subclass of GroovyTestCase to see how that can help.
6.1.1. A Java test for the Groovy implementation
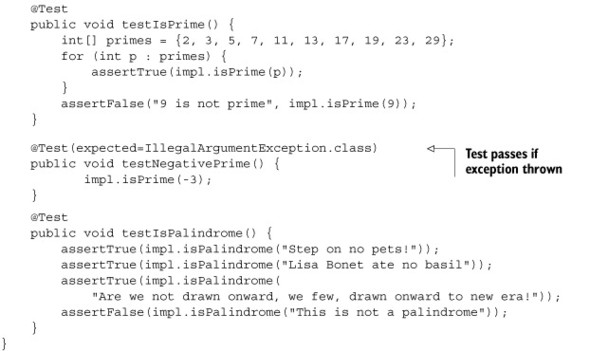
The following listing contains a JUnit 4 test, written in Java, to test the Groovy implementation. It includes a static import for the methods in the org.junit.Assert class and @Test annotations for the individual tests.
Listing 6.4. A Java JUnit test to check the Groovy implementation
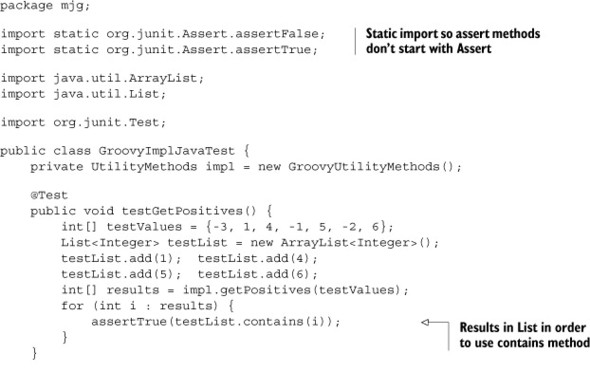
In JUnit 3 tests extended the org.junit.TestCase class, and test methods were detected by reflection. TestCase had all the needed assert methods in it. Now, in JUnit 4, tests don’t have a superclass and are detected through the @Test annotation. The assert methods are now static methods in the Assert class, leading to probably the most common use of static imports in all of Java. If you do a static import on the Assert class you can write the assert methods the same way they looked in the older version.
The only other interesting part of this is the use of the expected property of the @Test annotation, which declares that the test only passes if the expected exception is thrown. Figure 6.2 shows the result.
Figure 6.2. The isPrime method has a bug, but the rest are fine.
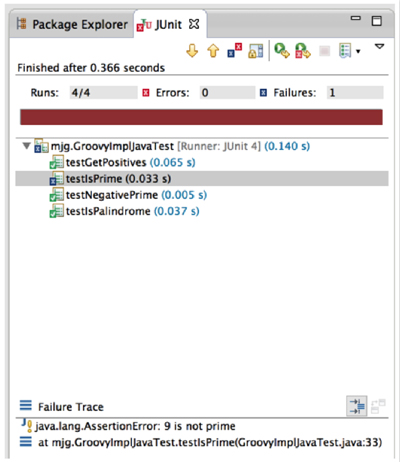
The test detected that the Groovy implementation is returning true for all cases. The Groovy implementation divides the given number by all the integers from 2 up to the square root of the number minus 1, looking for any that come out even. That algorithm is fine. The problem is that if a composite (non-prime) number is detected, the method is supposed to return false.
Unfortunately, a return from inside a closure doesn’t behave the way a regular Java developer expects. In fact, when you return from a closure it’s like you’re returning from a method within another method. It only returns from the closure, not the method containing it.
That’s a trap worthy of a callout:
Return From Closure
A return from inside a closure only returns from the closure, not the method that contains it.
Probably the easiest fix is to switch to a loop, where returns work as expected. Here’s one proper implementation:
boolean isPrime(int x) {
    if (x < 0) throw new IllegalArgumentException('argument must be > 0')
    if (x == 2) return true

    for (num in 2..< Math.sqrt(x) + 1) {
        if (x % num == 0) {
            return false
        }
    }
    return true
}
Now the test passes. Next I’ll show a Groovy test for the Java implementation.
6.1.2. A Groovy test for the Java implementation
You can implement JUnit tests using Groovy as easily as Java, with the attendant code simplifications. The next listing shows such a test.
Listing 6.5. A Groovy JUnit test for a Java implementation
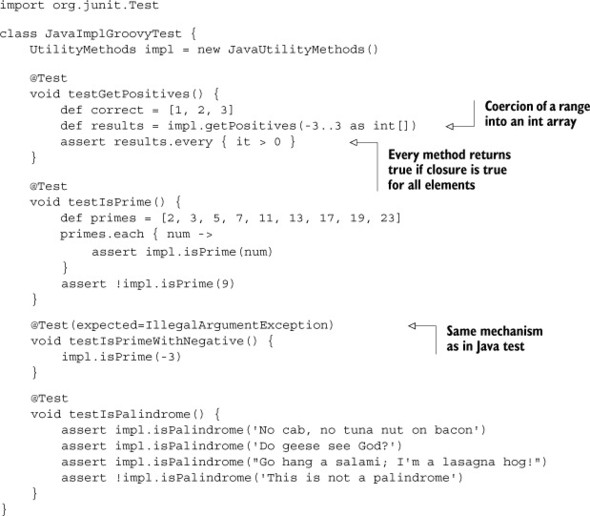
There are some code simplifications here, but this is still recognizably a standard JUnit test. Initial data can be provided by coercing a range into an array of integers. The every method in Collection lets me check all the return values in one statement. Otherwise this is the same as before.
One other note: due to the Groovy Truth,[3] assert in Groovy is the same as assertTrue and assertNotNull. Also, the Groovy assert has excellent debugging output. As a result, most Groovy developers use assert in their tests rather than any of the assert methods from the org.junit.Assert class.
3 Non-null references are true, non-zero numbers are true, non-empty collections are true, non-empty strings are true, and so on.
Finally, let me show a test class that extends GroovyTestCase and see what extra capabilities that brings.
6.1.3. A GroovyTestCase test for a Java implementation
Groovy provides the class groovy.util.GroovyTestCase as part of its standard library. As mentioned earlier, it extends org.junit.TestCase. The following listing shows one such test for the Java implementation.
Listing 6.6. A GroovyTestCase test for the Java implementation
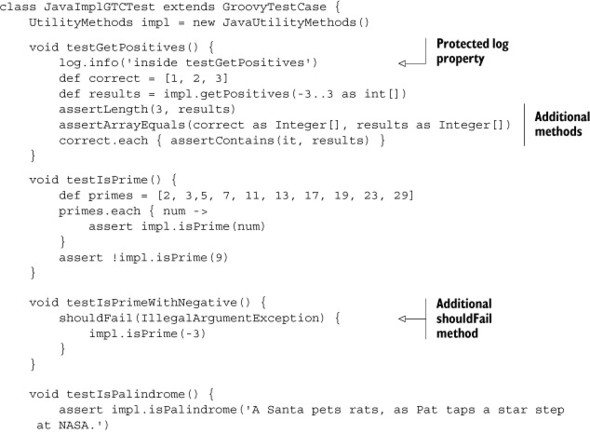
There are a few new features here. First, GroovyTestCase includes a static, protected property called log of type java.util.logging.Logger. It’s not exactly difficult to add a logger to a test yourself, but providing one automatically is a convenience.
Next, the class adds an assertLength method. It has three overloads. In each, the first argument is the expected length of the array. The second argument is an array of integers, an array of characters, or an array of type Object. Here I’m using the method to check that the number of positive integers returned is as expected.
The class also provides an assertArrayEquals method, which takes two Object arrays as arguments. The docs say that this method checks that the arrays are equivalent and contain the same elements.[4]
4 That sounds like it’s from the Department of Redundancy Department, but it’s not.
Another added method is assertContains. That method has two overloads, one for characters and one for integers, so it’s only useful in those cases.
Finally, the superclass also provides the shouldFail method, which takes either an exception type and a closure or just a closure. It expects an exception when the closure is run, so it behaves much as the @Test annotation with an expected property.
The GroovyTestCase class has a few additional methods that don’t appear here, like assertScript, shouldFailWithCause, and the ever-popular notYetImplemented. See the GroovyDocs for details.
The interesting part is that this test can be run from the command line. The groovy command acts as a text-based JUnit runner for GroovyTestCase subclasses. The result looks similar to this:
$ groovy -cp bin src/test/groovy/mjg/JavaImplGTCTest.groovy
.Jun 23, 2013 5:53:05 PM java_util_logging_Logger$info call
INFO: inside testGetPositives

...
Time: 0.179

OK (4 tests)
The Java interface and implementation classes are compiled and reside in the project’s bin directory, so they need to be added to the classpath when running the Groovy script.
1. JUnit is the most common Java unit-testing framework in the industry.
2. Normal JUnit tests are based on annotations. The @Test annotation has a property called expected. Such tests only pass if the expected exception is thrown.
3. Version 4 tests do not have a superclass. Instead, all of the assert methods are static methods in the org.junit.Assert class.
4. By the Groovy truth, assert, assertTrue, and assertNotNull are all the same.
5. Because the Groovy assert provides so much debugging information when it fails, it’s normally preferred over the standard JUnit assertEquals methods.
6. GroovyTestCase extends TestCase from JUnit and adds a handful of convenience methods, like assertLength and shouldFail.
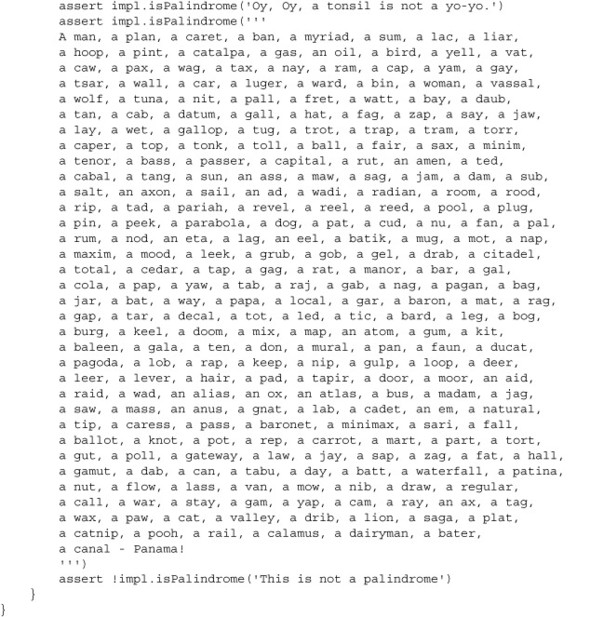
5 Before I leave this section, I should mention that the palindromes used in the examples come from the Gigantic List of Palidromes page at www.derf.net/palindromes/old.palindrome.html.
Testing a script written in Groovy involves special circumstances, especially if input data is supplied from outside. That’s the subject of the next section.
6.2. Testing scripts written in Groovy
Testing scripts is a bit different from testing classes. You don’t normally instantiate a script and call a method on it, although you can. Instead, it’s easiest just to execute the script and let its own internal assert statements do any correctness checks.
Using assert
When Groovy developers write scripts, they typically add asserts to demonstrate that the script works properly.
Running a script inside a test case is easy enough if no input or output variables are involved. Because scripts normally contain assert statements that verify their correctness, the key is simply to execute the script programmatically. That’s what the GroovyShell class is for.
Here’s a simple example. Consider a short but powerful script that accesses the Internet Chuck Norris Database,[6] reproduced from chapter 4:
6 Arguably, this is why the internet was invented.
import groovy.json.JsonSlurper

def result = 'http://api.icndb.com/jokes/random'.toURL().text
def json = new JsonSlurper().parseText(result)
def joke = json?.value?.joke
assert joke
println joke
Chuck Norris can instantiate an interface
This script, when executed, accesses the RESTful web service at the URL shown, retrieves a random joke in JavaScript Object Notation (JSON) form, parses (or, rather, slurps) it, and prints the resulting joke. The script uses the safe dereference operator to avoid NullPointerExceptions in case something goes wrong, but it has an assert statement to check that something actually was retrieved. When executed, the result is something like To test this script all I need to do is execute it and let the embedded assert statement do the work. I can execute it programmatically as in the following listing.
Listing 6.7. A class to hold all the script tests
class ScriptTests {
    @Test
    void testChuckNorrisScript() {
        GroovyShell shell = new GroovyShell()
        shell.evaluate(new File('src/main/groovy/mjg/chuck_norris.groovy'))
    }
}
The GroovyShell class, discussed in chapter 3 on Groovy and Java integration, has an evaluate method that takes a File argument. I simply point the File to the script in question, and the evaluate method on the shell executes it.
What if I want to check the results? In this case the result is random, but if my script has an actual result based on input values, is there something that can be done then?
To handle this I’m going to need a binding for the script (again discussed in chapter 3). A binding is an object that allows input and output variables to be accessed from the script.
Script Binding
Any variable that isn’t declared in a script is part of the binding and can be accessed from outside.
Consider the classic “Hello, World!” script in Groovy. I’ll put it in a package in the next listing, but other than that it’s the same script described in appendix B, “Groovy by feature.”
Listing 6.8. The “Hello, World!” script
package mjg
println 'Hello, World!'
This script doesn’t contain any assert statements, but because it prints to the console I’d like to be able to check the output. To do so I can assign the out property of the corresponding binding to a StringBuffer, which I can access after the script executes.[7] The following test has been added to the ScriptTests class started in listing 6.7.
7 This isn’t documented well at all, so consider it more value added for you by reading this book. Guillaume Laforge told me about it (and wrote it, too), so he gets the real credit.
Listing 6.9. A test that captures script output
@Test
void testHelloWorld() {
    Binding binding = new Binding()

    def content = new StringWriter()
    binding.out = new PrintWriter(content)
    GroovyShell shell = new GroovyShell(binding)
    shell.evaluate(new File('src/main/groovy/mjg/hello_world.groovy'))
    assert "Hello, World!" == content.toString().trim()
}
The out property of the binding is assigned to a PrintWriter wrapped around a StringWriter, so that when the println method in the script is executed, the output goes to the writer instead of the console. Then, after executing the script using the shell, I can check that the proper statement was printed by accessing the writer and trimming its output.
Normally a binding is used to pass input variables into a script. Here’s a slight variation on the previous example, using a name variable.
Listing 6.10. A script with a binding variable
package mjg
println "Hello, $name!"
Again, the only real difference here is that the print statement uses a name variable that is not declared inside the script. That means it can be passed in from outside, as shown in the following test.
Listing 6.11. Setting a binding variable to test a script
@Test
void testHelloName() {
    Binding binding = new Binding()
    binding.name = 'Dolly'
    def content = new StringWriter()
    binding.out = new PrintWriter(content)
    GroovyShell shell = new GroovyShell(binding)
    shell.evaluate(new File('src/main/groovy/mjg/hello_name.groovy'))
    assert "Hello, Dolly!" == content.toString().trim()
}
The name variable is set to Dolly, and the result is confirmed as before.
6.2.1. Useful subclasses of GroovyTestCase: GroovyShellTestCase
The combination of script and binding is sufficiently common that the Groovy API now includes the class groovy.util.GroovyShellTestCase. This is a subclass of GroovyTestCase that instantiates a GroovyShell inside the setUp method. The shell is provided as a protected attribute, but the class also includes a withBinding method that takes a Map of parameters and a closure to execute. The following listing shows tests for the Groovy scripts in this section.
Listing 6.12. Testing Groovy scripts using GroovyShellTestCase

The first test finds the script to run and executes it using the shell instantiated in the superclass. The other tests use the withBinding method to override the out variable and provide an input parameter. The results are the same as instantiating the GroovyShell and Binding classes directly.
The previous example showed how to capture standard output from a script, but normally scripts return concrete values. The withBinding method returns whatever the script returns. As a trivial example, consider the following powerful Groovy calculator, saved in a file called calc.groovy:
z = x + y
Because none of the three variables (x, y, and z) are declared, they can all be accessed through the script’s binding. The next listing shows a test for this script that validates the returned value.
Listing 6.13. A test for the addition script, calc.groovy
void testAddition() {
    def result = withBinding( [x:3,y:4] ) {
        shell.evaluate(new File('src/main/groovy/mjg/calc.groovy'))
        shell.context.z
    }
    assert 7 == result
}
The last line of the closure accesses the z variable, whose value is retrieved from the binding.
There’s one other subclass of GroovyTestCase available in the standard library, called GroovyLogTestCase, which helps when testing logging. That class is the subject of the next subsection.
6.2.2. Useful subclasses of GroovyTestCase: GroovyLogTestCase
Good developers don’t rely on capturing standard output. Instead they use loggers to direct output to locations that can be accessed later. For some time now Java has had a basic logging capability built into it, which can act as the front end on logging API implementations.
The Java logging classes, like Logger and Level, reside in the java.util.logging package. As an example of their use, consider the following minor variation on the calculator script from the previous section, stored in a file called calc_with_ logger.groovy.
Listing 6.14. A script that uses a logger
import java.util.logging.Logger

Logger log = Logger.getLogger(this.class.name)
log.info("Received (x,y) = ($x,$y)")
z = x + y
The static getLogger method from the Logger class is a factory method that creates a Logger instance for this particular component. Here I’m using the name of the script, which becomes the name of the generated class. Once again, the variables x, y, and z are part of the script binding. The logger provides methods corresponding to various log levels. In the standard, the built-in levels include finest, finer, fine, info, warning, and severe. In this particular case, the input parameters are being logged at info level. To execute this script with x and y set to 3 and 4, use the following code:
Binding b = new Binding(x:3, y:4)
GroovyShell shell = new GroovyShell(b)
shell.evaluate(new File('src/main/groovy/mjg/calc_with_logger.groovy'))
println shell.context.z
The result is similar to this (dates and times may vary):
Jun 24, 2013 12:21:19 AM
     org.codehaus.groovy.runtime.callsite.PojoMetaMethodSite$PojoCachedMethod
     SiteNoUnwrap invoke
INFO: Received (x,y) = (3,4)
7
The default logger includes a console “appender,” which directs all log output to the console. The mechanisms for capturing standard output don’t work here, though. Instead, Groovy provides a class called GroovyLogTestCase, which includes a static method called stringLog for that purpose. The next listing shows a test demonstrating its use.
Listing 6.15. Capturing log output in a test case
class CalcWithLoggerTests extends GroovyLogTestCase {

    void testAddition() {
        def result = stringLog(Level.INFO, calc_with_logger.class.name) {
            Binding b = new Binding()
            b.x = 3; b.y = 4
            GroovyShell shell = new GroovyShell(b)
            shell.evaluate(
                new File('src/main/groovy/mjg/calc_with_logger.groovy'))
            assert 7 == shell.context.z
        }
        assert result.contains('INFO: Received (x,y) = (3,4)')
    }
}
The stringLog method returns the log output as a string, which is used to check that the logger is working correctly.
Most of the scripts in this book are tested using the techniques described in this section. If the script (or any class, for that matter) has dependencies, however, there’s a bit more work to be done.
1. Groovy scripts provide their own challenges, especially when trying to capture input or output data and logging results.
2. Groovy source code can be executed programmatically through the GroovyShell and Binding classes, which then execute any contained assert methods.
3. Special subclasses of GroovyTestCase are available to simplify script testing.
True unit testing means testing an isolated class. The success or failure of the test should not rely on any associated objects. Any dependent objects should be replaced by mocks or stubs that return predetermined values when accessed.
This is another area that’s significantly easier to handle when using Groovy than it is when using Java. Groovy has several built-in mechanisms for creating mock or stub objects, which I’ll review in the next section.
6.3. Testing classes in isolation
In object-oriented programs no class is an island. Classes normally have dependencies. An integration test uses all of the dependencies together with the class under test (often called the CUT for that reason), but to truly test a given class you need to isolate it from its environment.
To isolate a class you need to provide it with what it needs from the dependencies in order to do its job. For example, if a class processes data it extracts from the rest of the system, you need to supply that data in a controlled manner that doesn’t involve the rest of the system.
Formally, the class being tested is known as the caller, and the classes it depends on are known as collaborators. The goal is to provide controlled implementations of all the collaborators so the caller can be tested by itself.
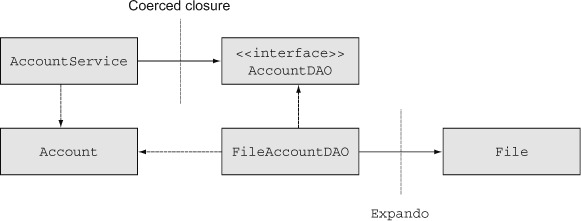
In this section we’ll look at an example similar to the one shown in chapter 7 on Spring. It’s simple enough to follow without being totally artificial. The example is a classic bank account. There’s an Account class, an AccountDAO interface, a File-AccountDAO implementation, and an AccountService class. The layout is shown in figure 6.3. The idea is that the service will have a method called transferFunds that sets transaction boundaries, the DAO class does persistence for the Account, and the Account itself is just an entity that will be saved and restored from some persistence structure.
Figure 6.3. A UML diagram of a simple banking system that uses a service, and a DAO implementation based on flat files. Dashed open arrows represent dependencies, solid open arrows are associations, and the dashed closed arrow indicates implementation.
In this case I’ll use a simple file for persistence. Normally I would use a database, but I want to illustrate how to do a unit test in Groovy with a stub representing the file. In the process I’ll get to discuss the difference between unit tests and integration tests. So far the tests in this chapter haven’t tried to mock any dependent objects, so they can be considered integration tests. Now I’ll look at doing true unit tests.
In addition to the basic classes, figure 6.3 also shows where the techniques in the following subsections (coerced closures and expandos) will be used for testing.
A (programmatic) client would use the banking system by invoking methods on the service class, AccountService, which presumably would be transactional. The service class uses implementations of the AccountDAO interface to work with individual accounts. The Account class itself is a simple POJO.
The next sections show the implementation code for the service and DAO, and illustrate how to use coerced closures and expandos to represent dependent objects. Specifically, when testing the logic in the service class a closure is used to represent the DAO. When testing the DAO implementation an expando stands in for the File class.
6.3.1. Coerced closures
Let me start with the AccountService, as shown in the next listing.
Listing 6.16. AccountService (in Java): uses the AccountDAO to find Accounts
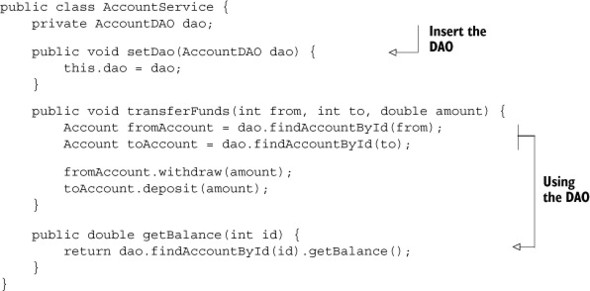
Again, to keep things simple, the AccountService has only two business methods: a transferFunds method to move money from one account to another, and a get-Balance method that delegates to the corresponding method in Account. Both methods take integer ids as arguments and use the AccountDAO to look up the corresponding accounts. Therefore, in order to do its job the AccountService needs an AccountDAO instance.
The AccountService is tied to the AccountDAO. A true unit test would test this class in isolation, meaning I need to provide some kind of stub for the AccountDAO class. AccountDAO is actually an interface, as shown in the next listing.
Listing 6.17. The AccountDAO interface, with CRUD methods for the Account class
public interface AccountDAO {
    Account findAccountById(int id);
    Collection<Account> findAllAccounts();
    int createNewAccount(double balance);
    void deleteAccount(int id);
}
If I create a stub implementation of the AccountDAO interface, I need to implement all these methods. Notice, however, that the AccountService only uses one method out of the interface: findAccountById. That’s the only method I actually need. Unfortunately, I can’t implement only that method. When implementing an interface I need to implement all its methods, whether I plan to use them or not.
I can use a Groovy technique to avoid all the extra work. If I provide a closure with the same argument list as the method I care about, I can then “coerce” the closure into the interface. The closure becomes the implementation of all the methods in the interface with the same argument list.
In this case I want to provide an implementation for the findAccountById method, which takes an integer id and returns an Account. I’m going to use a map to accomplish this:
Account a1 = new Account(1,100)
Account a2 = new Account(2,100)
def accounts = [1:a1, 2:a2]
The Account class (not shown, but it’s a simple POJO contained in the book source code) has a two-argument constructor that takes an id and an initial balance. I instantiated two accounts with IDs 1 and 2 and added them to a map under the ID values. Now I need the closure that implements my method:
{ id -> accounts[id] }
That’s a one-argument closure whose dummy variable, again called id, returns the Account stored under that ID. With that machinery in place I can provide a stub implementation for the DAO to the service class, as shown in the next listing.
Listing 6.18. A JUnit 4 test case for the AccountService, in Groovy, with a stubbed DAO
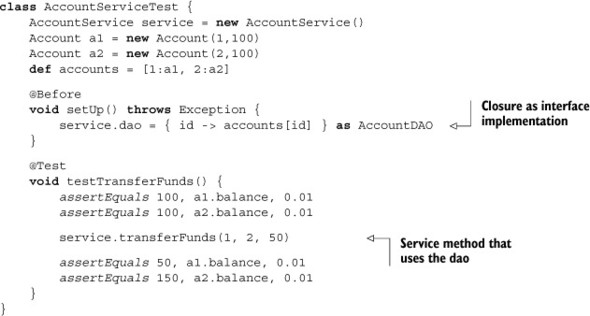
In the setUp method (with the @Before annotation), I use the as operator to treat the closure as an AccountDAO interface. That means the closure will be used as an implementation for all the methods in the interface. Because the only method used in the DAO interface was findAccountById, I can assign a single coerced closure to the dao property in the service (which goes through the setDao method, as usual), and I’m done. The testTransferFunds method verifies that the initial balances of the two accounts are as expected, does the transfer, and then checks that the updated balances are correct, keeping in mind that comparing doubles requires a third argument representing the precision.
If I need to implement multiple methods in the interface using a closure, I can supply a map of closures to method names, where each closure has the proper argument list. For example, the following listing shows a map of closures representing the entire AccountDAO interface and a few tests showing how it works.
Listing 6.19. Using a map of closures to implement an interface
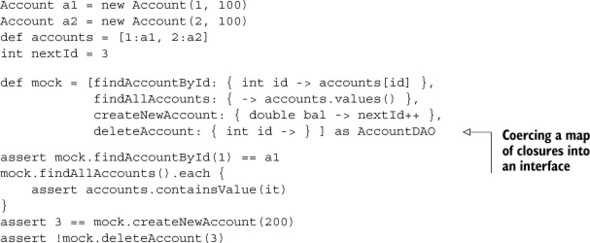
The bottom line is that closures can be used as the implementation of an interface, and that this is an easy and very powerful technique for providing stub implementations of collaborators.
Next I want to test the DAO implementation class that uses a flat file to store the accounts. The goal in this case will be to provide a stub that stands in for the java.io.File class.
6.3.2. The Expando class
I’m going to use a file as my persistence mechanism, but for the testing environment I’m going to keep a cache of accounts in a map. This means that when I initialize the DAO I need to read the file and store the accounts found there in a map, and any time I make a change to an account I need to write the results back to a file. When reading the data I can just use the map—unless the file has been changed, in which case I’ll have to re-read the file.[8]
8 I got the idea of using an expando this way from Jeff Brown, indefatigable coauthor of Definitive Guide to Grails 2 (Apress, 2013).
To start, here are the attributes in my FileAccountDAO class:
def accountsFile
Map<Integer, Account> accounts = [:]
private static int nextId
boolean dirty
I deliberately declared the variable representing the accounts file to be of type def rather than File, for reasons I’ll explain when I create the stub. The other attributes are a map to represent the accounts cache (using generics, which Groovy compiles successfully but doesn’t enforce[9]), a private static integer that will be my primary key generator, and a Boolean flag to indicate whether the accounts cache needs to be refreshed.
9 That’s another subtle trap. The syntax for Java generics compiles in Groovy, but just because you declared a List<Integer> doesn’t mean you can’t add instances of String, Date, or Employee if you want to. In Groovy, think of the generic declaration as nothing more than documentation.
Here’s the method used to read the accounts from the file:
void readAccountsFromFile() {
    accountsFile.splitEachLine(',') { line ->
        int id = line[0].toInteger()
        double balance = line[1].toDouble()
        accounts[id] = new Account(id:id,balance:balance)
    }
    nextId = accounts?.keySet().max() ?: 0
    nextId++
    dirty = false
}
Each account is stored as plain text, with a comma separating the id from the balance. Reading accounts uses the splitEachLine method that takes two arguments: the delimiter (a comma in this case) and a closure that defines what to do with the resulting list. The closure says to parse the ID and balance into the proper data types, instantiate an account with the resulting values, and save it in the map. Then I need to set the nextId variable to one more than the max of the IDs used so far, which gives me an opportunity to use the cool Elvis operator.[10] Finally, because this method refreshes the cache, I can set the dirty flag to false.
10 I don’t really go out of my way to find excuses to use the cool Elvis operator, but I don’t pass them up when they present themselves either.
The corresponding method to write out the accounts is shown next:
void writeAccountsToFile() {
    accountsFile.withWriter { w ->
        accounts.each { id, account ->
             w.println("$id,$account.balance")
        }
    }
    dirty = true
}
The withWriter method is from the Groovy JDK and is added to the java.io.File class. It provides an output writer wrapped around the file that closes automatically when the closure argument completes. The closure writes the ID and balance of each account to a single line in the file, separated by a comma. Because this method changes the file, it sets the dirty flag to true so that the class knows the cache needs to be refreshed.
With those methods in place, the next listing shows the complete DAO implementation.
Listing 6.20. The complete FileAccountDAO implementation, in Groovy
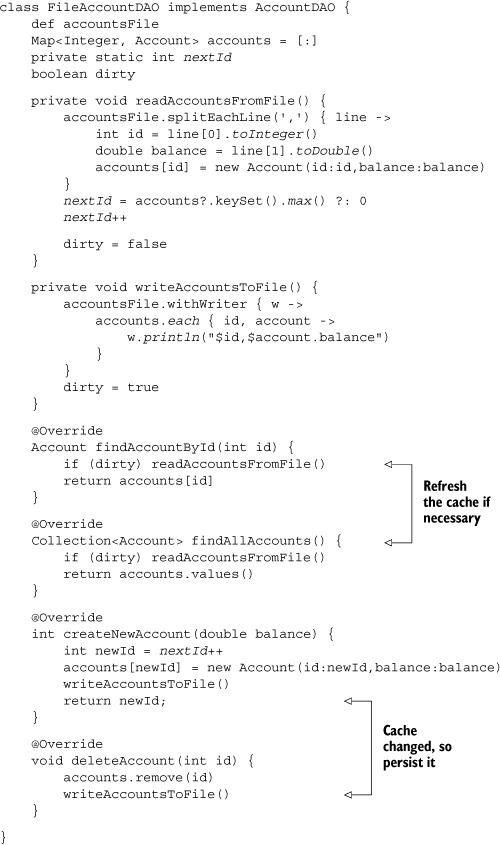
The business methods are straightforward, based on the accounts cache (the map). The only complication is determining whether or not the cache needs to be refreshed before returning a value. Methods that change the accounts force a write to the file. Methods that retrieve them just need to check if a read is necessary.
That’s a fair amount of code, and I would feel very uncomfortable if it wasn’t tested. An integration test would simply supply an actual file to the DAO, and I have such a test in the book’s source code. A unit test, however, would remove the dependency on the File class. That’s where the Expando comes in.
The groovy.util.Expando class creates an object with no attributes or methods of its own, other than the ones it inherits. The cool part is that you can treat an instance of Expando as though it was a map, where the keys are the names of properties or methods, and the values are the property values or method implementations.
Expando
A groovy.util.Expando is a class that creates an empty object to which you can add properties and methods as desired.
To see this in action, let me create an Expando to act as a replacement for the file in my DAO. First I have to see what methods in File need to be represented.
Here are the methods in AccountDAO that use the accountsFile dependency. The methods I need to mock are in bold:
private void readAccountsFromFile() {
    accountsFile.splitEachLine(',') { line ->
        int id = line[0].toInteger()
        double balance = line[1].toDouble()
        accounts[id] = new Account(id:id,balance:balance)
    }
    nextId = accounts?.keySet().max() ?: 0
    nextId++

    dirty = false

}

private void writeAccountsToFile() {
    accountsFile.withWriter { w ->
        accounts.each { id, account ->
            w.println("$id,$account.balance")
        }
    }
    dirty = true
}
Examining the previous listing shows that I’m using splitEachLine and withWriter in the File class and the println method from the Writer class, so these methods need to be implemented in the Expando.
All of those methods are already implemented in the String class. Therefore, why not use a string to represent the file? I’ll add a string property to the Expando and then implement all the needed methods so that they delegate to the corresponding methods on the string. Here’s the resulting code:
Expando ex = new Expando()
ex.data = ''
ex.println = { data.append(it) }
ex.withWriter = { new StringWriter() }
ex.splitEachLine = { pattern, clos ->
    data.splitEachLine(pattern, clos) }
First I instantiate the Expando. Next I add a data property to it and assign it to an empty string. The println method is then implemented through the append method on String. The withWriter method is assigned a closure that returns a new StringWriter. Finally, the splitEachLine method is assigned to a two-argument closure that delegates to the corresponding existing method on String.
All that’s left is to substitute the Expando for the file in the DAO:
FileAccountDAO dao = new FileAccountDAO(accountsFile:ex)
Here at last is the reason I needed to declare the accountsFile variable with def rather than File. An Expando isn’t a file and isn’t related to the File class in any way, so a File reference would be a problem. If I use def to declare the variable instead, I can freely assign the Expando variable to my variable. Duck typing does the rest; every time a method is invoked on the variable, the corresponding method is called on the Expando.
Dynamic Typing to The Rescue
If I declare a reference using def, I can assign it to anything. When I invoke methods on it I’m relying on the methods being there in whatever class I’ve used.
The next listing shows the complete unit test for the file DAO.
Listing 6.21. FileAccountDAO unit test, using an Expando to stub the File
class FileAccountDAOUnitTests {
    FileAccountDAO dao

    @Before
    void setUp() {
        Expando ex = new Expando()
        ex.data = ''
        ex.splitEachLine = { pattern, clos ->
            data.splitEachLine(pattern, clos) }
        ex.withWriter = { new StringWriter() }
        ex.println = { data.append(it) }
        dao = new FileAccountDAO(accountsFile:ex)
    }

    @Test
    void testCreateAndFindNewAccount() {
        int id = dao.createNewAccount(100.0)
        Account local = new Account(id:id,balance:100.0)
        Account fromDao = dao.findAccountById(id)
        assertEquals local.id, fromDao.id
        assertEquals local.balance, fromDao.balance, 0.01
    }

    @Test
    void testFindAllAccounts() {
        (1..10).each { num -> dao.createNewAccount(num*100) }
        def accounts = dao.findAllAccounts()
        assertEquals 10, accounts.size()
        accounts*.balance.each { it in (100..1000) }
    }

    @Test
    void testDeleteAccount() {
        (1..10).each { num -> dao.createNewAccount(num*100) }
        def accounts = dao.findAllAccounts()
        assertEquals 10, accounts.size()
        accounts.each { account -> dao.deleteAccount(account.id) }
        assert 0 == dao.findAllAccounts().size()
    }
}
In a way, I got lucky with this example. The variable I needed to stub, accountsFile, was exposed as a property, so I could assign the Expando to it from outside. What if that’s not the case? What if the variable is instantiated inside the class? Can anything be done then?
If I’m limited to Java, I’m out of luck.[11] In fact, even mocking frameworks have trouble with this situation. Fortunately, Groovy has a built-in mechanism for handling exactly this problem. The classes I need are called StubFor and MockFor.
11 Unless I have AspectJ available, but even then the solution is complicated.
6.3.3. StubFor and MockFor
A typical Groovy developer doesn’t necessarily spend a lot of time metaprogramming, but they sure reap the benefits of it. I use builders in several places in this book. Domain-specific languages (DSLs) like GORM, are built through metaprogramming techniques. The whole Groovy JDK is created through metaclass manipulation. In the last section I used an Expando to create a test object, and that only works in a language that supports metaprogramming. After a while you get used to metaprogramming capabilities and aren’t really surprised by their benefits any more.
In this section I’m going to show a technique that, even after all my years of programming in Groovy, still feels like magic. I know it works, and I use it wherever I can, but every time it happens I have to take a moment to sit back and smile at how cool it is.
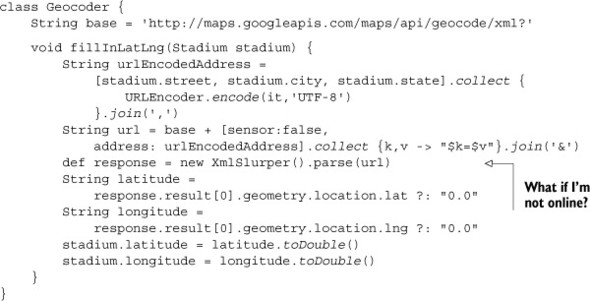
Let me go directly to the example I want to show and then explain the stub technique. Rather than use the bank account system described so far, let me remind you of the geocoder example I’ve used in several chapters of this book. The next listing shows the Geocoder class that’s part of the Groovy Baseball system described in chapter 2.
Listing 6.22. The Groovy Baseball Geocoder class, revisited
I have a test for this class, but it’s most definitely an integration test. The following listing shows a JUnit 4 test for the geocoder, written in Groovy.
Listing 6.23. GeocoderIntegrationTests.groovy: a JUnit 4 test for the geocoder
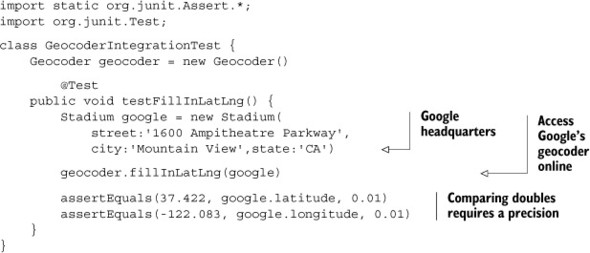
A Stadium has a street, city, state, latitude, and longitude, and the geocoder’s job is to take the address, invoke Google’s geocoder service using it, and use the result to update the latitude and longitude. After setting up a Stadium instance corresponding to Google’s home office, the test invokes the fillInLatLng method and checks that the updated latitude and longitude values are within tolerances.
This works just fine, but to do its job it has to access the Google geocoder service. That’s why it’s an integration test.[12]
12 See http://en.wikipedia.org/wiki/Integration_testing for the definition of an integration test.
What happens if I’m not online? More formally, is there any way I can test the logic in the fillInLatLng method without relying on the external URL?
The online access is being handled through the parse method of XmlSlurper. That method takes a URL, accesses it, downloads the XML response, parses it into a DOM tree, and returns the root element. In a normal mock I’d like to replace the expression “new XmlSlurper().parse(url)” with a pre-defined DOM tree. If the slurper had been supplied from outside this class, I could create a stub and force the parse method to return what I want. Unfortunately, the slurper is instantiated right inside the method.
Here’s where Groovy’s MockFor and StubFor classes come in.
Mocks have strong expectations, while stubs do not. That means that a test involving a mock fails if the collaborator methods are not called the proper number of times and in the proper order. With stubs, expectations are looser; you don’t need to call the methods in the proper order, though it does enforce the multiplicity requirement.
Conceptually, a stub is simply a stand-in for the collaborator, so the focus is on the caller. Because a mock’s expectations are strong, you’re effectively testing the interaction between the caller and the collaborator, known as the protocol.
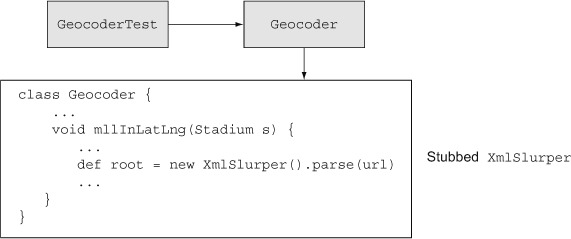
Figure 6.4 shows how I want the stub to work.
Figure 6.4. The geocoder relies on an XmlSlurper instantiated locally to do its job. The goal is to modify its parse method to return the needed value, even though the slurper is a local variable in the test method.
I want the parse method of the slurper to return the root of a DOM tree that looks like what the Google geocoder would have returned had I been able to access it. The easiest way to get that value is to set up the proper XML tree and parse it ahead of time:
String xml = '''
<root><result><geometry>
    <location>
        <lat>37.422</lat>

        <lng>-122.083</lng>
    </location>
</geometry></result></root>'''

def correctRoot = new XmlSlurper().parseText(xml)
The XML string has the proper latitude and longitude for the Google home office. To get the proper root value I invoke the parseText method of the XmlSlurper. My Geocoder class can take that root and walk the tree as usual to get the latitude and longitude.
The challenge is this: how do I get my own Geocoder to use this implementation when there’s no obvious way to inject it? The solution is to use the StubFor class and set the expectations around it:
def stub = new StubFor(XmlSlurper)
stub.demand.parse { correctRoot }
The StubFor constructor takes a class reference and builds a stub around it. Then I “demand” that the parse method return the root of the tree calculated in the previous fragment.
To get Groovy to use the new stub, invoke the test inside a closure argument to the use method:
stub.use {
   geocoder.fillInLatLng(stadium)
}
The use closure is the key. Through the magic of Groovy metaprogramming, when the parse method of XmlSlurper is accessed inside the fillInLatLng method, the demanded version is used rather than the actual implementation. The result is that the business logic of the fillInLatLng method is tested, without relying on the slurper itself.
The next listing shows the complete test. To make absolutely sure that the online version of the geocoder is not being used, I created a stadium with the wrong address. The only way the test passes is if the slurper returns the rigged values.
Listing 6.24. GeocoderUnitTest.groovy: tests geocoder even if not online

The test sets up a Stadium instance that deliberately has the wrong address. The correct root of the DOM tree is generated using the string data, and the demand property of the stub is used to return it. By executing the test inside the use block, the correct answer is supplied at the proper moment, and the test succeeds.
The StubFor and MockFor APIs are far more extensive than what’s being shown here. You can demand that a method returns different preset values each time you call it. You can verify that the methods are called the proper number of times in the proper order by using the verify method on StubFor (MockFor does that automatically). See the API for details.
The only real limitation on the StubFor and MockFor classes is that they can only be used to replace Groovy implementations. You can’t supply a Java class and have it work. Still, if your service is implemented in Groovy, they are an invaluable addition to your testing arsenal.[13]
13 Candor compels me to admit that I worked out how to use StubFor and MockFor over a few days, and then did what I should have done originally: looked them up in Groovy in Action. GinA (as it was then known; the second edition is ReGinA) had it all laid out over a few pages, nice and neat. There’s a reason that Groovy in Action is still my all-time favorite technical book.
1. To easily create a stub of an interface, use closures to implement the methods. This is known as closure coercion.
2. The Expando class has no properties or methods, but both can be added at runtime to configure an object to do what you want.
3. The StubFor and MockFor classes in the standard library can be used to create mock objects even when they’re replacing local variables in the test fixture.[14]
14 If you read nothing else in this chapter, take a look at that.
So far every technique in this chapter has been based on existing classes in the Groovy standard library. One new testing library, however, has been gaining momentum in the Groovy community, and not just because it has a clever name. The Spock framework is simple to learn, easy to use, and the subject of the next section.
6.4. The future of testing: Spock
The Spock framework yields more productivity for less effort than any other framework I’ve encountered. Spend a small amount of time with Spock (for example, through the discussions in this section), and you can immediately be productive. Spock provides both tests and a solid mocking capability in an easy-to-use package.
According to the developer of the framework,[15] the name Spock is a blend of “specification” and “mock.” That may even be true. It seems more likely, however, that somebody just liked the name Spock and the rest is clever rationalization.[16] The result, inevitably, is that any discussion of the framework results in a series of Star Trek-related puns. My original plan was to avoid them, but it’s practically impossible.[17]
15 Peter Niederweiser, who is active and helpful on the Spock email list.
16 Of which I totally approve.
17 For example, Spock is a logical framework for enterprise testing. Test well, and prosper. I have been, and always shall be, your friendly testing framework.
6.4.1. The Search for Spock
The main site for Spock is http://spockframework.org, which actually redirects to a Google code project at https://code.google.com/p/spock/. There you’ll find wiki pages with lots of good information. Like most cool projects these days, the source code is hosted at GitHub at https://github.com/spockframework/spock. You can clone the repository and do a manual build, or you can install the distribution from the standard Maven repository.
Spock versions are tied to Groovy versions. The latest release version of Spock is 0.7-groovy-2.0. Don’t let the low version number deter you.[18] The Spock API is simple and easy to use and understand, and its adoption has been very rapid.[19]
18 Version 1.0 is due out by the time this book appears in print.
19 The Spock plugin will be included in Grails by default starting in version 2.3.
The Gradle file in the next listing shows the appropriate dependencies to build this chapter’s source code.
Listing 6.25. Building and testing with Spock using Gradle
apply plugin: "groovy"

repositories {
    mavenCentral()
}

dependencies {
    groovy "org.codehaus.groovy:groovy-all:2.1.5
    testCompile "org.spockframework:spock-core:0.7-groovy-2.0"
}
The repository at Maven central holds the Groovy distribution and the Spock release versions. The dependency is decoded in the usual way, with the group being “org.spockframework,” the name (or artifact ID, in Maven speak) being “spock-core,” and the version number of 0.7-groovy-2.0. Note that the Spock version is tied to a Groovy version.
6.4.2. Test well, and prosper
Spock tests all extend a superclass called spock.lang.Specification. In addition to its own methods, the Specification class includes the @RunWith annotation from JUnit. The result is that Spock tests can be run within the normal JUnit testing infrastructure.
The tests themselves all have a common form. Each test method (known as a fixture) is declared using the def keyword, followed by a string that describes what the test is supposed to accomplish. Fixture methods normally take no arguments.
Listing 6.26 shows a simple Spock test to verify some String behavior. By convention, Spock test cases end in Spec. That isn’t a requirement,[20] but it does help to keep the Spock tests easily identifiable, especially when your system uses both Spock and JUnit tests together.
20 Spock tests in Grails do have to end in Spec.
Listing 6.26. A specification verifying basic java.lang.String behavior
import spock.lang.Specification;

class StringSpec extends Specification {
    String llap

    def setup() { llap = "Live Long and Prosper" }

    def "LLaP has 21 characters"() {
        expect: llap.size() == 21
    }

    def "LLaP has 4 words"() {
        expect: llap.split(/W/).size() == 4
    }

    def "LLaP has 6 vowels"() {
        expect: llap.findAll(/[aeiou]/).size() == 6
    }
}
The class extends spock.lang.Specification, which is what makes it a Spock test. The spec is testing a String, so it has an attribute named llap. In the setup method, the llap variable is assigned to the string “Live Long and Prosper.” The setup method runs before each test, similar to @Before in JUnit 4. JUnit 3 contains a method called setUp that does the same thing, but in Spock the setup method is written in lowercase, with a def keyword.
The test methods, known as feature methods in the Spock documentation, are written in block structure. In each of the test methods shown here, there’s a single block called expect. The expect block consists of a series of Boolean expressions, each of which must evaluate to true for the test to pass.
The three sample tests check (1) the number of characters in the test string; (2) that there are four words in the test string, based on splitting the string at non-word boundaries; and (3) that the test string has a total of six vowels, again based on a regular expression.
Like JUnit 4, Spock tests can verify that exceptions are thrown. Spock tests can also verify that exceptions are not thrown. Consider the following two tests, which are added to the previous listing:
def "Access inside the string doesn't throw an exception"() {
    when: s.charAt(s.size() – 1)
    then: notThrown(IndexOutOfBoundsException)
}

def "Access beyond the end of the string throws exception"() {
    when: s.charAt(s.size() + 1)
    then: thrown(IndexOutOfBoundsException)
}
These tests use the when/then blocks, which are used as a stimulus/response pair. Any code can be added to the when block, but the then block must consist of Boolean expressions, as with expect. The expressions are evaluated automatically, using the Groovy Truth. This means that non-null references, non-empty strings, and non-zero numbers all evaluate to true.
The charAt method in String throws an exception if its argument is negative or beyond the end of the string. The previous two tests show both conditions, using the thrown() and notThrown() methods. The thrown method can return the exception if you want to process it further, using one of two variations in syntax
Exception e = thrown()
or
e = thrown(Exception)
where the Exception can be any specific exception class.
Consider the following test, which also introduces the extremely useful old method.
Listing 6.27. Another spec, illustrating the old method
class QuoteSpec extends Specification {
    String quote = """I am endeavoring, ma'am, to construct a
        mnemonic memory circuit, using stone knives and bear skins."""

    List<String> strings

    def setup() { strings = quote.tokenize(" ,.") }

   def "test string has 16 words"() {
        expect: strings.size() == 16
    }

    def "adding a word increases total by 1"() {
        when: strings << 'Fascinating'
        then: strings.size() == old(strings.size()) + 1
    }
}
The tokenize method takes a set of delimiters as arguments and divides the string at those positions. The result is an ArrayList of words. That’s interesting enough, but the cool part is in the test that appends a new word to the list. In this case, the size of the list is evaluated twice, once before the when block is executed and once afterward. The expression shows that the result afterward is equal to the result beforehand, plus one.
6.4.3. Data-driven specifications
Spock tests have one additional feature beyond what appears in other testing frameworks: data-driven[21] specifications. The idea is that if you provide a collection of data in a format that Groovy can iterate over, then the test will run each entry through any supplied Boolean conditions.
21 Shouldn’t Data run on Android? (Yeah, that was particularly bad. Sorry.)
This is easier to show than to describe. Consider the test shown on the main page of the Spock website, repeated in the next listing. It feeds names from a data table into expect, using three different sources of data.
Listing 6.28. Data-driven Spock test
class HelloSpock extends spock.lang.Specification {
    @Unroll
    def "#name should be #length"() {
        expect:
        name.size() == length

        where:
        name     | length
        "Spock"  | 5
        "Kirk"   | 4
        "Scotty" | 6
        'McCoy'  | 5
    }

    def "check lengths using arrays"() {
        expect: name.size() == length

        where:
        name << ["Spock","Kirk","Scotty"]
        length << [5,4,6]
    }
    def "check lengths using pairs"() {
        expect: name.size() == length
        where:
        [name,length] << [["Spock",5],["Kirk",4],["Scotty",6]]
    }
}
The where block in the first test contains a data table. The column names (name and length) are variables, which are referenced in the expect block. Groovy takes each row of the table and evaluates the expect condition. It’s an elegant system that’s easy to understand and quite powerful. While the data table is a powerful construct, in fact any collection that Groovy knows how to iterate over works as well.
The second and third tests illustrate the same process but supply the data via collections. The second test uses separate lists for the name and length values. This means that to understand the test data you have to match up the collection indexes. For example, “Spock” goes with 5, “Kirk” goes with 4, and so on. The third test is a bit easier to visualize, because the data is organized into ordered pairs. Which mechanism you use (data table, sets of pairs, individual collections, and so on) is purely a question of style.
Another interesting part of Spock is the @Unroll annotation. Without it, the name listed in the test output would be the name of the test itself. With it, each row of the where block creates a different name.
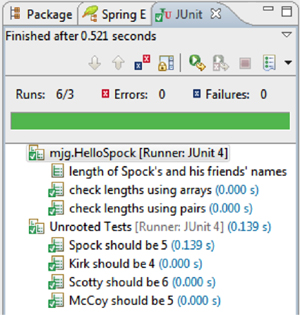
Figure 6.5 shows the results of executing this test in the Groovy and Grails Tool Suite (which is just Eclipse plus lots of plugins) as a JUnit test. In addition to demonstrating that Spock tests run with the existing JUnit infrastructure, the test also shows the difference in output that results with the @Unroll annotation. The second and third tests use the name of the method as their output. The first test, marked with @Unroll, shows up under “unrooted tests,” where each test gets its own unique name based on the test data.
Figure 6.5. Results of the Spock data-driven tests. The test with the @Unroll annotation is shown in the Eclipse output as “unrooted,” showing different output messages for each set of data.
What if the class you plan to test has dependencies? Those dependencies need to be stubbed or mocked, as discussed earlier. Fortunately, Spock has its own mocking capabilities built in.
6.4.4. The trouble with tribbles
The Specification class from Spock contains a method called Mock that is used to create mock objects. If your dependency is based on an interface, the Mock method can generate a mock object directly, using Java’s dynamic proxy mechanism. If it’s a class, Mock will extend the class using the CGLIB library.
It’s time for a relatively simple (and relatively silly) example. A tribble[22] is a small, furry animal that breeds prolifically, likes Vulcans, and hates Klingons. Here’s a Tribble class, written in Groovy.
22 See http://en.wikipedia.org/wiki/The_Trouble_With_Tribbles for details, in the unlikely event you haven’t seen that particular Star Trek (original series) episode. It holds up remarkably well after 35 (!) years.
Listing 6.29. A Tribble class in Groovy
class Tribble {

    String react(Vulcan vulcan) {
        vulcan.soothe()
        "purr, purr"
    }

    String react(Klingon klingon) {
        klingon.annoy()
        "wheep! wheep!"
    }

    def feed() {
        def tribbles = [this]
        10.times { tribbles << new Tribble() }
        return tribbles
    }

}
What do you get when you feed a tribble? Not a fat tribble, but rather a lot of hungry little tribbles. The feed method returns a list containing the original tribble plus 10 more.
The overloaded react method takes either a Vulcan or a Klingon as an argument. If it’s a Vulcan, the tribble soothes the Vulcan and purrs contentedly. If it’s a Klingon, the tribble annoys the Klingon and reacts badly. The Tribble class has a dependency on both Vulcan and Klingon.
To keep things simple, both Vulcan and Klingon are interfaces. The Vulcan interface is shown here:
interface Vulcan {
    def soothe()
    def decideIfLogical()
}
Vulcans have a soothe method, called by the tribble, and a decideIfLogical method that isn’t necessary for this test. That’s one of the problems with implementing stubs, by the way; you have to implement all the interface methods, even the ones that aren’t relevant to the test in question.
Klingons are a bit different:
interface Klingon {
    def annoy()
    def fight()
    def howlAtDeath()
}
Tribbles annoy Klingons. Klingons also fight and howlAtDeath,[23] two methods that aren’t needed here. To test the Tribble class, I need to create mock objects for both the Vulcan and Klingon classes, set their expectations appropriately, and test that the tribble behaves appropriately around each.
23 Klingons in Star Trek: The Next Generation howl at death. They didn’t in the original series, as far as I know.
Let me show the tests one by one. First I’ll check to see that the feed method works properly:
def "feed a tribble, get more tribbles"() {
    when:
    def result = tribble.feed()

    then:
    result.size() == 11
    result.every {
        it instanceof Tribble
    }
}
The when block invokes the feed method. The then block checks that there are 11 elements in the returned collection and that each is a tribble. There’s nothing new or unusual about this test. Moving on to the test for reacting to Vulcans, however, I need to mock the Vulcan interface.[24]
24 When I mock a Vulcan, I feel like Dr. McCoy.
def "reacts well to Vulcans"() {
    Vulcan spock = Mock()

    when:
    String reaction = tribble.react(spock)

    then:
    reaction == "purr, purr"
    1*spock.soothe()
}
There are two ways to use the Mock method in Spock. The first is shown here: instantiate the class, and assign it to a variable of the proper type. The method will implement the interface of the declared type. The second way is to use the interface type as an argument to the Mock method, which isn’t shown here.
Once the mock has been created, the when block uses the mock as the argument to the react method. In the then block, first the proper reaction is checked, and then comes the interesting part. The last line says that the test passes only if the soothe method is called on the mock exactly one time, ignoring any returned value.
This is a very flexible system. The cardinality can be anything, including using an underscore as a wild card (for example, (3.._) means three or more times).
Moving on to the Klingon interface, the following test does multiple checks:
def "reacts badly to Klingons"() {
    Klingon koloth = Mock()

    when:
    String reaction = tribble.react(koloth)

    then:
    1 * koloth.annoy() >> {
        throw new Exception()
    }
    0 * koloth.howlAtDeath()
    reaction == null
    Exception e = thrown()
}
After mocking the Klingon[25] and invoking the react method, the then block first checks to see that the annoy method on the mock is invoked exactly once and, using the right-shift operator, implements the method by throwing an exception. The next line checks that the howlAtDeath method is not invoked at all. Because the annoy method throws an exception, there is no returned reaction. The last line then verifies that annoying the Klingon did in fact throw the expected exception.
25 How do you mock a Klingon? From a galaxy far, far away (rimshot).
The idea is that even if the mock is configured to throw an exception, the tribble test still passes. The test verifies that the exception is thrown without making the test itself fail.
6.4.5. Other Spock capabilities
The capabilities shown so far hopefully provide a teaser for Spock. There are more features in Spock that go beyond the scope of this chapter. For example, the @Ignore annotation on a test skips that test, but there’s also an @IgnoreRest annotation that skips all the other tests instead. The @IgnoreIf annotation checks a Boolean condition and skips the test if the condition evaluates to true. There’s also a @Stepwise annotation for tests that have to be executed in a particular order, and a @Timeout annotation for tests that are taking too long to execute.
2. The Specification class has a JUnit runner, so Spock tests run in your existing JUnit infrastructure.
3. Spock test names are descriptive sentences. The framework uses AST transformations to convert them to legal Groovy.
4. The tests are composed of blocks, like expect or when/then. Expressions in an expect or then block are evaluated for the Groovy Truth automatically.
5. The old method from spock.lang.Specification evaluates its argument before the when block is executed.
6. The where block is used to iterate over test data, either from a table, a database result, or any data structure over which Groovy can iterate.
7. Spock has its own built-in mocking capabilities.
The wiki for Spock contains many examples, as well as detailed documentation about mock details (called interactions) and more. The source code also comes with a Spock example project that you can use as a basis for your project. Spock is built with Gradle, which configures all the dependencies, and can plug into other APIs like Spring. See the docs and APIs for details.[26]
26 See also the Manning book Spock in Action, by Ken Sipe, coming soon.
6.5. Summary
This chapter covered a lot of ground in the testing arena. Groovy brings a simple assert statement into play that can be used for scripts and includes the GroovyTestCase class that extends JUnit’s capabilities. When it comes to managing dependencies, you can build a stub implementation of an interface using closures, and you can build a more complete stub using the Expando class.
Groovy also has the StubFor and MockFor classes, which can be used to test interactions. They can even create mock objects for classes that are instantiated as local variables, which is pretty amazing.
Finally, if you’re willing to add an additional library, the Spock testing framework provides a simple yet versatile API that still runs on your existing JUnit-based infrastructure. It also has its own mock abilities and integrates with other libraries, like Spring and Tapestry.
Adding Groovy also adds a wide variety of options for testing Java and mixed Java/Groovy projects. Hopefully the techniques in this chapter will help you decide where you can get the most benefit from them.