Chapter 9
Making Connections
Topics: Connecting to MIDI devices (pianos, guitars, etc.), the Python MIDI library, MIDI programming, Open Sound Control (OSC) protocol, connecting to OSC devices (smartphones, tablets, etc.), client-server programming via OSC messages, the Python OSC library, creating hybrid (traditional + computer) musical instruments.
9.1 Overview
In the previous chapter, we began designing unique interactive musical instruments for live performance, employing the GUI library in the process. In this chapter, we extend this thread by exploring connections between a computer (e.g., a laptop) and external devices, such as MIDI instruments, synthesizers, various control surfaces, and smartphones. This is accomplished through two additional Python libraries (provided with this textbook), which allow your programs to connect to any device that communicates using MIDI or OSC (Open Sound Control) protocols.
This capability is quite enabling because, in addition to developing GUIs that turn your computer into a musical instrument, now we can design and implement hybrid musical instruments, incorporating traditional musical instrument interfaces (e.g., piano or guitar). These traditional instruments need to be MIDI or OSC enabled (as discussed below), so they can be connected to a Python program, with the latter “deciding” what sounds to generate.* Additionally, you may create futuristic (at the time of this writing) instruments, which may consist of smartphones and or tablets that somehow drive, guide, or contribute to the making of sound. Again you, the programmer, become a digital instrument maker, who can shape the musical experience of others. Your ability to design and program unique, innovative hybrid instruments gives you immense power, as your design choices will affect the type of music (style, timbres, etc.) that your end-users can make and, ultimately, will channel their creative expression. This allows you to make connections not only with arbitrary external instruments and devices, but also to design social events and community musical experiences that bring people together in various contexts of shared performance and music making.†
9.2 MIDI Devices—Connecting to Pianos, Guitars, etc.
This section looks at how to connect Python programs to external MIDI devices. This is accomplished by utilizing the MIDI library (provided with this textbook). There are two types of possible connections, input and output:
- Using MIDI input (one or more), we allow our program to receive incoming MIDI data from external devices, such as a MIDI-enabled instrument (guitars, pianos, violins, saxophones).
- Using MIDI output, we enable our programs to drive external synthesizers.
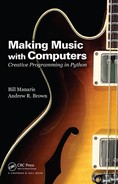
In other words, we are not limited anymore to receiving musical (or other) input only through the computer keyboard and mouse, and possibly interacting with a graphical user interface (as described in the previous chapter). Now we can extend our input framework to include elaborate, multimodal instruments (i.e., instruments with various input modalities), connecting virtual (GUI) displays with MIDI pedals, and, most importantly, traditional (yet MIDI-enabled) instruments, as shown in Figure 9.1.
A MIDI-enabled guitar and a MIDI pedal board connected to a Python program running on a laptop, along with various other devices and instruments (photo courtesy of Dave Brown).
Additionally, we are no longer limited to the MIDI synthesizers provided with our computer (i.e., the synthesizer of our computer’s operating system or the Java synthesizer). We now can connect to any available MIDI synthesizer. This is very empowering as it allows us to make music of higher timbral quality and to construct more elaborate musical instruments (limited by the connectivity of our computer and our imagination), as well as more creative, avant garde music performance scenarios and projects.
9.2.1 Case Study: Make Music with a MIDI Instrument
This case study is a variation of the last case study in Chapter 8 (“Random Circles with Timer”). Here it modifies the program to receive input from an external MIDI instrument, such as a MIDI guitar, piano, or saxophone (among others). It eliminates the Timer object, since timing information will now be provided by the user through entering notes on a real musical instrument.
Here is the (much shorter) program:
# randomCirclesThroughMidiInput.py
#
# Demonstrates how to generate a musical animation by drawing random
# circles on a GUI display using input from a MIDI instrument.
# Each input note generates a circle - the lower the note, the lower
# the red+blue components of the circle color. The louder the note,
# the larger the circle. The position of the circle on the display
# is random. Note pitches come directly from the input instrument.
#
from gui import *
from random import *
from music import *
from midi import *
##### create main display #####
d = Display("Random Circles with Sound")
# define callback function for MidiIn object
def drawCircle(eventType, channel, data1, data2):
"""Draws a circle based on incoming MIDI event, and plays
corresponding note.
"""
global d # we will access the display
# circle position is random
x = randint(0, d.getWidth()) # x may be anywhere on display
y = randint(0, d.getHeight()) # y may be anywhere on display
# circle radius depends on incoming note volume (data2)
radius = mapValue(data2, 0, 127, 5, 40) # ranges 5-40 pixels
# color depends on on incoming note pitch (data1)
red = mapValue(data1, 0, 127, 100, 255) # R component (100-255)
blue = mapValue(data1, 0, 127, 0, 100) # B component (0-100)
color = Color(red, 0, blue) # create color (green is 0)
# create filled circle from parameters
c = Circle(x, y, radius, color, True)
# and add it to the display
d.add(c)
# now, let's play the note (data1 is pitch, data2 is volume)
Play.noteOn(data1, data2)
# establish a connection to an input MIDI device
midiIn = MidiIn()
# register a callback function to process incoming MIDI events
midiIn.onNoteOn(drawCircle)
First, we need to import the MIDI library
from midi import *
This library (as discussed below) provides objects that allow our programs to connect to external input and output MIDI devices.
To establish a connection to a MIDI object, we do the following:
midiIn = MidiIn()
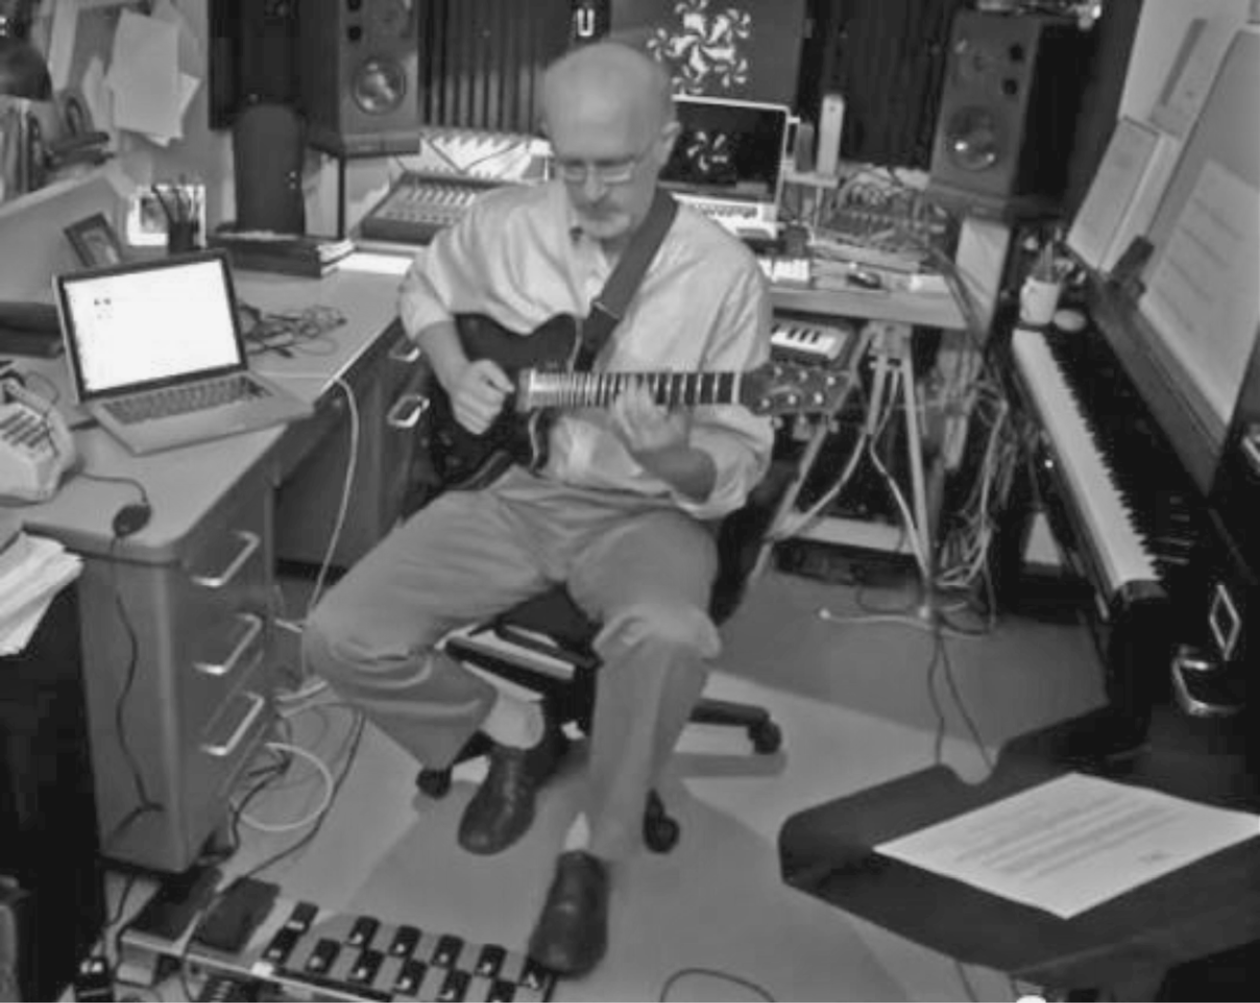
This creates a MidiIn object, which allows us to establish communication with a MIDI instrument connected to our computer. When the above statement is executed, it opens the GUI shown in Figure 9.2. This GUI contains a drop-down list populated with all available input MIDI devices. When we select one of these devices, the MidiIn object is connected to that device (and the GUI disappears).
Display opened when creating a MidiIn object. It contains all available input MIDI devices.
A program may contain several MidiIn objects, one for each desired input MIDI device. This opens endless possibilities for communication and processing of incoming MIDI data.
Now, to receive and process input, we register a callback function with the MidiIn object, as follows:
midiIn.onNoteOn(drawCircle)
This callback function needs to accept four parameters, namely, eventType, channel, data1, data2. These parameters are defined by the MIDI standard, and are explained in the next section. For NOTE-ON events, eventType is always 144, channel represents which channel is being used by the MIDI instrument, data1 holds the pitch of the note, and data2 holds the velocity of volume of the note.
The MidiIn object provides support for several other events. As seen in the next section, the information stored in the parameters (i.e., eventType, channel, data1, data2) can vary depending on the type of the particular event.
Finally, notice how we derive the circle’s radius and color from the incoming MIDI note:
# circle radius depends on incoming note volume (data2)
radius = mapValue(data2, 0, 127, 5, 40) # ranges 5-40 pixels
# color depends on on incoming note pitch (data1)
red = mapValue(data1, 0, 127, 100, 255) # R component (100-255)
blue = mapValue(data1, 0, 127, 0, 100) # B component (0-100)
color = Color(red, 0, blue) # create color (green is 0)
In particular, the circle’s radius depends on the MIDI note’s velocity (which is data2 for note events), whereas both the red and blue components of the circle’s color depend on the MIDI note’s pitch (data1 for note events). Other mappings, of course, are possible.
9.2.1.1 Exercise
Currently, notes generated by the above program continue to sound even after the user has stopped playing them (on the input MIDI instrument, e.g., a digital piano). This is because the callback function, drawCircle(), is executed when a note starts and this contains a Play.noteOn() statement. However, the program does not take into account the ending of notes in order to execute a corresponding Play.noteOff() statement.
Using the MidiIn object’s capability to capture NOTE-OFF events, add a second callback function, stopNote(), to terminate those notes. Hints: This function should have the same four parameters as drawCircle(), namely, eventType, channel, data1, data2. This function should contain a Play.noteOff() statement. The pitch to be turned off is provided in data1. To register this function with the MidiIn object, so that it is called when a NOTE-OFF event occurs, include the following:
midiIn.onNoteOff(stopNote)
9.2.2 The MIDI Library
The MIDI library enables the connection to various input and output MIDI devices connected to your computer.
9.2.2.1 The MidiIn Class
As we have seen, MidiIn objects are used to act as an interface between our Python code and MIDI devices that generate input events (e.g., a MIDI guitar, keyboard, or control surface). The following function creates a new MidiIn, so you need to save it in a variable (so you can use it later).
|
Function |
Description |
|
MidiIn() |
Creates a new MidiIn object to connect to an input MIDI device. When called, it presents the user with a GUI to select one from the available MIDI devices (see Figure 9.2). |
For example, the following:
mInput = MidiIn()
creates a MidiIn object mInput. Once such an object has been created, the following functions are available:
|
Function |
Description |
|
mInput.onNoteOn(function) |
When a NOTE_ON event happens on the mInput device (i.e., the user starts a note), the system calls the provided function. This function should have four parameters, eventType, channel, data1, data2. For NOTE_ON events, the eventType is always 144, the channel ranges from 0 to 15, data1 is the note pitch (0–127), and data2 is the volume of the note (0–127). |
|
mInput.onNoteOff(function) |
When a NOTE_OFF event happens on the mInput device (i.e., the user ends a note), the system calls the provided function. This function should have four parameters, eventType, channel, data1, data2. For NOTE_OFF events, the eventType is always 128, the channel ranges from 0 to 15, data1 is the note pitch (0–127), and data2 is ignored. |
|
mInput.onSetInstrument(function) |
When a SET_INSTRUMENT (also known as CHANGE_PROGRAM) event happens on the mInput device (i.e., the user selects a different timbre), the system calls the provided function. This function should have four parameters, eventType, channel, data1, data2. For SET_INSTRUMENT events, the eventType is always 192, the channel ranges from 0 to 15, data1 is the MIDI instrument (0–127), and data2 is ignored. |
|
Continued |
|
|
mInput.onInput(eventType, function) |
Associates an incoming eventType with a callback function. When the specified eventType event happens on the mInput device, the system calls the provided function. This function should have four parameters, eventType, channel, data1, data2. Can be used repeatedly to associate different event types (128–224) with different callback functions (one function per event type). If eventType is ALL_EVENTS, then function will be called for all incoming events that have not yet been assigned callback functions. |
Notice how the function onInput() makes it easy to specify callback functions for specific MIDI event types. This is done through the eventType parameter (i.e., the number associated with a particular message type). Moreover, onInput() can be used repeatedly to associate different event types with different callback functions (one function per event type).
Again, if eventType is ALL_EVENTS, the associated callback function is called for all events not handled already. This function should figure out which eventType it is dealing with (i.e., it will probably have a sequence of if/elif statements) and then specify what to do for different event types.
Finally, if onInput() is used more than once for the same eventType, only the latest callback function is retained.
9.2.2.2 The MidiOut Class
MidiOut objects are used to act as an interface between our Python code and MIDI devices that accept output events (e.g., an external MIDI synthesizer). The following function creates a new MidiOut, so you need to save it in a variable (so you can use it later).
|
Function |
Description |
|
MidiOut() |
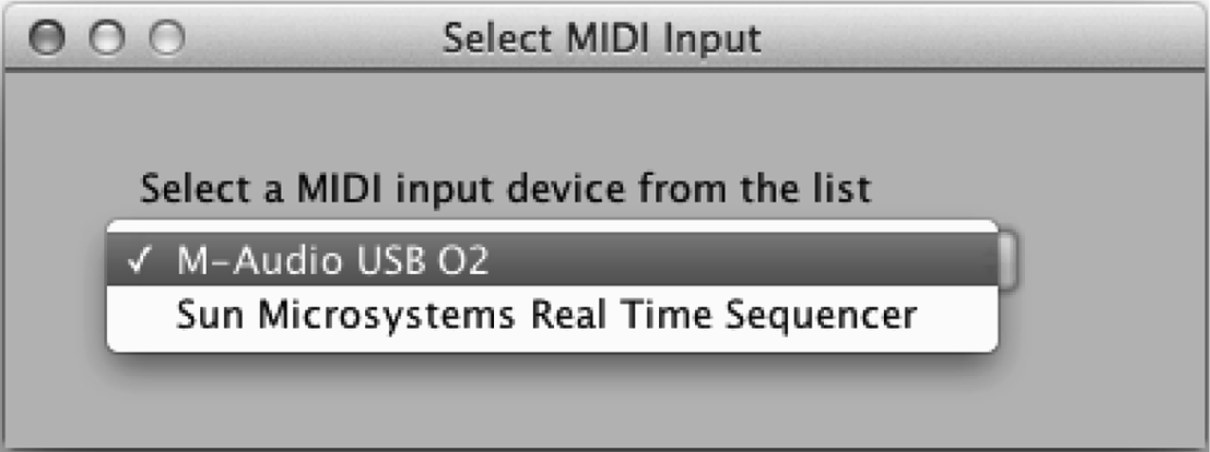
Creates a new MidiOut object to connect to an output MIDI device. When called, it presents the user with a GUI to select one from the available MIDI devices (see Figure 9.3). |
For example, the following:
mOutput = MidiOut()
creates a MidiOut object mOutput. Once such an object has been created, the following functions are available. (These functions are similar to the Play functions seen in Chapter 8, except that class Play is connected to the Java synthesizer.)
|
Function |
Description |
|
mOutput.noteOn(pitch, velocity, channel) |
Sends a NOTE_ON message with pitch (0–127), at a given velocity (0–127 — default is 100), to channel (0–15 — default is 0) on the mOutput device. |
|
mOutput.noteOff(pitch, channel) |
Sends a NOTE_OFF message with pitch (0–127), on given channel (0–15 — default is 0) on the mOutput device. If the pitch is not sounding on this channel, this has no effect. |
|
mOutput.setInstrument(instrument, channel) |
Sets a MIDI instrument (0–127 — default is 0) for the given channel (0–15, default is 0) on the mOutput device. Any notes played through the channel will sound using the instrument. |
|
mOutput.playNote(pitch, start, duration, velocity, channel) |
Schedules playing of a note with pitch at the given start time (in milliseconds from now), with duration (in milliseconds from start time), velocity (0–127 — default is 100), to channel (0–15 — default is 0) on the mOutput device. |
|
mOutput.play(material) |
Play music library material (Score, Part, Phrase, Note) on the mOutput device. |
Notice how function playNote() makes it easy to schedule notes to be played at a future time.
Finally, notice how function play() allows playback through any synthesizer connected to your computer for musical material developed with the algorithmic techniques presented in the earlier chapters.
9.3 OSC Devices—Connecting to Smartphones, Tablets, etc.
This section describes how to connect various everyday devices, such as smartphones, to your music-making programs, through the Open Sound Control (OSC) protocol.‡ This can be done through existing OSC applications and/or the OSC library provided with this book.
OSC is similar to MIDI in that it allows different devices to connect to and communicate with each other. It is different from MIDI in that it does not require the devices to be connected via special cables. Actually, OSC devices do not even need to be in the same room, or the same country or continent for that matter. This is because OSC uses the Internet to send and receive messages, and as long as the devices you wish to connect to are on the network they can “talk” to each other.
To turn any device (such as a smartphone, a tablet, or a laptop) into an OSC device, you need to connect them to the same network and run an OSC application (or program) that either sends or receives OSC messages.
Definition: An application/device that sends OSC messages is called an OSC client.
Definition: An application/device that receives OSC messages and acts on them is called an OSC server.
It is possible for a single device to be both an OSC client and server, in that it may send OSC messages to other devices as well as receive OSC messages from those (or other) devices. The connectivity options are quite flexible.
9.3.1 OSC Messages
OSC messages look similar to the URLs we type in browsers. They usually consist of an address pattern and optional arguments:
- OSC address patterns form a hierarchical name space, such as “/hello/world/”. It is up to the OSC client and server to decide what addresses will be used to communicate.§
- Arguments mainly are integers, floats, strings, and booleans. OSC messages may include zero or more arguments, as agreed between OSC clients and servers.
The advantages of OSC over MIDI are primarily connectivity over the Internet (no dedicated wires!), flexibility of setting up message types (OSC addresses), and use of standard data types (e.g., integer, float, string, boolean).
We will now explore how to write simple OSC programs in Python. These programs can be combined with existing OSC applications (clients or servers) running on other devices (or the same computer).
9.3.2 Case Study: Hello (OSC) World!
This case study shows a simple example to get two devices (an OSC client and an OSC server) to talk to each other. The OSC client device will control the OSC server device.
It is preferred that you use two different computers. However, for simplicity, you may use a single computer (just run the programs on two separate command windows).¶
9.3.2.1 Program for OSC Server Device
First, here is the program to receive the OSC messages. (Even if you use a single computer to execute both programs, the messages will be delivered via the Internet, as if you were using two different machines.)
# oscServer.py
#
# Demonstrates how to create an OSC server program.
#
from osc import *
from music import *
###### create an OSC input object ######
oscIn = OscIn(57110) # receive incoming messages on port 57110
# define two message handlers (functions) for incoming OSC messages
def simple(message):
print "Hello world!"
def complete(message):
OSCaddress = message.getAddress()
args = message.getArguments()
# print OSC message time and address
	print "
OSC Event:"
print "OSC In - Address:", OSCaddress,
# also, print message arguments (if any), all on a single line
for i in range(len(args)):
print ", Argument " + str(i) + ": " + str(args[i]),
###### now, associate above functions with OSC addresses ######
# callback function for incoming OSC address "/helloWorld"
oscIn.onInput("/helloWorld", simple)
# callback function for all incoming OSC addresses
# (specify that as "/.*")
oscIn.onInput("/.*", complete)
The above program creates an OscIn object, which sets up the computer for incoming OSC traffic. This specifies which port is being used. For more information, see the next section.
Then it defines two callback functions, each to be called for different OSC message addresses.
Finally, it associates each of the callback functions with the corresponding addresses.
When you run this program, it will output the following:
OSC Server started:
Ac cepting OSC input on IP address xxx.xxx.xxx.xxx at port 57110
(use this info to configure OSC clients)
where “xxx.xxx.xxx.xxx” is the IP address of the receiving computer (e.g., “192.168.1.223”). You should share this IP address and the port number with the people running the OSC clients from which you wish to receive messages. Of course, if you are behind a firewall, you also need to ensure the firewall allows incoming traffic at the given port (e.g., “57110”).
9.3.2.2 Program for OSC Client Device
Now here is the program to run on the OSC client (i.e., the computer sending the OSC messages).
# oscClient.py
#
# Demonstrates how to create an OSC client program.
#
from osc import *
###### create an OSC output object ######
# where to send outgoing OSC messages - you may replace "localhost"
# with the IP address of a receiving computer (e.g., "192.168.1.223")
oscOut = OscOut("localhost", 57110) # use port 57110
###### that's it - now, send some test OSC messages ######
# send a "/helloWorld" message without arguments
oscOut.sendMessage("/helloWorld")
# send a "/itsFullOfStars" message with an integer, a float,
# a string, and a boolean argument
oscOut.sendMessage("/itsFullOfStars", 1, 2.35, "wow!", True)
where “xxx.xxx.xxx.xxx” is the IP address of the receiving computer (e.g., “192.168.1.223”). You may use this IP address to set up your OSC clients. (The IP address is the Internet address you would use if you wanted to connect to your computer via the Internet.) Of course, if you are behind a firewall, you would also need to ensure that the firewall allows incoming traffic at the above port (e.g., “57110”).
9.3.2.3 Exercises
- Keep the OSC server running. Run the OSC client program a few times to see how the incoming messages arrive on the server.
- Modify the OSC client program to send a different message via the oscOut.sendMessage() function. Since the OSC server program has a generic function, that is, complete() that handles all incoming messages, see the output generated by your message. Run a few times.
- Modify the OSC server program to have a specific function for your new message. First, you will need to define that function (use complete() as a model). Then you need to associate this function with your new OSC message address; for that you use the oscIn.onInput() function. (Use the OSC server program as a model. Also see the next section.)
9.3.3 The OSC Library
The Open Sound Control (OSC) library provides functionality for OSC communication between programs running on your computer (servers) and OSC devices (clients).
9.3.3.1 The OscIn Class
OscIn objects are used to receive messages from OSC devices. The following function creates a new OscIn object, so you need to save it in a variable (so you can use it later).
Function Description
OscIn(port) C reates a new OscIn object to receive incoming messages from an OSC device (such as a smartphone or tablet) on the given port. The port number is an integer from 1024 to 65535 that is not being used by another program.**
For example, the following:
oscIn = OscIn(57110)
creates an OscIn object oscIn. You may create different OSC input objects (servers) to receive and handle OSC messages. As mentioned above, you just need to provide unique port numbers (of your choice). When created, the OscIn object prints out its host IP number and its port:
OSC Server started:
Ac cepting OSC input on IP address 192.168.1.223 at port 57110
(use this info to configure OSC clients)
This done is for convenience. Use the above information to set up OSC clients to send messages to this object.
To send messages to oscIn you may use objects of the OscOut class below, or another OSC client, such as TouchOSC or Control. The latter is most enabling, as it allows programs to be driven by external devices, such as smartphones, tablets, and other computers. This way you may build sophisticated musical instruments and artistic installations.
Once such an object has been created, the following function is available:
|
Function |
Description |
|
oscIn.onInput(address, function) |
When an OSC message with address arrives, call function. OSC addresses look like a URL, e.g., “/first/second/third”. The function should expect one parameter, the incoming OSC message. |
Notice how the function onInput() makes it easy to specify callback functions for specific OSC addresses. For example,
oscIn = OscIn(57110) # receive incoming messages on port 57110
def simple(message): # define a simple message handler (function)
print "Hello world!"
# callback function for incoming OSC address "/helloWorld"
oscIn.onInput("/helloWorld", simple)
If an incoming OSC address is “/helloWorld”, the oscIn object will automatically call the function simple(). This function simply outputs “Hello world”.
Similarly, the following code associates the function complete() with all incoming OSC address:
def complete(message):
OSCaddress = message.getAddress()
args = message.getArguments()
# print OSC message time and address
	print "
OSC Event:"
print "OSC In - Address:", OSCaddress,
# also, print message arguments (if any), all on a single line
for i in range(len(args)):
print ", Argument " + str(i) + ": " + str(args[i]),
# callback function for all incoming OSC addresses
# (specify that as "/.*")
oscIn.onInput("/.*", complete)
Notice the special OSC address “/.*” — this matches for all incoming addresses. Actually, the OSC library allows the use of regular expressions to specify OSC addresses used with function onInput(). Regular expressions allow matching of one or more different OSC addresses in one statement. Regular expressions are beyond the scope of this book.†† You should be able to handle most of your needs with simple OSC addresses, similar to “/gyro” and “/accelerometer”, as shown in the previous case study.
The function complete() in the code snippet above (as well as the functions gyro() and accel() in the previous case study) demonstrates how to extract arguments from incoming OSC messages. Initially in your code development, using a function like complete() allows you to see all incoming OSC messages (including their addresses and arguments). This allows you to decide which OSC addresses and arguments to use (i.e., to write functions specifically tailored to extract/capture only the needed information and ignore everything else). Again, see functions gyro() and accel() above as examples.
9.3.3.2 The OscOut Class
OscOut objects are used to send messages to other OSC devices. The following function creates a new OscOut object, so you need to save it in a variable (so you can use it later).
|
Function |
Description |
|
OscOut(IPaddress, port) |
Creates a new OscOut object to send outgoing messages to an OSC device (such as a smartphone or tablet) to the given IP address (a string, e.g., “192.168.1.223”) and port (an integer in the range 1024 to 65535). |
For example, the following:
# where to send outgoing OSC messages
# ("192.168.1.223" is the IP address of a receiving computer)
oscOut = OscOut("192.168.1.223", 57110)
creates an OscOut object oscOut.
You may create different OSC output objects (clients) to send OSC messages to different OSC servers (as defined by the provided IP address and port number).‡‡
Once such an OscOut object has been created, the following function is available:
|
Function |
Description |
|
OscOut.sendMessage(address, arg1, arg2,...) |
Sends an OSC message with address and 0 or more arguments to the OSC device associated with OscOut. |
For example, the following code:
oscOut.sendMessage("/helloWorld")
os cOut.sendMessage("/itsFullOfStars", 1, 2.3, "wow!", True)
sends two messages to the OSC input shown as an example in the previous section. Notice how the first message has no arguments. On the other hand, the second message demonstrates the different Python data types you may send via an OSC message (i.e., integer, float, string, and boolean).
9.3.4 Case Study: Make Music with your Smartphone
In this case study, we modify the “Random Circles Through Midi Input” program (see earlier in this chapter) to receive input from a smartphone, using the OSC protocol.
For this example, we used an iPhone running the free OSC app Control (see Figure 9.4). We selected this app because it is free and also available on Android devices. Of course, there are many other possibilities. Below we explain how to adapt this code for use with other devices.
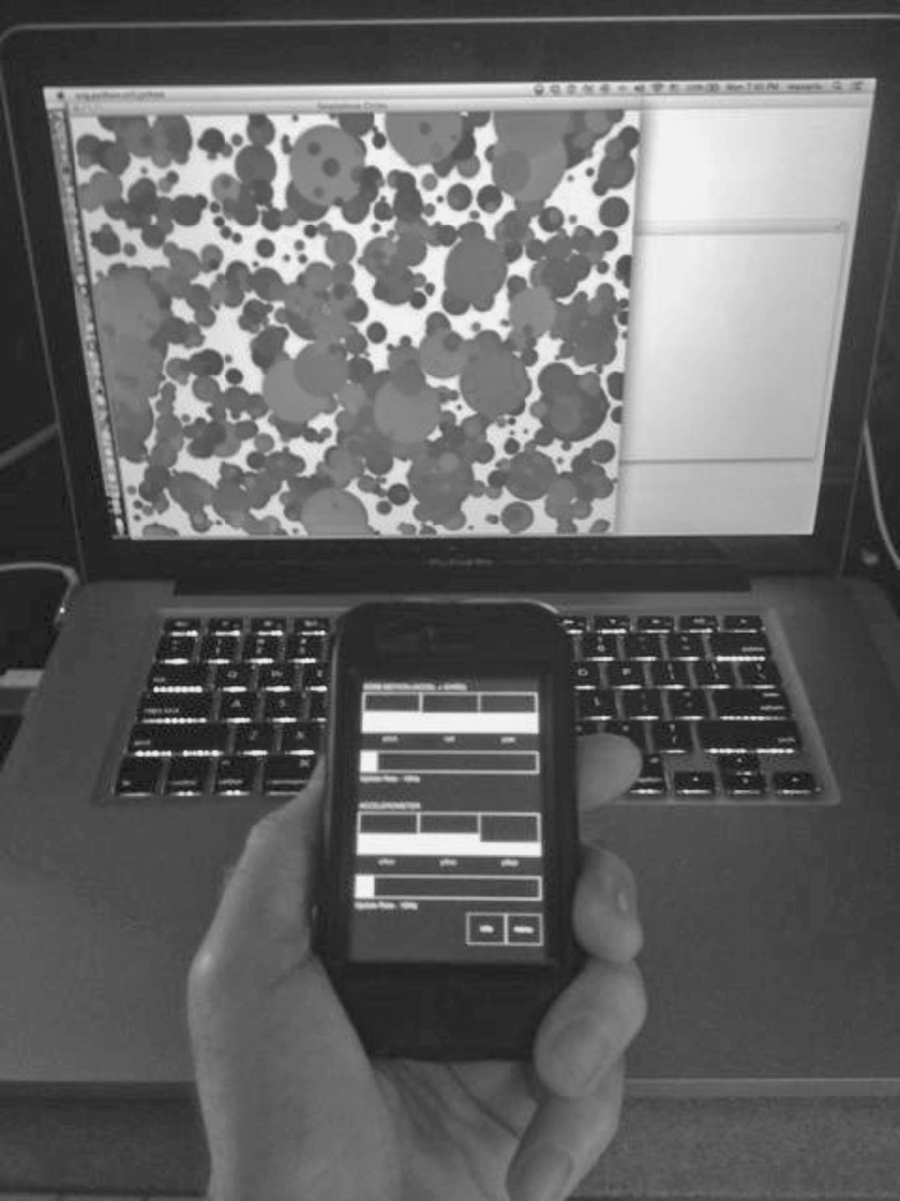
Using a smartphone to create music on a laptop (via OSC messages). The smartphone may be in a different room or a different continent (as long as it is connected to the Internet).
9.3.4.1 Performance Instructions
This program creates a musical instrument out of your smartphone. It has been specifically designed to allow the following performance gestures:
- Ready Position: Hold your smartphone in the palm of your hand, flat and facing up, as if you are reading the screen. Make sure it is parallel with the floor. Think of an airplane resting on top of your device’s screen, its nose pointing away from you, and its wings flat across the screen (left wing superimposed with the left side of your screen, and right wing with the right side of your screen).
- Controlling Pitch: The pitch of the airplane (the angle of its nose - pointing up or down) corresponds to musical pitch. The higher the nose, the higher the pitch.
- Controlling Rate: The roll of the airplane (the banking of its wings to the left or to the right) triggers note generation. You could visualize notes falling off the device’s screen, so when you roll/bank the device, notes escape (roll off).
- Controlling Volume: Device shake corresponds with loudness of notes. The more intensely you shake or vibrate the device as notes are generated, the louder the notes are.
That’s it. To summarize, the smartphone’s orientation (pointing from zenith to nadir) corresponds to pitch (high to low). Shaking the device plays a note—the stronger, the louder. Tilting the device clockwise produces more notes.
On the server side, that is, the program you are controlling with your smartphone:
- Note pitch is mapped to the color of circles (lower means darker/browner, higher means brighter/redder/bluer).
- Shake strength is mapped to circle size (radius).
- Finally, the position of the circle on the display is random.
All these settings could easily be changed. We leave that as an exercise.
9.3.4.2 Setting up Your Smartphone (OSC Client)
This section describes how to setup your smartphone so that you may use it send OSC data to the program below.§§
First, it is up to the OSC client (e.g., Control) to capture the necessary data from your device (e.g., smartphone or tablet computer), package it as OSC message, and send it to the right computer at the right port.
When setting up your OSC client running on your smartphone (or any other device, e.g., a tablet or laptop), you need to tell the OSC client where to send its messages. This consists of
- the receiving computer’s IP address (e.g., 192.168.1.223) and
- the appropriate port (e.g., 57110).
How you set up this information depends on the OSC client software you are using.¶¶
The program below helps you by printing out the necessary information (its IP address and port) when it starts.
9.3.4.3 Setting up Your Computer (OSC Server)
Below is the Python program you need to run on your computer. It creates the OSC server and starts listening for incoming messages from your smartphone. It also prints out the IP address and port, so that you can use these values to set up the OSC client (see previous section).
Here is the code:
# randomCirclesThroughOSCInput.py
#
# Demonstrates how to create a musical instrument using an OSC device.
# It receives OSC messages from device accelerometer and gyroscope.
#
# This instrument generates individual notes in succession based on
# its orientation in 3D space. Each note is visually accompanied by
# a color circle drawn on a display.
#
# NOTE: For this example we used an iPhone running the free OSC app
# "Control OSC". (There are many other possibilities.)
#
from gui import *
from random import *
from music import *
from osc import *
# parameters
scale = MAJOR_SCALE # scale used by instrument
normalShake = 63 # shake value at rest (using xAccel for now)
shakeTrigger = 7 # deviation from rest value to trigger notes
# (higher, less sensitive)
shakeAmount = 0 # amount of shake
devicePitch = 0 # device pitch (set via incoming OSC messages)
##### create main display #####
d = Display("Smartphone Circles", 1000, 800)
# define function for generating a circle/note
def drawCircle():
"""Draws one circle and plays the corresponding note."""
global devicePitch, shakeAmount, shakeTrigger, d, scale
# map device pitch to note pitch, and shake amount to volume
pitch = mapScale(devicePitch, 0, 127, 0, 127, scale) # use scale
volume = mapValue(shakeAmount, shakeTrigger, 60, 50, 127)
x = randint(0, d.getWidth()) # random circle x position
y = randint(0, d.getHeight()) # random circle y position
radius = mapValue(volume, 50, 127, 5, 80) # map volume to radius
# create a red-to-brown gradient
red = mapValue(pitch, 0, 127, 100, 255) # map pitch to red
blue = mapValue(pitch, 0, 127, 0, 100) # map pitch to blue
color = Color(red, 0, blue) # make color (green is 0)
c = Circle(x, y, radius, color, True) # create filled circle
d.add(c) # add it to display
# now, let's play note (lasting 3 secs)
Play.note(pitch, 0, 3000, volume)
##### define OSC callback functions #####
# callback function for incoming OSC gyroscope data
def gyro(message):
"""Sets global variable 'devicePitch' from gyro OSC message."""
global devicePitch # holds pitch of device
args = message.getArguments() # get OSC message's arguments
# output message info (for exploration/fine-tuning)
#print message.getAddress(), # output OSC address
#print list(args) # and the arguments
# the 4th argument (i.e., index 3) is device pitch
devicePitch = args[3]
# callback function for OSC accelerometer data
def accel(message):
"""
Sets global variable 'shakeAmount'. If 'shakeAmount' is higher
than 'shakeTrigger', we call function drawCircle().
"""
global normalShake, shakeTrigger, shakeAmount
args = message.getArguments() # get the message's arguments
# output message info (for exploration/fine-tuning)
#print message.getAddress(), # output the OSC address
#print list(args) # and the arguments
# get sideways shake from the accelerometer
shake = args[0] # using xAccel value (for now)
# is shake strong enough to generate a note?
shakeAmount = abs(shake - normalShake) # get deviation from rest
if shakeAmount > shakeTrigger:
drawCircle() # yes, so create a circle/note
##### establish connection to input OSC device (an OSC client) #####
oscIn = OscIn(57110) # get input from OSC devices on port 57110
# associate callback functions with OSC message addresses
oscIn.onInput("/gyro", gyro)
oscIn.onInput("/accelerometer", accel)
Notice the various parameters defined at the beginning:
# parameters
scale = MAJOR_SCALE # scale used by instrument
normalShake = 63 # shake value at rest (using xAccel for now)
shakeTrigger = 7 # deviation from rest value to trigger notes
# (higher, less sensitive)
shakeAmount = 0 # amount of shake
devicePitch = 0 # device pitch (set via incoming OSC messages)
As the comments indicate, normalShake and shakeTrigger parameters allow fine-tuning of the OSC instrument. The last two parameters, shakeAmount and devicePitch, are used as global variables. These are set by the OSC callback functions (see below) when the corresponding OSC messages arrive; they are mapped to circle and note attributes.
As we mentioned earlier, the use of global variables is bad style. The next section, on Python classes, will provide a neat way to avoid using global variables and improve reuse of our code.***
Function drawCircle(), when called, draws a circle and plays the corresponding note. Among other things, it maps the smartphone’s tilt to note pitch and the smartphone’s shake intensity to note volume, as follows:
# map device pitch to note pitch, and shake amount to volume
pitch = mapScale(devicePitch, 0, 127, 0, 127, scale) # use scale
volume = mapValue(shakeAmount, shakeTrigger, 60, 50, 127)
As it turns out, the device and OSC app used (i.e., iPhone and Control) return devicePitch values that roughly range between 0 and 127, so no real mapping is needed. The mapping code above was included for convenience, in case you wish to use this code with another device (which returns a different range of values).
Interestingly, the values returned for shake also range between 0 and 127. However, since we ignore shake values that are too weak, in this case, the second mapping statement is useful, as it stretches the incoming shake values across the complete MIDI volume range (0 to 127). Since the shake value returned at rest on the iPhone is 63, the following statements capture both leftward shake (which generates shake values smaller than the rest value) and rightward shake (which generates shake values larger than the rest value):
# map device pitch to note pitch, and shake amount to volume
pitch = mapScale(devicePitch, 0, 127, 0, 127, scale) # use scale
volume = mapValue(shakeAmount, shakeTrigger, 60, 50, 127)
If the absolute difference of the shake value (either leftward or rightward) is greater than the specified threshold (shakeTrigger), we start generating notes.
An important step in this case study is how to establish the connection with the OSC device and how to extract the data of interest. The OSC connection is accomplished with the last few statements in this program:
##### establish connection to input OSC device (an OSC client) #####
oscIn = OscIn(57110) # get input from OSC devices on port 57110
# associate callback functions with OSC message addresses
oscIn.onInput("/gyro", gyro)
oscIn.onInput("/accelerometer", accel)
The first line creates an OSC input object listening to port 57110. When this statement is executed it opens an OSC connection on the specified port. Any other device on the Internet can now send OSC messages to that particular port (for more information on OSC messages and selecting ports, see the next section).
OSC messages look similar to the URLs we type in browsers. They are automatically created by the software we use to capture and send data (e.g., the Control app mentioned above). In this case, Control sends messages with data from the smartphone’s gyroscope using the “/gyro” address pattern. It also sends messages with data from the smartphone’s accelerometer using the “/accelerometer” address. This could be changed, but we wrote the above code using Control’s defaults.
The last two lines above simply associate each of the two incoming OSC message addresses (“/gyro” and “/accelerometer”) with a corresponding callback function. In other words, when “/gyro” messages come in, Python will automatically call function gyro() to process them. For “/accelerometer” messages, it will call function accel().
Each of these functions accepts one parameter, namely, the OSC message, which will automatically be passed to them by Python. They use the following code to extract the desired information from the message:
args = message.getArguments() # get the message's arguments
# output message info (for exploration/fine-tuning)
#print message.getAddress(), # output OSC address
#print list(args) # and the arguments
The first line extracts the list of arguments sent with the OSC message. The other two lines (currently commented out) can be used (as the comment suggests) to see (explore) what the incoming arguments look like for this OSC message. Then you can decide which arguments to use. In our case, the gyro() function uses the 4th argument of the “/gyro” message, that is,
# the 4th argument (i.e., index 3) is devicePitch
devicePitch = args[3]
whereas the accel() function uses the first argument of the “/accelerometer” message, i.e.,
# get sideways shake from the accelerometer
shake = args[0] # sideways shake
Finally, as discussed earlier, it is up to the OSC client (e.g., Control) to capture the necessary data from the OSC device (e.g., smartphone), package it as OSC message, and send it to the right computer at the right port. Now that you understand the above program, it should be straightforward to update it, so that you can use it with any OSC client device. This is left as an exercise. Enjoy!
9.3.4.4 Exercises
- Modify this code to work with another device (e.g., an Android smartphone or tablet).
- Modify this code to work with a different OSC app—there are several.
- Create a different mapping between gyroscope/accelerometer data and music or drawing outcomes. Again, there are many possibilities.
- Different OSC devices have different sensors. For instance, your device may not have a gyroscope, but it may have another (possibly unique) sensor. Use the above program to observe and discover the types of OSC messages generated by your device. Write them down. What types of musical (or other) actions can you envision associating with these incoming messages?
- Design a new music-making application using incoming OSC data (e.g., using a different OSC app/device combination). There are endless possibilities. Be innovative.
9.3.5 Hybrid Musical Instrument Projects
Here are some more advanced exercises and design/implementation activities for creating hybrid (traditional + computer musical instruments):
- Design, on paper, a hybrid instrument consisting of a MIDI guitar (piano or control surface) and a Python program. Describe what type of musical experience you are trying to create. Also what type of musical background is required by your performer (e.g., how to play the guitar, or none).
- Design on paper a hybrid instrument consisting of a collection of smartphones communicating over OSC with a Python program. Describe what type of musical experience you are trying to create. Also what type of musical background is required by your performers.
- Design on paper a hybrid instrument consisting of a collection of a MIDI instruments and smartphones communicating over OSC with a Python program. Describe what type of musical experience you are trying to create. Also what type of musical background is required by your performers.
- Implement a prototype of one of the above hybrid instruments using Python and the libraries provided in this chapter.
- What other possibilities can you think of for creating immersive, shared musical performance spaces utilizing some of the tools presented so far?
9.4 Summary
This chapter discussed how to connect your musical programs to external devices via the MIDI and OSC protocols. These features will enable you to write programs that interact with other devices and instruments in a way that will open up a whole world of music performance and interaction opportunities.
Using MIDI connections allows you to interact with electronic musical instruments and various control surfaces. MIDI is a well-established protocol and many digital music devices support it. The chapter explored how to interface between MIDI devices and your programs and how to send and receive performance data (e.g., note messages) to either play back your music on a MIDI synthesizer or to capture performance information from a MIDI instrument.
Using OSC allows you to use Internet-enabled mobile computing devices (like smartphones and tablets) to connect and control your programs. The final exercises open the door to a whole new way of thinking about computer programming and instrument design. For instance, you may design innovative applications and hybrid musical instruments, which combine traditional instrument interfaces (e.g., piano) with algorithmic processes. Since you can control what functions are called in your programs, through arbitrary events on a musical instrument (or a smartphone), the sky is the limit. Also, you may design innovative performance projects, where you might allow many OSC clients (e.g., smartphones in the audience) control aspects of your performance on stage. This gives a whole new meaning to connecting with your audience!
* The choice about sounds to generate rests with you, the programmer. As should be obvious by now, there are endless possibilities. You may transform an existing musical instrument to a digital instrument that has never existed before. Also, instead of buying expensive pedals and sound processors, you can develop your own.
† This is similar to how a DJ helps create musical contexts for dancing and shared musical listening.
‡ Open Sound Control is a freely available protocol widely used in the computer music community. For more information see the main OSC web site: http://opensoundcontrol.org/
§ This is more flexible than the MIDI standard, which restricts the types of messages to a few predefined possibilities.
¶ Of course, it is much more convincing to see two different computers “talk” to each other via OSC.
** Each OscIn object requires its own port. So pick port numbers not used by other applications. For example, TouchOSC (a mobile app for Android and iOS devices), defaults to 8000 for sending OSC messages and 9000 for receiving messages. In general, any port from 1024 to 65535 may be used, as long as no other application is using it. If you have trouble, try changing port numbers. The best bet is a port in the range 49152 to 65535 (which is reserved for custom purposes).
†† Several tutorials are available online if you are interested in learning more about writing regular expressions.
‡‡ If you are planning to connect to OscIn objects (as mentioned in the previous section) when created, OscIn objects output (print out) their host IP number and port (for convenience). Use this info to set up your OscIn objects (OSC clients).
§§ Actually, if you do not have a smartphone, it is very easy to write a (small) Python program to send OSC data. It takes about three lines of code (see section “The OscOut Class”).
¶¶ If you choose to use the Control app, then there are setup instructions at the following URL and you can use the Gyro + Accelerometer interface preset. http://charlie-roberts.com/Control/?page_id=51
*** Code reuse refers to how easy it is to reuse existing code in different applications.