
12
Web3 Development Using Ethereum
Web3 is a JavaScript library that can be used to communicate with an Ethereum node via RPC communication. Web3 works by exposing methods that have been enabled over RPC. This allows the development of user interfaces (UIs) that make use of the Web3 library in order to interact with contracts deployed over the blockchain.
In this chapter, we’ll explore the Web3 API, and introduce some detailed examples of how smart contracts are written, tested, and deployed to the Ethereum blockchain. We will use various tools such as the Remix IDE and Ganache to develop and test smart contracts and look at the methods used to deploy smart contracts to Ethereum test networks and private networks. The chapter will explore how HTML and JavaScript frontends can be developed to interact with smart contracts deployed on the blockchain, and introduce advanced libraries such as Drizzle. The topics we will cover are as follows:
- Exploring Web3 with Geth
- Contract deployment
- Interacting with contracts via frontends
- Development frameworks
We will start with Web3, and gradually build our knowledge with various tools and techniques for smart contract development. You will be able to test your knowledge in the bonus content pages for this book, where we will develop a project using all the techniques that this chapter will cover.
Interacting with contracts using Web3 and Geth
Web3 is a powerful API and can be explored by attaching a Geth instance. To expose the required APIs via Geth, the following command can be used:
$ geth --datadir ~/etherprivate --networkid 786 --http --http.api "web3,net,eth,debug" --http.port 8001 --http.corsdomain http://localhost:7777
The -–http flag in the preceding command allows the web3, eth, net, and debug methods. There are other APIs such as personal, miner, and admin that can be exposed by adding their names to this list.
Note that I have used Geth version v1.10.14-stable. All commands work correctly for this version but may not work with previous versions. Try to use the latest version of Geth when running examples in this chapter, or at least v1.10.14-stable.
The Geth instance can be attached using the following command:
$ geth attach ~/etherprivate/geth.ipc
Once the Geth JavaScript console is running, Web3 can be queried:
Welcome to the Geth JavaScript console!
instance: Geth/v1.10.14-stable/darwin-arm64/go1.17.5
coinbase: 0x6e94bdb15141491bc3b9de3a9cab9d87ae2af82f
at block: 2421 (Sat May 21 2022 19:41:23 GMT+0100 (BST))
 datadir: /Users/imran/etherprivate
 modules: admin:1.0 debug:1.0 eth:1.0 ethash:1.0 miner:1.0 net:1.0 personal:1.0 rpc:1.0 txpool:1.0 web3:1.0
To exit, press ctrl-d or type exit
> web3.version
{
  api: "0.20.1",
  ethereum: undefined,
  network: "786",
  node: "Geth/v1.10.14-stable/darwin-arm64/go1.17.5",
  whisper: undefined,
  getEthereum: function(callback),
  getNetwork: function(callback),
  getNode: function(callback),
  getWhisper: function(callback)
}
>
Now that we’ve introduced Web3, let’s consider how the Remix IDE can be used to deploy a contract, and how the Geth console can interact with the deployed contract.
Deploying contracts
A simple contract can be deployed using Geth and interacted with using Web3 via the command-line interface (CLI) that Geth provides (console or attach). The following are the steps to achieve that.
Run the Geth client using one of the following commands. We’ve used all these commands in different contexts before, and you can use any of them to run Geth. The first command, shown next, allows connectivity with the Remix IDE as we have specified --http.corsdomain https://remix.ethereum.org:
$ geth --datadir ~/etherprivate --networkid 786 --allow-insecure-unlock --http --http.api "web3,net,eth,debug,personal" --http.port 8001 --http.corsdomain https://remix.ethereum.org
The second command, shown next, allows localhost:7777 to access the RPC server exposed by Geth. This option is useful if you have an application running on this interface and you want to give it access to RPC:
$ geth --datadir ~/etherprivate --networkid 786 --allow-insecure-unlock --http --http.api "web3,net,eth,debug,personal" --http.port 8001 --http.corsdomain http://localhost:7777
It also exposes RPC on port 8001 via the flag http.port 8001, which is useful in case you have some other service or application listening already on port 8545, which would mean that Geth won’t be able to use that already-in-use port. This is because Geth listens on port 8545 for the HTTP-RPC server by default.
The last command, shown next, allows all incoming connections as --http.corsdomain is set to *:
$ geth --datadir ~/etherprivate --networkid 786 --http --http.api "web3,net,eth,debug" --http.port 8001 --http.corsdomain "*"
If the Geth console is not already running, open another terminal and run the following command:
$ geth attach ~/etherprivate/geth.ipc
In order to deploy a smart contract, we use the Web3 deployment script. The main elements of the script, the Application Binary Interface (ABI) and the bytecode, can be generated from the Remix IDE. We will discuss the Remix IDE in more detail later in this chapter; for now, we are using this IDE only to get the required elements (ABI and bytecode) for the Web3 deployment script used for the deployment of the contract.
To learn how to download and use the Remix IDE, refer to Chapter 10, Ethereum in Practice.
First, paste the following source code into the Remix IDE:
pragma solidity ^0.8.0;
contract valueChecker
{
    uint price=10;
    event valueEvent(bool returnValue);
    function Matcher (uint8 x) public returns (bool)
    {
        if (x>=price)
        {
            emit valueEvent(true);
            return true;
        }
    }
}
Once the code is pasted in the Remix IDE, it will appear as follows in the Solidity compiler:

Figure 12.1: Code shown in Remix
Now create the Web3 deployment script as follows. First, generate the ABI and bytecode by using the ABI and Bytecode buttons in the Remix IDE (shown on the lower-left side of Figure 12.1) and paste them into the following script after the web3.eth.contract( and data: elements, respectively. The example shown below already has ABI and Bytecode pasted in:
var valuecheckerContract = web3.eth.contract([{"constant": false,"inputs": [{"name": "x","type": "uint8"}],"name": "Matcher","outputs": [{"name": "","type": "bool"}],"payable": false,"stateMutability": "nonpayable","type": "function"},{"anonymous": false,"inputs": [{"indexed": false,"name": "returnValue","type": "bool"}],"name": "valueEvent","type": "event"}]);
var valuechecker = valuecheckerContract.new({
     from: web3.eth.accounts[0],
     data: '0x6080604052600a60005534801561001557600080fd5b5061010d806100256000396000f300608060405260043610603f576000357c0100000000000000000000000000000000000000000000000000000000900463ffffffff168063f9d55e21146044575b600080fd 5b348015604f57600080fd5b50606f600480360381019080803560ff16906020019092 91905050506089565b604051808215151515815260200191505060405180910390f35b 600080548260ff1610151560db577f3eb1a229ff7995457774a4bd31ef7b13b6f4491a d1ebb8961af120b8b4b6239c6001604051808215151515815260200191505060405180 910390a16001905060dc565b5b9190505600a165627a7a72305820fe915bf3811b38f8 c7adcdca8d34daa2db1e11a309134504c285daff8d960e560029',
     gas: '4700000'
   }, function (e, contract){
    console.log(e, contract);
    if (typeof contract.address !== 'undefined') {
         console.log('Contract mined! address: ' + contract.address + ' transactionHash: ' + contract.transactionHash);
    }
})
Ensure that the account is unlocked. We created accounts earlier in Chapter 10, Ethereum in Practice; we can use that account or can create a new one if required.
First, list the accounts by using the following command, which outputs account 0 (the first account), as shown here:
> personal.listAccounts[0]
"0xc9bf76271b9e42e4bf7e1888e0f52351bdb65811"
Now unlock the account using the following command. It will need the passphrase (password) that you used originally when creating this account. Enter the password to unlock the account:
> personal.unlockAccount(personal.listAccounts[0])
Unlock account 0xc9bf76271b9e42e4bf7e1888e0f52351bdb65811
Password:
true
For more convenience, the account can be unlocked permanently for the length of the Geth console/attach session by using the command shown here:
> web3.personal.unlockAccount("0xc9bf76271b9e42e4bf7e1888e0f52351bdb65811", "Password123", 0);
true
Now, we can open the Geth console that has been opened previously and deploy the contract. However, before deploying the contract, make sure that mining is running on the Geth node; this will allow contracts to be mined and, as a result, deployed on the blockchain. The following command can be used to start mining under the Geth console:
> miner.start()
Now paste the previously mentioned Web3 deployment script into the Geth console as shown below:
> var valuecheckerContract = web3.eth.contract([{"constant": false,"inputs": [{"name": "x","type": "uint8"}],"name": "Matcher","outputs": [{"name": "","type": "bool"}],"payable": false,"stateMutability": "nonpayable","type": "function"},{"anonymous": false,"inputs": [{"indexed": false,"name": "returnValue","type": "bool"}],"name": "valueEvent","type": "event"}]);
After this, run the script as shown below, which contains the bytecode of the smart contract:
> var valuechecker = valuecheckerContract.new({
......      from: web3.eth.accounts[0],
......      data: '0x6080604052600a60005534801561001557600080fd5b5061010 d806100256000396000f300608060405260043610603f576000357c010000000000000000 0000000000000000000000000000000000000000900463ffffffff168063f9d55e2114604 4575b600080fd5b348015604f57600080fd5b50606f600480360381019080803560ff1690 602001909291905050506089565b604051808215151515815260200191505060405180910 390f35b600080548260ff1610151560db577f3eb1a229ff7995457774a4bd31ef7b13b6f4 491ad1ebb8961af120b8b4b6239c6001604051808215151515815260200191505060405180 910390a16001905060dc565b5b9190505600a165627a7a72305820fe915bf3811b38f8c7ad cdca8d34daa2db1e11a309134504c285daff8d960e560029',
......      gas: '4700000'
......    }, function (e, contract){
......     console.log(e, contract);
......     if (typeof contract.address !== 'undefined') {
.........          console.log('Contract mined! address: ' + contract.address + ' transactionHash: ' + contract.transactionHash);
.........     }
...... })
The previous command line shows how it looks when the Web3 deployment script is pasted into the Geth console for deployment.
Using solc to generate ABI and code
ABI and code can also be obtained by using the Solidity compiler, as shown in the following code snippets.
In order to generate the ABI, we can use the command shown as follows:
$ solc --abi valuechecker.sol
This command will produce the following output, with the contract ABI in JSON format:
======= valuechecker.sol:valueChecker =======
Contract JSON ABI
[{"anonymous":false,"inputs":[{"indexed":false,"internalType":"bool","name":"returnValue","type":"bool"}],"name":"valueEvent","type":"event"},{"inputs":[{"internalType":"uint8","name":"x","type":"uint8"}],"name":"Matcher","outputs":[{"internalType":"bool","name":"","type":"bool"}],"stateMutability":"nonpayable","type":"function"}]
The next step is to generate code, which we can use the following command to do:
$ solc --bin valuechecker.sol
This command will produce the binary (represented as hex) of the smart contract code:
======= valuechecker.sol:valueChecker =======
Binary:
6080604052600a60005534801561001557600080fd5b5061018b806100256000396000f3fe608 060405234801561001057600080fd5b506004361061002b5760003560e01c8063f9d55e2114610 030575b600080fd5b61004a600480360381019061004591906100f2565b610060565b604051610 057919061013a565b60405180910390f35b600080548260ff16106100ae577f3eb1a229ff79954 57774a4bd31ef7b13b6f4491ad1ebb8961af120b8b4b6239c600160405161009d919061013a565 b60405180910390a1600190506100af565b5b919050565b600080fd5b600060ff8216905091905 0565b6100cf816100b9565b81146100da57600080fd5b50565b6000813590506100ec816100c65 65b92915050565b600060208284031215610108576101076100b4565b5b6000610116848285016 100dd565b91505092915050565b60008115159050919050565b6101348161011f565b825250505 65b600060208201905061014f600083018461012b565b9291505056fea26469706673582212200 e651ef5fb0ca476c266684e18228bc96ce0e786775fe640d915f250b6fc07d164736f6c6343000 80b0033
When generating binary for use with the deployment script we saw earlier, just add 0x as a prefix to the generated binary string before using it in the script, to avoid any errors occurring due to hexadecimal not being recognized. Otherwise, you may see a message similar to the following:
Error: invalid argument 0: json: cannot unmarshal hex string without 0x prefix into Go struct field TransactionArgs.data of type hexutil.Bytes undefined
Undefined
Querying contracts with Geth
We can also see the relevant message in the Geth logs to verify that the contract creation transaction has been submitted; you will see messages similar to the one shown as follows:
INFO [06-03|19:19:02.330] Submitted contract creation hash=0xe55da8b738248c8cfa90519ed7d0985d48d4a826fa019377a118510eea1685a9 from=0x6E94BDb15141491bC3B9De3A9CaB9d87ae2af82f nonce=5 contract=0x3B52828C63Ffdcb27fA5105BC66B8F1CB1BC648C value=0
Also notice that in the Geth console, the following message appears as soon as the transaction is mined, indicating that the contract has been successfully mined:
Contract mined! address: 0x3b52828c63ffdcb27fa5105bc66b8f1cb1bc648c transactionHash: 0xe55da8b738248c8cfa90519ed7d0985d48d4a826fa019377a118510eea1685a9
Notice that in the preceding output, the transaction hash 0xe55da8b738248c8cfa90519ed7d0985d48d4a826fa019377a118510eea1685a9 is also shown.
After the contract is deployed successfully, you can query various attributes related to this contract, which we will also use later in this example, such as the contract address and ABI definition. Remember, all of these commands are issued via the Geth console, which we have already opened and used for contract deployment:
> valuechecker.
valuechecker.Matcher         valuechecker.abi             valuechecker.allEvents       valuechecker.transactionHash
valuechecker._eth            valuechecker.address         valuechecker.constructor     valuechecker.valueEvent
> valuechecker.abi
[{
    constant: false,
    inputs: [{
        name: "x",
        type: "uint8"
    }],
    name: "Matcher",
    outputs: [{
        name: "",
        type: "bool"
    }],
    payable: false,
    stateMutability: "nonpayable",
    type: "function"
}, {
    anonymous: false,
    inputs: [{
        indexed: false,
        name: "returnValue",
        type: "bool"
    }],
    name: "valueEvent",
    type: "event"
}]
>
There are a number of methods that are now exposed, and the contract can be further queried now, for example:
> eth.getBalance(valuechecker.address)
0
We can now call the actual methods in the contract. A list of the various methods that have been exposed now can be seen as follows:
> valuechecker.
valuechecker.Matcher         valuechecker.abi             valuechecker.allEvents       valuechecker.transactionHash valuechecker._eth           valuechecker.address         valuechecker.constructor     valuechecker.valueEvent
The contract can be further queried as follows.
First, we find the transaction hash, which identifies the transaction:
> valuechecker.transactionHash
The output of this command is the transaction hash of the contract creation transaction:
0xe55da8b738248c8cfa90519ed7d0985d48d4a826fa019377a118510eea1685a9
We can also query the ABI, using the following command:
> valuechecker.abi
The output will be as follows. Note that it shows all the inputs and outputs of our example contract:
> valuechecker.abi
[{
    constant: false,
    inputs: [{
        name: "x",
        type: "uint8"
    }],
    name: "Matcher",
    outputs: [{
        name: "",
        type: "bool"
    }],
    payable: false,
    stateMutability: "nonpayable",
    type: "function"
}, {
    anonymous: false,
    inputs: [{
        indexed: false,
        name: "returnValue",
        type: "bool"
    }],
    name: "valueEvent",
    type: "event"
}]
In the following example, the Matcher function is called with the arguments. Arguments, also called parameters, are the values passed to the functions. Remember that in the smart contract code, there is a condition that checks if the value is equal to or greater than 10, and if so, the function returns true; otherwise, it returns false. To test this, type the following commands into the Geth console that you have open.
Pass 12 as an argument, which will return true as it is greater than 10:
> valuechecker.Matcher.call(12)
true
Pass 10 as an argument, which will return true as it is equal to 10:
> valuechecker.Matcher.call(10)
true
Pass 9 as an argument, which will return false as it is less than 10:
> valuechecker.Matcher.call(9)
false
In this section, we learned how to use the Remix IDE to create and deploy contracts. We also learned how the Geth console can be used to interact with a smart contract and explored which methods are available to interact with smart contracts on the blockchain. We also introduced the Web3.js library, which allows us to interact with an Ethereum node. Now we’ll see how we can interact with Geth using JSON RPC over HTTP.
Interacting with Geth using POST requests
It is possible to interact with Geth via JSON RPC over HTTP. For this purpose, the curl tool can be used.
curl is available at https://curl.haxx.se/.
An example is shown here to familiarize you with the POST request and show how to make POST requests using curl.
POST is a request method supported by HTTP which is used to send text to a web server for processing. It is widely used in webpages to send data from forms to the server and update databases.
Before using the JSON RPC interface over HTTP, the Geth client should be started up with appropriate switches, as shown here:
--http.api "web3 "
This switch will enable the web3 interface over HTTP. The Linux command curl can be used for the purpose of communicating over HTTP, as shown in the following example.
For example, in order to retrieve the list of accounts using the personal_listAccounts method, the following command can be used:
$ curl -X POST -H "Content-Type: application/json" --data '{"jsonrpc":"2.0","method":"personal_listAccounts","params":[],"id":67}' http://localhost:8001
This will return the output, a JSON object with the list of accounts:
{"jsonrpc":"2.0","id":67,"result":["0x6e94bdb15141491bc3b9de3a9cab9d87ae2af82f","0x0f044cb4a0f924b6cfcf07c6c57945a0af75ec5b"]}
In the preceding curl command, --request is used to specify the request command, POST is the request, and --data is used to specify the parameters and values. Finally, localhost:8545 is used where the HTTP endpoint from Geth is opened.
In this section, we covered how we can interact with the smart contract using the JSON RPC over HTTP. While this is a common way of interacting with the contracts, the examples we have seen so far are command line-based. In the next section, we’ll see how we can interact with the contracts by creating a user-friendly web interface.
Interacting with contracts via frontends
So far, we have seen how we can interact with a contract using the Geth console via the command line, but in order for an application to be usable by end users, who will mostly be familiar with web interfaces, it becomes necessary to build web frontends so that users can communicate with the backend smart contracts using familiar webpage interfaces.
It is possible to interact with the contracts using the web3.js library from HTML-/JS-/CSS-based webpages.
The HTML content can be served using any HTTP web server, whereas web3.js can connect via local RPC to the running Ethereum client (Geth) and provide an interface to the contracts on the blockchain. This architecture can be visualized in the following diagram:

Figure 12.2: web3.js, frontend, and blockchain interaction architecture
Installing the web3.js JavaScript library
If you do not have web3.js installed, use these steps; otherwise, move on to the next section.
Web3, which we discussed earlier in this chapter, was looked at in the context of the Web3 API exposed by Geth. In this section, we will introduce the Web3 JavaScript library (web3.js), which is used to introduce different functionalities related to the Ethereum ecosystem in DApps. The web3.js library is a collection of several modules, which are listed as follows with the functionality that they provide.
web3-eth: Ethereum blockchain and smart contractsweb3-shh: Whisper protocol (P2P communication and broadcast)web3-bzz: Swarm protocol, which provides decentralized storageweb3-utils: Provides helper functions for DApp development
The web3.js library can be installed via npm by simply issuing the following command:
$ npm install web3
web3.js can also be directly downloaded from https://github.com/ethereum/web3.js.
web3.min.js, downloaded via npm, can be referenced in the HTML files. This can be found under node_modules, for example, cd.
Note that drequinox is specific to the user under which these examples were developed; you will see the name of the user that you are running these commands under.
The file can optionally be copied into the directory where the main application is and can be used from there. Once the file is successfully referenced in HTML or JavaScript, Web3 needs to be initialized by providing an HTTP provider. This is usually the link to the localhost HTTP endpoint exposed by running the Geth client. This can be achieved using the following code:
web3.setProvider(new web3.providers.HttpProvider('http://localhost:8545'));
Once the provider is set, further interaction with the contracts and blockchain can be done using the web3 object and its available methods.
Creating a web3 object
The first step when creating a web3.js-based application is to create the web3 object. It is created by selecting the appropriate available Web3 provider, which serves as an “entry point” to the blockchain through the HTTP RPC server exposed on a locally running Geth node. The necessary code will look similar to the following:
if (typeof web3 !== 'undefined')
{
    web3 = new Web3(web3.currentProvider);
}
else
{
    web3 = new Web3(new Web3.providers.HttpProvider("http://localhost: 8545"));
}
This code checks whether there is already an available Web3 provider; if yes, then it will set the provider to the current provider. Otherwise, it sets the provider to localhost: 8545; this is where the local instance of Geth is exposing the HTTP-RPC server. In other words, the Geth instance is running an HTTP-RPC server, which is listening on port 8545. In our case, as we started Geth with port 8001, it will be 8001 that we use in our code. Note that there is no need to run this code, as we will create a web3 object later in the exercise.
So far, we have explored how to install web3.js, the Ethereum JavaScript API library, and how to create a web3 object that can be used to interact with the smart contracts using the HTTP provider running on the localhost as part of the Geth instance.
Creating an app.js JavaScript file
In the following section, an example will be presented that will make use of web3.js to allow interaction with the contracts, via a webpage served over a simple HTTP web server.
This can be achieved by following these steps. First, create a directory named /simplecontract/app, the home directory. This is the main directory under your user ID on Linux or macOS. This can be any directory, but in this example, the home directory is used.
Then, create a file named app.js, and write or copy the following code into it:
var Web3 = require('web3');
if (typeof web3 !== 'undefined') {
  web3 = new Web3(web3.currentProvider);
} else {
  // set the provider you want from Web3.providers
  web3 = new Web3(new Web3.providers.HttpProvider("http://localhost:8001"));
}
web3.eth.defaultAccount = web3.eth.accounts[0];
var SimpleContract = web3.eth.contract([
    {
        "constant": false,
        "inputs": [
            {
                "name": "x",
                "type": "uint8"
            }
        ],
        "name": "Matcher",
        "outputs": [
            {
                "name": "",
                "type": "bool"
            }
        ],
        "payable": false,
        "stateMutability": "nonpayable",
        "type": "function"
    },
    {
        "anonymous": false,
        "inputs": [
            {
                "indexed": false,
                "name": "returnValue",
                "type": "bool"
            }
        ],
        "name": "valueEvent",
        "type": "event"
    }
]);
var simplecontract = SimpleContract.at("0x3b52828c63ffdcb27fa5105bc66b8f1cb1bc648c");
        console.log(simplecontract);
function callMatchertrue()
{
var txn = simplecontract.Matcher.call(12);
{
};
console.log("return value: " + txn);
}
function callMatcherfalse()
{
var txn = simplecontract.Matcher.call(1);{
};
console.log("return value: " + txn);
}
function myFunction()
{
  var x = document.getElementById("txtValue").value;
    var txn = simplecontract.Matcher.call(x);{
};
console.log("return value: " + txn);
    document.getElementById("decision").innerHTML = txn;
}
This file contains various elements:
First, we created the web3 object and provided a localhost geth instance listening on port 8545 as the Web3 provider.
After this, web3.eth.accounts[0] is selected as the account with which all the interactions will be performed with the smart contract.
Next, the ABI is provided, which serves as the interface between the user and the contract. It can be queried using Geth, generated using the Solidity compiler, or copied directly from the Remix IDE contract details.
After this, the simplecontract is created, which refers to the smart contract with the address 0x3b52828c63ffdcb27fa5105bc66b8f1cb1bc648c.
Finally, we declared three functions: callMatchertrue(), callMatcherfalse(), and myFunction(). Once the web3 object is correctly created and a simplecontract instance is created, calls to the contract functions can be made easily.
callMatchertrue() simply calls the smart contract function matcher using the simplecontract object we created in the app.js file we created earlier.
Similarly, callMatcherfalse() calls the smart contract’s Matcher function by providing a value of 1.
Finally, the myFunction() function is defined, which contains simple logic to read the value provided by the user on the webpage in a txtValue textbox and uses that value to call the smart contract’s matcher function.
After that, the functions, the return value is also logged in the debug console, available in browsers by using console.log.
Calls can be made using simplecontractinstance.Matcher.call and then by passing the value for the argument. Recall the Matcher function in the Solidity code:
function Matcher (uint8 x) returns (bool)
It takes one argument x of type uint8 and returns a Boolean value, either true or false. Accordingly, the call is made to the contract, as shown here:
var txn = simplecontractinstance.Matcher.call(12);
In the preceding example, console.log is used to print the value returned by the function call. Once the result of the call is available in the txn variable, it can be used anywhere throughout the program, for example, as a parameter for another JavaScript function.
Finally, check the availability of the contract. This line of code simply uses console.log to print the simple contract attributes, in order to verify the successful creation of the contract:
var simplecontract = SimpleContract.at("0x82012b7601fd23669b50bb7dd79460970ce386e3");
console.log(simplecontract);
Once this call is executed, it will display various contract attributes indicating that the web3 object has been created successfully and HttpProvider is available. Any other call can be used to verify the availability, but here, printing simple contract attributes has been used.
In this part of the example, we have created a simplecontract instance and then used console.log to display some attributes of the contract, which indicates the successful creation of the simplecontract instance.
Creating a frontend webpage
The next stage is to create the frontend webpage. For this, we create a file named index.html with the source code shown as follows:
<html>
<head>
<title>SimpleContract Interactor</title>
<script src="./web3.min.js"></script>
<script src="./app.js"></script>
</head>

<body>

<p>Enter your value:</p>
<input type="text" id="txtValue" value="">

<p>Click the "get decision" button to get the decision from the smart contract.</p>
<button onclick="myFunction()">get decision</button>
<p id="decision"></p>
<p>Calling the contract manually with hardcoded values, result logged in browser debug console:</p>
<button onclick="callMatchertrue()">callTrue</button>
<button onclick="callMatcherfalse()">callFalse</button>

</body>
</html>
This file will serve as the frontend of our decentralized application. In other words, it provides the UI for interacting with the smart contracts.
First, we referred to the JavaScript web3.js library and app.js, which we created earlier in this section. This will allow the HTML file to call the required functions from these files.
After that, standard HTML is used to create an input text field so that users can enter the values.
Then we used the onclick event to call the myFunction() function that we declared in our JavaScript app.js file.
Finally, two onclick events with the buttons callTrue and callFalse are used to call the callMatchertrue() and callMatcherfalse() functions, respectively.
We are keeping this very simple on purpose; there is no direct need to use jQuery, React, or Angular here, which would be a separate topic. Nevertheless, these frontend frameworks make development easier and a lot faster, and are commonly used for blockchain-related JavaScript frontend development.
In order to keep things simple, we are not going to use any frontend JavaScript frameworks in this section, as the main aim is to focus on blockchain technology and not the HTML, CSS, or JavaScript UI frameworks.
In this part of the example, we have created a web frontend and a JavaScript file backend, where we have defined all the functions required for our application.
The app.js file we created in the previous section is the main JavaScript file that contains the code to create a web3 object. It also provides methods that are used to interact with the contract on the blockchain.
In the next stage of this example, we will explore how contract functions can be called.
Calling contract functions
Contract functions can be called as shown in the following code, which is part of the app.js file created earlier:
function callMatchertrue()
{
var txn = simplecontract.Matcher.call(12);
{
};
console.log("return value: " + txn);
}
function callMatcherfalse()
{
var txn = simplecontract.Matcher.call(1);{
};
console.log("return value: " + txn);
}
function myFunction()
{
  var x = document.getElementById("txtValue").value;
    var txn = simplecontract.Matcher.call(x);{
};
console.log("return value: " + txn);
    document.getElementById("decision").innerHTML = txn;
}
The preceding code shows three simple functions, callMatchertrue(), callMatcherfalse(), and myFunction().
Creating a frontend webpage
Finally, the HTML file named index.html is created with the following code. This HTML file will serve as the frontend UI for the users, who can browse to this page served via an HTTP server to interact with the smart contract:
<html>
<head>
<title>SimpleContract Interactor</title>
<script src="./web3.js"></script>
<script src="./app.js"></script>
</head>

<body>

<p>Enter your value:</p>
<input type="text" id="txtValue" value="">

<p>Click the "get decision" button to get the decision from the smart contract.</p>
<button onclick="myFunction()">get decision</button>
<p id="decision"></p>
<p>Calling the contract manually with hardcoded values, result logged in browser debug console:</p>
<button onclick="callMatchertrue()">callTrue</button>
<button onclick="callMatcherfalse()">callFalse</button>

</body>
</html>
It is recommended that a web server is running in order to serve the HTML content (index.html as an example). Alternatively, the file can be browsed from the filesystem but that can cause some issues related to serving the content correctly with larger projects; as a good practice, always use a web server.
A web server in Python can be started using the following command. This server will serve the HTML content from the same directory that it has been run from:
$ python -m SimpleHTTPServer 7777
Serving HTTP on 0.0.0.0 port 7777
The web server does not have to be in Python; it can be an Apache server or any other web container.
If you are using Visual Studio Code, you can use the live server extension, available here: https://marketplace.visualstudio.com/items?itemName=ritwickdey.LiveServer. Note that, do not load the HTML file directly into the browser – it won’t work. You need a web server, which can be run as shown above.
Now any browser can be used to view the webpage served over the chosen TCP port. This is shown in the following screenshot:
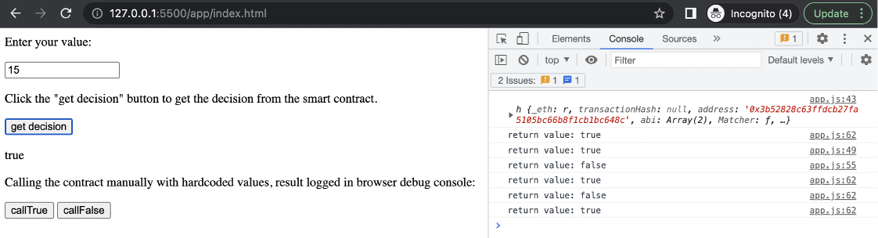
Figure 12.3: Interaction with the contract
It should be noted that the output shown here is in the browser’s console window. The browser’s console must be enabled in order to see the output.
As the values (12 and 1) are hardcoded in the code for simplicity, two buttons shown in the screenshot, callTrue and callFalse, have been created in index.html. Both of these buttons call functions with hardcoded values. This is just to demonstrate that parameters are being passed to the contract via Web3 and values are being returned accordingly.
There are three functions being called behind these buttons. We will describe them as follows:
- The
get decisionbutton returns the decision from the contract:<button onclick="myFunction()">get decision</button> function myFunction() { var x = document.getElementById("txtValue").value; var txn = simplecontract.Matcher.call(x);{ }; console.log("return value: " + txn); document.getElementById("decision").innerHTML = txn; }The
get decisionbutton invokes the smart contract’sMatcherfunction with the value entered on the webpage. The variablexcontains the value passed to this function via the webpage, which is12. As the value is12, which is greater than 10, theget decisionbutton will returntrue.
- The
callTruebutton will call theMatcherfunction with a value that is always greater than 10, such as 12, always returningtrue. ThecallMatchertrue()method has a hardcoded value of12, which is sent to the contract using the following code:simplecontractinstance.Matcher.call(12)The return value is printed in the console using the following code, which first invokes the
Matcherfunction and then assigns the value to thetxnvariable to be printed later in the console:simplecontractinstance.Matcher.call(1) function callMatchertrue() { var txn = simplecontractinstance.Matcher.call(12);{ }; console.log("return value: " + txn); }
- The
callFalsebutton invokes thecallMatcherfalse()function. ThecallMatcherfalse()function works by passing a hardcoded value of1to the contract using this code:simplecontractinstance.Matcher.call(1)The return value is printed accordingly:
console.log("return value: " + txn);
function callMatcherfalse()
{
var txn = simplecontractinstance.Matcher.call(1);{
};
console.log("return value: " + txn);
}
Note that there is no real need for the callTrue and callFalse methods here; they are just presented for pedagogical reasons so that readers can correlate the functions with the hardcoded values and then to the called function within the smart contract, with value as a parameter.
This example demonstrates how the Web3 library can be used to interact with the contracts on the Ethereum blockchain. First, we created a web frontend using the JavaScript app.js file and the HTML file. We also included the Web3 library in our HTML so that we could create the web3 object and use that to interact with the deployed smart contract.
In the next section, we will explore some development frameworks that aid Ethereum development, including a commonly used framework called Truffle.
Deploying and interacting with contracts using Truffle
There are various development frameworks now available for Ethereum. As seen in the examples discussed earlier, it can be quite time-consuming to deploy the contracts via manual means. This is where Truffle and similar frameworks such as Embark can be used to make the process simpler and quicker. We have chosen Truffle because it has a more active developer community and is currently the most widely used framework for Ethereum development. However, note that there is no best framework as all frameworks aim to provide methods to make development, testing, and deployment easier.
You can explore other frameworks and tools here: https://ethereum.org/en/developers/local-environment/
We discussed Truffle briefly in Chapter 11, Tools, Languages, and Frameworks for Ethereum Developers. In this section, we will see an example project that will demonstrate how Truffle can be used to develop a decentralized application. We will see all the steps involved in this process such as initialization, testing, migration, and deployment. First, we will see the installation process.
Installing and initializing Truffle
If Truffle is not already installed, it can be installed by running the following command:
$ npm install -g truffle
Next, Truffle can be initialized by running the following commands. First, create a directory for the project, for example:
$ mkdir testdapp
Then, change the directory to the newly created testdapp and run the following command:
$ truffle init
Starting init...
================
> Copying project files to /Users/imran/testdapp
Init successful, sweet!
Once the command is successful, it will create the directory structure, as shown here. This can be viewed using the tree command in Linux:
$ tree .
.
├── contracts
│   └── Migrations.sol
├── migrations
│   └── 1_initial_migration.js
├── test
└── truffle-config.js
3 directories, 3 files
This command creates three main directories:
contracts: This directory contains Solidity contract source code files. This is where Truffle will look for Solidity contract files during migration.migration: This directory has all the deployment scripts.test: As the name suggests, this directory contains relevant test files for applications and contracts.
Finally, Truffle configuration is stored in the truffle.js file, which is created in the root folder of the project from where truffle init was run.
Now that we have initialized Truffle, let’s see how it is used to compile, test, and migrate smart contracts.
Compiling, testing, and migrating using Truffle
In this section, we will demonstrate how to use various operations available in Truffle. We will learn how a sample project available with Truffle can be downloaded, and introduce how to use compilation, testing, and migration commands in Truffle to deploy and test Truffle boxes, which are essentially sample projects available with Truffle. We will use the MetaCoin Truffle box. Later, further examples will be shown on how to use Truffle for custom projects.
We will use Ganache as a local blockchain to provide the RPC interface. Make sure that Ganache is running in the background and mining.
We covered the Ganache setup in Chapter 11, Tools, Languages, and Frameworks, for Ethereum Developers . You can refer to that chapter for a refresher.
Ganache typically runs on port 7545 with 10 accounts, however, these choices can be changed in the Settings option in Ganache.
We will use the Ganache workspace that we saved in Chapter 11, Tools, Languages, and Frameworks, for Ethereum Developers. Alternatively, a new environment can also be set up.
After the successful setup of Ganache, the following steps need to be performed in order to unpack the webpack Truffle box and run the MetaCoin project:
- First, create a new directory:
$ mkdir tproject $ cd tproject - Now, unbox the metacoin sample from Truffle, by issuing the command below:
$ truffle unbox metacoin Starting unbox... ================= ? Preparing to download box ? Downloading ? Cleaning up temporary files ? Setting up box Unbox successful, sweet! - Edit the
truffle.jsfile: if Ganache is running on a different port, then change the port from the default to where Ganache is listening. - Edit the file and uncomment the defaults. The file should look like the one shown here:
module.exports = {
  // Uncommenting the defaults below
  // provides for an easier quick-start with Ganache.
  // You can also follow this format for other networks;
  // see <http://truffleframework.com/docs/advanced/configuration>
  // for more details on how to specify configuration options!
  //
  networks: {
    development: {
      host: "127.0.0.1",
      port: 7545,
      network_id: "*"
    },
    test: {
      host: "127.0.0.1",
      port: 7545,
      network_id: "*"
    }
  }
};
Now, after unboxing the webpack sample and making the necessary configuration changes, we are ready to compile all the contracts.
- Now run the following command to compile all the contracts:
$ truffle compileThis will show the following output:
Compiling your contracts...
===========================
> Compiling ./contracts/ConvertLib.sol
> Compiling ./contracts/MetaCoin.sol
> Compiling ./contracts/Migrations.sol
> Artifacts written to /Users/imran/tproject/build/contracts
> Compiled successfully using:
   - solc: 0.5.16+commit.9c3226ce.Emscripten.clang
- Now we can test the contracts using the
truffle testcommand as shown here:$ truffle testThis command will produce the output shown as follows, indicating the progress of the testing process:
Compiling your contracts...
===========================
> Compiling ./test/TestMetaCoin.sol
> Artifacts written to /var/folders/c5/dnw63gx93j9cl0d7r4nhc6k00000gn/T/test--1429-MvQiDl7EIBLN
> Compiled successfully using:
   - solc: 0.5.16+commit.9c3226ce.Emscripten.clang
  TestMetaCoin
    ? testInitialBalanceUsingDeployedContract (151ms)
    ? testInitialBalanceWithNewMetaCoin (109ms)
  Contract: MetaCoin
    ? should put 10000 MetaCoin in the first account (53ms)
    ? should call a function that depends on a linked library (75ms)
    ? should send coin correctly (206ms)
 5 passing (5s)
We can also see that in Ganache, the transactions are being processed as a result of running the test:
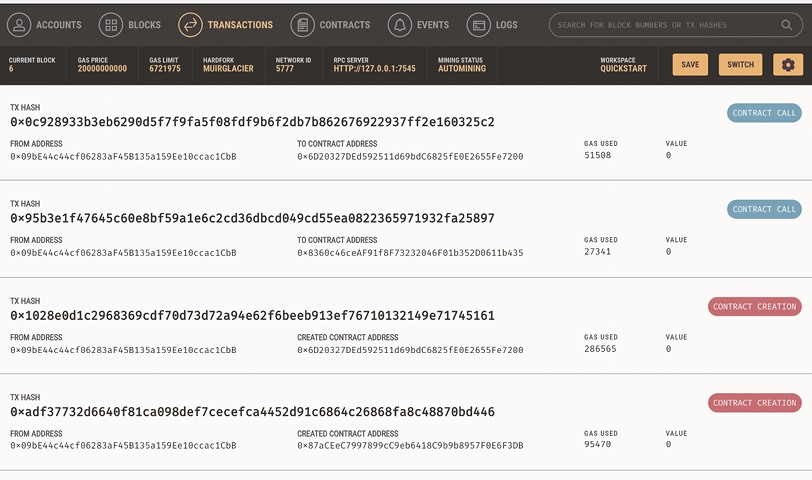
Figure 12.4: Truffle screen as a result of testing
- Once testing is completed, we can migrate to the blockchain using the code below. Migration will use the settings available in
truffle.jsthat we edited in the second step of this process to point to the port where Ganache is running. This is achieved by issuing the following command:$ truffle migrate
The output is shown as follows. Note that not the entire output is shown, just a summary, indicating the success of the deployment:
Starting migrations...
Summary
=======
> Total deployments:   3
> Final cost:          0.0109242 ETH
Notice that when the migration runs, it will reflect on Ganache; for example, the balance of accounts will go down and you can also view transactions that have been executed. You can see BALANCE updating in Ganache, as the transactions run and ETH is consumed:

Figure 12.5: Ganache displaying accounts
In the Ganache workspace, we can also add the Truffle project to enable extra features. For this, click on the upper right-hand corner gear icon, and open the Settings screen. Add the Truffle project by selecting the truffle-config.js file in the tproject directory.
Save and restart to commit the changes. When Ganache is back up again, you will be able to see additional information about the contract, as shown in the following screenshot:

Figure 12.6: More contract details are visible after adding the Truffle project
In this section so far, we’ve explored how Truffle can be used to compile, test, and deploy smart contracts on the blockchain. We used Ganache, the Ethereum personal blockchain (a simulated version of the Ethereum blockchain), to perform all the exercises.
Note that you will see slightly different outputs and screens depending on your local environment and Ganache and Truffle versions.
Now, we can interact with the contract using the Truffle console. We will explore this in the following section.
Interacting with the contract
Truffle also provides a console (a CLI) that allows interaction with the contracts. All deployed contracts are already instantiated and ready to use in the console. This is a REPL-based interface, meaning Read, Evaluate, and Print Loop. Similarly, in the Geth client (via attach or console), REPL is used via exposing the JavaScript runtime environment (JSRE):
- The console can be accessed by issuing the following command:
$ truffle console - This will open a CLI:
truffle(development)>Once the console is available, various methods can be run in order to query the contract. A list of methods can be displayed by typing the preceding command and tab-completing.
- Other methods can also be called in order to interact with the contract; for example, in order to retrieve the address of the contract, the following method can be called using the Truffle console:
truffle(development)> MetaCoin.address '0x670939B81a085d8eBD6a6Fb2C2530d9f04b2a21D' - This address is also shown in the contract creation transaction in Ganache:

Figure 12.7: Contract creation transaction shown in Ganache
A few examples of other methods that we can call in the truffle console are shown here.
- To query the accounts available, enter the following command:
truffle(development)> MetaCoin.web3.eth.getAccounts() - This will return the output shown here:
[ '0x9559428d898A807ce57B76b760Da37Cc849dd6Ae', '0x63B9315C73AD1646e1D4b004F4A89f230f552897', '0xB45708b2b3d2bBD9F1Ab80a7B39568179d11eFac', '0x5d21E49Da087AD4A44c1ca581aB34631C071dD69', '0x95aCC244602Ac08db4A06198cd07C980dD17F7B3', '0x96A7910c8C7f4DF5F313cBa0720B744DD1A56e94', '0x6511B815E79BC26e9c839A8D88699c4BBA79E384', '0x5df2ac93A9e9D45c7832274ef5E1f116edfa90c0', '0x904025806f01483365587b2B339274D69A7091CD', '0xa96275Fb47d10Ecb1FE801f631cbAe94A3776441' ] - To query the balance of the contract, enter the following command:
truffle(development)> MetaCoin.web3.eth.getBalance("0x9559428d898A807ce57B76b760Da37Cc849dd6Ae") - This will show the output shown here:
99987682160000000000 - To end a session with the truffle console, the
.exitcommand is used.
This completes our introduction to the sample webpack Truffle box and the MetaCoin application using Truffle. In this section, we discovered how Truffle can be used to interact with deployed smart contracts. MetaCoin, in this section, is an example of a decentralized application, however, we used this merely as an example to learn how Truffle works.
In the next section, we will see how a contract can be developed from scratch, tested, and deployed using Truffle, Ganache, and our privatenet.
Using Truffle to test and deploy smart contracts
This section will demonstrate how we can use Truffle for testing and deploying smart contracts. Let’s look at an example of a simple contract in Solidity, which performs addition. We will see how migrations and tests can be created for this contract with the following steps:
- Create a directory named
simple:$ mkdir simple - Change directory to
simple:$ cd simple - Initialize Truffle to create a skeleton structure for smart contract development:
$ truffle init - Once initialization completes, place the two files
Addition.solandMigrations.solin thecontractsdirectory. The code for both of these files is listed as follows:Addition.sol:pragma solidity ^0.5.0; contract Addition { uint8 x; //declare variable x // define function addx with two parameters y and z, and modifier public function addx(uint8 y, uint8 z ) public { x = y + z; //performs addition } // define function retrievex to retrieve the value stored, variable x function retrievex() view public returns (uint8) { return x; } } Migrations.sol: pragma solidity >=0.4.21 <0.7.0; contract Migrations { address public owner; uint public last_completed_migration; constructor() public { owner = msg.sender; } modifier restricted() { if (msg.sender == owner) _; } function setCompleted(uint completed) public restricted { last_completed_migration = completed; } }
- Now compile the contracts:
Compiling your contracts... =========================== > Compiling ./contracts/Addition.sol > Compiling ./contracts/Migrations.sol > Artifacts written to /Users/imran/simple/build/contracts > Compiled successfully using: - solc: 0.5.16+commit.9c3226ce.Emscripten.clang - Under the
migrationfolder, place two files1_initial_migration.jsand2_deploy_contracts.jsas shown here:1_initial_migration.js: var Migrations = artifacts.require("./Migrations.sol"); module.exports = function(deployer) { deployer.deploy(Migrations); }; 2_deploy_contracts.js: var SimpleStorage = artifacts.require("Addition"); module.exports = function(deployer) { deployer.deploy(SimpleStorage); }; - Under the
testfolder, place the fileTestAddition.sol. This will be used for unit testing:TestAddition.sol:pragma solidity ^0.4.2; import "truffle/Assert.sol"; import "truffle/DeployedAddresses.sol"; import "../contracts/Addition.sol"; contract TestAddition { function testAddition() public { Addition adder = Addition(DeployedAddresses.Addition()); adder.addx(100,100); uint returnedResult = adder.retrievex(); uint expected = 200; Assert.equal(returnedResult, expected, "should result 200"); } }
- The test is run using the command shown here:
Using network 'development'. Compiling your contracts... =========================== > Compiling ./test/TestAddition.sol > Artifacts written to /var/folders/c5/dnw63gx93j9cl0d7r4nhc6k00000gn/T/test--26262-L5233Jk29gwo > Compiled successfully using: - solc: 0.8.5+commit.a4f2e591.Emscripten.clang TestAddition ? testAddition (417ms) 1 passing (6s) - This means that our tests are successful. Once the tests are successful, we can deploy it to the network, in our case, Ganache:
$ truffle migrateIn Ganache we see this activity, which corresponds to our migration activity under the Transactions tab.
As the
Additioncontract is already instantiated and available in the truffle console, it is quite easy to interact with the contract. In order to interact with the contract, the following methods can be used:
- Run the following command:
$ truffle consoleThis will open the
truffle console, which will allow interaction with the contract. For example, in order to retrieve the address of the deployed contract, the following method can be called:truffle(development)> Addition.address 0x742CD9222cccd146972d89fE491D6Bd0B1167426
- To call the functions from within the contract, the deployed method is used with the contract functions. An example is shown here. First instantiate the contract:
truffle(development)> let additioncontract = await Addition.deployed() undefined - Now call the
addxfunction:truffle(development)> additioncontract.addx(2,2)This will produce the following output indicating the execution status of the transaction that was created as a result of calling the
addxfunction:{ tx: '0x7386a0cb0a4c3f57121df668efe80e2ea2eb4d8dc09d72cefbb81dddf2e39334', receipt: { transactionHash: '0x7386a0cb0a4c3f57121df668efe80e2ea2eb4d8dc09d72cefbb81dddf2e39334', transactionIndex: 0, blockHash: '0x951378cbaf6089b9eb71a2bd51e59571c7abc4739f48bdb92bd598f27ca752f1', blockNumber: 335, from: '0x9559428d898a807ce57b76b760da37cc849dd6ae', to: '0x742cd9222cccd146972d89fe491d6bd0b1167426', gasUsed: 42986, cumulativeGasUsed: 42986, contractAddress: null, logs: [], status: true, logsBloom: '0x00000000000000000000000000000000000000000000000000000000000000000000000000000000000000000000000000000000000000000000000000000000000000000000000000000000000000000000000000000000000000000000000000000000000000000000000000000000000000000000000000000000000000000000000000000000000000000000000000000000000000000000000000000000000000000000000000000000000000000000000000000000000000000000000000000000000000000000000000000000000000000000000000000000000000000000000000000000000000000000000000000000000000000000000000000000', rawLogs: [] }, logs: [] }We see the transaction in Ganache too, under the Transactions tab.
- Finally, we can call the
retrievexfunction to see the current value afteraddition:truffle(development)> additioncontract.retrievex() BN { negative: 0, words: [ 4, <1 empty item> ], length: 1, red: null }
Finally, we see the value 4 returned by the contract.
In this section, we created a simple smart contract that performs an addition function and learned how the Truffle framework can be used to test and deploy the smart contract. We also learned how to interact with the smart contract using the Truffle console.
Can you deploy this project using Truffle on the privatenet we created earlier? Hint: you have to change the truffle-config.js to point to the local private network.
In the next section, we will look at IPFS, which can serve as the decentralized storage layer for a decentralized ecosystem. We will now see how we can host one of our DApps on IPFS.
Deployment on decentralized storage using IPFS
As discussed in Chapter 1, Blockchain 101, in order to fully benefit from decentralized platforms, it is desirable that you decentralize the storage and communication layer too in addition to decentralized state/computation (blockchain). Traditionally, web content is served via centralized servers, but that part can also be decentralized using distributed filesystems. The HTML content shown in the earlier examples can be stored on a distributed and decentralized IPFS network in order to achieve enhanced decentralization.
IPFS is available at https://ipfs.io/.
Note that IPFS is under heavy development and is an alpha release. Therefore, there is the possibility of security bugs. Security notes are available here: https://ipfs.io/ipfs/QmYwAPJzv5CZsnA625s3Xf2nemtYgPpHdWEz79ojWnPbdG/security-notes
IPFS can be installed by following this process:
- Download the IPFS package using the command below:
$ curl -O https://dist.ipfs.io/go-ipfs/v0.12.2/go-ipfs_v0.12.2_darwin-amd64.tar.gz - And decompress the
.gzfile:$ tar -xvzf go-ipfs_v0.12.2_darwin-amd64.tar.gz - Change directory to where the files have been decompressed:
$ cd go-ipfs - Start the installation:
$ ./install.shThis will produce the following output:
Moved ./ipfs to /usr/local/bin
- Check the version to verify the installation:
$ ipfs --version - This will produce the following output:
ipfs version 0.12.2 - Initialize the IPFS node:
$ ipfs initThis will produce the following output:
generating ED25519 keypair...done
peer identity: 12D3KooWNY2s8dKsocHQuk4sUR9TFjPxETZcf8rkTSs2NiwiiTyy
initializing IPFS node at /Users/imran/.ipfs
to get started, enter:
ipfs cat /ipfs/QmQPeNsJPyVWPFDVHb77w8G42Fvo15z4bG2X8D2GhfbSXc/readme
- Enter the following command to ensure that IPFS has been successfully installed:
$ ipfs cat /ipfs/QmQPeNsJPyVWPFDVHb77w8G42Fvo15z4bG2X8D2GhfbSXc/readme - Now, start the IPFS daemon:
$ ipfs daemonThis will produce the following output (not the entire output is shown):
Initializing daemon...
 . . . .
Daemon is ready
- Copy files onto IPFS using the following command:
$ ipfs add . --recursive –-progressThis will produce the following output, indicating the progress of adding the pages to IPFS:
added QmcCGHgtAn4CpAw185Wd4VmSHsVFwbA3GJLTckMtAvqXqo simplecontract/app/app.js
added Qmcuo7cC9ycKaSgNN12kdrpx6h6RoHbtZxyMX8d4myqLUM simplecontract/app/index.html
. . . . .
Now it can be accessed in the browser by using the URL that is pointing to the IPFS filesystem: http://localhost:8080/ipfs/Qmcuo7cC9ycKaSgNN12kdrpx6h6RoHbtZxyMX8d4myqLUM/app/
- Finally, in order to make the changes permanent, the following command can be used:
$ ipfs pin add Qmcuo7cC9ycKaSgNN12kdrpx6h6RoHbtZxyMX8d4myqLUM
This will show the following output:
pinned Qmcuo7cC9ycKaSgNN12kdrpx6h6RoHbtZxyMX8d4myqLUM recursively
The preceding example demonstrated how IPFS can be used to provide decentralized storage for the web part (UI) of smart contracts.
Remember that in Chapter 1, Blockchain 101, we described how a decentralized application consists of a frontend interface (usually a web interface), backend smart contracts on a blockchain, and the underlying blockchain. We have covered all these elements in this example and created a decentralized application.
Summary
This chapter started with the introduction of Web3. We explored various methods to develop smart contracts. Also, we saw how the contract can be tested and verified using a local test blockchain before implementation on a public blockchain or private production blockchain.
We worked with various tools such as Ganache, the Geth client console, and the Remix IDE to develop, test, and deploy smart contracts. Moreover, the Truffle framework was also used to test and migrate smart contracts. We also explored how IPFS can be used to host the webpages that we created for our DApp, serving as the decentralized storage layer of the blockchain ecosystem.
In the next chapter, we will introduce how Ethereum is evolving into a more advanced form previously called Ethereum 2.0 but now called simply Ethereum - the combination of Execution layer (Eth1) and consensus layer (Eth2).
Join us on Discord!
To join the Discord community for this book – where you can share feedback, ask questions to the author, and learn about new releases – follow the QR code below:
