
There is an easy way and a hard way. The hard part is finding the easy way.
—Anonymous
Emily called Kyle and Joshua for a short discussion.
“Ok, remember our second app, ‘Weather for all’? The back-end team doesn’t want to keep maintaining two servers, and they asked us to unify our requests to the same endpoints.”
“Now that we have the network Swift Package, we can duplicate it and add it to the project. Few hours and we all set,” Kyle suggested.
Emily didn’t like the idea: “But that’s code duplication. What’s the point of having a Swift Package if, eventually, we can’t share it?”
“Maybe we can share it,” Joshua said. “Maybe we can upload it to git in a separated repository and link it to both our apps.”
“It’s a good idea,” Emily said. “But that means exposing, because we’ll have to make it public, no?”
“I don’t know,” Joshua answered. “It’s a good question. I need to search a little bit.”
The problem our iOS team is facing is a common one. We are always saying code sharing is essential, and Swift Package is a great way to share code. But how exactly do we do it? And how do we handle security?
How to share code using a public git repository
How to handle versioning when we have several projects
How to create a good Readme.md file
How to connect to a Swift Package, hosted in a private git repository, using personal access token and SSH
What a Monorepo is and what its pros and cons are
Sharing Options
When we had one project, it was easy. We just created some local packages in our project and linked them easily.
If you remember, we can even use a relative path to create dependencies between our packages (if needed, of course), and everything seems to be simple.
But we know that one of Swift Packages’ benefits is the ability to share and reuse code not only within our project and targets but also between projects, between developers, and even with developers around the world.
But as simple as it sounds, just uploading the package to a git repository and connecting it, in reality, it may come with a cost of complexity and security issues.
There are several techniques of sharing your package between your projects, with many pros and cons, and we’ll go over them in this chapter.
Sharing Using a Public Git Repo
Uploading your package to a public git repo is one of the simplest ways of dealing with sharing your Swift Package.
However, there are several things you need to be aware of with this approach.
There Is No Support for Multipackage Repositories
As of this writing, a git repository can only have one Swift Package, meaning you need to create a repository for each Swift Package you want to share.
Create a local package containing files from your project
Connect the local package and integrate your app to see that everything is working as it should
Create a git repository and upload the files to git
Connect the app to the git repository
So, while setting up remote Swift Packages may sound like a big hassle, it gives you the ability to maintain each package separately, with different developers and different access controls.
Putting your Swift Packages on public repositories gives you another interesting opportunity – make some of your logic an open source library. An open source library can let other developers worldwide help you maintain your code without exposing them to other parts of your app.
Versioning
Versioning is a pain point, relevant not only for Swift Packages but also for any external library you implement in your project.
The first stage of writing a library and adding it to your project is relatively easy. It is similar to adding a new set of classes to your app.
Once your library is shared across multiple projects, we assume that it is not standing still and evolves based on project requirements over time.
Remember that a first-party library is not a classic product – we (that is to say, an app) demand modifications or add-ons, and then we implement them into our library.
The described process may cause us backward compatibility with other apps and projects depending on that library.
The issue gets even worse when different projects and even other libraries are dependent on that particular library we just changed.
The fact that we manage each library independently, in its git repository, and potentially with many developers (since it’s public) makes the backward compatibility problem a real issue we need to deal with.
Remember Semantic Versioning Standard?
If you remember from the previous chapter, semantic versioning standard aims to address precisely that.
Every dependency requirement needs to be defined according to its life cycle stage. After the initial library development is finished, the worst thing you can do is lock the dependency to a particular git branch, particularly the main branch. Sticking to a branch may cause incompatible updates in the future that may cause your app or your library to break.
The versioning process needs to be according to semantic versioning standard. While it sounds obvious to you, it doesn’t mean it is clear for the other developers that work on that library, especially when it is a public one. This should be taken into consideration when doing code reviews and pull requests.
Keeping the versioning rules on both sides (the dependency requirement definition and the library itself) improves your integrations’ stability from breaking.
Testing
Semantic versioning standard is a great way to sustain backward compatibility – on a paper.
In reality, code breaks even without public interface changes, just because developers create bugs and change behaviors, sometimes even without being aware of them.
Semantic versioning standard is just part of the solution.
Also, another critical tool we can use to catch issues is testing.
We haven’t discussed testing just yet, but testing is a primary weapon when fighting backward compatibility issues.
When talking about testing in this context, we refer to two types of testing – unit and integration tests.
In short, unit tests aim to catch certain use cases of the library functions with specific parameters, and integration tests’ goal is to see how your libraries work together.
Even though we’ll discuss testing in the next chapter, I want to clear up something in terms of backward compatibility.
One of the test’s primary goals is to catch any regressions in your code. In this case, bugs may be created due to code changes in the library itself or one of the library dependencies.
Remember that unit tests (and especially integration tests) are not supposed to be written without context. You should always create your tests based on user stories or, in this case, based on how the client (another library or an app) uses your package.
For example, if your app calls one of your package functions with certain parameters and expects a specific result, you should write a test covering just that. Sure, it is useful to cover edge case scenarios, but covering particular use cases ensures your code won’t break in the future.
When talking about Swift Packages, integration tests become even more critical. If your package is dependent on other packages, integration tests ensure this dependency fulfills the required behavior. Integration tests become even more critical when discussing open source packages with the nature of receiving code updates supposed to fill different projects’ demands.
Remember, Public Is Public
Some of our packages contain sensitive information we don’t want to expose to the world.
Some of them are not even relevant to other developers around the world.
This means that making some of our code an open source project is not always what we want, so what do we do?
In previous chapters, we learned how to decouple modules in our code and use different design patterns to do it.
The same approach can be used in this case to take out some private information and then enjoy the benefits of sharing your code.
The leading principle here (again) is SoC (“separation of concerns ”) – separating the private information from the package itself lets you put the package on a public repository in the future.
Not only can separating private information help you make your package public, but it can also make it more reusable and testable.
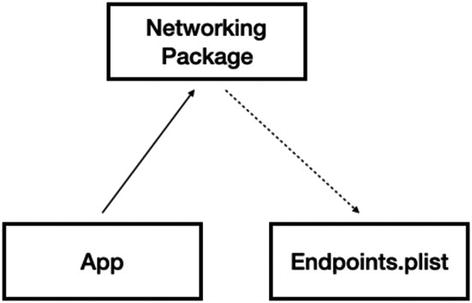
Separate endpoints list from the networking package
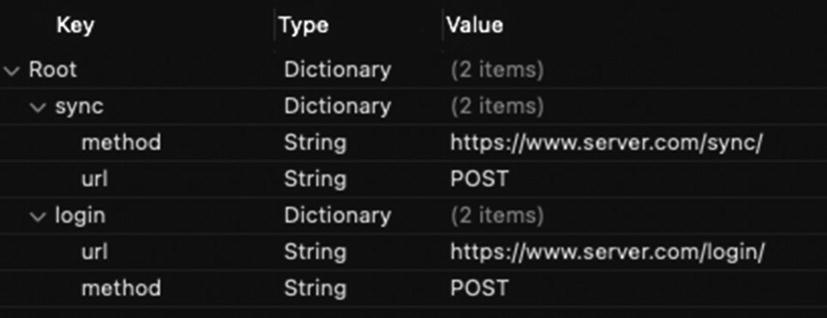
Endpoints.plist file
Now, this is an example of how to take a private package and make it public.
The conversion to a public repository reduces complexity and can give you additional benefits of better design and faster bug fixes.
Distribute Your Package
In general, the fact that your package repository is public and not private means it is already available for others to clone and integrate it into their projects.
There is no need to do additional steps for that to happen.
There is no “official” Swift Package index at the time of this writing, even though there are some suggestions in the Swift developer’s community to create one.
Searching from Xcode for a Swift Package will find your package (or other public packages) as long as it is public. But a real, official index does not yet exist.
However, there are some alternative indexes where you can find many Swift Packages to use. The most famous one is https://swiftpackageindex.com, containing thousands of public Swift Packages for you to use.
It has a great search engine and full detailed information for each package. I recommend you add your package to that index or any other index, for that matter.
Readme.md File
We didn’t talk about the Readme.md file yet, and perhaps now is the time for that.
There are three different aspects we document our package – the first is comments, which provide relevant documentation while coding, and we discussed that in previous chapters. The second is unit tests that other than making sure our package performs as expected are part of the documentation.
The third is the Readme.md file.
The Readme.md file is the first file git hosting services show when a developer entered the repository.
Package goal
Installation details
Setup steps
Usage
Different notes
The Readme.md file is important in private repositories as well, but in public repositories, it is critical documentation.
Remember that your package may contain many Swift files. Documenting every public interface using comments is excellent, but it doesn’t answer the developer question “What is the ‘main’ file?”
In other words, the one question every Readme.md file should answer is “How do I start?”
As I said, even in private packages, that information can be important while we share it with other developers in our team or even forget that ourselves.
Readme.md File Location and Formatting
The Readme.md file should be located in the root folder of your package, but don’t worry about that – when creating a new Swift Package, a Readme.md file is automatically generated for you.
FMDB Readme.md file
As you can see from Figure 6-3, the Readme.md file is not a plain text document. The “md” extension refers to “MarkDown,” and it is elementary to create a well rich, documented file for your library.
Readme.md Markdown Formatting
The Readme.md markdown formatting is probably one of the most straightforward formats that exist.
Some basic rules:
One hash mark (#) at the beginning of the sentence produces a title.
Adding more hash marks (“##”, “###”) adds headers in different sizes correspondingly.
A sequence of three apostrophes (```) is used to start a code snippet, and another series of three apostrophes are used to close the code snippet.
Adding a link is done using the following format: [<Displayed name>](URL).
For example:
[Apple Inc](www.apple.com)
You can also make the text richer:
Bold – **This is bold text** (This is bold text)
Italic – *Italic text* (Italic text)
Strikethrough – ~~This is a strikethrough text~~ (This is a strikethrough text)
Creating lists – You can use the same symbols you generally use to create lists, such as -, a digit, or *.
You can even insert images and GIF animations to your Readme.md file quite easily by using the link formatting I mentioned previously.
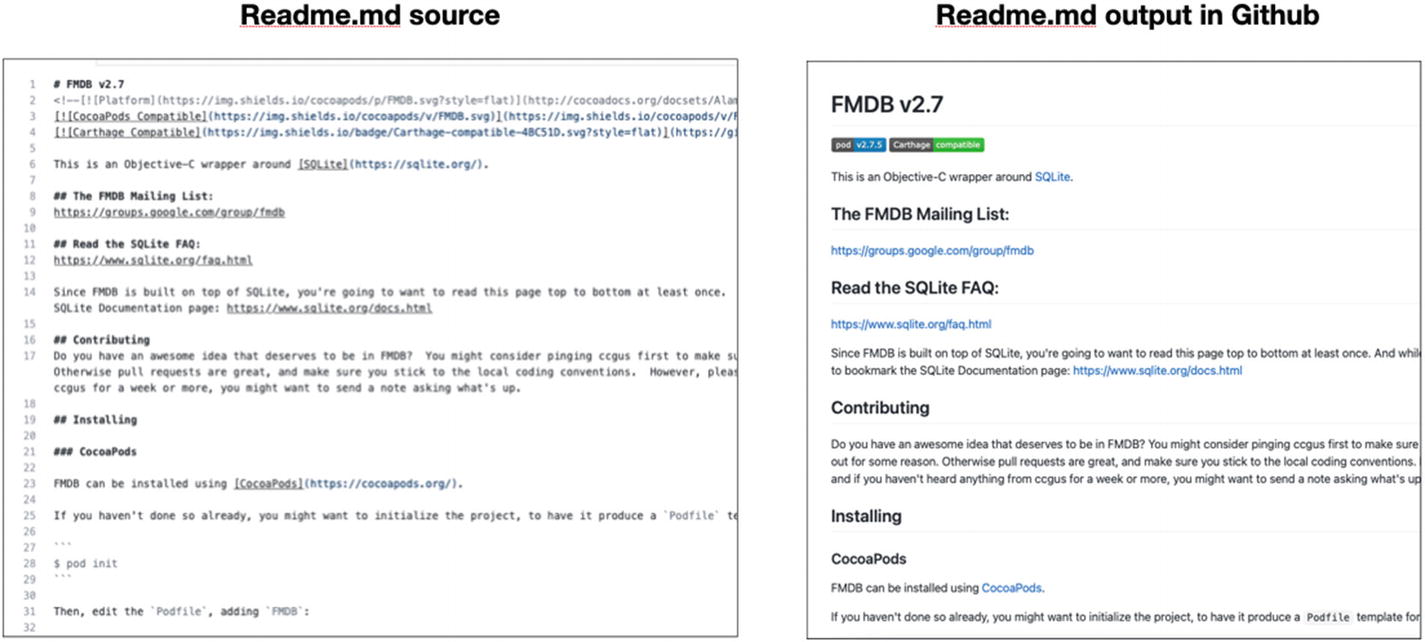
FMDB Readme.md file – source vs. output in GitHub
Unlike HTML, the markup language used in Readme.md files is straightforward and clear even in the source version.
Readme.md Best Practices
The Readme.md formatting is not the most crucial part of the file, but rather its content.
Most Readme.md files are structured into sections, describing the different package’s areas implementation and usage.
Here are some of the sections that are recommended to be included in your Readme.md file:
Overview – Describing in short what the package does and what it aims to solve.
What’s new? – Describe what’s new in the latest release. Update this section with every release.
Requirements – Usually what platforms and minimum versions are required for the package to be installed. This can be corresponding to what is written in the Package.swift file.
Install – Necessary steps for the developer to add the package to its project. If you support other dependencies’ managers, this is the place to mention that.
Setup – If there’s some initialization needed to start using the package code, you write it under “Setup.” It is best to include a code snippet.
Usage, examples, and tips – Take the primary use cases and demonstrate how to use your package in each one of them.
History – Document here primary releases or maybe the origin of the code if it was part of another project or library.
Contributors – List of developers that have a central role in working on the library.
Support and bugs – What to do in case of a problem? How to open an issue?
You don’t have to add all the preceding sections, but this list can give you a good picture of how Readme.md files are built and what types of information are expected to be included.
Adding Pictures and Animations
Another good way to demonstrate your package, which many developers ignore, is visual explanations.
In case your package deals with UI elements, you can add images to your Readme.md files to show how it performs. Not only that, but you can also add GIF animations to show the UI behavior.
Besides “eye-catching,” adding visual content also helps you explain what your package does better than any words.
To add images or GIF animations, you can use the markdown formatting rules mentioned previously.
Private Git Repository
There are cases when exposing our Swift Packages to the public is not something we want.
Usually, it happens when our Swift Package contains sensitive logic or just private code we don’t want the public to know.
Previously in this chapter, we discussed how to solve situations where our packages contain sensitive information and how to create this information and make it one of the package dependencies.
But there are cases when we need our package to be private, which could be a problem if we want it to be a dependency.
What Is the Problem Exactly?
The problem is, of course, access control.
When you connect your private dependency to your project, Xcode takes care of the credentials for you. It will probably ask you for a username and password and will save it for later use.
But this approach has two main issues.
First, it doesn’t work when your (private) package is a dependency for other packages and not your app.
Second, this method works only on your machine and is based on your private git account.
When working in a team, this could be an issue, and the problem gets even more prominent when we try to implement that in a CI machine.
Fortunately , there are two primary ways to solve that – personal access token and ssh.
Personal Access Token
The following explanations are based on GitHub because that’s the most popular git repository service but are undoubtedly relevant to other git providers as well.
First, I’ll start by saying that “personal access token” (let’s call it PAT from now on) is not the recommended way to give access to private repositories in git, but it’s indeed the simplest way.
- 1.
Generate a new token in git.
- 2.
Add the token to the package git URL in the Package.swift.
Generating New Token in Git

GitHub personal menu

Developer settings on GitHub

“Personal access tokens” menu in GitHub
In Figure 6-7, you can see a button named “Generate new token,” which will generate a new token for you to use.
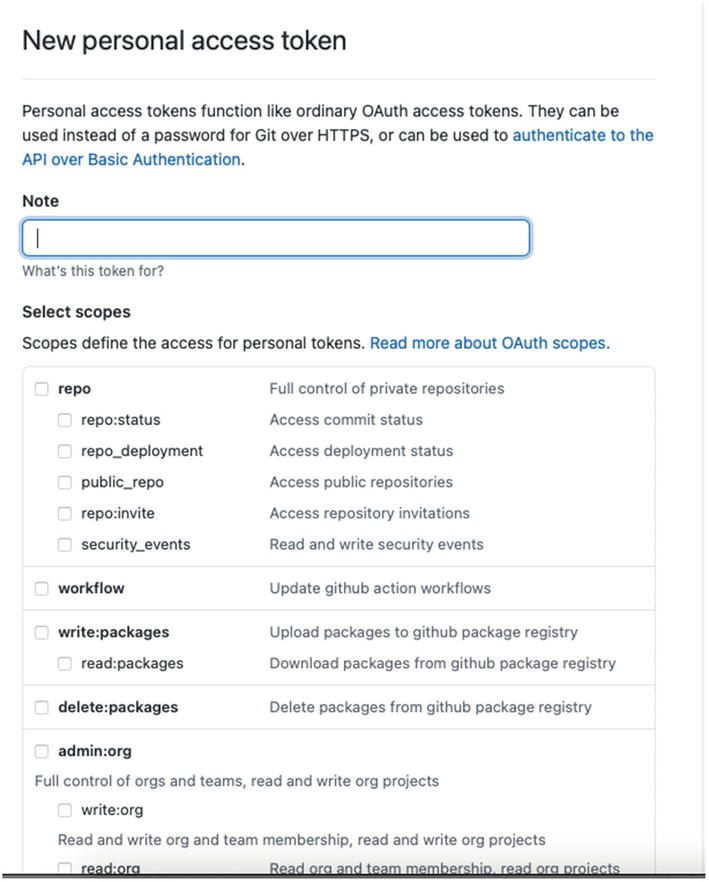
Scopes for the token
In the case of Swift Packages, all you need to mark is the first scope (“repo”), and that’s all.
After generating the token, you’ll see the token itself, and you should copy it to somewhere else because that’s the last time it is exposed to you.
This should work for other developers as well and even on CI machine.
The Problem with Personal Access Token
There are some advantages to PAT.
First, as you can see, it’s a very simple method to give access without exposing your username and password.
You can always delete your token and generate a new one, and you can also limit what you can do with it by selecting different scopes.
The problem is that a token is de facto, a weakened password. Sure, it is much limited, but it is still a password you expose in your Package.swift file .
Personal tokens are very convenient for personal use or give temporary access to other developers or machines.
To establish a secured connection for other developers and machines, the recommended way is to use an SSH connection.
Using SSH
Using SSH is probably the best-secured method for using private Swift Packages with multiple developers, CI machines, and so on.
Unlike a personal access token, using SSH requires a little more work to set up, but it works flawlessly once you set it up.
What Is SSH Connection?
SSH is a way for a user to authenticate with a server, without using a username and password, but with keys.
SSH contains two keys – public and private. Think of the public key as a “lock” and the private key as the key that opens that lock.
Once we generated the two keys, we put the “lock,” a.k.a. public key, on the server and register the private key on the machine, and from that point, we open the “lock” using our private key.
Generating SSH Keys
(when [email protected] is, of course, your email address).
What the ssh-keygen command does is creating a new pair of keys. The “-t” option defines the type of key we wish to generate.
We can use several other types of keys – dsa, ecsda, and rsa, but ed25519 is considered the most secure and fast kind of key.
ssh-keygen will ask you to enter the location where you wish to save the SSH public and private keys while suggesting the default location of saving it in your home folder. You can press enter or provide a different path.
After generating the SSH keys, you need to make sure your ssh-agent is working to proceed. ssh-agent is a system process that is responsible for using the private keys to authenticate with the server.
The preceding line means that the ssh-agent works fine, and we can proceed to our next step.
Editing SSH Config File
The next step you need to do is to edit your SSH config file. These files manage the configuration of your SSH keys according to the different servers. This is the place where you configure whether your keys use the built-in macOS keychain, for example.
Change the IdentityFile row to the right path if you chose to save the ssh keys in a different path other than the default.
Adding the Keys to the Agent
Again, just like in the config file, change the path to the keys’ right location in case you provided a different location when generating them.
Adding the Public Key to GitHub
After generating two keys – private and public – we added the private key to our ssh-agent, so it can use it to authenticate with our git server.
What we need to do next is to add the public key to our git server, so it will have “the lock” we talked about.

Private repository settings screen
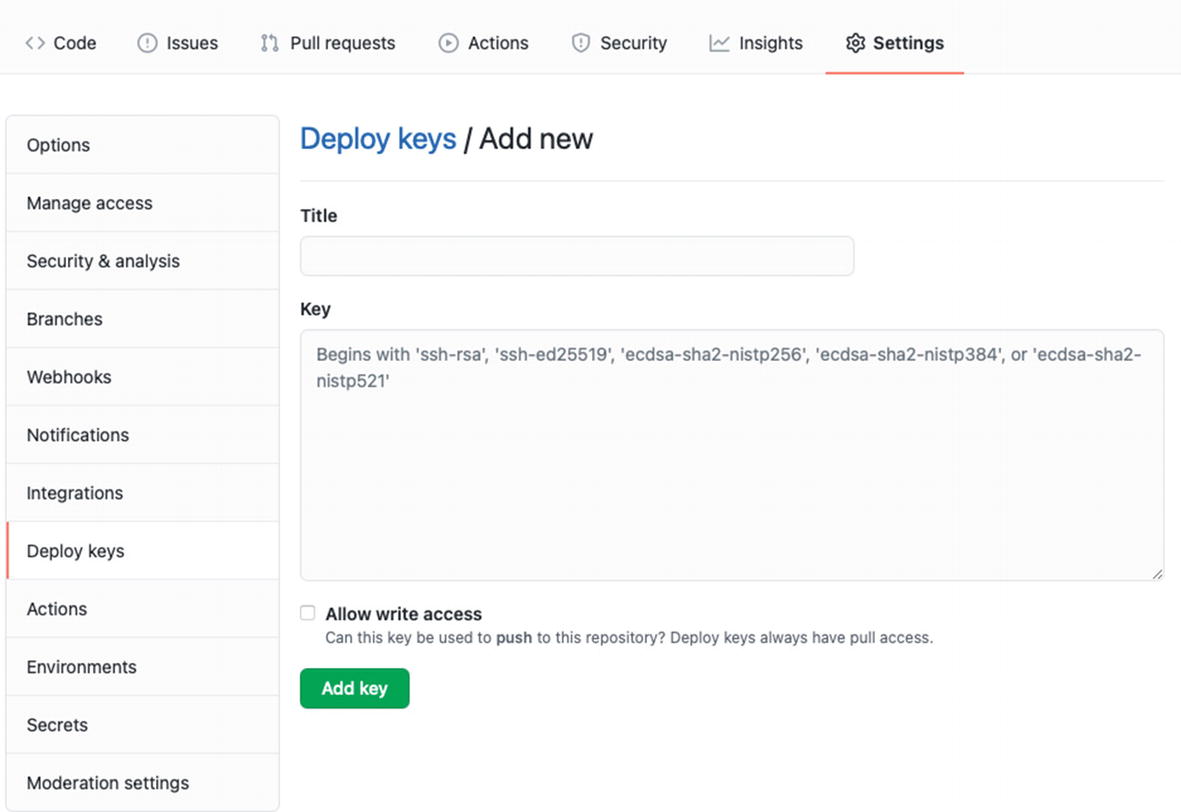
Adding a new key to a private repository
Besides the title field, you can see that the key field expects to type some text inside. That should be the content of the public key you generated earlier.
What pbcopy does is copy the content of the provided file to the system clipboard.
Once you have the public key content in your clipboard, pass it to the key field, and press “Add key.”
Going Back to the Package.swift File
Now that everything is set up, we need to go back to the Package.swift file and define our server’s dependency.
Just so you won’t get confused here, I’m not referring to the Package.swift file that belongs to the package we just uploaded to git, but to the package that is trying to use the uploaded package as a dependency.
Note that we don’t need to add any token or password to the git URL.
Other Machines
Using SSH with git private repositories requires a public key (which is the “lock”), which is supposed to be on the server, and a private key that has to be on the local machine.
This process needs to be done for every machine we want to be authorized with the private repository.
Since the private key is not part of the project, it’s a more secured method than personal access token, even though it requires more prework to be done.
The Monorepo Solution
Creating private and public repositories to store a package is an excellent way to share your package code between projects or other developers.
But, as you probably saw, setting up a bunch of repositories and connecting them to your project come with the cost of complexity.
And setting up is just the tip of the ice when speaking about complexity – managing versions between projects, integration tests, and more can become a real pain.
To simplify the process, we can use something called a “Monorepo.”
What Is a Monorepo?
You probably heard the term Monorepo here and there.
That’s because many big companies use it – Facebook, Google, Uber, and more.

A Monorepo diagram
While this idea may sound a little bit weird at first, it has several significant advantages.
Dependencies’ Management Can Be Simpler
I want to emphasize the phrase “Can Be” because, in many cases and small- and medium-scale repositories, that’s the situation.
The fact that all libraries are in the same repository doesn’t make dependencies’ management unnecessary, but it can make it much simpler.
The preceding structure is just a suggestion, but you can easily see what we did there.
We created a folder named Packages and put each Swift Package into its folder.
On the same level of the folder Packages, we created the two projects (can be more) side by side.
The Packages folder and the two projects are all inside the Monorepo.
To create dependencies between packages, all we need to do in our Package.swift file is to point to a local package as a dependency.
Looking at the preceding dependency requirement, you see how easy it is to create local dependencies when all the packages are located in the same repository.
Cross-Project Changes Are Easier
Imagine the following scenario – we have two projects and two libraries with a local dependency (just like we saw in the previous section). Now, we want to do an API change in one of the libraries on which both projects are dependent.
The library API changes require us to change code in both projects and verify everything works as expected.
Doing that in a polyrepo (a strategy where all projects and libraries have their repository) requires us to clone different repositories, modify the code, push it back, resolve the remote package again, and verify everything is stable.
And to overcome a situation where we push untested code to the main branch or a stable version, we need to check out a branch in the library repository, point the dependency requirement to the new branch, and then merge everything.
You can see the hassle that we have when all we want to do is change a simple API, which was a “simple” scenario.
In the case of Monorepo, this situation is easily handled, with changes being done quickly across all projects and libraries together.
How to Move Forward with Only One Project?
One question often asked when considering a Monorepo is “what to do when we try to branch out and work on a feature in a specific project?”
And that is a pretty good question. With Monorepo, all the projects and libraries are tightly coupled in one repository, and it gives us the feeling that working on a specific branch is awkward.
It is true that when we do a checkout to a new branch, we create a copy of the entire repository.
But code being merged back contains only changes we do, so eventually, most of our commits will be atomic.
Monorepo Also Has Disadvantages
Monorepo can help simplify some issues I mentioned earlier, but on the other hand, it can create other problems as well.
The first issue is perhaps the git performance and history. Using a Monorepo means we need to clone all the projects and libraries since they are all in the same repository.
If we have only one or two medium projects, that can be reasonable. But what if we have five or six medium/large projects?
And it doesn’t end just with cloning – what about git pull actions when we have a large team?
When we are in a Monorepo workspace, we pull all the changes from all projects every time, which can be a large amount of data.
Speaking on git, another issue is git history, which is now merged from all projects and libraries.
Another issue Monorepo creates is the inability to restrict access to certain parts of the code.
With Monorepo, all the developers have access to all projects and libraries. Again, when we have a big team, this can be a problem.
The last issue with Monorepo – at the beginning of the book, we discussed the impact of having your architecture modular and what does it mean to keep the SoC (“separation of concerns”).
Using a Monorepo means we are losing the modularity advantages outside the repository.
We cannot share our libraries with projects outside the repository, not to mention making them open source projects.
Solutions to Monorepo Issues
Monorepo is very simple to set up, but as we just saw, it comes with some significant drawbacks, especially when dealing with a big team or many projects.
In the bottom line, like most development issues, it is just a trade-off. And even with Monorepo, we can deal with some of the problems and “pay” with simplicity.
Disassemble Your Monorepo

A repository only for packages
On the one hand, creating a repository only for packages solves the issues I just mentioned but separates the projects from each other.
On the other hand, it makes it harder to make cross-project changes, which is a significant benefit of one big Monorepo.
Changing a library behavior requires us to test the change in other projects.
Summary
In this chapter, we’ve learned three ways of sharing our code between our projects – a public git repository, a private git repository, and a Monorepo.
Each of them has its pros and cons, and the right way is based on our project’s size, security, and more.
Sharing our package increases the need for useful testing, and this is what we deal with in the next chapter.