6 Playback Menu

Wide Eyed Lemur © 2018 Allan Pakett (apakett)
The Nikon Z7 has a big, 3.2-inch, 2.1-million pixel, tilting, touch-sensitive, TFT-LCD, rear Monitor, which you can use to examine the images you have taken in great detail. You can zoom in past the 100 percent pixel-peeping level to make sure an image is sharp enough. You can review, delete, rotate, rate, and examine detailed shooting information on each picture. You can even use the Monitor or EVF (electronic viewfinder) to view a slide show, or use the HDMI port to output the slide show to a larger device, such as a television (HDTV).
The Playback Menu has everything you need to control your camera’s image playback and copying functions. You’ll be taking thousands of pictures and will view many of them on the Monitor or in the EVF; therefore, it’s a good idea to learn how to use the Playback Menu well.
This chapter, and the next several chapters, will consider the camera’s menu systems. The Z7 has seven primary menu systems—along with several supplementary menus—with hundreds of configuration options. We’ll examine each setting in each menu, starting with the Playback Menu.
To open the camera’s menu system, press the Menu button on the lower–right back of the camera.

Figure 6.0: Playback Menu
The Playback Menu is first in the list of menus (figure 6.0) and it contains the following functions:
- Delete: Allows you to delete all or selected images from your camera’s memory card(s).
- Playback folder: Allows you to set which image folders your camera will display, if you have multiple folders on the camera’s memory card(s).
- Playback display options: Controls how many informational screens the camera will display for each image.
- Image review: Turns the camera’s post–shot automatic image review on or off.
- After delete: Determines which image is displayed next when you delete an image from a memory card.
- After burst, show: Allows you to choose whether the camera Monitor displays the first or last picture from a burst series of images taken in Continuous release mode.
- Rotate tall: Allows you to choose whether portrait-orientation (vertical) images display in an upright position or lying on their side on the horizontal Monitor.
- Slide show: Allows you to display all the images on your camera’s memory card(s) in a sequential display, like the slide shows of olden days. No projector is required.
- Rating: Rate a picture on a sliding scale of 1 to 5 stars, or mark an image for deletion.
Let’s examine each of these settings in detail, with full explanations on how, why, and when to configure each item.
Delete
(User’s Manual: Page 153, Reference Manual: Page 123)
The Delete function allows you to selectively delete individual images from a group of images in a single folder or multiple folders on your camera’s memory card. It also allows you to clear all images in the folders without deleting the folders. This is similar to a card formatting operation that affects only images, and not folders. However, if you have protected images, this function will not delete them.
There are three parts to the Delete menus:
- Selected: Deletes only selected images.
- Select date: Deletes all images taken on a certain date.
- All: Deletes all images in the folder you currently have selected with the Playback folder function (see the next main section).
Selected
Figure 6.1A shows the menu screens you’ll use to control the Delete function for selected images.
Notice in image 3 of figure 6.1A that there is a list of images, each with a number in its lower-right corner. These numbers run in sequence from 1 to however many images you have in your current image folder or on the entire memory card. The number of images shown will vary according to how you have the Playback folder settings configured. (See the next section of this chapter, Playback Folder.)

Figure 6.1A: Delete menu screens for the Selected option
If you have Playback folder set to Current (factory default), the camera will show you only the images found in your current Playback folder. If you have Playback folder set to All, the Z7 will display all the images it can find in all the folders on your camera’s memory card.
Here are the steps to delete one or more images:
- 1. Select Delete from the Playback Menu and scroll to the right (figure 6.1A, image 1).
- 2. Choose Selected and scroll to the right (figure 6.1A, image 2).
- 3. Locate the images for deletion with the Multi selector and then press the checkered Zoom out button—or touch the image thumbnail(s) with your fingertip—to select and mark the image(s) for deletion. You will mark or unmark images for deletion by toggling a small trash can symbol on and off on the top right of the selected image(s) (red arrow in figure 6.1A, image 3).
- 4. Select the images you want to permanently delete, then press or touch the OK control. A screen will appear and ask you to confirm the deletion of the image(s) you have selected (figure 6.1A, image 4).
- 5. To finish deleting the image(s), select Yes and then press or touch the OK control. To cancel, select No and press or touch the OK control (figure 6.1A, image 4).
Settings Recommendation: This function is useful when you are reviewing your images and want to delete multiple images. Simply mark and delete the image(s) you no longer want by using the steps listed above.
There is a simpler and faster way to delete a single image. Simply display the image you no longer want on the camera’s monitor and press the Delete (garbage can) button twice. The image shown in figure 6.1B has been displayed on the monitor and the Delete button has been pressed once, which opens a Delete? screen. Press the Delete button once more, or touch Yes with your fingertip, to finish deleting the unwanted image.

Figure 6.1B: Press the Delete button twice to delete a single displayed image.
Select Date
Using the Select date method to delete images is simple. When you preview your images for deletion, you won’t be shown a list of all the images, as with the Delete option. Instead, the Select date screen (figure 6.1C, image 3) will give you a list of dates with a single representative image following each date.

Figure 6.1C: Delete menu screens for the Select date option
Here are the steps to delete images by Select date:
- 1. Select Delete from the Playback Menu and scroll to the right (figure 6.1C, image 1).
- 2. Choose Select date and scroll to the right (figure 6.1C, image 2).
- 3. Notice that there’s a check box to the left of each date (figure 6.1C, image 3). Check a box by scrolling up or down to the date of your choice with the Multi selector pad and then scroll to the right to place a check mark in the box(es), or you can touch the box(es) you want to select with your fingertip. Placing a check mark in the box(es) tells the camera to later delete all images that were taken on a checked date. If the single tiny representative image next to the date is not sufficient to help you remember which images you took on that date, you can view the whole bunch. Press the checkered Zoom out button, or touch Confirm, and the Z7 will display the images for that date. If you want to examine an image more closely, you can press and hold the Zoom in button, or touch Zoom with your fingertip, to temporarily zoom in on individual images. When you’re satisfied that none of the images for that date are worth keeping, and while you are still examining images for a single date, press or touch OK to select the date, then press the Zoom out button—or touch Back (not shown)—to return to the list of all available dates.
- 4. Make sure the date(s) you want to delete are checked as described in step 3, and then press or touch the OK control to start the image deletion process (figure 6.1C, image 3).
- 5. A final screen will ask you to confirm your deletion (figure 6.1C, image 4). This screen has a big red exclamation point and asks, Delete all images taken on selected date? Select Yes and press or touch the OK control, and the images will be deleted. Be careful! Select No and press or touch the OK control to cancel the operation.
Settings Recommendation: Be very careful with this function! It could permanently delete hundreds of images all at once. Use the listed steps to carefully review the dated images to make sure you don’t accidentally delete important pictures.
All
This option is like formatting the memory card, except that it will not delete folders. It will delete only images—except for protected images (figure 6.1D). Using this option is a quick way to format your card while maintaining your favorite folder structure and keeping protected images in them.

Figure 6.1D: Delete menu screens for the All option
Here are the steps to delete all images on the card (or in the current folder):
- 1. Select Delete from the Playback Menu and scroll to the right (figure 6.1D, image 1).
- 2. Select All and scroll to the right (figure 6.1D, image 2).
- 3. Select Yes from the next screen with the big red exclamation point and dire warning of imminent deletion (figure 6.1D, image 4). Be very careful from this point forward! If you have Playback folder (next chapter section) set to NCZ_7, the camera will delete all images in every folder that was created by the Z7, and the warning will say, All images will be deleted. OK?, followed by NCZ_7. If you have Playback folder set to Current, the camera will delete only the images in the folder that is currently in use, and the warning will say, All images will be deleted. OK?, followed by Current. If you have Playback folder set to All, the camera will delete all images in all folders, and the warning will say, All images in all folders will be deleted. OK?, followed by All. The camera is prepared to delete every image in every folder (created by any camera) if Playback Menu > Playback folder > All is selected. (See the next main section for information on the Playback folder option.) When you select Yes and tap the OK control, the images will be deleted.
Being the paranoid type, I tested this thoroughly and found that the Z7 really will not delete protected and hidden images, and it will keep any folders you have created. However, if you are a worrier, maybe you should transfer the images off the card before deleting any images.
Settings Recommendation: I don’t use the Delete > All function often since I usually don’t create special folders for each type of image. If you maintain a series of folders on your memory card(s), you may enjoy using the Delete > All function. Most of the time, I just use Delete > Selected to remove particular images. Any other time I want to clear the card, I use the Format memory card function on the Setup Menu. We’ll discuss formatting the memory card in the chapter titled Setup Menu, under the heading Format Memory Card on page 472.
Protecting Images from Deletion
The Nikon Z7 will allow you to protect images from accidental deletion when you use the Delete function. Using this method will not protect images from deletion when you format the memory card.
To mark an image as protected from deletion, you will use the Help/protect button, as shown in figure 6.1E and the upcoming steps.

Figure 6.1E: Protecting images from deletion
Use the following steps to protect individual images from accidental deletion (figure 6.1E):
- 1. Display an image on the Monitor (figure 6.1E, image 1).
- 2. Press the i button just below the Sub-selector joystick and the photo Quick Menu will open (figure 6.1E, image 2). Choose Protect from the menu and a small key symbol will appear in the upper left of the Monitor, signifying that this image is protected from the Delete function (figure 6.1E, image 3—red arrow).
Settings Recommendation: You can either use this photo Quick Menu choice, or you can assign the Protect function to one of the camera’s buttons for faster image protection by configuring the Custom Menu > f controls > f2 Custom control assignment function. Follow the instructions starting on page 423 to choose an appropriate physical button and make the Protect assignment.
You can remove image protection on individual images by following the previous steps again, which will remove the key symbol and protected status.
Recovering Deleted Images
If you accidentally delete an image or a group of images, or even if you format the entire memory card and then realize that you didn’t really mean to, all is not lost. Immediately remove the card from your camera and do not use it until you can run image recovery software on the card. Deleting or formatting doesn’t permanently remove the images from the card. It merely marks the images as deleted and removes the references to them from the memory card’s file allocation table (FAT). The images are still there and can usually be recovered as long as you don’t write any new data to the card before you try to recover them.
It’s wise to have a good image recovery program on your computer at all times. Sooner or later you’ll have a problem with a card and will need to recover images. Many of the better brands of memory cards include recovery software, either on the card itself, or as a downloadable app.
To find recovery software, do a Google search for your card’s brand name followed by “image recovery software.” Sometimes it’s free, other times it costs a few dollars. However, it is best to have the software on hand for emergencies.
Playback Folder
(User’s Manual: Page 123, Reference Manual: Page 153)
The Playback folder setting allows your camera to display images during preview and slide shows. You can have the Z7 show you images created by the Z7 only, in all folders; images that were created by the Z7 and any other Nikon cameras, in all folders; or only the images in the current folder.
If you regularly use your memory card in multiple cameras, as I do, and sometimes forget to transfer images, adjusting the Playback folder setting is a good idea. I use a D500, D850, and Z7 on a regular basis. Often, I’ll grab a 64 GB XQD card out of one of the cameras and stick it in another one for a few shots. If I’m not careful, I’ll later transfer the images from one camera and forget that I have folders created by the other camera on the memory card. It’s usually only after I have formatted the card that I remember the other camera’s images on my memory card. The Z7 comes to my rescue with its Playback folder > All function.
With All set, I can see all the images in all folders created by all Nikon cameras on both memory cards.
Let’s look at how the Playback folder function works by first looking at what each selection does, and then examining the steps needed to select the best function for you (figure 6.2).
The three selections are as follows:
- NCZ_7: The camera will display images created by the Z7 from all folders on both memory cards. This is good to use if you are interested in seeing only Z7-created images, wherever they may reside.
- All: The Z7 will obligingly show you every image—created by any Nikon camera it can find—in all of the folders on both memory cards. During playback, or before deletion, the Z7 will display images from other Nikon cameras you’ve used with the current memory card. Each camera usually creates its own unique folders, and normally the other folders are not visible. When you select All, the Z7 intelligently displays its own images and any other Nikon-created images in any folder on the two cards.
- Current: This is the most limited playback mode. Images in the image folder the camera is currently using will be displayed during playback, whether the images were created by the Z7 or another Nikon camera. No other images or folders will be displayed.

Figure 6.2: Selecting a Playback folder source
Use the following steps to select the folder(s) from which your camera will display images:
- 1. Select Playback folder from the Playback Menu and scroll to the right (figure 6.2, image 1).
- 2. Select NCZ_7, All, or Current and press the OK button or tap your selection (figure 6.2, image 2).
Settings Recommendation: Using anything except All makes it possible for you to accidentally lose images. If you don’t have any other Nikon cameras, this may not be a critical issue. However, if you have other Nikon cameras around that use XQD cards, you will likely switch memory cards between them. If there are images on any of your memory cards, don’t you want to see them and know they are there? Until I started using the All setting, I was sometimes formatting cards with forgotten images on them. Use All!
Playback Display Options
(User’s Manual: Page 123, Reference Manual: Page 153)
The Playback display options selection allows you to customize how the Z7 displays several histogram and data screens for each image. You get to those screens by displaying an image on the camera’s Monitor and scrolling up or down with the Multi selector.
When you want to see a lot of detailed information about each image, you can program your camera to display your preferred data screens. Or, if you would rather take a minimalist approach to viewing image information, simply turn off some of the screens.
If you turn off certain screens, the camera still records the information—such as lens used, shutter speed, and aperture—and adds it to the metadata embedded within each image. However, with no Playback display options selected, you’ll see only one basic file information screen when you view images.
With some or all of the Playback display option screens enabled, you can use the Multi selector to scroll up or down and examine detailed data on any image. In other words, you can scroll through your images by pressing left or right on the Multi selector (or swiping with your finger), and you can also scroll through the data screens for that image by pressing up or down on the Multi selector. You cannot swipe up and down to see any selected Playback display options screens. You must use the Multi selector.
Here are the selections in this menu:
Add info
- Focus point
Additional photo info
- Exposure info
- Highlights
- RGB histogram
- Shooting data
- Overview
- None (image only)

Figure 6.3A: Playback display options menu screens
Use the following steps to enable or disable any of the seven playback display screens:
- 1. Select Playback display options from the Playback Menu and scroll to the right (figure 6.3A, image 1).
- 2. Choose any of the seven available Playback display options by highlighting a line in yellow with the Multi selector pad and then scrolling to the right to put a check mark in the box for that item, or you may tap a box to add or remove a check mark (figure 6.3A, image 2). You must scroll down to see the final two menu selections, Overview and None (image only). In figure 6.3A, image 2, only Highlights and RGB histogram are selected. After you have put check marks in the boxes for all the screens you want to use, press or touch the OK control.
Now, let’s look at what each of these selections accomplish (figures 2.3B to 2.4L).
Focus Point
If you are curious about how the autofocus (AF) points are focused on your subject (the focus mode), and where the points are focused (the AF-area mode) during an exposure, use this mode to easily find out.
These are the six AF-area modes that you can use to decide where on your subject is the most important area for autofocus:
- Pinpoint AF
- Single-point
- Dynamic-area AF (shows only center AF point of nine-point pattern)
- Wide-area AF (S)
- Wide-area AF (L)
- Auto-area AF
When you are using the first five AF-area modes, you’ll see a single red AF indicator that varies in size with each mode, showing where the camera was focused when you took the picture (figure 6.3B, images 2–5).

Figure 6.3B: Focus point display
The pattern of focus points for Auto-area AF, shown in red in figure 6.3B, image 6, will vary in number and location, as the camera examines the entire frame to seek likely focus points.
We will discuss the use of the AF-area modes (where the image focuses), in the chapter titled Photo Shooting Menu, under the heading AF-Area Mode, on page 264. We also touched on using the AF-area modes in the chapter titled Camera Control Screens, on page 23.
Exposure Info
Exposure info provides a simple screen that, in addition to displaying your subject, shows the image number, exposure mode, shutter speed, aperture, exposure compensation, and ISO sensitivity (figure 6.3C, image 2).

Figure 6.3C: The Exposure info screen
The gray bar along the bottom of the screen in figure 6.3C, image 2 shows the Exposure info (e.g., 1/50, F8, ISO 400). Here is a list of the items seen in the gray bar and what they mean:
- A: Exposure mode. The letter represents one of the selections on the Mode dial on top left of the camera:
- P = Programmed auto
- S = Shutter priority auto
- A = Aperture priority auto
- M = Manual exposure
- Auto = Automatic exposure (point-and-shoot mode)
- U1 to U3 = User programmable modes, uses one of the first five modes in this list (a–e), per selection by the photographer (page 475).
- 1/50: Shutter speed. This value can vary between 30 seconds and 1/8000 second, or X-sync (1/200), Time, and Bulb.
- F8: Aperture. The maximum and minimum values of the aperture setting will vary with the mounted lens (e.g., f/1.8 to f/32).
- +/− +0.7: Exposure value (EV) compensation. Can be set between five EV steps overexposure (+5.0) and five EV steps underexposure (−5.0), in one third EV step increments (1 EV step = 1 stop).
- ISO 400: ISO sensitivity. Normal ISO sensitivity range is from ISO 64 to ISO 25600. The ISO can be extended outside the normal range in both directions, from Lo 1.0 (ISO 32) to Hi 2.0 (102400). ISO sensitivity roughly equals the older ASA film sensitivity standard.
- 11/17: Image number/total images in current folder. The number shown in the top right of figure 6.3C, image 2, is a simple numeric count of the images in the current folder (11/17). The first number (11) is the number of the currently displayed image. The second number (17) is the total number of images in the current folder. In other words, this image is number 11 of 17 images in this particular folder. This image number has no relationship with the actual file name of the image; it is merely an image-count-per-folder number. Note: We will discuss how to create and change folders in the Setup Menu chapter under the Storage Folder heading on page 168.
Settings Recommendation: I like this simple screen, which shows only the important exposure information, and its uncluttered look does not distract from viewing my latest image.
Highlights
If you decide to use the Highlights selection, as shown in figure 6.3D, you will use what I call the “blink mode” screen. When any area of the image is overexposed, that area will blink white and black repeatedly.
This is to warn you that the areas of the image that blink white and black are overexposed and have lost detail. You will need to use exposure compensation or manually control the camera to contain the exposure within the dynamic range of the camera’s sensor.

Figure 6.3D: Highlights display
Look at the white area behind the blocks in figure 6.3D, screens 2 and 3. Notice how it is white (blown out) in image 2 and mostly black in image 3. The blinking area of the image is completely blank from overexposure and has lost all detail.
If you examine the RGB histogram (see next subheading, figure 6.3E) for an overexposed (blown-out) image, you’ll see that it’s cut off, or clipped, on the right side. Current software can’t recover much, if any, image data from the blown-out areas. The exposure has exceeded the recording capacity of the sensor. We discussed how to deal with images that have light ranges that exceed the sensor’s recording capacity in the chapter Metering, Exposure Modes, and Histogram on page 67.
Highlights mode conveniently warns you when the exposure has surpassed what the sensor can capture in a JPEG image (a RAW image may have a little more detail), and lets you know that portions of the image may be overexposed. Generally, for best results, adjust the exposure until the blinking goes away (or almost goes away).
RGB Histogram
A histogram is a digital readout that shows the range of light and color in an image. If there is too much contrast, the histogram display will be cut off. We’ll examine the histogram in more detail later. For now, let’s see how to turn the display on and off.
I like this feature because it allows me to view not just a basic luminance (brightness) histogram as some cameras do, but also all three color (chrominance) histograms—red, green, and blue—on one screen (figure 6.3E, image 2). The Z7 stacks the four histograms on the right side of the screen, with luminance on top (white histogram) and the RGB color histograms below.

Figure 6.3E: RGB histogram display
It is quite useful to see each color channel in its own histogram because it is possible to overexpose or underexpose one color channel only. The white luminance histogram usually looks similar to the green channel histogram because green is the most common color and the luminance histogram is weighted toward green. We discussed the luminance histogram, and the three RGB channel histograms, in the chapter titled Metering, Exposure Modes, and Histogram on page 67.
Shooting Data
This setting gives you four additional image shooting data screens to scroll through (figure 6.3F).
The Shooting data screens insert a transparent, black rectangle over the image they represent; therefore, you will see the same picture beneath the five overlays. The data on these screens includes the following information.

Figure 6.3F: Shooting data screens
Shooting data, screen 1 (figure 6.3G)
- Meter type (e.g., Matrix), Shutter speed (e.g., 1/30), and Aperture (e.g., F11)
- Exposure mode (e.g., P, S, A, M) and ISO sensitivity (e.g., 800)
- Exposure compensation value (e.g., 0.0)
- Lens focal length (e.g., 49mm)
- Lens overview data (e.g., 24–70mm/2.8)
- AF mode (e.g., AF-S) and AF-area mode (e.g., Single-point AF)
- VR mode (i.e., Off, Normal, Sport)
- White balance type (e.g., Auto, Direct sunlight)
- Color Space (e.g., sRGB, Adobe RGB)

Figure 6.3G: Shooting data, screen 1
Shooting data, screen 2 (figure 6.3H)
- Flash type
- Commander mode (CMD, requires a separate Speedlight or SU-800 unit)
- Flash sync mode
- Flash control and compensation
- Commander mode info (if used)

Figure 6.3H: Shooting data, screen 2
Shooting data, screen 3 (figure 6.3I)
- Picture control type: Auto, Standard, Neutral, Vivid, Monochrome, Portrait, Landscape, and Flat (or one of the creative Picture Controls—e.g., Dream, Pop)
- Picture Control adjustments: Quick sharpening, Sharpening, Mid-range sharpening, Clarity, Contrast, Brightness, Saturation, and Hue
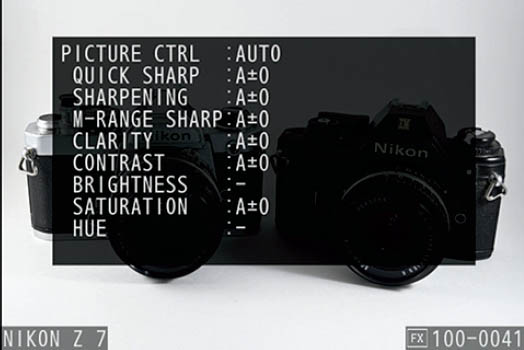
Figure 6.3I: Shooting data, screen 3
Shooting data, screen 4 (figure 6.3J)
- High ISO noise reduction, Long exposure noise reduction
- Active D-Lighting (i.e., Off, Low, Normal, High, Extra high, Auto)
- HDR exposure differential (e.g., Auto, 1 EV) and smoothing (e.g. Low, High)
- Vignette control (i.e., Off, Low, Normal, High)
- Retouch history
- Image comment

Figure 6.3J: Shooting data, screen 4
Overview
This screen provides an overview of the image detail for each picture (figure 6.3K). It is packed with information on each image, all in one convenient place.

Figure 6.3K: Overview screen
With this screen and the always-available File information screen (figure 6.3M), you will have enough information to determine the most important details about a particular image. Whether you select any other screens is entirely up to you and is determined by how much information you want for each image you have taken.
None (Image Only)
This setting is designed to give you a somewhat larger view of the current image, using all of the available screen space to show the image (figure 6.3L, image 2). There are no text overlays—the image is shown by itself.

Figure 6.3L: None (image only) display
This is a good selection for when you want to zoom in on the image to look at details. Since only the image is displayed, it is easier to scroll around within it for deep looks when using the camera’s two zoom buttons (zoom in and out), or stretch-and-pinch gestures on the monitor. You can zoom all the way in to 32× the normal image view. There is a tremendous level of detail buried inside each 45.7-megapixel image. You have an easy way to view it with None (image only).
File Information
This File information screen is not selectable under the Playback display options for the simple reason that it is always turned on and available for each image (figure 6.3M).
You cannot turn it off, although if you have Playback display options > Focus point enabled, the Focus point and File information screens will be combined into just one screen. File information includes a large, clear view of the picture with only basic image information.

Figure 6.3M: File information screen
This screen provides the following information: image number in folder (22), total images in current folder (217), folder name (100NCZ_7), image file name (DSC_0027.jpg), JPEG compression level and/or RAW size (e.g., FINE, RAW L, RAW L+FINE), date (10/09/2018), time (12:40:42), Image area (FX, DX, 5:4, 1:1, 16:9), Image size (L, M, S), and image pixel count (8256 × 5504).
GPS Screen
If you take a picture with a GPS unit attached and active on your Z7, you’ll have an additional screen available (figure 6.3N)—even if you don’t have Shooting data selected.

Figure 6.3N: GPS screen
The GPS screen will not show up unless a GPS unit was attached to the camera when you took the picture, or you inserted GPS data into the image from your smartphone.
There are a lot of screens to scroll through, but they provide a great deal of information about the image. Look how far we’ve come since the days when cameras wrote date information on the lower-right portion of an image (permanently marking it) or between the frames on pro-level cameras.
Settings Recommendation: The screens I use frequently on my Z7 are as follows: Exposure info (figure 6.3C), Highlights (figure 6.3D), RGB histogram (figure 6.3E), Overview (figure 6.3K), and None (image only) as seen in figure 6.3L.
The Exposure info screen gives me just the basics when I need to see what exposure settings I’ve used on an image.
The Highlights screen is useful because I can see at a glance where I have overexposed an image and can take corrective action. The black-and-white blinking areas grab my attention, and I can change my settings and then retake the shot for an immediate improvement.
The RGB histogram is also important to me because it allows me to see all the color channels, just in case one of them is being clipped off on the light or dark sides (no detail). It also allows me to see if I am keeping my exposure balanced for light and dark.
The Overview screen gives me, at a glance, most of the important information I need to know about the image, along with a larger luminance histogram. If I had only one screen, I’d want it to be the Overview screen.
I like None (image only) because I love to drill down into my images to see what detail I’ve been able to capture. Due to the absence of an optical low pass filter (OLPF; also known as an AA or blur filter) on the sensor, the Z7 gives me deeply detailed images. I enjoy this setting because it lets me examine the image without text overlays. And it’s also nice to view the composition of the image with no distractions.
The Shooting data and Focus point screens are not very important to me, unless I need that metadata for a special purpose. Also, if I have the Shooting data screens enabled, I’ll have to scroll through four more screens to get to the screens I like to use. However, those are my personal preferences. If you want to examine a large amount of extra image data, then you should enable the other screens, too. Nikon gives us very thorough picture detail screens. Use what you like best.
Image Review
(User’s Manual: Page 123, Reference Manual: Page 154)
Image review displays an image you’ve just taken on your camera’s Monitor or in the EVF (electronic viewfinder). With this function set to On, you will see each picture just after you take it. You can review the image for quality and usefulness.
With Image review set to Off, you won’t see each picture unless you press the Playback button afterward. This saves battery life, which can be important for a camera using Live view all the time. If you prefer to review every image after you take it, then you’ll need to set this feature to On.
You can control how long each image is displayed on the Monitor before it shuts off by adjusting Custom Setting Menu > c Timers/AE lock > c3 Power off delay > Image review. This custom image review time can be adjusted to display pictures from 2 seconds to 10 minutes. We’ll discuss the image review timeout setting in more detail under Image Review on page 395. There are three Image review settings. Let’s examine each of them:
- On: Shows the picture on the Monitor or EVF after each shutter release. After the review timeout, the screen will return to its normal state. If your eye is looking through the EVF, the camera will display the image there. If you are holding the camera away from your eye, the Z7 will display the image on the rear monitor instead. Keep in mind that reviewing images on the EVF will prevent you from using the EVF to take pictures until you have reviewed the image for the specified timeout period (default 4 seconds), or you have half-pressed the Shutter-release button to force the review off and normal viewing back on. Therefore, if you are shooting bursts of images, or need to be able to take another picture with no delay, you may not want Image review enabled for the both the Monitor and the EVF. The next setting may be better for you.
- On (monitor only): Shows the picture on the rear Monitor only. This works more like a DSLR, giving you the ability to review images immediately after taking them. You may find this setting the most useful one since you can ignore the monitor if you are in a situation where you must take more images quickly while using the EVF.
- Off: The Monitor or EVF does not display the image you just took. You must press the Playback button to see it on the current display (Monitor or EVF).

Figure 6.4: Enabling Image review
Here are the steps to choose an Image review setting:
- 1. Choose Image review from the Playback Menu and scroll to the right (figure 6.4, image 1).
- 2. Select On, On (monitor only), or Off from the Image review screen (figure 6.4, image 2) and press the OK button or tap the option to lock in the setting.
Note: The current setting you have selected with the Monitor mode button (page xi), on the left side of the Viewfinder bump, will affect how Image review works, as follows:
- Proritize viewfinder or Automatic display switch: The camera will automatically switch the image review between the EVF and Monitor according to whether or not your eye is at the Viewfinder.
- Viewfinder only: The rear Monitor will not display images for review. Only the EVF will be able to display images for review.
- Monitor only: The EVF will not display images for review. Only the rear Monitor will display images for review.
Settings Recommendation: Mirrorless cameras use more battery power than DSLRs, especially when using the rear Monitor. Therefore, you should consider carefully if you really need to review every image after you take it. With Image review set to Off, the only way to view an image after taking it is to press the Playback button.
I am an unashamed image chimper (see sidebar Are You a Chimper, Too?) and if there’s time and I have extra batteries, I examine every image. My main style of shooting (landscapes) often allows me time to examine each image. However, shooting weddings, graduations, and other events often does not allow one time to admire each image between shots. If you are shooting a sports event and blasting through hundreds of shots per hour, there certainly isn’t time to view each image.
It all boils down to how you shoot. If you aren’t inclined to view your images as you take them, then it may be a good idea to set Image review to Off—merely to save battery life.
Are You a Chimper, Too?
“Chimping” means reviewing images on the Monitor or EVF after each shot. I guess people think you look like a monkey if you review each image. Well, I do it anyway! Sometimes I even make monkey noises when I’m chimping my images. Try saying, “Ooh, Ooh, Ooh, Ah, Ah, Ah” when you’re looking at an image and are happy with it. That’s chimping with style, and it’s the reason the word was coined.
After Delete
(User’s Manual: Page 123, Reference Manual: Page 154)
If you delete an image during playback (Image review), another of your other images will be displayed on the camera’s Monitor. The After delete function lets you select which image is displayed after you delete an image. The camera can display the next image or the previous image, or it can detect which direction you were scrolling—forward or backward—and let that determine which image appears after you have deleted one. The three selections on the After delete menu are:
- Show next: If you delete an image and it wasn’t the last image on the memory card, the camera will display the next image on the card. If you delete the last image on the card, the previous image will be displayed because there is no next image. Show next is the factory default behavior of the Z7.
- Show previous: If you delete an image that is not the first image on the memory card, the previous image will then be displayed. If you delete the first image on the memory card, the camera will display the next image because there is no previous image.
- Continue as before: This weird little setting shows the flexibility of computerized camera technology in all its glory. If you are scrolling to the right (the order in which the images were taken) and decide to delete an image, the camera uses the Show next method to display the next image. If you happen to be scrolling to the left (opposite from the order in which the images were taken) when you delete a picture, the camera will use the Show previous method instead.

Figure 6.5: After delete
Use the following steps to choose an After delete setting:
- 1. Choose After delete from the Playback Menu and scroll to the right (figure 6.5, image 1).
- 2. Highlight one of the three settings from the After delete screen (figure 6.5, image 2) and press the OK button or tap the option to lock in the setting.
Settings Recommendation: When I delete an image, I’m not overly concerned about which image shows next—most of the time. However, this functionality is handy for certain styles of shooting and when I am deleting rejects.
For instance, some sports or wildlife shooters might like to move backward through a long sequence of images, starting with the last image taken. They can then delete the images that are not usable in the sequence, and the camera will immediately show the previous image for review. When they reach the first image in the sequence, the entire series is clean and ready to use.
I set my camera to Continue as before because, after I delete an image, it will resume the direction in which I had been scrolling.
After Burst, Show
(User’s Manual: Page 124, Reference Manual: Page 155)
The After burst, show function will work only if you have Image review (page 150) turned off. When you are taking pictures in one of the burst modes using Continuous L (low), Continuous H (high), or Continuous H* (high extended) Release mode (page 97), you can use this function to choose whether the camera displays the first or last photo in the series of images on the camera’s Monitor or EVF for review.
Since Image review must be turned off, the camera will not display an image at all until you press the Playback button. When you press Playback, the camera will display the first or last image in the burst series, according to how you have this function configured.

Figure 6.6: After burst, show
Use the following steps to choose an After burst, show setting:
- 1. Choose After burst, show from the Playback Menu and scroll to the right (figure 6.6, image 1).
- 2. Select either First image in burst or Last image in burst (figure 6.6, image 2) and press the OK button to lock in your choice. You can also tap on one of the settings for immediate selection.
Settings Recommendation: After testing this function, I chose the First image in burst setting so that I could easily scroll forward through all the images in the series. If you prefer to see the last image for validation, choose the other option.
I don’t generally use this function because I prefer the Image review function’s way of doing things. If Image review and the camera’s Monitor are both enabled, and you quickly look at the Monitor after a long burst series, you will see individual images in the series scroll by on the Monitor as the camera writes the images to the memory card. The number of images you actually see is affected by the speed of the memory card.
Rotate Tall
(User’s Manual: Page 124, Reference Manual: Page 155)
When you shoot a portrait-oriented (vertical) image with the camera rotated sideways, the image can later be viewed as a horizontal image lying on its side or as a smaller, upright (tall) image on the camera’s horizontal (wide) Monitor.
If you view the image immediately after taking it, the camera’s software assumes you are still holding the camera in the rotated position and the image will be displayed correctly for that angle. Later, if you are reviewing the image with the camera’s playback functionality and have Rotate tall set to On, the image will be displayed as an upright, vertical image that is smaller so it will fit on the horizontal Monitor. You can zoom in to see sharpness detail if needed.
If you would rather have the camera leave the image lying on its side while in a horizontal view, you’ll need to choose Off. The following two settings are available.
- On: When you take a vertical image, the camera will rotate it so you don’t have to turn your camera to view it naturally during playback. This resizes the view of the image so that a vertical image fits in the horizontal frame of the Monitor. The image will be a bit smaller than normal. When you first view the image after taking it, the camera does not rotate it because it assumes you are still holding the camera in a vertical orientation. It also senses which end of the camera is up—if the Shutter-release button is up or down—and displays the image accordingly.
- Off: Vertical images are left in a horizontal direction, lying on their side; you’ll need to turn the camera to view the images in the same orientation as when they were taken. This provides a slightly larger view of a portrait-oriented image.

Figure 6.7: Rotate tall
Use these steps to choose a Rotate tall setting:
- 1. Choose Rotate tall from the Playback Menu and scroll to the right (figure 6.7, image 1).
- 2. Select On or Off from the Rotate tall screen (figure 6.7, image 2) and press the OK button to lock in your choice. You can also tap on one of the settings for immediate selection.
Besides this Rotate tall function, the camera evidently has built-in auto image rotation, which causes the Z7 to record the angle at which you are holding the camera body as part of the image’s metadata. This is important so that an image will report how it should be displayed on the camera’s Monitor and later on your computer and smart devices. Who wants to manually rotate images later to look at them on your computer monitor or smart device screen? The built-in auto image rotation prevents that.
In Nikon DSLRs released before the Z7, Auto image rotation was a Playback menu function that could be enabled or disabled. However, in the Z7 (firmware C1.0) the function appears to be an automatic function that cannot be disabled. There are no function listings for Auto image rotation in the User’s Manual or Reference Guide. However, auto image rotation is mentioned as being a Playback operation, in the User’s Manual on page 206, and in the Reference Manual on page 431.
Basically, Rotate tall and the camera’s built-in auto image rotation work together to display your image in the correct orientation. Rotate tall gives you the choice of how the image is viewed based on the orientation information it finds in the image’s metadata. Auto image rotation causes the camera to store how the image was taken so it will know whether the image has a vertical or horizontal composition. It can then report this information to the Rotate tall function.
Settings Recommendation: I leave Rotate tall set to On. That way, I can view a portrait-oriented image in its natural, vertical orientation without turning my camera. Be sure you understand the relationship between this function and auto image rotation, which stores orientation data with the picture.
Slide Show
(User’s Manual: Page 124, Reference Manual: Page 156)
Slide show allows you to display an automatic, sequenced show of images and movies on your camera’s Monitor. With the Z7’s big 3.2-inch, high-resolution Monitor, it should be a satisfying viewing experience for one or two people.
If the camera Monitor is not large enough, you can connect the camera to a high-definition television (HDTV) and do a slide show for an even larger group. Connecting to an HDTV requires the separate purchase of an HDMI (type A) to mini-HDMI (type C) cable.
When you are ready for your show, you can control how long each image is displayed with the Frame interval setting. First, let’s see how to start a Slide show (following the Z7’s menu order), and then we’ll see how to change the Image type for display and the Frame interval timing.
Starting a Slide Show
You can start the Slide show immediately, and it will commence with a default display time (Frame interval) of two seconds (2s) per image, displaying the images and movies it finds on your camera’s memory card(s).

Figure 6.8A: Starting a Slide show
Use the following steps to start a Slide show immediately:
- 1. Select Slide show from the Playback Menu and scroll to the right (figure 6.8A, image 1).
- 2. Select Start and the Slide show will begin immediately (figure 6.8A, image 2), using the default Image type (Still images and Movies) and Frame interval timing (2 s).
You can easily change the way the camera chooses which Image type to display during the Slide show. The next subsection shows how.
Selecting an Image Type for a Slide Show
As you will notice in figure 6.8B, image 2, you can set the camera to display Still images and movies, Still images only, Movies only, or By rating (page 159).

Figure 6.8B: Selecting the Slide show Image type
Use the following steps to change the Image type for display:
- 1. Select Image type from the Slide show screen (figure 6.8B, image 1).
- 2. Choose one of the three listed image types (figure 6.8B, image 2) and press the OK button to lock in your choice. You can also tap on one of the settings for immediate selection.
Note: If Movies only is grayed out and unavailable, it simply means you have no movies on the memory cards inserted in the camera.
Now let’s consider how to change the amount of time before the camera changes to the next image or movie in the slide show.
Changing a Slide Show’s Frame Interval
If you want to allow a little more time for each Still image to display, or between each Movie, you’ll need to change the Frame interval (display time). Your Frame interval choices are as follows.
- 2 s: 2 seconds
- 3 s: 3 seconds
- 5 s: 5 seconds
- 10 s: 10 seconds

Figure 6.8C: Selecting the Slide show Frame interval
Use these steps to change the Slide show’s Frame interval:
- 1. Choose Frame interval from the Slide show menu and scroll to the right (figure 6.8C, image 1).
- 2. Select one of the four choices from 2 s to 10 s (figure 6.8C, image 2) and press the OK button to lock in your choice. You can also tap on one of the settings for immediate selection.
To start the Slide show after you change the Frame interval, repeat the steps shown in the previous subsection, Starting a Slide Show (page 156). The Slide show will now run at the speed you chose.
Settings Recommendation: I usually set the Frame interval to 3 s. If the images are especially beautiful, I might set it to 5 s. I’ve found that 2 s is not quite enough, and 5 s or 10 s may be too long. I wish there were a four-second setting, but 3 s seems to work well most of the time.
Slide Show Camera Control Options
Several options affect how the images are displayed during a slide show. None of these options are in the camera menus; they are available through the camera’s physical controls. Your options are as follows:
- Skip back/Skip ahead: During the slide show you can go back to the previous image for another viewing by simply pressing left on the Multi selector pad. You can also see the next image with no delay by pressing right on the Multi selector pad. This is a quick way to skip images or review previous images without stopping the slide show.
- View additional photo information: While the slide show is running, you can press up or down on the Multi selector pad to view the additional data screens. The screens you will see depends on how you have your camera’s Playback display options configured for Highlights, Focus point, RGB histogram, and Shooting data (see the section called Playback Display Options earlier in this chapter). If any of these screens are available, they can be used during the slide show.
- Pause slide show: During the slide show you may want to Pause, change the Frame interval, or even Exit the show. If you press the OK button, the slide show will be suspended and you will see the Pause screen (figure 6.8D). To select one of the choices on the screen, do one of the following: Tap on your choice to immediately execute it, highlight the item and press the OK button, or scroll to the right with the Multi selector pad. Here are the choices:
- Restart: This option immediately continues the slide show, starting with the image following the last one that was viewed.
- Frame interval: This option takes you to a screen that allows you to change the display time to one of four values: 2 s, 3 s, 5 s, or 10 s. After you choose the new Frame interval, select Restart to continue the slide show where you left off.
- Exit: This option exits the slide show immediately. It is unrelated to the next three items in the main list, which provide alternate ways to exit a slide show without accessing up the Pause screen.

Figure 6.8D: Slide show Pause and Restart
- Exit to the Playback Menu: If you want to quickly exit the slide show, simply press the MENU button and you’ll jump directly back to the Playback Menu.
- Exit to playback mode: You can press the Playback button to stop the slide show and switch to a normal full-frame or thumbnail view of the last image seen in the slide show. This exits the show on the last image viewed.
- Exit to shooting mode: If you press the Shutter-release button halfway down, the slide show will stop. The camera is now in shooting mode, meaning it is ready to take some pictures.
Note: When a video is playing on the monitor, you can press the Zoom in button—to the left of the Menu button—to raise the movie’s volume, or press the Zoom out button to lower the volume.
Rating
(User’s Manual: Page 124, Reference Manual: Page 157)
The Rating system in the Z7 allows you to add your own personal one- to five-star rating to a displayed image (figure 6.9).

Figure 6.9: Adding a star (![]() ) rating to your pictures
) rating to your pictures
Use the following steps to add a star (![]() ) rating to an image:
) rating to an image:
- 1. Press the Playback button and then find an image you want to rate. With the picture displayed on the screen, press the i button and choose Rating from the menu (figure 6.9, image 1).
- 2. Use the Multi selector pad to scroll to the right (or left) until you have displayed the number of stars you want to use as the rating for this image (figure 6.9, image 2, red arrow). You can also slide your fingertip back and forth on the bar in the bottom-left area of the screen, or tap the dots individually until they turn into a star. Choose from one (
 ) to five stars (
 ). Here, I selected four stars.
 - 3. Press or touch the OK control to lock in the rating. The Monitor will now display a rating (e.g., 4) in the bottom-left area of the image (figure 6.9, image 3, red arrow).
Note: You can also assign the Rating system option to one of the camera’s programmable buttons, using Custom Setting Menu > f Controls > f2 Custom control assignment (see page 423).
Author’s Conclusion
We have configured all aspects of the camera’s image Playback system. By now you should be pretty well informed on how to use the Playback functions to view your images on the camera Monitor or a smart device (smartphone or tablet).
Let’s move on to the next menu system in the camera, the Photo Shooting Menu. This is one of the most important menus for photographers because it affects how the camera is configured to shoot still pictures.