
8
Deployment with Kubernetes
As you have reached this chapter, you already know how to bootstrap microservices, set up the logic for accessing the database, implement service APIs, use serialization, and enable asynchronous communication between your microservices. Now, we are ready to cover a topic that is very important in practice—microservice deployment.
Deployment is a technique of uploading and running your code to one or multiple servers that are often located remotely. Prior to this chapter, we assumed that all services are run locally. We implemented services using static hardcoded local addresses, such as localhost for Kafka. At some point, you will need to run your services remotely—for example, on a remote server or in a cloud, such as Amazon Web Services (AWS) or Microsoft Azure.
This chapter will help you to learn how to build and set up your applications for deployments to such remote infrastructure. Additionally, we are going to illustrate how to use one of the most popular deployment and orchestration systems, Kubernetes. You will learn about the benefits it provides, as well as how to set it up for the microservices that we created in the previous chapters.
In this chapter, we will cover the following topics:
- Preparing application code for deployments
- Deploying via Kubernetes
- Deployment best practices
Now, let’s proceed to the first part of the chapter, which is going to help you to better understand the core ideas behind the deployment process, and prepare your microservices for deployments.
Technical requirements
To complete this chapter, you need Go 1.11+ or above, similar to the previous chapters. Additionally, you will need Docker, which you can download at https://www.docker.com. You will need to register on the Docker website in order to test service deployments in this chapter.
In addition to Docker, to complete this chapter, you will need Kubernetes, which you can download at https://kubernetes.io (you will need the kubectl and minikube tools from it).
You can find the GitHub code for this chapter here:
https://github.com/PacktPublishing/microservices-with-go/tree/main/Chapter08
Preparing application code for deployments
In this section, we are going to provide a high-level overview of a service deployment process and describe the actions required to prepare your microservices for deployments. You will learn how to configure Go microservices for running in different environments, how to build them for different operating systems, and some other tips for preparing your microservices for remote execution.
Let’s proceed to the basics of the deployment process.
Deployment basics
As we mentioned in the introduction to this chapter, deployments allow you to run and update your applications on one or multiple servers. Such servers are usually located remotely (clouds or dedicated web hosting) and are running all the time to allow your applications to serve the request or process data 24/7.
The deployment process for each environment usually consists of multiple steps. The steps include the following:
- Build: Build a service by compiling it (for compiled languages, such as Go) and including additional required files.
- Rollout: Copy the newly created build to servers of the target environment and replace the existing running code, if any, with the newly built one.
The rollout process is usually sequential: instead of replacing the build on all hosts parallelly, it performs one replacement at a time. For example, if you have ten service instances, the rollout process would first update one instance, then verify that the instance is healthy and move to the second one, and continue until it updates the last service instance. This is done to increase service reliability because if a new version consists of a bug or entirely fails to start on some server, the rollout would not affect all servers at once.
In order to enable the testing of microservices, servers can be classified into multiple categories, called environments:
- Local/development: Servers that are used for running and testing code while working on the code. This environment should never handle any requests from users, and it often consists just of a developer’s computer. It can be also configured to use simplified versions of a database and other components, such as single-server and in-memory implementations.
- Production: Servers that are intended to handle user requests.
- Staging: A mirror of a production environment, but is used for testing. Staging differs from the local/production environment due to configuration and separate data storages, which help to avoid any interference with production data during testing.
Production deployments can be done in canary mode—a deployment mode that performs the changes only on a small fraction (such as 1%) of production hosts. Canary deployments are useful for the final testing of new code before updating all production instances of a service.
Let’s now see how developers can configure their microservices for deployments to multiple environments.
Application configuration
In the previous section, we described the differences between various environments, such as local/development and production. Each environment is usually configured differently—if your services have access to databases, each environment will generally have a separate database with different credentials. To enable your services to run in such environments, you would need to have multiple configurations of your services, one per environment.
There are two ways of configuring your services:
- In-place/hardcode: All required settings are stored in the service code (Go code, in our case).
- Separate code and configuration: Configuration is stored in separate files so that it can be modified independently.
Separating service code and configuration often results in better readability, which makes configuration changes easier. Each environment can have a separate configuration file or a set of files, allowing you to read, review, and update environment-specific configurations easily. Additionally, various data formats, such as YAML, can help to keep configuration files compact. Here’s a YAML configuration example:
mysql:
  database: ratings
kafka:
  topic: ratings
In this book, we are going to use an approach that separates application code and configuration files and stores the configuration in YAML format. This approach is common to many Go applications and can be seen in many popular open source Go projects.
Important note
Note that invalid configuration changes are among the top causes of service outages in most production systems. I suggest you explore various ways of automatically validating configuration files as a part of the code commit flow. An example of Git-based YAML configuration validation is provided in the following article: https://ruleoftech.com/2017/git-pre-commit-and-pre-receive-hooks-validating-yaml.
Let’s review our microservice code and see which settings can be extracted from the application configuration:
- Our metadata service does not have any settings other than its gRPC handler address, localhost:8081, which you can find in its main.go file:
lis, err := net.Listen("tcp", fmt.Sprintf("localhost:%v", port)) - We can extract this setting to the service configuration. A YAML configuration file with this setting would look like this:
api:
port: 8081
- Let’s make the changes for reading the configuration from a file. Inside the metadata/cmd directory, create a config.go file and add the following code to it:
package main
type serviceConfig struct {APIConfig apiConfig `yaml:"api"`
}
type apiConfig struct {Port string `yaml:"port"`
}
- In addition to this, create a configs directory inside the metadata service directory and add a base.yaml file to it with the following contents:
api:
port: 8081
- The file we just created contains the YAML configuration for our service. Now, let’s add code to our main.go file to read the configuration. Replace the first line of the main function that prints a log message with this:
log.Println("Starting the movie metadata service")f, err := os.Open("base.yaml")if err != nil {panic(err)
}
defer f.Close()
var cfg serviceConfig
if err := yaml.NewDecoder(f).Decode(&cfg); err != nil {panic(err)
}
Additionally, replace the line with the net.Listen call with this:
lis, err := net.Listen("tcp", fmt.Sprintf("localhost:%d", cfg. APIConfig.Port))- The code we have just added is using a gopkg.in/yaml.v3 package to read a YAML file. Import it into our module by running the following command:
go mod tidyMake the same changes that we just made for the other two services we created earlier. Use port number 8082 for the rating service and 8083 for the movie service in your YAML files.
The changes we just made helped us introduce the application configuration that is separate from the service logic. This can help us when we want to introduce additional configurable options—to make any configuration changes, we would just need to update the YAML files without touching our service Go code.
Now that we have finished configuring our microservices for deployment, we are ready to move to the next section, which is going to cover the deployment process of our microservices.
Deploying via Kubernetes
In this section, we are going to illustrate how to set up deployments for our microservices using a popular open source deployment and orchestration platform, Kubernetes. You will learn the basics of Kubernetes, how to set up our microservices for using it, and how to test our microservice deployments in Kubernetes.
Introduction to Kubernetes
Kubernetes is an open source deployment and orchestration platform that was initially created at Google and later maintained by a large developer community backed by the Linux Foundation. Kubernetes provides a powerful, scalable, and flexible solution for running and deploying applications of any size, from small single-instance applications to ones having tens of thousands of instances. Kubernetes helps to orchestrate multiple operations, such as deployments, rollbacks, up- and down-scaling of applications (changing the application instance count upward and downward), and many more.
In Kubernetes, each application consists of one or multiple pods—the smallest deployable units. Each pod contains one or multiple containers—lightweight software blocks containing the application code. The deployment of a single container to multiple pods is illustrated in the following diagram:

Figure 8.1 – Kubernetes deployment model
Kubernetes pods can be run on one or multiple hosts, called nodes. A group of nodes is called a cluster, and the relationship between the cluster, nodes, and its pods is illustrated in the following diagram:
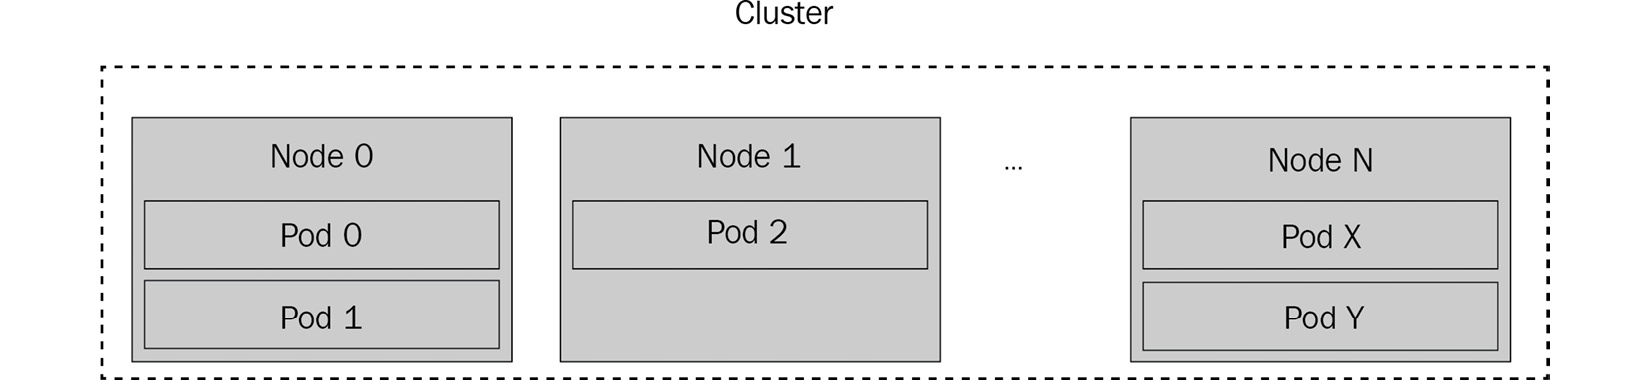
Figure 8.2 – Kubernetes cluster model
For deploying a service in Kubernetes, developers generally need to perform the following steps:
- Prepare a container image: A container image contains either the application code or its compiled binary (both options can be used, as long as the container image contains the instructions and any tools to run the code), as well as any additional files required for running it. A container image is essentially a program ready for deployment.
- Create a deployment configuration: A Kubernetes deployment configuration tells it how to run the application. It includes settings such as the number of replicas (number of pods to run), names of containers, and many more.
- Run a deployment command: Kubernetes will apply the provided configuration by running the desired number of pods with the target application(s).
One of the benefits of Kubernetes is abstracting away all the low-level details of deployments, such as selecting target servers to deploy (if you have many, you need to balance their load otherwise), copying and extracting your files, and running health checks. In addition to this, there are some other useful benefits:
- Service discovery: Kubernetes offers a built-in service discovery API for use in applications.
- Rollbacks: In case there are any issues with the deployment, Kubernetes allows you to roll back the changes to the previous state.
- Automated restarts: If any pod experiences any issue, such as an application crash, Kubernetes will perform a restart of that pod.
Now, let’s describe how we can set up deployments of our microservices using Kubernetes.
Setting up our microservices for Kubernetes deployments
All the necessary steps for setting up deployments in Kubernetes for our three microservices are set out here:
- The first step is to create a container image for each service. Kubernetes supports multiple types of containers, and Docker is currently the most popular container type. We already used Docker in Chapter 3 and will illustrate now how to use it for creating containers for our services.
Inside the metadata service directory, create a file called Dockerfile and add the following code to it:
FROM alpine:latest

COPY main .
COPY configs/. . EXPOSE 8081
CMD ["/main"]
In the file that we just added, we specified that to prepare the image for our container for the metadata service, Docker should use the alpine:latest base image. Alpine is a lightweight Linux distribution that has a size of just a few megabytes and is optimal for our services. Then, we added a command to copy the executable file called main to a container, copy the configs directory of the service, and expose an 8081 port so that we can accept incoming requests on it.
- As the next step, add a file with the same contents inside the rating and the movie service directories. Make sure you use the right ports in the files (8082 and 8083, correspondingly).
Once you have created the Docker configuration files, run the build command inside each service directory:
GOOS=linux go build -o main cmd/*.goThe results of the previous command should be the executable file called main, stored in each service directory. Note that we used a GOOS=linux variable—this tells the go tool to build our code for the Linux operating system.
docker build -t metadata .Similarly, run this command from the rating service directory:
docker build -t rating .Finally, run this command from the movie service directory:
docker build -t movie .If each command is executed successfully, we are ready to run out containers using the following commands:
docker run -p 8081:8081 -it metadata
docker run -p 8082:8082 -it rating
docker run -p 8083:8083 -it movie
The result of each execution should be a successful execution of each service.
- The next step is to create Docker Hub repositories in your account so that you can publish your service images to them. Log in to https://hub.docker.com, go to the Repositories section, and create three repositories, called metadata, rating, and movie.
Execute the following commands to publish the images:
docker tag metadata <Your Docker username>/metadata:1.0.0
docker push <Your Docker username>/metadata:1.0.0
docker tag metadata <Your Docker username>/rating:1.0.0
docker push <Your Docker username>/rating:1.0.0
docker tag metadata <Your Docker username>/movie:1.0.0
docker push <Your Docker username>/movie:1.0.0
These commands should upload the images we just created to your Docker Hub repositories so that Kubernetes can download them during the deployment.
At this point, we are ready to create a Kubernetes deployment configuration that is going to tell Kubernetes how to deploy our services.
- Inside the metadata service directory, create a file called kubernetes-deployment.yml with the following contents:
apiVersion: apps/v1
kind: Deployment
metadata:
name: metadata
spec:
replicas: 2
selector:
matchLabels:
app: metadata
template:
metadata:
labels:
app: metadata
spec:
containers:
- name: metadata
image: microservices-with-go/metadata:1.0.0
imagePullPolicy: IfNotPresent
ports:
- containerPort: 8081
The file that we just created provides instructions to Kubernetes on how to deploy our service. Here are some important settings:
- Replicas: The number of pods to run
- Image: The name of the container image to deploy
- Ports: Container port to expose
Note that the container port is different from the application port (the one that we configured in our APIConfig structure). The mapping between these settings is done by Docker as a part of the docker run settings.
- Now, create a file with the same name in the rating service directory with the following contents:
apiVersion: apps/v1
kind: Deployment
metadata:
name: rating
spec:
replicas: 2
selector:
matchLabels:
app: rating
template:
metadata:
labels:
app: rating
spec:
containers:
- name: rating
image: <Your Docker username>/rating:1.0.3
imagePullPolicy: IfNotPresent
ports:
- containerPort: 8082
Remember to replace the image property with the Docker image name that you created in step 4.
- Finally, create a kubernetes-deployment.yml file in the movie service directory with the following contents:
apiVersion: apps/v1
kind: Deployment
metadata:
name: movie
spec:
replicas: 2
selector:
matchLabels:
app: movie
template:
metadata:
labels:
app: movie
spec:
containers:
- name: movie
image: ashuiskov/movie:1.0.0
imagePullPolicy: IfNotPresent
ports:
- containerPort: 8083
- The next step is to start the local Kubernetes cluster using the minikube tool, which you should have installed as a part of Kubernetes. Run the following command to start the cluster:
minikube start- Then, apply our metadata deployment configuration by running the following command from the metadata service directory:
kubectl apply -f kubernetes-deployment.yml - If the previous command is executed successfully, you should see the new deployment by running this command:
kubectl get deploymentsThe output of the command should be this:
NAME       READY   UP-TO-DATE   AVAILABLE   AGE
metadata   0/2     2            0           6s
Also, check the state of the service pods by running the following command:
kubectl get podsThe output should show the Running status for our metadata service pods, as shown here:
NAME                        READY   STATUS    RESTARTS   AGE
metadata-5f87cbbf65-st69m   1/1     Running   0          116s
metadata-5f87cbbf65-t4xsk   1/1     Running   0          116s
As you may notice, Kubernetes created two pods for our service, the same number as we specified in the deployment configuration. Each pod has a unique identifier (UID), which is shown in the left column. You can see that Kubernetes created two pods for our metadata service.
You can check the logs of each pod by running the following command:
kubectl logs -f <POD_ID>Now, perform the same changes that we did for the metadata service for the other two services, and verify that the pods are running.
If you want to make some manual API requests to the services, you need to set up port forwarding by running the following command:
kubectl port-forward <POD_ID> 8081:8081This command would work for the metadata, rating, and movie services; however, you would need to replace the 8081 port value with 8082 and 8083, correspondingly.
If you did everything well, congratulations! We have finished setting up basic Kubernetes deployments of our microservices. Let’s summarize what we did in this section:
- First, we created container images for each of our services so that we could deploy them.
- Then, we published our container images to Docker Hub so that Kubernetes could pull the images during the deployment.
- We created a Kubernetes deployment configuration to tell it how to deploy our microservices.
- Finally, we tested our Kubernetes deployments using a combination of minikube and kubectl commands.
At this point, you should have some understanding of Kubernetes deployments and know how to deploy your microservices using them. This knowledge will help you to run your services on many platforms, including all popular cloud platforms, such as AWS, Azure, and Google Cloud Platform (GCP).
Deployment best practices
In this section, we are going to describe some best practices related to the deployment process. These practices, listed here, will help you to set up a reliable deployment process for your microservices:
- Automated rollbacks
- Canary deployments
- Continuous deployment (CD)
Automated rollbacks
Automated rollbacks are the mechanism of automatically reverting a deployment in case there was a failure during it. Imagine you are making deployment of a new version of your service and that version has some application bug that is preventing it from starting successfully. In that case, the deployment process will replace your active instances of a service (if the service is already running) with the failing ones, making your services unavailable. Automated rollbacks are a way to detect and revert such bad deployments, helping you to avoid an outage in situations when your services become unavailable due to such issues.
Automated rollbacks are not offered by default in Kubernetes, at the time of writing this book, similar to many popular deployment platforms. However, this should not stop you from using this technique, especially if you aim to achieve high reliability of your services. The high-level idea of implementing automated rollbacks with Kubernetes is as follows:
- Perform continuous health checks of your service (we are going to cover such logic in Chapter 12 of this book).
- When you detect a health issue with your service, check whether there was a recent deployment of your service. For example, you can do so by running the kubectl describe deployment command.
- In case there was a recent deployment and the time of it closely matches the time when the health check issues were detected, you can roll it back by executing this rollback command: kubectl rollout undo deployment <DEPLOYMENT_NAME>.
Canary deployments
As we mentioned at the beginning of the chapter, canary is a special type of deployment, where you update only a small fraction (1 to 3%) of instances. The idea of canary deployments is to test a new version of your code on a subset of production instances and validate its correctness before doing a regular production deployment.
We won’t cover the details of setting up canary deployments in Kubernetes, but can cover the basic ideas that would help you to do this once you want to enable canary deployments for your microservices, as set out here:
- Create two separate Kubernetes deployment configurations, one for canary and one for production.
- Specify the desired number of replicas in each configuration—if you want to run a service on 50 pods and let canary handle 2% of traffic, set 1 replica for canary and 49 replicas for production.
- You may also add environment-specific suffixes to deployment names. For example, you can call a canary deployment of a rating service, rating-canary, and rating-production for the production environment.
- When you perform a deployment of your service, deploy it using a canary configuration first.
- Once you verify that the deployment was successful, make a deployment using a production configuration.
Canary deployments are strongly recommended for increasing the reliability of your deployments. Testing new changes on a small fraction of traffic helps to reduce the impact of various application bugs and other types of issues that your services can encounter.
Replace with Continuous Deployment (CD)
Continuous Deployment (CD) is a technique of making frequent recurring deployments. With CD, services get deployed automatically—for example, on each code change. The main benefit of CD is early deployment failure detection—if any change (such as a Git commit of a new service code) is causing a deployment failure, the failure would often get detected much sooner than in the case of manual deployments.
You can automate deployments by programmatically monitoring a change log (such as Git commit history), or by using Git hooks—configurable actions that are executed at specific stages of Git changes. With Kubernetes, once you detect a new version of your software, you can trigger a new deployment by using a kubectl apply command.
Due to the high cadence of version updates, CD requires some tooling for automated checks of service health. We are going to cover such tooling later in Chapter 11 and Chapter 12 of this book.
Summary
In this chapter, we have covered a very important topic—service deployments. You have learned about the basics of the service deployment process, as well as the necessary steps for preparing our microservices for deployment. Then, we introduced Kubernetes, a popular deployment and orchestration platform that is now provided by many companies and cloud providers. We have illustrated how to set up a local Kubernetes cluster and deploy our microservices to it, running multiple instances of each service to illustrate how easy is to run any arbitrary number of instances within the Kubernetes platform.
The knowledge you gained should help you to set up more complex deployment processes, as well as to work with the services that are already deployed via Kubernetes.
This chapter summarizes our material on service deployments. In the next chapter, we are going to describe another important topic: unit and integration.
Further reading
If you’d like to learn more, refer to the following links:
- Kubernetes documentation: https://kubernetes.io/docs/home/
- Service deployment best practices: https://codefresh.io/learn/software-deployment/
- Setting up Kubernetes services: https://kubernetes.io/docs/concepts/services-networking/service/
- Blue-green deployments: https://www.redhat.com/en/topics/devops/what-is-blue-green-deployment