
- Microsoft® Office Excel® 2007 Plain & Simple
- SPECIAL OFFER: Upgrade this ebook with O’Reilly
- Acknowledgments
- 1. Introduction: About This Book
- 2. What’s New in Excel 2007?
- 3. Getting Started with Excel 2007
- Surveying the Excel Screen
- Starting Excel
- Finding and Opening Existing Workbooks
- Using File Properties
- Creating a New Workbook
- Working with Multiple Workbooks
- Sizing and Viewing Windows
- Zooming In or Out on a Worksheet
- Viewing a Worksheet in Full Screen Mode
- Saving and Closing an Excel Workbook
- Using the Excel Help System
- 4. Building a Workbook
- Understanding How Excel Interprets Data Entry
- Navigating the Worksheet
- Selecting Cells
- Entering Text in Cells
- Entering Numbers in Cells
- Entering Dates and Times in Cells
- Entering Data with Other Shortcuts
- Creating a Data Table
- Editing Cell Contents
- Inserting a Symbol in a Cell
- Creating Hyperlinks
- Cutting, Copying, and Pasting Cell Values
- Undoing or Redoing an Action
- Finding and Replacing Text
- Checking the Spelling of Your Worksheet
- 5. Managing and Viewing Worksheets
- Viewing and Selecting Worksheets
- Renaming Worksheets
- Moving Worksheets
- Copying Worksheets
- Inserting and Deleting Worksheets
- Hiding or Showing a Worksheet
- Changing Worksheet Tab Colors
- Inserting, Moving, and Deleting Cells
- Inserting, Moving, and Deleting Columns and Rows
- Hiding and Unhiding Columns and Rows
- Entering Data and Formatting Many Worksheets at the Same Time
- Changing How You Look at Excel Workbooks
- Naming and Using Worksheet Views
- 6. Using Formulas and Functions
- Understanding Formulas and Cell References in Excel
- Creating Simple Cell Formulas
- Assigning Names to Groups of Cells
- Using Names in Formulas
- Creating a Formula that References Values in a Table
- Creating Formulas that Reference Cells in Other Workbooks
- Summing a Group of Cells without Using a Formula
- Creating a Summary Formula
- Summing with Subtotals and Grand Totals
- Exploring the Excel Function Library
- Using the IF Function
- Checking Formula References
- Debugging Your Formulas
- 7. Formatting the Worksheet
- Formatting Cell Contents
- Formatting Cells Containing Numbers
- Formatting Cells Containing Dates
- Adding Cell Backgrounds and Shading
- Formatting Cell Borders
- Defining Cell Styles
- Aligning and Orienting Cell Contents
- Formatting a Cell Based on Conditions
- Changing How Conditional Formatting Rules Are Applied
- Displaying Data Bars, Icon Sets, or Color Scales Based on Cell Values
- Copying Formats with the Format Painter
- Merging or Splitting Cells or Data
- 8. Formatting the Worksheet
- Applying Workbook Themes
- Coloring Sheet Tabs
- Changing a Worksheet’s Gridlines
- Changing Row Heights and Column Widths
- Inserting Rows or Columns
- Moving Rows and Columns
- Deleting Rows and Columns
- Outlining to Hide and Show Rows and Columns
- Hiding Rows and Columns
- Protecting Worksheets from Changes
- Locking Cells to Prevent Changes
- 9. Printing Worksheets
- Previewing Worksheets Before Printing
- Printing Worksheets with Current Options
- Choosing Whether to Print Gridlines and Headings
- Choosing Printers and Paper Options
- Printing Part of a Worksheet
- Printing Row and Column Headings on Each Page
- Setting and Changing Print Margins
- Setting Page Orientation and Scale
- Creating Headers and Footers
- Adding Graphics to a Header or a Footer
- Setting and Viewing Page Breaks
- 10. Customizing Excel to the Way You Work
- 11. Sorting and Filtering Worksheet Data
- 12. Summarizing Data Visually Using Charts
- 13. Enhancing Your Worksheets with Graphics
- Working with Graphics in Your Worksheets
- Adding Graphics to Worksheets
- Adding Drawing Objects to a Worksheet
- Adding Fills to Drawing Objects
- Adding Effects to Drawing Objects
- Customizing Pictures and Objects
- Aligning and Grouping Drawing Objects
- Using WordArt to Create Text Effects in Excel
- Inserting Clip Art into a Worksheet
- Inserting and Changing a Diagram
- Creating an Organization Chart
- 14. Sharing Excel Data with Other Programs
- 15. Using Excel in a Group Environment
- About the Author
- Choose the Right Book for You
- Index
- About the Author
- SPECIAL OFFER: Upgrade this ebook with O’Reilly
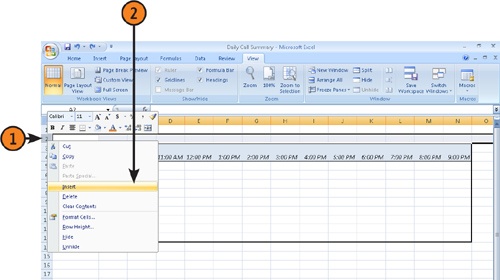
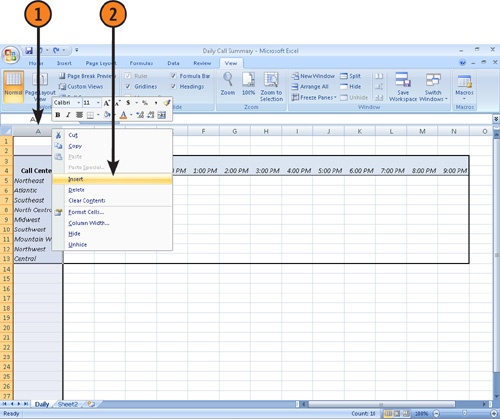
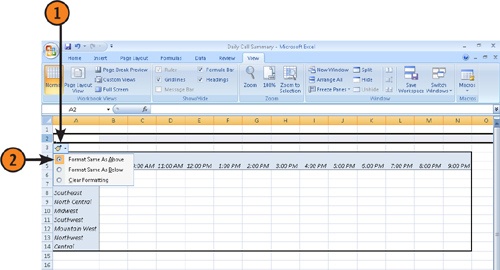
After you’ve created a worksheet and begun filling in your data, you might decide to insert a row or column to add data you didn’t think to include when you started. For example, a customer might want to add a product to an order. To accommodate this, you can insert a blank row below the last row in the existing order and add the new item there. If you wanted to add a row in the middle of the existing order data, you could insert a blank row above an existing row. You can perform similar actions with columns: If you want to begin recording a new piece of information about your customers, such as a Web site or e-mail address, you can add a column to store that information. You can even use the Insert Options smart tag to format the new rows or columns.
-
No Comment