
Setting Up Log Shipping
In order to use log shipping for a high availability solution, you should plan on having at least three separate servers available. One server is the “source” SQL Server from which you will identify a database to log ship from. Another server will be the “destination” SQL Server that is the target of the log shipping and will be your secondary server for fail-over. And finally, the third server will be the “monitor” SQL Server that keeps track of the log shipping tasks and timeliness. We are assuming that you are using the FULL recovery model (or BULK-LOGGED) for database backup, since this creates transactions in the transaction log that will be the source of log shipping. If you choose the SIMPLE recovery model, there would be nothing to log ship, since the transaction log would be truncated on a regular basis. In fact, the log shipping option would not even be available for any database that has chosen this recovery model.
Before Creating the Log Shipping DB Maintenance Plan
As part of setting up log shipping from Enterprise Manager, we must first register all SQL Server instances that will be used in the log shipping model. It should be noted that if you want to use Enterprise Manager to do the log shipping setup, it can only be used to log ship to disks. Log shipping can be setup to ship to tape as well (backup-to-tape option), but this must be done via manual scripts for copying and restoring the transaction logs (and isn't done much these days anyways).
You should also make sure that each SQL Server instance has its corresponding SQL Server Agent running, since tasks will be created on each SQL Server instance and won't get executed unless the SQL Server Agent is running. The login that you use to start the MS SQL Server and SQL Server Agent services must have administrative access to the log shipping plan jobs, the source server, and the destination server. The user who sets up log shipping must be a member of the SYSADMIN server role, which gives them permission to modify the database to do log shipping.
Next, you will need to create a network share on the primary server where the transaction log backups will be stored. This is done so that the transaction log backups can be accessed by the log shipping jobs (tasks). This is especially important if you use a directory that is different from the default backup location. This would take the form
"\SourceServerXXNetworkSharename"
Using the DB Maintenance Plan Wizard to Create Log Shipping
Now you are ready to begin the log shipping setup process. Microsoft has placed this capability within the database maintenance plan feature. As you can see in Figure 6.2, to create a maintenance plan that includes log shipping, you will have to right-click on the database that will become the “source” of the log shipping, choose the All Tasks option, and then the Maintenance Plan item. This initiates the Database Maintenance Plan Wizard.
Figure 6.2. Initiating the Database Maintenance Plan Wizard from Enterprise Manager.

Setting Up Log Shipping Using Northwind Database
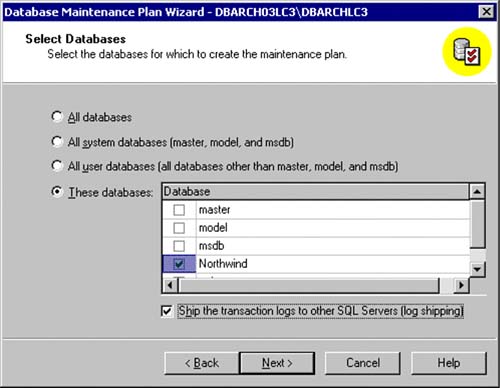
For simplicity, we will create a maintenance plan for the Northwind database that is shipped with SQL Server 2000. This will also allow you to replicate this example very easily. Be sure to set the Northwind databases recovery model to be “Full” so that the Ship the Transaction Logs check box will be available.
As you can see in Figure 6.3, you will have to identify the database that you wish to create a maintenance plan for (Northwind) and specify if you will be using log shipping. Once you select the log shipping option, you will be presented with many different log shipping related dialogs to complete. These are very different from the usual maintenance plan dialogs that you are probably used to seeing.
Figure 6.3. Indicate that you will be doing log shipping for this database.
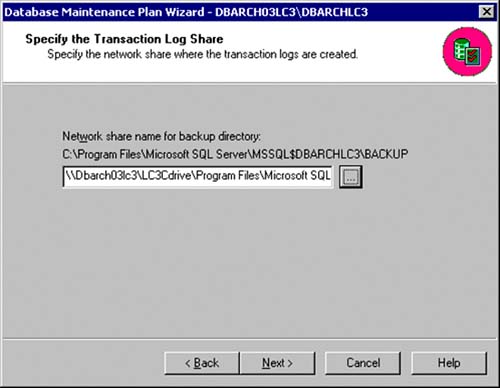
Since this is a database maintenance plan, the next few dialogs are for the usual maintenance plan items. You might already have an existing database maintenance plan for your production database. If this is the case, we would recommend that you create a separate (new) one that is dedicated to doing log shipping only. If this is the only database maintenance plan for this database, go ahead and specify the normal backup options as you would for any production database. Then, there are a few other dialogs that are for specifying the data optimization update options, the database integrity checking options, a regularly scheduled database backup, and the location for the database backups (BACKUP directory is the default). In addition, you will be prompted to specify the location of the transaction log backups as part of this database maintenance plan. If you use a directory that is different from the default backup location, you must share that directory so that it can be accessed by the log shipping jobs.
Specifying the Network Share Location for Log Shipping
Up to this point, all of the dialogs are the standard dialogs for any database maintenance plan. Figure 6.4 shows the first new dialog for log shipping that requires you to identify a network share location where the transaction logs will be created (stored). This should be that network share location that was previously set up (in the form of “\SourceServerXXNetworkSharename”).
Figure 6.4. Identify the network share name for the transaction log dumps that are to be used by log shipping.
Identifying the Destination Database for Log Shipping
The next set of dialogs in the maintenance plan wizard specify the destination server (or servers if you intend to create more than one log shipping destination). The initial Log Shipping Destinations dialog (as seen in Figure 6.5 upper left) starts out with no destination servers identified. You simply click on the Add button at the bottom of this dialog and you will be presented with a full screen Add Destination Database dialog (as seen in Figure 6.5 right).
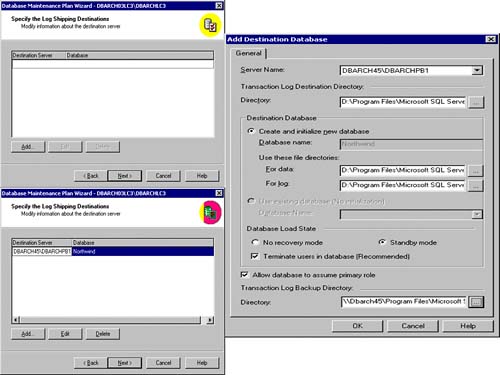
You start by specifying the server name and SQL Server instance that will be the target of the log shipping (DBARCH45DBARCHPB1 SQL Server instance in this example). Next, you must identify the transaction log directory on the destination side. This can be the default BACKUP directory on that destination server or any other destination server specific subdirectory. When the destination database is initialized, you can have the wizard fully create the database or use an existing database that you have created manually (for this example, you need to drop the Northwind database on the destination server side first, since you will be having the wizard create a new database with that name). If you have the wizard create the database, remember that this may take a while if the database is large. In the case of a very large database (greater than a terabyte), you should use a full database dump and incremental transaction log dumps to restore to a point in time for this initialization. As you can see in Figure 6.5, we have clicked on the radio button to have the wizard create and initialize a new database for us. As part of this specification, we need to specify valid data and log file directories that correspond to your production file location standards (if you have standards). In our example this will be the SQL Server default locations.
In the case of large databases (or if you just prefer to manually create the destination database yourself), you choose the “existing” database option (this is greyed out in Figure 6.5). When choosing this existing database option, the destination database must be already in standby mode and must be an exact image of the source database from a schema and user id's point of view.
Specifying the Database Load State for Log Shipping
The database load state identifies how a destination database (the target of the log shipping process) is to be managed during data loads.
NORECOVERY mode indicates that this destination database is not available for use. The destination database will be in NORECOVERY mode as the result of either the RESTORE LOG or RESTORE WITH NORECOVERY operations. When and if the source server fails, the mode for this destination database will be changed so that it can be used.
STANDBY mode is the indication that this destination database is available for use, but in read-only mode. The destination database will be placed in STANDBY mode as the result of either the RESTORE LOG or RESTORE DATABASE WITH STANDBY operations.
Our example will allow for read-only access to this destination database by specifying the “standby” mode option. You should also specify the “terminate users in database” option, since any restore operation (of transaction logs) will fail if any users are connected to the destination database. This might seem a bit abrupt, but it is critical to keeping the database intact and an exact image of the source database. The users can re-establish their connection to this destination database once the restore process is completed (which is usually very quickly). As we specify the frequency of these restores, the usage of this destination database as a secondary data access point will need to be considered (like for reporting, and so on).
Will This Destination Database Assume the Primary Role?
If you intend to use this destination database as a fail-over database, you must specify that it can assume the role of the source database (the primary). Once you have selected this option, you must indicate the destination server transaction log share name which will be used to store the transaction logs that will be created once this secondary server becomes the source server (has assumed the primary role). Again, this share should be in the form of
"\DestinationServerXXNetworkSharename"
Initializing the Destination Database for Log Shipping
Since we have chosen to create the destination database from scratch, a database dump will be used as the method to create the destination database. As you can see in Figure 6.6 (in the upper left), the Initialize the Destination Databases dialog prompts you to select either to perform a database dump right now, or to use an existing database dump that was done recently for this destination database initialization. In our example, we will specify that a dump be done immediately. If you had chosen to use an existing database backup, the wizard would only list the backups that were done on the current source server. And, when you use an existing database backup, the database backup file must reside in a directory other than the one you are using to store the log shipping backup.
Figure 6.6. Initializing the destination database and specifying the log shipping schedule values.
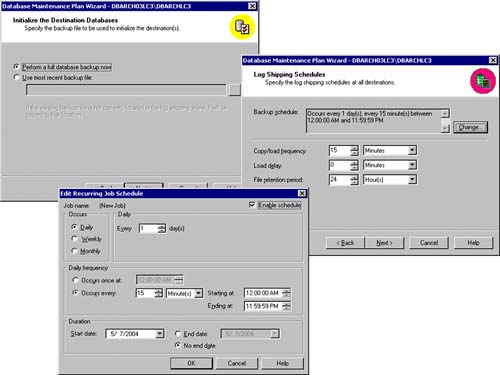
Log Shipping Schedule
After the initialization of the database information is specified, the log shipping schedule has to be established based on your particular needs (your high availability requirements). The default backup schedule is every day, every 15 minutes, as also seen in Figure 6.6 (the dialog on the right is the summary of the log shipping schedule; the dialog on the bottom is the detail job schedule specification that you will see if you need to change the schedule values).
The default backup schedule might not be what you want. If you are using the destination database for reporting purposes, you should adjust this backup schedule (and the associated copy/load frequency, load delay, and file retention period) to reflect your reporting needs.
Design NoteIf you are going to use the destination database for reporting, you might want to decrease the frequency of these backups and copy/loads, since the reporting requirements may well tolerate something less frequent. If the destination server is to be a “hot spare” for fail-over, you might even want to increase the frequency to a few minutes apart for both the backups and the copy/loads. |
The default of the load delay is always zero (0). But this too can be adjusted to meet your requirements. Zero delay simply means that the destination server should immediately restore any transaction log backups after they are copied. The file retention period is the length of time that the transaction logs are retained on the destination server before they are deleted. The length of time you specify should consider the available disk space. Watch out: These directories fill up rather quickly. And, we already showed you how you can use the Remove Files Older Than option (which deletes backup files from the primary server after a specified amount of time has elapsed).
Setting Up the Monitor Server and Alerts for Log Shipping
After the destination database schedule has been specified, it is now time to provide the information for monitoring and alerts. In particular, you must identify the log shipping thresholds for the Backup Alerts and for the Out of Sync Alerts. The monitor server will own these jobs (tasks). The Backup Alert threshold is the maximum elapsed time since the last transaction log backup occurred on the source server. In other words, an alert will be generated if the monitor server detects that no transaction log backup has occurred on the source server within the threshold value. This makes the most sense to monitor, since these transaction log backups drive the entire log shipping model. As you can see in Figure 6.7, the default is 45 minutes, but adjust this to fit your monitoring needs. The Out of Sync Alert threshold is the maximum elapsed time between the last transaction log backup on the source server and the last transaction log restore on the destination server. In other words, if the subsequent restore on the destination server side has not happened within the specified threshold, there is likely a problem on the destination server side. Both alerts are written to the Windows event log and to the SQL Server error logs.
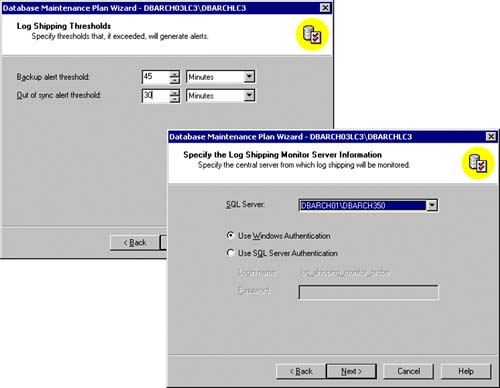
You must now specify the log shipping monitor server information. As previously recommended, use a separate server and SQL Server instance to be your monitor server for risk mitigation purposes. If your source server (primary) fails for any reason, you want to make sure that monitoring is being done by this other (monitor) server. Then, the monitoring alerts will be generated when these failures start occurring (thresholds are exceeded). If you had put the monitor server on the same server as the source server (which is allowed), you would not receive these alerts if the source server failed. As you can also see in Figure 6.7, you can use either Microsoft Windows authentication or SQL Server authentication depending on the security configuration for your server; however, Microsoft recommends that you use Windows authentication. If you use SQL Server authentication, you can only use the log_shipping_monitor_probe login to monitor log shipping. If you use the log_shipping_monitor_probe login for other database maintenance plans, you must use the same password. If this is the first time you are using the log_shipping_monitor_probe login, you will specify a new password.
Design NoteWhat is actually happening is the log_shipping_monitor_probe login (or Windows Authentication) is used by the source and destination servers to update two log shipping tables in the MSDB database. These tables, msdb.dbo.log_shipping_primaries and msdb.dbo.log_shipping_ secondaries, are continuously being updated when the transaction log is backed up, copied, or restored. You can also directly query these tables yourself if you like. It is as easy as the following select statements: SELECT * from msdb..log_shipping_primaries WHERE primary_database_name like 'yoursourcedb%' SELECT * from msdb..log_shipping_secondaries WHERE secondary_database_name like 'yourdestinationdb%' |
The Reports to Generate dialog identifies where the maintenance plan's text reports are to be written. These reports will include a text description of the log shipping issues or alerts that may have occurred. It is also possible to have these reports sent to an email address. If you choose to have reports generated, specify to delete text reports older than some time period (like four weeks).
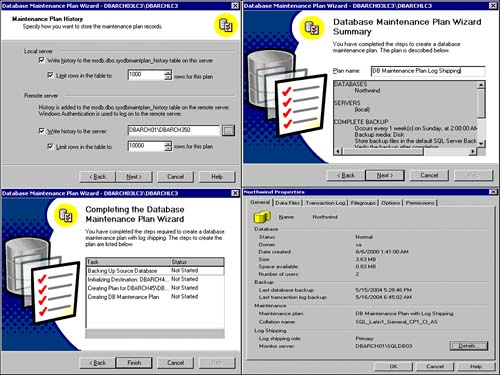
Then, as you can see in Figure 6.8 (top left), the Maintenance Plan History dialog prompts you for how and where you want the maintenance plan records to be stored. In keeping with the risk mitigation approach for high availability, we always choose to have the maintenance records written to a remote server in addition to the local server. In this example, it would be the monitor server (DBARCH01DBARCH350). All maintenance plan records are inserted into the msdb..sysdbmaintplan_history table. After you have specified the Maintenance Plan History values, a summary of all plan steps will be shown (Figure 6.8 top right) that describes what will be done with which database on which SQL Server instance in your log shipping configuration, and you will be able to name the maintenance plan (for future reference). Figure 6.8 bottom left shows the status of each step that will be executed to fully initialize log shipping. This includes the initial database backup, the creation of the destination database, and all database plan creations. Once this has completed, log shipping should be active. A quick look at the database properties of the Northwind database on the source server should show you the log shipping role and monitor server that was configured to monitor for this log shipping pair (as seen in Figure 6.8 bottom right).
Figure 6.8. Log shipping maintenance plan history (left top), maintenance plan summary (right top), completing the wizard (left bottom), and database properties of a fully configured database with log shipping (right bottom).
Completing Setup of Log Shipping and a Few Potential Issues
If the log shipping source database is a large database, the database initialization will take a while. Once the final process steps have completed, a successfully created maintenance plan dialog box appears. If there were problems on any of these steps, you will see these now. The most common errors are usually related to the copy and restore operations. Very often, the network share becomes unavailable or disconnected. This will result in a copy error to the destination transaction log backup directory (share). After you have re-established this share, everything will work fine. If the maintenance plan tasks end without success because of one or more errors, you may have to “clean up” some of the MSDB log shipping table entries manually. If you simply back up in the wizard and start over, many of the log shipping entries in the log shipping tables will not have been removed. Use the queries identified previously to look to see what needs to be cleaned up and delete the appropriate rows (only the ones that related to the current plan being created).These tables are
log_shipping_databases
log_shipping_monitor
log_shipping_plan_databases
log_shipping_plan_history
log_shipping_plans
log_shipping_primaries
log_shipping_secondaries
You will not find entries in all tables in all SQL Servers in your topology. Only the tables that are needed by each servers functions will have rows. So, don't be alarmed.
During the setup steps, SQL Server and the SQL Agent must be running under a user account that has permissions to use the network shares. If the setup attempt failed because the SQL Server service account that you are using didn't have access to the share name on the source server, you won't get a chance to back up in the wizard and fix it. The wizard exits and you will have to start all over.
Viewing Log Shipping Properties
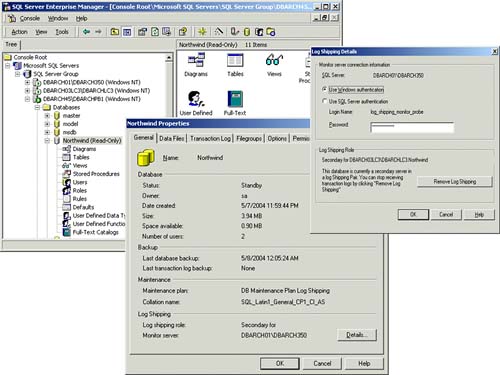
Once the maintenance plan wizard has finished and the database maintenance plan has been created successfully (which we just completed in the prior section), you will be able to see the destination database and its new log shipping related properties. Figure 6.9 (top left) shows the Enterprise Manager view of the newly created destination database in its “Read-Only” state. If you try to access this database and if a log restore operation is still in progress, you will get an error message telling you of this failed access attempt. Remember, we specified to have all database connections terminated during these transaction log loads. Once these are completed, you can freely access all tables in this new, log shipped, destination database. If you right-click on this new database, you will see the added properties of log shipping at the bottom of the General tab (as illustrated in the middle dialog box of Figure 6.9). This identifies the role that this database is serving (secondary server role in this case), which server is the monitor server, and that this database is in the StandBy status. If you click on the Details button in the Log Shipping section of this dialog box, you will see the connection information being used for the monitor server and the detail information of the log shipping role (Figure 6.9 right dialog box).
Figure 6.9. The destination database from Enterprise Manager and its log shipping properties.
As you can also see in the Log Shipping Details dialog box of Figure 6.9, you can remove this database from log shipping by clicking on the Remove Log Shipping button. One place this comes into play is when you need to delete the entire maintenance plan that you just created (which contains log shipping). You will have to remove the destination databases from log shipping first. Then, and only then, can you delete the maintenance plan.
Monitor Server Properties
From the monitor server's point of view, it now shows a new branch under the Management options called Log Shipping Monitor. Any source/destination pair that this monitor server is monitoring will appear here. In our example, this was a separate monitor server (SQL Server). Figure 6.10 shows this new branch and the current source/destination pair. In addition, you can see the current history of both the backups and the restores by simply choosing either of the view options. As you can also see, the current log shipping pair is “in sync”. This means that there are no failures and the pair is busily log shipping to each other. Remember, a log shipping pair is assigned for each source and destination database that you define log shipping for. If you use log shipping to send the source database to two destination databases, there will be two log shipping pairs.
Figure 6.10. Monitor server source/destination pairs and the SQL Server Agent Backup/Restore Alert Jobs.
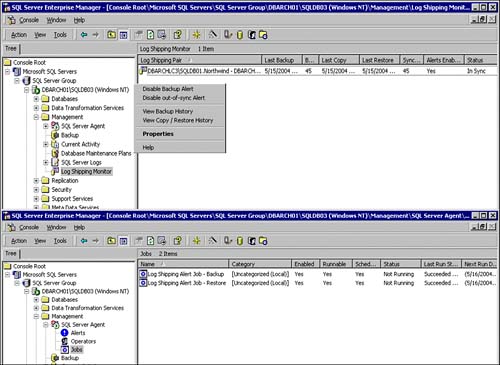
Figure 6.10 also shows the SQL Server Agent jobs that got created on the monitor server (and, as you remember, the monitor server is just a SQL Server instance that is being used to monitor log shipping). These are the jobs that are managing the Backup and Copy/Load Alert thresholds. If any of these thresholds are exceeded, these jobs will notify the system of these failures via event logs, emails, and so on.
Deleting Log Shipping
If you want to delete log shipping from the maintenance plan, you can go to the properties of the maintenance plan and select the Log Shipping tab. Select the destination server you want to remove from log shipping and click the Delete Log Shipping button.
To see which databases are associated with which maintenance plans, you can run this query:
SELECT b.database_name, a.plan_name
FROM msdb..sysdbmaintplans as a,
     msdb..log_shipping_databases as b
WHERE b.maintenance_plan_id  = a.plan_id
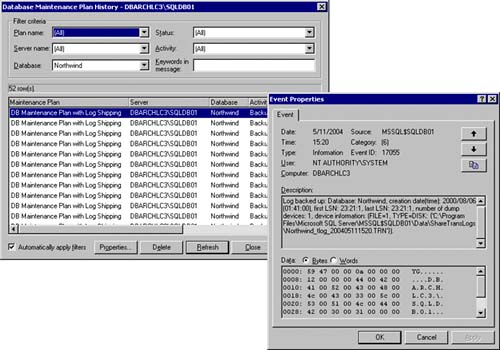
On this properties dialog you can also update log shipping information like schedules, user accounts, and so on for a destination server/database, as well as add new destination server/database entries. Figure 6.11 shows a complete history view of the transaction log backups that are being generated on the source server side. As you can also see in Figure 6.11, each transaction log backup execution is posted to the system event log (event ID 17055).
Figure 6.11. View of transaction log backup history (top) and Event Viewer (bottom)—Event ID 17055.
Changing the Primary Role
If you had selected to allow your database to assume the primary role and your source (primary) server/database fails, you can easily upgrade your destination (secondary) server to be the current source (primary) server. This is truly an upgrade. You will be upgrading the destination server to a source server (primary).
CAUTION Remember, when you indicated that the destination server could be used as a primary, you had to specify a share name for the destination server's transaction logs (to be used in this event).
Okay, now the original destination server should be functioning as the current source server (primary). The old source server (primary) is no longer part of the log shipping topology.
Log Shipping System Stored Procedures
The system stored procedures that relate to log shipping are
sp_add_log_shipping_database— Add a new log shipping database.
sp_delete_log_shipping_database— Delete an existing database from log shipping.
sp_add_log_shipping_plan— Add a log shipping plan.
sp_delete_log_shipping_plan— Delete an existing log shipping plan.
sp_add_log_shipping_plan_database— Add a database to the log shipping plan.
sp_delete_log_shipping_plan_database— Delete an existing database from a log shipping plan.
sp_add_log_shipping_primary— Identify (add) the log shipping primary server.
sp_delete_log_shipping_primary— Delete an existing log shipping primary server.
sp_add_log_shipping_secondary— Identify (add) the log shipping secondary server (the destination).
sp_delete_log_shipping_secondary— Delete an existing secondary server.
sp_can_tlog_be_applied— Verify whether the transaction logs can be applied to a destination.
sp_get_log_shipping_monitor_info— Find out the log shipping status for a source/destination pair.
sp_change_monitor_role— Performs the role change on the monitor server of the current secondary to the primary role.
sp_remove_log_shipping_monitor— Removes the existing monitor server for log shipping.
sp_change_primary_role— Removes the current primary server from the log shipping plan.
sp_resolve_logins— Resolves logins from a login file (filename). This can be used as part of the primary role change.
sp_change_secondary_role— Changes the role of the secondary (destination) server to the primary (source) server.
sp_update_log_shipping_monitor_info— Updates the monitoring information for a source/destination pair.
sp_create_log_shipping_monitor_account— Specifies the creation of the log_shipping_monitor_probe account.
sp_update_log_shipping_plan— Updates log shipping plan information.
sp_define_log_shipping_monitor— Sets up the log shipping monitor account on the monitor server.
sp_update_log_shipping_plan_database— Updates an existing database that is part of a log shipping plan.
It is possible to add log shipping to an existing database maintenance plan entirely via these system stored procedures. The easiest way to get a template skeleton is to turn profiler on and run through one full database maintenance wizard with log shipping. Then, save these as a manual backup for creating log shipping via scripts. The trickiest part is the plan IDs, since they are unique IDs that are assigned at creation time.